Archer Risk Management Solution
The Archer Risk Management solution provides a structured approach to identifying, assessing, and responding to risks.
This solution is part of Archer Core Solutions.
For information on the latest changes to the solution, see the Release Notes.
On this page
Key Components
Solution Architecture
The following diagram shows the relationships between the applications in the solution.
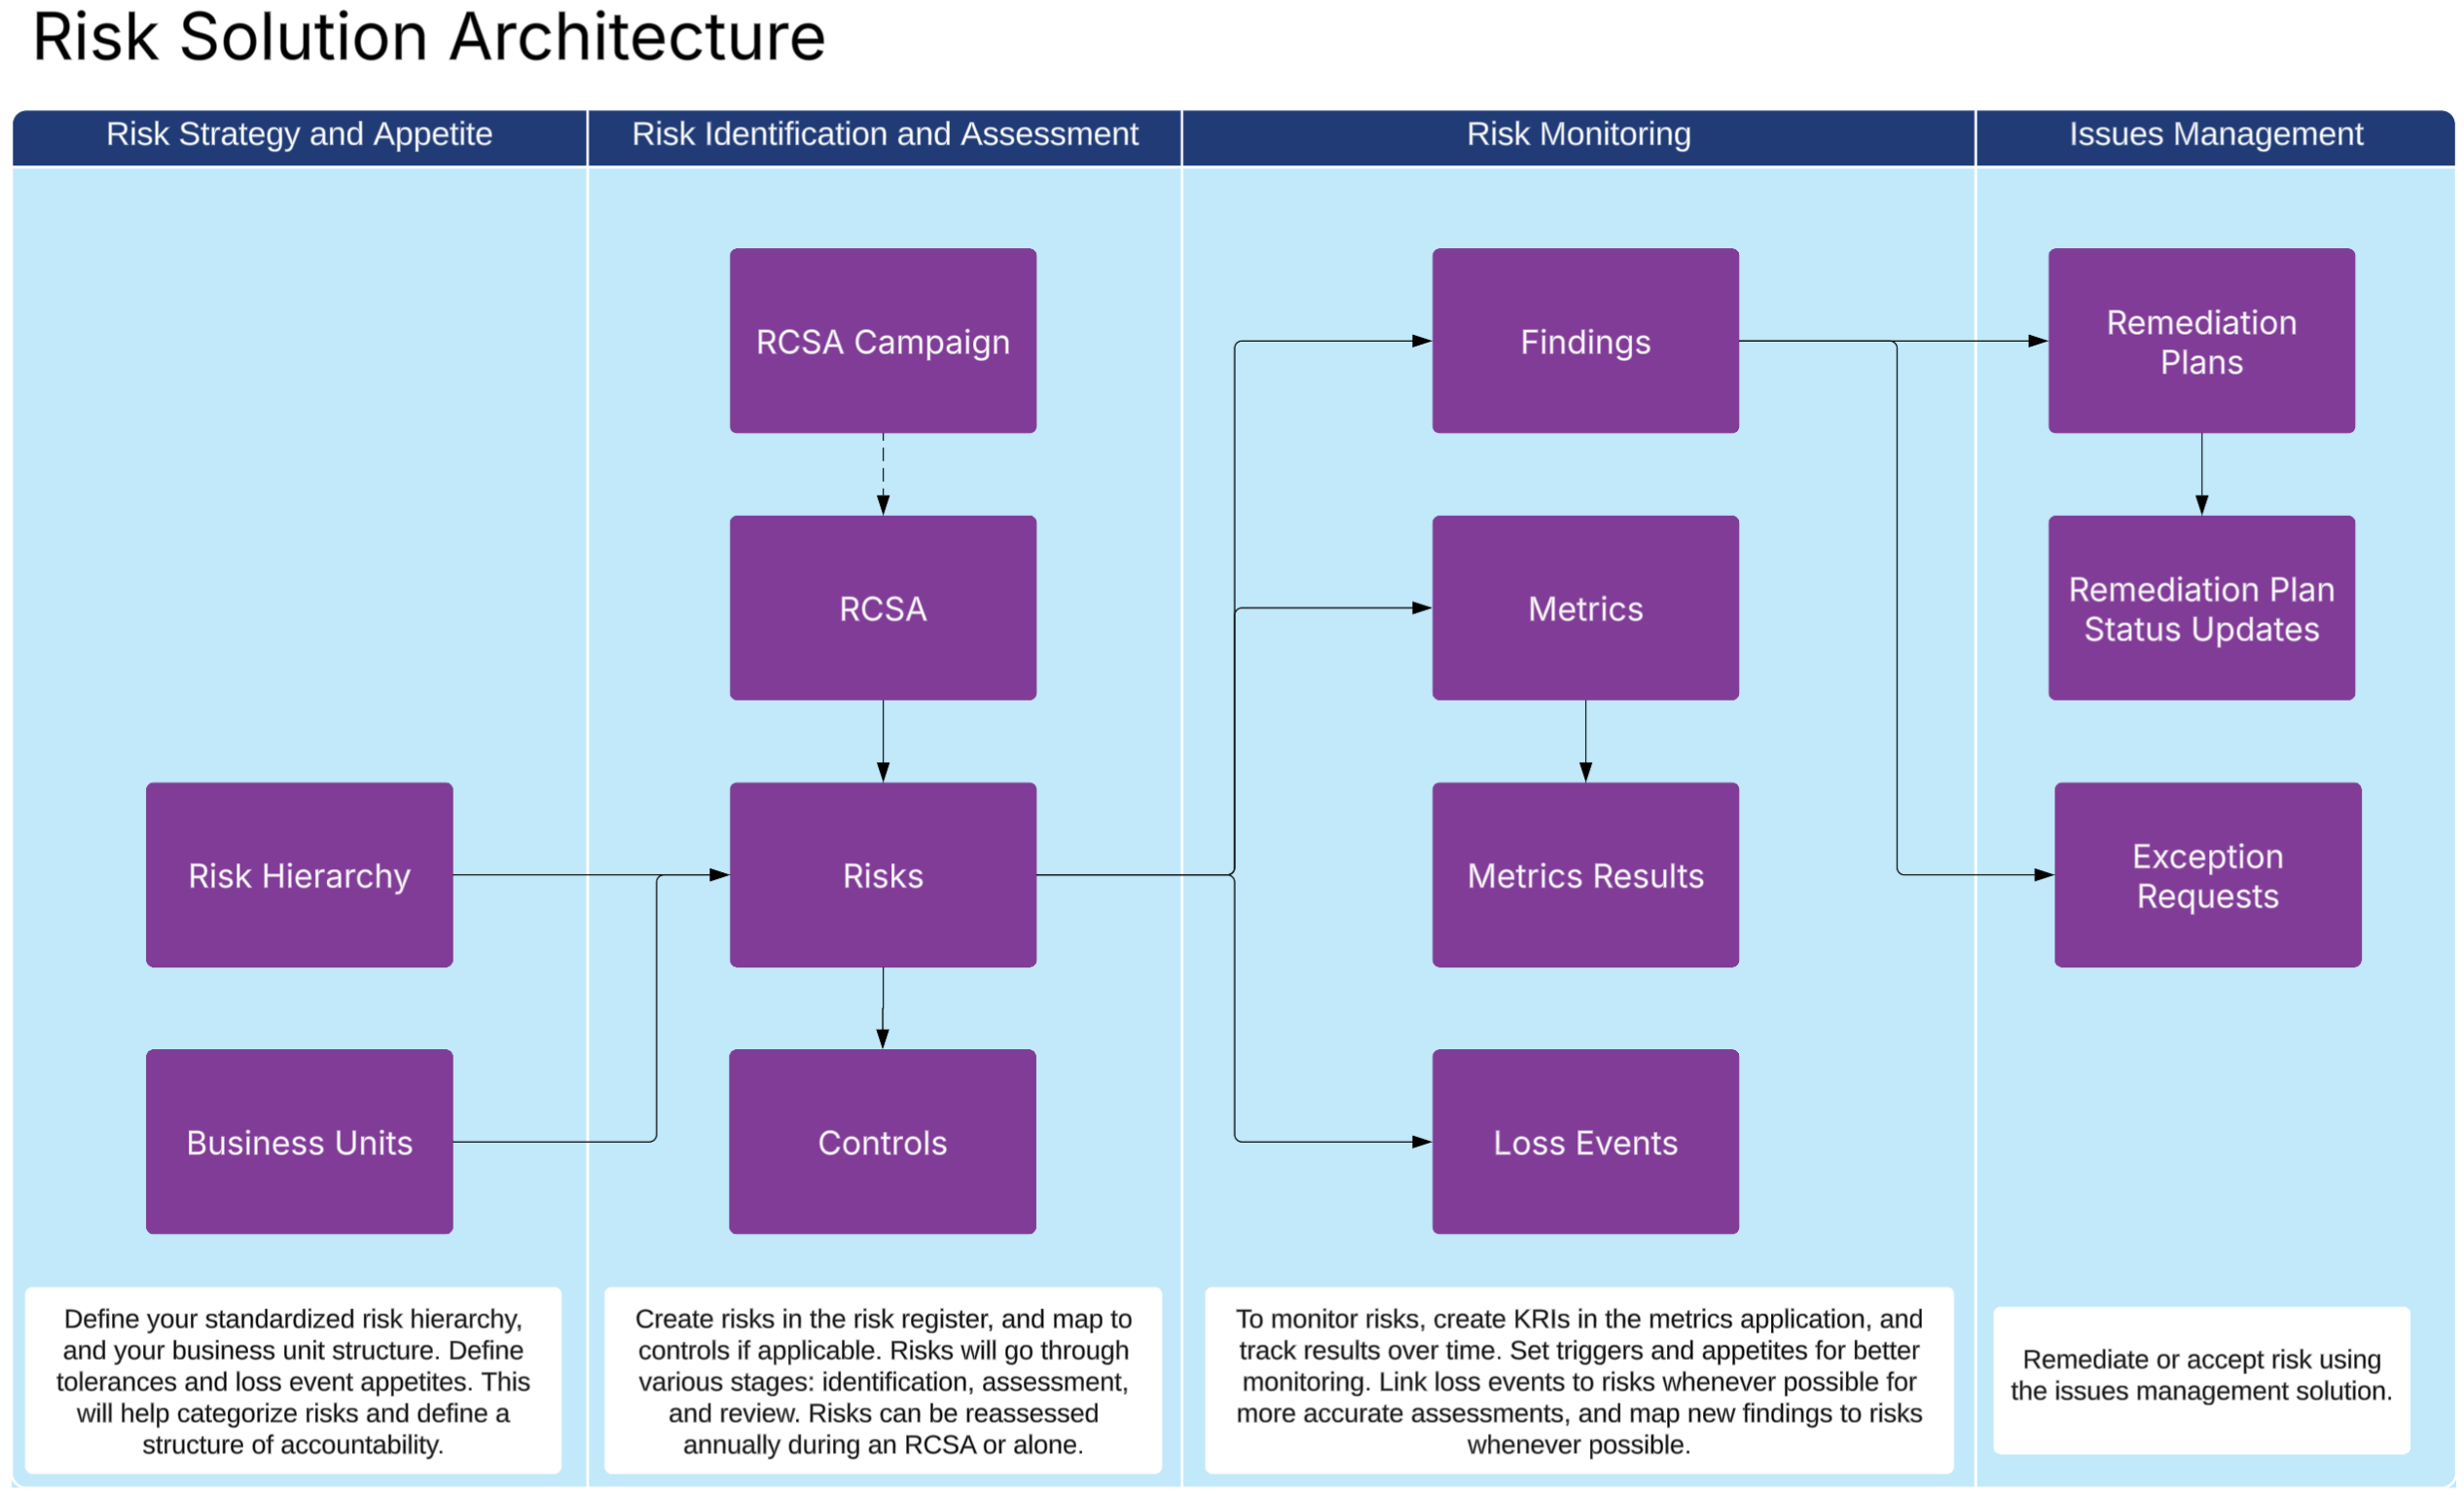
Core Applications
| Applications | Description |
|---|---|
|
Business Units |
Stores the organizational structure of the company. Archer also has a Company application and a Division application, so this should be the lowest level of your organizational hierarchy, comprising a functional unit with a known owner and purpose. Used to assign ownership and context for risks, controls, incidents, and metrics. |
|
Risk Hierarchy |
Defines the library of standardized risks used across the organization. Includes two levels of risk categories and their descriptions to support consistent risk identification and assessment. |
|
Risks |
Captures individual risks identified by the business. Includes details such as risk description, impact, likelihood, owner, status, and links to controls, business units, and loss events. |
|
Controls |
Captures control activities designed to mitigate or prevent identified risks. Includes information about the control like description type, frequency, owner, and linkage to risks or business processes. |
|
RCSA (Risk and Control Self-Assessment) |
Captures the entire risk and control self-assessment process. Risks and controls are pulled in via data feed, allowing the assessor to take stock of their risk and control matrix, identify new risks, reassess risks, add controls, and better understand their risks. |
|
RCSA Campaign |
Allows users to determine the scope of the RCSA by business unit or process, and to select more of each. |
|
Risk Snapshot |
Captures the results of a risk after approval or after an RCSA. Allows risk managers to trend risk ratings whenever a risk owner has fully assessed a risk. |
|
Loss Events |
Logs actual incidents or events that resulted in a financial, operational, or reputational impact. Used for root cause analysis and can be used to help with risk quantification. |
|
Metrics |
Defines key risk indicators (KRIs), key performance indicators (KPIs), and other measurable criteria. Includes threshold definitions, frequency, data sources, and responsible parties. |
|
Metrics Results |
Stores individual measurement values for each metric over time. Supports trend analysis, threshold tracking, and visualization of risk or performance data. Can be updated via API or through a system generated task that goes to the metric owner on a flexible reoccurring frequency. |
Access Groups
| Group Name | Description |
|---|---|
|
Risk Management |
Gives full admin access to all risk applications. Users in the group receive emails when new risks have been assessed. |
|
Risk User |
Gives limited access to all risk applications. Users in this group can own and assess risks, metrics, and loss events. |
Data Feeds (Automations)
| Data Feed | Description |
|---|---|
|
DF.RM.SCH.02.04 Generate Metrics Results |
This data feed examines the Metrics application and creates new records in the Metrics Results application based on the frequency and the last time a metric value was added. This triggers a task for the metric owner to provide the latest value. The data feed automatically populates all fields except the value. It also copies the amber and red thresholds for historical tracking of thresholds, making sure changing the threshold on a metric does not affect historical statuses. |
|
DF.RM.AWF.01.01 Copy Risks From Process to RCSA |
This data feed triggers when an RCSA is created and the user selects at least one process for the RCSA. The data feed examines the risks tied to the processes selected and connects them to the current RCSA, allowing the assessor to see every risk at once. This does not bring any other data besides the cross-reference linkage. |
|
DF.RM.AWF.01.02 Copy Risks from BU to RCSA |
This data feed triggers when an RCSA is created and the user selects at least one business unit for the RCSA. The data feed examines the risks tied to the business units selected and connects them to the current RCSA, allowing the assessor to see every risk at once. This does not bring any other data besides the cross-reference linkage. |
|
DF.RM.AWF.02.01 Create Process RCSA from Campaign |
This data feed creates one RCSA record per process selected and assigns each to the process owner. After this feed, the RCSA creation feed runs for the RCSA. |
|
DF.RM.AWF.02.02 Create BU RCSA from Campaign |
This data feed creates one RCSA record per business unit selected and assigns each to the business unit manager. After this feed, the RCSA creation feed runs for the RCSA. |
|
DF.RM.AWF.03.01 Take Risk Snapshot After Assessment |
This feed captures high level information about a risk and saves it in the Risk Snapshots application. This allows users to trend individual risks over time. This feed runs nightly. |
|
DF.RM.AWF.03.02 Post-RCSA Risk Snapshot |
This feed creates a risk snapshot for all the risks that were recently assessed in an RCSA. This allows users to see the final assessments approved by risk owners each time an RCSA is approved. This feed runs nightly. |
Dashboards
| Dashboard | Description |
|---|---|
|
Risk Manager Dashboard |
Provides a consolidated view of risk assessments and metrics. |
|
Loss Event Management Dashboard |
Focuses on tracking loss events, viewing trending data, and finding outliers. |
Workflow Overview
This section provides step-by-step guidance for key workflows.
Identifying and Assessing a Risk
This process helps users document and evaluate a risk that may impact the organization. Accurate risk identification and assessment support proactive management and consistent decision-making across business units.
The following diagram shows how risks are identified and assessed.
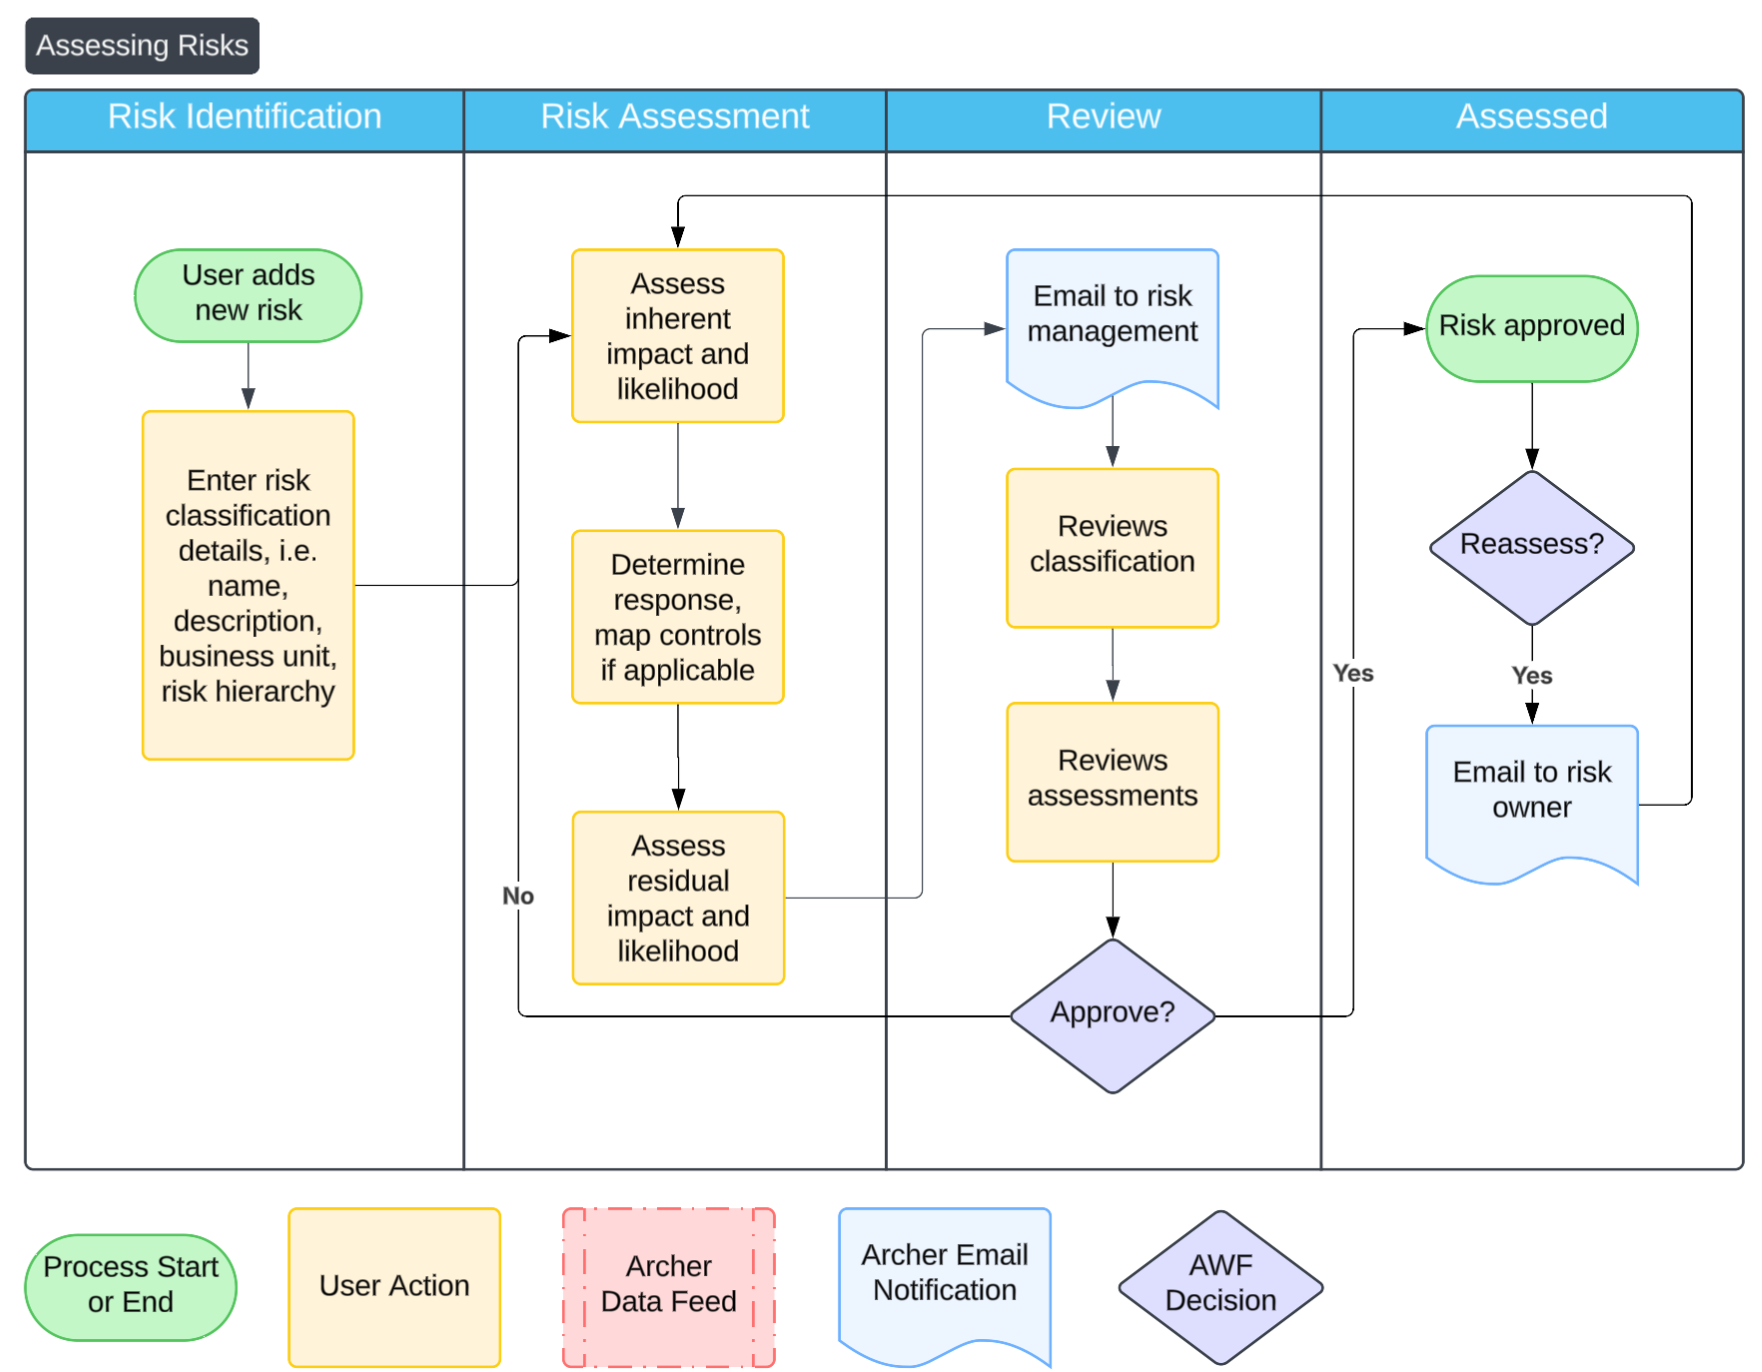
The following steps detail how to Identify and assess a risk:
-
Identify the new risk.
-
Navigate to the Risks application and click Add New.
-
Enter the risk name and description. Select the appropriate business unit and risk hierarchy classification.
-
Complete all required fields to help categorize and define the risk clearly.
-
Click Save.
-
-
Assess inherent risk.
-
Navigate to the Risk Assessment section.
-
Assign values for Inherent Impact and Inherent Likelihood based on what the risk would be without any controls in place. These values reflect the potential severity and frequency of the risk in its raw form.
-
-
Determine risk response.
-
Select one of the following risk response strategies: Reduce, Accept, Avoid, Transfer, or Share.
-
If Reduce is selected, link applicable controls using the related records section.
-
-
Assess residual risk.
-
Based on the response and any linked controls, assign values for Residual Impact and Residual Likelihood. These reflect the level of risk after mitigation efforts.
-
-
Submit for review.
-
Once assessment fields are completed, click Save & Submit to route the risk for review. An email notification is sent to the designated Risk Management Reviewer.
-
-
(Optional) Complete risk management review.
-
Evaluate the classification and both the inherent and residual assessments.
-
-
Approve and reassess the risk.
-
Once approved, the risk status becomes active and displays on dashboards.
-
Click Assess Risk to go back to the assessment stage. An email is sent to the risk owner when the reassessment is triggered.
-
Performing an RCSA
The RCSA Workflow allows business or process managers to identify risks, see and assess their current risks and controls, and produce standardized snapshots for reporting.
The following diagram shows the workflow for RCSAs from campaign creation, to assessment, to review and approval.
RCSA Overview
The RCSA has four main stages:
-
Assignment: Risk managers create an RCSA for one or more processes and business units, assign to users, and set a due date.
-
Assessment: Assessors review risks in the RCSA, reassess them as needed, add new risks or controls, and submit for review.
-
Review: Risk managers review risks and controls for accuracy and quality before approving.
-
Assessed: Upon approval, the system captures risk and control snapshots for historical comparison.
Creating an RCSA
-
Launch the new RCSA using one of two methods:
-
Launch via the RCSA Campaign.
-
Create a record in the RCSA Campaign application.
-
Enter a name, type, and due date.
-
Use the cross reference to choose multiple processes or business units.
-
Click Generate RCSAs. A campaign data feeds runs. This creates a RCSA per selected item and assigns them to the appropriate owner. After creation, another data feed runs to populate the RCSAs.
-
-
Launch a single RCSA.
-
Create a record in the RCSA application.
-
Select the business units or process(es) that are in scope for the RCSA
-
Assign an assessor and set a due date.
-
Save the record. The system runs a data feed to copy the risks and controls from the items selected.
-
-
-
Assess the RCSA.
-
Open the RCSA task from the email sent or from the notification.
-
Review the pre-populated risks.
-
For each risk that needs changes:
-
Open the risk and click Reassess.
-
Use the workflow guide for assessing risks to go through the risk assessment process.
-
-
If new risks are identified:
-
Click Add New Risk within the RCSA.
-
Map to the appropriate business unit or process.
-
Use the workflow guide for assessing risks to go through the risk assessment process.
-
-
Click Submit.
Note: All risks must be fully assessed and reviewed. The assessor is not required to re-assess all of their risks, just the ones that need changing
-
-
Review the RCSA.
-
Review the risk and control matrix and check for accuracy.
-
Validate any newly added risks or controls.
-
Approve the RCSA. Upon approval, the RCSA moves to the Completed stage and a snapshot is taken of the risks.
-
Performing the RCSA
This guide is for business users and process owners who have been assigned an RCSA.
When completing an RCSA, the main responsibilities are to:
-
Confirm whether the listed risks accurately reflect how your area operates today.
-
Update risk ratings when something changes.
-
Identify new risks or controls.
-
Provide clear, practical input based on how work is actually performed.
When you open your RCSA for the first time, your risks and controls are pre-populated based on the business unit or process in scope. Prior assessment details and the Risk & Control Matrix (RCM) display for review. Your primary task is to review, update where needed, and submit the RCSA.
To review the risks, scan the RCM and determine if those risks still apply to how you operate today. Determine if the impact or likelihood ratings have changed. Examine loss numbers, open issues, and metrics to determine if their rating has changed. If a control has changed, click on the risk to open it, then reassess the risk.
If you need to add new risks, click Add New on the risk list, fill in the details, then go through the workflow as needed.
When you submit the RCSA, the risk team reviews it for consistency and quality. They may return the RCSA to you with questions. Once approved, the RCSA is marked as approved and the system captures a snapshot of the risks.
Creating and Tracking a KRI
Key Risk Indicators (KRIs) help monitor emerging risk trends by capturing data tied to a specific risk exposure. This process details how to set up a new KRI in Archer, define how it will be measured, and optionally automate the data collection process through system-generated tasks.
The following steps detail how to create and track a KRI:
-
Create a new metric record.
-
Navigate to the Metrics application and click Add New.
-
Enter a Metric Name and a Metric Description.
-
(Optional) Provide Collection Instructions to guide the metric owner when entering results.
-
Under Metric Type, select Key Risk Indicator (KRI).
-
Choose the Type of Monitoring:
-
Numeric Threshold: Define specific numerical ranges for Red, Amber, and Green thresholds.
-
Qualitative Threshold: Provide written guidance for what Red, Amber, and Green mean.
-
-
Choose the Measurement Frequency that determines how often the metric is updated.
-
(Optional) Use the Targets field to specify business units, processes, or controls the KRI relates to.
-
-
Assign ownership.
-
Select the Metric Owner responsible for entering results. The Metric Reviewer is notified when changes to the metrics are made and can approve them.
-
-
Configure thresholds or guidance.
-
If Numeric Threshold was selected, enter Red and Amber threshold values when prompted. The system determines the correct direction of the thresholds automatically.
-
If Qualitative Threshold was selected, provide clear descriptions for what each threshold color represents.
-
-
Determine task automation.
-
Under Generate Tasks Automatically, select Yes if you want Archer to create a recurring task for the metric owner to submit results based on the selected frequency.
-
Select No if you want the metric to be updated manually or via API.
-
-
Save and submit for review.
-
Click Save, then click Submit when you're ready to send it through the review process. Once approved, the metric moves to Active and begins generating result tasks if task automation is enabled
-
Reporting and Reviewing a Loss Event
Loss events capture real-world incidents that result in financial, operational, or reputational impact. Documenting these events enables the organization to analyze causes, evaluate control effectiveness, and inform future risk assessments. The process includes business user intake, followed by review and analysis by the risk team.
The following diagram shows how a loss event is reported and reviewed.
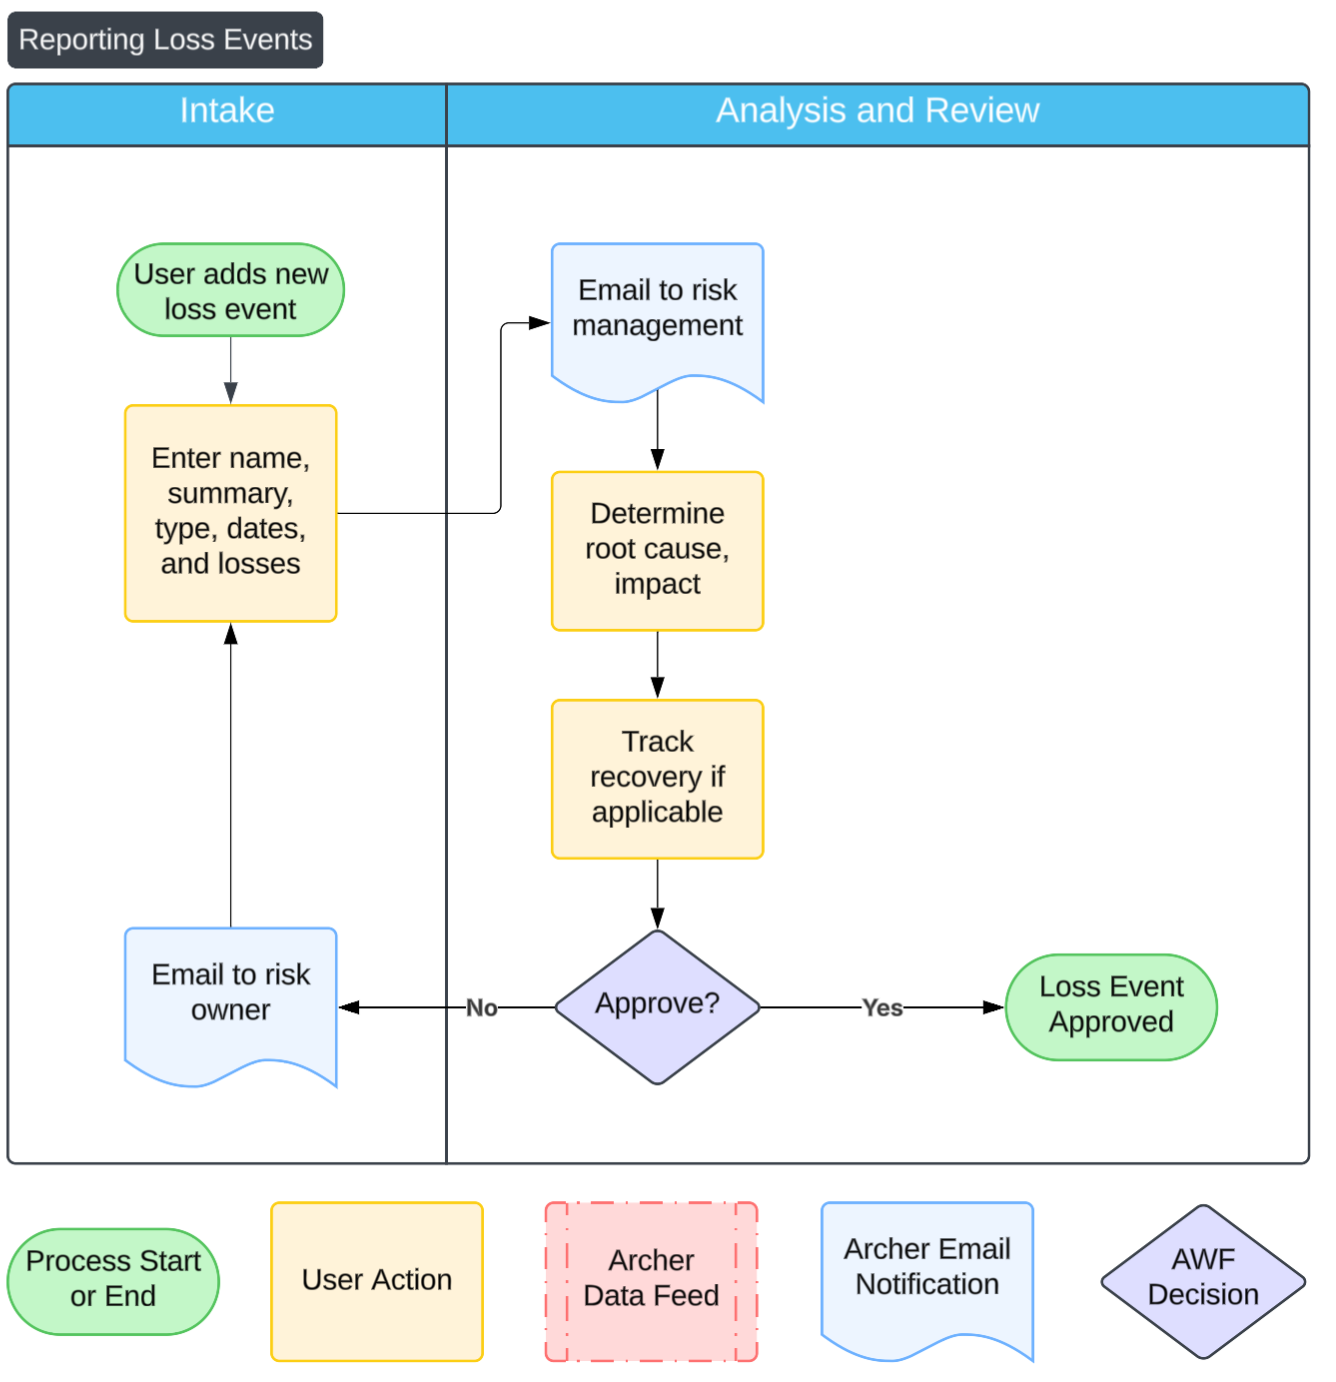
The following steps detail how toreport and review a loss event:
-
Submit a new loss event (intake).
-
Navigate to the Loss Events application and click Add New.
-
Enter a Name and Summary describing what happened.
-
Select the appropriate Event Type.
-
Choose the Business Unit where the event occurred or was impacted.
-
Fill in the relevant dates:
-
Occurrence Date: When the event happened.
-
Discovery Date: When the event was identified.
-
Loss Date: When a loss (if any) was confirmed or recorded.
-
-
Enter any known Monetary Loss or Qualitative Impact to describe the severity.
-
Click Save & Submit to send the record to the risk team for review.
-
-
Review and analysis by risk team.
Note: This step is completed by the Risk Management or Operational Risk Management team.
-
Evaluate the event details and confirm completeness.
-
Conduct a Root Cause Analysis to identify underlying issues.
-
Perform an Impact Analysis to determine business implications.
-
Link the event to related records as applicable:
-
Risks (to show exposure or alignment)
-
Business Processes (to show where in operations the event occurred)
-
Controls (to highlight any failed or missing controls)
-
-
Once the review and analysis are complete, approve and close the event. The loss event is now available for reporting, trend analysis, and lessons learned across the organization.
-
Best Practices
Archer’s solution is based on several authoritative sources.
-
The COSO Framework, which outlines how organizations should approach enterprise risk management.
-
NIST Risk Management Framework (RMF), which provides guidance on how to take a risk based approach to systems.
-
ISO 31000, the international standard for managing risk faced by organizations. It includes a standardized approach to conducting risk assessments.
-
Basel II, which is an international regulatory framework developed by the Basel Committee on Banking Supervision to help with risk management in the banking sector. Basel II includes information about credit risk, market risk, and operational risk.
It’s recommended that organizations align to these standards and use Archer to operationalize the processes. This section contains some best practices to consider to run a successful business continuity program.
Conduct annual assessments
Risks evolve over time—so should your risk records. An annual risk assessment process ensures that inherent and residual ratings are still accurate, controls are functioning, and the risk treatment strategy remains appropriate. Schedule these reviews by business unit or risk owner and tie them to your broader risk program calendar. You can trigger the review in Archer by navigating to your active risks and clicking Assess Risk.
Identify risks by business unit or by process
Organizing risks by business unit or core process allows for clearer ownership and better integration with operational planning. This structure also supports targeted reporting and helps connect risks directly to accountability and controls. In Archer, you are able to go to the business unit or process record and click Add New Risk to identify all of the risks by the entity.
Determine how you prioritize and assess risks
Establish consistent criteria for evaluating risks, such as five-point impact and likelihood scales or heat maps. Document whether your organization emphasizes financial loss, reputational damage, compliance impact—or a combination. Make sure every team uses the same definitions to avoid confusion or underestimation. You can configure the Risks application to include images, like a impact chart, to help your users assess. Alternatively, you can add more impact fields to determine the overall inherent and residual risks.
Determine how risks can be treated
Risk treatment decisions should be intentional and traceable. Use standard categories like Avoid, Reduce, Transfer, Accept, or Share, and ensure each decision is supported by rationale and linked controls if applicable. Define when controls are considered sufficient and when escalation is needed. Out of the box, Archer allows all treatment types, but configure Archer to support just the treatments your organization wants to accept.
Start by determining how you want to report risks to leadership
Work backward from your desired reporting outcomes. What should leadership see? Which risks need visibility? Knowing this helps you decide how to structure risk categories, which fields are required, and which metrics to track. Effective dashboards start with intentional data design.
Define your risk hierarchy before assessing new risks
Before business units start adding risk records, ensure your risk hierarchy is clearly defined and agreed upon. This includes risk categories and subcategories that reflect your organization’s major exposures. A strong hierarchy supports better analysis, clearer reporting, and consistency across assessments.
Track key metrics and align to the risk hierarchy
KRIs and other metrics are more valuable when linked to specific risk categories. This enables you to detect trends early, compare risk exposure across areas, and show whether controls are effectively reducing risk. Make sure your metrics are measured consistently and reviewed regularly.
For better board reporting, tie critical KRIs directly to the risk hierarchy, so they appear on the KRI scorecard report (found on the Risk Manager Dashboard). This will help you quickly share critical information with executives at any given point in time.
Track loss events, even if you don’t know the loss numbers
Don’t wait for perfect data before logging a loss event. Capture qualitative impacts, root causes, and timing even if the monetary impact is unclear or still under investigation. These records are essential for trend analysis, control evaluation, and justifying changes to risk ratings. Use the qualitative rating to capture how bad the event was, which helps with your qualitative risk assessments. If you tie the losses to existing risk records, they show up on the page when a business user is reassessing a risk, which helps the determine the impact.
Frequently Asked Questions
What data should I have in place before I get started?
| Application | Format | Priority |
|---|---|---|
|
Business Unit |
A list of organizational units with owners. |
Required |
|
Business Process |
A list of business processes or business functions. |
Optional |
|
Risk Taxonomy |
A standardized list of risks, ideally broken into two levels, Level 1 - Enterprise Risks, and a second level that maps to the first, Level 2 - Intermediate Risks. |
Recommended |
|
Risks |
An existing risk register or list of risks by business unit. |
Optional |
|
Controls |
A list of controls mapped to risks. |
Optional |
|
Metrics |
A list of key risk indicators or metrics that are tracked, along with historical values if possible. |
Optional |
|
Loss Events |
A list of operational risk events, or loss events that have occurred. |
Optional |
Can I change the impact and likelihood ratings?
Yes. This is a primary feature of Archer and you can make changes to meet your business needs.
Will the RCSA work if I change the risk application?
Yes. The RCSA is a tool to view your risks and controls in one location. Changes to your risks are made in the Risk application. You may want to update the RCSA to take into consideration your changes to the risk application.
For example, if you add a quantifiable impact rating to a risk, you should configure your RCSA to include the new data. In Reports, find the report named RCSA Risk and Control Matrix. Modify the report to include the new data. No changes to the data feed are needed.
How can I give everyone in the company access to report loss events?
With the new user experience in SaaS, any administrator can provide a link to users that allows them to create loss events. In the Loss Event application, create a new record. Copy the URL in the browser and provide it to users. Users must have an account within Archer with the proper role (Loss Event (C)) to create loss events in Archer.
If you're providing a link to employees outside Archer, or non-provisioned users, it's recommended to use Archer Engage to create a loss event form and provide the link to anyone who needs it.
When does the system take risk snapshots?
The system has two nightly data feeds that take risk snapshots. One data feed takes a snapshot if any risk assessment is done, and the other data feed focuses takes snapshots when an RCSA is fully approved. Whenever a risk owner declares their opinion on the risk through an ad-hoc assessment, a change during the RCSA, or by not changing the risk during an RCSA, the system captures a snapshot.
When performing an RCSA, all risks, regardless if they have been updated, have their snapshot taken. The Last Assessed Date field is updated to the RCSA approved date.
Will the RCSA work if I customize my risk assessment?
Yes. The RCSA is built to handle customizations for risks, whether you change the rating factors, fields required, or justification requirements. There are some considerations to keep in mind when customizing your risk assessment.
The RCSA initializing feed connects the risks in scope to the RCSA record, so there is no need to customize the data feed for setting up RCSAs. However, the Risk and Control Matrix report and the data feeds that capture risk snapshots should be modified.
Risk and Control Matrix
The RCM report can be found by clicking on the report icon and searing for the RCSA Risk and Control Matrix. This report is used on the RCSA applications layout. By default, it has high-level fields like inherent risk, residual risk, open issues, and failed metrics. Based on your customizations, you may want to change the fields on this report to better reflect your risk assessment.
Risk Snapshot Data Feeds
The Risk Snapshot captures only high level fields rather than every field for every risk. If the captured fields need to be changed, then both data feeds should be updated.
The following steps detail how to update a data feed:
-
Update the Risk Snapshot application to include new fields.
-
Update the source reports to include new fields.
-
Update the XSLT in the data feeds by copying the current XSLT and adding new fields using the same format.
-
Update the data mapping by connecting the Risk ID to the Risk application, setting the DFM:TakeSnapshot field to No, and mapping the fields.
Note: The Risk application and the RCSA application both have the DFM:TakeSnapshot field, so make sure the data feeds are pointing to the right field.
-
Test the feeds by assessing a risk an ensuring that fields are populating correctly.
Can I bring in BIA results into the RCSA?
Yes. This is ideal for process-based RCSAs, but it can also be done with business unit RCSAs. The BIA (Business Impact Analysis) application in the Resilience solution targets a process and rolls up the latest approved BIA results onto the business process record itself.
The RCSA also targets a process, so you can create calculated fields that can pull data from the process into the RCSA and display them with other metrics. This enables you to include information like criticality rating, RTO, RPO, and MTPD. When adding those fields to the RCSA, make sure to use the same values list used in the Business Processes Application, mark them as Calculated Fields, and set them equal to the values in the Business process Application.
If you want to input BIA information on a Business Unit RCSA, first configure the Business Unit to capture BIA information, then follow the steps above to include BIA information in the RCSA.