Archer Australian Incident Management
The Archer Australian Incident Management Accelerator is a streamlined version of the Archer Incident Management use case specific to customers in Australia. This offering allows customers to quickly and easily document, triage and remediate compliance and risk incidents. It provides a simplified workflow to create incidents, conduct compliance reviews, assign ownership, investigate, and close incidents.
Archer Exchange: With the Archer Exchange, the Archer team has created a broad selection of supplemental, value-added offerings to help you get your unique risk management program on the right path, right from the start. You can leverage the Archer Exchange offerings to expand the use of Archer solutions into new business processes and address specific industry, geographic, regulatory, or technical requirements.
On this page
Release notes
Last updated: August 2023
Overview
Organizations develop comprehensive incident response plans that outline the roles and responsibilities of team members, communication protocols, escalation procedures, and the steps to be taken during different types of incidents. These plans are tailored to the specific needs of the organization and its industry. The incident management process begins with identifying and classifying incidents. Once an incident is identified, it is escalated to the appropriate personnel or teams within the organization. This often includes notifying various stakeholders within the organization and often times the governing regulatory bodies.
Archer Australian Incident Management Accelerator provides case management and incident response for reporting and categorizing cyber and physical incidents and determining the appropriate response procedures.
Archer Australian Incident Management Accelerator provides a streamlined version of the Archer Incident Management use case that supports specific requirements for managing incidents in Australia, such as ASIC’s RG78, OAIC, and Corporations Act s912D Checklists. It provides a metrics dashboard for tracking and reporting the status of all incidents, their costs, related incidents, losses and recovery.
The Archer Australian Incident Management Accelerator can be paired with Archer Australian Regulatory Correspondence to facilitate regulatory reporting. Organizations are required to report to regulators to ensure compliance with industry laws, mitigate risks, and demonstrate transparency in their operations. This includes reporting on operational disruptions, cybersecurity incidents, compliance breaches, and other regulatory obligations specific to their industry. By leveraging these solutions, clients can streamline reporting processes, ensure timely submissions, and maintain accurate records to meet regulatory requirements efficiently.
Features and benefits
The Archer Australian Incident Management Accelerator offering enables organizations todo the following tasks.
-
Support the documentation, triage and remediation of compliance and risk incidents.
-
Include a simplified workflow allowing the creation, compliance review, ownership and closure of incidents.
-
Track due dates in line with regulatory reporting timeframes.
-
Track correspondence sent to and received from regulators.
-
Support the process to investigate into serious or likely breach.
-
Use built-in checklists to prompt the assessment of whether an incident could be any of the following items.
-
Breach per Corporations Act 2001 s912D.
-
Reportable situation per Regulatory Guide 78 Breach reporting by AFS licensees and credit licensees (RG 78).
-
Notifiable data breach per Office of the Australian Information Commissions (OAIC).
-
The Archer Australian Incident Management Accelerator has the following benefits.
-
Solution tailored specificall for Australian clients' unique requirements.
-
Centralized simplified incident workflow and tracking.
-
Customizable incident response plans to address your organization's specific challenges.
User Guide
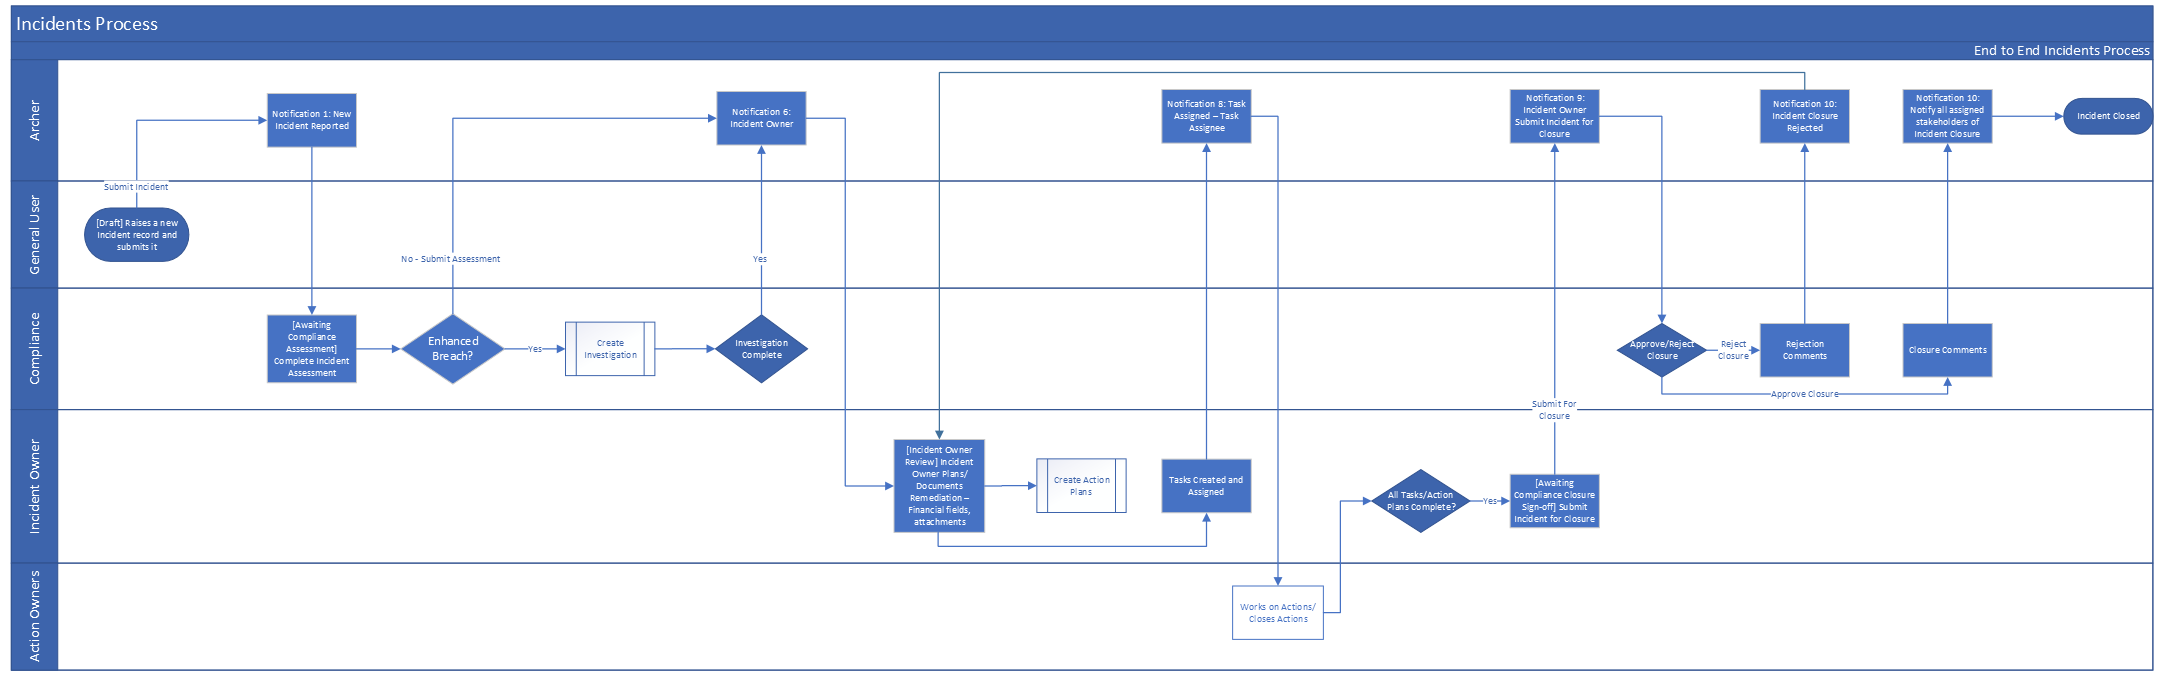
User: General User
-
Create Incidents record.
-
From the menu bar, click on the dropdown beside Incident Management Accelerator Workspace.
-
Under Individual Incident Management > Incidents, click on New Record.
-
-
Fill in the following information in Event Information section:
-
Enter Incident Name.
-
Enter the Incident Description.
-
Enter the details about How did the Incident Happen.
-
Enter the details about Initial Actions Taken.
-
Select Incident Cause by clicking
 and making your selection.
 -
Select Interaction Point Affected by clicking
and making your selection. -
Select the Date Discovered, Date Occurred, and Date Reported by clicking the calendar icon next to the field
-
Complete the remaining fields in the Event Information section.
-
-
(Optional) Add attachments/documentation to the record by clicking the | Add New | button in the Supporting Documentation field.
-
Once the record is complete, click Save in the Record Toolbar to save in record.
-
Click Submit Incident at the top left of the screen.
Users: Compliance Manager
-
Select the Incidents record you want to provide response by clicking the Incident Name under the Tasks section on your Task landing screen.
-
Click Edit in the top of the record.
-
Select user from the list in the Incident Owner field by clicking
from the Incident Stakeholders section. -
In the Intake Assessment section:
-
Select Impact Assessment by clicking the down arrow next to the field and making your selection.
-
Select Regulator by clicking
and making your selection. -
If Impact Assessment is Critical OR Remediation Plan is Required for the Incident. Enter details in the Compliance Remediation Recommendations.
-
Complete the remaining fields in the section.
-
-
In the Breach Assessment section:
-
Select PotentialBreach? by clicking the down arrow next to the field and making your selection.
-
If Potential Breach = Yes, select user from the list in the Applicable Legal Team field by clicking
. -
If s912D Checklist Required? = Yes, complete the s912D Assessment section.
-
If s912D Checklist Q5 = Yes, complete the Reportable Situation section.
-
In the Reportable Situation section: if RG78 Checklist Q3 = Yes, then create Investigations by clicking the | Add New | button in the Investigations field. Refer below Tasks 3 and 4 for more details.
-
-
If OAIC Assessment Required? = Yes, complete the OAIC Assessment section.
-
-
(Optional)Add Comments to the record by clicking the | Add New | button in the Comments section.
-
Click Save in the Record Toolbar.
-
Click Submit Assessment from the Actions dropdown at the top left of the screen.
User: Compliance Manager
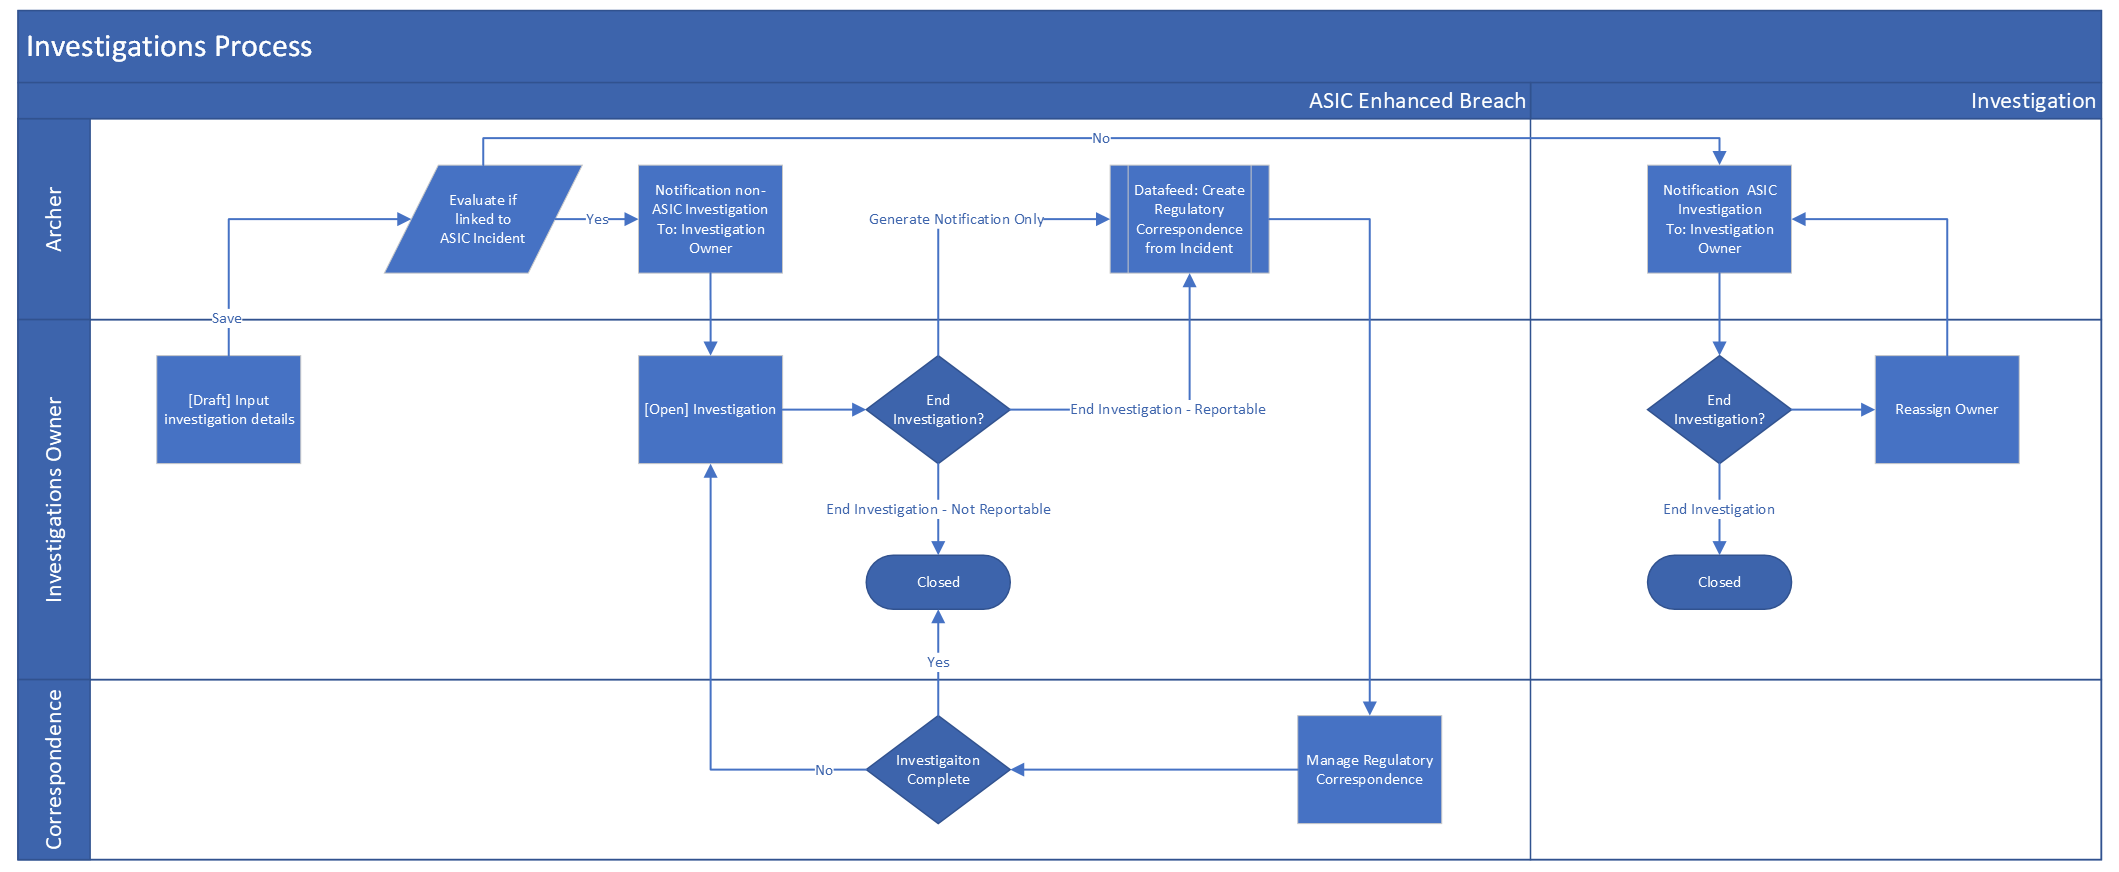
-
Create Investigations record.
-
From the menu bar, click on the dropdown beside Incident Management Accelerator Workspace.
-
Under Individual Incident Management > Investigations, click on New Record.
-
-
Fill in the following information in General Information section:
-
Enter Investigation Request Name.
-
Select Related Incidents by clicking
in the Target field.
-
-
In the Investigator Assignments section:
-
Select user from the list in the Investigation Owner field by clicking
. -
Select user from the list in the Investigation Manager field by clicking
.
-
-
In the Investigation Request Information section:
-
Select Request Type and Urgency by clicking the down arrow next to the field and making your selection.
-
Select Investigation Location by clicking
and making your selection. -
Enter Request Description.
-
-
Once the record is complete, click Save in the Record Toolbar to save in record.
Users: Compliance Manager
-
Select the Incidents record you want to provide response by clicking the Incident Name under the Tasks section on your Task landing screen.
-
Click Edit in the top of the record.
-
Navigate to Investigation Outcome section.
-
Not a Reportable Situation
-
Select ‘Not a Reportable Situation’ value in the Reportable Situation Resolution field.
-
Click on End Investigation – Not Reportable from the Actions dropdown at the top left of the screen.
-
-
Reportable Situation
-
Select relevant value in the Reportable Situation Resolution field.
-
Enter details in the Investigation Outcome field.
-
-
Click on End Investigation – Reportable from the Actions dropdown at the top left of the screen.
Users: Incident Owner
-
Select the Incidents record you want to provide response by clicking the Incident Name under the Tasks section on your Task landing screen.
-
Click Edit in the top of the record.
-
Navigate to the Resolution tab.
-
In the Financial Analysis section:
-
Enter Financial Loss Amount, Recovered Amount and Amount Gained.
-
Enter details in Cost Calculation field.
-
-
Create Remediation Plans by clicking the | Add New | button in the Remediation Plans section.
-
(Optional) Add Comments to the record by clicking the | Add New | button in the Comments section.
-
Click Save in the Record Toolbar.
-
Click Submit for Closure from the Actions dropdown at the top left of the screen.
Users: Compliance Manager
-
Select the Incidents record you want to provide response by clicking the Incident Name under the Tasks section on your Task landing screen.
-
Click Edit in the top of the record.
-
To Approve the incident closure
-
Review the information in the Incidents Record.
-
Enter comments in the Compliance Closure Comments field.
-
Click on Approve Closure from the Actions dropdown at the top left of the screen.
-
-
To Reject the response:
-
Click on Reject Closure from the Actions dropdown at the top left of the screen.
-
Document the reason for rejecting the response in the Compliance Closure Rejection Comments field.
-
Click on Submit from the Actions dropdown at the top left of the screen.
-
-
(Optional) Add Comments to the record by clicking the | Add New | button in the Comments section.
-
Click Save in the Record Toolbar.
Administrator guide
Prerequisites (System requirements)
|
Components |
Prerequisites |
|---|---|
|
Archer Solution Area(s) |
Archer Resilience Management |
|
Archer Use Case(s) |
|
|
Archer Applications |
|
|
Uses Custom Objects |
No |
|
Requires Archer On-Demand Application Licenses |
Zero (0) Archer On-Demand Application licenses required. |
| Archer Licensing | Requires Archer Australian Regulatory Correspondence license for use of the Australian Regulatory Correspondence application. |
|
Archer requirements |
Archer Platform Release 6.13 and later |
| Supported Archer Environments |
|
Compatible use cases and applications - related applications
|
Application |
Use Case |
Primary Purpose(s) of the Relationship |
|---|---|---|
|
FAR Regulatory Correspondence |
Individual Accountability Management |
|
|
Contacts |
Business Asset Catalog |
|
|
Business Unit
|
Business Asset Catalog |
|
|
Division
|
Business Asset Catalog |
|
|
Products and Services |
Business Asset Catalog |
|
|
Facilities |
Business Asset Catalog |
|
Components
Architecture diagram

Process diagrams
Incidents
Investigations
Applications
|
Application |
Description |
|---|---|
|
Incidents |
The Incidents application provides a central repository for reporting incidents and managing the incident lifecycle. Through the Incidents application |
|
Investigations |
The Investigations application allows you to report and manage investigations for one or more incidents. |
|
FAR Regulatory Correspondence |
The FAR Regulatory Correspondence application provides the ability to track regulatory communication and track submission of such to the Regulator. |
Personas and access roles
The following table describes the functions that make up the application’s organization roles. Depending on the organization of your company, these functions and responsibilities may vary.
|
Function |
Description |
|---|---|
|
Compliance Manager |
The Compliance Manager is the initial point of contact for intaking and triaging Incidents. The Compliance Manager is responsible for conducting the Impact Assessments, any Breach evaluations and assigning the Incident Owner. Furthermore, the Compliance Manager reviews the Incident once it’s been submitted by the Incident Owner for closure. |
|
Incident Owner |
The Incident Owner is the individual within the Business who owns the overarching Remediation of the Incident. The Incident Owner is also able to track details around Financial Loss. |
|
Incidents Legal Team |
The Incident Legal Team is a Group which can be leveraged to notify the Legal department where there might be a breach that requires Legal oversight. The Legal Team isn’t a formal part of the workflow, however they are notified when required as a result of Breach determination by the Compliance Manager. |
Permissions chart
|
Applications |
IM: Admin |
IM: Owner |
CM: Manager |
RM: Manager |
Incidents: Legal |
Incidents: General User |
|---|---|---|---|---|---|---|
|
Incidents |
CRUD |
CRU |
CRU |
CRU |
R |
CRU |
|
Investigations |
CRUD |
CRU |
CRU |
CRU |
R |
|
|
FAR Regulatory Correspondence |
CRUD |
CRU |
CRU |
CRU |
R |
|
|
Remediation Plans |
CRU |
CRU |
CRU |
R |
R |
|
|
Business Unit |
RU |
RU |
RU |
R |
R |
|
|
Division |
RU |
RU |
RU |
R |
R |
|
|
Contacts |
RU |
RU |
RU |
R |
R |
|
|
Products and Services |
RU |
RU |
RU |
R |
R |
|
|
Facilities |
RU |
RU |
RU |
R |
R |
|
C = Create, R = Read, U = Update, D = Delete
Install Archer Australian Incident Management Accelerator
-
(Optional) Set up the data feeds.
-
Test the offering according to your company standards and procedures, to ensure that it works with your existing processes.
Prepare for the installation
-
Ensure that your Archer system is at Archer Platform version 6.13 or later.
-
Download the installation package.
-
Read and understand "Packaging Data" in the Archer Platform Help.
Install the package
There is no Undo function for a package installation. Packaging is a powerful feature that can make significant changes to an instance. Back up the instance database before installing a package. This process enables a full restoration if necessary.
An alternate method for undoing a package installation is to create a package of the affected objects in the target instance before installing the new package. This package provides a snapshot of the instance before the new package is installed, which can be used to help undo the changes made by the package installation. New objects created by the package installation must be manually deleted.
-
From the menu bar, click
 > Application Builder > Install Packages.
 - In the Available Packages section, click Import.
- Click Add New, then locate and select the package file that you want to import.
- Click OK.
The package file is displayed in the Available Packages section and is ready for installation.
Important: This step is required only if you are upgrading to a later version.
-
From the menu bar, click
> Application Builder > Install Packages. - In the Available Packages section, locate the package you want to map.
- In the Actions column, click
 for that package.
The analyzer examines the information in the package. The analyzer automatically matches the system IDs of the objects in the package with the objects in the target instance and identifies objects from the package that are successfully mapped to objects in the target instance, objects that are new or exist but are not mapped, and objects that do not exist (the object is in the target but not in the source).
When the analyzer is complete, the Advanced Package Mapping page lists the objects in the package file and corresponding objects in the target instance.
- On the Advanced Mapping page, click to open each category and review the icons next to each object to determine which objects you must map manually.
The following table describes the icons. Icon
Name
Description

Awaiting Mapping Review
Indicates that the system could not automatically match the object or one of its children to a corresponding object in the target instance.
Objects marked with this icon must be mapped manually.
New objects should not be mapped. Select Do Not Map from the drop-down menu to clear this icon for an individual object, or click Do Not Map to clear the icon for all unmapped objects.

Mapping Completed
Indicates that the object and all children are mapped to objects in the target instance, or that they have been marked as Do Not Map. Nothing more needs to be done with these objects in Advanced Package Mapping.
Note: You can run the mapping process without mapping all objects. The
icon is for informational purposes only. - For objects awaiting mapping review, do one of the following:
- To map each object individually, use the drop-down menu in the Target column to select the object in the target instance to which you want to map the source object. To leave an object unmapped, select Do Not Map in the Target column.
- To automatically map all objects in a category that have different system IDs but the same object name as an object in the target instance, click Auto Map. Select whether to ignore case and spaces when matching object names. Click OK.
- To mark all unmapped objects as Do Not Map, click Do Not Map.
-
(Optional) Click
 to enable filter fields that you can use to find specific objects in each mapping category. To undo your mapping selections, click Undo, then select whether to undo all mappings in the category or only the mappings on a single page. If you choose to undo all mappings, you will be returned to the categories list.
 - (Optional) To save your mapping selections and return to the categories list without committing changes to the target instance, click
 .
. - After you review and map all objects, click Execute.
- Select I understand the implications of performing this operation. Click OK.
When the mapping is complete, the Import and Install Packages page displays.
Important: Advanced Package Mapping modifies the system IDs in the target instance. You must update any Data Feeds and Web Service APIs that use these objects with the new system IDs.
All objects from the source instance are installed in the target instance unless the object cannot be found or is flagged to not be installed in the target instance. The Log Messages section provides a list of conditions that may cause objects not to be installed. The Package Installation Log section displays a log entry.
-
From the menu bar, click
 > Application Builder > Install Packages.
 -
In the Available Packages section, locate the package file that you want to install, and click Install.
-
In the Selected Components section, click the Lookup button to open the Package Selector window.
-
To select all components, select the top-level checkbox.
-
To install only specific global reports in an already installed application, select the checkbox associated with each report that you want to install.
Note: Items in the package that do not match an existing item in the target instance are selected by default.
-
-
Under the Install Method drop-down menu, select an option for each selected component. To use the same Install Method for all selected components, select a method from the top-level drop-down list.
Note: If you have any existing components that you do not want to modify, select Create New Only. You may have to modify those components after installing the package to use the changes made by the package.
-
To deactivate target fields and data-driven events that are not in the package, in the Post-Install Actions section, select the Deactivate target fields and data-driven events that are not in the package checkbox. To rename the deactivated target fields and data-driven events with a user-defined prefix, select the Apply a prefix to all deactivated objects checkbox, and enter a prefix. This can help you identify any fields or data-driven events that you may want to review for cleanup post-install.
-
Click Install.
-
Click OK.
-
From the menu bar, click
> Application Builder > Install Packages. - In the Package Installation Log section, click the package that you want to view.
- In the Package Installation Log page, in the Object Details section, click View All Errors.
Note: To view individual logs, in the Errors column of the log you want to view, click the Failures link or Warnings link. Clicking View All Errors, Failures, or Warnings opens the specific errors on a different page.
- Click the Export icon to export the log file.
- Click Close.
For a list of packaging installation log messages and remediation information for common messages, see Package Installation Log Messages.
-
Go to the Applications page.
-
From the menu bar, click
. -
Under Application Builder, click Applications.
-
-
In the Applications section, select the Incidents Application.
-
On the Advanced Workflow Tab, click ‘Activate’ in the top right corner of the page.
-
Then click ‘Save Workflow’ in the top left corner of the page.
-
Repeat Step 1 above. In the Applications section, select the Investigations Application.
-
On the Advanced Workflow Tab, click ‘Activate’ in the top right corner of the page.
-
Then click ‘Save Workflow’ in the top left corner of the page.
Set up data feeds (optional)
If you are using or installed the FAR Regulatory Correspondence application, then configure the below data feed.
-
Go to the Manage Data Feeds page.
-
From the menu bar, click
. -
Under Integration, click Data Feeds.
-
-
In the Manage Data Feeds section, locate and select the ‘Create Regulatory Correspondence from Investigations’ data feed.
-
From the General tab in the General Information section, in the Status field, select Active.
-
Click the Transport tab. Complete the fields in the Transport Configuration section as follows: In the URL field, type: YourServerName/VirtualDirectoryName/ws/search.asmx
-
In the User Name and Password fields, type the username and password of a Platform user that has API access and access to all the records on the Platform instance (from which the data feed is coming).
-
In the Instance field, type the name of the Platform instance from which the data feed is coming (this is the instance name as you enter it on the Login window).
-
Verify the settings on the Source Definition tab. This will be pre-configured to identify the necessary fields.
Note: The Type and Clear Notification Helper Field on the Source Definition tab will be automatically populated when you install the data feed. Repopulating the fields by clicking on “Load Fields” will lead to removal of these pre-populated fields from the list. Hence, follow the below steps to add the two fields in Source definition tab:
-
Add a new field by clicking on “Add New” and rename as “Type” and select field type “Static Text” with appropriate value “Breach” in the Text editor.
-
Add a new field by clicking on “Add New” and rename as “Clear Notification Helper” and select field type “Static Text” with appropriate value “Created” in the Text editor. Also, be sure that the data mappings are configured correctly after the load fields.
-
Verify that except for the Regulatory Correspondence, key field values are not missing from the data feed setup window.
-
Click Save.
Important: A data feed must be active and valid to successfully run.
As you schedule your data feed, the Data Feed Manager validates the information. If any information is invalid, an error message is displayed. You can save the data feed and correct the errors later; but the data feed does not process until you make corrections.
-
Go to the Schedule tab of the data feed that you want to modify.
-
From the menu bar, click
. -
Under Integration, click Data Feeds.
-
Select the data feed.
-
Click the Schedule tab.
-
-
Go to the Recurrences section and complete frequency, start and stop times, and time zone.
-
(Optional) To override the data feed schedule and immediately run your data feed, in the Run Data Feed Now section, click Start.
-
Click Save.
Certification environment
Date tested: August 2023
|
Product Name |
Version Information |
Operating System |
|---|---|---|
|
Archer |
6.13 |
Virtual Appliance |