Archer Internal Dispute Resolution
In the context of regulatory compliance, there exists a significant challenge for financial firms regarding the effective tracking and management of customer complaints in Australia. The Australian Securities & Investments Commission (ASIC) has a regulation titled RG 271 on Internal Dispute Resolution. The regulation came into effect in October 2021 and mandates specific timelines around complaint, or internal dispute type, treatment and remediation. The Regulation can be found here: https://asic.gov.au/regulatory-resources/find-a-document/regulatory-guides/rg-271-internal-dispute-resolution/.
Compliance with ASIC RG 271 is essential for financial firms to manage and resolve their complaints. When utilized alongside the Archer Complaints Tracking app-pack, the Archer Internal Dispute Resolution accelerator assists organizations in meeting the requirements of ASIC RG 271 regulation. Integrated with ASIC's specified Complaint Types, it establishes the maximum internal dispute resolution timeframe corresponding to each complaint type. Additionally, it monitors the acknowledgment process for internal dispute resolution and identifies instances necessitating a formal response. Furthermore, leveraging the FAR Regulatory Correspondence Add-On, it effectively tracks regulatory correspondence and facilitates notifications to ASIC or the Australian Financial Complaints Authority (AFCA).
Release notes
| Release Date | Archer Platform Release | Notes |
|---|---|---|
|
June 2024 |
2024.06 | Initial Release |
On this page
Key features and benefits
The Archer Internal Dispute Resolution accelerator enables organizations to:
-
Offer transparency regarding acknowledgment and response times for internal dispute resolution, in accordance with ASIC's standards.
-
Monitor essential internal dispute resolution details for the organization.
-
Track response and remediation actions to address the complaint.
-
Facilitate reporting as needed to ASIC and AFCA through the FAR Regulatory Correspondence Add-On.
Prerequisites (ODA and system requirements)
|
Components |
Prerequisites |
|
Archer Solution Area(s) |
Archer Regulatory & Corporate Compliance Management |
|
Archer Use Case(s) |
The offering requires the Archer Complaints Tracking App Pack or one (1) Archer On-Demand Application. The FAR Regulatory Correspondence Add-On is optional, providing the ability to track Regulatory Correspondence to the Regulator regarding IDR’s. |
|
Archer Applications |
N/A |
|
Uses Custom Objects |
Yes |
|
Requires Archer On-Demand License |
Zero (0) Archer On-Demand Application (ODA) licenses are required when installed with the Archer Complaints Tracking app-pack. Otherwise, one (1) Archer On-Demand Application is required. |
|
Archer Platform Requirements |
Archer Platform Release 2024.06 and later |
|
Supported Archer Environments |
|
|
Partner/Vendor Requirements |
N/A |
|
Operating System |
Windows Server 2012 R2 |
|
Database Server |
Microsoft SQL Server 2014 (64-bit) |
|
Services Server |
Java Runtime Environment (JRE) 8 (64-bit) |
Compatible use cases and applications
This section shows additional features that are available if you have the specified use cases licensed.
For information on these Archer use cases, see the Archer Solutions Help.
Related applications
| Application |
Use Case |
Primary Purposes of the Relationship |
|---|---|---|
|
Control Procedures |
Controls Assurance Program Management (Regulatory & Corporate Compliance) IT Controls Assurance (IT Security Risk Management) |
You can link the IDR Complaint to your Control framework. |
|
Regulatory Correspondences |
Individual Accountability Management – FAR Add-On Regulatory Correspondence |
The regulatory correspondence application allows you to track regulatory correspondence to ASIC for the IDR complaints that require reporting. This application allows you to capture submission dates and status tracking. |
|
Business Process |
Business Impact Analysis |
The Business Processes application captures the base data for a given process. A process may be assigned to a particular business unit or shared across multiple business units. Processes are related to products and services, applications, controls, scoping decisions and process walk-throughs. |
|
Policies |
Policy Program Management IT Policy Program Management |
The Policies application allows you to centralize corporate policy content, manage the review and approval process, and deliver policies to end users based on their job functions. The application provides a best-practice framework for creating, normalizing and rationalizing policy content based on your corporate objectives and the authoritative sources that govern your business. All employees of an organization typically use this application. |
|
Obligations |
Policy Program Management IT Policy Program Management |
This provides the ability to link IDR Complaints to the relevant/impacted Obligation. |
|
Business Unit |
Business Asset Catalog IT Asset Catalog |
The Business Unit application provides the user with a detailed view of all activities related to the specific business unit. Utilizing this application, users can view related risks, control procedures, incidents, products and services and other enterprise-level information and see how changes to these related elements influence the overall business unit. |
|
Findings |
Issues Management |
The Findings application supports multiple solutions. It is used to document issues, deficiencies or gaps found through assessments and control testing. Findings are auto-generated from questionnaires and include links back to the questionnaire, target and any applicable control standards and authoritative sources. |
|
Exception Request |
Issues Management |
The Exception Requests application allows you to manage the process of granting and expiring exceptions to policies and control standards. Through built-in workflow, the application enables you to ensure that all exceptions are properly reviewed. |
|
Remediation Plan |
Issues Management |
The Remediation Plans application allows you to centrally manage multiple findings and track actual and estimated remediation costs and timeframes. Relating multiple findings in the context of remediation plans allows you to identify larger issues and support informed decision making. |
|
Third Party Profile |
Third Party Catalog |
The Third Party Profile application is used to document all of the third party relationships used by an organization. In this application, the organizational structure of the third party relationship is established, third party contacts documented, and relationship manager, risk analyst, and procurement / legal officer accountabilities are created. |
|
Contacts |
Policy Program Management |
The Contacts application serves as a central repository for contact information, enabling management to document information about the personnel involved in key organizational tasks, such as device administration and business process ownership. This application is utilized across multiple areas of the Archer Suite and contains information that is often leveraged by other solutions. |
|
Product and Services |
Controls Assurance Program Management Business Asset Catalog |
The Products and Services application maintains all products and services provided within an organization. For example, a financial services firm provides a variety of products and services, such as banking, brokerage and lending services. |
|
Operational Incidents |
Incident Management |
This application facilitates the reporting of cyber and physical incidents, including categorization and determination of the appropriate response procedures. |
|
Risks |
Top-Down Assessment |
The Risks application serves as the corporate controlled instantiation of risks used by the entire organization. It allows users to capture data for an instance of a risk from any given risk statement. |
Additional Resources
The following additional resources are available for this offering:
-
Australian Securities & Investments Commission (ASIC) RG 271: https://asic.gov.au/regulatory-resources/find-a-document/regulatory-guides/rg-271-internal-dispute-resolution/
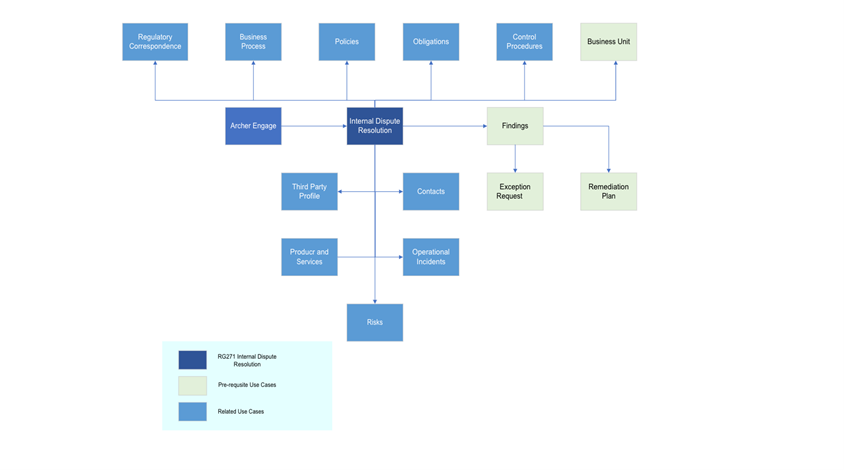
Archer Internal Dispute Resolution components
Architecture diagram
The following diagram shows the relationships between the applications that make up Archer Internal Dispute Resolution.
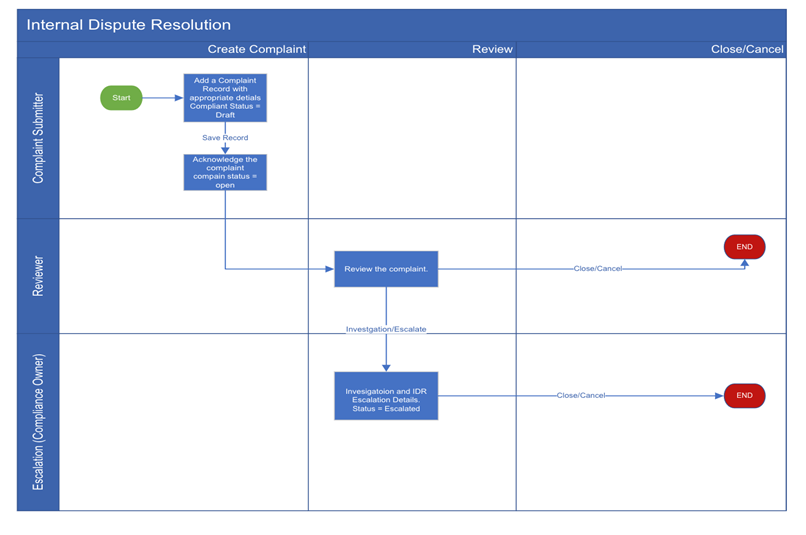
Process diagram
The following diagram shows the general workflow of the application.
Applications
|
Application |
Description |
|
Internal Dispute Resolution |
The Archer Internal Dispute Resolution accelerator assists organizations in meeting the requirements of ASIC RG 271 regulation. Integrated with ASIC's specified Complaint Types, it establishes the maximum internal dispute resolution timeframe corresponding to each complaint type. |
Personas and access roles
| Persona | Description |
|---|---|
|
Complaint Submitter |
Creates the complaint records. Add the details for the complaints like, acknowledgment, responses, etc. Submits record for review. |
|
Complaint Owner |
Review the complaint record. Based on the review decides to escalate, investigate, close or cancel. |
|
Complaint Reviewer |
Reviews the record for investigation or escalation post which closes the record. |
Installing Archer internal dispute resolution
Security considerations
The information in this publication is provided "as is". Archer makes no representations or warranties of any kind with respect to the information in this publication, and specifically disclaims implied warranties of merchantability or fitness for a particular purpose. Client is solely responsible for ensuring that the installation of the application is performed in a secure manner. Archer recommends clients perform a full security evaluation prior to implementation.
Installation
Complete the following tasks to install Archer Internal Dispute Resolution.
Step 1: Prepare for the installation
-
Ensure that your Archer system meets the following requirements: Archer Platform version 2024.06
-
Read and understand "Packaging Data" in the Archer Platform Help.
Step 2: Install the package
Installing a package requires that you import the package file, map the objects in the package to objects in the target instance, and then install the package.
Task 1: Back up your database
There is no Undo function for a package installation. Packaging is a powerful feature that can make significant changes to an instance. Back up the instance database before installing a package. This process enables a full restoration if necessary.
An alternate method for undoing a package installation is to create a package of the affected objects in the target instance before installing the new package. This package provides a snapshot of the instance before the new package is installed, which can be used to help undo the changes made by the package installation. New objects created by the package installation must be manually deleted.
Task 2: Import the package
-
From the menu bar, click
 > Application Builder > Install Packages.
 - In the Available Packages section, click Import.
- Click Add New, then locate and select the package file that you want to import.
- Click OK.
The package file is displayed in the Available Packages section and is ready for installation.
Task 3: Map objects in the package
Important: This step is required only if you are upgrading to a later version of the offering.
-
From the menu bar, click
> Application Builder > Install Packages. - In the Available Packages section, locate the package you want to map.
- In the Actions column, click
 for that package.
The analyzer examines the information in the package. The analyzer automatically matches the system IDs of the objects in the package with the objects in the target instance and identifies objects from the package that are successfully mapped to objects in the target instance, objects that are new or exist but are not mapped, and objects that do not exist (the object is in the target but not in the source).
When the analyzer is complete, the Advanced Package Mapping page lists the objects in the package file and corresponding objects in the target instance.
- On the Advanced Mapping page, click to open each category and review the icons next to each object to determine which objects you must map manually.
The following table describes the icons. Icon
Name
Description

Awaiting Mapping Review
Indicates that the system could not automatically match the object or one of its children to a corresponding object in the target instance.
Objects marked with this icon must be mapped manually.
New objects should not be mapped. Select Do Not Map from the drop-down menu to clear this icon for an individual object, or click Do Not Map to clear the icon for all unmapped objects.

Mapping Completed
Indicates that the object and all children are mapped to objects in the target instance, or that they have been marked as Do Not Map. Nothing more needs to be done with these objects in Advanced Package Mapping.
Note: You can run the mapping process without mapping all objects. The
icon is for informational purposes only. - For objects awaiting mapping review, do one of the following:
- To map each object individually, use the drop-down menu in the Target column to select the object in the target instance to which you want to map the source object. To leave an object unmapped, select Do Not Map in the Target column.
- To automatically map all objects in a category that have different system IDs but the same object name as an object in the target instance, click Auto Map. Select whether to ignore case and spaces when matching object names. Click OK.
- To mark all unmapped objects as Do Not Map, click Do Not Map.
-
(Optional) Click
 to enable filter fields that you can use to find specific objects in each mapping category. To undo your mapping selections, click Undo, then select whether to undo all mappings in the category or only the mappings on a single page. If you choose to undo all mappings, you will be returned to the categories list.
 - (Optional) To save your mapping selections and return to the categories list without committing changes to the target instance, click
 .
. - After you review and map all objects, click Execute.
- Select I understand the implications of performing this operation. Click OK.
When the mapping is complete, the Import and Install Packages page displays.
Important: Advanced Package Mapping modifies the system IDs in the target instance. You must update any Data Feeds and Web Service APIs that use these objects with the new system IDs.
Task 4: Install the package
-
From the menu bar, click
> Application Builder > Install Packages. - In the Available Packages section, locate the package file that you want to install, and click the file name or
 at end of the row to open the Options menu.
 - In the Selected Components section, click the Lookup button to open the Package Selector window.
- To select all components, select the top-level checkbox.
- To install only specific global reports in an already installed application, select the checkbox associated with each report that you want to install.
Note: Items in the package that do not match an existing item in the target instance are selected by default.
- Under the Translation Option drop-down menu, select an option for each selected component. To use the same Translation Option for all selected components, select a method from the top-level drop-down list.
Note: The Translation Option is enabled only when a language is selected.The following table describes the options. Option
Description
Full Install
Installs the component and its translations from the selected languages.
Translations Only
Only installs the translations from the selected languages.
- Under the Install Method drop-down menu, select an option for each selected component. To use the same Install Method for all selected components, select a method from the top-level drop-down list.
The following table describes the options. Option
Description
Create New Only
Only creates new fields and other elements in the applications, questionnaires, workspaces, data feeds, and dashboards specified in the package file. This option does not modify any existing elements on your instance of Archer. This is useful when you want to add functionality to an existing application, questionnaire, workspace, dashboard, data feed, or access role, but you do not want to risk making any unwanted changes to the existing elements of workspaces, data feeds, or dashboards.
Note: The Create New Only option does not apply to access roles or languages.
Create New and Update
Updates all elements in the applications, questionnaires, workspaces, data feeds, and dashboards as specified in the package file. This includes adding new elements and updating existing elements.
Note: The Create New and Update option does not apply to access roles or languages.
- Under the Install Option drop-down menu, select an option for each selected component. To use the same Install Option for all selected components, select an option from the top-level drop-down list.
The following table describes the options. Option
Description
Do not Override Layout
Installs the component, but does not change the existing layout. This is useful if you have a lot of custom fields and formatting in your layout that you do not want to risk losing.
You may have to modify the layout after installing the package to use the changes made by the package.
Note: The Do not Override Layout option does not apply to access roles or languages.
Override Layout
Updates the layout as specified in the package file, overwriting the existing layout.
Note: The Override Layout option does not apply to access roles or languages.
- Click Continue to advance to the next object category in the Package Selector, and repeat steps 4 to 6. After reviewing all object categories, click OK.
- To deactivate target fields and data-driven events that are not in the package, in the Post-Install Actions section, select the Deactivate target fields and data-driven events that are not in the package checkbox. To rename the deactivated target fields and data-driven events with a user-defined prefix, select Apply a prefix to all deactivated objects, and enter a prefix. This can help you identify any fields or data-driven events that you may want to review for cleanup post-install.
- Click Install.
- Click OK.
Task 5: Review the package installation log
-
From the menu bar, click
> Application Builder > Install Packages. - In the Package Installation Log section, click the package that you want to view.
- In the Package Installation Log page, in the Object Details section, click View All Errors.
Note: To view individual logs, in the Errors column of the log you want to view, click the Failures link or Warnings link. Clicking View All Errors, Failures, or Warnings opens the specific errors on a different page.
- Click the Export icon to export the log file.
- Click Close.
For a list of packaging installation log messages and remediation information for common messages, see Package Installation Log Messages.
Step 3: Test the installation
Test the application according to your company standards and procedures, to ensure that the use case works with your existing processes.
Using Archer Internal Dispute Resolution
Register the Complaint
User: Complaint Submitter
-
Go to the Nav Menu and click on Complaints Tracking.
-
From the drop down select the Internal Dispute Resolution application.
-
Create New Record.
-
Update the Complaint Details:
-
Save the record.
-
Based on Complaint Type the Resolution timeframe is auto populated.
-
The Status of the Complaint is Draft.
-
-
Enter the Date of acknowledgment.
-
Update the Stakeholders.
-
Update the Response.
-
If there is a delay update the IDR Response Delay.
-
Click Submit for Review.
-
The complaint status is open.
Review the Complaint
User: Complaint Owner
-
Review the complaint details post review.
-
Select the next Action after review
-
Investigate
-
Escalate
-
Close
-
Cancel
-
Investigate/Close the Complaint
User: Compliance Manager
-
Review the complaint.
-
Under Investigation:
-
Update the investigation details.
-
Add Finding record based on the investigation.
-
Link the Regulatory Correspondence record (if necessary).
-
-
Under Escalation
-
Update the IDR Escalation Details.
-
Update the investigation details.
-
Add Finding record based on the investigation.
-
Link the Regulatory Correspondence record (if necessary).
-
-
-
Close the complaint
Certification environment
Date Tested: June 2024
|
Product Name |
Release Information |
Operating System |
|
Archer |
2024.06 |
Virtual Appliance |