Karta NERC CIP Accelerator
The North American Electric Reliability Corporation (NERC) registered entities are responsible to deliver electricity to nearly 400 million people in its purview. NERC standards include a subset of Critical Infrastructure Protection (CIP) measures. The Karta NERC CIP Accelerator empowers utilities to create NERC evidence from core Archer asset inventories (Devices, Third Party Profiles etc.); intake, review, and assess system changes for continued NERC compliance via Archer Questionnaire; and assess supplier risk against industry criteria in a new Archer questionnaire. This offering can complement the Karta NERC Management app-pack or can be used as standalone functions as well.These accelerators and questionnaires are designed to create a utility-friendly overlay with core Archer use cases such as Archer Enterprise Management and Archer Third Party Risk Management.
On this page
Release history
Last updated: November 2024
Overview of Karta NERC CIP Accelerator
Key features and benefits
-
Generate relevant evidence for asset inventory, ensuring proper formatting and terminology for NERC compliance
-
Improve the change management process by implementing NERC-compliant questionnaires and workflows
-
Strengthen supplier risk assessments through the use of NERC-compliant questionnaires and evaluation criteria
Prerequisites (ODA and system requirements)
|
Components |
Prerequisites |
|---|---|
|
Archer Solution Area(s) |
|
|
Archer Use Case(s) |
|
|
Archer Applications |
|
|
Uses Custom Objects |
No |
|
Requires Archer On-Demand License |
|
|
Archer Requirements |
Archer Platform Release 2024.09(6.15.302.10262)and later |
|
Supported Archer Environments |
The following Archer environments are supported:
|
|
Partner/Vendor Requirements |
Additional license fees may be required. Contact sales@kartacorp.com for additional information. |
Compatible Use Cases and Applications
Required Applications
Devices application is required for NERC Change Management Questionnaire and Third Party Profile application is required for NATF Energy Sector Supply Chain Risk Questionnaire. Target Applications are required in the system to install the questionnaires respectively.
|
Application |
Use Case |
Primary Purpose(s) of the Relationship |
|---|---|---|
|
Devices |
IT Asset Catalog |
The Devices application serves as a central repository of knowledge about business-critical devices. NERC CIP-002 scoping and inventories can be connected and referenced to the Devices application. In addition, the NERC Change Management questionnaire can be linked to individual devices in your organization. |
|
Third Party Profile |
Third Party Governance |
The Third Party Profile application stores the vendors/supplier organizations that support your operations in various ways. In addition, the NATF Questionnaire (CIP-013) questionnaire links directly to this repository to add NERC security insights. |
Additional Resources
The following additional resources are available for this offering:
-
North American Electric Reliability Corporation (NERC): https://www.nerc.com
-
NERC Reliability Standards: https://www.nerc.com/pa/Stand/Reliability%20Standards%20Complete%20Set/RSCompleteSet.pdf
-
United States Federal Energy Regulatory Commission: https://www.ferc.gov/
-
North American Transmission Forum: https://www.natf.net/industry-initiatives/supply-chain-industry-coordination
-
Canada Energy Regulator: https://www.cer-rec.gc.ca/en/
Offering components
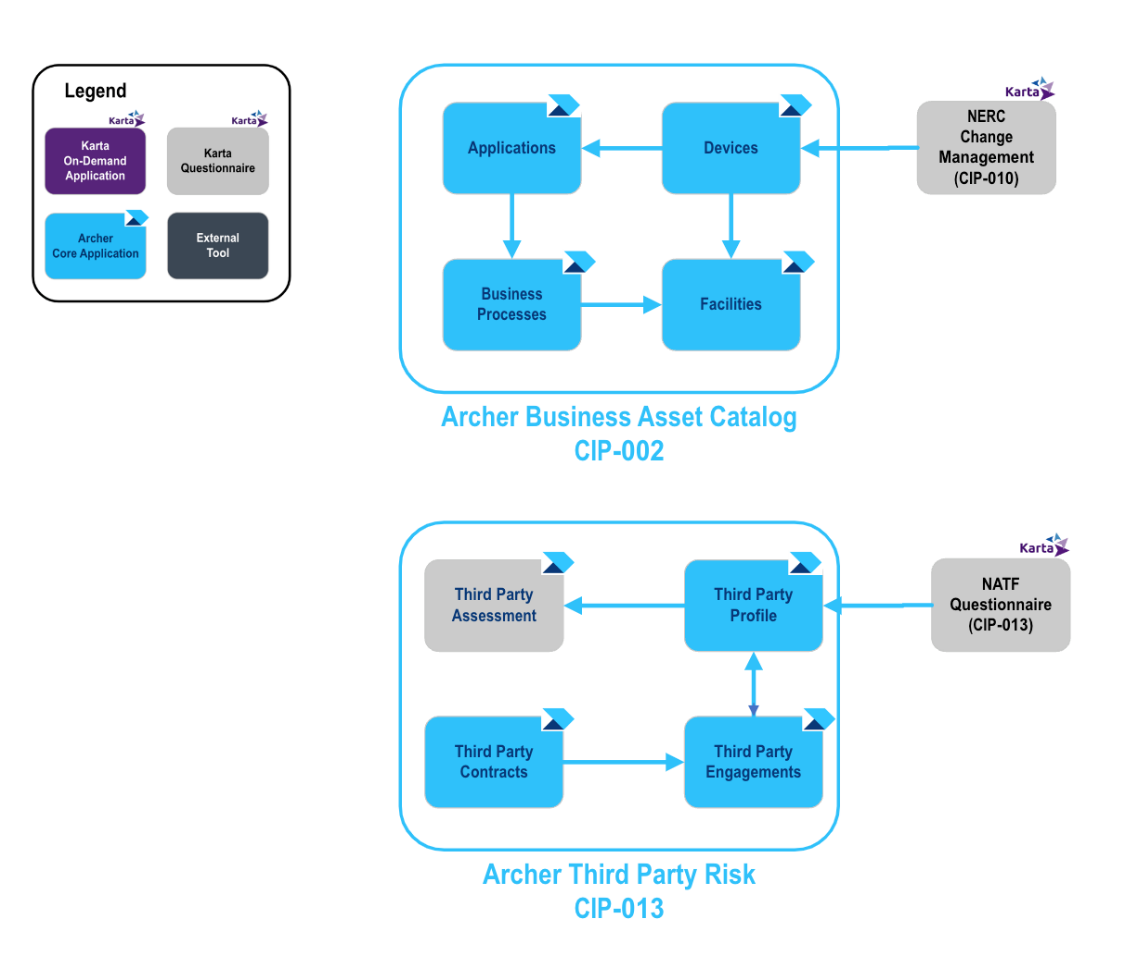
Architecture diagram
The following diagram shows the relationships between the applications that make up the NERC CIP Accelerator solution and their complementary Archer components.
Process diagrams
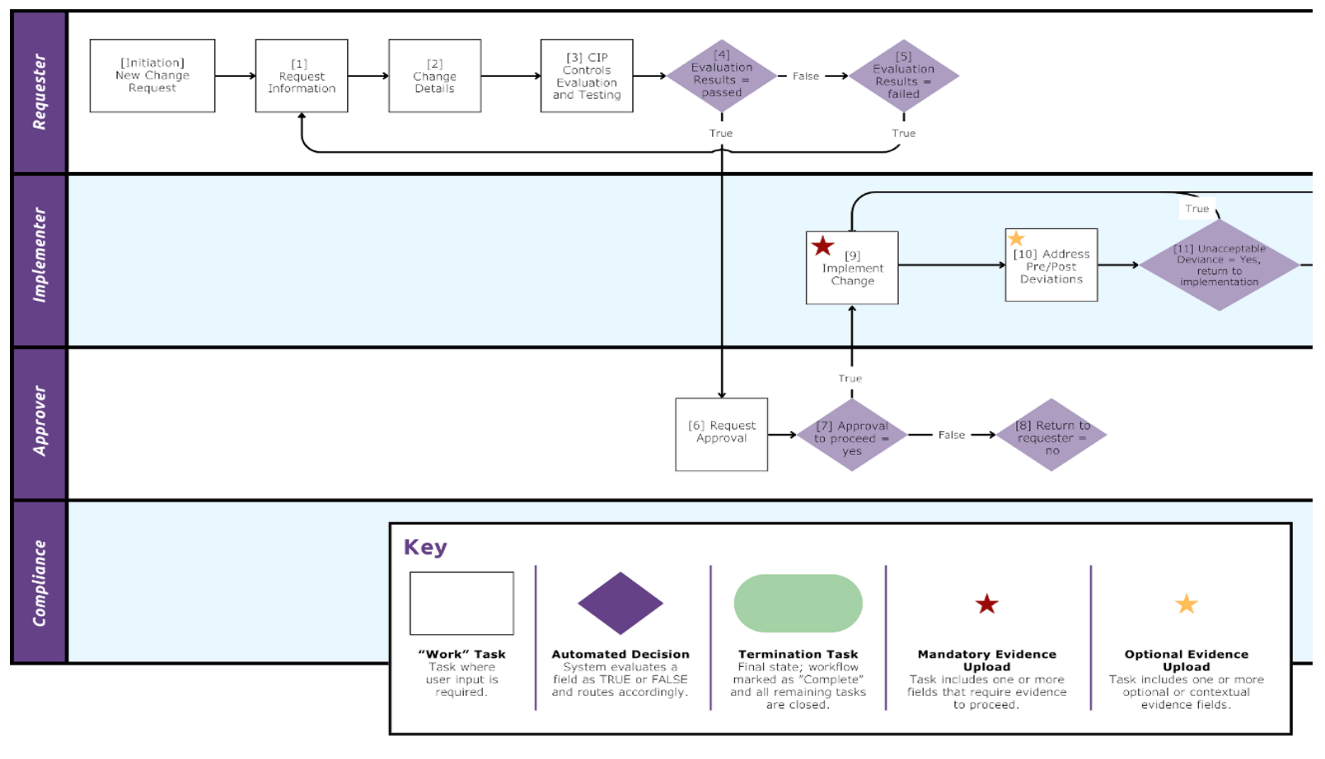
NERC Change Management
The following diagram shows the general workflow of the NERC Change Management Questionnaire.

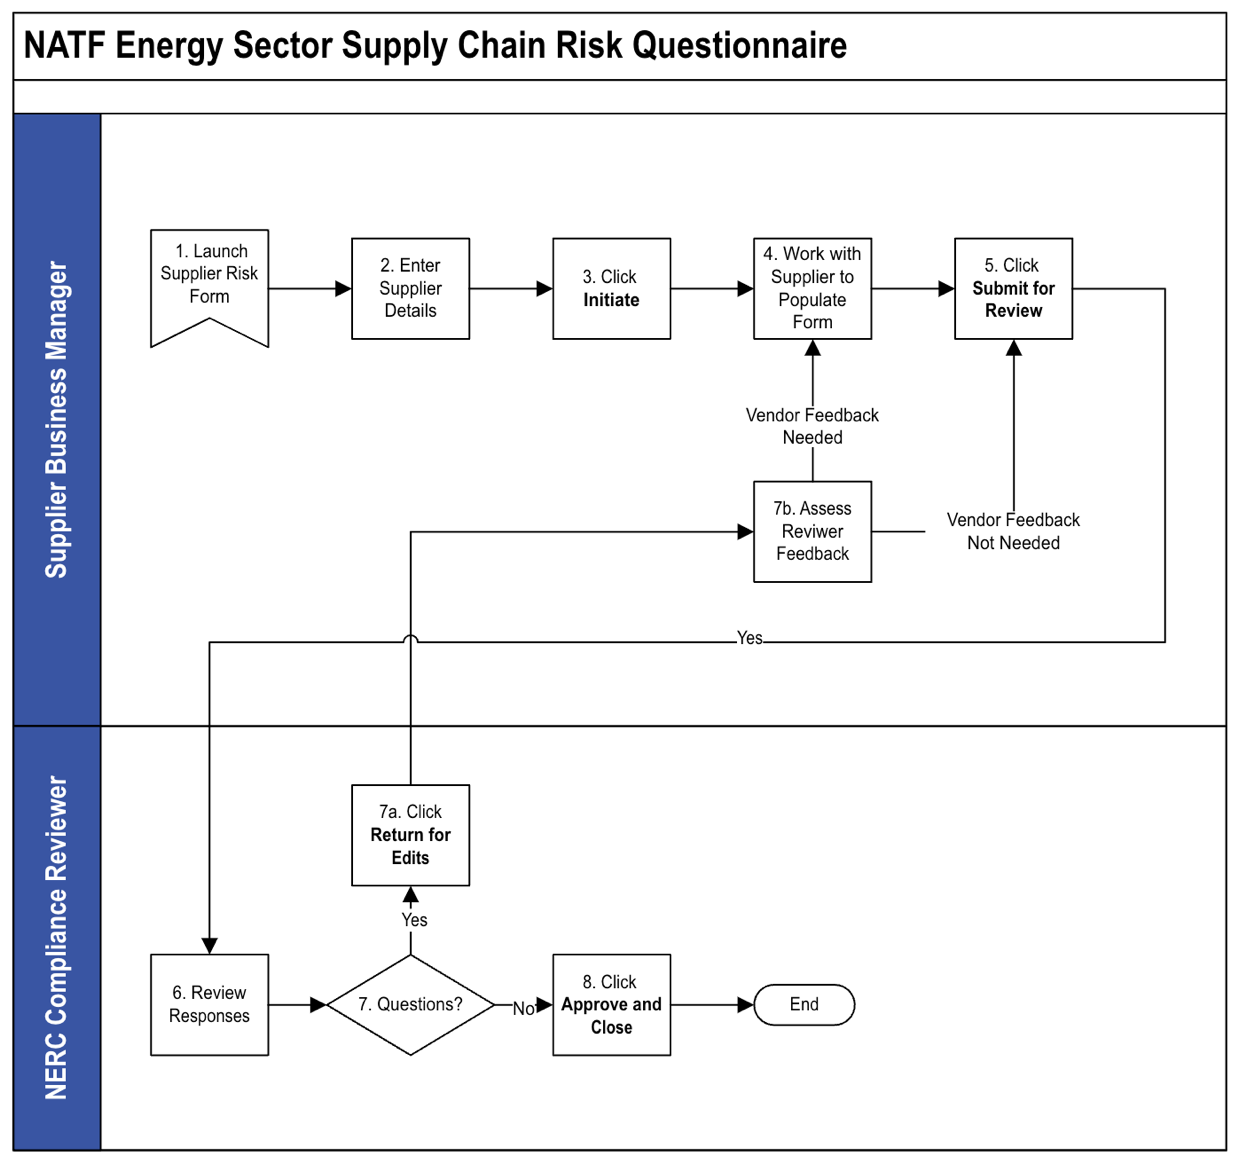
NATF Energy Sector Supply Chain Risk Questionnaire
The following diagram shows the general workflow of the NATF Energy Sector Supply Chain Risk Questionnaire.
Applications
The following table describes the Karta NERC CIP Accelerator components.
|
Component |
Description |
|---|---|
|
Devices |
The Karta NERC CIP Accelerator adds additional fields to the Devices application, allowing organizations to document additional data points that are needed when providing evidence during a NERC audit. Based on the classification of the asset, the revised application will provide fields for additional insight and understanding of items that support the Bulk Electric System (BES). |
|
NERC Change Management |
The NERC Change Management questionnaire provides utilities witha central location for requesting, approving and reviewing changes to IT Assets that support the Bulk Electric System (BES). After a change has been submitted, workflow participants can review the change for impacts based on NERC Requirements for CIP-005, CIP-007 and CIP-010. After a change is marked as implemented, team members can also review and sign off on any post-implementation effects to ensure there has not been a disruption to the organization. |
|
NATF Energy Sector Supply Chain Risk Questionnaire V5 |
The North American Transmission Forum provides a publicly available vendor questionnaire organizations may reference to ensure they are conducting comprehensive vendor reviews that align with NERC Requirements. The Karta NERC CIP accelerator includes version 5 of this questionnaire released in the spring of 2024. |
Personas and Access Roles
The following table describes the functions that make up the application’s organization roles. Depending on the organization of your company, these functions and responsibilities may vary.
|
Access Role |
Description |
|---|---|
|
NERC CIP – Admin |
Associated with the NERC Compliance Administrator group. This role and group are listed as the Application/Questionnaire owners for the modules within the NERC CIP Accelerator solution. |
|
NERC CIP – Manager |
Associated with the NERC Compliance Manager group. This role manages record data within the solution, identifies NERC assets that are in-scope, creates third party risk assessments, and approves NERC Change management requests. |
|
NERC CIP – SME |
Associated with the NERC Compliance Operator group, enters CIP-010 change requests questionnaires, tests and validates post deployment compliance. May contribute to CIP-002 asset inventories and contribute knowledge to the CIP-013 third party risk assessments. |
|
NERC CIP – Read |
Associated with the NERC Compliance Executive Read group. This role grants read access to records throughout the NERC CIP Accelerator solution. |
Permission Chart
|
Application/Questionnaire |
NERC CIP - Admin |
NERC CIP - Manager |
NERC CIP - SME |
NERC CIP - Read |
|---|---|---|---|---|
|
Devices |
CRUD |
CRU |
CRU |
R |
|
NERC Change Management |
CRUD |
CRU |
CRU |
R |
|
NATF Energy Sector Supply Chain Risk Questionnaire V5 |
CRUD |
CRU |
CRU |
R |
|
Third Party Profile |
CRUD |
CRU |
CRU |
R |
|
Facilities |
CRUD |
CRU |
CRU |
R |
|
Products and Services |
CRUD |
CRU |
CRU |
R |
C = Create, R = Read, U = Update, D = Delete
Installing the offering
Security considerations
The information in this publication is provided “as is”. Archer makes no representations or warranties of any kind with respect to the information in this publication, and specifically disclaims implied warranties of merchantability or fitness for a particular purpose. Client is solely responsible for ensuring that the installation of the application is performed in a secure manner. Archer recommends clients perform a full security evaluation prior to implementation.
Installation overview
Complete the following tasks to install the offering.
Step 1: Prepare for the installation
-
Ensure that your Archer system meets the following requirements:
-
Archer Platform Version: 2024.09
-
-
Read and understand "Packaging Data" in the Archer Platform Help.
Step 2: Install the package
Installing a package requires that you import the package file, map the objects in the package to objects in the target instance, and then install the package.
Installing the package
Task 1: Back up your database
There is no Undo function for a package installation. Packaging is a powerful feature that can make significant changes to an instance. Archer strongly recommends backing up the instance database before installing a package. This process enables a full restoration if necessary.
An alternate method for undoing a package installation is to create a package of the affected objects in the target instance before installing the new package. This package provides a snapshot of the instance before the new package is installed, which can be used to help undo the changes made by the package installation. You must manually delete new objects created by the package installation.
Task 2: Import the package
-
From the menu bar, click
 > Application Builder > Install Packages.
 -
In the Available Packages section, click Import.
-
Click Add New, then select the package file that you want to import.
-
Click OK. The Available Packages section displays the package file and is ready for installation.
Task 3: Map objects in the package
Important: This step is required only if you are upgrading to a later version of the Archer Core Devices application. This package adds a new tab to the application layout, named NERC Profile, and additional optional fields to the Devices application.
Please consult with business stakeholders across the organization prior to making updates as the Devices application may be used by multiple business groups. It is advised that this action be first performed in a lower environment to ensure any existing configurations you may have done to the Devices application are not overwritten.
-
From the menu bar, click
> Application Builder > Install Packages. -
In the Available Packages section, select the package you want to map.
-
In the Actions column, click
 for that package.
The analyzer runs and examines the information in the package. The analyzer automatically matches the system IDs of the objects in the package with the objects in the target instances and identifies objects from the package that are successfully mapped to objects in the target instance, objects that are new or exist but are not mapped, and objects that do not exist (the object is in the target but not in the source).
Note: This process can take several minutes or more, especially if the package is large, and may time out after 60 minutes. This time-out setting temporarily overrides any IIS time-out settings set to less than 60 minutes.
-
When the analyzer is complete, the Advanced Package Mapping page lists the objects in the package file and corresponding objects in the target instance. The objects are divided into tabs, depending on whether they are found within Applications, Solutions, Access Roles, Groups, Sub- forms, or Questionnaires.
On each tab of the Advanced Mapping Page, review the icons next to each object to determine which objects you must map manually.
|
Icon |
Name |
Description |
|---|---|---|
|
|
Awaiting Mapping Review |
Indicates that the system could not automatically match the object or children of the object to a corresponding object in the target instance. Objects marked with this symbol must be mapped manually through the mapping process. Important: New objects should not be mapped. This icon should remain visible. The mapping process can proceed without mapping all the objects. Note: You can execute the mapping process without mapping all the objects. The |
|
|
Mapping Completed |
Indicates that the object and all child objects are mapped to an object in the target instance. Nothing more needs to be done with these objects in Advanced Package Mapping. |
|
|
Do Not Map |
Indicates that the object does not exist in the target instance or the object was not mapped through the Do Not Map option. These objects will not be mapped through Advanced Package Mapping and must be remedied manually. |
|
|
Undo |
Indicates that a mapped object can be unmapped. This icon is displayed in the Actions column of a mapped object or object flagged as Do Not Map. |
-
For each object that requires remediation, do one of the following:
-
To map each item individually, on the Target column, select the object in the target instance to which you want to map the source object. If an object is new or if you do not want to map an object, select Do Not Map from the drop-down list.
Important: Ensure that you map all objects to their lowest level. When objects have child or related objects, the parent object provides a drill-down link. You must map child objects before parent objects. For more details, see"Mapping Parent/Child Objects"in the Archer Platform Help.
-
To automatically map all objects in a tab that have different system IDs but the same object name as an object in the target instance, do the following:
-
In the toolbar, click Auto Map.
-
Select an option for mapping objects by name.
Option
Description
Ignore case
Select this option to match objects with similar names regardless of the case of the characters in the object names.
Ignore spaces
Select this option to match objects with similar names regardless of whether spaces exist in the object names.
-
Click OK.
The Confirmation dialog box opens with the total number of mappings performed. These mappings have not been committed to the database yet and can be modified in the Advanced Package Mapping page.
-
Click OK.
-
-
To set all objects in the tab to Do Not Map, in the toolbar, click Do Not Map.
Note: To undo the mapping settings for any individual object, in the Actions column, click Undo.
When all objects are mapped, the ![]() icon is displayed in the tab title. The
icon is displayed in the tab title. The ![]() icon is displayed next to the object to indicate that the object will not be mapped.
icon is displayed next to the object to indicate that the object will not be mapped.
-
Verify that all other objects are mapped correctly.
-
(Optional) To save your mapping settings so that you can resume working later, see "Importing and Exporting Mapping Settings" in the Archer Platform Help.
-
Once you have reviewed and mapped all objects, click Execute.
-
Select I understand the implications of performing this operation and click OK.
The Advanced Package Mapping process updates the system IDs of the objects in the target instance as defined on the Advanced Package Mapping page. When the mapping is complete, the Import and Install Packages page is displayed.
Important: Advanced Package Mapping modifies the system IDs in the target instance. You will need to update any Data Feeds and Web Service APIs that use these objects, with the new system IDs.
Task 4: Install the package
All objects from the source instance are installed in the target instance unless the object can not be found or is flagged to not be installed in the target instance. The Log Messages section provides a list of conditions that may cause objects not to be installed. The Package Installation Log section displays a log entry.
-
From the menu bar, click
> Application Builder > Install Packages. -
In the Available Packages section, locate the package file that you want to install, and click Install.
-
In the Selected Components section, click the Lookup button to open the Package Selector window.
-
To select all components, select the top-level checkbox.
-
To install only specific global reports in an already installed application, select the checkbox associated with each report that you want to install.
-
Note: Items in the package that do not match an existing item in the target instance are selected by default.
-
Under the Install Method drop-down menu, select an option for each selected component. To use the same Install Method for all selected components, select a method from the top-level drop-down list.
Note: If you have any existing components that you do not want to modify, select Create New Only. You may have to modify those components after installing the package to use the changes made by the package.
-
To deactivate target fields and data-driven events that are not in the package, in the Post-Install Actions section, select the Deactivate target fields and data-driven events that are not in the package checkbox. To rename the deactivated target fields and data-driven events with a user-defined prefix, select the Apply a prefix to all deactivated objects checkbox, and enter a prefix. This can help you identify any fields or data-driven events that you may want to review for clean up post-install.
-
Click Install.
-
Click OK.
Task 5: Review the package installation log
-
From the menu bar, click
> Application Builder > Install Packages. -
In the Package Installation Log tab, click the package that you want to view.
-
In the Package Installation Log page, in the Object Details section, click View All Errors.
Note: To view individual logs, in the Errors column of the log you want to view, click the Failures link or Warnings link. Clicking View All Errors, Failures, or Warnings opens the specific errors on a different page.
-
Click the Export icon to export the log file.
-
Click Close.
Configuring the offering
Step 1: Organize and set up NERC Groups
When loading new groups into an environment via a package, Archer does not maintain the original parent/child relationships. The following groups are included with this build:
Task 1: Nest NERC Compliance Groups Under Parent Group (Optional)
The following steps can be performed if the ‘Karta NERC Compliance Management App-Pack' is already installed in the system and the NERC Compliance group is already present in the systemor after creation of NERC Compliance group, these steps can be followed.
-
The NERC Compliance group is the parent group container. Upon completing the installation, you will need to nest the specific groups under this master group.
-
Under the administration options, navigate to the Access Control menu.
-
Open the “Groups” page.
-
Select “NERC Compliance.” The NERC Compliance group opens.
-
In the Members section, select to add the following groups as members of the NERC Compliance group:
-
NERC Compliance Administrator – The members of this group have Application/Questionnaire ownership rights within the solution, allowing them the ability to Create/Update/Delete module components such as fields, events, and layout objects.
-
NERC Compliance Manager – The members of this group have completecreate, read and update access, to all records within the NERC Compliance solution.
-
NERC Compliance Operator – The members of this group have the ability to create records within all components of the solution, but only have read/update rights to records where they have been specifically selected within a Record Permissions field.
-
NERC Compliance Executive Read – The members of this group have Read Only to all records within the NERC CIP Accelerator solution.
-
-
For future groups you may create for managing NERC, place those groups as members of the “NERC Compliance” group. While this group will serve as a container for other groups, it is not intended that any individual be a direct member of this parent group.
-
Click Save to complete the update.
Task 2: Populate NERC Groups with Relevant Staff
Various processes within the NERC solution require specific users to be members of certain groups. Before you can fully utilize the NERC solution, you must populate each group with at least one user.
-
Under the administration options, navigate to the Access Control menu.
-
Open the “Groups” page.
-
Select one of the specific NERC Compliance groups, such as “NERC Compliance Administrator.” The group opens.
-
In the Members section, select one or more individuals to be a member of this group.
-
Click Save to complete the update.
-
Repeat these steps for all other NERC groups so that each group has a minimum of one member.
Step 2: Activate advanced workflows
By default, Advanced Workflows are inactivated by packaging and need to be reactivated after the installation is complete.
-
From the menu bar, the menu bar, click the Administration
icon. -
Under Application Builder, click Applications, and then search for NERC Change Management and open the questionnaire.
-
Click the Advanced Workflow tab.
-
Click Activate, then Save Workflow.
-
Repeat the same process to activate the Advanced Workflow for the NATF Energy Sector Supplier Risk Questionnaire.
Step 3: Personalize the workspace display
The NERC CIP Management workspace may appear lower in the list of Workspaces displayed at the top of the Archer homepage after the installation. The ordering of the workspace tab strip is a task done by each individual user. Moving up the NERC CIP Management workspace in the view does not move the workspace for all users.
-
Each user will click his/her initials at the top right-hand side of the Archer homepage and select Preferences.
-
Under the Workspaces tab, click the handle to the left of the workspace to move, and then drag it up higher in the list. Once done click Save.
Step 4: Configure Record Permissions
-
All NERC group members must haveread access to Third Party Profile, Facilities, Product & Services records. Configure record permissions in Third Party Profile, Facilities and Products and Services application to grant content level access to NERC Compliance Administrator, NERC Compliance Executive Read, NERC Compliance Manager and NERC Compliance Operator group.
-
NERC Compliance Manager must have update access to Devices records. So that they can modify existing records.
-
Open the Devices Application and search for ‘NERC Default Record Permission’ field.
-
Go to ‘Default Users/Groups’ section.
-
Check the Update Checkbox for ‘NERC Compliance Manager’ group.
-
Save the field.
-
Using the offering
Devices Application
User Persona: NERC Compliance Manager
As a core Archer application, it is likely you may already have records populated within your Devices application. The NERC CIP Accelerator appends additional fields, specific to NERC compliance to this repository. NERC content is hidden within a record up until a user selects, “Yes” in the NERC Scope field.
Once “Yes” is selected, you will see a new tab across the top of the application named, “NERC Profile.” From this tab you can populate various fields needed when reporting device/asset information while demonstrating NERC compliance.
Based on your selection in the NERC Device Category field, additional sections will appear on this tab for you to populate. Once these fields populate them with the appropriate values.
During a NERC review period, your team can use the “NERC CIP Evidence Request Tool” dashboard to generate reports that align with NERC’s online ERT tool. For more information on this process, please review NERC’s page dedicated to this file: https://www.nerc.com/pa/comp/CAOneStopShop/CIP%20Evidence%20Request%20Tool%20User%20Guide%20v8.pdf
NERC Change Management Questionnaire
Task 1: Create Change Management Request
Important: Please ensure that all assets have been created in the devices application before creating a change request and any needed personnel exist in the personnel application.
User Persona: NERC Compliance Operator
-
Navigate to the NERC Change Management Dashboard under NERC CIP Management > Dashboards > NERC Change Management.
-
Select Request a Configuration Change to create a new change request.
-
Select the asset associated with this change from Devices application.
-
After selection of related record from the Devices application, Click Apply. Fill in the preliminary details for the change request. These include:
-
Title - A unique and descriptive title for your change request
-
Change Type - Access/Role Change, Add or Remove Software, Change or Update Firmware, Decommission Cyber Assets, Firmware update, Modify Local Device Access, New Cyber Asset(s) or Remove Software/Firmware
-
Description of Change - Detailed Description of the change request
-
Justification - Justification for why the change is occurring
-
Date - Due - Date by which the change needs to be implemented
-
-
Under the Workflow Details section, please select the:
-
Requester - Defaults to current user
-
Approver - Person responsible for approving the change request
-
Implementer - Person responsible for implementing the change
-
Compliance Reviewer - Person responsible for the compliance review once the change has been implemented
-
-
In the Change Details section, detail the Implementation Plan and the Backout Plan.
-
Once you are satisfied with the details of the change request, you may begin the pre-change evaluation. Save the record and then select the Evaluate action button at the top of the page
-
A new tab displayed on the change request, called Pre-Change Evaluation Questions. On the Pre-Change Evaluation Questions tab, there are 12 evaluation questions that must be answered, after responding yes/no to each question you must also briefly explain the rationale for the answer.
-
Once the Pre-Change Evaluation questions have been completed, complete the Evaluation Results section. Check the Evaluation Complete? Checkbox, as well as a short description of your evaluation process and any evaluation comments if necessary.
-
Once the evaluation is completed, submit the record by selecting “Submit for Review” from the Action dropdown.
Task 2: Review & Approve Change Management Request
User Persona: Approver
-
The Approver will receive an email letting them know a change request has been submitted for review. The approver will see a read-only copy of the evaluation, and will decide to Approve, Return or Deny the change request. They can also add a comment in the comments sub-form at the bottom of the page.
-
Approve - The change is approved and the record advances to the implementation stage.
-
Return - The change requires more details to continue and is returned to the requester to re-submit.
-
Deny - The request is denied and cannot be re-submitted. This will close the record.
-
Task 3: Document Implementation Results
User Persona: Implementer
-
The Implementer will receive a notification that the request has been approved and can begin to implement the change. The implementer will document the details of the implementation and add evidence on the Implementation Notes tab. If there are any Unexpected Changes, they will be required to document the change and whether the deviance from the baseline was acceptable.
-
Once the implementation is completed without any unacceptable consequences, they can mark the Implementation Complete using the actions button.
Task 4: Completing the Change Request
User Persona: NERC Compliance Reviewer
-
The Compliance Reviewer will receive an email notification telling them the implementation has been completed. The Compliance Reviewer can review the details from the previous stages and then complete the Post-Change Evaluation Questions.
-
After completing the post-change evaluation, the compliance reviewer will determine whether the changes were successfully implemented. If the changes were not implemented successfully, they will have the option to Return to Implementer.
-
If the Compliance Reviewer determines that all changes have been implemented and baselines have been updated, they can Complete the record. This will signal that the change has been successfully implemented without issue, and the change request record will be closed. The record will now remain in a read-only format and can no longer be modified.
NATF Energy Sector Supply Chain Risk Questionnaire V5
Task 1: Launch a New Questionnaire Record
User Persona: NERC - SME
-
Navigate to the NATF Energy Sector Supply Chaing Risk Questionnaire V5 under the NERC CIP Management solution in your left-hand navigation.
-
Click the selection icon […] next to the questionnaire name.
-
Select “Create New Record.” The Add New Record screen appears.
-
Click the selection icon and browse to find the Third Party Profile record you want to assess.
-
Select the record and then click OK at the bottom of the page.
-
Click Apply. A new questionnaire record will generate.
-
Enter the name of the Supplier Business Manager and Reviewer.
-
Populate answers to the General (GNRL) questions and then select what types of information the supplier will be engaging with and the other types of information (TOI) fields.
-
At the top of the page, click Initiate.
Task 2: Obtain Supplier Responses
User Persona: NERC Compliance Operator
-
In partnership with you supplier contact answer all relevant questions across the following tabs:
-
Supplier Corporate Systems
-
Supplier Product
-
Product Development Systems
-
-
Once all answers have been entered, click the Actions button at the top of the page and select, “Submit for Review.” The responses will be sent to the listed Reviewer to be assessed. The Reviewer will be sent an email notification, notifying the individual of a new record that needs review.
Clients that have licensed Archer Engage can submit these questions directly to the supplier so that those organizations self-submit responses into the Archer Engage portal. For information on how to optimize this questionnaire through Archer Engage, please contact Karta.
For clients without Engage, you will need to submit answers on the supplier’s behalf – either through manual entry or by capturing answers through a spreadsheet and then using Archer’s Data import feature to load the responses.
Task 3: Obtain Supplier Responses
User Persona: NERC Compliance Manager
-
Open the email notification you received regarding the completed Supply Chain Risk Questionnaire.
-
Click the link for the Questionnaire ID.
-
Log in to Archer (if your organization does not have SSO enabled or you aren’t already logged in.) You will be taken directly to the questionnaire.
-
Click Edit at the top of the page.
-
Review the responses.
-
If there are issues with any responses, notate the issues in the yellow, comments icon to right of the question.
-
Enter your comment and then click Save and Close. When you return to the question layout, the yellow note icon next to the question will display as filled out
 .
.
-
If, at any point, you need to send one or more comments back to the Supplier Manager for additional insights or to open a conversation with the supplier, click the Actions button at the top of the page and select, “Return for Edits.” This will send the record back to the submitter and sent that individual an email notification.
Task 4: Approve and Close the Questionnaire
User Persona: NERC - Manager
There may be a back and forth between Task 3 and Task 4 as parties work to resolve issue, questions, and content within the questionnaire. Once the record is in the Reviewer stage and all issues are resolved, the Review can select, “Approve and Close”, from the Action dropdown. This action concludes the workflow process and closes the questionnaire.
Certification environment
Date tested: November 2024
|
Product Name |
Version Information |
Operating System |
|---|---|---|
|
Archer |
2024.09 (6.15.302.10262) |
Virtual Appliance |