Templar Shield Anti-Money Laundering (AML) Rule Management
Templar Shield’s Anti-Money Laundering (AML) Rule Management App-Pack, powered by the Archer Integrated Risk Management Platform, provides institutions with the ability to simplify complex AML program elements, including AML rule optimization and tuning. The AML Rule Management app-pack enables organizations to centralize AML rules and thresholds and create an automated rule optimization process.
Additionally, the AML Rule Management App-Pack fits within a larger Templar Shield AML Compliance Program Management solution. With the integrated AML Compliance Program Management solution, organizations will have a comprehensive, up-to-date program that is easier to run, with less staff hours, providing regulatory-ready output to evidence AML preparedness.
On this page
Release history
Last updated: February 2021
Overview of AML Rule Management
Key features and benefits
The Templar Shield AML Rule Management App-Pack enables organizations to:
-
Establish a central repository for AML rules, AML thresholds, and AML rule optimization
-
Establish, monitor, and optimize AML rules and thresholds to identify suspicious behavior
-
Integrate external transaction monitoring systems for comprehensive compliance risk management
Benefits include:
-
Reduced manual processes and ease of workflow and reporting
-
The ability to report accurately and easily to regulators about AML activities and AML risk
-
Automated rule optimization processes
-
Eased tracking through reporting and dashboarding, enabling better insight into rules, thresholds, and their optimization
Prerequisites (on-demand application (ODA) and system requirements)
|
Components |
Recommended Software |
|---|---|
|
ODA License |
AML Rule Management requires 3 ODA licenses |
|
Operating System |
Windows Server 2012 R2 |
|
Database Server |
Microsoft SQL Server 2014 (64-bit) |
|
Services Server |
Java Runtime Environment (JRE) 8 (64-bit) |
|
Archer |
Archer 6.8 P2 and later |
|
Use Cases |
Issues Management |
Compatible use cases and applications
Related applications
|
Application |
Use Case |
Primary Purpose(s) of the Relationship |
|---|---|---|
|
Risk Project AML Risk Assessment |
Bottom-Up Risk Assessment |
The purpose of the Bottom-Up Risk Assessment is to engage teams via targeted project risk assessments. Projects can include fraud assessment, staffing and scoping, risk identification, risk analysis and risk treatment. When risks are deemed too high, risk treatments and remediation plans can be documented and tracked. |
|
Risk Register Risk Hierarchy |
Risk Catalog |
The Archer Risk Catalog provides the foundation to record and track risks across your enterprise and establish accountability by business unit and named first line of defense manager. The catalog provides a three level roll up of risk, from a granular level up through enterprise risk statements. Inherent and residual risk can be assessed utilizing a top-down, qualitative approach, with assessed values rolling up to the associated business unit and enterprise risks. |
|
Policies Control Standards Authoritative Sources |
Policy Program Management |
Archer Policy Program Management provides the framework to help organizations establish a scalable and flexible environment to manage corporate and regulatory policies and ensure alignment with compliance obligations. This includes documentation of policies and standards, assigning ownership, and mapping policies to key business areas and objectives. Organizations can effectively manage the entire policy development lifecycle process and gain the agility and flexibility to handle policy exceptions amidst an increasing volume of changes in a complex regulatory compliance landscape. |
|
Control Procedures |
Controls Assurance Program Management |
Archer Controls Assurance Program Management offers a framework and taxonomy to systematically document the control universe and assess and report on the performance of controls at the business hierarchy and business process level. You can apply clear, accurate control guidance in support of any compliance objective. By improving the linkage between compliance requirements and internal controls, the business can better communicate and report on compliance obligations using a common taxonomy and language across the organization. With Archer® Suite’s agile and flexible compliance framework, compliance teams can proactively manage regulatory change across the business. |
|
Investigation Response Procedures Incidents |
Incident Management |
Archer Incident Management provides a case management and incident response solution for reporting and categorizing events such as cyber-attacks, ethics violations, and physical incidents. You can quickly evaluate the criticality of an incident, determine the appropriate response procedures, and assign response team members based on factors like business impact and regulatory requirements. Incident Management also provides dashboards for tracking and reporting on costs, related incidents, losses and recovery. |
|
Findings Exception Requests Remediation Plans |
Issues Management |
Archer Issues Management lays the foundation for your integrated risk management program, enabling you to manage issues generated by multiple groups, such as AML audit, risk, and compliance. The use case includes the business hierarchy to establish the corporate structure and accountability, and workflow and reporting to manage findings, remediation plans and exceptions. With Archer Issues Management, you can create a coordinated and consolidated view into known issues. An organized, managed process to escalate issues provides visibility into ownership through your established chains of command. Workflow for proper sign-off and approval of issues, remediation plans, and exceptions ensures identified issues are well managed. As a result, your organization will realize quicker resolution to emerging issues, creating a more secure and resilient environment while reducing costs. |
Additional resources
The following additional resources are available for this application:
-
Third-party website: www.templarshield.com
-
Templar Shield Anti-Money Laundering (AML) Compliance Program Management Solution
AML Rule Management components
Architecture diagram
The below diagram shows the architecture of the AML Rule Management app-pack within the Templar Shield AML Compliance Program Management solution. The scope of this implementation guide focuses specifically on the AML Rule Management app-pack as a standalone addition to Archer.
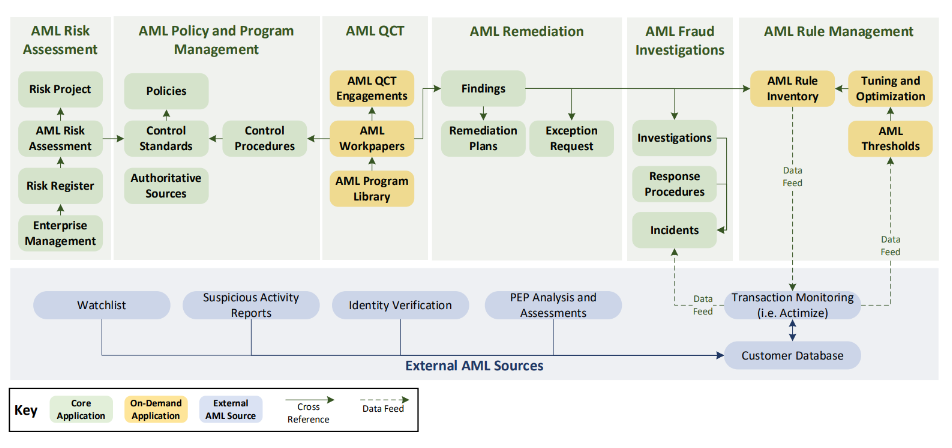
Note: The AML Quality Control Testing (QCT) offering is a separate app-pack that is planned for a future Archer Exchange release.
Applications
|
Application |
Description |
|---|---|
|
AML Rule Inventory |
The AML Rule Inventory application contains all the transaction monitoring rules that the financial institution has currently. These rules will be used to identify potential accounts used for money laundering based on flagging suspicious transactions. The rules in this repository should be updated (re-tuned/optimized) regularly to avoid too many false positives and still maintain their efficacy. |
|
AML Thresholds |
This AML Thresholds application acts as a repository for all transaction monitoring thresholds used in the rule tuning process. It receives its record via datafeed from a transaction monitoring application. Users will cross reference records in the AML Tuning and Optimization application. |
|
AML Tuning and Optimization |
The AML Tuning and Optimization application tracks where a transaction monitoring rule might be while in the process of being created (tuned) or updated (re-tuned/optimized). This application has information that's populated from the AML Rule Inventory application. |
Personas and access roles
The following table describes the functions that make up the application’s organization roles. Depending on the organization of your company, these functions and responsibilities may vary.
|
Function |
Description |
|---|---|
|
AML Review Board |
Uses Dashboards and iViews to review high-level data and make decisions for the company. |
|
AML Oversight Manager |
Maintains and oversees AML Rules, Risks, AML Audits and Investigations. |
|
AML Analyst |
Creates and maintains at the lowest level any AML Rules, Risks, AML Audits, Investigations, etc. |
Installing AML Rule Management
Installation overview
Complete the following tasks to install the application.
Task 1: Prepare for the installation
-
Ensure that your Archer system meets the following requirements:
-
Archer Platform version 6.8 P2
-
-
To obtain installation package please contact Templar Shield by email at info@templarshield.com or call 858-609-9509.
-
Read and understand the "Packaging Data" section of the Archer Online Documentation.
Task 2: Install the package
Installing a package requires that you import the package file, map the objects in the package to objects in the target instance, and then install the package. See Installing the Application Package for complete information.
Task 3: Set up data feeds
You must import and schedule each use case data feed that you want to use. See Setting Up Data Feeds for complete information.
Task 4: Test the installation
Test the application according to your company standards and procedures, to ensure that the use case works with your existing processes.
Installing the package
Task 1: Back up your database
There is no Undo function for a package installation. Packaging is a powerful feature that can make significant changes to an instance. Archer strongly recommends backing up the instance database before installing a package. This process enables a full restoration if necessary.
An alternate method for undoing a package installation is to create a package of the affected objects in the target instance before installing the new package. This package provides a snapshot of the instance before the new package is installed, which can be used to help undo the changes made by the package installation. New objects created by the package installation must be manually deleted.
Task 2: Import the package
-
Go to the Install Packages page.
-
From the menu bar, click
 .
. -
Under Application Builder, click Install Packages.
-
-
In the Available Packages section, click Import.
-
Click Add New, then locate and select the package file that you want to import.
-
Click OK.
The package file is displayed in the Available Packages section and is ready for installation.
Task 3: Map objects in the package
Important: This step is required only if you are upgrading to a later version of [ODA name].
-
In the Available Packages section, select the package you want to map.
-
In the Actions column, click
 for that package.
The analyzer runs and examines the information in the package. The analyzer automatically matches the system IDs of the objects in the package with the objects in the target instances and identifies objects from the package that are successfully mapped to objects in the target instance, objects that are new or exist but are not mapped, and objects that do not exist (the object is in the target but not in the source).
Note: This process can take several minutes or more, especially if the package is large, and may time out after 60 minutes. This time-out setting temporarily overrides any IIS time-out settings set to less than 60 minutes.
When the analyzer is complete, the Advanced Package Mapping page lists the objects in the package file and corresponding objects in the target instance. The objects are divided into tabs, depending on whether they are found within Applications, Solutions, Access Roles, Groups, Sub- forms, or Questionnaires.
-
On each tab of the Advanced Mapping Page, review the icons that are displayed next to each object name to determine which objects require you to map them manually.
|
Icon |
Name |
Description |
|---|---|---|
|
|
Awaiting Mapping Review |
Indicates that the system could not automatically match the object or children of the object to a corresponding object in the target instance. Objects marked with this symbol must be mapped manually through the mapping process. Important: New objects should not be mapped. This icon should remain visible. The mapping process can proceed without mapping all the objects. Note: You can execute the mapping process without mapping all the objects. The |
|
|
Mapping Completed |
Indicates that the object and all child objects are mapped to an object in the target instance. Nothing more needs to be done with these objects in Advanced Package Mapping. |
|
|
Do Not Map |
Indicates that the object does not exist in the target instance or the object was not mapped through the Do Not Map option. These objects will not be mapped through Advanced Package Mapping, and must be remedied manually. |
|
|
Undo |
Indicates that a mapped object can be unmapped. This icon is displayed in the Actions column of a mapped object or object flagged as Do Not Map. |
-
For each object that requires remediation, do one of the following:
-
To map each item individually, on the Target column, select the object in the target instance to which you want to map the source object. If an object is new or if you do not want to map an object, select Do Not Map from the drop-down list.
Important: Ensure that you map all objects to their lowest level. When objects have child or related objects, a drill-down link is provided on the parent object. Child objects must be mapped before parent objects are mapped. For more details, see "Mapping Parent/Child Objects" in Archer Help.
-
To automatically map all objects in a tab that have different system IDs but the same object name as an object in the target instance, do the following:
-
In the toolbar, click Auto Map.
-
Select an option for mapping objects by name.
Option
Description
Ignore case
Select this option to match objects with similar names regardless of the case of the characters in the object names.
Ignore spaces
Select this option to match objects with similar names regardless of whether spaces exist in the object names.
-
Click OK.
The Confirmation dialog box opens with the total number of mappings performed. These mappings have not been committed to the database yet and can be modified in the Advanced Package Mapping page.
-
Click OK.
-
-
To set all objects in the tab to Do Not Map, in the toolbar, click Do Not Map.
Note: To undo the mapping settings for any individual object, click ![]() in the Actions column.
in the Actions column.
When all objects are mapped, the ![]() icon is displayed in the tab title. The
icon is displayed in the tab title. The ![]() icon is displayed next to the object to indicate that the object will not be mapped.
icon is displayed next to the object to indicate that the object will not be mapped.
-
Verify that all other objects are mapped correctly.
-
(Optional) To save your mapping settings so that you can resume working later, see "Exporting and Importing Mapping Settings" in Archer Help.
-
Once you have reviewed and mapped all objects, click
 .
. -
Select I understand the implications of performing this operation and click OK.
The Advanced Package Mapping process updates the system IDs of the objects in the target instance as defined on the Advanced Package Mapping page. When the mapping is complete, the Import and Install Packages page is displayed.
Important: Advanced Package Mapping modifies the system IDs in the target instance. Any Data Feeds and Web Service APIs that use these objects will need to be updated with the new system IDs.
Task 4: Install the package
All objects from the source instance are installed in the target instance unless the object cannot be found or is flagged to not be installed in the target instance. A list of conditions that may cause objects not to be installed is provided in the Log Messages section. A log entry is displayed in the Package Installation Log section.
-
Go to the Install Packages page.
-
From the menu bar, click
. -
Under Application Builder, click Install Packages.
-
-
In the Available Packages section, locate the package file that you want to install, and click Install.
-
In the Configuration section, select the components of the package that you want to install.
-
To select all components, select the top-level checkbox.
-
To install only specific global reports in an already installed application, select the checkbox associated with each report that you want to install.
Note: Items in the package that do not match an existing item in the target instance are selected by default.
-
In the Configuration section, under Install Method, select an option for each selected component. To use the same Install Method for all selected components, select a method from the top-level drop-down list.
Note: If you have any existing components that you do not want to modify, select Create New Only. You may have to modify those components after installing the package to use the changes made by the package.
-
In the Configuration section, under Install Option, select an option for each selected component. To use the same Install Option for all selected components, select an option from the top-level drop-down list.
Note: If you have any custom fields or formatting in a component that you do not want to lose, select Do not Override Layout. You may have to modify the layout after installing the package to use the changes made by the package.
-
To deactivate target fields and data-driven events that are not in the package, in the Post- Install Actions section, select the Deactivate target fields and data-driven events that are not in the package checkbox. To rename the deactivated target fields and data-driven events with a user-defined prefix, select the Apply a prefix to all deactivated objects checkbox, and enter a prefix. This can help you identify any fields or data-driven events that you may want to review for cleanup post-install.
-
Click Install.
-
Click OK.
Task 5: Review the package installation log
-
Go to the Package Installation Log tab of the Install Packages page.
-
From the menu bar, click
. -
Under Application Builder, click Install Packages.
-
Click the Package Installation Log tab.
-
-
Click the package that you want to view.
-
In the Package Installation Log page, in the Object Details section, click View All Warnings.
-
Enable the advanced workflow in related applications.
Setting up data feeds
Note: The data feeds involved in this app-pack are with external sources and consequently, could require an API. The below information is only for reference if a data feed is used for data drops or share-file locations.
Task 1: Import a data feed
-
Go to the Manage Data Feeds page.
-
From the menu bar, click
. -
Under Integration, click Data Feeds.
-
-
In the Manage Data Feeds section, click Import.
-
Locate and select the .dfx5 file for the data feed.
-
From the General tab in the General Information section, in the Status field, select Active.
-
Click the Transport tab. Complete the fields in the Transport Configuration section as follows: In the URL field, type: YourServerName/VirtualDirectoryName/ws/search.asmx
-
In the User Name and Password fields, type the username and password of a Platform user that has API access and access to all of the records on the Platform instance (from which the data feed is coming).
-
In the Instance field, type the name of the Platform instance from which the data feed is coming (this is the instance name as you enter it on the Login window).
-
Verify that key field values are not missing from the data feed setup window.
-
Click Save.
Task 2: Schedule a data feed
Important: A data feed must be active and valid to successfully run.
As you schedule your data feed, the Data Feed Manager validates the information. If any information is invalid, an error message is displayed. You can save the data feed and correct the errors later; but the data feed does not process until you make corrections.
-
Go to the Schedule tab of the data feed that you want to modify.
-
From the menu bar, click
. -
Under Integration, click Data Feeds.
-
Select the data feed.
-
Click the Schedule tab.
-
-
Go to the Recurrences section and complete frequency, start and stop times, and time zone.
-
(Optional) To override the data feed schedule and immediately run your data feed, in the Run Data Feed Now section, click Start.
-
Click Save.
Using AML Rule Management
The AML Rule Management is an On-Demand app-pack within the AML Compliance Program Management solution. The below tasks simply describe the users AML Oversight Manager and Analyst’s role within the AML Rule Management applications.
Manual changes
For total use of the AML Rule Management app-pack, following the creation of the AML-related Roles and Groups, Archer Administrators must add those groups to any corresponding, core applications’ Default Record Permission fields, Rules, Actions, Dashboards, Workspaces, etc. All other manual changes will vary based on the organization and their needs.
Task 1: Create user accounts
AML Review Board User
-
Go to the Manage Users page.
-
From the menu bar, click
. -
Under Access Control, click Users.
-
-
Click Add New.
-
In the General Information section, enter:
-
The name of the user
-
The username for log on
-
The domain.
-
-
(Optional) In the Contact Information section, enter the default email address and any other pertinent information for contacting the user.
-
(Optional) In the Localization section, enter the time zone, locale, and language if the location and language of the user is different from the system.
-
In the Account Maintenance section, enter the user password and assign the security parameter for this user.
-
(Optional) Select the Send user a notification with password information checkbox if you want to send the user an email notification of the password change.
Note: If you do not select this checkbox, you must inform the user of the new password. The Default Email address is used for the notification email.
-
(Optional) In the Notes section, record any additional information about the user account. For example, list hours of availability or preferences for contacting the user. Account notes appear when users click a linked username in Archer to view the user profile.
-
In the Groups tab, select AML Review Board group through lookup option.
-
Click Save.
AML Oversight Manager User
-
Go to the Manage Users page.
-
From the menu bar, click
. -
Under Access Control, click Users.]
-
-
Click Add New.
-
In the General Information section, enter:
-
The name of the user
-
The username for log on
-
The domain.
-
-
(Optional) In the Contact Information section, enter the default email address and any other pertinent information for contacting the user.
-
(Optional) In the Localization section, enter the time zone, locale, and language if the location and language of the user is different from the system.
-
In the Account Maintenance section, enter the user password and assign the security parameter for this user.
-
(Optional) Select the Send user a notification with password information checkbox if you want to send the user an email notification of the password change.
Note: If you do not select this checkbox, you must inform the user of the new password. The Default Email address is used for the notification email.
-
(Optional) In the Notes section, record any additional information about the user account. For example, list hours of availability or preferences for contacting the user. Account notes appear when users click a linked username in Archer to view the user profile.
-
In the Groups tab, select AML Oversight Manager group through lookup option.
-
Click Save.
AML Analyst User
-
Go to the Manage Users page.
-
From the menu bar, click
. -
Under Access Control, click Users.]
-
-
Click Add New.
-
In the General Information section, enter:
-
The name of the user
-
The username for log on
-
The domain.
-
-
(Optional) In the Contact Information section, enter the default email address and any other pertinent information for contacting the user.
-
(Optional) In the Localization section, enter the time zone, locale, and language if the location and language of the user is different from the system.
-
In the Account Maintenance section, enter the user password and assign the security parameter for this user.
-
(Optional) Select the Send user a notification with password information checkbox if you want to send the user an email notification of the password change.
Note: If you do not select this checkbox, you must inform the user of the new password. The Default Email address is used for the notification email.
-
(Optional) In the Notes section, record any additional information about the user account. For example, list hours of availability or preferences for contacting the user. Account notes appear when users click a linked username in Archer to view the user profile.
-
In the Groups tab, select AML Analyst group through lookup option.
-
Click Save.
Use Case: AML rule tuning and optimization
Task 1: Create an AML rule inventory record
Users: AML Analyst / AML Oversight Manager
-
In the AML Compliance Program Management workspace, expand the solutions.
-
Expand the AML Rule Management Solution.
-
Move your cursor over the AML Rule Inventory application and then click “Create New Record”.
-
Enter any pertinent information.
-
Click Save.
Task 2: Tuning an AML rule
Users: AML Analyst / AML Oversight Manager
-
In the AML Management Dashboard, navigate to the Rule Inventory iView.
-
Select the desired Rule ID to access an AML Rule Inventory Record.
-
Scroll down the record to the Rule Tuning section and click “Add New.”
-
Enter any pertinent information.
Note: Be sure to add the appropriate users to the AML Owner, AML Manager, AML Delegates, and AML Testing Approver fields as they will be performing Submissions/Approvals, and continuation of the workflow will be dependent on the users selected in those fields.
-
Click Save. This will enroll the record into the Advanced Workflow
Task 3: Submitting a rule tuning for plan approval
Users: AML Analyst (Identified in Rule Owner or Rule Owner Delegates fields)
-
In the AML Management Dashboard, navigate to the Rule Inventory iView.
-
Select the desired Rule ID to access an AML Rule Inventory Record.
-
Scroll down the record to the Rule Tuning section and select the Rule Tuning ID of record in the Rule Tuning section.
-
Enter any pertinent information and click the Submit for Plan Approval button in the Actions Dropdown.
Task 4: Approving a rule tuning plan
Users: AML Oversight Manager (Identified in the AML Manager field)
-
In the AML Management Dashboard, navigate to the Rule Inventory iView.
-
Select the desired Rule ID to access an AML Rule Inventory Record.
-
Scroll down the record to the Rule Tuning section and select the Rule Tuning ID of record in the Rule Tuning section.
-
Review the content and click the Plan Approved for Testing button in the Actions Dropdown.
Task 5: Completion of testing
Users: AML Analyst/AML Oversight Manager (Identified in AML Testing Approver fields)
-
In the AML Management Dashboard, navigate to the Rule Inventory iView.
-
Select the desired Rule ID to access an AML Rule Inventory Record.
-
Scroll down the record to the Rule Tuning section and select the Rule Tuning ID of record in the Rule Tuning section.
-
If the testing has been completed and is ready to move forward in the workflow, click the Testing Completed button in the Actions Dropdown.
Task 6: Reviewing testing results
Users: AML Analyst (Identified in Rule Owner or Rule Owner Delegates fields)
-
In the AML Management Dashboard, navigate to the Rule Inventory iView.
-
Select the desired Rule ID to access an AML Rule Inventory Record.
-
Scroll down the record to the Rule Tuning section and select the Rule Tuning ID of record in the Rule Tuning section.
-
Review the test results in the Test Results attachment field and click the Test Results Approved button in the Actions Dropdown.
Task 7: Approving the rule tuning
Users: AML Oversight Manager (Identified in the AML Manager field)
-
In the AML Management Dashboard, navigate to the Rule Inventory iView.
-
Select the desired Rule ID to access an AML Rule Inventory Record.
-
Scroll down the record to the Rule Tuning section and select the Rule Tuning ID of record in the Rule Tuning section.
-
Review the content and click the Rule Tuning Completed button in the Actions Dropdown.
Task 8: Returning a rule tuning to the planning stage
Users: AML Analyst/AML Oversight Manager (Identified in either the Rule Owner, Rule Owner Delegates, AML Manager or AML Testing Approver fields)
-
In the AML Management Dashboard, navigate to the Rule Inventory iView.
-
Select the desired Rule ID to access an AML Rule Inventory Record.
-
Scroll down the record to the Rule Tuning section and select the Rule Tuning ID of record in the Rule Tuning section.
-
Review the content and click the Return to Planning button in the Actions Dropdown.
Note: At any stage of the workflow prior to completion, a record can be returned to the Stage.” All approvals will be required once again.