Archer Australian Regulatory Correspondence
Regulatory compliance is a critical component of operating in highly regulated industries, and managing correspondence with Australian regulatory bodies—particularly ensuring compliance with the Financial Accountability Regime (FAR)—can be both complex and time-intensive. Organizations require a structured approach to document, track, and respond to regulatory inquiries, findings, and requirements efficiently. The Archer Regulatory Correspondence app-pack offers a centralized solution to streamline communication and improve compliance processes. This app-pack includes preconfigured FAR reporting forms, automatically pulling the necessary data from Archer into the required formats, giving organizations confidence in submitting accurate and compliant reports.
On this page
Release notes
|
Release Date |
Release Version |
Notes |
|---|---|---|
|
August 2023 |
6.12 P4 |
Initial Release for Archer Individual Accountability Management app-pack |
|
February 2025 |
2024.11 |
Initial Release of the Archer Australian Regulatory Correspondence app-pack including the following updates:
|
Overview
Key features and benefits
With the Archer Australian Regulatory Correspondence app-pack, you can:
-
Organize and track all regulatory communications in one structured system.
-
Maintain a clear record of regulatory inquiries, responses, and outcomes to ensure transparency and accountability.
-
Ensure timely responses with automated alerts and escalation workflows.
-
Manage, track, and submit FAR-related forms and regulatory reports to meet compliance obligations.
-
Ensure proper tracking and timely submission of FAR regulatory reporting requirements.
Prerequisites (ODA and system requirements)
|
Components |
Prerequisites |
|---|---|
|
Archer Solution Area(s) |
Archer Regulatory & Corporate Compliance Management |
|
Archer Use Case(s) |
Archer Issues Management and Archer Incident Management + Archer Australian Incident Management Accelerator OR Archer Issues Management and Archer Individual Accountability Management 2024.11 (new SKU) |
|
Archer Applications |
Contacts, Findings, Incidents |
|
Uses Custom Objects |
No |
|
Archer Licensing |
Additional licensing fees apply for the Archer Australian Regulatory Correspondence app-pack. Please contact Archer Sales Representative for more information and pricing. |
|
Archer Requirements |
Archer Platform Release 2024.11 and later |
|
Supported Archer Environments |
The following Archer environments are supported:
|
Compatible Use Cases and Applications
Related Applications
|
Application |
Use Case |
Primary Purpose(s) of the Relationship |
|---|---|---|
|
Contacts |
Business Asset Catalog |
Used to identify the Accountable Person for FAR Regulatory Reporting. |
|
Findings |
Issues Management |
Identify and track findings related to regulatory correspondences. |
|
Incidents |
Incident management |
Identify incidents related to regulatory correspondences. |
|
Business Unit |
Business Asset Catalog |
Identify the business unit in which the regulatory correspondence applies to. |
|
Authoritative Source |
Policy Program Management |
Identify regulatory body. |
|
Accountability Statements |
Individual Accountability Management |
Documents the Accountable Person, their accountabilities or responsibilities, and a qualification assessment to determine if the Accountable Person is qualified to perform their role. The Accountability Statement application also identifies delegates for accountabilities and documents the Accountability Statement’s review and approvals and communication with the Regulators. |
|
Accountabilities |
Individual Accountability Management |
Documents the Accountabilities within an organization. |
|
Significant Related Entities |
Individual Accountability Management |
Documents the Significant Related Entities of the Accountable Entity and the start and end dates. |
|
Assigned Accountabilities |
Individual Accountability Management |
Documents the Accountabilities assigned to Accountable Persons. |
|
Assigned Significant Related Entities |
Individual Accountability Management |
Documents assigned Significant Related Entities, responsibilities to Accountable Persons, and start and end dates. |
Offering components
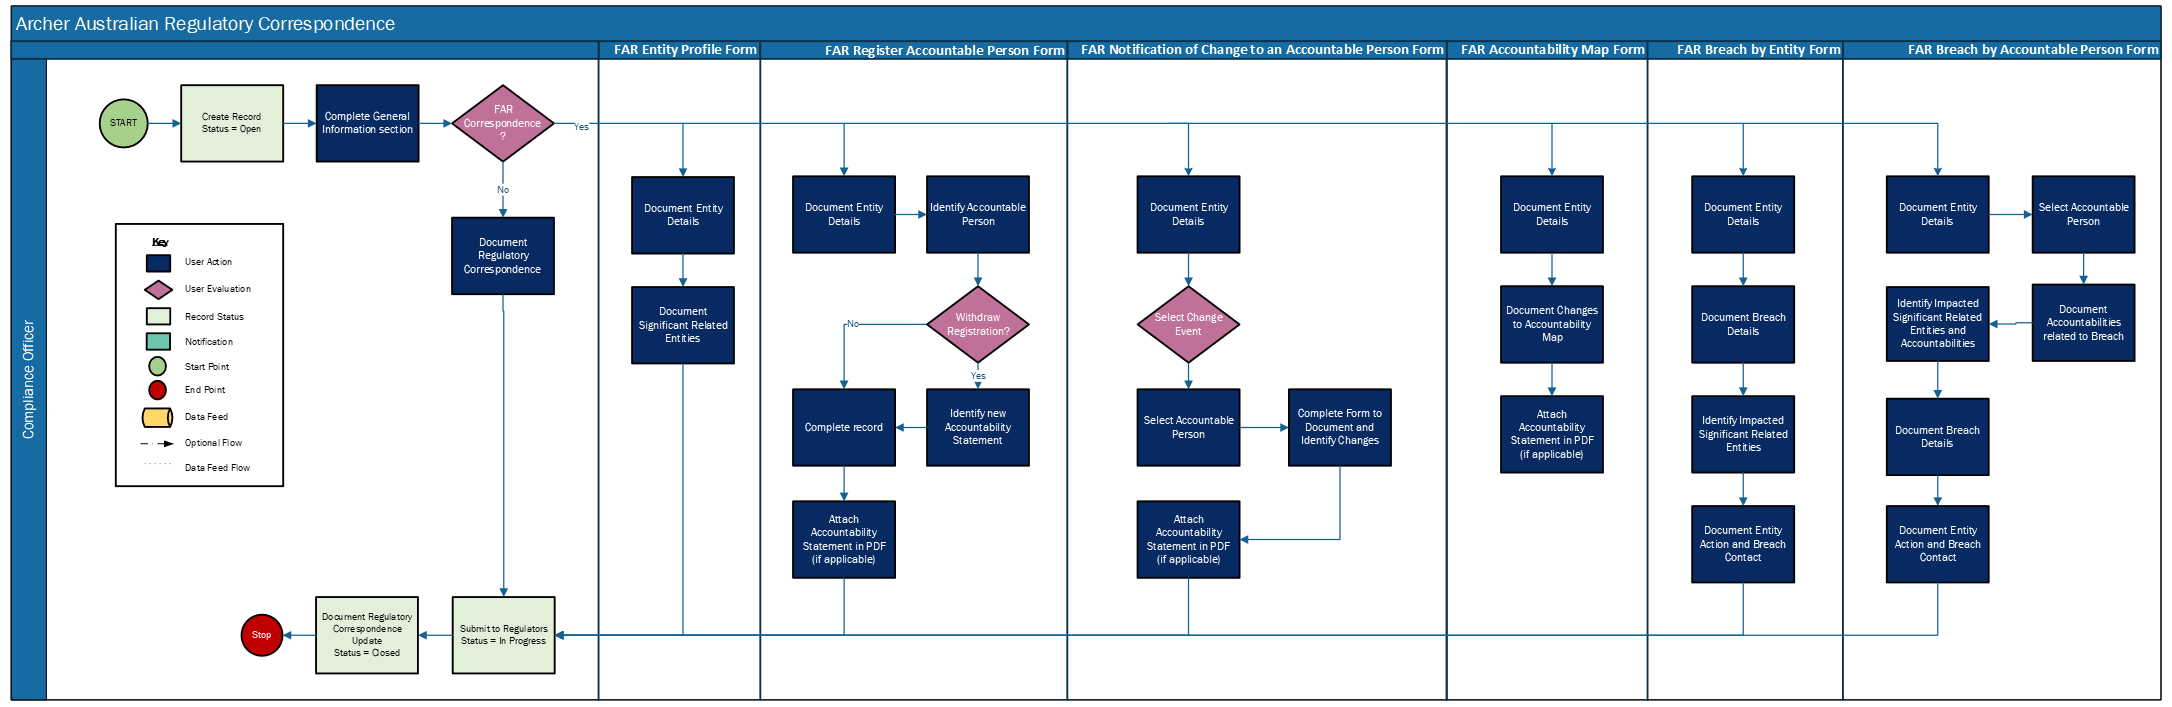
Process Diagram
The following diagram illustrates the overall Archer Australian Regulatory Correspondence process.
Note: The Australian Regulatory Correspondence application will refer to the Accountable Person and Accountability Statements within the Archer Individual Accountability Management app-pack. Please make any necessary changes and updates there before documenting the FAR Correspondence.
Applications
|
Application |
Description |
|---|---|
|
Australian Regulatory Correspondence |
The Australian Regulatory Correspondence application documents regulatory interactions that your organization may have with regulators, identifying the type of correspondence, and capturing important dates and regulatory information as it relates to the communication. It provides FAR Regulatory Forms and mail merges for reporting to APRA and ASIC for individual accountability. This repository allows you to associate communications with specific individual accountability reporting activities, breaches, incidents, and more, as well as provide follow-up to regulatory requests. |
Personas and Access Roles
The following table describes the functions that make up the application’s organizational roles. Depending on the organization of your company, these functions and responsibilities may vary. Access roles can be designed based on organizational need.
|
Function |
Description |
|---|---|
|
Owner |
The Owner is responsible for documenting the regulatory correspondence and ensuring that it is processed appropriately and responsibly. |
|
Reviewer |
The Reviewer is responsible for ensuring the appropriate information is documented for the regulatory correspondence. |
Installing the Archer Australian Regulatory Correspondence App-Pack
The Archer Australian Regulatory Correspondence installation package is required for installation and consists of the following:
-
One (1) Application
-
Six (6) Mail Merge Templates
If this application is intended for use with Individual Accountability Management, it is recommended to install and configure the latest version of the Archer Individual Accountability Management app-pack before proceeding with this package installation.
Security considerations
The information in this publication is provided “as is”. Archer makes no representations or warranties of any kind with respect to the information in this publication, and specifically disclaims implied warranties of merchantability or fitness for a particular purpose. Client is solely responsible for ensuring that the installation of the application is performed in a secure manner. Archer recommends clients perform a full security evaluation prior to implementation.
Installation overview
Complete the following tasks to install the offering.
Step 1: Prepare for the installation
-
Ensure that your Archer system meets the following requirements:
-
Archer Platform Release 2024.11 and later.
-
-
Read and understand "Packaging Data"in the Archer Platform Help.
Step 2: Install the package
Installing a package requires that you import the package file, map the objects in the package to objects in the target instance, and then install the package.
Task 1: Back up your database
There is no undo function for package installation. Packaging is a powerful feature that can make significant changes to an instance. Archer strongly recommends that you back up the instance database before installing a package. This process enables a full restoration if necessary.
An alternate method for undoing a package installation is to create a package of the affected objects in the target instance before installing the new package. This package provides a snapshot of the instance before the new package is installed, which can be used to help undo the changes made by the package installation. You must manually delete new objects created by the package installation
Task 2: Import the package
-
From the menu bar, click
 > Application Builder > Install Packages.
 -
In the Available Packages section, click Import.
-
Click Add New, then select the package file that you want to import.
-
Click OK.
The Available Packages section displays the package file and is ready for installation.
Task 3: Map objects in the package
Important: This step is required only if FAR Regulatory Correspondence is already present in your system, and you are installing this package.
-
From the menu bar, click
> Application Builder > Install Packages. -
In the Available Packages section, select the package you want to map.
-
In the Actions column, click
 for that package.
The analyzer runs and examines the information in the package. The analyzer automatically matches the system IDs of the objects in the package with the objects in the target instances and identifies objects from the package that are successfully mapped to objects in the target instance, objects that are new or exist but are not mapped, and objects that do not exist (the object is in the target but not in the source).
Note: This process can take several minutes or more, especially if the package is large, and may time out after 60 minutes. This time-out setting temporarily overrides any IIS time-out settings set to less than 60 minutes
-
When the analyzer is complete, the Advanced Package Mapping page lists the objects in the package file and corresponding objects in the target instance. The objects are divided into tabs, depending on whether they are found within Applications, Solutions, Access Roles, Groups, Sub- forms, or Questionnaires.
On each tab of the Advanced Mapping Page, review the icons next to each object to determine which objects you must map manually.
|
Icon |
Name |
Description |
|---|---|---|
|
|
Awaiting Mapping Review |
Indicates that the system could not automatically match the object or children of the object to a corresponding object in the target instance. Objects marked with this icon must be mapped manually through the mapping process. Important: New objects should not be mapped. This icon should remain visible. The mapping process can proceed without mapping all the objects. Note: You can run the mapping process without mapping all the objects. The icon is for informational purposes only. |
|
|
Mapping Completed |
Indicates that the object and all child objects are mapped to an object in the target instance. There are no further steps required with these objects in Advanced Package Mapping. |
|
|
Do Not Map |
Indicates that the object does not exist in the target instance, or the object was not mapped through the Do Not Map option. These objects will not be mapped through Advanced Package Mapping and must be remedied manually. |
|
|
Undo |
Indicates that a mapped object can be unmapped. This icon is displayed in the Actions column of a mapped object or object flagged as Do Not Map. |
-
For each object that requires remediation, do one of the following:
-
To map each item individually, on the Target column, select the object in the target instance to which you want to map the source object. If an object is new or if you do not want to map an object, select Do Not Map from the drop-down list.
Important: Ensure that you map all objects to their lowest level. When objects have child or related objects, the parent object provides a drill-down link. You must map child objects before parent objects. For more details, see "Mapping Parent/Child Objects" in the Archer Platform Help.
-
To automatically map all objects in a tab that have different system IDs but the same object name as an object in the target instance, do the following:
-
In the toolbar, click Auto Map.
-
Select an option for mapping objects by name.
Option
Description
Ignore case
Select this option to match objects with similar names regardless of the case of the characters in the object names.
Ignore spaces
Select this option to match objects with similar names regardless of whether spaces exist in the object names.
-
Click OK. The Confirmation dialog box opens with the total number of mappings performed. These mappings have not been committed to the database yet and can be modified in the Advanced Package Mapping page.
-
Click OK.
-
To set all objects in the tab to Do Not Map, in the toolbar, click Do Not Map.
-
Note: To undo the mapping settings for any individual object, in the Actions column, click Undo.
When all objects are mapped, the icon ![]() is displayed in the tab title. The
is displayed in the tab title. The ![]() icon is displayed next to the object to indicate that the object will not be mapped.
icon is displayed next to the object to indicate that the object will not be mapped.
-
Verify that all other objects are mapped correctly.
-
(Optional) To save your mapping settings so that you can resume working later, see "Importing and Exporting Mapping Settings" in the Archer Platform Help.
-
Once you have reviewed and mapped all objects, click Execute.
-
Select I understand the implications of performing this operation and click OK.
The Advanced Package Mapping process updates the system IDs of the objects in the target instance as defined on the Advanced Package Mapping page. When the mapping is complete, the Import and Install Packages page is displayed.
Important: Advanced Package Mapping modifies the system IDs in the target instance. You will need to update any Data Feeds and Web Service APIs that use these objects, with the new system IDs.
Task 4: Install the package
All objects from the source instance are installed in the target instance unless the object cannot be found or is flagged to not be installed in the target instance. The Log Messages section provides a list of conditions that may cause objects not to be installed. The Package Installation Log section displays a log entry.
-
From the menu bar, click
> Application Builder > Install Packages. -
In the Available Packages section, locate the package file that you want to install, and click Install.
-
In the Selected Components section, click the Lookup button to open the Package Selector window.
-
To select all components, select the top-level checkbox.
-
To install only specific global reports in an already installed application, select the checkbox associated with each report that you want to install.
-
Note: Items in the package that do not match an existing item in the target instance are selected by default.
-
Under the Install Method drop-down menu, select an option for each selected component. To use the same Install Method for all selected components, select a method from the top-level drop-down list.
Note: If you have any existing components that you do not want to modify, select Create New Only. You may have to modify those components after installing the package to use the changes made by the package.
-
To deactivate target fields and data-driven events that are not in the package, in the Post-Install Actions section, select the Deactivate target fields and data-driven events that are not in the package checkbox. To rename the deactivated target fields and data-driven events with a user-defined prefix, select the Apply a prefix to all deactivated objects checkbox, and enter a prefix. This can help you identify any fields or data-driven events that you may want to review for cleanup post-install.
-
Click Install.
-
Click OK.
Task 5: Review the package installation log
-
From the menu bar, click
> Application Builder > Install Packages. -
In the Package Installation Log tab, click the package that you want to view.
-
In the Package Installation Log page, in the Object Details section, click View All Errors.
Note: To view individual logs, in the Errors column of the log you want to view, click the Failures link or Warnings link. Clicking View All Errors, Failures, or Warnings opens the specific errors on a different page.
-
Click the Export icon to export the log file.
-
Click Close.
Configuring the Archer Australian Regulatory Correspondence App-Pack
Depending on the use of this application, complete the following configuration tasks.
Configure the Archer Individual Accountability Management App-Pack for FAR Regulatory Reporting
If this offering is intended for use with Individual Accountability Management, it is recommended to install and configure the latest version of the Archer Individual Accountability Management app-pack before proceeding with the following tasks.
Note: For existing Archer Individual Accountability Management implementations, please see the “Upgrading the Archer Australian Regulatory Correspondence App-Pack” section on how to upgrade the existing FAR Regulatory Correspondence application.
Task 1: Configure Contacts application
Add Australian Regulatory Correspondence to the Contacts application.
-
Go to Administration > Application Builder > Contacts.
-
Under Individual Accountability tab, in Regulatory Communication section, place the FAR Regulatory Correspondence field.
-
Remove the Regulatory Communication reference from the section, if available and not necessary.
-
Rename the section to FAR Regulatory Correspondence, if required.
-
Save the layout.
Note: If the reference is placed outside of the Regulatory Communication section, update the events accordingly.
Task 2: Configure Accountability Statements
Add Australian Regulatory Correspondence to the Accountability Statements application.
-
Go to Administration > Application Builder > Accountability Statements
-
Under Regulatory Communication tab, in Regulatory Communication section, place the FAR Regulatory Correspondence field.
-
Remove the Regulatory Communication reference from the section, if available and not necessary.
-
Rename the section to FAR Regulatory Correspondence, if required.
-
Save the layout.
Note: If the reference is placed outside of the Regulatory Communication section, update the events accordingly.
Task 3: Configure Historical Accountability Statements
Add Australian Regulatory Correspondence to the Historical Accountability Statements application.
-
Go to Administration > Application Builder > Historical Accountability Statements.
-
Under Regulatory Communication tab, in Regulatory Communication section, place the FAR Regulatory Correspondence field.
-
Remove the Regulatory Communication reference from the section, if available and not necessary.
-
Rename the tab and section to FAR Regulatory Correspondence, if required.
-
Save the layout.
-
Update the Historical Accountability Statement data feed to copy the FAR Regulatory Correspondence from Accountability Statement.
Note: If the reference is placed outside of the Regulatory Communication section, update the events accordingly.
Upgrading the Archer Australian Regulatory Correspondence App-Pack
For existing implementations of the Archer Individual Accountability Management app-pack, upgrade to version 2024.11 of the Archer Individual Accountability Management. This version contains the updates required to support the FAR Regulatory Reporting forms.
Existing FAR Regulatory Correspondence application
For existing implementations of FAR Regulatory Correspondence application, please take necessary backups before installing the Archer Australian Regulatory Correspondence installation package and completing the following tasks below.
Note: Existing implementations contain the “FAR Registration Form” and “FAR Notification Form”, which have been removed from this app-pack, as they are no longer valid forms. Users will utilize the FAR forms for regulatory reporting included in this installation package.
Update FAR Correspondence Type Values and Inactivate Values
Follow the steps below to update FAR Correspondence Type values to rename the “FAR Registration Form” and “FAR Notification Form” values to “BEAR Registration Form” and “BEAR Notification Form” and inactivate or remove the value from FAR Correspondence Type selection.
-
Go to Australian Regulatory Correspondence application and search for FAR Correspondence Type field in the field listing.
-
Open the FAR Correspondence Type field.
-
Under the Values section click on Edit Values.
-
Change “FAR Registration Form” value to “BEAR Registration Form” and inactivate the value.
-
Change “FAR Notification Form” value to “BEAR Notification Form” and inactivate the value.
-
Save the values.
Using the Archer Australian Regulatory Correspondence App-Pack
Document a Regulatory Correspondence
-
Go to Australian Regulatory Correspondence Workspace > Australian Regulatory Correspondence application > Create new record
-
Under General Information section, Change the Type value from FAR Correspondence to any other value. By default FAR Correspondence is selected.
-
Provide Title, Description, Due Date. Select Regulatory Body, Entity, Related Incidents.
-
Provide any other relevant information on the form.
-
Tasks can be assigned using the Open Tasks/Actions section.
-
Change the status field accordingly.
-
Save the record.
-
Submit it to Regulators.
-
Document Regulatory correspondence updates, if required.
Document a FAR Regulatory Correspondence
-
Go to Australian Regulatory Correspondence Workspace > Australian Regulatory Correspondence application > Create new record
-
Under the General Information section, Select Type as FAR Correspondence.
-
Select the FAR Correspondence Type as needed.
-
Fill in the General Information Section & FAR Entity Details section.
-
Based on FAR Correspondence Type selection different set of fields will be displayed. Fill in the information accordingly:
-
If FAR Entity Profile Form is selected in FAR Correspondence Type:
-
Document Entity Details & Significant Related Entities.
-
-
If FAR Register Accountable Person Form is selected in FAR Correspondence Type:
-
Document Entity Details
-
Identify Accountable Person
Important: Please save after selecting the Accountable Person. It is required to populate the Accountability Statements, Accountabilities and SRE details in the form.
-
Select the registration status and fill in the form as needed
-
Attach accountability statement in pdf format (if applicable)
-
-
If FAR Notification of Change to an Accountable Person Form is selected in FAR Correspondence Type:
-
Document Entity Details
-
Select change event
-
Select Accountable Person
Important: Please save after selecting the Accountable Person. It is required to populate the Accountability Statements, Accountabilities and SRE details in the form.
-
Fill in the form to document and identify changes
-
Attach accountability statement in pdf format (if applicable)
-
-
If FAR Accountability Map Form is selected in FAR Correspondence Type:
-
Document Entity Details
-
Document changes to accountability map
-
Attach accountability statement in pdf format (if applicable)
-
-
If FAR Breach by Entity Form is selected in FAR Correspondence Type:
-
Document Entity Details
-
Document Breach Details
-
Identify Impacted Significant Related Entities
-
Document Entity Action and Breach Contact
-
-
If FAR Breach by Accountable Person Form is selected in FAR Correspondence Type:
-
Document Entity Details
-
Select Accountable Person
Important: Please save after selecting the Accountable Person. It is required to populate the Accountability Statements, Accountabilities and SRE details in the form.
-
Document Accountabilities related to breach
-
Identify Impacted Significant Related Entities and Accountabilities
-
Document Breach Details
-
Document Entity Action and Breach Contact
-
-
Save the record.
-
Submit it to Regulators.
-
Document Regulatory Correspondence updates, if required.
Export a FAR Reporting Form
-
Open a FAR Correspondence record.
-
Click on the export icon from the right corner of the record.
-
Select the Report Template based on FAR Correspondence Type selected in the record.
-
Once the export completes, click on “click here” to download the exported form.
-
Validate the details with the record.
Troubleshooting tips
This section provides post-installation guidance, detailing common issues and their solutions. If the suggested steps do not resolve the issue, please submit an Archer Support ticket.
Mail Merge Values Not Populating when Exporting
-
Issue: I exported my record using the mail merge template, but the values are missing from the table.
-
Explanation: The field alias in the mail merge template must match the field alias in the application exactly.
-
Remediation: Verify the field alias in both the mail merge template and the application, and update it to ensure they match.
Known issues
In SaaS instances, the link to the FAR Privacy Collection Notice may not populate correctly in the mail merge export document when the output type is configured as DOCX or DOC in the mail merge template. However, the link will appear in PDF exports.
Certification environment
Date Tested: February 2025
|
Product Name |
Version Information |
Operating System |
|---|---|---|
|
Archer |
2024.11 |
Virtual Appliance |