Archer DORA-Aligned Register of Information
The Archer DORA-Aligned Register of Information (RoI) offering streamlines the process of capturing and managing the data required for DORA RoI reporting. It leverages existing data already available within Archer and enables organizations to collect any additional information necessary for compliance. The solution ensures data integrity and accuracy through built-in validation mechanisms, which are especially important given the complexity of the reporting requirements.
Important: The information in this publication is provided "as is". Archer makes no representations or warranties of any kind with respect to the information in this publication, and specifically disclaims implied warranties of merchantability or fitness for a particular purpose. Client is solely responsible for ensuring that the installation of the application is performed in a secure manner. Archer recommends clients perform a full security evaluation prior to implementation.
Archer Exchange: With the Archer Exchange, the Archer team has created a broad selection of supplemental, value-added offerings to help you get your unique risk management program on the right path, right from the start. You can leverage the Archer Exchange offerings to expand the use of Archer solutions into new business processes and address specific industry, geographic, regulatory, or technical requirements.
On this page
Release notes
|
Release date |
Platform release |
Notes |
|---|---|---|
| November | 2024.11 |
|
| February 2025 | 2024.09 | Initial release |
Overview
The Digital Operational Resilience Act (DORA) is a regulatory framework introduced by the European Union to ensure the operational resilience of financial institutions and critical infrastructures in the face of digital disruptions, such as cyber-attacks or IT failures. This regulation also affects non-European companies doing business in Europe. As part of DORA, financial entities must maintain and report specific operational data to ensure compliance and improve resilience.
Financial institutions are under mounting pressure from a growing array of cyber threats, IT system failures, and vulnerabilities within third-party ecosystems—factors that pose serious risks to both their operations and the broader financial system. The introduction of the Digital Operational Resilience Act (DORA) has raised the bar, requiring organizations to demonstrate their ability to withstand, respond to, and recover from digital disruptions. This regulation enforces rigorous standards for monitoring and reporting operational resilience data.
Despite these requirements, many institutions continue to rely on fragmented tools and manual processes to manage their ICT assets and interdependencies. This fragmented approach often results in inefficiencies, oversight gaps, and heightened exposure to risk. Archer DORA-Aligned Register of Information offers a centralized, automated solution designed to meet regulatory expectations and streamline compliance efforts.Non-compliance with DORA can lead to regulatory sanctions, reputational harm, and increased operational vulnerabilities. To mitigate these risks, organizations must implement robust frameworks for managing ICT risks, overseeing third-party relationships, and demonstrating compliance—all while ensuring business continuity and maintaining customer trust.
The register of information (RoI) established for the application of Regulation (EU) 2022/2554 (DORA) requires financial entities to report information pertaining to various parties involved in the use and provision of Information and Communication Technology (ICT) services to ensure compliance and improve resilience.
How Archer Handles the DORA Register of Information
This offering guides organizations through a structured, repeatable process to build and maintain the Register of Information with the following:
-
Identify ROI Scope: Define the boundaries of the register, including entities, ICT services, and serfvice providers that fall under DORA’s requirements.
-
Scope Validation: Archer validates, organizes, and formats the data into DORA’s Excel template, ensuring accuracy, completeness, and consistency.
-
Prepare for ROI Reporting: Generate a CSV package formatted for reporting, enabling easy submission to regulators or internal governance teams.
-
Document ROI Reporting: Document the reporting process within Archer for audit readiness, traceability, and historical reference.
The Archer DORA-Aligned Register of Information helps financial entities comply with the Digital Operational Resilience Act (DORA) regulation introduced by the European Union. It applies to financial entities such as banks, insurers, investment firms, and their critical third-party ICT (Information and Communication Technology) service providers in Europe or doing business with entities in Europe. This offering captures all required data for the DORA Register of Information and prepares it for regulator-ready reporting.
This offering organizes all required data into a readable, structured format and performs checks to prevent errors that could complicate submission. It also automatically generates the reporting package in the format mandated by DORA. Additionally, it can document communications with regulators and track outcomes, supporting a complete and auditable reporting process.
Features & benefits
Archer DORA-Aligned Register of Information enables organizations to achieve the following goals.
-
Scope Definition: Streamlines RoI reporting by auto-generating and identifying the required scope.
-
Comprehensive Data Capture: Leverages existing Archer data and collects additional information needed for DORA compliance.
-
Built-in Validation: Ensures data integrity and accuracy through automated checks, minimizing submission errors.
-
Structured Reporting Output: Organizes complex data into DORA’s required Excel format and exports in XBRL-CSV Zip for submission.
-
Regulatory Communication Tracking: Documents and tracks interactions with regulators to support auditability and compliance.
The benefits of using Archer DORA-Aligned Register of Information includes the following.
-
Provides a structured approach to assessing third-party risks, ensuring proactive management of potential vulnerabilities
-
Ensures vendors meet required cybersecurity and resilience standards, reducing the risk of non-compliance
-
Ensures compliance with DORA and other regulatory frameworks that require transparency in third-party risk management
-
Helps identify vendors handling critical or sensitive data, allowing for targeted security assessments and penetration testing
User guide
When creating a Register of Information (ROI) for the first time, the scope must be manually defined by entering key data. Due to the additional requirements of DORA reporting, which go beyond standard Archer use cases, dedicated applications have been developed to capture all necessary information.
During initial setup, records must be manually created to define the scope of the ROI. This includes entering data related to entities, contracts, ICT service providers, and other components relevant to the organization’s operational and contractual ecosystem.
To streamline this process, Archer offers a record generation feature that automatically creates required records based on existing Companies or Contracts.
How Record Generator works
The record generator allows selection of one or more Companies or Contracts. Archer then runs a data feed to automatically generate the following records.
-
Entities records for each selected Company
-
Contractual Arrangements records for each selected Contract
-
If a Contract is linked to a Master Service Agreement (MSA), a Contractual Arrangement record is also created for the MSA
-
-
ICT Service Provider records for third parties and first-level subcontractors associated with each Contract
What needs manual input
While the record generator automates a significant portion of documenting your organization’s operational and contractual ecosystem, the following must still be entered manually.
-
Functions
-
Third parties conducting operational activities
-
Intra-group service providers and contracts
This combination of automated and manual input ensures that the ROI is both comprehensive and tailored to the organization’s structure.
Follow the steps below to complete an entity record.
-
Complete the General Information section.
-
In the Branches section, add any branches located outside the entity’s home country.
-
Complete the Ownership Structure section.
-
Complete the Register of Information section. If the entity is included in the Register of Information, a Record Validation status will be displayed in this section. Failed validations will be displayed as per the DORA Validation Rules.
-
Complete the Record Status section:
-
Ready – Not Validated: The record can be reported without validation.
-
Ready – Validation Complete: The record has been validated and can be reported.
A separate entry must be created for each unique combination of the following.
-
Financial Entity’s LEI
-
Licensed Activity
-
Function
Follow the steps below to complete a function record.
-
In the General Informationon, enter the following details:
-
Function name
-
Licensed activity
-
Entity
-
Criticality or importance assessment.
-
Date of last assessment of criticality or importance, if the function is supported by ICT services provided by ICT third-party service providers. If no assessment has been performed, enter the date as 9999-12-31.
-
Recovery time objective – in hours
-
Recovery point objective – in hours
-
Impact of discontinuing the function based on the financial entity’s assessment.
-
-
In the Related Process/Service section, select any related business process or product and service linked to the function.
-
In the Related Register of Information section, if the entry is included in the Register of Information, the Record Validation Status will be displayed in this section. Failed Validations will be displayed in accordance with DORA validation requirements.
-
Set the Record Status.
Follow the steps below to complete an ICT Service Provider record.
-
General Information - In this section, enter:
-
Service provider category from the following options:
-
Direct third party – external service providers (select related Third party name)
-
Intragroup – internal service providers (select related Entities)
-
Subcontractors – service providers who support external or internal service providers (select related Subcontractor)
-
If a service provider falls into more than one category, select the higher-level option. Example: If a provider is both a direct third party and a subcontractor, select Direct third party
-
-
Identification code type (e.g., LEI, National ID, or other).
-
Identification code. If the type is LEI - Legal Entity Identifier, click Validate LEI to confirm Identification code validity.
-
Legal Name of the ICT service provider in Latin, Cyrillic, or Greek alphabets.
-
For Is the legal name of the ICT service provider registered in Latin? Select Yes or No. If No, enter the Name of the ICT third-party service provider in Latin alphabet.
-
Type of person (e.g., individual or legal)
-
ICT services
-
Country of the headquarters
-
Currency
-
Total annual expense or estimated cost
-
Additional Identification Details (if applicable)
-
Select Yes or No for Is the ICT third-party service provider an ultimate parent undertaking? If No, select the Ultimate Parent Undertaking in the below section.
-
-
Related Register of Information - If the record is included in the Register of Information, the Record Validation Status will be displayed in this section. Any failed validations will appear in accordance with DORA validation requirements.
-
Record Status - Once all information has been completed, set the Record Status to one of the following:
-
Ready – Not Validated: The record can be reported without validation.
-
Ready – Validation Complete: The record has been validated and can be reported.
-
Follow the steps below to complete a contractual arrangement record.
-
Arrangement Source - In this section:
-
Select the Type of Contractual Arrangement.
-
Standalone Arrangement: Select the related contract, if available.
-
Overarching Arrangement: Select the related Master Service Agreement (MSA), if available.
-
Subsequent or Associated Arrangement: Select the related contract and overarching arrangement, if available.
-
-
For Is this an intragroup contractual arrangement?, select Yes or No
-
-
General Information - In this section:
-
Select the Entity signing the contractual arrangement.
-
Select the ICT service provider.
-
For Is the entity signing the agreement the same as the entity making use of the service?, select Yes or No. If No, select the Entity making use of the service.
-
For Does the service provider utilize subcontractors?, select Yes or No. If Yes, select the Subcontractors.
-
-
ICT Service Supply Chain - This sub form captures the supply chain ranking among the service providers for the specific ICT service provided within the contractual arrangement
-
Enter the Direct ICT Service Provider as Rank 1 in the supply chain sub form. No recipient is required for rank.
-
Identify and record all Subcontractors in the appropriate rank order as additional entries in the sub form. Identify Subcontractor as ICT third-party service provider and Recipient of the sub-contracted ICT services.
-
-
Contractual Arrangement Details - Enter details of the contract, including Notice Periods, Start Date and End Date, Country Details
-
Function Covered by the Contractual Arrangement - Select the function supported by the contractual arrangement.
-
ICT Services
-
Select the Type of ICT Service covered by the contractual arrangement.
-
If the contractual arrangement supports a critical or important function, it is mandatory to provide the following details:
-
Storage of Data
-
Location of Data at Rest (Storage), if applicable
-
Location of Management of the Data (Processing)
-
Sensitivity of Data stored by the ICT third-party service provider
-
Level of Reliance on the ICT service supporting the critical or important function
-
Assessment of the ICT Service
-
-
-
Related Register of Information
-
If the entry is included in the Register of Information, the Record Validation Status will be displayed in this section.
-
Failed validations are displayed in accordance with DORA validation requirements.
-
-
Record Status - Once all information has been entered, set the Record Status to one of the following:
-
Ready – Not Validated: The record can be reported without validation.
-
Ready – Validation Complete: The record has been validated and can be reported.
-
-
Exclude for final Register of Information Reporting
-
Select Yes for Exclude from ROI Reporting, to exclude the contractual arrangement from final reporting package.
-
Provide Reason for moving out of scope.
-
Note: Note: Any linked entities, functions, ict service providers will not be reported only if they are not selected in any other related contractual arrangements
Complete a Register of Information
-
 Identify ROI Scope
The first step in the DORA-aligned reporting process is identifying the scope of the Register of Information (ROI). This is where compliance and third-party governance teams begin defining what should be included in the ROI for a specific reporting period.
Under DORA, the ROI must provide a comprehensive view of the organization’s ICT-related operational and contractual ecosystem. This includes the following:
-
The reporting entity itself (the regulated financial institution)
-
Entities within scope, such as subsidiaries, branches, or third parties performing operational activities
-
ICT service providers, including third parties, subcontractors, and intragroup entities delivering ICT services
-
Contractual arrangements, such as contracts, Master Service Agreements (MSAs), and other binding documents
-
Supporting functions and ICT services that are critical or important to operational resilience.
Together, these components form the complete Register of Information required under DORA.
In Archer, scope can be defined in two ways:
-
Creating a new ROI record: This involves building the scope from the ground up for a new reporting period.
-
Updating an existing ROI record: Select an existing record and revise it to reflect organizational or contractual changes.
To streamline this process, theoffering includes a record generator and auto-scoping feature. These tools help accelerate scope definition while maintaining flexibility for complex organizational structures. This combination of automation and manual input ensures the ROI remains both accurate and adaptable.
-
-
Accelerate ROI Scope Definition with Auto-Scoping
To simplify and accelerate the scoping process for the Register of Information (ROI), Archer provides an auto-scoping feature that builds out scope by leveraging existing Entity and Contractual Arrangement records.
Once Entity and Contractual Arrangement records are created and properly linked, either type of record can serve as the starting point for auto-scoping the ROI:
-
Starting with Entities
Select one or more Entity records. Archer will automatically pull in the associated Contractual Arrangements linked to those Entities.
-
Starting with Contractual Arrangements
Select one or more Contractual Arrangement records. Archer will then auto-scope the ROI by including the linked Entities.
Recommended Practices
To maximize the effectiveness of auto-scoping:
-
Ensure Entity and Contractual Arrangement records are created ahead of time.
-
Verify that relationships between records are accurately established.
This feature minimizes manual effort, enhances consistency, and ensures that the ROI scope accurately reflects the organization’s operational and contractual landscape.
-
-
Validate Scope
Once the scoping process is complete, the next step is to initiate the workflow that transitions the Register of Information (ROI) into the validation stage.
When the ROI package is submitted for reporting, Archer runs validation checks against the European Banking Authority (EBA) standards to determine whether the submission meets regulatory requirements. These checks help ensure:
-
Accuracy and completeness of the data
-
Reduced risk of rejection during regulatory submission
By performing validations within Archer, organizations can proactively identify and resolve issues before exporting or submitting the final package.
Excel Template Support
During the 2024 DORA dry run exercise, the European Supervisory Authorities provided an Excel template to organize and capture all required reporting data. Archer continues to support this format, allowing users to:
-
Review data in a familiar, structured layout
-
Compare Archer records against the DORA reporting framework
Built-In Validation Tools
Archer includes functionality to help users easily identify and resolve validation issues:
-
Most validation checks are performed directly within Archer
-
Reports for errors and gaps in the individual records which are within scope, before exporting to the Excel template
-
This ensures confidence in the accuracy of your submission
-
-
Understand ROI Snapshot
After completing the scoping process, the next step is to advance the workflow to the validation stage. At this point, Archer automatically runs a background data feed that creates a point-in-time snapshot of the entire ROI scope.
The ROI Snapshot stores a complete copy of the scoped data and organizes it into the correct structure for reporting. This includes the following:
-
Proper naming conventions
-
Section formatting aligned with DORA requirements
Review the snapshot directly within Archer or export it to the Excel template provided during the 2024 DORA dry run. This format remains available to help users validate their data against the expected reporting structure.
Follow the instructions below to understand and use the ROI Snapshot application.
-
General Information Section - This section displays:
-
The linkage to the original Register of Information record.
-
The sections being reported, based on the selected ROI scope.
-
Export for Duplicate Validation (Excel):
-
Exports the ROI data into an Excel template.
-
The file will be downloaded to your local machine.
-
Use this file to perform internal data validation before reporting.
-
-
-
Generates an XBRL-CSV zip package required for regulatory submission.
-
The zip file will be automatically attached in the Attachments section.
-
-
-
Use the Export ROI Data button to export data for reporting or validation. When selected, two export options will be available:
-
-
Sections with “B_” in ()
-
Data contained in these sections is included in export files.
-
This is the information that will be reported to the regulator.
-
Review these sections carefully to confirm accuracy before export.
-
If there are any inaccuracies, update the parent records linked in related Register of information and generate new snapshot but do not modify data in this section. Changes will impact data consistency within the system.
-
-
Regulatory Communication
-
Multiple ROI Snapshots can be created for the same Register of Information so this section can be used to track which snapshot was reported.
-
Document ROI reporting using this section to track communications with the regulator:
-
Within ROI Snapshot in this section
-
-
Parameters Section
-
This section supports the XBRL-CSV zip file generation process.
-
Do not modify any parameters in this section, as changes may impact the file generation or data integrity.
-
-
-
Export ROI to template
Once the ROI data is exported, Archer presents it in a structured Excel template designed to support DORA reporting. This template organizes the data across multiple tabs, making it easier to review and validate duplicates.
The Validation Instructions tab outlines all the checks performed within the spreadsheet:
-
The first column indicates which tab the validation applies to.
-
The second column identifies the relevant fields.
-
The third column describes the validation rule.
For example, the first row may show that tab b_01.01 must not contain duplicate entries for a specific field. If multiple fields are listed, the combination of those fields must be unique.
The Validation_Result tab displays any issues found during the validation process. Each issue includes a direct link to the exact location in the spreadsheet where the problem was identified, allowing for quick review and resolution.
Resolving Validation Issues
To address validation errors:
-
Return to Archer and update the relevant records.
-
Re-export the data to the Excel template.
-
Confirm that the issues have been resolved.
This process ensures your ROI data is accurate and aligned with DORA reporting standards before final submission.
-
Following the validation step, Archer prepares the submission package in the required XBRL-CSV zip format, which is the only format accepted by competent authorities for DORA reporting. All technical formatting is handled automatically, ensuring full compliance with:
-
EBA taxonomy
-
Required file naming conventions
-
All applicable technical validation rules
This automation simplifies the process, reduces complexity, and enables compliance teams to focus on oversight rather than formatting, ensuring the package is ready for regulatory submission.
To generate the submission package:
-
Navigate to the ROI Snapshot record.
-
Click Export ROI Data.
-
Select Zip Package for Reporting.
Once generated, the zip file is automatically attached to the ROI Snapshot record for easy access and version control.
Opening the zip file reveals a structured folder layout aligned with EBA’s required format. The contents include the following.
-
Organized folders by reporting section
-
Raw data files formatted for submission
Each file can be reviewed to inspect captured data points and confirm alignment with reporting requirements.
Regenerating the Package
If validation issues are resolved or updates are made:
-
Re-export the data.
-
Archer replaces the existing zip file with the latest version, ensuring only the most current package is stored and ready for submission.
Archer provides functionality to maintain a record of submissions within the Regulatory Communications application, available as part of the Privacy Program Management use case. This documentation capability supports audit readiness and reflects an organization’s proactive approach to regulatory compliance.
The application enables detailed capture of submission content, communications exchanged with regulators, and final outcomes. This creates a comprehensive audit trail that supports demonstration of compliance posture and facilitates responses to inquiries or reviews from competent authorities.
Custom Objects and Snapshot Data Feed
-
These components are designed to work with field and section aliases.
-
Field aliases should not be updated. If replacing an existing field, reuse the original alias.
-
If aliases are modified, review custom objects and snapshot data feeds for potential impacts.
ROI Snapshot Application Layout
-
The layout is specifically designed to support custom code for data export.
-
Layout objects may be collapsed or new objects added; however, moving objects off the layout is not recommended, as it may disrupt data export functionality.
-
Section names must not be changed, as they are required for exporting data in XBRL-CSV format.
Value Lists and DORA Alignment
-
Most value lists in this application package are required in the Register of Information and are aligned with the DORA Register of Information Template.
-
Each value list item includes a code representing the actual value reported to the regulator, shown in the value description.
-
Existing value descriptions must not be modified, as changes may affect the final report and cause validation errors.
-
When adding new values, ensure alignment with DORA reporting requirements and maintain consistency with the official template.
-
Administrator guide
Prerequisites (on-demand application (ODA) & system requirements)
The following table lists the components and prerequisites for the offering.
|
Components |
Prerequisites |
|---|---|
|
Archer solution area |
Third Party Management |
|
Archer use case |
Third Party Engagements |
|
Archer applications |
Third Party Profile, Subcontractors, Contracts, Master Service Agreement, Company |
|
Uses custom objects |
Yes. Custom objects provided for both classic and New User Experience in SaaS. |
|
Requires Archer license |
Additional licensing fees apply for Archer DORA-Aligned Register of Information. Please contact Archer Sales Representative for more information and pricing. |
|
Archer Platform requirements |
Archer Platform Release 2024.11 and later |
|
Supported Archer environments |
|
Compatible use cases & applications
For information on Archer use cases, see the Archer Solutions Help.
Related applications
The following table lists the related applications.
Application | Use case | Primary Purpose of the relationship |
|---|---|---|
Company | Third Party Catalog | This is referenced to report Entities |
Contracts | Third Party Catalog, Third Party Engagements | This is referenced to report Contractual Arranagements |
Master Service Agreements | Third Party Engagements | This is referenced to report Contractual Arranagements |
Products and Services | Third Party Engagements | This is referenced to report Functions |
Business Processes | Third Party Engagements | This is referenced to report Functions
|
Regulatory Communications | Privacy Program Management | Track any communications with regulator |
Subcontractors | Third Party Engagements | This is referenced to report ICT Service Providers |
Third Party Profile | Third Party Catalog, Third Party Engagements | This is referenced to report ICT Service Providers
|
Impacted use cases
The following use cases were impacted for Archer DORA-Aligned Register of Information.
Third Party Catalog
Third Party Engagements
Additional resources
The following additional resources are available.
Preparations for reporting of DORA registers of information | European Banking Authority
ITS on the registers of information - Adopted and published in the Official Journal of the EU
Components
Architecture diagram
The following diagram shows the architecture.
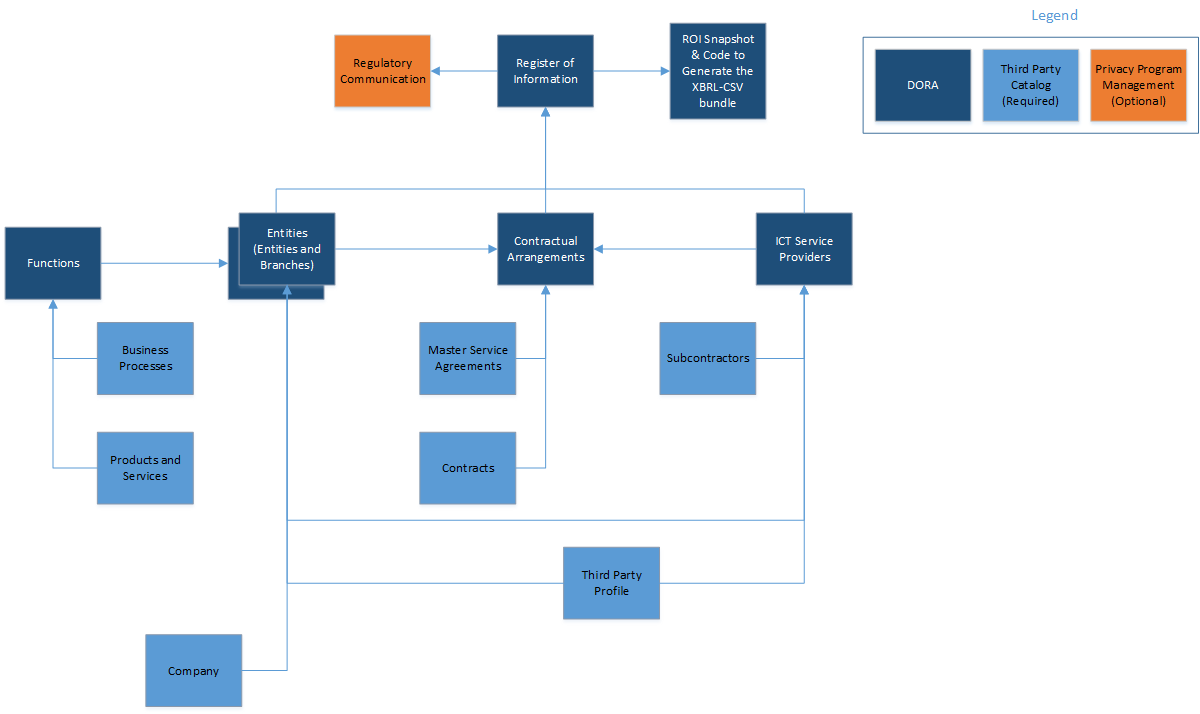
Applications
The following table describes the applications for Archer DORA-Aligned Register of Information.
Application | Description |
|---|---|
Register of Information | The Register of Information (RoI) maintains comprehensive and up-to-date details of all contractual arrangements, ICT service providers, and functions as required under the Digital Operational Resilience Act (DORA). It serves as a central repository that enables financial entities to:
|
Entities | The Entities application is used to record and maintain
|
Contractual Arrangements | The Contractual Arrangements application is used to record and maintain details of:
|
ICT Service Providers | The ICT Service Providers application is used to record and maintain details of:
|
Functions | The Functions application is used to record and maintain all processes or services supported by the contractual agreements. Each financial entity, including entities within the same group, maintains its own internal taxonomy of functions based on its specific business model and organisational structure. To enable clear monitoring and distinction between financial functions and ICT services, financial entities must designate relevant functions using a Function Identifier at both individual and group levels. |
ROI Snapshot | The ROI Snapshot is a point-in-time copy of the Register of Information (ROI) record. It replicates the DORA Register of Information template and provides a static view of data at the time the snapshot was created. |
Personas and access roles
Organizations should configure permissions and access roles following their requirements.
Install Archer DORA-Aligned Register of Information
Complete the following tasks to install Archer DORA-Aligned Register of Information.
Prepare for the installation.
Obtain the installation package.
Read and understand the "Packaging Data" Archer Platform Help.
Test the installation. Test the application according to your company standards and procedures, to ensure that the use case works with your existing processes.
Install the package
Installing a package requires that you import the package file, map the objects in the package to objects in the target instance, and then install the package.
There is no Undo function for a package installation. Packaging is a powerful feature that can make significant changes to an instance. Back up the instance database before installing a package. This process enables a full restoration if necessary.
An alternate method for undoing a package installation is to create a package of the affected objects in the target instance before installing the new package. This package provides a snapshot of the instance before the new package is installed, which can be used to help undo the changes made by the package installation. New objects created by the package installation must be manually deleted.
From the menu bar, click
 > Application Builder > Install Packages.
- In the Available Packages section, click Import.
- Click Add New, then locate and select the package file that you want to import.
- Click OK.
The package file is displayed in the Available Packages section and is ready for installation.
Important: This step is required only if FAR Regulatory Correspondence is already present in your system, and you are installing this package.
From the menu bar, click
> Application Builder > Install Packages.- In the Available Packages section, locate the package you want to map.
- In the Actions column, click
 for that package.
The analyzer examines the information in the package. The analyzer automatically matches the system IDs of the objects in the package with the objects in the target instance and identifies objects from the package that are successfully mapped to objects in the target instance, objects that are new or exist but are not mapped, and objects that do not exist (the object is in the target but not in the source).
When the analyzer is complete, the Advanced Package Mapping page lists the objects in the package file and corresponding objects in the target instance.
- On the Advanced Mapping page, click to open each category and review the icons next to each object to determine which objects you must map manually.
The following table describes the icons. Icon
Name
Description

Awaiting Mapping Review
Indicates that the system could not automatically match the object or one of its children to a corresponding object in the target instance.
Objects marked with this icon must be mapped manually.
New objects should not be mapped. Select Do Not Map from the drop-down menu to clear this icon for an individual object, or click Do Not Map to clear the icon for all unmapped objects.

Mapping Completed
Indicates that the object and all children are mapped to objects in the target instance, or that they have been marked as Do Not Map. Nothing more needs to be done with these objects in Advanced Package Mapping.
Note: You can run the mapping process without mapping all objects. The
icon is for informational purposes only. - For objects awaiting mapping review, do one of the following:
- To map each object individually, use the drop-down menu in the Target column to select the object in the target instance to which you want to map the source object. To leave an object unmapped, select Do Not Map in the Target column.
- To automatically map all objects in a category that have different system IDs but the same object name as an object in the target instance, click Auto Map. Select whether to ignore case and spaces when matching object names. Click OK.
- To mark all unmapped objects as Do Not Map, click Do Not Map.
(Optional) Click
 to enable filter fields that you can use to find specific objects in each mapping category. To undo your mapping selections, click Undo, then select whether to undo all mappings in the category or only the mappings on a single page. If you choose to undo all mappings, you will be returned to the categories list.
- (Optional) To save your mapping selections and return to the categories list without committing changes to the target instance, click
 .
. - After you review and map all objects, click Execute.
- Select I understand the implications of performing this operation. Click OK.
When the mapping is complete, the Import and Install Packages page displays.
Important: Advanced Package Mapping modifies the system IDs in the target instance. You must update any Data Feeds and Web Service APIs that use these objects with the new system IDs.
All objects from the source instance are installed in the target instance unless the object cannot be found or is flagged to not be installed in the target instance. A list of conditions that may cause objects not to be installed is provided in the Log Messages section. A log entry is displayed in the Package Installation Log section.
- From the menu bar, click > Application Builder > Install Packages.
- In the Available Packages section, locate the package file that you want to install, and click the file name or
 at end of the row to open the Options menu.
 - In the Selected Components section, click the Lookup button to open the Package Selector window.
- To select all components, select the top-level checkbox.
- To install only specific global reports in an already installed application, select the checkbox associated with each report that you want to install.
Note: Items in the package that do not match an existing item in the target instance are selected by default.
- Under the Translation Option drop-down menu, select an option for each selected component. To use the same Translation Option for all selected components, select a method from the top-level drop-down list.
The Translation Option is enabled only when a language is selected.The following table describes the options. Option
Description
Full Install
Installs the component and its translations from the selected languages.
Translations Only
Only installs the translations from the selected languages.
- Under the Install Method drop-down menu, select an option for each selected component. To use the same Install Method for all selected components, select a method from the top-level drop-down list.
The following table describes the options. Option
Description
Create New Only
Only creates new fields and other elements in the applications, questionnaires, workspaces, data feeds, and dashboards specified in the package file. This option does not modify any existing elements on your instance of Archer. This is useful when you want to add functionality to an existing application, questionnaire, workspace, dashboard, data feed, or access role, but you do not want to risk making any unwanted changes to the existing elements of workspaces, data feeds, or dashboards.
Note: The Create New Only option does not apply to access roles or languages.
Create New and Update
Updates all elements in the applications, questionnaires, workspaces, data feeds, and dashboards as specified in the package file. This includes adding new elements and updating existing elements.
Note: The Create New and Update option does not apply to access roles or languages.
- Under the Install Option drop-down menu, select an option for each selected component. To use the same Install Option for all selected components, select an option from the top-level drop-down list.
The following table describes the options. Option
Description
Do not Override Layout
Installs the component, but does not change the existing layout. This is useful if you have a lot of custom fields and formatting in your layout that you do not want to risk losing.
You may have to modify the layout after installing the package to use the changes made by the package.
Note: The Do not Override Layout option does not apply to access roles or languages.
Override Layout
Updates the layout as specified in the package file, overwriting the existing layout.
Note: The Override Layout option does not apply to access roles or languages.
- Click Continue to advance to the next object category in the Package Selector, and repeat steps 4 to 6. After reviewing all object categories, click OK.
- To deactivate target fields and data-driven events that are not in the package, in the Post-Install Actions section, select the Deactivate target fields and data-driven events that are not in the package checkbox. To rename the deactivated target fields and data-driven events with a user-defined prefix, select Apply a prefix to all deactivated objects, and enter a prefix. This can help you identify any fields or data-driven events that you may want to review for cleanup post-install.
- Click Install.
- Click OK.
From the menu bar, click
> Application Builder > Install Packages.- In the Package Installation Log section, click the package that you want to view.
- In the Package Installation Log page, in the Object Details section, click View All Errors.
Note: To view individual logs, in the Errors column of the log you want to view, click the Failures link or Warnings link. Clicking View All Errors, Failures, or Warnings opens the specific errors on a different page.
- Click the Export icon to export the log file.
- Click Close.
For a list of packaging installation log messages and remediation information for common messages, see Package Installation Log Messages.
Set up data feeds
From the menu, click
 > Integration > Data Feeds. If you did not install the data feeds through the package, you should install the data feeds before proceeding.
Select the data feed you want to configure.
On the General tab, in the General Information section, select Active.
On the Source Connection tab, follow the set of steps based on the transport type.
Archer Web Services transport type
In the Logon Properties section, enter your URL in the URL field. Your URL depends on whether you're using an on-premises installation and where you installed Archer or whether you are a SaaS client.
If you're on-premises and installed Archer at the root level of Microsoft Internet Information Services (IIS), your URL is: YourServerName. For example, http://grc.mycompany.com
If you're on-premises and installed Archer as a sub-site in Microsoft Internet Information Services (IIS), your URL is: YourServerName/VirtualDirectoryName. For example, http://grc.mycompany.com/Archer
If you're using SaaS, your URL is: YourSaaSURL/archerirm.region.For example, http://mycompany/archerirm.us
Specify whether the Archer instance uses anonymous authentication or Windows Authentication.
In the User Name and Password fields, enter the credentials of a Platform user that has API access and access to all of the records on the Platform instance (from which the data feed originates).
In the Transport Configuration section, select a Search Type and do one of the following:
Enter the credentials of the account that runs the report. The report results will be based on the permissions of that account. The account could be a content administrator with full access permissions to the content of the applications. Do not use the same account that you used to log on. It is suggested to use different accounts for different data feeds.
Select Use Windows Authentication. Single Sign-On must be configured in the source instance to use this option.
In the Instance field, enter the name of the instance where the data feed originates (this is the same instance name you enter on the Login window).
Click the Data Map tab, then click the Field Map and Key Field Definitions tabs. The data feed might map to objects and key fields in applications that you do not have licensed. Clicking on the Field Map and Key Field Definitions tabs allows the system to resolve these mappings.
To continue configuring the data feed, go to the next task. To finish setting up the feed later, click Save or Save and Close.
A data feed must be active and valid to successfully run. A successful data feed run processes all input data, completes all expected record updates, and does not report any failures in the Run Details Report.
The Data Feed Manager validates the information when a data feed is scheduled. If any information is invalid, the data feed displays an error message. You can save the data feed and correct the errors later, but the data feed does not process until you make corrections.
Data feeds are configured to run via data feed node.
You can initiate data feeds at various times and configure them to run in regular increments for an indefinite period of time.
You can run the data feed immediately.
To prevent excess server load, schedule data feeds on a staggered basis. Archer recommends scheduling a maximum of 10 data feeds to run at a time.
Configure Custom Objects
Extract the Archer_DORA_Aligned_ROI_CustomObject_Bundle_v1.zip to obtain all the custom codes. Open the folder with the name of the application you are configuring.
Important: All custom objects are dependent on field names, therefore, we strongly recommend not modifying any field name that is referenced in custom code, as such changes will require corresponding code updates.
Important: Do not make any modifications within the ROI Snapshot application, including changes to field names, section names, or field placements. Any changes may cause the associated custom code to malfunction.
Go to Entities Application. Select Level as Entities.
Open ‘Validate LEI’ custom Object.
Copy the code from ‘EntitiesLEIValidationforClassicView.html’ and paste it into Custom Object properties section.
If you are using NGRX enabled instance, copy the code from ‘EntitiesLEIValidationfor NGRXView.html’ and paste it into New Experience Custom Object section within the same custom object.
Select Display as “Display when editing a record”.
Save the changes and save the layout.
Select the Level as Branches.
Open ‘Validate LEI’ custom object.
Copy the code from ‘BranchesLEIValidationforClassicView.html’ and paste it into Custom Object properties section.
If you are using NGRX enabled instance, copy the code from ‘BranchesLEIValidationfor NGRXView.html’ and paste it into New Experience Custom Object section within the same custom object.
Select Display as “Display when editing a record”.
Save the changes and save the layout.
Go to ICT Service Providers application.
Open ‘Validate LEI’ custom object.
Copy the code from ‘ICTSP_(IC)_LEIValidationforClassicView.html’ and paste it into Custom Object properties section.
If you are using NGRX enabled instance, copy the code from ‘ICTSP_(IC)_LEIValidationfor NGRXView.html’ and paste it into New Experience Custom Object section within the same custom object.
Select Display as “Display when editing a record”.
Save the changes and save the layout.
Open ‘LEI Validation’ custom object.
Copy the code from ‘ICTSP_(AIC)_LEIValidationforClassicView.html’ and paste it into Custom Object properties section.
If you are using NGRX enabled instance, copy the code from ‘ICTSP_(AIC)_LEIValidationfor NGRXView.html’ and paste it into New Experience Custom Object section within the same custom object.
Select Display as “Display when editing a record”.
Save the changes and save the layout.
Go to ROI Snapshot application.
Open ‘Generate Export’ Custom Object.
Copy the code from ‘ROI_ExportforClassicView.html’ and paste it into Custom Object properties section.
If you are using NGRX enabled instance, Please follow the steps mentioned below.
Create a Dashboard named ‘DORA ROI Helper’ or give a name something similar and select workspace as ‘DORA Aligned Register of Information’.
Place a custom widget in the dashboard.
Copy the code from ‘ROI_Dashboard(NGRXwidget).html’ and place it in the custom widget and save it.
From the workspace menu, click on newly created dashboard and copy the url of it.
Open the ‘ROI_ExportforNGRXView.html’ in a text editor (Visual Studio / Notepad++) and go to line number 204.
In dashboardUrl variable provide the dashboard url you have created and save it.
Copy this updated code and paste it into New Experience Custom Object section within the same custom object.
Select Display as ‘Display the custom object when viewing or editing a record’.
Save the changes and save the layout.
Note: Read and update access to records to execute the custom code.
Certification environment
Date tested: November 2025
Product Name | Release Information | Operating System |
|---|---|---|
Archer | 2024.11 | Virtual Appliance |