Archer Contract Clause Management
Archer Contract Clause Management provides a central repository for storing contract clauses used in agreements with third parties. It provides a consistent process for creating and approving the clauses while providing visibility into changes within contracts and their clauses allowing you to easily identify contract clauses that require approval.
On this page
Release notes
|
Release Version |
Published Date |
Notes |
|---|---|---|
|
Archer 6.9 SP3 P2 |
December 2021 |
|
|
Archer 6.4 SP1 |
November 2018 |
Initial Release |
Overview
While Archer Contract Clause Management offers robust features for contract clause management, small to mid-sized companies may face the challenge of integrating this solution into their existing infrastructure. Integrating new software and processes can be complex, requiring careful planning and coordination with existing systems and workflows. Ensuring a seamless transition and maintaining data consistency between other tools can be a potential challenge. Organizations must address this challenge to fully realize the economic benefits of efficient contract and clause management.
Efficiently manage contract clauses with this comprehensive solution. Create, maintain, and assemble contracts with pre-approved language, identify clauses by engagement type, develop new clauses, and track amendments and modifications, all while ensuring e-Signature approval.
Archer Contract Clause Management helps organizations establish standard clauses to utilize in the Contracts application and document key information, which they use to run their business on a day to day basis. This solution enables organizations to effectively track and manage the process of developing and approving Contract Clauses. In addition, organizations can track and prioritize the different types of Clauses for a Contract, change requests to standard Contract Clauses and Contracts, association of the Clauses to the Contracts, approval information, and visibility of the Clause statuses. Graphical dashboards provide professional-looking reports to inform users of pending action items, overview of Standard and Non-Standard Clauses, non-standard clauses by engagement types, and more.
Key features and benefits
With Archer Contract Clause Management, you can do the following.
-
Create and maintain a library for Standard Contract Clauses that have been approved using e-Signatures to use within contracts.
-
Identify Contract Clauses by engagement type and monitor usage in contracts.
-
Assemble Contracts with pre-approved language by your organization.
-
Develop new contract clauses while assembling contracts.
-
Track Contract Amendments and modifications to standard contract clauses.
Archer Contract Clause Management has the folloiwng benefits.
-
Centralized Standardization: A central repository for standard contract language
-
Efficient Approval Workflow: A consistent process for creating and approving contract clauses
-
Enhanced Visibility: Visibility into contract clause changes and contract amendments
-
Automate Approvals: The ability to easily identify contract clauses requiring approval
User guide
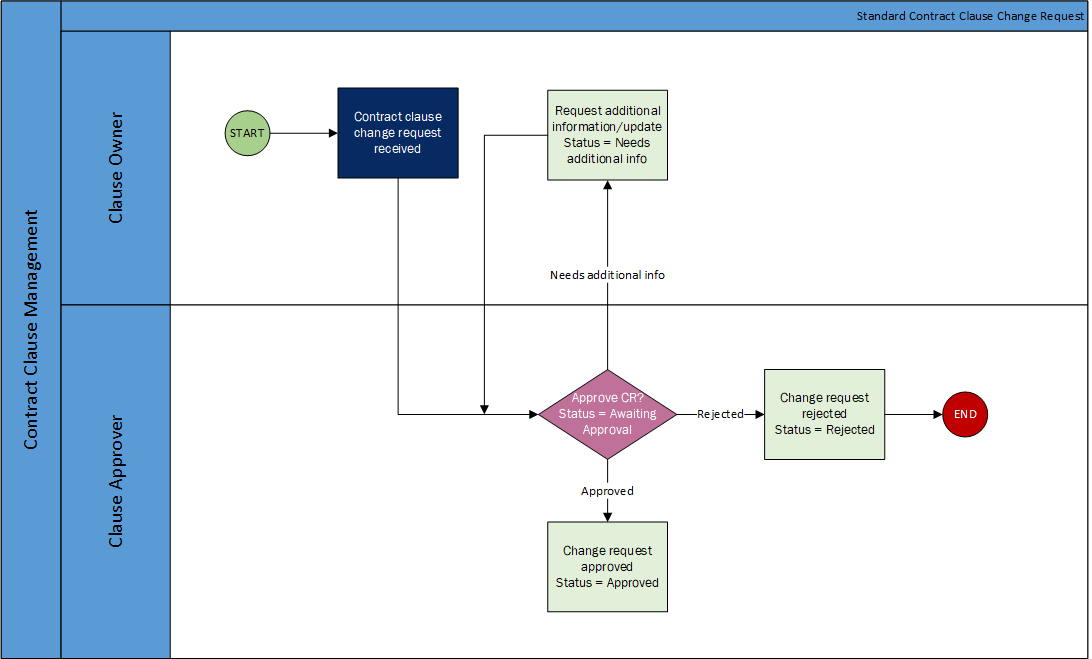
Task 1: Create a Change Request Record
User: Change Requestor
-
Create the Change Request record.
-
From the menu bar, click Contract Clause Management.
-
Under Applications, click Clause Change Requests.
-
Under More Options
 , click New Record.
-
-
Enter Change Name in the General Information section.
-
Select the Change Target from the dropdown and select respective record from the lookup for which changes are required.
-
Select the Priority, Change Impact from the dropdown and enter the Description of the change request.
-
Select any users from the list in the Stakeholders field, these users will receive a notification when the status is updated.
-
Enter Target Start Date and Target End Date in Dates section.
-
To upload any document related to request, upload it in Supporting Documentation field.
-
The Change Owner and Change Approver are populated automatically from the selected target record once the record is saved.
-
Once the record is complete, click Submit Request in the top left of the screen.
Task 2: Reviewing the Change Request
User: Change Approver
Do one of the following:
-
Approve the change request
-
Review the details in General Information section.
-
Document any notes in the Review Comments field in Review Details section. (Optional)
-
Click Approve from Actions dropdown at the top left of the screen.
-
-
Request additional information
-
Document the additional information being requested in the Review Comments field.
-
Click Needs Additional Information from Actions dropdown at the top left of the screen.
-
-
Reject the change request
-
Review the details in General Information section.
-
Document the reason for rejecting the Change Request in the Review Comments field.
-
Click Reject from Actions dropdown at the top left of the screen.
-
Task 3: Resubmitting the Change Request
User: Change Requestor
-
Check the Review Comments in Review Details section.
-
Modify/Provide the required information in the General Information section.
-
In the Supporting Documentation field, attach any additional documentation or files if requested.
-
In the Comments section, add your comments, if required.
-
When finished revising the request, click Resubmit from Actions dropdown at the top left of the screen.
Task 4: Completing the Change Request
Users: Change Requestor/Change Owner
-
Make sure the requested changes have been completed in the target record.
-
Once all information is completed, click Complete from Actions dropdown at the top left of the screen.
Task 5: Cancelling the Change Request
User: Change Requestor
-
In the Cancel Reason field, enter the details for cancelling the request.
-
Click Cancel Request from Actions dropdown at the top left of the screen.
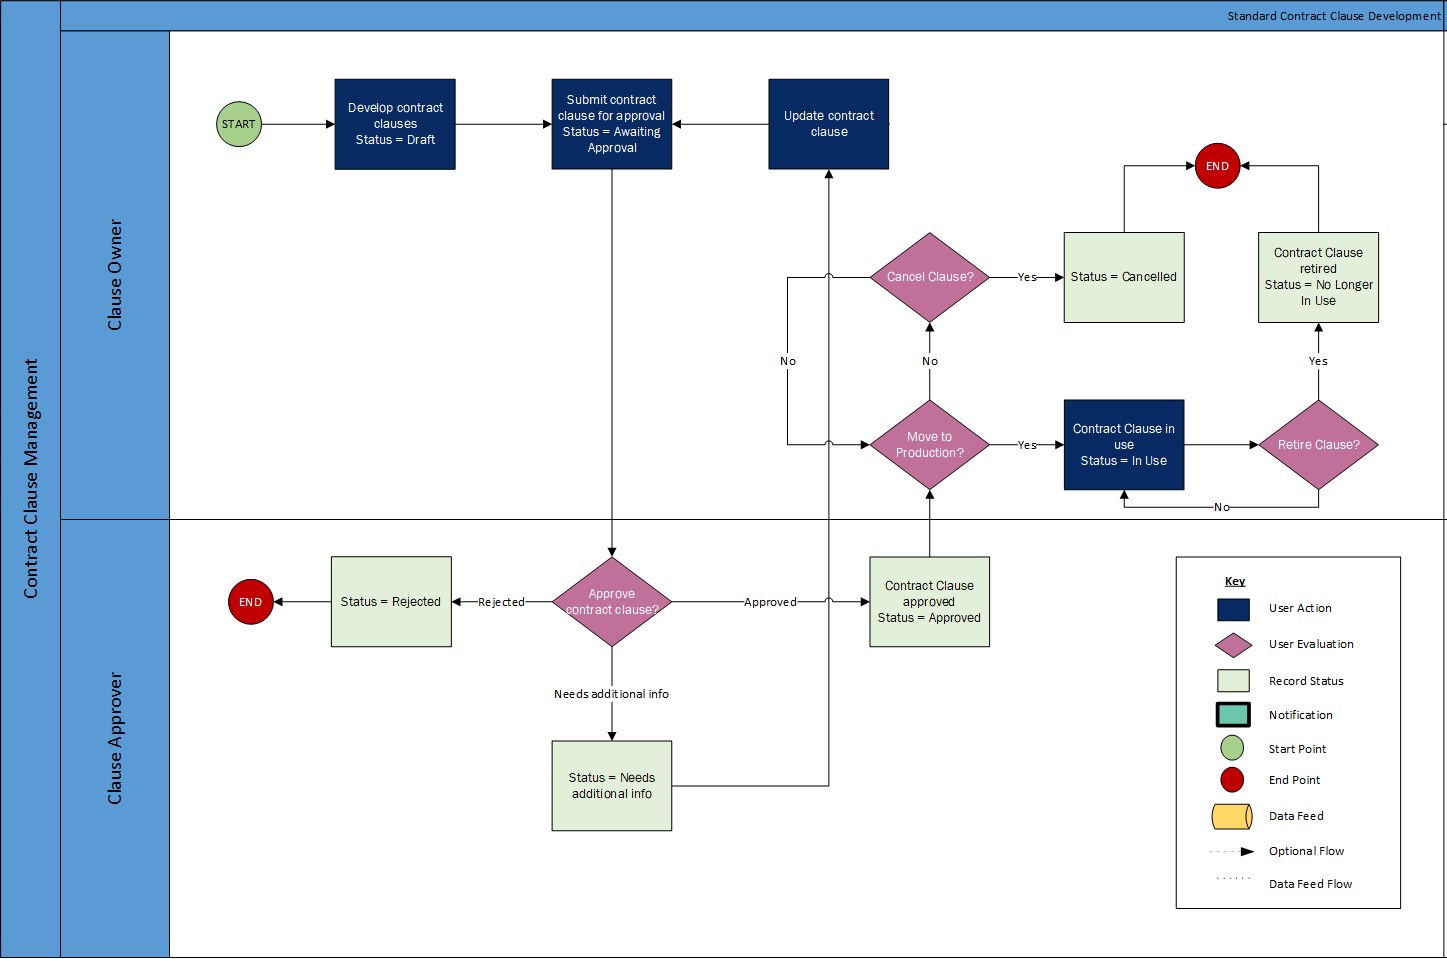
Task 1: Create a Clause
User: Clause Owner
-
Create a Clause Library record.
-
From the menu bar, click Contract Clause Management.
-
Under Applications, click Clause Library.
-
Under More Options
, click New Record.
-
-
In the General Information section, enter all pertinent information related to the Clause.
-
Enter a descriptive Clause Title.
-
Select Clause Category by clicking
the lookup next to the field and making your selection. -
(Optional) Select the Engagement Types by clicking
and selecting respective record in the General Information section. -
Enter a descriptive Clause Description and Clause Text.
-
Select Clause Approver in the Workflow and Approvals section.
-
To upload any document related to Clause, upload it in Attachments field.
-
Click Save in the Record Toolbar to save in Draft mode.
-
Once the record is complete, click the Submit for Approval button in the top left of the screen.
Task 2: Review Clause
User: Clause Approver
-
Open a Clause Library record with the Awaiting Approval status.
-
From the menu bar, click Contract Clause Management.
-
Under Dashboards, click Clause Approver.
-
View the list of records in Requests Pending for My Action.
-
-
Select the Clause Library record by clicking the Clause Title from the report.
-
Click Edit in the top of the record.
-
Do one of the following:
-
Approve the clause
-
Review the details in General Information section.
-
(Optional) Add additional comments to the record in the Clause Comments section.
-
Click Approve from Actions dropdown at the top left of the screen.
-
The user has a secure way to approve the Clause with the help of new feature called electronic signature.
-
The user enters their Archer password for completing the Approve action.
-
Electronic signature is tracked through entries in a History Log field and by having a system generated snapshot automatically attached to an attachment field.
-
-
-
Request Additional Information
-
Document the additional information being request in the Clause Comments field.
-
Click Request Additional Information from Actions dropdown at the top left of the screen.
-
-
Reject the Clause
-
Document the reason for rejecting the Clause in the Reason for Rejection field.
-
Click Reject from Actions dropdown at the top left of the screen.
-
Task 3: Resubmitting the Clause
Users: Clause Owner
-
Open a Clause Library record.
-
From the menu bar, click Contract Clause Management.
-
Under Dashboards, click Clause Owner.
-
View the list of records in Requests Pending for My Action.
-
-
Select the Clause Library record with the Needs Additional Info status.
-
Click Edit in the top of the record.
-
In Clause Comments section, check the Clause Comments.
-
In the General Information section, modify or provide the required information in the General Information section.
-
In the Attachments field, attach any additional documentation or files requested.
-
In the Comments section, add comments, if required.
-
When finished revising the request, click Resubmit for Approval from Actions dropdown at the top left of the screen.
Task 4: Move Clause to Production
Users: Clause Owner
-
Open a Clause Library record with the Approved status.
-
From the menu bar, click Contract Clause Management.
-
Under Dashboards, click Clause Owner.
-
View the list of records in Requests Pending for My Action.
-
-
To select the Clause Library record, click the Clause Title from the report.
-
Click Edit in the top of the record.
-
Review the Clause Library Record.
-
Click Move to Production from Actions dropdown at the top left of the screen.
Task 5: Discontinue Clause
User: Clause Owner
-
Open a Clause Library record.
-
From the menu bar, click Contract Clause Management.
-
Under Applications, click Clause Library.
-
-
Select the Clause Library record with the In Use status.
-
Click Edit in the top of the record.
-
In the Reason for Discontinuing Clause field, enter the.
-
Click Discontinue Clause from Actions dropdown at the top left of the screen.
Task 6: Cancelling Clause
User: Clause Owner
-
Open a Clause Library record.
-
From the menu bar, click Contract Clause Management.
-
Under Applications, click Clause Library.
-
-
Select the Clause Library record to be canceled.
-
Click Edit in the top of the record.
-
Complete the Reason for Cancellation field.
-
Click Cancel Clause from Actions dropdown at the top left of the screen.
Task 7: Reassign Approver
Users: Clause Owner / Clause Approver
-
Open a Clause Library record.
-
From the menu bar, click Contract Clause Management.
-
Under Applications, click Clause Library.
-
-
Select the Clause Library record with the Awaiting Approval status.
-
Click Edit in the top of the record.
-
Click Reassign Approver from Actions dropdown at the top left of the screen.
Task 1: Create a Contract Clause
User: Clause Owner
-
Create a Contract Clause record.
-
From the menu bar, click Contract Clause Management.
-
Under Applications, click Contracts.
-
Under More Options
, click New Record.
-
-
In the General Information section, enter the information related to the Contract.
-
To add a standard clause to the Contracts application, user must follow the below steps:
-
Select Clauses from Clause Library by clicking
the lookup next to the field and making your selection. -
In the Generate Contract Clauses field, select Yes.
-
Click Save in the Record Toolbar.
-
Upon saving the record, the Data Feed: Copy Clauses to Contract creates a copy of the standard clause from the clause library application into the Contract Clauses application.
Note: Clause Type will update to Non-Standard when changes are made to clauses in the Contract Clauses application. Non-Standard clause types will require approval to proceed further.
-
-
To add a non-standard clause to the Contracts application, in the Contract Clauses field, click Add New.
-
In the General Information section, enter all pertinent information related to the Clause.
-
Enter the Clause Order, Clause Label, and a descriptive Clause Title.
-
The Clause type value defaults to Non-Standard.
-
Select Clause Category by clicking
. -
(Optional) Select the Engagement Types by clicking
and selecting respective record in the General Information section. -
Enter a descriptive Clause Description and Clause Text.
-
Select Clause Approver in the Workflow and Approvals section.
-
To upload any document related to Clause, upload it in Attachments field.
-
Once the record is complete, select the value Submitted in Submission Status field in the Workflow and Approvals section.
-
Click Save on the record toolbar.
-
-
Upon completion of adding the Contract Clauses to Contract in the Contract Terms and Agreement section, review and update the Clause Order and Clause Label for each contract clauses by enabling the Inline edit feature.
-
Click Save on the record toolbar.
-
Proceed with the Submission of Contract record as per the Advanced Workflow.
Task 2: Review Contract Clause
User: Clause Approver
-
Review of Contract Clauses is typically part of Contracts core application workflow. It is done by enabling the inline edit feature from the View/Edit mode.
-
Open a Contracts record with the Awaiting Review status.
-
From the menu bar, click Contract Clause Management.
-
Under Applications, click Contracts.
-
-
To open the Contracts, record with the Awaiting Review status, click the Contract Name from the record.
-
Click Export in the top of the record.
-
Select the Contract Clauses mail merge template from the export window. View/Save the mail merge document and Review the Contract Clauses.
-
Return to the record view page of the Contracts. In the Contract Terms and Agreement section, click Enable Inline Edit.
-
Select the check boxes for each Contract Clause entry and choose the value Approve/Reject/Update required from the dropdown of Approval Status field.
Note: To reject the clause, document the reason for rejecting the Clause in the Reason for Rejection field.
-
Review the Contract Clauses individually, following the steps below:
-
Open a Contract Clauses record with the Approval Required status.
-
From the menu bar, click Contract Clause Management.
-
Under Dashboards, click Clause Approver.
-
View the list of records in Requests Pending for My Action.
-
-
To select the Contract Clauses record, click the Clause Title from the report.
-
Click Edit in the top of the record.
-
Do one of the following:
-
Approve the clause.
-
Review the details in General Information section.
-
(Optional) Add additional comments to the record in the Clause Comments section.
-
Select the value Approved in Approval Status field in the Workflow and Approvals section
-
Click Save in the Record Toolbar to save changes to record.
-
-
Request Updates to the Clause.
-
Document the additional information requested in the Clause Comments field.
-
Select the value Update Required in Approval Status field in the Workflow and Approvals section.
-
Click Save.
-
-
Reject the Clause.
-
Document the reason for rejecting the Clause in the Reason for Rejection field.
-
Select the value Rejected in Approval Status field in the Workflow and Approvals section.
-
Click Save.
-
Task 3: Resubmitting the Contract Clause
User: Clause Owner
-
Open a Clause Library record.
-
From the menu bar, click Contract Clause Management.
-
Under Dashboards, click Clause Owner.
-
View the list of records in Requests Pending for My Action.
-
-
Select the Contract Clauses record with the Update required status.
-
Click Edit in the top of the record.
-
In the Clause Comments section, check the Clause Comments.
-
In the General Information section, modify or enter the required information in the appropriate General Information section.
-
In the Attachments section, attach any additional documentation or files requested.
-
Add comments in the Clause Comments section, if required.
-
When finished revising the request, in the Workflow and Approvals section, in the Submission Status field, select Resubmitted.
-
Click Save.
User: Clause Owner
-
Open a Contracts record with the Executed status.
-
From the menu bar, click Contract Clause Management.
-
Under Applications, click Contracts.
-
-
Open the Contracts record with the Executed status by clicking the Contract Name from the record.
-
Click Edit in the top of the record.
-
Upload the Amendment to the Contract record.
-
Add a new Contract Clause to the Contract.
-
See Step 5 of Task 1: Create a Contract Clause in Contract Clauses section above.
-
See Step 7 of Task 2: Review Contract Clause to Approve/Reject the Contract Clause added from the above step.
-
-
Update an existing Contract Clause in the Contract.
-
A change request must be submitted and approved. Refer Task 1 and Task 2 of Change Requests section above.
-
Make necessary changes to the Contract Clauses and save the record.
-
-
Click Save.
Administrator guide
Prerequisites (ODA and system requirements)
|
Components |
Prerequisites |
|---|---|
|
Archer solution areas |
Archer Third Party Governance |
|
Archer use cases |
Archer Third Party Catalog |
|
Archer applications |
Contracts |
| Uses custom objects | No |
| Archer platform requirements | Archer Platform Release 6.9 SP3 P2 and later |
|
Requires Archer license |
Three (3) Archer On-Demand Application (ODA) licenses and one (1) core application licenses are required.
|
| Archer supported environments |
|
Compatible use cases & applications - related applications
|
Application |
Use Case |
Primary Purpose(s) of the Relationship |
|---|---|---|
|
Engagement Types |
Third Party Catalog |
|
Components
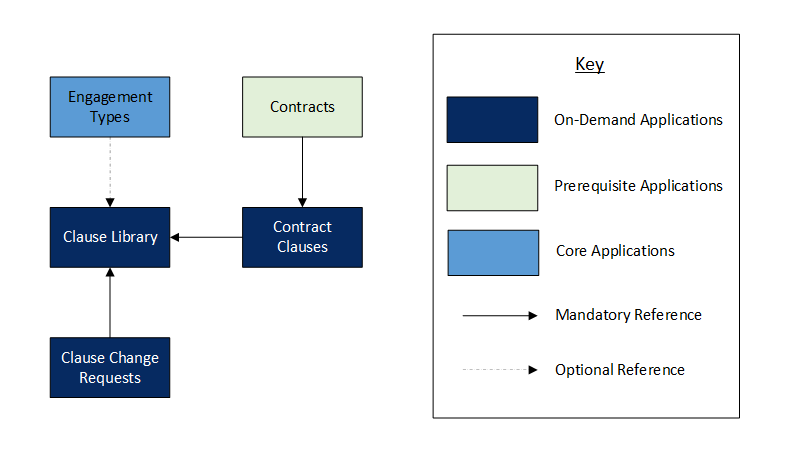
Architecture diagram
The following diagram shows the relationship between the applications in Archer Contract Clause Management.
Process diagram
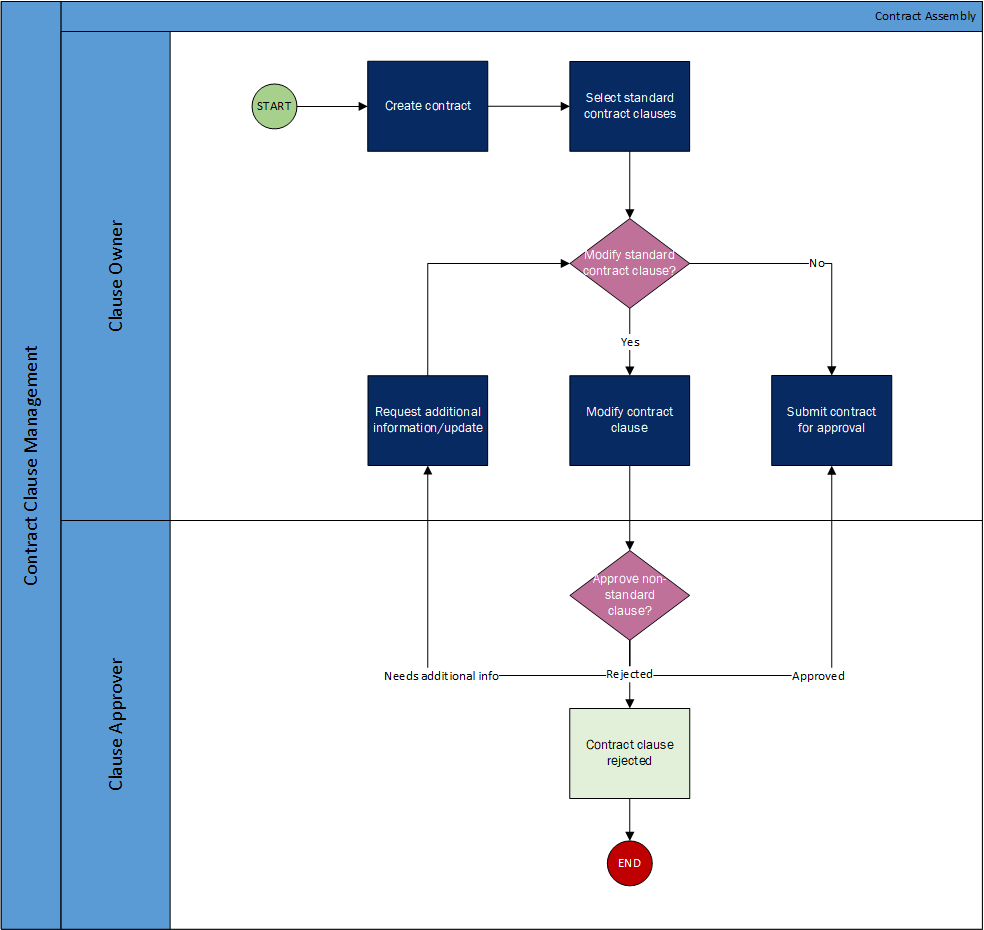
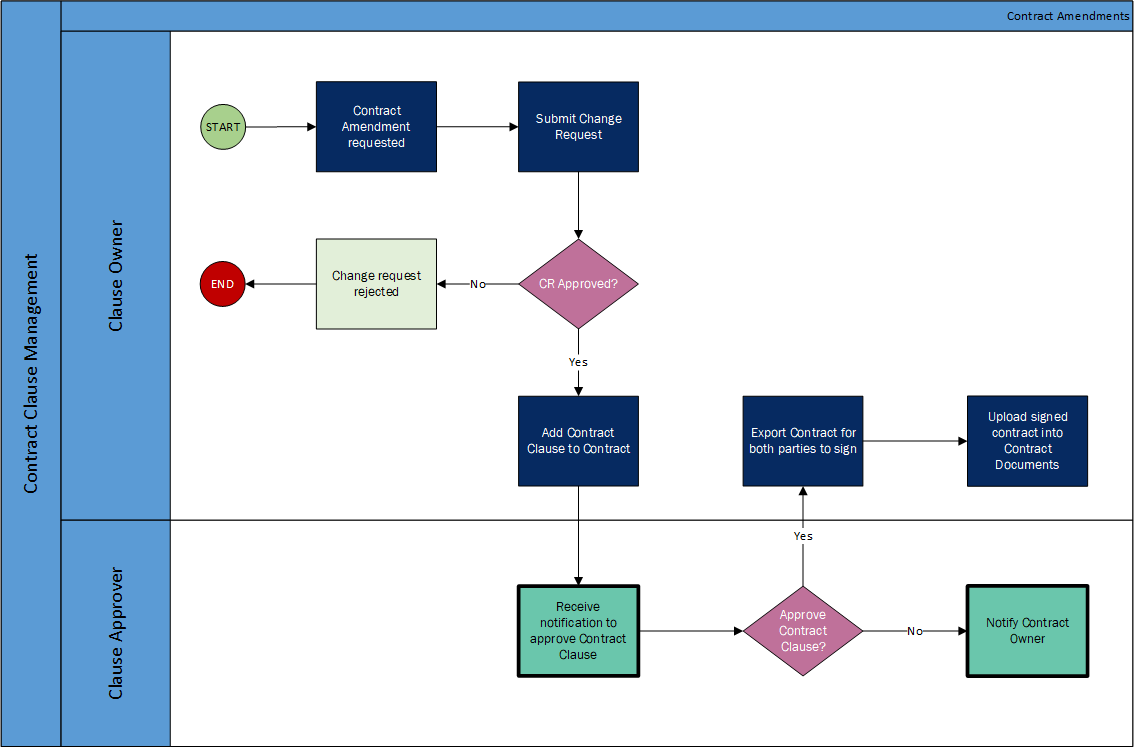
The following diagram shows the general workflow of the application.
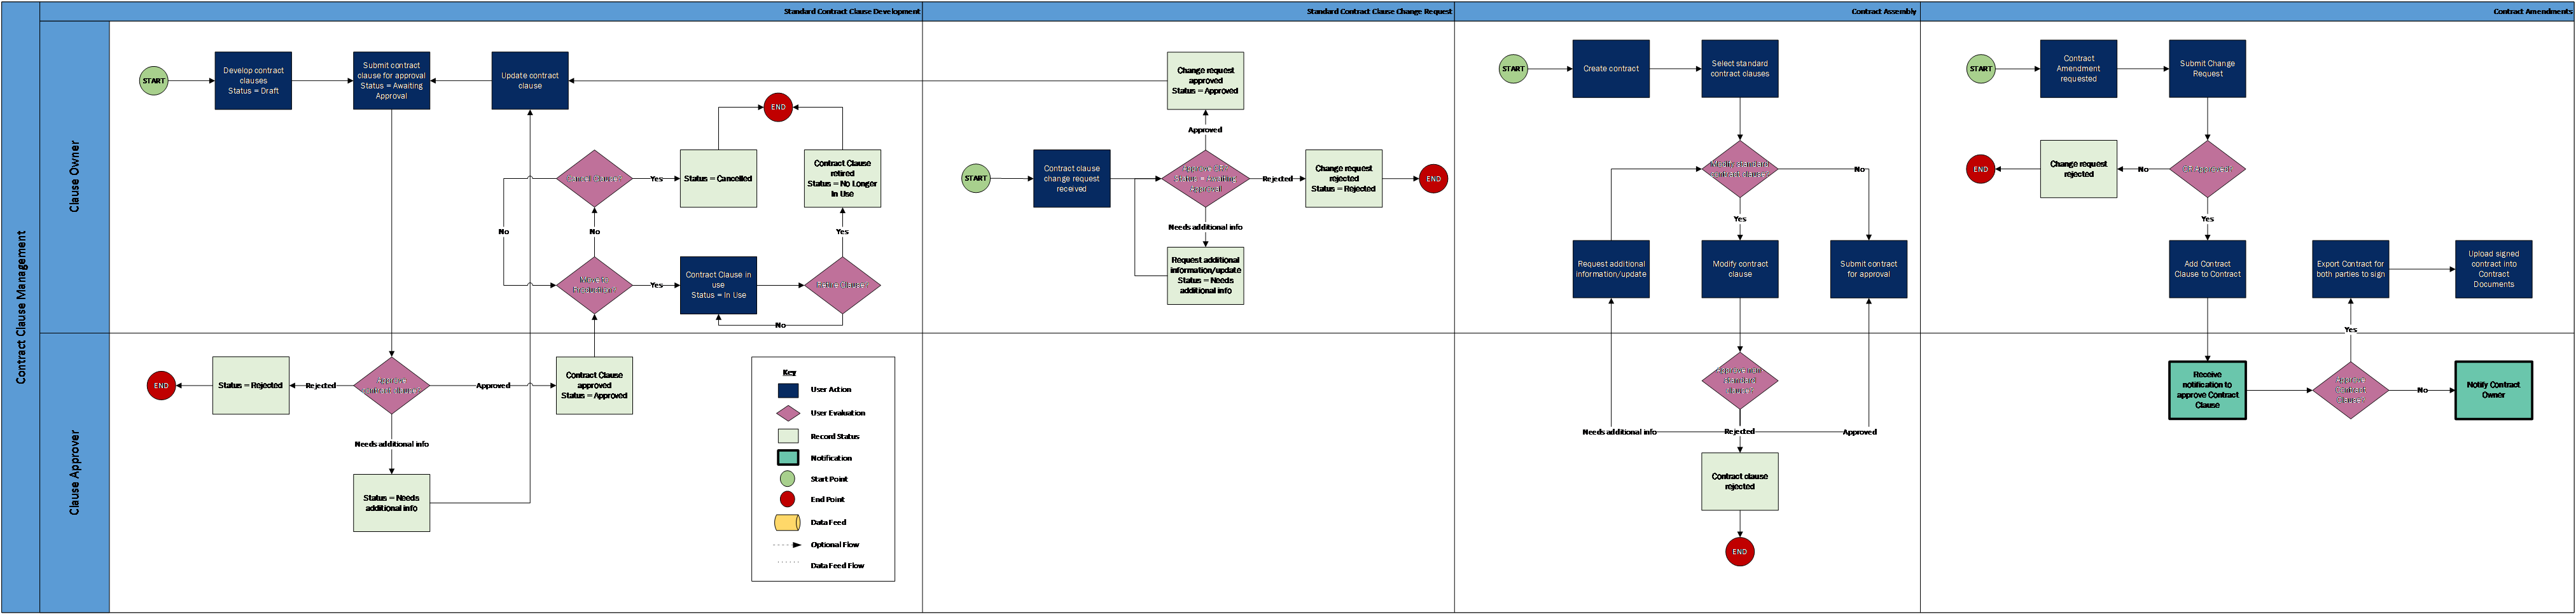
Standard Contract Clause Development
Clause Change Requests
Contract Assembly
Contract Amendments
Applications
|
Application |
Description |
|---|---|
|
Clause Library |
The Clause Library application captures standard clauses to utilize in agreements, documents key information (meta-data) and change requests, tracks approval, and copies for each clause. |
|
Clause Change Requests |
The Clause Change Request application tracks changes to standard contract clauses in the Clause Library and amendments to Contracts. It is used to document the change requirements and rationale, and track approvals for the change. |
|
Contract Clauses |
The Contract Clauses application captures contract clauses associated with contracts, documents key information (meta-data) and change requests, tracks approval and usage for each clause. |
Personas and Access Roles
The following table describes the functions that make up the application’s organization roles. Depending on the organization of your company, these functions and responsibilities may vary.
|
Function |
Description |
|---|---|
|
Clause Owner |
The Clause Owner is in charge of managing contracts and clauses. They develop the contract clauses, assemble the contracts, and manage changes to contracts and clauses. They are typically engaged in the day-to-day administration of the vendor management program. Some responsibilities may include managing the vendor's performance, spend, engagement, and contracts. Most times there are many Clause Owners and each person may manage more than one vendor, depending on the size of the vendor account. |
|
Clause Approver |
The Clause Approver is responsible for approving contracts and clauses. They are responsible for ensuring the contracts and clauses are legally acceptable for the organization. This could be the Legal and/or the Business Unit in which the contract or clause supports. |
Permissions Chart
|
Applications / Questionnaires |
Clause Owner / Change Requestors |
Clause Approver |
|---|---|---|
|
Must be added to the following groups:
|
Must be added to the following groups:
|
|
Application |
Clause Management: Clause Owner |
Clause Management: Clause Approver |
|---|---|---|
|
Clause Library |
CRU |
CRU |
|
Clause Change Request |
CRU |
CRU |
|
Contract Clauses |
CRU |
CRU |
|
Contracts |
CRU |
RU |
|
Engagement Types |
R |
R |
C = Create, R = Read, U = Update, D = Delete
Install Archer Contract Clause Management
-
Prepare for the installation.
-
Download the ODA install package from the Archer Exchange.
-
Read and understand the "Packaging Data" section of the Archer Platform Help.
-
-
Test the offering according to your company standards and procedures, to ensure that it works with your existing processes.
Install the package
There is no Undo function for a package installation. Packaging is a powerful feature that can make significant changes to an instance. Back up the instance database before installing a package. This process enables a full restoration if necessary.
An alternate method for undoing a package installation is to create a package of the affected objects in the target instance before installing the new package. This package provides a snapshot of the instance before the new package is installed, which can be used to help undo the changes made by the package installation. New objects created by the package installation must be manually deleted.
-
From the menu bar, click
 > Application Builder > Install Packages.
 - In the Available Packages section, click Import.
- Click Add New, then locate and select the package file that you want to import.
- Click OK.
The package file is displayed in the Available Packages section and is ready for installation.
Important: This step is required only if you are upgrading to a later version.
-
From the menu bar, click
> Application Builder > Install Packages. - In the Available Packages section, locate the package you want to map.
- In the Actions column, click
 for that package.
The analyzer examines the information in the package. The analyzer automatically matches the system IDs of the objects in the package with the objects in the target instance and identifies objects from the package that are successfully mapped to objects in the target instance, objects that are new or exist but are not mapped, and objects that do not exist (the object is in the target but not in the source).
When the analyzer is complete, the Advanced Package Mapping page lists the objects in the package file and corresponding objects in the target instance.
- On the Advanced Mapping page, click to open each category and review the icons next to each object to determine which objects you must map manually.
The following table describes the icons. Icon
Name
Description

Awaiting Mapping Review
Indicates that the system could not automatically match the object or one of its children to a corresponding object in the target instance.
Objects marked with this icon must be mapped manually.
New objects should not be mapped. Select Do Not Map from the drop-down menu to clear this icon for an individual object, or click Do Not Map to clear the icon for all unmapped objects.

Mapping Completed
Indicates that the object and all children are mapped to objects in the target instance, or that they have been marked as Do Not Map. Nothing more needs to be done with these objects in Advanced Package Mapping.
Note: You can run the mapping process without mapping all objects. The
icon is for informational purposes only. - For objects awaiting mapping review, do one of the following:
- To map each object individually, use the drop-down menu in the Target column to select the object in the target instance to which you want to map the source object. To leave an object unmapped, select Do Not Map in the Target column.
- To automatically map all objects in a category that have different system IDs but the same object name as an object in the target instance, click Auto Map. Select whether to ignore case and spaces when matching object names. Click OK.
- To mark all unmapped objects as Do Not Map, click Do Not Map.
-
(Optional) Click
 to enable filter fields that you can use to find specific objects in each mapping category. To undo your mapping selections, click Undo, then select whether to undo all mappings in the category or only the mappings on a single page. If you choose to undo all mappings, you will be returned to the categories list.
 - (Optional) To save your mapping selections and return to the categories list without committing changes to the target instance, click
 .
. - After you review and map all objects, click Execute.
- Select I understand the implications of performing this operation. Click OK.
When the mapping is complete, the Import and Install Packages page displays.
Important: Advanced Package Mapping modifies the system IDs in the target instance. You must update any Data Feeds and Web Service APIs that use these objects with the new system IDs.
All objects from the source instance are installed in the target instance unless the object cannot be found or is flagged to not be installed in the target instance. The Log Messages section provides a list of conditions that may cause objects not to be installed. The Package Installation Log section displays a log entry.
-
From the menu bar, click
 > Application Builder > Install Packages.
 -
In the Available Packages section, locate the package file that you want to install, and click Install.
-
In the Selected Components section, click the Lookup button to open the Package Selector window.
-
To select all components, select the top-level checkbox.
-
To install only specific global reports in an already installed application, select the checkbox associated with each report that you want to install.
Note: Items in the package that do not match an existing item in the target instance are selected by default.
-
-
Under the Install Method drop-down menu, select an option for each selected component. To use the same Install Method for all selected components, select a method from the top-level drop-down list.
Note: If you have any existing components that you do not want to modify, select Create New Only. You may have to modify those components after installing the package to use the changes made by the package.
-
To deactivate target fields and data-driven events that are not in the package, in the Post-Install Actions section, select the Deactivate target fields and data-driven events that are not in the package checkbox. To rename the deactivated target fields and data-driven events with a user-defined prefix, select the Apply a prefix to all deactivated objects checkbox, and enter a prefix. This can help you identify any fields or data-driven events that you may want to review for cleanup post-install.
-
Click Install.
-
Click OK.
-
From the menu bar, click
> Application Builder > Install Packages. - In the Package Installation Log section, click the package that you want to view.
- In the Package Installation Log page, in the Object Details section, click View All Errors.
Note: To view individual logs, in the Errors column of the log you want to view, click the Failures link or Warnings link. Clicking View All Errors, Failures, or Warnings opens the specific errors on a different page.
- Click the Export icon to export the log file.
- Click Close.
For a list of packaging installation log messages and remediation information for common messages, see Package Installation Log Messages.
Configure the Archer Contract Clause Management
-
Click
and navigate to Applications.-
Under the Application Builder dropdown, select Applications.
-
-
Select the Contracts application and navigate to the Designer tab.
-
In Data Fields section, ensure the cross-reference field Select Clauses from Clause Library is present.
-
In Data Fields section, ensure the related records field Contract Clauses is present.
-
Add a new field
-
Generate Contract Clauses
-
Type: Value List (Field Specific)
-
Display Control: Radio Buttons
-
Configuration: 2 Column Layout
-
Values:
-
Yes
-
No (Make No as Default value)
-
-
Access: Public
-
-
-
Add new Section named Contract Terms and Agreement under General Information section. Place the created field in this section. Repeat this in all the layouts of Contracts application.
-
Save the application.
-
Navigate to reports page of Contracts application.
-
Click on New.
-
In the Fields to Display section, select the following fields:
-
Tracking ID
-
Contract Name
-
Submitted By
-
Approved By
-
Click on Add New Relationship and select Clause Library
-
Tracking ID
-
Clause Title
-
Status
-
Approval Status
-
Clause Category
-
Clause Text
-
Clause Description
-
Date Reviewed
-
Production Date
-
Engagement Type
-
Clause Required for Engagement Types?
-
-
Add the following Filters:
-
Generate Contract Clauses Contains Yes
-
Status Contains In Use
-
-
In the Display Options, select the Display Format as Column - Flat.
-
Click on Search.
-
Click Save.
-
Enter the name: Data Feed: Copy Clauses to Contract.
-
Permissions: Global Report.
-
Save the Report.
-
Note down the Report GUID. This will be helpful in the Data Feed Configuration step.
-
Click on Save > Save Report changes
-
In the Report Information section, Copy and Save the ID value in a Notepad.
-
Set up the data feed
-
Go to the Manage Data Feeds page.
-
From the menu bar, click
. -
Under Integration, click Data Feeds.
-
-
In the Manage Data Feeds section, click Import.
-
Locate and select the Data Feed: Copy Clauses to Contract.dfx5 file for the data feed.
-
From the General tab in the General Information section, select Active.
-
Click the Source Connection tab. Complete the fields in the Logon Properties section as follows:
-
In the URL field, type: YourServerName/VirtualDirectoryName/ws/search.asmx
-
-
Complete the fields in the Transport Configuration section as follows:
-
Enter the Report ID which was saved from the previous Task.
-
In the User Name and Password fields, type the username and password of a Platform user that has API access and access to all the records on the Platform instance (from which the data feed is coming).
-
In the Instance field, type the name of the Platform instance from which the data feed is coming (this is the instance name as you enter it on the Login window).
-
-
In the Data Map tab:
-
Map the source field Generate_CC_Flag with the target field Generate Contract Clauses. Configure: uncheck Add unknown source values option and choose Replace existing target field values.
-
Verify that key field values are not missing from the data feed setup window.
-
-
Click Save.
Important: A data feed must be active and valid to successfully run.
As you schedule your data feed, the Data Feed Manager validates the information. If any information is invalid, an error message is displayed. You can save the data feed and correct the errors later; but the data feed does not process until you make corrections.
-
Go to the Run Configuration tab of the data feed that you want to modify.
-
From the menu bar, click
. -
Under Integration, click Data Feeds.
-
Select the data feed.
-
Click the Run Configuration tab.
-
-
Go to the Schedule section and complete frequency, start date and time, and time zone.
-
(Optional) To override the data feed schedule and immediately run your data feed, click Run Now button at the top.
-
Click Save.
Add Mail Merge Templates
-
Go to the Mail Merge Templates page.
-
From the menu bar, click
. -
Under Management Reporting, click Mail Merge Templates.
-
-
Add a new Mail Merge template, click
 .
. -
Complete the General Information section.
-
Enter the name Contract Clauses
-
Select Contracts from the dropdown in the Application field.
-
Select Output Type as DOCX.
-
-
In the Report Template section, do the following:
-
Click
. -
Attach the file Contract Clause_MailMerge.docx
-
Click Upload.
-
-
Click Save or Save and Close.
Create User Accounts
Create User: Clause Owner
-
-
From the menu bar, click
. -
Under Access Control, click Users.
-
-
Click Add New.
-
In the General Information section, enter:
-
The name of the user
-
The user name for log on
-
-
In the Contact Information section, enter the default email address and any other pertinent information for contacting the user.
-
(Optional) In the Localization section, enter the time zone, locale, and language if the location and language of the user is different from the system.
-
In the Account Maintenance section, enter the user password and assign the security parameter for this user.
-
(Optional) Select the Send user a notification with password information checkbox if you want to send the user an email notification of the password change.
Note: If you do not select this checkbox, you must inform the user of the new password. The Default Email address is used for the notification email.
-
(Optional) In the Notes section, record any additional information about the user account. For example, list hours of availability or preferences for contacting the user. Account notes appear when users click a linked user name in Archer to view the user profile.
-
In the Groups tab, select the Clause Management: Clause Owner group through lookup option.
-
Click Save.
Create User: Clause Approver
-
Go to the Manage Users page.
-
From the menu bar, click
. -
Under Access Control, click Users.
-
-
Click Add New.
-
In the General Information section, enter:
-
The name of the user
-
The user name for log on
-
-
In the Contact Information section, enter the default email address and any other pertinent information for contacting the user.
-
(Optional) In the Localization section, enter the time zone, locale, and language if the location and language of the user is different from the system.
-
In the Account Maintenance section, enter the user password and assign the security parameter for this user.
-
(Optional) Select the Send user a notification with password information checkbox if you want to send the user an email notification of the password change.
Note: If you do not select this checkbox, you must inform the user of the new password. The Default Email address is used for the notification email.
-
(Optional) In the Notes section, record any additional information about the user account. For example, list hours of availability or preferences for contacting the user. Account notes appear when users click a linked user name in Archer to view the user profile.
-
In the Groups tab, select Clause Management: Clause Approver group through lookup option.
-
Click Save.
Certification environment
Date tested: December 2021
|
Product Name |
Version Information |
Operating System |
|---|---|---|
|
Archer Suite |
6.9 SP3 P2 |
Virtual Appliance |