Archer Discussion Forum
Archer Discussion Forum can help you manage informal interactive communication within your organization. You can start a discussion and allow other users to respond to the posted topic. You can also associate a record in Archer and assign specific users to participate in the discussion or allow everyone in your organization to participate. In addition, you can track the outcomes of discussions to ensure any actions are completed. Once a discussion is closed, you can choose to delete or archive it.
Archer Exchange: With the Archer Exchange, the Archer team has created a broad selection of supplemental, value-added offerings to help you get your unique risk management program on the right path, right from the start. You can leverage the Archer Exchange offerings to expand the use of Archer solutions into new business processes and address specific industry, geographic, regulatory, or technical requirements.
On this page
Release notes
Last updated: October 2024| Release | Date | Notes |
|---|---|---|
| 2024.09 | October 2024 | Classic Dashboards are now replaced with Next generation dashboard |
| 6.8 | February 2021 | Initial release |
Overview
Implementing Archer Discussion Forum may present challenges tied to adopting a new communication culture within the organization. Transitioning from informal, untracked exchanges to structured discussion forums requires a significant cultural shift. Initially, users may resist documenting conversations and following formalized processes. To ensure success, it’s essential to drive active participation, maintain follow-up on actions, and foster acceptance of this new communication model. These steps are critical for maximizing the offering’s effectiveness and overcoming potential resistance to change.
Archer Discussion Forum helps organizations create a structured and collaborative communication environment. It enables teams to move beyond informal exchanges by providing tools to manage discussions, assign participants, and link conversations to actionable outcomes. This approach ensures transparency, accountability, and alignment with organizational goals.
A Discussion Forum is a structured, secure environment where users can participate in focused conversations with other users. Discussion forums are a good place to ask questions, share opinions, offer solutions, and explore new ideas. They can also be categorized and filtered to the user's preference. When a message is posted to the discussion forum, the message is immediately available to other users to participate in the discussion. The message remains displayed in the discussion forum until the Discussion Owner archives or deletes it.
Archer users within an organization require a way to track and manage discussions within Archer. These discussions need to provide a means of structure and security in which the Archer Users can have focused conversations with other Archer users and have a sense of privacy around the information that is being shared. Archer Users may require the need to associate discussions to specific records or content in Archer and require the ability to add other Archer users to the discussion.
Features and benefits
Archer Discussion Forums enables organizations to do the following.
Facilitate organized conversations where users can post messages on diverse topics—questions, opinions, solutions, or innovative ideas—within a controlled environment.
Assign specific individuals to discussions to ensure relevant stakeholders are engaged and action items are addressed effectively.
Convert discussions into actionable steps by creating and tracking action plans derived from conversation outcomes.
Link discussions directly to Archer records for easy tracking, referencing, and maintaining context related to specific issues or topics.
Benefits of using Archer Discussion Forum include the following.
Drive active participation in discussions within a structured environment, fostering engagement and collaboration among team members.
Improve communication within the organization by asking questions, sharing opinions, offering solutions or exploring new ideas.
Easily identify areas for improvement and innovation by analyzing the insights and discussions generated within the platform.
User guide
User: Discussion Owner
Go to the New Discussion.
From the menu bar, click Discussion Forums
Under Solutions, click Discussion Forums.
Under Applications, click Discussions.
Click New Record.
Enter the following in the General Information Section
Discussion subject in [Subject].
Description in [Body]
Select any records related to the discussion in [Related Records]
Select [Expiration Date]
In [Expiration Plan], select Archive/Delete/None depending on what should happen to the discussion and its related responses on expiration.
Select [Discussion Accessibility] as Public to make the record available to public. Default selection is Private.
Enter [Discussion Participants] and [Watchers] in the Discussion Stakeholders section
Click Save.
User: Discussion Owner/Discussion Participant
Open the discussion record. Click on Add New on the top right corner of the Reply section.
Enter the following in the General Information Section
Reply subject in [Subject].
Description in [Body]
Select any records related to the reply in [Related Records]
Select users in [Tag Users] to tag them for response.
Click Save.
User: Discussion Owner/Discussion Participant
Open the response record. Click on Add New on the top right corner of the Reply section.
Enter the following in the General Information Section
Reply subject in [Subject].
Description in [Body]
Select any records related to the reply in [Related Records]
Select users in [Tag Users] to tag them for response.
Click Save.
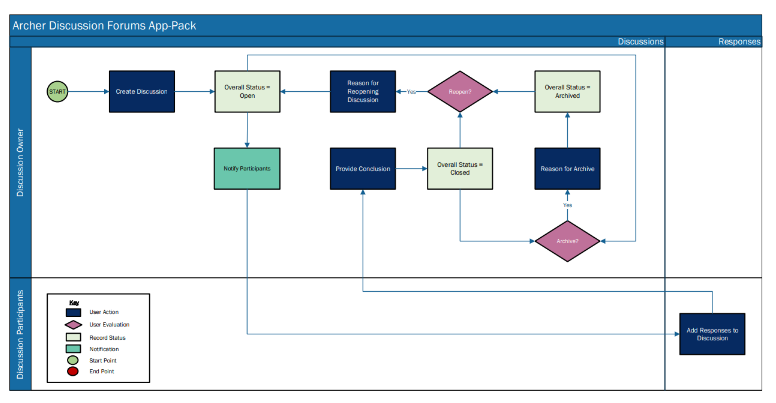
User: Discussion Owner
Open the discussion record.
In Discussion Owner Actions section, select Locked in [Discussion Status]
Provide [Discussion Conclusion], if any.
Click Save.
Overall Status for the discussion and related responses will change to Locked. Record and related responses become read-only to all users except Discussion Owner.
User: Discussion Owner
Open the discussion record.
In Discussion Owner Actions section, select Closed in [Discussion Status]
Provide [Discussion Conclusion], if any.
Click Save.
Overall Status for the discussion and related responses will change to Closed. Closed Date will be set to current day. Record and related responses become read-only to all users except Discussion Owner.
User: Discussion Owner
Open the discussion record.
In Discussion Owner Actions section, select Archived in [Discussion Status]
Provide [Reason for Archive], if any.
Click Save.
Overall Status for the discussion and related responses will change to Archived. Archived Date will be set to current day. Record and related responses are only visible to the Discussion Owner.
User: Discussion Owner
Open a discussion record.
In Discussion Owner Actions section, select Open in [Discussion Status]
Provide [Reason for Reopening].
Change [Expiration Date], in General Information Section if required.
Click Save.
Overall Status for the discussion and related responses will change to Open. Reopened Date will be set to current day. Record and related responses become visible to all stakeholders.
User: Discussion Owner
Open a discussion record.
In the right corner of the record click on the share button and select Email.
Select the email template of your choice.
On Demand Email Dialog will popup. Provide the recipient mail address, modify subject and body, add attachments if any and click on send.
Administrator guide
Prerequisites (ODA and system requirements)
Components | Recommended Software |
|---|---|
| Archer Solution Area(s) | All |
| Archer Use Case(s) | This offering does not have any prerequisite use cases. |
| Archer Application(s) | This offering does not have any prerequisite applications. |
| Uses Custom Objects | No |
Requires Archer On-Demand Application Licenses | This offering requires two (2) Archer On-Demand Application licenses. |
Archer requirements | Archer Platform Release 2024.09 and later |
Supported Archer Environments |
|
Compatible use cases & applications - related applications
Application | Use Case | Primary Purpose of the Relationship |
|---|---|---|
Findings | Issues Management | You can create any findings for action items identified during the discussion |
Task Management | Task Management | You can create any user tasks for action items identified during the discussion |
Components
Architecture diagram
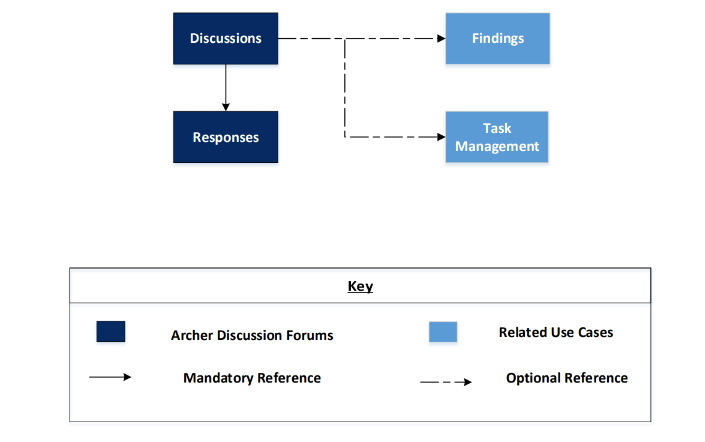
Persona process diagram
The diagram below shows general working of the offering.
Applications
Application | Description |
|---|---|
Discussions | The Discussions application documents the discussions and information regarding the discussion (i.e. related records, supporting documentation, discussion participants). |
Responses | The Responses application documents replies to discussions and responses. It tracks the participants and documents any related records or supporting documentation. |
Personas and Access Roles
The following table describes the functions that make up the application’s organization roles. Depending on the organization of your company, these functions and responsibilities may vary.
Function | Description | How Many? | Optional/Required |
|---|---|---|---|
Discussion Owners | Responsible for creating discussions and assigning participants. They are also responsible for managing the discussion and closing and archiving the discussion when it is no longer required. This person can be anyone in the organization that has authority to create a discussion. | One | Required |
Discussion Participants | Responsible for participating in discussions. They can respond to a discussion or a message in the discussion. They can attach supporting documents or reference related records. This person must be added to the discussion in order to participate. | Many | Optional |
Applications | Discussion Owners | Discussion Participants | Discussion: Read-only |
|---|---|---|---|
Discussions | CRUD* | R | R |
Responses | CRUD* | CRUD* | R |
Findings | CRU | CRU | CRU |
Task Management | CRU | CRU | CRU |
**Record creator can delete their own records.
Installing Archer Discussion Forums
Prepare for the installation.
Obtain the installation package.
Read and understand the "Packaging Data" topic in the Archer Platform Help.
Install the package.
Set up the data feeds.
Test the installation. Test the application according to your company standards and procedures, to ensure that the use case works with your existing processes.
You must import and schedule each use case data feed that you want to use. See Setting Up Data Feeds for complete information.
Install the package
Installing a package requires that you import the package file, map the objects in the package to objects in the target instance, and then install the package.
There is no Undo function for a package installation. Packaging is a powerful feature that can make significant changes to an instance. Back up the instance database before installing a package. This process enables a full restoration if necessary.
An alternate method for undoing a package installation is to create a package of the affected objects in the target instance before installing the new package. This package provides a snapshot of the instance before the new package is installed, which can be used to help undo the changes made by the package installation. New objects created by the package installation must be manually deleted.
From the menu bar, click
 > Application Builder > Install Packages.
- In the Available Packages section, click Import.
- Click Add New, then locate and select the package file that you want to import.
- Click OK.
The package file is displayed in the Available Packages section and is ready for installation.
Important: This step is required only if FAR Regulatory Correspondence is already present in your system, and you are installing this package.
From the menu bar, click
> Application Builder > Install Packages.- In the Available Packages section, locate the package you want to map.
- In the Actions column, click
 for that package.
The analyzer examines the information in the package. The analyzer automatically matches the system IDs of the objects in the package with the objects in the target instance and identifies objects from the package that are successfully mapped to objects in the target instance, objects that are new or exist but are not mapped, and objects that do not exist (the object is in the target but not in the source).
When the analyzer is complete, the Advanced Package Mapping page lists the objects in the package file and corresponding objects in the target instance.
- On the Advanced Mapping page, click to open each category and review the icons next to each object to determine which objects you must map manually.
The following table describes the icons. Icon
Name
Description

Awaiting Mapping Review
Indicates that the system could not automatically match the object or one of its children to a corresponding object in the target instance.
Objects marked with this icon must be mapped manually.
New objects should not be mapped. Select Do Not Map from the drop-down menu to clear this icon for an individual object, or click Do Not Map to clear the icon for all unmapped objects.

Mapping Completed
Indicates that the object and all children are mapped to objects in the target instance, or that they have been marked as Do Not Map. Nothing more needs to be done with these objects in Advanced Package Mapping.
Note: You can run the mapping process without mapping all objects. The
icon is for informational purposes only. - For objects awaiting mapping review, do one of the following:
- To map each object individually, use the drop-down menu in the Target column to select the object in the target instance to which you want to map the source object. To leave an object unmapped, select Do Not Map in the Target column.
- To automatically map all objects in a category that have different system IDs but the same object name as an object in the target instance, click Auto Map. Select whether to ignore case and spaces when matching object names. Click OK.
- To mark all unmapped objects as Do Not Map, click Do Not Map.
(Optional) Click
 to enable filter fields that you can use to find specific objects in each mapping category. To undo your mapping selections, click Undo, then select whether to undo all mappings in the category or only the mappings on a single page. If you choose to undo all mappings, you will be returned to the categories list.
- (Optional) To save your mapping selections and return to the categories list without committing changes to the target instance, click
 .
. - After you review and map all objects, click Execute.
- Select I understand the implications of performing this operation. Click OK.
When the mapping is complete, the Import and Install Packages page displays.
Important: Advanced Package Mapping modifies the system IDs in the target instance. You must update any Data Feeds and Web Service APIs that use these objects with the new system IDs.
All objects from the source instance are installed in the target instance unless the object cannot be found or is flagged to not be installed in the target instance. A list of conditions that may cause objects not to be installed is provided in the Log Messages section. A log entry is displayed in the Package Installation Log section.
- From the menu bar, click > Application Builder > Install Packages.
- In the Available Packages section, locate the package file that you want to install, and click the file name or
 at end of the row to open the Options menu.
 - In the Selected Components section, click the Lookup button to open the Package Selector window.
- To select all components, select the top-level checkbox.
- To install only specific global reports in an already installed application, select the checkbox associated with each report that you want to install.
Note: Items in the package that do not match an existing item in the target instance are selected by default.
- Under the Translation Option drop-down menu, select an option for each selected component. To use the same Translation Option for all selected components, select a method from the top-level drop-down list.
The Translation Option is enabled only when a language is selected.The following table describes the options. Option
Description
Full Install
Installs the component and its translations from the selected languages.
Translations Only
Only installs the translations from the selected languages.
- Under the Install Method drop-down menu, select an option for each selected component. To use the same Install Method for all selected components, select a method from the top-level drop-down list.
The following table describes the options. Option
Description
Create New Only
Only creates new fields and other elements in the applications, questionnaires, workspaces, data feeds, and dashboards specified in the package file. This option does not modify any existing elements on your instance of Archer. This is useful when you want to add functionality to an existing application, questionnaire, workspace, dashboard, data feed, or access role, but you do not want to risk making any unwanted changes to the existing elements of workspaces, data feeds, or dashboards.
Note: The Create New Only option does not apply to access roles or languages.
Create New and Update
Updates all elements in the applications, questionnaires, workspaces, data feeds, and dashboards as specified in the package file. This includes adding new elements and updating existing elements.
Note: The Create New and Update option does not apply to access roles or languages.
- Under the Install Option drop-down menu, select an option for each selected component. To use the same Install Option for all selected components, select an option from the top-level drop-down list.
The following table describes the options. Option
Description
Do not Override Layout
Installs the component, but does not change the existing layout. This is useful if you have a lot of custom fields and formatting in your layout that you do not want to risk losing.
You may have to modify the layout after installing the package to use the changes made by the package.
Note: The Do not Override Layout option does not apply to access roles or languages.
Override Layout
Updates the layout as specified in the package file, overwriting the existing layout.
Note: The Override Layout option does not apply to access roles or languages.
- Click Continue to advance to the next object category in the Package Selector, and repeat steps 4 to 6. After reviewing all object categories, click OK.
- To deactivate target fields and data-driven events that are not in the package, in the Post-Install Actions section, select the Deactivate target fields and data-driven events that are not in the package checkbox. To rename the deactivated target fields and data-driven events with a user-defined prefix, select Apply a prefix to all deactivated objects, and enter a prefix. This can help you identify any fields or data-driven events that you may want to review for cleanup post-install.
- Click Install.
- Click OK.
From the menu bar, click
> Application Builder > Install Packages.- In the Package Installation Log section, click the package that you want to view.
- In the Package Installation Log page, in the Object Details section, click View All Errors.
Note: To view individual logs, in the Errors column of the log you want to view, click the Failures link or Warnings link. Clicking View All Errors, Failures, or Warnings opens the specific errors on a different page.
- Click the Export icon to export the log file.
- Click Close.
For a list of packaging installation log messages and remediation information for common messages, see Package Installation Log Messages.
Set up data feeds
Configure the archer to archer data feeds in the following order:
Delete Expired Discussions
Delete Orphaned Responses
Go to the Manage Data Feeds page.
From the menu bar, click
.Under Integration, click Data Feeds.
In the Manage Data Feeds section, locate and select the data feed.
From the General tab in the General Information section, in the Status field, select Active.
Click the Transport tab. Complete the fields in the Transport Configuration section as follows: In the URL field, type: YourServerName/VirtualDirectoryName/ws/search.asmx
In the User Name and Password fields, type the username and password of a Platform user that has API access and access to all of the records on the Platform instance (from which the data feed is coming).
In the Instance field, type the name of the Platform instance from which the data feed is coming (this is the instance name as you enter it on the Login window).
Verify that key field values are not missing from the data feed setup window.
Click Save.
Important: A data feed must be active and valid to successfully run.
As you schedule your data feed, the Data Feed Manager validates the information. If any information is invalid, an error message is displayed. You can save the data feed and correct the errors later; but the data feed does not process until you make corrections.
Go to the Schedule tab of the data feed that you want to modify.
From the menu bar, click
.Under Integration, click Data Feeds.
Select the data feed.
Click the Schedule tab.
Go to the Recurrences section and complete frequency, start and stop times, and time zone.
(Optional) To override the data feed schedule and immediately run your data feed, in the Run Data Feed Now section, click Start.
Click Save.
Migrate from Archer Platform Discussion Forum to Archer Exchange Discussion Forum
This section is only applicable to users who are currently using the discussion forums feature of Archer and would like to migrate the data to the Archer Exchange Discussion Forum.
Discussions application would capture “Forum” information from the Discussion Forum Feature. The Topics/Messages would be captured in the Responses application.
If any discussion type fields were used by the customers, manually create the cross references to the discussion and the responses applications.
Discussion Forum Community: Only community name is captured in the Discussion Category field in Discussions Application. This field is placed off-layout in package. Users can move this onto the layout if required.
Discussion Forum Roles: Not Migrated.
Note: Once the records are migrated from feature to applications, you must identify Discussion Owner, Participants and Watchers in the Discussions application. This is a one-time task.
Forum: Data migration will be done for following components:
Forum Name:
Target Application – Discussions
Target Field - Subject
Description
Target Application – Discussions
Target Field - body
Status (Locked/Archived)
Target Application – Discussions
Target Field – Discussion Status
Forum Expiration Plan
Target Application – Discussions
Target Field – Discussion Expiration Plan
Forum Expiration Date
Target Application – Discussions
Target Field – Discussion Expiration Date
Created By
Target Application – Discussions
Target Field – Created By
Created Date
Target Application – Discussions
Target Field – Created Date
Message: Data migration will be done for following components:
Subject:
Target Application – Responses
Target Field – Subject
Body:
Target Application – Responses
Target Field – Body
Created By
Target Application – Responses
Target Field – Created By
Created Date
Target Application – Responses
Target Field – Created Date
Identify if there are any discussion fields in your applications.
Create cross-reference fields to those applications in the Discussions application. Name the fields with prefix “Related” for easy identification.
Add all the newly created cross-references to the Related Records, Multi Reference Display Control type, field.
Go to the Manage Data Feeds page.
From the menu bar, click
.Under Integration, click Data Feeds.
In the Manage Data Feeds section, locate and select the data feed.
From the General tab in the General Information section, in the Status field, select Active.
Click the Transport tab, provide connections to your archer instance database in Database configuration tab (Connection String, Username, Password).
If any new cross-references were created as mentioned in Task 1 above, then perform the following:
In Data Map > Field Map tab:
Map discussions->discussion->dis_f_content id in source to Tracking ID of the all the newly created cross-reference fields under Parent Discussion.
For Tracking ID field mapping of each cross-reference, make sure Empty Values is unchecked in the field population popup.
At each newly mapped cross-reference field level, make sure Empty Values, Add Unknown are un-checked, and Field Population is set to Append data to list- based fields.
In Data Map > Key Field Definitions Tab, Add key field definitions for the newly created cross-references.
Check the key field definitions and field mappings once again. Click Save.
Go to the Schedule tab of the data feed, click Start to immediately run your data feed, in the Run Data Feed Now section. Click Save.
Inactivate the feed the datafeed is complete.
Note: Once the records are migrated from feature to applications, customers need to identify Discussion Owner, Participants and Watchers for the records in the Discussions application. This is a one-time task.
Go to Discussions default search results:
From the menu bar, click Discussion Forums
Under Solutions, click Discussion Forums.
Under Applications, click Discussions.
Click on options dropdown to right corner of the search results header.
Select Enable Bulk Update button.
Select the records and bulk update discussion owner, discussion participants and watchers as required. Click Save Changes button on the right corner of the search results header.
Certification Environment
Date Tested: October 2024
| Product Name | Release Information | Operating System |
| Archer | 2024.09 | Virtual Appliance |