Archer Exam Management
Archer Exam Management solution enables organizations to more effectively prepare for, document and manage the processes for conducting an examination by providing a centralized platform to efficiently manage the scoping, data collection, collaboration and post analysis phase of an exam. Using this solution, organizations are better able to track the phases of the exam, assign and track information requests, log hours worked on each phase, and maintain visibility into related loss events. In addition, robust reporting tools and graphical dashboards provide professional looking reports to inform executives of exam status, findings and remediation activities.
Archer Exchange: With the Archer Exchange, the Archer team has created a broad selection of supplemental, value-added offerings to help you get your unique risk management program on the right path, right from the start. You can leverage the Archer Exchange offerings to expand the use of Archer solutions into new business processes and address specific industry, geographic, regulatory, or technical requirements.
On this page
Release notes
| Release Date |
Release Version |
Notes |
|---|---|---|
| November 2025 | Archer 2024.11 |
|
| Release Date |
Release Version |
Notes |
|---|---|---|
|
April 2021 |
Archer 6.9 |
|
|
November 2017 |
Archer 6.2 |
Initial Release |
Overview
Navigating the complex landscape of regulatory examinations can be challenging for organizations, with manual documentation and data gathering processes often leading to time-consuming efforts. The lack of visibility into examination and finding status can leave management teams unprepared for potential fines and penalties.
Interacting with regulatory bodies typically involves a large time investment, especially for medium and large organizations in business sectors such as financial services, telecommunications, healthcare and other highly-regulated industries. In addition, providing these regulators with hard copies of sensitive information creates potential risk, as this information could be lost or stolen.
Establishing a consistent, centralized process for managing requests for information from regulators increases the consistency of responses, allows for a reduction in duplicated information, minimizes the exposure of sensitive information and reduces the time required to aggregate and disseminate the data. Implementing Archer Exam Management addresses this challenge by centralizing and streamlining the examination process.
Features and benefits
With Archer Exam Management, you will be able to do the following.
-
Manage the process of submitting and responding to regulatory request through an access- controlled environment to prevent the exposure of sensitive data.
-
Eliminates the need for producing hard copies of sensitive data, thereby greatly minimizing the risk of loss or theft of confidential company information.
-
Identify outstanding information requests and assign information owners to research and submit evidence.
-
Attach documentation from regulators and supporting evidence from your organization
-
Store answers to previous regulatory questions to enable rapid response to similar questions in the future.
-
Report on the status of all regulatory inquiries across your organization.
-
Link examinations to specific divisions, business units, and products and services.
The benefits of using Archer Exam Management include the following.
-
Simplify collaboration of the data collection process of evidence for regulatory examinations.
-
Increase the likelihood examiner receives accurate and complete information.
-
Centralized document repository management including version control and historical archival.
-
Quickly identify and communicate with Information Owners.
-
Reduce penalties or fines from regulatory violations.
-
Analyze past examination results and trends to augment the preparation and response to current and future exams.
-
Track hours worked on each exam phase to effectively manage assignments and improve the efficiency of future examinations.
User guide
-
Go to the Exam Management record.
-
From the menu bar, click Exam Management.
-
Under Applications, click Exam Management.
-
Under More Options, click New Record.
-
-
Enter all pertinent information related to the exam in the General Information section.
-
Enter an Exam Name, Exam Owner, Exam Type, and Phase.
-
Select the Exam Open Date and Exam Close Date for the Exam.
-
(Optional) In the Exam Purpose field, record any information that describes the reason for the exam.
-
In the Regulatory Information section, select the Agency Location and Primary Regulatory Contacts from their respective fields.
-
Click Save in the Record Toolbar.
Users: Exam Manager
-
Select the Exam Management record you would like to move to the Scoping & Impact Analysis phase.
-
Click Edit in the top of the record.
-
Select Scoping & Impact Analysis from the Exam Phase dropdown box.
-
Navigate to the Scoping & Impact Analysis tab.
-
Select the Scope of the examination and the target in the Scoping section.
-
Choose the Impact Rating from the dropdown box and input an Impact Description in the Impact Analysis section.
-
Answer the questions in the Readiness Checklist section.
-
-
Click Save in the Record Toolbar.
Users: Exam Manager
-
Select the Exam Management record you would like to move to the Data Collection & Review phase.
-
Click Edit in the top of the record.
-
Select Data Collection & Review from the Exam Phase dropdown box.
-
Navigate to the Data Collection & Review. Click on the tab to begin the process.
-
Submit an Information Request by clicking the | Add New | button in the Data Collection & Review section.
-
To link an existing Exam to the Information Request, do the following:
-
In the Exam Name field, click
 .
. -
From the Record Lookup window click the check box of the Exam(s) you want to link with the Information Request.
-
Click OK.
-
-
Select the Information Owner you wish to send the request to by choosing the down arrow in the Information Owner field and selecting their name.
-
Choose the appropriate Business Unit by clicking
next to the field. -
Select the type of evidence by clicking the down arrow in the Evidence Type field.
-
Select the Information Due Date by clicking the calendar icon and picking a date.
-
Once the record is completed, click the Submit Information Request button in the top left of the screen.
-
Select the Information Requests record you want to provide response from the Tasks section on your Task landing screen.
-
Click Edit in the top of the record.
-
Enter Information Submission Notes that you would like to send to the reviewing Exam Manager.
-
If you are the incorrect Information Owner click Incorrect Information Owner from Actions dropdown at the top left of the screen to return the record to the Exam Manager.
-
To link an existing document, click | Lookup | in the Document Repository section and select the document you wish to attach.
-
To attach a new document, click | Add New | in the Document Repository section.
-
Submit hours worked on data gathering click | Add New | in the Exam Hours section.
-
Once you have completed the aforementioned fields click Submit To Exam Manager from Actions dropdown at the top left of the screen.
Users: Exam Manager
-
Select the Information Requests record you want to review from the Tasks section on your Task landing screen.
-
Click Edit in the top of the record.
-
After reviewing the submission, document any notes supporting your decision in the Review Notes field.
-
To Approve the information submission click Approve from Actions dropdown at the top left of the screen.
-
To Cancel the information submission click Cancel from Actions dropdown at the top left of the screen.
-
To request a revision to the information submission, enter the details in the Review Notes section and click Request Revision from Actions dropdown at the top left of the screen.
-
Click Save in the Record toolbar.
-
Select the Exam Management record that you would like to move to the Wrap-Up phase.
-
Click Edit in the top of the record.
-
Select Wrap-Up from the Exam Phase dropdown box.
-
Navigate to the Wrap-Up tab. Click on the tab to begin the process.
-
Link existing Findings to the Exam by clicking the | Lookup | icon in the Findings section or add new Findings by clicking the | Add New | button.
-
If any Sanctions result from the Examination, choose the down arrow in the Sanctions field and select ‘Yes’. If you choose Yes in the Findings field, you will be prompted to enter a description of the sanctions resulting from the examination.
-
Choose any Violations found during the examination by clicking
next to the field name.-
Enter any additional details in the Violations Details field.
-
-
If there are Client Reimbursements resulting from the examination enter the dollar amount in the Client Reimbursements field.
-
Enter any additional details in the Reimbursement Details field.
-
-
Click Save in the Record Toolbar.
-
Select the Exam Management record that you would like to move to the Exam Completion phase.
-
Click Edit in the top of the record.
-
Select Exam Completion from the Exam Phase dropdown box.
-
Navigate to the Exam Completion tab. Click on the tab to begin the process.
-
Enter any Fine Avoidance, Vendor Costs, Payout Date, Issue Synopsis, and Executive Summary resulting from the examination in the Post Exam Information section.
-
When Exam Manager is ready to submit the Exam for review, select ‘Submitted’ in the dropdown box next to the Post Exam Submission Status field.
-
Select the Post Exam Submit Date by clicking the calendar icon next to the field and selecting the date you are submitting the exam for review.
-
-
The Exam Owner will be prompted with a notification that the examination is ready for their review.
-
The Exam Owner can then select the desired status and date in the Post Exam Review Status and Post Exam Review date fields.
Users: Exam Manager, Exam Owner, Information Owner
-
Go to the Exam Hours record.
-
From the menu bar, click Exam Hours.
-
Under Applications, click Exam Hours.
-
Under More Options, click New Record.
-
-
Select the Exam Name you want to link to the hours worked by clicking
next to the field name. -
Choose the Phase when the hours were worked by pressing the down arrow next to the field and choosing the appropriate phase.
-
Enter the number of hours worked in the Hours Worked field.
-
Select a Start Date and End Date when the hours were worked by clicking the calendar icon next to the respective fields.
-
Enter any supporting information about the hours worked in the Notes field.
-
Click Save in the Record Toolbar.
-
Select the Exam Management record that you would like to auto-generate next Exam.
-
Click Edit in the top of the record.
-
Select Exam Frequency for the request by clicking the down arrow next to the field and making your selection.
-
Select value Yes in the Auto-Generate Next Exam field by clicking the down arrow next to the field and making your selection.
-
Click Save in the Record Toolbar.
Note: Next Exam Date is a calculated field based on the Exam Open Date and Exam Frequency. The criteria to trigger the Data Feed to generate a new exam is: a) Auto-Generate Next Exam = Yes and b) Next Exam Date = Current Date.
Administrator guide
Prerequisites (ODA and system requirements)
|
Components |
Recommended Software |
|---|---|
| Archer solution areas | Regulatory Corporate and Compliance Management |
| Archer use cases | Not applicable |
| Archer applications | Not applicable |
| Uses Custom Objects | No |
| Archer on-demand applications license | Zero (0) Archer On-Demand Application licenses required |
| Archer licensing | Additional licensing fees apply for Archer Exam Management. Please contact Archer Sales Representative for more information and pricing. |
|
Archer Platform requirements |
Archer Platform Release 2024.11 and later |
| Supported Archer environments |
|
| Partner/vendor requirements | N/A |
| Operating system | Windows |
Compatible use cases and applications - Related applications
|
Application |
Use case |
Primary purpose of the relationship |
|---|---|---|
|
Business Unit |
IT Asset Catalog, Issues Management |
Link regulatory examination to Business Unit |
|
Company |
IT Asset Catalog, Issues Management |
Link regulatory examination to Company |
|
Division |
IT Asset Catalog, Issues Management |
Link regulatory examination to Division |
|
Contacts |
IT Asset Catalog, Business Asset Catalog |
Link regulatory examination to Contacts |
|
Findings |
Issues Management |
Document findings resulting from examination |
|
Loss Events |
Loss Event Management |
Detail loss events resulting from regulatory violations |
|
Products & Services |
Business Asset Catalog, Third Party Risk Management |
Link regulatory examination to Products & Services |
|
Regulatory Communications |
Privacy Program Management |
Link Regulatory Communications to examination. |
|
PBC Documentation Requests |
Financial Controls Monitoring |
Document PBC Documentation Request from examination. |
Components
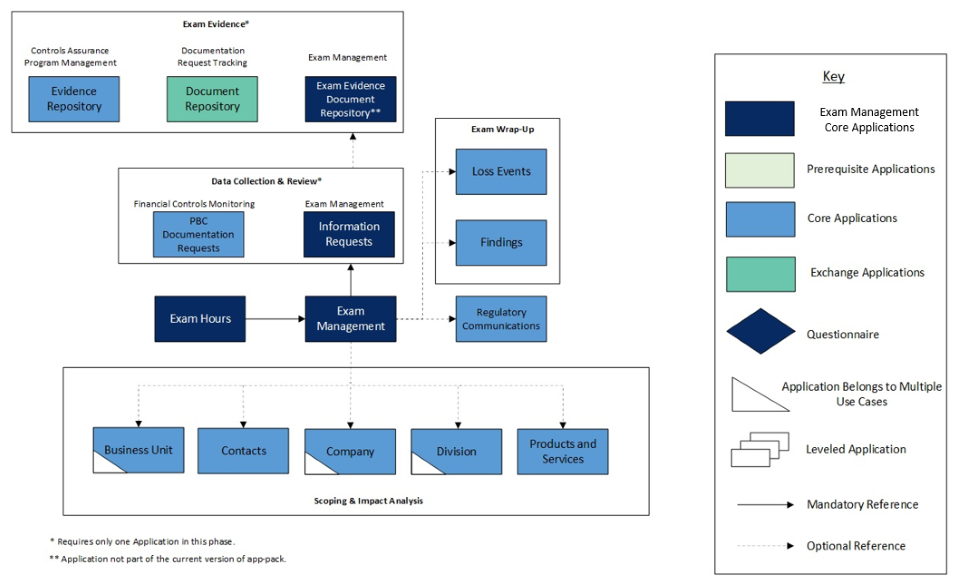
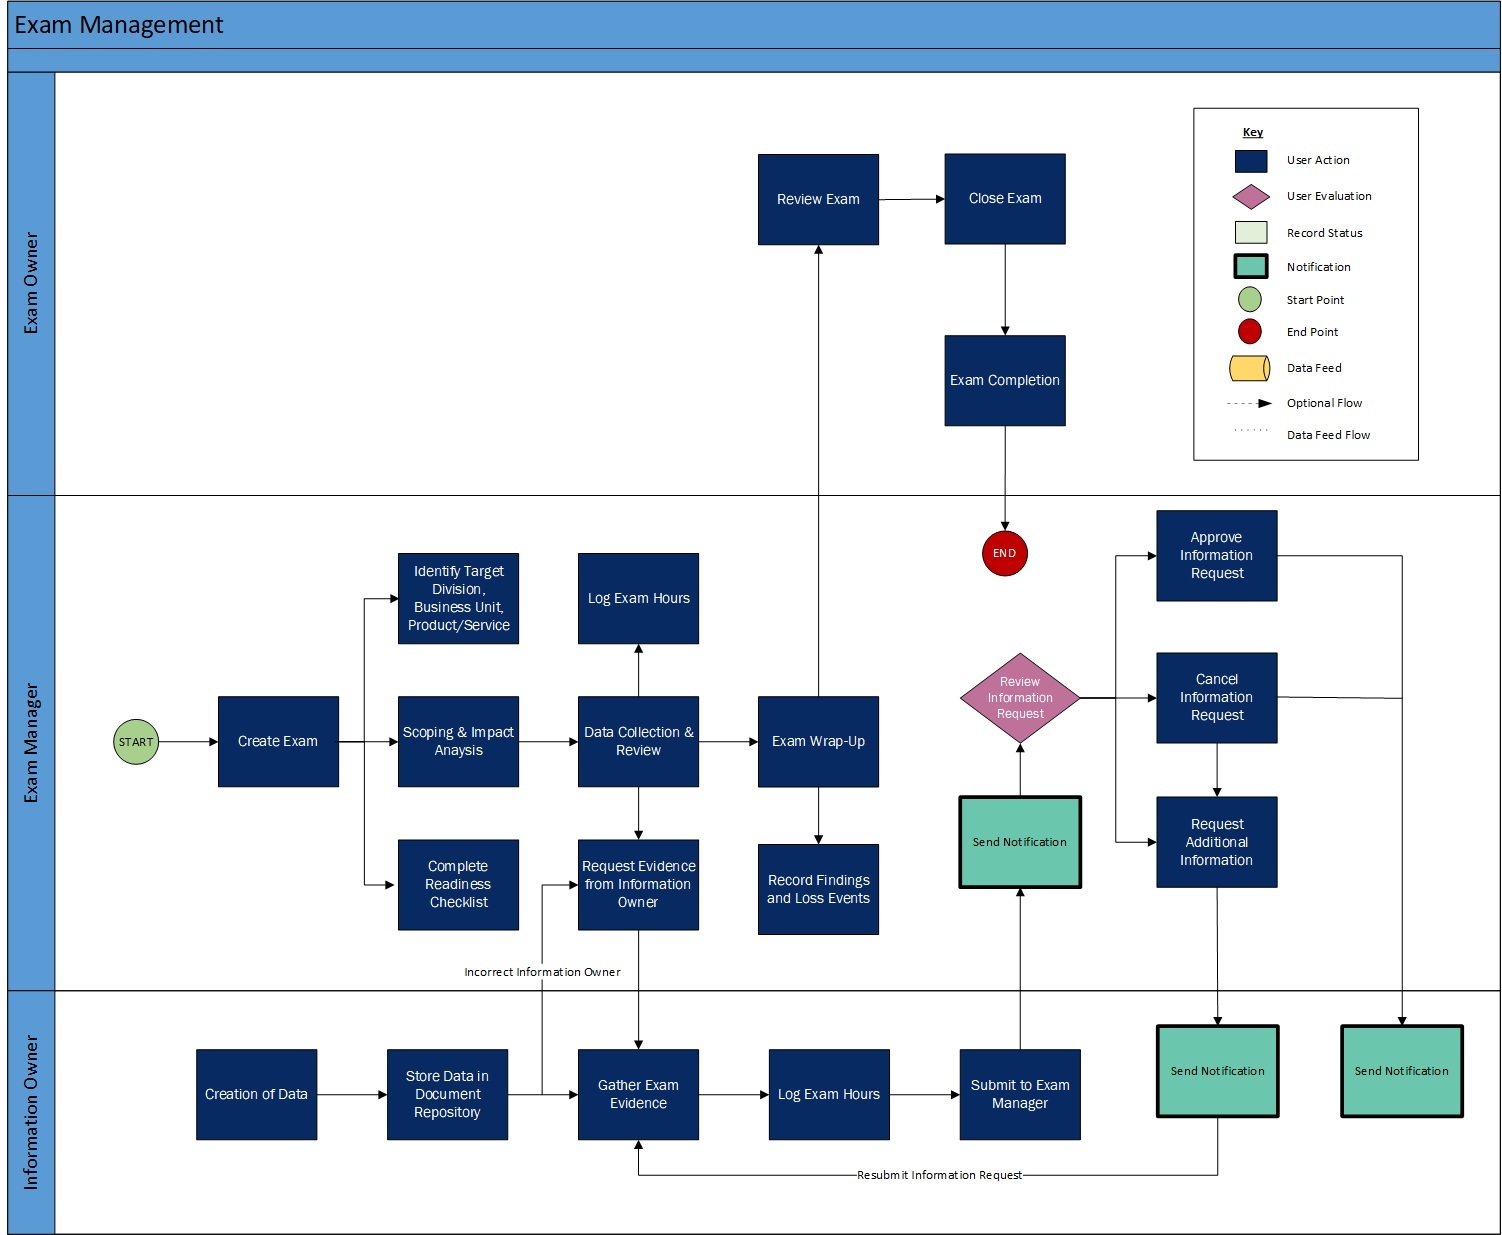
Architecture diagram
Process diagram
The Archer Exam Management process begins when the Exam Manager creates a new exam record. The examination is subsequently scoped and linked to a specific company, division, business unit, or product and service. Once the readiness checklist is complete, the exam transitions to the data collection and review phase. Here the Exam Manager can log hours spent on exam tasks and request exam evidence from Information Owners. Once all information is gathered and approved the wrap-up phase will begin. In this phase the Exam Manager receives findings and any loss events (sanctions, penalties, fees, and fines) from the Regulatory Agency. The examination is then sent to the Exam Owner who is responsible for final negotiation with the Regulators and closing the examination.
The following diagram shows the general workflow of the application.
Applications
|
Application |
Description |
|---|---|
|
Exam Management |
The Examination Management application establishes a framework for this business process, allowing you to manage multiple informational requests from a secure, centralized location. The application provides an easy way for regulators to submit specific questions to your organization, and it gives you flexible assignment options for addressing individual questions. When responses require supporting evidence, the necessary documentation and files can be uploaded to the application and then viewed by exam managers and owners in a secure environment. By transmitting data through a secure and access-controlled environment, you can eliminate the need for producing hard copies of sensitive data, thereby greatly minimizing the risk of loss or theft of confidential company information. |
|
Information Requests |
The Information Requests application automates the data collection process of evidence for regulatory examinations. It allows the exam manager to submit a data gathering request to information owners, track the status of the information request, dictate expected delivery times, request more information or communicate desired revisions to the submitted data. The application also sends notifications to the information owner notifying them that a request has been made and updates the exam manager when submissions have been completed. The exam manager can also quickly determine if the request is past due and if approved evidence has been submitted to regulators. |
|
Exam Hours |
The Exam Hours application is used to track the time worked during each phase of the regulatory examination. Exam Hours allows the exam owner, exam manager, and information owners to select the exam, the phase of the examination for which they are performing work, how many hours were spent on the task, when the work began and ended, and any notes they'd like to add. Hours are tracked by the exam manager and used to evaluate how much time is being spent on each phase of the examination and which information owners are performing the most work. |
Personas and access roles
|
Function |
Description |
|---|---|
|
Exam Manager |
Responsible for oversight and management of the internal business process for the exam. The exam manager acts as the formal liaison between the regulator and the rest of the organization once the exam commences. Tasks include capturing and categorizing data requests and providing real-time updates to regulators and key internal stakeholders. |
|
Exam Owner |
Acts as the business manager for the target of the exam. The exam owner is accountable for the results of the regulatory examination. They are interested in reviewing the exam status and findings, managing any needed escalations, and implementing effective remediation plans. |
|
Information Owner |
Owns the information that the regulator would like to review. They are responsible for the timely collection and communication of data related to the exam. The exam is not their full-time job. Therefore, they would like to complete the data collection as quickly as possible and return to value added activities. |
Permissions chart
|
Application |
Exam Manager |
Exam Owner |
Information Owner |
|---|---|---|---|
|
Exam Management |
CRU* |
CRUD |
R* |
|
Information Requests |
CRU* |
CRUD |
RU* |
|
Exam Hours |
CRU* |
CRUD |
CRU* |
C = Create, R = Read, U = Update, D = Delete
*Indicates Record Permissions
Note: Please ensure members of Exam Manager, Exam Owner & Information Owner groups have access to the referenced application records.
Upgrading Archer Exam Management
With the release of Archer Exam Management 2024.11, the offering has transitioned to a licensed offering. This means it is no longer using Archer On-Demand Applications (ODA).
Organizations upgrading to Archer Exam Management 2024.11 and later must to follow the steps below:
-
Purchase offering through Archer Sales Representative
-
Refresh the license key upon completion of purchase
-
Download installation package from myArcher
-
Proceed with installation steps below
Upon installation, the ODAs will be converted to core applications.
Note: Before upgrading, it is essential to perform an impact analysis on any customized configurations. A data dictionary is provided to support this process.
If you are upgrading Exam Management to version 2024.11, be aware of the following changes.
Exam Evidence Document Repository application was deprecated and excluded from the package. Archer strongly recommends doing one of the following prior to installation:
-
If users are using Exam Evidence Document Repository application and wish to utilize the latest package alongside the Exam Evidence Document Repository ODA, then following changes are required during package installation.
-
Ensure to choose Merge Permissions for the Exam Manager, Exam Owner, and
Information Owner access roles.
-
Reference to the field Exam Evidence Document Repository has been removed in the reports mentioned below. If you are using the below reports in Information Requests application in your Archer instance, ensure to not install them during package installation.
-
Information Requests Summary
-
Information Not Sent to Regulators
-
Information Sent to Regulators
-
Approved Information Requests
-
My Approved Information Requests
-
My Cancelled Information Requests
-
My Rejected Information Requests
-
-
-
If users are NOT using Exam Evidence Document Repository application and wish to utilize the latest package with an application that serves as the central storage and retrieval system for evidence collected and reviewed for exam regulators. Following changes are recommended after package installation.
-
Ignore the warnings related to Exam Evidence Document Repository application in package installation page.
-
Install either one of the below applications in Archer and create a cross reference in Exam Management solution.
-
Document Repository application from Archer Documentation Request Tracking. For more details, visit Archer Exchange.
-
Evidence Repository application from Controls Assurance Program Management use case.
-
-
Information Requests application is included in the package. Archer strongly recommends doing one of the following prior to installation:
-
If users are using Information Requests application and wish to utilize the latest package alongside the Information Requests application, then no further changes are required during package installation.
-
If users are NOT using Information Requests application and wish to utilize the latest package with application that automates the data collection process of evidence for regulatory examinations. Following changes are recommended.
-
Install either one of the below applications in Archer.
-
Information Requests application from Archer_Exam_Management_2024.11_Installation_Package.
-
PBC Documentation Requests application from Financial Controls Monitoring use case.
-
-
Install Archer Exam Management
-
Prepare for the installation.
-
Obtain the installation package.
-
Read and understand the "Packaging Data" topic in the Archer Platform Help.
-
Apply the latest license file in the Archer Control Panel.
-
- Set up the data feed.
-
Test the installation. Test the application according to your company standards and procedures, to ensure that the use case works with your existing processes.
Install the package
Installing a package requires that you import the package file, map the objects in the package to objects in the target instance, and then install the package.
There is no Undo function for a package installation. Packaging is a powerful feature that can make significant changes to an instance. Back up the instance database before installing a package. This process enables a full restoration if necessary.
An alternate method for undoing a package installation is to create a package of the affected objects in the target instance before installing the new package. This package provides a snapshot of the instance before the new package is installed, which can be used to help undo the changes made by the package installation. New objects created by the package installation must be manually deleted.
-
From the menu bar, click
 > Application Builder > Install Packages.
 - In the Available Packages section, click Import.
- Click Add New, then locate and select the package file that you want to import.
- Click OK.
The package file is displayed in the Available Packages section and is ready for installation.
Important: This step is required only if FAR Regulatory Correspondence is already present in your system, and you are installing this package.
-
From the menu bar, click
> Application Builder > Install Packages. - In the Available Packages section, locate the package you want to map.
- In the Actions column, click
 for that package.
The analyzer examines the information in the package. The analyzer automatically matches the system IDs of the objects in the package with the objects in the target instance and identifies objects from the package that are successfully mapped to objects in the target instance, objects that are new or exist but are not mapped, and objects that do not exist (the object is in the target but not in the source).
When the analyzer is complete, the Advanced Package Mapping page lists the objects in the package file and corresponding objects in the target instance.
- On the Advanced Mapping page, click to open each category and review the icons next to each object to determine which objects you must map manually.
The following table describes the icons. Icon
Name
Description

Awaiting Mapping Review
Indicates that the system could not automatically match the object or one of its children to a corresponding object in the target instance.
Objects marked with this icon must be mapped manually.
New objects should not be mapped. Select Do Not Map from the drop-down menu to clear this icon for an individual object, or click Do Not Map to clear the icon for all unmapped objects.

Mapping Completed
Indicates that the object and all children are mapped to objects in the target instance, or that they have been marked as Do Not Map. Nothing more needs to be done with these objects in Advanced Package Mapping.
Note: You can run the mapping process without mapping all objects. The
icon is for informational purposes only. - For objects awaiting mapping review, do one of the following:
- To map each object individually, use the drop-down menu in the Target column to select the object in the target instance to which you want to map the source object. To leave an object unmapped, select Do Not Map in the Target column.
- To automatically map all objects in a category that have different system IDs but the same object name as an object in the target instance, click Auto Map. Select whether to ignore case and spaces when matching object names. Click OK.
- To mark all unmapped objects as Do Not Map, click Do Not Map.
-
(Optional) Click
 to enable filter fields that you can use to find specific objects in each mapping category. To undo your mapping selections, click Undo, then select whether to undo all mappings in the category or only the mappings on a single page. If you choose to undo all mappings, you will be returned to the categories list.
 - (Optional) To save your mapping selections and return to the categories list without committing changes to the target instance, click
 .
. - After you review and map all objects, click Execute.
- Select I understand the implications of performing this operation. Click OK.
When the mapping is complete, the Import and Install Packages page displays.
Important: Advanced Package Mapping modifies the system IDs in the target instance. You must update any Data Feeds and Web Service APIs that use these objects with the new system IDs.
All objects from the source instance are installed in the target instance unless the object cannot be found or is flagged to not be installed in the target instance. A list of conditions that may cause objects not to be installed is provided in the Log Messages section. A log entry is displayed in the Package Installation Log section.
- From the menu bar, click > Application Builder > Install Packages.
- In the Available Packages section, locate the package file that you want to install, and click the file name or
 at end of the row to open the Options menu.
 - In the Selected Components section, click the Lookup button to open the Package Selector window.
- To select all components, select the top-level checkbox.
- To install only specific global reports in an already installed application, select the checkbox associated with each report that you want to install.
Note: Items in the package that do not match an existing item in the target instance are selected by default.
- Under the Translation Option drop-down menu, select an option for each selected component. To use the same Translation Option for all selected components, select a method from the top-level drop-down list.
The Translation Option is enabled only when a language is selected.The following table describes the options. Option
Description
Full Install
Installs the component and its translations from the selected languages.
Translations Only
Only installs the translations from the selected languages.
- Under the Install Method drop-down menu, select an option for each selected component. To use the same Install Method for all selected components, select a method from the top-level drop-down list.
The following table describes the options. Option
Description
Create New Only
Only creates new fields and other elements in the applications, questionnaires, workspaces, data feeds, and dashboards specified in the package file. This option does not modify any existing elements on your instance of Archer. This is useful when you want to add functionality to an existing application, questionnaire, workspace, dashboard, data feed, or access role, but you do not want to risk making any unwanted changes to the existing elements of workspaces, data feeds, or dashboards.
Note: The Create New Only option does not apply to access roles or languages.
Create New and Update
Updates all elements in the applications, questionnaires, workspaces, data feeds, and dashboards as specified in the package file. This includes adding new elements and updating existing elements.
Note: The Create New and Update option does not apply to access roles or languages.
- Under the Install Option drop-down menu, select an option for each selected component. To use the same Install Option for all selected components, select an option from the top-level drop-down list.
The following table describes the options. Option
Description
Do not Override Layout
Installs the component, but does not change the existing layout. This is useful if you have a lot of custom fields and formatting in your layout that you do not want to risk losing.
You may have to modify the layout after installing the package to use the changes made by the package.
Note: The Do not Override Layout option does not apply to access roles or languages.
Override Layout
Updates the layout as specified in the package file, overwriting the existing layout.
Note: The Override Layout option does not apply to access roles or languages.
- Click Continue to advance to the next object category in the Package Selector, and repeat steps 4 to 6. After reviewing all object categories, click OK.
- To deactivate target fields and data-driven events that are not in the package, in the Post-Install Actions section, select the Deactivate target fields and data-driven events that are not in the package checkbox. To rename the deactivated target fields and data-driven events with a user-defined prefix, select Apply a prefix to all deactivated objects, and enter a prefix. This can help you identify any fields or data-driven events that you may want to review for cleanup post-install.
- Click Install.
- Click OK.
-
From the menu bar, click
> Application Builder > Install Packages. - In the Package Installation Log section, click the package that you want to view.
- In the Package Installation Log page, in the Object Details section, click View All Errors.
Note: To view individual logs, in the Errors column of the log you want to view, click the Failures link or Warnings link. Clicking View All Errors, Failures, or Warnings opens the specific errors on a different page.
- Click the Export icon to export the log file.
- Click Close.
For a list of packaging installation log messages and remediation information for common messages, see Package Installation Log Messages.
-
Go to the Applications page.
-
From the menu bar, click
. -
Under Application Builder, click Applications.
-
-
In the Applications section, select the Information Requests Application.
-
On the Advanced Workflow Tab, click ‘Activate’ in the top right corner of the page.
-
Then click ‘Save Workflow’ in the top left corner of the page.
Set up data feeds
Archer Exam Management includes the Exam Management: Auto-Generate Next Exam data feed. This Data Feed is used to create new Exam records. The report returns data for automatically launching exams on a schedule and is triggered by Auto-Generate Next Exam field value as Yes and Next Exam Date is equal to today’s date in Exam Management application.
-
Go to the Manage Data Feeds page.
-
From the menu bar, click
. -
Under Integration, click Data Feeds.
-
-
Locate and select the Exam Management: Auto-Generate Next Exam data feed.
-
From the General tab
-
In the General Information section, set the Status field to Active.
-
In the Feed Information section, confirm that the Target field is set to Exam Management.
-
-
Click the Transport tab.
-
Complete the fields in the Transport Configuration section as follows: In the URL field, type: YourServerName/VirtualDirectoryName/ws/search.asmx
-
In the User Name and Password fields, type the username and password of a Platform user that has access to all of the records on the Platform instance (from which the data feed is coming).
-
In the Instance field, type the name of the Platform instance from which the data feed is coming (this is the instance name as you enter it on the Login window).
-
-
Verify the settings on the Source Definition tab. This will be pre-configured.
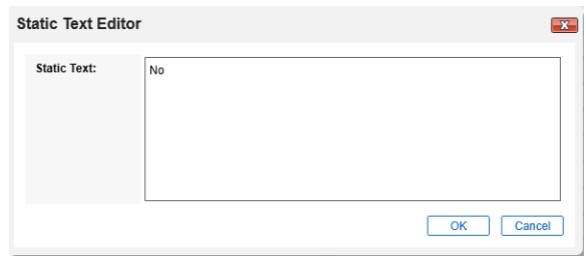
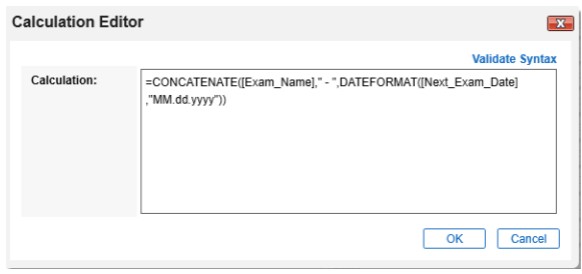
Note: All the Source Fields on the Source Definition tab will get automatically populated when you import the data feed. Repopulating the fields by clicking on “Load Fields” will lead to removal of two pre-populated fields from the list i.e., Auto-Generate Next Exam and Exam Name Calc Field. Follow the steps below to configure the fields in Source Definition tab:
Add a new field by clicking on “Add New” and rename as “Auto-Generate Next Exam” and select field type “Static Text” with value “No” in the Text editor (refer screenshots below).
Add a new field by clicking on “Add New” and rename as “Exam Name Calc Field” and select field type “Calculated Field” with formula “=CONCATENATE([Exam_Name]," - ",DATEFORMAT([Next_Exam_Date],"MM.dd.yyyy"))” in the Calculation editor (refer screenshots below).

Auto-Generate Next Exam:
Exam Name Calc Field:
-
Verify the settings and mappings on the Data Map tab.
-
The Key Definition fields should be pre-populated based on the information from the imported Data Feed.
-
Do not define any key field for Exam Management application.
-
Define “Tracking ID” as Key fields for all the cross referenced mapped in the Data Feed.
-
-
Click Save.
Important: A data feed must be active and valid to successfully run.
As you schedule your data feed, the Data Feed Manager validates the information. If any information is invalid, an error message is displayed. You can save the data feed and correct the errors later; but the data feed does not process until you make corrections.
-
Go to the Schedule tab of the data feed that you want to modify.
-
From the menu bar, click
. -
Under Integration, click Data Feeds.
-
Select the data feed.
-
Click the Schedule tab.
-
-
Go to the Recurrences section and complete frequency, start and stop times, and time zone.
-
(Optional) To override the data feed schedule and immediately run your data feed, in the Run Data Feed Now section, click Start.
-
Click Save.
Certification environment
Date tested: November 2025
| Product Name | Version Information | Operating System |
| Archer Suite | 2024.11 | Virtual Appliance |