Archer FFIEC-Aligned Cybersecurity Framework
The Archer FFIEC-Aligned Cybersecurity Framework app-pack is aligned with the FFIEC Cybersecurity Assessment Tool, which was developed to help financial institutions identify risks and determine cybersecurity maturity to prepare for and mitigate cyber risks.
On this page
Release notes
|
Date |
Version |
Changes |
|---|---|---|
|
September 2023 |
Archer 6.10 |
|
|
May 2022 |
Archer 6.10 |
|
|
January 2019 |
Archer 6.5 |
|
Overview of Archer FFIEC-Aligned Cybersecurity Framework
About Archer FFIEC-Aligned Cybersecurity Framework
The Archer FFIEC-Aligned Cybersecurity Framework app-pack allows customers to define the scope of a cybersecurity profile for assessment. Using the FFIEC's guidelines, they can identify the inherent risks, determine their cybersecurity maturity level, and implement and track their action plans to reach their desired maturity level.
The app-pack provides a common language to address and manage cybersecurity risk in a cost-effective way based on business needs without placing additional regulatory requirements on businesses. The framework consists of an Inherent Risk Assessment and a Cybersecurity Maturity Assessment. The Inherent Risk Assessment identifies the inherent risk before implementing controls. The Cybersecurity Maturity Assessment includes domains, assessment factors, components, and individual declarative statements across five maturity levels to identify specific controls and practices that are in place.
The Inherent Risk Assessment is completed by the Profile Owner against the Cybersecurity profile. It is based on five categories:
-
Technologies and Connection Types
-
Delivery Channels
-
Online/Mobile Products and Technology Services
-
Organizational Characteristics
-
External Threats Management
Next, an Assessor conducts a Cybersecurity Maturity Assessment against the Cybersecurity Profile for each of five domains:
-
Cyber Risk Management and Oversight
-
Threat Intelligence and Collaboration
-
Cybersecurity Controls
-
External Dependency Management
-
Cyber Incident Management and Resilience
By reviewing both the Inherent Risk and Cybersecurity Maturity Levels across the domains, management can determine whether its maturity levels are appropriate in relation to its risk. If not, action may be taken to reduce the level of risk or to increase the levels of maturity.
Key features and benefits
The Archer FFIEC-Aligned Cybersecurity Framework offering enables customers to:
-
Prioritize and Scope the organization's business objectives and priorities.
-
Orient the overall program scope to the systems, assets, regulatory requirements, and risk approach that enables the organization to identify threats and vulnerabilities to those systems.
-
Create a Current Profile indicating which outcomes from the Core are currently being achieved.
-
Risk Assess the operational environment to discern the likelihood of a cybersecurity event and the impact that event would have on the organization.
-
Identify a Target Profile that focuses on the assessment categories that describe the organization's desired cybersecurity outcomes.
-
Analyze comparing the Current Profile to the Target Profile to determine gaps.
-
Implement an Action Plan to identify which steps to take to remediate the gaps focusing on standards, guidelines, and practices that work best for the organization's needs.
With Archer FFIEC-Aligned Cybersecurity Framework, you can:
-
Create a common language to communicate requirements and progress among stakeholders (internal, partners, contractors, suppliers).
-
Provide a method to understand how everyone fits into the larger cybersecurity ecosystem.
-
Apply the FFIEC Cybersecurity Assessment principles and best practices of risk management to improve cybersecurity and resiliency of your critical infrastructure.
Key terminology
Application: Database that stores a specific type of data record, for example, policies, assessments, assets, threats, vulnerabilities, and controls.
Authorized User: A user who has logged into the system and has a right to perform some operation. The system knows the identity and permissions granted to this individual.
Cross-Reference: A field type that allows users to create associations between records in the same application (internal references) or records in two separate applications (external references). By adding a cross-reference to an application, the system automatically adds a Related Record field.
Dashboard: With reports defined and saved in the inventory of system reports, those identified as Global Reports can be added to dashboards. Each dashboard can include one of many reports in the format they were saved.
Notifications: Emails sent from Archer to Users or Groups, based on a schedule or a change in the record status.
Record: A collection of field values, stored within applications, sub-forms, or questionnaires.
Report: Saved search criteria that can be run again later. In Archer, the construct for reports is a combination of a query and its related output presentation options. The data returned is filtered by a user permission, allowing users to see only the data for which they have been granted access.
Sub-Form: For one application, administrators can develop multiple sub-forms to hold all related data. Sub-forms can be shared across applications; however, changing a sub-form affects all applications using that sub-form.
Task: Action items that have been assigned to a user in relation to the Support Request.
User: Any person who uses and is registered within the system. In this guide, the user is assumed to be an employee using Archer Support Requests.
User Profile: Preferences of the registered user that are saved within the system.
Workspace: Display mechanism that provides the user with a way to access their data.
Prerequisites (ODA and system requirements)
| Components | Prerequisites |
|---|---|
|
Operating System |
Windows Server 2012 R2 |
|
Database Server |
Microsoft SQL Server 2014 (64-bit) |
|
Services Server |
Java Runtime Environment (JRE) 8 (64-bit) |
|
Archer |
Archer 6.10 and later |
|
On-Demand Licenses |
The Archer FFIEC-Aligned Cybersecurity Framework App-Pack requires three (3) On-Demand Applications licenses and one (1) available Questionnaire from an existing licensed use case. |
|
Pre-Requisite Applications |
Requirements for the installation and operation of Archer FFIEC- Aligned Cybersecurity Framework includes the following applications:
**Use cases are available to only 6.x customers. |
Compatible use cases and applications
Optional applications
|
Application |
Use Case |
Primary Purpose(s) of the Relationship |
|---|---|---|
|
Authoritative Sources
|
Policy Program Management |
Track activities to other regulations. |
|
Control Procedures |
Policy Program Management |
Serves as a central repository for instances of control procedures, baselines and activities that are mapped to corporate Master Controls, establishing the foundation for enterprise-wide risk monitoring and compliance measurement. |
Archer Documentation Request Tracking components
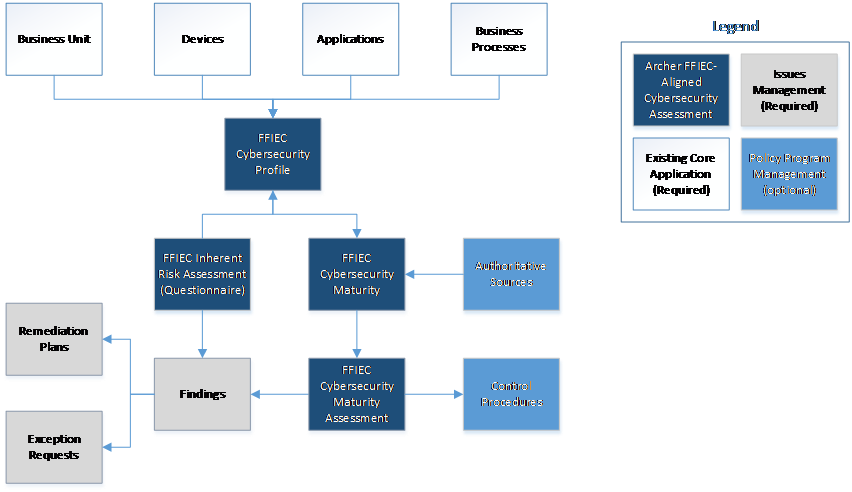
Architecture diagram
The following diagram shows the relationship between the applications in Archer FFIEC-Aligned Cybersecurity Framework.
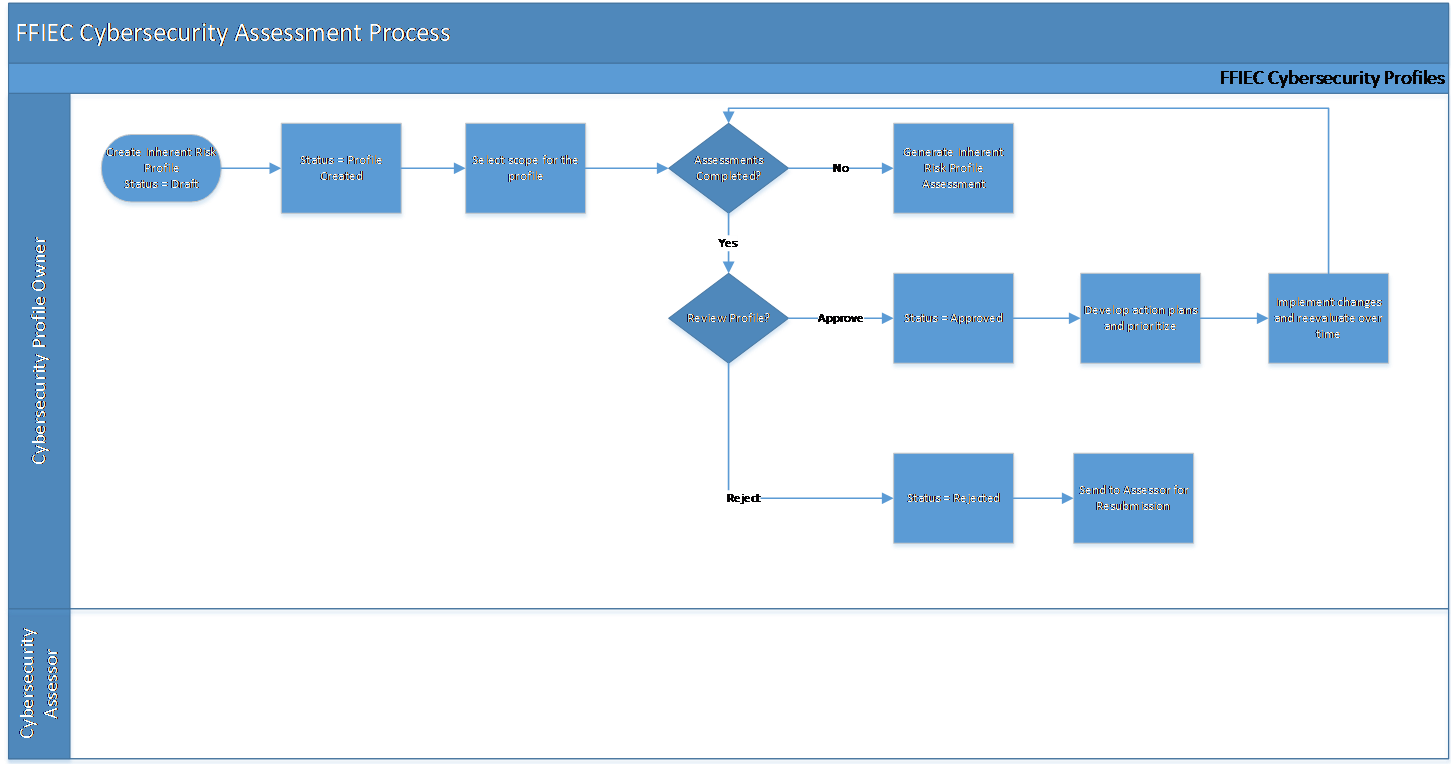
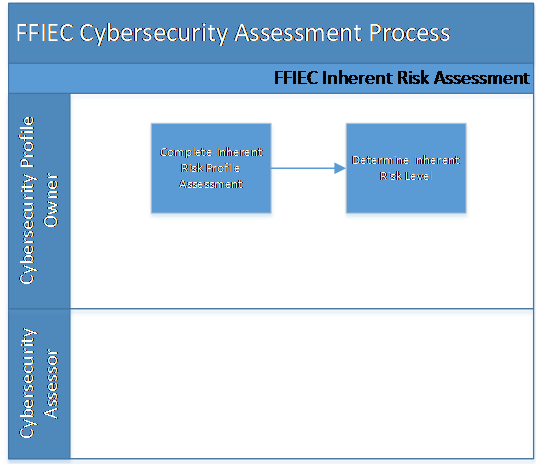
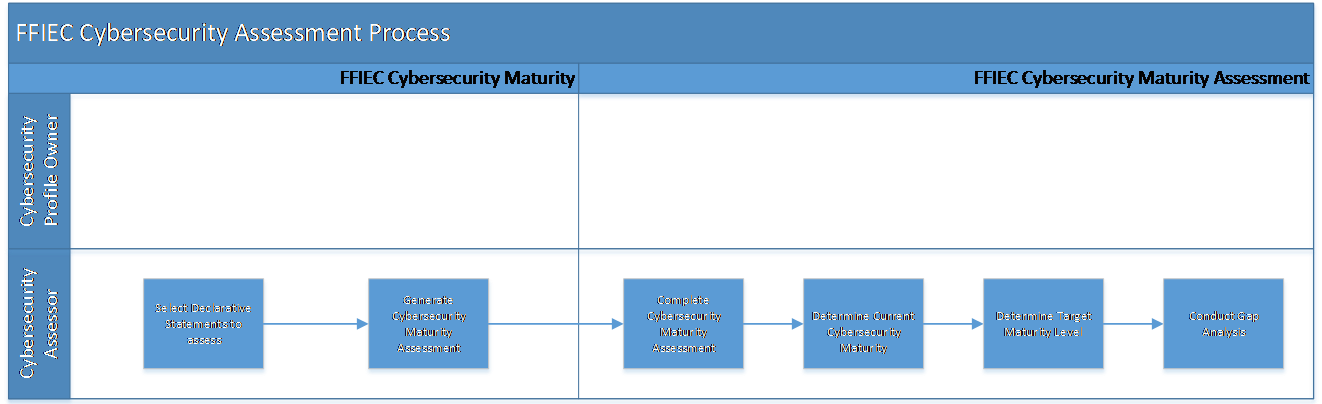
Swim Lane diagram
The following diagram shows the general workflow of the use case.

FFIEC Cybersecurity Profiles
FFIEC Inherent Risk Assessment
FFIEC Cybersecurity Maturity Assessment
Applications
The following table describes the applications in Archer FFIEC-Aligned Cybersecurity Framework.
|
Application |
Description |
|---|---|
|
FFIEC Cybersecurity Profiles |
The FFIEC Cybersecurity Profiles application captures meta-data and information regarding the Cybersecurity Inherent Risk Assessment and Cybersecurity Maturity Assessment and documents issues resulting from the assessment. |
|
FFIEC Cybersecurity Maturity |
The FFIEC Cybersecurity Maturity application captures the framework from the FFIEC Cybersecurity Assessment Tool to determine the Cybersecurity Maturity Level of the profile. It can also contain references to the related authoritative sources. |
|
FFIEC Cybersecurity Maturity Assessments |
The FFIEC Cybersecurity Maturity Assessment application captures the FFIEC Cybersecurity requirement for the assessment and documents meta-data, assessment results and any supporting documentation. |
|
Questionnaire |
Description |
|---|---|
|
FFIEC Inherent Risk Assessment |
The FFIEC Inherent Risk Assessment questionnaire contains the questions per the FFIEC Cybersecurity Assessment Tool. The completion of the questionnaire determines the inherent risk level for the profile.
|
Personas and Access Roles
|
Function |
Description |
How many?
|
Optional / Required
|
|---|---|---|---|
|
Cybersecurity Profile Owner |
Responsible for the creation and approval of the Inherent Risk Profile and Cybersecurity Maturity Assessments. This role could include a business process manager, business unit manager, or information system owner. They will likely own multiple business processes. |
At least one, likely multiple
|
Required |
|
Cybersecurity Assessor |
Responsible for the conducting and evaluating the Cybersecurity Maturity Assessment and determining the Cybersecurity Maturity Level against the boundaries defined in the Inherent Risk Profile (e.g., business processes or information systems). This role could include someone from internal audit, internal compliance, etc. |
At least one, likely multiple
|
Required |
|
Executive Management |
The Executive Management team would like to understand the Cybersecurity Profiles in the organization, what they do, how significant they are, have assurance there is adequate change control procedures, and must be sure that the organization potential cyber threats. |
Many |
Required |
The following table describes the functions that make up the application’s organization roles. Depending on the organization of your company, these functions and responsibilities may vary.
|
Applications |
FFIEC: Cybersecurity Profile Owners |
FFIEC: Cybersecurity Assessors |
FFIEC: Executive Management |
|---|---|---|---|
|
FFIEC Cybersecurity Profiles |
CRU* |
RU* |
R |
|
FFIEC Inherent Risk Assessment |
RU* |
R |
R |
|
FFIEC Cybersecurity Maturity |
R |
R |
R |
|
FFIEC Cybersecurity Maturity Assessments |
R |
RU* |
R |
|
Business Units |
R |
R |
R |
|
Business Processes |
R |
R |
R |
|
Applications |
R |
R |
R |
|
Devices |
R |
R |
R |
|
Findings |
CRU |
CRU |
R |
|
Remediation Plans |
CRU |
CRU |
R |
|
Control Procedures |
R |
R |
R |
|
Authoritative Sources |
R |
R |
R |
C = Create, R = Read, U = Update, D = Delete, * Indicates Record Permissions
Note: Members of the FFIEC Cybersecurity groups should also be assigned to the EM: Read Only group under Enterprise Management to allow selection of Business Unit, Business Processes, Applications, and Devices.
Installing Archer FFIEC-Aligned Cybersecurity Framework
Complete the following tasks to install the offering.
Step 1: Prepare for the installation
-
Ensure that your Archer system meets the following requirements:
-
Archer Platform version 6.10 and later
-
Download the ODA install package from the Archer Exchange: https://archerirm.exchange/en-US/apps/421624/archer-ffiec-aligned-cybersecurity-framework
-
Read and understand the "Packaging Data" section of the Archer Platform Help.
Step 2: Install the package
Installing a package requires that you import the package file, map the objects in the package to objects in the target instance, and then install the package. See Installing the Application Package for complete information.
Step 3: Set up data feeds
You must import and schedule each use case data feed that you want to use. See Setting up Data Feed for complete information.
Step 4: Test the installation
Test the application according to your company standards and procedures, to ensure that the use case works with your existing processes.
Installing the package
Task 1: Back up your database
There is no Undo function for a package installation. Packaging is a powerful feature that can make significant changes to an instance. Archer strongly recommends backing up the instance database before installing a package. This process enables a full restoration if necessary.
An alternate method for undoing a package installation is to create a package of the affected objects in the target instance before installing the new package. This package provides a snapshot of the instance before the new package is installed, which can be used to help undo the changes made by the package installation. New objects created by the package installation must be manually deleted.
Task 2: Import the package
-
Go to the Install Packages page.
-
From the menu bar, click
 .
. -
Under Application Builder, click Install Packages.
-
-
In the Available Packages section, click Import.
-
Click Add New, then locate and select the package file that you want to import.
-
Click OK.
The package file is displayed in the Available Packages section and is ready for installation.
Task 3: Map objects in the package
Important: This step is required only if you are upgrading to a later version of Archer Documentation Request Tracking.
-
In the Available Packages section, select the package you want to map.
-
In the Actions column, click
 for that package.
The analyzer examines the information in the package. The analyzer automatically matches the system IDs of the objects in the package with the objects in the target instance and identifies objects from the package that are successfully mapped to objects in the target instance, objects that are new or exist but are not mapped, and objects that do not exist (the object is in the target but not in the source).
When the analyzer is complete, the Advanced Package Mapping page lists the objects in the package file and corresponding objects in the target instance. The objects are divided into the following categories:
-
Access Roles
-
Applications
-
Dashboard
-
Data Feeds
-
Folders
-
Global Values Lists
-
Groups
-
iViews
-
Languages
-
Letterheads
-
Questionnaires
-
Solutions
-
Sub-forms
-
Workspaces
-
|
Icon |
Name |
Description |
|---|---|---|
|
|
Awaiting Mapping Review |
Indicates that the system could not automatically match the object or children of the object to a corresponding object in the target instance. Objects marked with this symbol must be mapped manually through the mapping process. Important: New objects should not be mapped. This icon should remain visible. The mapping process can proceed without mapping all the objects. Note: You can execute the mapping process without mapping all the objects. The |
|
|
Mapping Completed |
Indicates that the object and all child objects are mapped to an object in the target instance. Nothing more needs to be done with these objects in Advanced Package Mapping. |
|
|
Do Not Map |
Indicates that the object does not exist in the target instance or the object was not mapped through the Do Not Map option. These objects will not be mapped through Advanced Package Mapping and must be remedied manually. |
|
|
Undo |
Indicates that a mapped object can be unmapped. This icon is displayed in the Actions column of a mapped object or object flagged as Do Not Map. |
-
On the Advanced Mapping page, click to open each category and review the icons next to each object to determine which objects you must map manually.
Note: You can execute the mapping process without mapping all objects. The
 icon is for informational purposes only.
 -
For objects awaiting mapping review, do one of the following:
-
To map each object individually, use the drop-down menu in the Target column to select the object in the target instance to which you want to map the source object. To leave an object unmapped, select Do Not Map in the Target column.
-
To map each object individually, use the drop-down menu in the Target column to select the object in the target instance to which you want to map the source object. To leave an object unmapped, select Do Not Map in the Target column.
-
To map each object individually, use the drop-down menu in the Target column to select the object in the target instance to which you want to map the source object. To leave an object unmapped, select Do Not Map in the Target column.
-
Note: Click ![]() to enable filter fields that you can use to find specific objects in each mapping category. To undo your mapping selections, click Undo, then select whether to undo all mappings in the category or only the mappings on a single page. If you choose to undo all mappings, you will be returned to the categories list.
to enable filter fields that you can use to find specific objects in each mapping category. To undo your mapping selections, click Undo, then select whether to undo all mappings in the category or only the mappings on a single page. If you choose to undo all mappings, you will be returned to the categories list.
-
(Optional) To save your mapping selections and return to the categories list without committing changes to the target instance, click
 .
. -
After you review and map all objects, click Execute.
-
Select I understand the implications of performing this operation and click OK. When the mapping is complete, the Import and Install Packages page is displayed.
Important: Advanced Package Mapping modifies the system IDs in the target instance. You must update any Data Feeds and Web Service APIs that use these objects with the new system IDs.
Task 4: Install the package
All objects from the source instance are installed in the target instance unless the object cannot be found or is flagged to not be installed in the target instance. A list of conditions that may cause objects not to be installed is provided in the Log Messages section. A log entry is displayed in the Package Installation Log section.
-
Go to the Install Packages page.
-
From the menu bar, click
. -
Under Application Builder, click Install Packages.
-
-
In the Available Packages section, do the following:
-
Locate the package file you want to install.
-
In the Actions column, click
 .
.
-
-
In the Configuration section, select the components of the package that you want to install.
-
To select all components, select the top-level checkbox.
-
To install only specific global reports in an already installed application, select the checkbox associated with each report that you want to install.
-
Note: Items in the package that do not match an existing item in the target instance are selected by default.
-
Click Lookup.
-
For each component section, do the following:
Note: To move onto another component section, click Continue or select a component section in the Jump To drop-down menu.
-
In the Install Method drop-down menu, select an install method for each selected component.
Note: If you have any existing components that you do not want to modify, select Create New Only. You may have to modify those components after installing the package to use the changes made by the package.
b. In the Install Option drop-down menu, select an install option for each selected component.
Note: If you have any custom fields or formatting in a component that you do not want to lose, select Do Not Override Layout. You may have to modify the layout after installing the package to use the changes made by the package.
-
Click OK.
-
To deactivate target fields and data-driven events that are not in the package, in the Post-Install Actions section, select the Deactivate target fields and data-driven events that are not in the package checkbox. To rename the deactivated target fields and data-driven events with a use defined prefix, select the Apply a prefix to all deactivated objects checkbox, and enter a prefix. This can help you identify any fields or data-driven events that you may want to review for cleanup post-install.
-
Click Install.
-
Click OK.
Task 5: Review the Package Installation Log
-
Go to the Package Installation Log tab of the Install Packages page.
-
From the menu bar, click
. -
Under Application Builder, click Install Packages.
-
Click the Package Installation Log tab.
-
-
Click the package that you want to view.
-
In the Package Installation Log page, in the Object Details section, click View All Warnings.
Task 6: Import the Content into FFIEC Cybersecurity Maturity
-
Import the Domain file:
-
Navigate to Data Import page of the application. FFIEC-Aligned Cybersecurity Framework -> FFIEC Cybersecurity Maturity -> Data Import.
-
Browse the “01 FFIEC CSF_Domain.csv” file.
-
Choose Import type as “Create New Records.”
-
Make sure the key fields in the files match the key fields in the applications.
-
Verify the field mappings. Click on Next and Import the content.
-
-
Import the Assessment Factor file:
-
Navigate to Data Import page of the application. FFIEC-Aligned Cybersecurity Framework > FFIEC Cybersecurity Maturity > Data Import.
-
Browse the “02 FFIEC CSF_Assessment Factor.csv” file.
-
Choose Import type as “Create New Records.”
-
Make sure the key fields in the files match the key fields in the applications.
-
Verify the field mappings. Click on Next and Import the content.
-
-
Import the Component file:
-
Navigate to Data Import page of the application. FFIEC-Aligned Cybersecurity Framework > FFIEC Cybersecurity Maturity > Data Import.
-
Browse the “03 FFIEC CSF_Component.csv” file.
-
Choose Import type as “Create New Records.”
-
Make sure the key fields in the files match the key fields in the applications.
-
Verify the field mappings. Click on Next and Import the content.
-
-
Import the Declarative Statements file:
-
Navigate to Data Import page of the application. FFIEC-Aligned Cybersecurity Framework > FFIEC Cybersecurity Maturity > Data Import.
-
Browse the “04 FFIEC CSF_Declarative Statements” file.
-
Choose Import type as “Create New Records.”
-
Make sure the key fields in the files match the key fields in the applications.
-
Verify the field mappings. Click on Next and Import the content.
-
-
(Optional) Import the Declarative Statements with NIST CSF Authoritative Sources:
-
Navigate to Application Builder > Applications > Authoritative Sources.
-
Go to Layouts tab > Sub Section Level.
-
Navigate to options tab of the field Sub Section ID and select the option to make it as a key field.
-
Save the Application.
-
Navigate to Data Import page of the application. FFIEC-Aligned Cybersecurity Framework > FFIEC Cybersecurity Maturity > Data Import.
-
Browse the “04 FFIEC CSF_Declarative Statements” file.
-
Choose Import type as “Create New Records.”
-
Make sure the key fields in the files match the key fields in the applications.
-
Verify the field mappings. Click on Next and Import the content.
-
Setting up Data Feed
Set up the data feeds as required:
-
Generate Cybersecurity Maturity Assessments
-
Archive Cybersecurity Maturity Assessments
-
Autoscope FFIEC Cybersecurity Profiles from Business Processes PATH 1
-
Autoscope FFIEC Cybersecurity Profiles from Business Processes PATH 2
Task 1: Activate a data feed
-
Go to the Manage Data Feeds page.
-
From the menu bar, click
. -
Under Integration, click Data Feeds.
-
In the Manage Data Feeds section, click on the data feed name.
-
From the General tab in the General Information section, in the Status field, select Active.
-
Click the Source Connection tab.
-
Complete the fields in the Login Properties section as follows:
-
In the URL field, type: YourServerName/VirtualDirectoryName/ws/search.asmx
-
-
Complete the fields in the Transport Configuration section as follows:
-
In the Username and Password fields, type the username and password of a Platform user that has API access and access to all the records on the Platform instance (from which the data feed is coming).
-
In the Instance field, type the name of the Platform instance from which the data feed is coming (this is the instance name as you enter it on the Login window).
-
-
Verify that key field values are not missing from the data map tab.
-
Click Save.
Task 2: Schedule a data feed
Important: A data feed must be active and valid to successfully run.
As you schedule your data feed, the Data Feed Manager validates the information. If any information is invalid, an error message is displayed. You can save the data feed and correct the errors later; but the data feed does not process until you make corrections.
-
Go to the Run Configuration tab of the data feed that you want to modify.
-
From the menu bar, click
. -
Under Integration, click Data Feeds.
-
Select the data feed.
-
Click the Run Configuration tab.
-
-
Go to the Schedule section and complete frequency, start, and stop times, and time zone.
-
(Optional) To override the data feed schedule and immediately run your data feed click on “RUN NOW” button at the top of the screen.
-
Click Save.
Using Archer FFIEC-Aligned Cybersecurity Framework
Task 1: Create a Cybersecurity Profile
Users: Cybersecurity Profile Owner
-
Go to the FFIEC Cybersecurity Profiles record
-
From the menu bar, click FFIEC- Aligned Cybersecurity Framework.
-
Under Solutions, click FFIEC- Aligned Cybersecurity Framework.
-
Under Applications, click FFIEC Cybersecurity Profiles.
-
In the Cybersecurity Profile record browser, Click New Record.
-
-
Enter a Profile Name, Profile Description, Assessment Start Date, and Assessment Frequency for the Cybersecurity Profile in the “General Information” section.
-
Select Cybersecurity Assessor and Cybersecurity Profile Owner in the “Personnel” section.
-
To upload any document related to the Cybersecurity Profile, attach to the Supporting Documentation field using the Add New button.
-
Click Save in the Record Toolbar.
Task 2: Generate Scope for Cybersecurity Profile
Users: Cybersecurity Profile Owner
-
Open a FFIEC Cybersecurity Profile record in ‘Profile Created’ status.
-
Click EDIT in the top of the record browser.
-
Navigate to the Scope tab.
-
Select the assets that are part of the boundary for the Cybersecurity Profile. Use the Lookup button to find existing records or the Add New button to create new records in the “Scope Definition” section:
-
To auto-populate related Business Unit, Applications, and Devices records, use the lookup button to select the Business Process. Select Yes from field ‘Populate Scope Automatically?’ and click on “Auto Scope” button at the top of the screen.
If the "Auto Scope" button is not visible, please save the record to enroll into advanced workflow.
-
To populate the scope manually, select No from field ‘Populate Scope Automatically?’ and use the Lookup button to find existing records or the Add New button to create new records in Business Unit, Applications, and Devices.
-
Task 3: Generate Inherent Risk Assessments
Users: Cybersecurity Profile Owner
-
Open a FFIEC Cybersecurity Profile record in ‘Profile Created’ status.
-
Click EDIT in the top of the record browser.
-
Click on Generate Inherent Risk button from the top left of the screen.
-
Navigate to Assessments tab and complete the Assessment.
Steps to Complete Inherent Risk Assessment:
-
Edit the Questionnaire record from the “FFIEC Inherent Risk Assessment” section in the Assessments tab.
-
Answer all the Questions from each category.
-
To upload any document related to the assessment, attach to the Supporting Documentation field using the Add New button.
-
Select the Cybersecurity Profile Owner in the Submitter field in the “General Information” section.
-
Select the value Submitted from submission status field.
-
Click Save in the Record Toolbar.
Task 4: Generate Cybersecurity Maturity Assessments
Users: Cybersecurity Assessor
-
Open a FFIEC Cybersecurity Profile record in ‘Profile Created’ status.
-
Click EDIT in the top of the record browser.
-
Navigate to the Assessments tab.
-
Select the applicable Domains or Declarative Statements from FFIEC Cybersecurity Maturity by clicking on lookup in the “Assessment Generation” section.
-
Click on Generate Cybersecurity Maturity Assessment button from the top left of the screen.
-
Wait for the Cybersecurity Maturity Assessments to be generated and the system will return the user to the record.
Note: Assessments are generated for each Declarative Statement selected. For selections made at the Domain or Assessment Factor or Component level, the Assessments will be generated for all the associated Declarative Statements in FFIEC Cybersecurity Maturity Assessments application.
Steps to complete Cybersecurity Maturity Assessment
-
Navigate to FFIEC “Cybersecurity Maturity Assessments” section in the Assessments tab.
-
Enable Inline Edit.
-
Select values in the Answer field for all the Declarative Statements.
-
Use Lookup to tie Control Procedures to the Declarative Statements.
-
If required, Use Lookup to tie Remediation Plans to the Declarative Statements.
-
Click Save in the Record Toolbar.
Task 5: Submit Cybersecurity Profile
Users: Cybersecurity Assessor
-
Open a FFIEC Cybersecurity Profile record in ‘Profile Created’ status.
-
Click EDIT in the top of the record browser.
-
Make sure Inherent Risk Assessment is complete.
-
Expand the Cybersecurity Maturity Assessment Summary section.
-
Make sure the Remaining Assessments field equals zero.
-
Select the Target Maturity level for each Domain.
-
If current maturity level does not equal the target maturity, then that means there is a capability gap, and a Findings record can be created to track the capability gap.
-
Now that all the Cybersecurity Assessments are complete, click the Submit for Review button at the top of the record.
Task 6: Review Cybersecurity Profile
Users: Cybersecurity Profile Owner
-
Open a FFIEC Cybersecurity Profile record in ‘Awaiting Review’ status.
-
Click EDIT in the top of the record browser.
-
Review the Scope, Inherent Risk Assessment, Cybersecurity Maturity Assessments, and the Assessment Summary tab.
-
Click the Approve button at the top of the record and end the Cybersecurity Profile review.
-
The user has a secure way to approve the cybersecurity profile with the help of new feature called electronic signature.
-
User enters their Archer password for completing the Approve action.
-
Electronic signature is tracked through entries in a History Log field and by having a system generated snapshot automatically attached to an attachment field.
-
-
To Reject the profile:
-
Document the reason for rejecting in the Comments field.
-
Click the Reject button at the top of the record to send the Cybersecurity Profile back to the assessors, so that they can make the needed changes.
-
Task 7: Reassign Stakeholders
Users: Cybersecurity Profile Owner, Cybersecurity Assessor
-
Open a FFIEC Cybersecurity Profile record in ‘Awaiting Review’ Status.
-
Click EDIT in the top of the record browser.
-
Click Reassign Stakeholders button in the top left of the screen.
Task 8: Archive and Re-Assess
Users: Cybersecurity Profile Owner
-
Navigate to Cybersecurity Profile record.
-
Click Archive and Re-Assess to archive Cybersecurity Assessments.
-
Repeat tasks 2 through 6.
Certification environment
|
Product Name |
Version Information |
Operating System |
|---|---|---|
|
Archer Suite |
6.10 |
Virtual Application |