Archer Gift Registration
Gifts, entertainment, and charitable donations are used frequently to build and maintain good relationships between an organization and the companies with which they do business. However, if they are not managed properly, they can result in risks with conflict of interest. Most organizations implement some form of anti-bribery or conflict of interest policy to ensure employees are conducting business in an honest and ethical manner when contemplating or entering a transaction or arrangement that might benefit one party over the other. It is crucial for organizations to ensure that any gifts, entertainment, or charitable donations are within the company's policies and do not pose a conflict of interest to protect the relationships between their partners, customers, vendors, and anyone else they conduct business with.
The Archer Gift Registration offering ensures compliance against organization's gift and entertainment policies. It helps monitor the risks against violations of conflict of interest about gifts, entertainment expenses, and charitable donations.
The Archer Gift Registry application captures all gifts, entertainment expenses, and charitable donations given to or received by a customer, third party, or vendor. It tracks the approvals and exceptions for requests over the organization's tolerance.
On this page
Release notes
Last updated: November 2023
The Gift Registration app-pack seamlessly connects with Archer Engage. Users without access to Archer can generate records via Archer Engage which would be replicated in Archer via automation.
Release 6.14
New and changed features
-
Ability to publish Archer Gift Registration layout to Archer Engage.
-
All the dashboards have been transitioned to Next Gen Dashboards.
Overview of Archer Gift Registration
Benefits
The Archer Gift Registration offering enables an organization to:
-
Track gifts, entertainment expenses, and charitable donations.
-
Identify and manage non-compliant expenses.
-
Manage and report exceptions for expenses.
-
Obtain visibility into the status of the requests.
Prerequisites (ODA and system requirements)
The following table lists the components and prerequisites for<offering>.
|
Components |
Prerequisites |
|---|---|
|
Archer Solution Area (s) |
Archer Regulatory & Corporate Compliance Management |
|
Archer Use Case(s) |
Archer Issues Management |
|
Archer Applications |
Requirements for the installation and operation of Archer Gift Registration includes the following use cases:
|
|
Requires On-Demand License |
One (1) On-Demand Application license required |
|
Archer Requirements |
Archer 6.14 and later |
Compatible use cases and applications
Related applications
|
Application |
Use Case |
Primary Purpose(s) of the Relationship |
|---|---|---|
|
Business Unit |
Archer Issues Management, Archer Business Impact Analysis, Archer Third Party Catalog, Archer IT Asset Catalog, Archer Business Asset Catalog, Archer Key Indicator Management, Policy Program Management, Cyber Incident & Breach Response, ESG Management |
|
|
Third Party Profile |
Archer Third Party Catalog |
|
|
Policies |
Archer Policy Program Management |
|
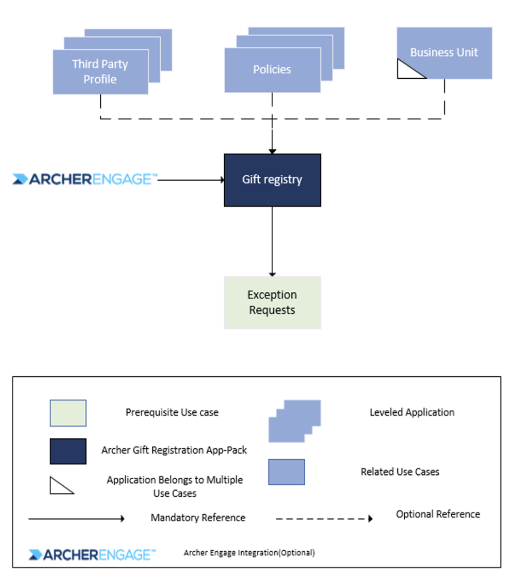
Archer Gift Registration components
Architecture diagram
Swim lane diagram
Applications
|
Application |
Description |
|---|---|
|
Gift Registry |
The Gift Registration application captures all gifts, entertainment expenses and charitable donations given to or received by a customer, third party, or vendor. It tracks the approvals and exceptions for requests over the organization’s tolerance. |
Personas and access roles
The following table describes the functions that make up the application’s organization roles. Depending on the organization of your company, these functions and responsibilities may vary.
|
Function |
Description |
|---|---|
|
Requestor |
Responsible for tracking gifts, entertainment expenses, and charitable donations. Can be anyone in the organization. |
|
Approver |
Responsible for approving gifts, entertainment expenses, and charitable donations. This person can be the requestor’s manager or someone in the Compliance or Legal. |
|
Legal |
Monitor expenses and reviews exceptions for legal ramifications. This person can be someone with an additional level of authority from a legalistic perspective or could be someone with higher level of authority such as a C-Level executive or Chief Compliance Officer. |
Permissions chart
|
Applications
|
Requestor
|
Approver
|
Legal
|
|
|---|---|---|---|---|
|
Gift Registry |
CRU* |
CRU* |
R |
|
|
Business Units |
R |
R |
R |
|
|
Policies |
R |
R |
R |
|
|
Third Party Profile |
R |
R |
R |
|
|
Exception Requests |
R |
CRU |
R |
|
C = Create, R = Read, U = Update, D = Delete
Note: Members of the Owner, Approver groups should also be assigned to the EM: Read Only, PM: Read Only and Third Party: Read Only Groups under Enterprise Management, Policy Management and Third Party Risk Management to allow selection of Business Unit, Policies and Third Party Profiles.
Installing Archer Gift Registration
Installation overview
Complete the following tasks to install the offering.
Task 1: Prepare for the installation
-
Ensure that your Archer system meets the following requirements:
-
Archer Platform version 6.14 or later
-
-
Obtain the Data Dictionary for the ODA by contacting your Archer Account Representative or calling 1-888-539-EGRC.The Data Dictionary contains the configuration information for the use case.
-
Read and understand "Packaging Data" in the Archer Platform Help.
Task 2: Install the package
Installing a package requires that you import the package file, map the objects in the package to objects in the target instance, and then install the package. For more information, see Installing the Packages.
Task 3: Test the installation
Test the application according to your company standards and procedures, to ensure that the use case works with your existing processes.
Installing the package
Task 1: Back up your database
There is no undo function for package installation. Packaging is a powerful feature that can make significant changes to an instance. Archer strongly recommends that you backup the instance database before installing a package. This process enables a full restoration if necessary.
An alternate method for undoing a package installation is to create a package of the affected objects in the target instance before installing the new package. This package provides a snapshot of the instance before the new package is installed, which can be used to help undo the changes made by the package installation. You must manually delete new objects created by the package installation.
Task 2: Import the package
-
From the menu bar, click
 > Application Builder > Install Packages.
 -
In the Available Packages section, click Import.
-
Click Add New, then select the package file that you want to import.
-
Click OK.
The Available Packages section displays the package file and is ready for installation.
Task 3: Map objects in the package
Important: This step is required only if you are upgrading to a later version of [ODA name].
-
From the menu bar, click
> Application Builder > Install Packages. -
In the Available Packages section, select the package you want to map.
-
In the Actions column, click
 for that package.
The analyzer runs and examines the information in the package. The analyzer automatically matches the system IDs of the objects in the package with the objects in the target instances and identifies objects from the package that are successfully mapped to objects in the target instance, objects that are new or exist but are not mapped, and objects that do not exist (the object is in the target but not in the source).
Note: This process can take several minutes or more, especially if the package is large, and may time out after 60 minutes. This time-out setting temporarily overrides any IIS time-out settings set to less than 60 minutes.
-
When the analyzer is complete, the Advanced Package Mapping page lists the objects in the package file and corresponding objects in the target instance. The objects are divided into tabs, depending on whether they are found within Applications, Solutions, Access Roles, Groups, Sub- forms, or Questionnaires.
On each tab of the Advanced Mapping Page, review the icons next to each object to determine which objects you must map manually.
|
Icon |
Name |
Description |
|---|---|---|
|
|
Awaiting Mapping Review |
Indicates that the system could not automatically match the object or children of the object to a corresponding object in the target instance. Objects marked with this icon must be mapped manually through the mapping process. Important: New objects should not be mapped. This icon should remain visible. The mapping process can proceed without mapping all the objects. Note: You can run the mapping process without mapping all the objects. The |
|
|
Mapping Completed |
Indicates that the object and all child objects are mapped to an object in the target instance. There are no further steps required with these objects in Advanced Package Mapping. |
|
|
Do Not Map |
Indicates that the object does not exist in the target instance, or the object was not mapped through the Do Not Map option. These objects will not be mapped through Advanced Package Mapping and must be remedied manually. |
|
|
Undo |
Indicates that a mapped object can be unmapped. This icon is displayed in the Actions column of a mapped object or object flagged as Do Not Map. |
-
For each object that requires remediation, do one of the following:
-
To map each item individually, on the Target column, select the object in the target instance to which you want to map the source object. If an object is new or if you do not want to map an object, select Do Not Map from the drop-down list.
Important: Ensure that you map all objects to their lowest level. When objects have child or related objects, the parent object provides a drill-down link. You must map child objects before parent objects. For more details, see "Mapping Parent/Child Objects"in the Archer Platform Help.
-
To automatically map all objects in a tab that have different system IDs but the same object name as an object in the target instance, do the following:
-
In the toolbar, click Auto Map.
-
Select an option for mapping objects by name.
Option
Description
Ignore case
Select this option to match objects with similar names regardless of the case of the characters in the object names.
Ignore spaces
Select this option to match objects with similar names regardless of whether spaces exist in the object names.
-
Click OK.
The Confirmation dialog box opens with the total number of mappings performed. These mappings have not been committed to the database yet and can be modified in the Advanced Package Mapping page.
-
Click OK.
-
To set all objects in the tab to Do Not Map, in the toolbar, click Do Not Map.
-
Note: To undo the mapping settings for any individual object, in the Actions column, click Undo.
When all objects are mapped, the ![]() icon is displayed in the tab title. The
icon is displayed in the tab title. The ![]() icon is displayed next to the object to indicate that the object will not be mapped.
icon is displayed next to the object to indicate that the object will not be mapped.
-
Verify that all other objects are mapped correctly.
-
(Optional) To save your mapping settings so that you can resume working later, see "Importing and Exporting Mapping Settings" in Archer Help.
-
Once you have reviewed and mapped all objects, click Execute.
-
Select I understand the implications of performing this operation and click OK.
The Advanced Package Mapping process updates the system IDs of the objects in the target instance as defined on the Advanced Package Mapping page. When the mapping is complete, the Import and Install Packages page is displayed.
Important: Advanced Package Mapping modifies the system IDs in the target instance. You will need to update any Data Feeds and Web Service APIs that use these objects, with the new system IDs.
Task 4: Install the package
All objects from the source instance are installed in the target instance unless the object can not be found or is flagged to not be installed in the target instance. The Log Messages section provides a list of conditions that may cause objects not to be installed. The Package Installation Log section displays a log entry.
-
From the menu bar, click
> Application Builder > Install Packages. -
In the Available Packages section, locate the package file that you want to install, and click Install.
-
In the Selected Components section, click the Lookup button to open the Package Selector window.
-
To select all components, select the top-level checkbox.
-
To install only specific global reports in an already installed application, select the checkbox associated with each report that you want to install.
-
Note: Items in the package that do not match an existing item in the target instance are selected by default.
-
Under the Install Method drop-down menu, select an option for each selected component. To use the same Install Method for all selected components, select a method from the top-level drop-down list.
Note: If you have any existing components that you do not want to modify, select Create New Only. You may have to modify those components after installing the package to use the changes made by the package.
-
To deactivate target fields and data-driven events that are not in the package, in the Post-Install Actions section, select the Deactivate target fields and data-driven events that are not in the package checkbox. To rename the deactivated target fields and data-driven events with a user-defined prefix, select the Apply a prefix to all deactivated objects checkbox, and enter a prefix. This can help you identify any fields or data-driven events that you may want to review for clean up post-install.
-
Click Install.
-
Click OK.
Task 5: Review the package installation log
-
From the menu bar, click
> Application Builder > Install Packages. -
In the Package Installation Log tab, click the package that you want to view.
-
In the Package Installation Log page, in the Object Details section, click View All Errors.
Note: To view individual logs, in the Errors column of the log you want to view, click the Failures link or Warnings link. Clicking View All Errors, Failures, or Warnings opens the specific errors on a different page.
-
Click the Export icon to export the log file.
-
Click Close.
Configuring Archer for Archer Gift Registration
Note: This chapter is only needed if Engage for Business Users integration is required.
A new layout is added which when published to Engage becomes a record page template in the Engage Portal. It can be used to create multiple records in Archer without having the need to login into Archer. Once the record is created the remaining steps can be done in Archer.
Task 1: Enable publish template feature
-
From the Administration Bar click Applications to open the application list.
-
Click on the Gift Registry.
-
Click on the design tab.
-
From the layout object list select and place the publish template custom object on the layout.
-
Custom object configuration can be found in the Archer Engage documentation in the Archer Help Center.
-
Save the layout.
Task 2: Publish template
-
Go to the Gift Registry record.
-
From the menu bar, click Gift Registration.
-
From the Dropdown, click Gift Registration.
-
From the Dropdown, click Gift Registry.
-
In the Gift Registry record browser, click New Record.
-
-
Publish the template.
-
From the layout. Click on publish.
-
After publishing is successful and email will be sent to the configured user.
-
-
Remove the Publish Template custom object from the layout via requesting an administrator.
Task 3: Update template
-
Enable Delete button to remove the exiting template by following the below steps:
-
From the Administration Bar click Applications.
-
Click on the Gift Registry.
-
Click on the design tab.
-
From the layout object list select and place the Delete template custom object on the layout.
-
Custom object configuration can be found in the Archer Engage documentation in the Archer Help Center.
-
Save the layout.
-
-
Delete the template by following the bellow steps:
-
From the menu bar, click Gift Registration.
-
From the Dropdown, click Gift Registration.
-
From the Dropdown, click Gift Registry.
-
In the Gift Registry record browser, click New Record.
-
In the record page click on delete template.
-
-
After deletion is successful the record template will be removed from Engage.
-
Remove the Publish Template custom object from the layout.
-
To publish the new updated template, follow the steps mentioned in the Task 1.
Upgrading Archer Gift Registration
For the Archer Gift Registration 6.14 release, the Gift Registry application has been updated to enable publishing of the templates to Archer Engage portal. If you are upgrading from Gift Registration version 6.12 or earlier to version 6.14 or later, be aware of the following changes.
Gift Registration
A new layout is added which when published to Engage becomes a record page template. It can be used to create multiple records in archer without having the need to login into Archer. Once the record is created the next steps can be done in Archer.
The following table describes the changes in the Gift Registration 6.14 release.
|
Field |
Change Made |
|---|---|
|
Request Category |
Added new ‘Hospitalities’ values list. |
|
Engage Submitter Name |
Added new field to capture Name of the user who submitted the request. |
|
Engage Submitter |
Added new field to capture email of the user who submitted the request. |
|
Identify Applicable Business Unit |
Added new field to capture Applicable Business Unit(s) of the user who submitted the request. |
|
Identify Applicable Policy |
Added new field to capture Applicable Policy the user has gone through. |
|
Requestor Details |
Added new sub form filed to capture the email of the engage submitter and date of the submission. |
|
Custom Object |
Change Made |
|---|---|
|
Publish Template |
Added new custom object to enable publishing of the template to engage portal. |
|
Delete Template |
Added new custom object to delete template published to engage portal. |
|
Layout Name |
Change Made |
|---|---|
|
001 Default Layout
|
Added Engage details Section. Added DDEs to Hide Engage section if all the fields in the section are empty |
|
002 Review Layout |
Added Engage details Section. Added DDEs to Hide Engage section if all the fields in the section are empty |
|
003 Needs additional Layout |
Added Engage details Section. Added DDEs to Hide Engage section if all the fields in the section are empty |
|
004 Reassign Approver Layout |
Added Engage details Section. Added DDEs to Hide Engage section if all the fields in the section are empty |
|
Engage Layout |
Added New layout which will be sent to Engage as a template. |
|
Dashboards |
Change Made |
|---|---|
|
Requester Dashboard |
|
|
Approver Dashboard |
|
|
Executive Dashboard |
|
Using Archer Gift Registration
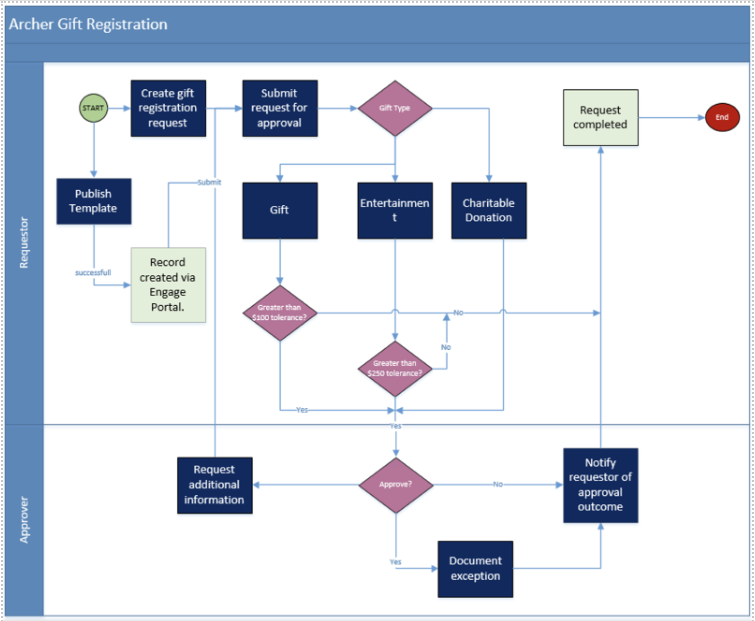
Task 1a: Create a new request (in Archer)
User: Requestor (Everyone)
-
Go to the Gift Registry record.
-
From the menu bar, click Gift Registration.
-
From the Dropdown, click Gift Registration.
-
From the Dropdown, click Gift Registry.
-
In the Gift Registry record browser, click New Record.
-
-
Enter Request Title, Request Category in the General Information section.
-
Select the Received From, Gift Recipient Type field values by clicking the down arrow next to the field and making your selection.
-
Select the associated Business Units by clicking and selecting respective record.
-
(Optional) Select any Watchers you would like to add to the request by clicking and selecting their username.
-
Select the Exchange Date by clicking the calendar icon next to the field.
-
Enter the Amount, Description for the request.
-
Enter all pertinent information related to the request in the Request Details section.
-
Select user from the list in the Approver field by clicking from the Personnel section. Approver field is displayed for the below request scenarios:
-
All Charitable Donation Requests.
-
Gift Requests with Amount greater than $100.
-
Entertainment Requests with Amount greater than $250.
-
-
To capture the Outcome of the Gift Registry and other necessary details, enter the details by clicking the Add New button in the Comments section.
-
(Optional) Add attachments/documentation to the record by clicking the | Add New | button in the Supporting Documentation field.
-
Click Save in the Record Toolbar to save in record.
-
Once the record is complete, click the Submit button in the top left of the screen.
Task 1b: Create a new request (via Archer Engage)
Note: Please verify that all the prerequisites regarding Engage integration are met before proceeding with this task.
-
Login into the Engage Portal.
-
From the top left Click on the hamburger button to open the action list
-
Click on Create new.
-
Select your Organization, Report, and Language.
-
Enter Request Title, Request Category, Exchange Date, Description, Amount, Received From, gift Recipient Type, Acknowledgment.
-
Provide the Business Unit, Policy in text form in the ‘Identify Applicable Business Units’ and ‘Identify Applicable Policies’ fields respectively.
-
If you have gone through the policy, please tick the checkbox for acknowledgment.
-
Enter all pertinent information related to the request.
-
Submit the request.
Note: The steps above enable the creation of a record in Archer. Once the record is submitted, the record is created in Archer and the remaining tasks should be performed in Archer.
Task 2: Reviewing the request
User: Approver
-
Select the Gift Registry Request you want to review by clicking the Request title # under the Tasks section on your Task landing screen.
-
Click the Edit button in the top of the record.
-
To Approve the request
-
Add or Lookup an Exception Requests record by clicking the Add New or Lookup button in the Exception Requests field.
-
Click the Approve button in the top left of the screen. The user has a secure way to approve the record with electronic signatures.
-
User enters their Archer password for completing the Approve action.
-
Electronic signature is tracked through entries in a History Log field and by having a system generated snapshot automatically attached to an attachment field.
-
-
To request additional information from the Requestor:
-
Document the additional information requested in the Review Comments field.
-
Click the Request Additional Information button at the top left of the screen.
-
-
To Reject the profile:
-
Document the reason for rejecting the request in the Review Comments field.
-
Click the Reject button at the top left of the screen.
-
Task 3: Reassign approver
User: Requestor/Approver
-
Go to the Gift Registry record.
-
From the menu bar, click Gift Registration.
-
Under Solutions, click Gift Registration.
-
Under Applications, click Gift Registry.
-
-
Select the request record in ‘Submitted’ Status.
-
Click the Edit button in the top of the record.
-
Click Reassign Approver in the top left of the screen.
-
Select the user from the Approver field by clicking from the Personnel section.
-
Click the Save Assignment button in the top left of the screen.
Task 4: Resubmitting a request
User: Requestor
-
Select the Request you want to revise by clicking the Request title # under the Tasks section on your Task landing screen.
-
Click the Edit button in the top of the record.
-
Make the revisions requested by the Approver.
-
(Optional) Add attachments to the record by clicking the | Add New | button in the Supporting Documentation field.
-
(Optional) Add additional comments to the record by clicking the | Add New | button in the Comments section.
-
Click the Resubmit button in the top left of the screen.
Certification environment
Date tested: November 2023
|
Product Name |
Version Information |
Operating System |
|---|---|---|
|
Archer |
6.14 |
Virtual Appliance |


