Evalto Inactive User Reporting
The Inactive User Reporting (IUR) solution provides proactive reporting of inactive, locked, and users no longer in groups (“Inactive Users”) in active records across the Archer platform.
On this page
Release history
Release 2.0
Last updated: January 2021
New and changed features
The Evalto Inactive User Reporting V2.0 leaps forward in ease of configuration setup, adds reporting of users no longer in access groups, adds support for SaaS/Hosted customers, and other requested enhancements.
-
Ease of Config Setup: A new setup button automatically pulls a list of applications and questionnaires. After selecting an app/questionnaire, all the record permission and user/group fields are available for selection as well as any numeric fields for filtering. Optionally, Report Owners without system administrator access can manage the config easily.
-
Users No Longer in Access Groups: This solves the pain point when users move between teams within your organization and lose their access to records in process. These users are not inactive but have the same effect when they cannot complete the tasks or receive emails once access is removed.
-
Support for SaaS/Hosted Customers: This feature allows customers to execute the inactive user reporting logic to identify inactive users and produce reports outside of a JavaScript Transporter Data Feed using an enterprise job scheduler or Windows Task Scheduler. On-Premises Environment customers can also use this implementation for increased performance and detailed error logging.
-
Additional Updates:
-
Increased number of monitored fields to 10 per app/questionnaire
-
Added additional information to reports
-
Reason/status of user:inactive, locked, and/or not in group
-
Users last login date
-
-
Added new scheduling option: Last Day of Month
-
Increased flexibility of backend configuration of URLs/paths for various web server configurations
-
Release 1.0
Original features
The Evalto Inactive Users Reporting solution proactively identifies records in core or ODA applications/questionnaires which have inactive or locked users in record permission or user/group fields. Reports are based on your desired filter criteria and flexible scheduling. This allows you to proactively address problems before campaigns are created, emails are sent, and/or due dates are past due.
Original functionality
-
Configurations are easy to setup per application or questionnaire
-
Filters can limit reporting to specific records (active, published, etc.)
-
Report frequency is customizable/flexible
-
Emails can be sent to Report Owners if inactive users are found
-
Reports allows you to open directly to the record and update the record
-
A .csv file attachment is available and can be used for data imports
-
A review workflow enables tracking and influences dashboard reporting
Overview of Evalto Inactive User Reporting
About Evalto Inactive User Reporting
Organizations need to ensure that governance, risk, and compliance processes are handled in a timely manner often with tight deadlines and a cost (regulatory, financial, opportunity, legal, or risk avoidance) for noncompliance by the due date. Key processes such as Findings and Assessments with inactive users miss their due dates and process owners waste time scrambling to find the new responsible person. The new person responsible needs to get up-to-speed on the issue or task which further delays the completion of the task or process. Meanwhile, regulatory fines are adding up, risks to your organization are prolonged, increasing likelihood of breaches or longer outages, and more.
The Inactive User Reporting solution proactively identifies records in core and ODA applications and questionnaires which have inactive users (inactive, locked, and users no longer in groups) in Record Permission or User/Group fields.
Reports are based on your desired filter criteria (all records or only open/active records) and flexible scheduling. Designated Report Owners are notified via email and can update records quickly. This allows you to proactively address problems long before campaigns are created, emails are sent, and due dates are past due.
After initial app-pack installation and setup, the creation of configurations to monitor applications takes a few moments and the system runs automatically going forward.
Key features and benefits
-
Easily create reporting configurations per application or questionnaire to find inactive, locked and/or users no longer in groups.
-
Filter or limit reporting to specific records (such as active, open, published).
-
Customize report frequency per configuration.
-
Email notification sent to separate Report Owners per configuration if inactive users are found.
-
Easily open the impacted record and update the record with an active user.
-
Optionally use a .CSV file attachment for tracking updates or data imports.
-
Utilize a review workflow for tracking and influencing dashboard reporting.
Key Benefits:
-
Eliminate regulatory fines, legal fees, opportunity costs, realized risks, and wasted time from the risks of inactive users responsible for key tasks.
-
Simple and elegant solution to identify inactive users responsible for key tasks or activities.
-
Reports of inactive users are sent to specific Report Owners who can remediate the issue.
-
Ensures key risk/compliance tasks and processes are completed ontime.
-
Allows you to proactively address problems long before campaigns are created, emails are sent, and records are past due.
Common Example Scenarios:
-
Findings: Monitoring open Findings for the Assigned to and Reviewer field
-
Contracts: Report on pending Contracts for the Submitted and Approved By fields
-
BC/DR Plans: Evaluate the Plan Owner and Reviewer for open plans
-
Control Procedures: Ensure users are active before campaigns are run pulling inactive users into questionnaires
-
Assessments: Monitor any questionnaire for inactive Submitter and Reviewer fields
-
Custom ODAs/questionnaires: Report on any process in Archer
-
And any other scenario in your Archer environment where inactive users would have a negative impact on risk or compliance
Prerequisites (ODA and system requirements)
|
Components |
Recommended Software |
|---|---|
|
ODA License |
Inactive User Reporting requires 1 ODA license and 1 questionnaire license. |
|
Evalto License |
This solution requires separate licensing though Evalto, Inc. or one of their authorized resellers. |
|
Operating System |
Windows Server 2012 R2 |
|
Database Server |
Microsoft SQL Server 2014 (64-bit) |
|
Services Server |
Java Runtime Environment (JRE) 8 (64-bit) |
|
Archer |
Archer 6.6 P5 later |
|
Use Cases |
Compatible with all use cases |
Compatible Use Cases and Applications
Related Applications
|
Application |
Use Case |
Primary Purpose(s) of the Relationship |
|---|---|---|
|
Any Applications and Questionnaires |
Any Use Cases |
|
Additional resources
The following additional resources are available for this application:
-
Product websites:
Inactive User Reporting components
Architecture diagram
Our solution is available in two architectural implementations:
-
Archer JavaScript Transporter (JST) Architecture for On-Premises Environment Customers
-
Scheduled Job Architecture for SaaS & Hosted (and optionally for On-Premises Environment)
Archer JavaScript Transporter (JST) architecture for on-premises environment customers
This implementation uses the JavaScript Transporter data feed in Archer to perform the logic/reporting. At the time this solution was released, Archer does not allow non-Archer developed JST code to run in SaaS or Hosted environments. Please review the Scheduled Job Architecture for SaaS & Hosted (and optionally for On-Premises Environment) implementation if you are a SaaS or Hosted customer below.
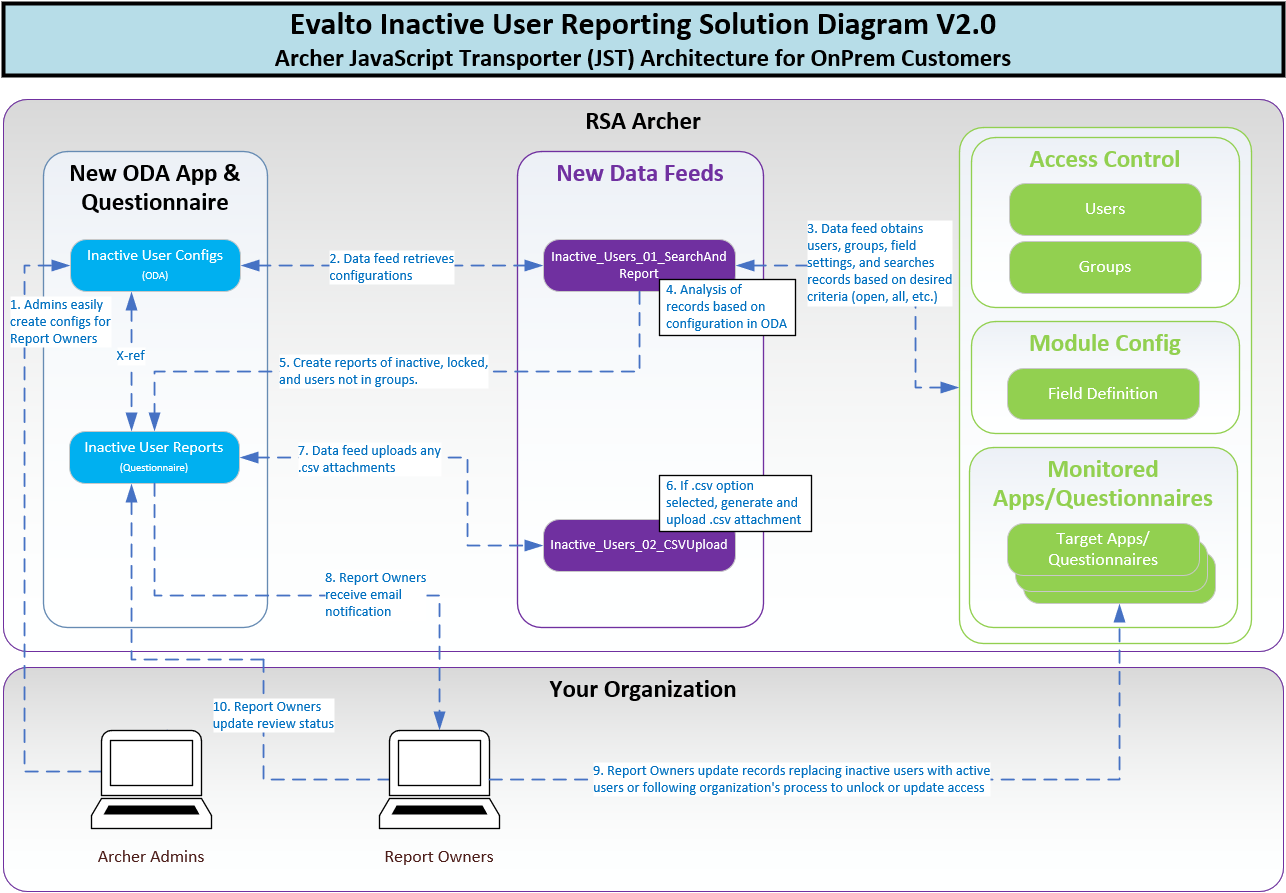
The following describes the On-Premises Environment Architecture Diagram:
-
Inactive User Reporting admins (typically Archer System Administrators) create a new configuration record in the Inactive User Configuration application by populating the details of the configuration such as the application, report owners, schedule, fields to monitor, and any desired filters.
-
The Inactive_Users_01_SearchAndReport data feed runs once per day to retrieve the configurations. The data feed determines which configurations are scheduled to run today based on the desired schedule in the configuration.
-
The data feed retrieves user account details to verify the user status. For each configuration scheduled to run today, the data feed obtains the fields involved and groups configured for those fields. The data feed then retrieves the members of those groups for verification. Then it retrieves records from the target application or questionnaire based on the filter criteria and the users in the record permission or User/Group fields.
-
The data feed performs analysis to determine which records have inactive, locked and/or users no longer in groups for each record. The data feed builds reports in HTML, .CSV, or both based on the configuration.
-
If any inactive users are found, the data feed creates new Inactive User Report records populating relevant information.
-
The Inactive_Users_02_CSVUpload data feed determines if any of the Inactive User Reports should have a .CSV format report based on the configuration.
-
If .CSV format was a selected output, the data feed will create the attachment and upload it to the Inactive User Report record.
-
Report owner(s) named in the configuration will receive an email with a link to the Inactive User Report record alerting them to the issue of inactive users in records.
-
Report owner(s) research the target record(s) to find suitable replacements for the inactive users and update the records.
-
After all records are updated with active users, the report owner marks the Inactive User Report record as “Reviewed” and it is removed from their Reports Awaiting Review dashboard.
Scheduled job architecture for SaaS & hosted (and optionally for on-premises environment)
This implementation uses the same logic from JavaScript Transporter data feed and is executed via a scheduled job on a Windows Server. On-Premises Environment customers can also use this implementation and has shown to perform faster than in the data feed and increased error logging capabilities.
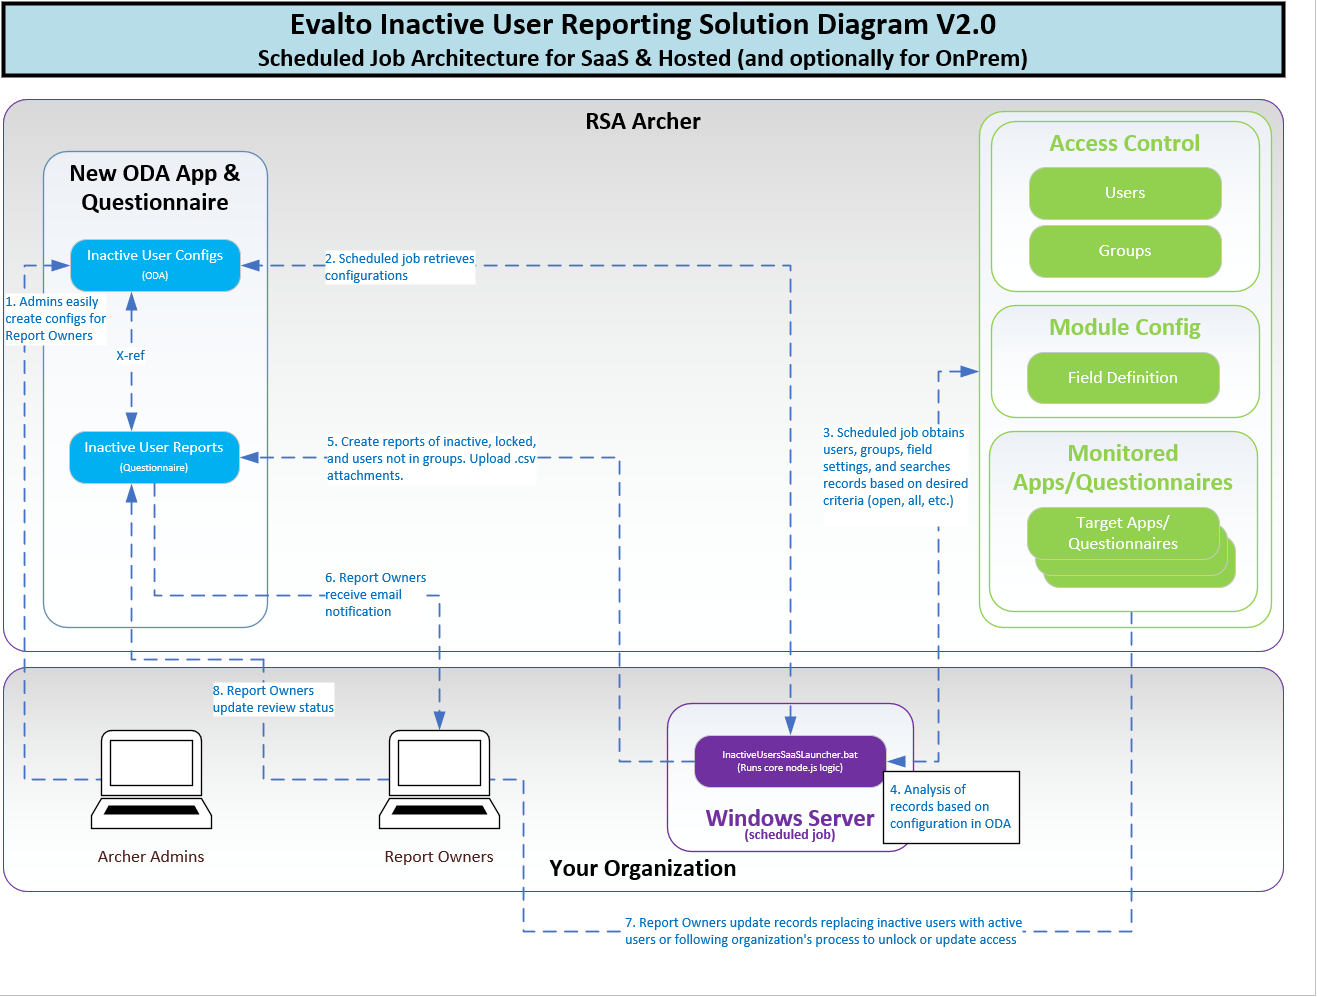
The following describes the Scheduled Job Architecture Diagram:
-
Inactive User Reporting admins (typically Archer System Administrators) create a new configuration record in the Inactive User Configuration application by populating the details of the configuration such as the application, report owners, schedule, fields to monitor, and any desired filters.
-
The scheduled job executes “InactiveUsersSaaSLauncher.bat” which runs the node.js applications once per day. The application retrieves the configurations and determines which configurations are scheduled to run today based on the desired schedule in the configuration.
-
The application retrieves user account details to verify the user status. For each configuration scheduled to run today, the application obtains the fields involved and groups configured for those fields. The application then retrieves the members of those groups for verification. Then it retrieves records from the target application or questionnaire based on the filter criteria and the users in the record permission or User/Group fields.
-
The application performs analysis to determine which records have inactive, locked and/or users no longer in groups for each record. The application builds reports in HTML, .CSV, or both based on the configuration.
-
If any inactive users are found, the application creates new Inactive User Report records populating relevant information. If any of the Inactive User Reports should have a .CSV format report based on the configuration, the application will create the attachment and upload it to the Inactive User Report record.
-
Report owner(s) named in the configuration will receive an email with a link to the Inactive User Report record alerting them to the issue of inactive users in records.
-
Report owner(s) research the target record(s) to find suitable replacements for the inactive users and update the records.
-
After all records are updated with active users, the report owner marks the Inactive User Report record as “Reviewed” and it is removed from their Reports Awaiting Review dashboard.
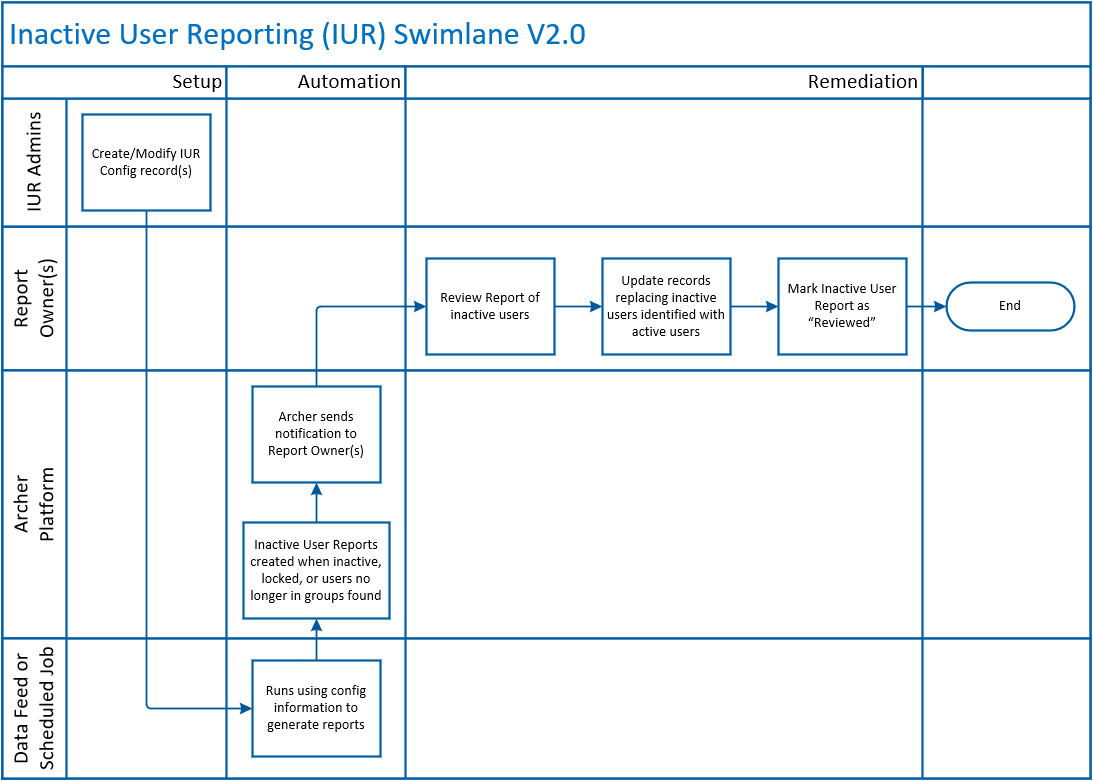
Swimlane diagram
The following diagram shows the general workflow of the solution. The workflow is the same for both On-Premises Environment and Scheduled Job implementations.
Applications
|
Application |
Description |
|---|---|
|
Inactive User Config
|
This application contains the configurations (frequently called “configs”)and settings to monitor and report on inactive users in records. You can choose the application or questionnaire, report format, report owner(s), report frequency, which fields are monitored, and any filter criteria on records evaluated. The Inactive_Users_01_SearchAndReport data feed (On-Premises Environment) or Scheduled Job (SaaS/Hosted) uses the information in this application. |
|
Inactive User Reports
|
This questionnaire holds the results from scans for inactive users based on configurations in the Inactive Users Config application. The Inactive_Users_01_SearchAndReport data feed (On-Premises Environment) or Scheduled Job (SaaS/Hosted) creates this record and Report Owners are notified of the inactive users. If the CSV option was selected, the data feedor scheduled job creates and uploads a .CSV file into the record. Report owners are notified via email if inactive users were found and can manage the status of their review process. |
Personas and Access Roles
The following table describes the functions that make up the application’s organization roles. Depending on the organization of your company, these functions and responsibilities may vary.
|
Function |
Description |
|---|---|
|
System Administrator |
Performs initial installation of package, data feeds, and access. |
|
IUR Admins |
Responsible for configuring the Inactive User Config records to monitor applications or questionnaires. They are typically also system administrators, without requiring the System Administrator access role. They need access to manage targeted applications/questionnaires to obtain field IDs or to create calculated fields if the information is not already provided to them. |
|
IUR Data Feed |
The data feed role allows the data feed or SaaS job to access Archer to perform the processing to identify inactive users. It requires read access to the Access Control: Manage Users rights to evaluate the status of users and provide details in the report. Organizations will optionally update this role in Chapter 5: Task 3 to provide access to the target applications/questionnaires. |
|
IUR Report Owners |
Risk/Compliance program owners or practitioners who want to ensure inactive, locked, and users not in groups are not assigned to open/active records. They review their Inactive User Reports and update records upon notification of inactive users or follow the organizations process to unlock an account or change group access. |
The following table describes the rights that make up the Inactive User Reporting - Admins role assigned to the IUR: Admins group.
|
Application |
Page Type |
Page Name |
Create |
Read |
Update |
Delete |
|---|---|---|---|---|---|---|
|
Access Control |
Administrative |
Manage Users |
|
Yes |
|
|
|
Inactive User Config |
EndUser |
Inactive User Config: Bulk Update |
|
Yes |
|
|
|
Inactive User Config |
EndUser |
Inactive User Config: Content Record |
Yes |
Yes |
Yes |
Yes |
|
Inactive User Config |
EndUser |
Inactive User Config: Data Import |
Yes |
Yes |
Yes |
Yes |
|
Inactive User Config |
EndUser |
Inactive User Config: Email Option |
|
Yes |
|
|
|
Inactive User Config |
EndUser |
Inactive User Config: Export Options |
|
Yes |
|
|
|
Inactive User Config |
EndUser |
Inactive User Config: Print Option |
|
Yes |
|
|
|
Inactive User Config |
EndUser |
Inactive User Config: Save Report |
Yes |
Yes |
Yes |
Yes |
|
Inactive User Config |
EndUser |
Inactive User Config: Schedule |
Yes |
Yes |
Yes |
Yes |
|
Inactive User Reports |
EndUser |
Inactive User Reports: Bulk Update |
|
Yes |
|
|
|
Inactive User Reports |
EndUser |
Inactive User Reports: Content Record |
Yes |
Yes |
Yes |
Yes |
|
Inactive User Reports |
EndUser |
Inactive User Reports: Data Import |
Yes |
Yes |
Yes |
Yes |
|
Inactive User Reports |
EndUser |
Inactive User Reports: Email Option |
|
Yes |
|
|
|
Inactive User Reports |
EndUser |
Inactive User Reports: Export Options |
|
Yes |
|
|
|
Inactive User Reports |
EndUser |
Inactive User Reports: Print Option |
|
Yes |
|
|
|
Inactive User Reports |
EndUser |
Inactive User Reports: Save Report |
Yes |
Yes |
Yes |
Yes |
|
Inactive User Reports |
EndUser |
Inactive User Reports: Schedule |
Yes |
Yes |
Yes |
Yes |
The following table describes the rights that make up the Inactive User Reporting - Data Feed role assigned to the IUR: Data Feed Accounts group.
|
Application |
Page Type |
Page Name |
Create |
Read |
Update |
Delete |
|---|---|---|---|---|---|---|
|
Access Control |
Administrative |
Manage Users |
|
Yes |
|
|
The following table describes the rights that make up the Inactive User Reporting - Report Owners role assigned to the IUR: Report Owners group.
|
Application |
Page Type |
Page Name |
Create |
Read |
Update |
Delete |
|---|---|---|---|---|---|---|
|
Inactive User Config |
EndUser |
Inactive User Config: Content Record |
|
Yes |
|
|
|
Inactive User Config |
EndUser |
Inactive User Config: Email Option |
|
Yes |
|
|
|
Inactive User Config |
EndUser |
Inactive User Config: Export Options |
|
Yes |
|
|
|
Inactive User Config |
EndUser |
Inactive User Config: Print Option |
|
Yes |
|
|
|
Inactive User Config |
EndUser |
Inactive User Config: Save Report |
Yes |
Yes |
Yes |
Yes |
|
Inactive User Reports |
EndUser |
Inactive User Reports: Content Record |
|
Yes |
Yes |
|
|
Inactive User Reports |
EndUser |
Inactive User Reports: Email Option |
|
Yes |
|
|
|
Inactive User Reports |
EndUser |
Inactive User Reports: Export Options |
|
Yes |
|
|
|
Inactive User Reports |
EndUser |
Inactive User Reports: Print Option |
|
Yes |
|
|
|
Inactive User Reports |
EndUser |
Inactive User Reports: Save Report |
Yes |
Yes |
Yes |
Yes |
Installing Inactive User Reporting
Installation overview
Complete the following tasks to install the application.
Step 1: Prepare for the installation
-
Ensure that your Archer system meets the following requirements:
-
Archer Platform version 6.6 P5 or later
-
Archer is running on Archer’s supported hardware and software
-
One (1) ODA license is available and your Archer license includes questionnaire functionality
-
-
Obtain and license the App-Pack install package from Evalto, Inc.at www.evalto.com
-
Read and understand the "Packaging Data" section of Archer Help.
Step 2: Install the package
Installing a package requires that you import the package file, map the objects in the package to objects in the target instance, and then install the package. See Installing the Package for information.
Step 3: Set up data feeds
You must import and schedule each use case data feed that you want to use. SeeSetting Up Data Feeds for information.
Step 4: Test the installation
Test the application according to your company standards and procedures to ensure that the use case works with your existing processes.
Installing the package
Task 1: Back up your database
There is no Undo function for a package installation. Packaging is a powerful feature that can make significant changes to an instance. Archer strongly recommends backing up the instance data base before installing a package. This process enables a full restoration if necessary.
An alternate method for undoing a package installation is to create a package of the affected objects in the target instance before installing the new package. This package provides a snapshot of the instance before the new package is installed, which can be used to help undo the changes made by the package installation. New objects created by the package installation must be manually deleted.
Task 2: Import the package
-
Go to the Install Packages page.
-
From the menu bar, click
 .
. -
Under Application Builder, click Install Packages.
-
-
In the Available Packages section, click Import.
-
Click Add New, then locate and select the package file that you want to import.
-
Click OK.
The package file is displayed in the Available Packages section and is ready for installation.
Task 3: Map objects in the package
Important: This step is required only if you are upgrading to a later version of [ODA name].
-
In the Available Packages section, select the package you want to map.
-
In the Actions column, click
 for that package.
The analyzer runs and examines the information in the package. The analyzer automatically matches the system IDs of the objects in the package with the objects in the target instances and identifies objects from the package that are successfully mapped to objects in the target instance, objects that are new or exist but are not mapped, and objects that do not exist (the object is in the target but not in the source).
Note: This process can take several minutes or more, especially if the package is large, and may time out after 60 minutes. This time-out setting temporarily overrides any IIS time-out settings set to less than 60 minutes.
When the analyzer is complete, the Advanced Package Mapping page lists the objects in the package file and corresponding objects in the target instance. The objects are divided into tabs, depending on whether they are found within Applications, Solutions, Access Roles, Groups, Sub- forms, or Questionnaires.
-
On each tab of the Advanced Mapping Page, review the icons that are displayed next to each object name to determine which objects require you to map them manually.
|
Icon |
Name |
Description |
|---|---|---|
|
|
Awaiting Mapping Review |
Indicates that the system could not automatically match the object or children of the object to a corresponding object in the target instance. Objects marked with this symbol must be mapped manually through the mapping process. Important: New objects should not be mapped. This icon should remain visible. The mapping process can proceed without mapping all the objects. Note: You can execute the mapping process without mapping all the objects. The |
|
|
Mapping Completed |
Indicates that the object and all child objects are mapped to an object in the target instance. Nothing more needs to be done with these objects in Advanced Package Mapping. |
|
|
Do Not Map |
Indicates that the object does not exist in the target instance or the object was not mapped through the Do Not Map option. These objects will not be mapped through Advanced Package Mapping, and must be remedied manually. |
|
|
Undo |
Indicates that a mapped object can be unmapped. This icon is displayed in the Actions column of a mapped object or object flagged as Do Not Map. |
-
For each object that requires remediation, do one of the following:
-
To map each item individually, on the Target column, select the object in the target instance to which you want to map the source object. If an object is new or if you do not want to map an object, select Do Not Map from the drop-down list.
Important: Ensure that you map all objects to their lowest level. When objects have child or related objects, a drill-down link is provided on the parent object. Child objects must be mapped before parent objects are mapped. For more details, see "Mapping Parent/Child Objects" in Archer Help.
-
To automatically map all objects in a tab that have different system IDs but the same object name as an object in the target instance, do the following:
-
-
In the toolbar, click Auto Map.
-
Select an option for mapping objects by name.
Option
Description
Ignore case
Select this option to match objects with similar names regardless of the case of the characters in the object names.
Ignore spaces
Select this option to match objects with similar names regardless of whether spaces exist in the object names.
-
Click OK.
The Confirmation dialog box opens with the total number of mappings performed. These mappings have not been committed to the data base yet and can be modified in the Advanced Package Mapping page.
-
Click OK.
-
To set all objects in the tab to Do Not Map, in the toolbar, click Do Not Map.
-
Note: To undo the mapping settings for any individual object, click ![]() in the Actions column.
in the Actions column.
When all objects are mapped, the ![]() icon is displayed in the tab title. The
icon is displayed in the tab title. The ![]() icon is displayed next to the object to indicate that the object will not be mapped.
icon is displayed next to the object to indicate that the object will not be mapped.
-
Verify that all other objects are mapped correctly.
-
(Optional) To save your mapping settings so that you can resume working later, see "Exporting and Importing Mapping Settings" in Archer Help.
-
Once you have reviewed and mapped all objects, click
 .
. -
Select I understand the implications of performing this operation and click OK.
The Advanced Package Mapping process updates the system IDs of the objects in the target instance as defined on the Advanced Package Mapping page. When the mapping is complete, the Import and Install Packages page is displayed.
Important: Advanced Package Mapping modifies the system IDs in the target instance. Any Data Feeds and Web Service APIs that use these objects will need to be updated with the new system IDs.
Task 4: Install the package
All objects from the source instance are installed in the target instance unless the object can not be found or is flagged to not be installed in the target instance. A list of conditions that may cause objects not to be installed is provided in the Log Messages section. A log entry is displayed in the Package Installation Log section.
-
Go to the Install Packages page.
-
From the menu bar, click
. -
Under Application Builder, click Install Packages.
-
-
In the Available Packages section, do the following:
-
Locate the package file you want to install.
-
In the Actions column, click
 .
.
-
-
In the Selected Components section, select the components of the package that you want to install.
-
To select all components, select the top-level checkbox.
-
To install only specific global reports in an already installed application, select the checkbox associated with each report that you want to install.
-
Note: Items in the package that do not match an existing item in the target instance are selected by default.
-
Click Lookup.
-
For each component section, do the following:
Note: To move onto another component section, click Continue or select a component section in the Jump To drop-down menu.
In the Install Method drop-down menu, select an install method for each selected component.
Note: If you have any existing components that you do not want to modify, select Create New Only. You may have to modify those components after installing the package to use the changes made by the package.
In the Install Option drop-down menu, select an install option for each selected component.
Note: If you have any custom fields or formatting in a component that you do not want to lose, select Do Not Override Layout. You may have to modify the layout after installing the package to use the changes made by the package.
-
Click OK.
-
To deactivate target fields and data-driven events that are not in the package, in the Post-Install Actions section, select the Deactivate target fields and data-driven events that are not in the package checkbox. To rename the deactivated target fields and data-driven events with a user-defined prefix, select the Apply a prefix to all deactivated objects checkbox, and enter a prefix. This can help you identify any fields or data-driven events that you may want to review for clean up post-install.
-
Click Install.
-
Click OK.
Task 5: Review the package installation log
-
Go to the Package Installation Log tab of the Install Packages page.
-
From the menu bar, click
. -
Under Application Builder, click Install Packages.
-
Click the Package Installation Log tab.
-
-
Click the package that you want to view.
-
In the Package Installation Log page, in the Object Details section, click View All Warnings.
Task 6: Configure the JavaScript transporter settings (on-premises environment only)
Note: These steps are only for On-Premises Environment installations. If SaaS/Hosted, skip to Chapter 4.
Before you upload a JavaScript file within the data feed manager, you must configure JavaScript Transporter settings in the Archer Control Panel. If your organization has already implemented digital thumbprints for JavaScript Transporter data feeds, this section can be skipped.
-
Open the Archer Control Panel.
-
Go to Instance Management and select All Instances.
-
Select the instance.
-
On the General tab, go to the JavaScript Transporter section.
-
-
In the Max Memory Limit field, set the value to 2048 MB (2 GB).
-
In the Script Timeout field, set the value to 360 minutes (6 hours).
-
Require Signature is enabled by default after installing Archer. This setting is optional for On-Premises Environment customers and is typically disabled. If Require Signature is not enabled, skip to step 5.
-
In the Signing Certificate Thumbprints section, add a thumbprint for each digitally signed JavaScript file.
-
Double-click an empty cell in the Signing Certificate Thumbprints section.
-
Enter the digital thumbprint of the trusted certificate used to sign the JavaScript file.
-
-
Note: For information on how to obtain digital thumbprints, see Obtaining Digital Thumbprints. Important: If you enable Require Signature and do not specify thumbprints, JavaScript files will not be accepted by the system.
-
On the toolbar, click Save.
-
If Require Signature is not enabled (typical for On-Premises Environment installs), skip to Chapter 4.
-
Digital Thumbprints - only if require signature enabled in ACP
When running JavaScript data feeds, you can set the system to only allow digitally signed JavaScript files from trusted sources for security considerations.
For a certificate to be trusted, all the certificates in the chain including the Root CA Certificate and Intermediate CA certificates must be trusted on both the Web Server and Services Server machines.
Evalto Inc. Cert in the Trusted Root CA Store
Important: You must install the certificates on the ArcherWeb and Services Servers.
-
On the JavaScript file, Right-click and select Properties.
-
Click the Digital Signatures tab.
-
From the Signature List window, select Evalto Inc.
-
Click the Details button.
-
Click View Certificate.
-
Click Install Certificate.
-
Select Local Machine and click Next.
-
Select Place all certificates in the following store and click Browse.
-
Select Trusted Root Certification Authorities and click OK.
-
Click Next.
-
Click Finish.
-
-
-
Upon successful import, click OK.
Obtaining a Certificate Thumbprint
-
On the Web Server(s) and Services Server(s) machines, open the Manage Computer Certificates program.
-
Launch “certmgr” from the Start menu.
-
Navigate to Certificates – Local Computer > Trusted Root Certification Authorities > Certificates
-
Ensure the following certificates are in the Certificates sub-folder of the Trust Root Certification Authorities folder.
-
Evalto Inc
-
-
-
Verify that the certificate is trusted.
-
Double click the Evalto certificate.
-
In the Certificate window, click the Certification Path tab.
-
Ensure that the Certificate Status windows displays the following message: “This certificate is OK”.
-
Note: If the Certificate Status windows displays something different, follow the on-screen instructions.
-
Obtain the trusted certificate thumbprint.
-
In the Certificate window, click the Details tab.
-
Select the Thumbprint field.
-
The certificate's digital thumbprint appears in the window. Copy thumbprint.
-
Note: For information on adding digital thumbprints, see Step 4a of “Configure the JavaScript Transporter Settings” section of the document, regarding where thumbprint is relevant.
Configure Evalto Inactive User Reporting
After the package is installed, complete the following steps to configure the solution.
Task 1: Create data feed/API account
The following data feed/API user account is required to run the two data feeds (On-Premises Environment) or the scheduled job (SaaS/Hosted). This account will be added to the IUR: Data Feed Accounts group which provides access to the Inactive User Reporting - Data Feed role providing proper access to Inactive User Config and Inactive User Reporting. Read access to Manage Users in Access Control is used to identify active user accounts.
-
Log in to Archer using System Administrator role access (or equivalent access).
-
Under the Administration in the Access Control submenu, click Users.
-
Click Add New to create a new user.
-
Complete the form with the following information:
|
Field |
Value |
|---|---|
|
First Name |
dfm_InactiveUsers (recommended) |
|
Last Name |
DFM (recommended) |
|
User Name |
dfm_InactiveUsers (recommended) |
|
User Domain |
No Domain |
|
Password |
<<Your Choice>> |
|
Force Password Change |
Uncheck |
|
Security Parameter |
A Security Parameter which has a non-expiring password for data feeds/API accounts and the session timeout is a minimum of 6 hours. If one does not exist, we recommend creating one unless you have a process to manage expiring service accounts. |
|
Group |
IUR: Data Feed Accounts |
-
Click the Save and Close button to create the new user account.
Task 2: On-prem only - configure the Inactive_Users_01_SearchAndReport data feed
The following data feed does the bulk of the logic to generate reports of inactive users.
-
Log in to Archer using System Administrator role access.
-
Under the Administration menu in the Integration submenu, click Data Feeds.
-
Click the Inactive_Users_01_SearchAndReport data feed.
-
Change the following information:
|
Tab |
Field |
New Value |
|---|---|---|
|
General |
Status |
Active |
|
General |
Target |
Verify the “Inactive User Reports” questionnaire is selected. |
|
Transport |
Transport Configuration |
Upload the 01-InactiveUsersReporting.js file |
|
Transport |
Custom Parameters: archer_username |
Use the username of the data feed account you created above. Our default recommended username is dfm_InactiveUsers |
|
Transport |
Custom Parameters: archer_password |
The password of the data feed account you created above. |
|
Transport |
Custom Parameters: archer_instanceName |
The name of your Archer instance in the Archer Control Panel. Note: Instance name is case-sensitive |
|
Transport |
Custom Parameters: archer_webroot |
This is the URL of your Archer instance excluding the Archer IIS virtual directory. A typical installation will look something like this: https://dev.company.com/ |
|
Transport |
Custom Parameters: archer_webpath |
This is the Archer IIS virtual directory where Archer is installed. Include a trailing slash. A typical installation will look something like this: archer/ |
|
Transport |
Custom Parameters: archer_ws_root |
This is the Archer IIS directory where Archer has the Web Services API files. Include a trailing slash. A typical installation will look something like this: archer/ws/ |
|
Transport |
Custom Parameters: archer_rest_root |
This is the Archer IIS directory where Archer hasthe REST API files. Include a trailing slash. A typical installation will look something like this: archer/platformapi/ |
|
Transport |
Custom Parameters: licensekey |
The license key provided by your Evalto, Inc. sales team member or your reseller. The data feed will not process any records without a valid key. Note: The license key is case-sensitive and licensed to a single Archer server/instance. You will receive a license key for each non-prod and prod instance. |
|
Transport |
Custom Parameters: html_zebracolor |
Provides the option to set the color of the zebra striping in the HTML report in the Inactive User Reporting record. Format is in HTML hex format of #xyz or #xxyyzz Default (gray): #eee |
|
Transport |
Custom Parameters: iMaxRecordCount |
Sets the maximum number of records to return/evaluate per configuration when searching records in scope. Default: 200,000 Note: Using search criteria in the configuration should significantly reduce the number of records evaluated per application or questionnaire. Set this to a low number for initial testing of a config. |
|
Transport |
Custom Parameters: iRecordsPerPage |
Sets the maximum number of records to return per page per config when searching records in scope. Default: 3,000 Note: Performance testing with 5,000 records resulted in slightly shorter data feed run time, but higher CPU and memory usage. |
|
Schedule |
Recurrences |
We suggest setting this to run after any user account synchronization completes (LDAP, custom process, etc.) and only runs one time per day during low utilization of the platform. |
-
Click Save.
-
Optional: To run the data feed, click Start on the Schedule tab to verify operation. No records should be impacted because the Inactive Users Config records have not been created at this point.
Task 3: On-premises environment only - Configure the Inactive_Users_02_CSV Upload data feed
The following data feed creates and uploads the .CSV files when the CSV option is used. If your organization does not plan to use the CSV option, you can skip installing this feed and remove the CSV options in the Inactive User Config application for Report Type.
-
Log in to Archer using System Administrator role access.
-
Under the Administration menu in the Integration submenu, click Data Feeds.
-
Click the Inactive_Users_02_CSVUpload data feed.
-
Change the following information:
|
Tab |
Field |
New Value |
|---|---|---|
|
General |
Status |
Active |
|
General |
Target |
Verify the “Inactive User Reports” questionnaire is selected. |
|
Transport |
Transport Configuration |
Upload the 02-InactiveUsersCSVUpload.js file |
|
Transport |
Custom Parameters: archer_username |
Use the username of the data feed account you created above. Our default recommended username is dfm_InactiveUsers. Some organizations create a different account per feed. Since this data feed runs in convoy and once per day, there should not be any contention with the account sessions. |
|
Transport |
Custom Parameters: archer_password |
The password of the data feed account you created above. |
|
Transport |
Custom Parameters: archer_instanceName |
The name of your Archer instance in the Archer Control Panel. Note: Instance name is case-sensitive. |
|
Transport |
Custom Parameters: archer_webroot |
This is the URL of your Archer instance excluding the Archer IIS virtual directory. A typical installation will look something like this: https://dev.company.com/ |
|
Transport |
Custom Parameters: archer_webpath |
This is the Archer IIS virtual directory where Archer is installed. Include a trailing slash. A typical installation will look something like this: archer/ |
|
Transport |
Custom Parameters: archer_ws_root |
This is the Archer IIS directory where Archer has the Web Services API files. Include a trailing slash. A typical installation will look something like this: archer/ws/ |
|
Transport |
Custom Parameters: archer_rest_root |
This is the Archer IIS directory where Archer has the REST API files. Include a trailing slash. A typical installation will look something like this: archer/platformapi/ |
|
Transport |
Custom Parameters: retain_CSV_source_data |
Provides the option to retain CSV Source Data in the Inactive User Reporting record. This is only necessary for any troubleshooting of .CSV files. Default: 0 Options: Disable (default): 0 Enable: 1 |
|
Schedule |
Recurrences |
Set to your desired frequency. Note: It is recommended to reference the data feed above and run in convoy mode. |
-
Click Save.
-
Optional: To run the data feed, click Start on the Schedule tab to verify operation. No records should be impacted because the Inactive User Reporting records have not been created at this point.
Task 4: SaaS/Hosted only - Configure SaaS/Hosted Application and Schedule
Introduction
In the SaaS/Hosted implementation, we take the functionality provided by the data feeds and perform that work in a scheduled job using a batch process. Many organizations utilize enterprise job scheduling software such as Tidal, ActiveBatch, BMC Control-M, etc. The steps outlined below demonstrate the configuration with Windows Task Scheduler, however many of the same concepts apply for other scheduling software.
On-Premises Environment customers may choose this implementation model as well since the performance overhead of a JavaScript Transporter data feed is more significant than running natively in a Node.JS environment.Error logging is also significantly enhanced providing greater insights pinpointing issues easily.
Options for monitoring multiple instances
Non-Prod vs. PROD Instances: Organizations with enterprise job schedulers typically have different instances of their job scheduler for each level of test and production environments (development, test, QA, PROD, etc.). If you need to monitor extra instances, simply repeat steps 2 through 4 below using a new directory for each instance to monitor. Example directories:
-
C:\Archer\InactiveUserReportingDEV
-
C:\Archer\InactiveUserReportingQA
-
C:\Archer\InactiveUserReportingPROD
Multiple Archer PROD Instances: Organizations may have multiple production instances for different functions or after a merger. To monitor different production instances, simply repeat steps 2 through 4 below using a new directory for each instance to monitor. Example directories:
-
C:\Archer\InactiveUserReportingCompliance
-
C:\Archer\InactiveUserReportingITRisk
-
C:\Archer\InactiveUserReportingVendorMgmt
Step 1: Install node.JS on host server
-
Log into the server with administrator rights where you will run the Inactive User SaaS scripts from programmatically.
-
Download and install the node.js application from http://nodejs.org
-
Choose all default options (or change as necessary)
-
Regarding “Tools for Native Modules” you do NOT need to check the box to automatically install the necessary tools.
-
Step 2: Create folder and install node packages
-
Locate or create the folder/path where you want to run the Inactive User SaaS scripts. Suggestion/Example: C:\Archer\InactiveUserReporting. Avoid using spaces in your path/folder names for automated jobs.
-
Install the required node packages with the Node Package Manager (npm)
-
Open a “Node.js command prompt” from your Windows Start Menu. Pin the “Node.js command prompt” to your taskbar
-
Change directories to the path/folder created in the step above.
-
Run the command “npm install request”
-
Run the command “npm install xmldom”
-
Run the command “npm install xml2js”
-
Step 3: Configure the .js script settings for your environment
-
From the app-pack zip file, place the following files in the folder/path you created above:
-
01-InactiveUsersReportingSaaS.js
-
02-InactiveUsersCSVuploadSaaS.js
-
InactiveUsersSaaSLauncher.bat
-
sendmail.ps1
-
-
Configure the 01-InactiveUserReportingSaaS.js application
-
Edit the 01-InactiveUsersReportingSaaS.js in any text editor (notepad, notepad++, etc.)
-
Locate the defaultParams variable (search for “var defaultParams”) and change the following settings to the appropriate setting for your company
-
archer_username - The account you setup for the data feeds/API above. Example: dfm_InactiveUsers
-
archer_password - Password for the account above
-
archer_instanceName - Case sensitive name of your Archer Instance. Example: Dev
-
archer_webroot - Main URL of your Archer instance with a trailing slash. Example: https://archer.mycompany.com/
-
licensekey - A valid license key is required to run the solution. Obtain your licensekey from Evalto, Inc. or an authorized reseller. Example: “IUR123-456-789”
-
-
Locate and change the bIsSaaS setting to true. Example: 'bIsSaaS':true,
-
Review other parameters which may be different in your Archer environment. Most common changes are the archer_webpath, archer_ws_root, and archer_rest_root. Review the helpful examples and comments per variable.
-
Save the 01-InactiveUserReportingSaaS.js file
-
-
Configure the 02-InactiveUsersCSVuploadSaaS.js application
-
Edit the 02-InactiveUsersCSVuploadSaaS.js in any text editor (notepad, notepad++, etc.)
-
Locate the defaultParams variable (search for “var defaultParams”) and change the following settings to the appropriate setting for your company
-
archer_username - The account you setup for the data feeds/API above. Example: dfm_InactiveUsers
-
archer_password - Password for the account above
-
archer_instanceName - Case sensitive name of your Archer Instance. Example: Dev
-
archer_webroot - Main URL of your Archer instance with a trailing slash.Example: https://archer.mycompany.com/
-
-
Locate and change the bIsSaaS setting to true. Example: 'bIsSaaS':true,
-
Review other parameters which may be different in your Archer environment. Most common changes are the archer_webpath, archer_ws_root, and archer_rest_root. Review the helpful examples and comments per variable.
-
Save the 02-InactiveUsersCSVuploadSaaS.js file
-
-
Configure the InactiveUsersSaaSLauncher.bat file
-
Edit the InactiveUsersSaaSLauncher.bat in any text editor (notepad, notepad++, etc.)
-
Locate and change the following settings to the appropriate setting for your company
-
Change the Archer Instance Name on this line:
-
set ArcherInstanceName=Dev
Note: This setting is informational for logging to help determine which instance is having issues should an error occur
-
-
-
At the very bottom of the file, we provide the ability to send an email via the sendmail.ps PowerShell script if an error is detected. Your enterprise job scheduler may have a different method to send emails. If you are interested in using our script, complete the following steps:
-
Remove the “REM” before the “PowerShell” text to uncomment the line.
-
Edit the sendmail.ps1 in any text editor (notepad, notepad++, etc.)
-
Locate and change the following settings to the appropriate settings:
-
$emailSmtpServer
-
$emailSmtpServerPort
-
$emailFrom
-
$emailTo
-
$emailMessage.Subject
Note: You can leave as-is or change to a different format
-
$emailMessage.Body
Note: You can leave as-is or change to a different format
-
-
If your email server requires SSL:
-
Uncomment $SMTPClient.EnableSsl
-
-
If your email server requires authentication:
-
Uncomment and set the following fields:
-
$emailSmtpUser
-
$emailSmtpPass
-
-
Uncomment the $SMTPClient.Credentials row
-
-
Save the sendmail.ps1 file
-
-
Save the InactiveUsersSaaSLauncher.bat file
-
-
Execute a test run - No records will be created yet because configs do not exist yet
-
Launch the InactiveUsersSaaSLauncher.bat file from the directory it resides in to run the applications
-
Verify successful execution or remediate any configuration issues by looking in the log file
-
Step 4: Setup scheduled job
Some organizations are required to use enterprise job schedulers such as Tidal, ActiveBatch, BMC Control-M, etc. Evalto cannot provide support for those tools, however the settings below for Windows Task Scheduler may help you with the necessary settings in your organization.
-
Log into the Windows server with administrator rights where you will run the Inactive User SaaS scripts from programmatically
-
Start the Windows Task Scheduler application on the server from the Start Menu
-
Create folders for Archer jobs
-
Right-click Task Scheduler Library and click New Folder
-
Type “Archer” and click OK button
-
Right-click Archer folder and click New Folder
-
Type “Inactive User Reporting” and click OK button
-
-
Right-click the “Inactive User Reporting” folder and click Create Task…
-
General Tab Settings:
-
Name: Archer Evalto Inactive User Reporting
-
Description: This task launches the Evalto Inactive User Reporting SaaS applications to proactively identify inactive users in records in the Archer platform.
-
Click the Change User or Group… button and set to a user account which has administrator or Logon as Batch privileges
Note: You will likely need to setup an appropriate service account for this with a non-expiring password or a method to change the password and update the password in this task periodically.
-
Change the radio button selection to “Run whether user is logged on or not”
-
Set Configure for to current operating system
-
-
Triggers Tab Settings:
-
Click New… button
-
Begin the task: On a schedule
-
Settings:
-
Daily
-
Start: Current Day at whatever time make sense. Example: 12/19/2020 at 2:00am
-
Recure every: 1 days
-
-
Advanced Settings:
-
Stop task if it runs longer than 8 hours: Checked
-
Enabled: Checked
-
-
Click OK button
-
-
Actions Tab Settings:
-
Click New… button
-
Action: Start a program
-
Program/Script: [Full path to the batch file.] Example: C:\Archer\InactiveUserReporting\InactiveUsersSaaSLauncher.bat
-
Start in (optional): [Full path of your batch file.] Example: C:\Archer\InactiveUserReporting\
-
Click OK button
-
-
Conditions Tab Settings:
-
Network: Start only if the following network connection is available:
-
Checked
-
Set dropdown to Any Connection
-
-
-
Settings Tab Settings:
-
Allow task to be run on demand: Checked
-
Stop the task if it runs longer than 8 hours: Checked
-
If the running task does not end when requested, force it to stop: Checked
-
If the task is already running, then the following rule applies: Do not start a new instance
-
-
Click the OK button to save your new task
-
Test the scheduled job
-
Right-click the scheduled job and click Run
-
Task 5: Update the inactive users quick links iView
Update the Create New Inactive User Configuration link in the Inactive Users Quick Links iView, which is specific to your Archer instance. Update this per instance.
-
Log in to Archer using System Administrator role (or equivalent access with the ability to update iView content).
-
Identify the Inactive User Config application ID:
-
Under the Administration menu in the Application Builder submenu, click Applications.
-
Scroll or filter to find the Inactive User Config application (do not click it).
-
Hover over the Inactive User Config application and identify the ID in the lower-right of the screen and remember or write down that number. Example: ID: 2755 (This is just an example; your ID will be different)
-
-
Update the link in the iView:
-
Navigate to the Inactive User Reporting workspace.
-
Click
 in the Inactive Users Quick Links iView to view the menu.
 -
Click Edit Properties.
-
In the Custom Content field, locate the http link to Create New Inactive User Configuration.
-
Update the module ID to the ID of your application from step 4 above. Example:
-
Original link: moduleId=1532
-
Your link: moduleId=2755 (This is just an example; your ID will be different)
-
-
-
Click OK to save your changes.
-
-
Test the updated iView link:
-
Click the Create New Inactive User Configuration link in the Inactive Users Quick Links iView to test to ensure Archer opens a new Inactive User Config record.
-
Task 6: Configure custom object in inactive user config application
The Custom Object used to easily setup configs may need to be configured for your environment. If the path to the REST API folder is not “/archer/platformapi/”, then you need to update the custom object script. You can optionally change other settings as well.
-
Locate and edit the CustomObject - IUR Setup.html file in the app-pack install package in any text editor (notepad, notepad++, etc.)
-
Possible edits to make:
-
Changing the API Folder:
-
Search for the string “var urlToAPIFolder” and change the text in the quotes to match your Archer environment.
-
The path must start and end with a slash. Example: “/archer/platformapi/”
-
-
If you decided to change the application alias of the “Inactive User Config” application, you need to update the alias in the custom object
-
Search for the string “var sEvaltoIURAppAlias” and change the text in the quotes to match your Archer environment.
-
-
Optionally, if you want to filter the names of the numeric Filter_ID fields to a specific prefix used specifically for Inactive User Config filters:
-
Search for the string “var sFilterNamePrefix” and change the text in the quotes to match your desired prefix such as “IUR_”.
-
-
Optionally, if you want to exclude/filter additional numeric fields which will never be used in an Inactive User Config:
-
Search for the string “var aIgnoreFiltersNamed” and add the name of the field in lowercase in quotes separated by a comma.
Note: This just makes selecting fields faster/easier, so you don’t have to scroll through potentially dozens of fields.
-
-
-
Save the file for future edits.
-
Copy all the custom object code/text in the file to your clipboard.
-
Steps to update the Custom Object:
-
-
From the menu bar, click
. -
Under Application Builder, click Applications.
-
-
Search or scroll to the Inactive User Config application.
-
Click the Layout tab.
-
In the Setup section, click the dropdown arrow for CO_SetupIUR and click Edit Custom Object Properties.
-
In the Code text area, clear out/delete all text.
-
Paste the text in your clipboard in the Code text area.
-
Click OK.
-
Click Save to save the application changes.
-
Using Inactive User Reporting
Task 1: Setup User Access Inactive User Reporting
The following details how to configure access for end-users to become Inactive User Reporting Admins and Report Owners.
For alternative access approaches, see the Appendix A - Additional Considerations and Options section at the end of this guide.
User: Inactive User Reporting Admins (Typically has System Administrator Role or equivalent access with access to manage users and/or groups)
Setup access for Inactive User Reporting Admins
-
Go to the Groups page.
-
From the menu bar, click
. -
Under Access Control, click Groups.
-
-
Search or scroll to the IUR: Admins group.
-
Click the IUR: Admins group to edit the group.
-
In the Members section, search for desired users and add to the Selected column.
-
Click Save.
Setup access for Inactive User Reporting Report Owners
-
-
From the menu bar, click
. -
Under Access Control, click Groups.
-
-
Search or scroll to the IUR: Report Owners group.
-
Click the IUR: Report Owners group to edit the group.
-
In the Members section, search for desired users and add to the Selected column.
-
Click Save.
Task 2: Obtain information for creating Inactive User config records from business partners
Overview
The following details how to identify necessary information to create an Inactive User Configuration record to monitor an application or questionnaire for inactive users.
-
Multiple config records may be required to accomplish different scenarios. Examples:
-
Different fields monitored, Report Owners, and/or Filter Criteria:
-
Open Findings where Source field is “Internal Audit” and should be reported to audit team leads.
-
Open Findings where Source field is “Security Operations”, and Criticality is “Medium or High” should be reported to InfoSec team.
-
-
More than ten(10) fields need to be monitored in each application.
-
-
Only Record Permissions or User/Group field types are supported to monitor for inactive users.
-
As an example, text fields are not supported. Text fields do not contain enough information to identify unique users in your Archer instance in Manage Users. Contact Evalto, Inc. if you have a specific use case and we will evaluate incorporating that functionality in a future release.
-
-
Tips:
-
Use the Custom Object button in the Inactive User Config record for the fastest data entry/configuration.
-
If performing the setup without the custom object (manually), we suggest having two browser tabs open to identify the App/Field IDs and enter the configuration rather than copying into Notepad. This assumes you are familiar with having multiple tabs open without ending your Archer session.
-
Step 1: Information to obtain from your business partners
User: IUR Admins (Typically has System Administrator Role or equivalent access)
Meet or request the following information from your business partners:
-
Identify which application(s) or questionnaire(s) to monitor for inactive users.
-
Choose which Record Permission or User/Group fields to monitor for inactive users.
-
Decide if you will monitor all records or certain records (active, open, published, and more).
-
It is extremely rare to monitor all records because you will likely want to retain the inactive user in records that completed the workflow for audit purposes.
-
If certain records (active, open, etc.), you will need to define the filter and use either a numeric field or XML search criteria. Details are outlined in Task 4 below.
-
-
Decide who will receive the reports when inactive users are found (Report Owners).
-
Decide the frequency the report will be generated (daily, weekly, monthly, specific days, and more).
Task 3: Configure Data Feed/API Access to Target Application/Questionnaire
The Inactive User Reporting data feed/API account (dfm_InactiveUsers) requires read access to the target application or questionnaire and all of the fields utilized above (Record Permission, User/Group, Filter fields).
User: Inactive User Reporting Admins (Typically has System Administrator role or equivalent access)
To set up Inactive User Data Feed/API Account Access to the Target Application/Questionnaire:
Option 1: Read-only access (recommended approach)
Note: This option follows the suggested concept of “Least Privilege Access” but requires a few additional configuration steps per application or questionnaire monitored.
-
Update the Inactive User Reporting - Data Feed access role to provide read access to content record.
-
If the application/questionnaire has any record permission fields (very common), you will need to update an existing or create a new Automatic Record Permission field to provide read access to the IUR: Data Feed Accounts group or whatever other method your organization uses to provide read access to this group.
Option 2: Content administrator/application owner access
Note: This option is easierto setup but provides full access (create, read, update, and delete) to all content within the application or questionnaire. While it is an option, this may violate company policies and should be reviewed with your security and/or compliance departments.
The Inactive User Reporting solution does not change any data except the Inactive User Config application and Inactive User Reporting questionnaire.
-
While managing your application or questionnaire, click the Administration tab.
-
Add the IUR: Data Feed Accounts group to the Content Administrator (Archer Version 6.7+) or Application Owners (Archer Versionsprior to 6.7) field.
Option 3: System admin
Note: This option is the easiest to setup and it only needs to be performed once. But this configuration provides full access (create, read, update, and delete) to all system administration functionality and content within all applicationsand questionnaire. While it is an option, this may violate company policies and should be reviewed with your security and/or compliance departments.
The Inactive User Reporting solution does not change any data except the Inactive User Config application and Inactive User Reporting questionnaire.
-
Log in to Archer using System Administrator role access
-
Under the Administration in the Access Control submenu, click Users.
-
Locate and edit the IUR data feed/API user account (we suggested dfm_InactiveUsers)
-
Click the Roles tab
-
Click Lookup
-
Search and select the System Administrator role
Note: If you don’t see the role, you did not log in as a System Administrator - Only System Administrators can grant this level of access
-
Click OK
-
Click Save
Ensure or grant Inactive User Data Feed/API Account Access to the Record Permission, User/Group, and Filter Criteria fields involved.
The Inactive User Reporting Data Feed account requires read access to all fields identified for monitoring or filter criteria fields. It does not need access to all fields in the application, just the fields involved in monitoring for inactive users.
-
If none of the fields identified are private, go to Task 4: Determine/Configure Records in Scope for Monitoring below.
-
If any fields are private-and-“Everyone” does not have read access, you need to add the IUR: Data Feed Accounts group to the list with read access using these steps:
-
Edit the field.
-
Click Access tab.
-
Search for the IUR: Data Feed Accounts group
-
Click to add the IUR: Data Feed Accounts group to the Selected list
-
Click Save.
-
-
Repeat steps for any other private fields involved in the Inactive User Config record (Record Permission, User/Group, and/or Filter Criteria field or XML).
Task 4: Determine/configure records in scope for monitoring (Filtering)
User: Inactive User Reporting Admins (Typically has System Administrator role or equivalent access)
Overview
Report Owners defined the records in scope above and have the following options:
-
All Records
Note: It will be rare to use All Records since many use cases have records no longer in an “Active” status. Most organizations will want to retain the users who performed the action even if they are inactive for historical/audit purposes.
-
Filter ID (numeric field only)
-
Records with a value set to 1 are in scope to be monitored and 0 to be ignored.
-
Recommended approaches to set this value to 1 for open/in-scope records:
-
Calculated field (most popular)
-
Populated via Data Feed
-
Populated via data import/bulk update
-
Set via DDE or Advanced Workflow
-
-
-
Filter XML (Advanced: Archer API Search Format)
Step 1: Determine or configure records in ccope
-
If using All Records, skip this step and continue to Task 5.
-
If using the Filter ID (Numeric Field):
-
If you intend to create a new numeric calculated field to filter records:
Note: It is assumed as an Archer administrator you have the knowledge to do the following steps; however, limited guidance is provided for example purposes:
-
Create a new numeric field which calculates to 1 if the record is open, active, published, and more.
Example calculation:
IF
(
CONTAINS(ANY,[Overall Status],VALUEOF([Overall Status],"New","In Progress")),
1,
0
)
-
-
If you intend to create a new numeric field populated by other means (data feed, workflow, bulk update, import, etc.):
-
Simply create a new numeric field.
-
If setting the field to private, ensure the IUR: Data Feed Accountsgroup has read access.
-
-
3. If you intend to use the Custom XML Filter option:
Important: While this is the most powerful and flexible filter option, invalid search criteria may fail to accurately report on critical records. It is strongly suggested to thoroughly test your search criteria in your target environment(s) before adding to the config record. XML entered is not validated/tested and is only utilized at runtime in the data feed.
Note: This is an advanced feature typically used by developers familiar with Archer’s API and building search criteria.
Important: GUIDs are not supported when using values lists in search criteria. Therefore, Custom XML Filters are specific to an Archer Instance when using values list values. Ensure you are creating your search criteria from your production environment.
Note: Custom XML Filter text must be in a single line (no carriage returns) to be entered into a simple text box (not text area). This is done to ensure no custom HTML/formatting causes issues during execution.
It is assumed as an advanced Archer administrator/developer that you have the knowledge to do the following steps; however, some guidance is provided:
-
Construct your XML Search criteria.
-
Ensure IUR: Data Feed Accounts has read access to all fields in the criteria
-
Test to ensure records returned are expected and accurate
-
Obtain all XML nodes including the "Filter" start and end nodes all on one line of text.
Example:
<Filter><Conditions><ValueListFilterCondition name="Value List 1"><Field name="Overall Status">68ecb49e-4eb6-492b-986f-43bf4a2f0d1f</Field><Operator>DoesNotContain</Operator><IsNoSelectionIncluded>False</IsNoSelectionIncluded><Values><Value name="Closed">1659</Value></Values></ValueListFilterCondition></Conditions></Filter>
Note: This is one example, your XML will be different.
Task 5: Create Inactive User Config Record(s)
You gathered all the necessary information, the following steps detail how to create an Inactive User Configuration record to monitor an application or questionnaire for inactive users.
Multiple config records may be required to accomplish different scenarios. Examples:
-
Different fields monitored, Report Owners and/or Filter Criteria:
-
Open Findings where Source field is “Internal Audit” and should be reported to audit team leads.
-
Open Findings where Source field is “Security Operations” and Criticality is “Medium or High” should be reported to InfoSec team.
-
-
More than ten (10) fields need to be monitored in each application.
User: IUR Admins (Typically has system administrator role or equivalent access) or non-admins if using any of the alternate access models in Appendix A.
-
Click the Inactive User Reporting workspace.
-
In the Inactive Users Quick Links iView, click the Create New Inactive User Configuration link.
-
Enter the following fields:
-
Inactive User Config Name
Use the name of the application or questionnaire targeted and other criteria such as fields monitored and filter criteria.
Examples:
-
Findings - All Users - Open Records
-
Third Party Profile - Relationship Manager - Active
-
Company - CEO/CFO - All Records
-
Report Format(s)
Choose a report output format if inactive users are found.
Options:
-
CSV: Creates a comma separated file (.csv) attachment for download and import into Excel.
-
HTML: Provides a report with hyperlink to the record with inactive users.
-
CSV and HTML(default): Creates both types above.
-
Report Owner(s)
-
Users who receive notifications and access to the reports. Groups can be used if using the Alternate Access Model outlined in the Additional Considerations/Options section in Appendix A.
-
Ensure these users have access to the target application or questionnaire and impacted records so they can update the record and replace the inactive users.
-
Comments
Use this field to store any comments about the configuration. Suggestions include:
-
Details about the filtering options
-
Information about business partners involved in the decision making
-
Status
Active configurations are included in the scheduled review process. Inactive configurations are skipped; however, they are still counted as part of the licensing agreement.
-
Report Frequency
Sets the frequency of the scan/report generation.
All schedules are dependent on the time theArcher Admin sets the data feed/job to run. We suggest running the data feed/jobdaily during a non-peak time and then using this field to determine when the report will be generated. If the Archer Admin sets a schedule other than daily, you will have to ensure that config schedule is compatible with the data feed/job settings otherwise a report will not be generated. The Archer Admin sets the data feed/job to run the 1st of every month, but the frequency is every Tuesday. The report will only run if the 1st of the month falls on a Tuesday.
Suggestions:
-
For time sensitive applications such as Findings, use the daily or weekly option depending on the criticality and how often you expect turnover.
-
For scheduled campaigns, run the configuration on the target application a week or two in advance of the campaign launching. This provides enough time to locate replacement users before the campaign creates records and sends notifications.
-
For periodic assessments such as quarterly risk assessments, running the process on specific custom dates during the assessment period would be efficient, although if you are using filters for open records, you could leave it running daily without much of a performance impact.
-
Selecting Application/Questionnaire, Fields, and Filter:
Option 1 (recommended): Using the Setup Custom Object in the Setup section
This is the fastest setup method and eliminates errors from manual entry. Follow these steps:
-
Click the Load Applications and Questionnaires button
-
Select an application or questionnaire from the drop-down list. This sets the data needed in the “Target Application or Questionnaire” section and loads the remaining fields.
-
Select a field to monitor in the Field 1 dropdown. This sets the data needed in the “Record Permission and User/Group Fields Tracked” section.
-
Repeat for remaining fields to track in Field 2 through Field 10.
-
If using a numeric Filter Field, select the field from the Filter Field dropdown.
-
-
This sets the data needed in the “Application/Questionnaire Filter Criteria Options” section.
-
Only numeric fields are available for selection
-
Many default Archer fields have been filtered out to make the selection faster.
Option 2: Manually setting the fields
If the custom object does not work in your environment, review the section above to configure the custom object. If you are still experiencing issues, contact Evalto for assistance. In the meantime, use the information in Appendix B to obtain the necessary field IDs and set the following fields:
-
App-Questionnaire ID
This is the module ID of the application or questionnaire.Example for Findings: 167. May be different in your Archer instance.
-
Field X Name
This field is simply used to help remember what field the Field ID represents. It is not used in the config or report because we obtain the actual name of the field during execution to include in the report in the event the field name changes.
-
FieldX ID
This is the field ID of the Record Permission or User/Group field you are interested in finding inactive users.
Note:
-
Field 1 ID is required; Fields 2-10 are optional.
-
IDs will differ between Archer instances (DEV, TEST, PROD). Ensure you use the field IDs for this specific Archer instance.
-
Any typos will generate a report with an error message to the Report Owners.
-
-
Report Criteria
This determines what criteria is used to evaluate records. Options include:
-
All Records: All records will be evaluated in the target application or questionnaire.
Most applications have a status field for in scope records. The likely scenario where this is used is the target of an application for a campaign but only if the records are all active, in scope, open, published, etc.Again, this is extremely rare.
-
Custom XML Filter: For experienced Archer software/API developers familiar with Archer's Search API XML structure, this option would provide the most flexibility.
-
Filter_ID Field: A numeric field within your target application set to the value "1" which indicates a record is in-scope for search and reporting. Example: CALC_OpenRecords.
-
Using the filter criteria determined above in Task 2: Obtain Configuration Information, select the appropriate value and configuration
Review your settings and make any necessary changes.
Click Save or Save and Close.
Note: The Filter XML in the example above is very specific to the Evalto demo Archer environment and your values will be different.
Task 6: Data feed/scheduled job execution
Introduction/Purpose
The Inactive User Reporting data feeds/scheduled jobs execute daily but could be ran on demand/manually to test configurations in a development environment.
On-Premises Environment Implementation: Data Feeds
The following steps explain how to run the data feeds on demand:
User: IUR Admins (Typically has System Administrator Role or equivalent access)
-
From the menu bar, click
. -
Under Integration, click Data Feeds.
-
Click the Inactive_Users_01_SearchAndReport data feed.
-
Click the Schedule tab.
-
Click Start.
-
Click OK when prompted to save.
-
After the status changes to Completed, click the red x to return to the list of data feeds.
-
If you are using the .CSV output type and testing, continue and execute the second data feed:
-
Click the Inactive_Users_02_CSVUpload data feed.
-
Click the Schedule tab.
-
Click Start.
-
Click OK when prompted to save.
-
After the status changes to Completed, click the red x to return to the list of data feeds.
-
SaaS/Hosted implementation: scheduled job applications
The following steps explain how to run the scheduled job on demand:
User: User with access to run jobs on the scheduling server
Option 1: Run InactiveUsersSaaSLauncher.batBatch file
This option is perfect for testing Inactive User Config record configurations quickly.
-
Log into the server with administrator rights where you will run the Inactive User SaaS scripts from programmatically
-
Open a Node.js command prompt from your Windows Start Menu
-
Change directories to the path/folder where your Inactive User SaaS scripts are located
-
Type InactiveUsersSaaSLauncher.batand press Enter to execute the scripts
Option 2: Run scheduled job from scheduler
This option is used to test the automated/scheduled process after confirming Option 1 above is working.
If using Windows Task Scheduler to schedule the jobs, perform the following steps:
-
Log into the server with administrator rights where you will run the Inactive User SaaS scripts from programmatically
-
Start the Windows Task Scheduler application on the server from the Start Menu
-
Locate and right-click the Archer Evalto Inactive User Reporting task and click Run
-
Type InactiveUsersSaaSLauncher.batand press Enter to execute the scripts
-
The Status should change to “Running”
-
You may need to refresh the display occasionally to confirm the script completed. Refresh by clicking Action and then click Refresh
-
If using a different product to schedule the jobs, follow the process to launch the job.
Task 7: Report owner(s) view report, update records, and complete review
User: IUR Report Owners
The following steps detail what Report Owner(s) do when inactive users are found in records for which they are responsible.
Process overview
-
Email notification is sent to Report Owner(s) only when inactive users are found.
-
Report Owner(s) review and perform remediation steps such as:
-
Updating impacted records in their applications/questionnaires replacing inactive users with active users.
-
Following your organization’s process for unlocking an account.
-
Following your organization’s process for adding users to groups.
-
3. Report Owner(s) complete the review process marking the review complete.
Detailed steps
-
Upon receiving an email, the report owner clicks the link to the Inactive User Report
-
Archer opens displaying the Inactive User Report.
-
Remediate records with Inactive Users:
-
Using the Report Results in the Inactive User Report Results section, observe the record, cause of issue (Locked, Inactive, or Not in Group),field impacted and the inactive user.
-
Choose and perform appropriate remediation steps:
-
Replace inactive users with active users:
-
Click the link in the Content ID column to open/view the record impacted.
-
Edit the record.
Replace the inactive user with an active user.
Note: You could also use bulk update, data import, or inline edit if appropriate.
ii. Following your organization’s process for unlocking an account.
iii. Following your organization’s process for adding users to groups.
-
-
-
Repeat for all records impacted.
-
When all records/users are remediated, go to the next steps.
-
4. Click Edit to edit the Inactive User Report record.
5. Change the Review Status:
-
You may keep the record in the "Awaiting Review" status until you are ready to complete the review.
-
When you have completed all tasks, change the Review Status to "Review Completed”. This will remove this record from your dashboard view so you can focus on any remaining reviews.
6. (Optional) Enter comments about actions performed in the Review Comments/Actions text box.
7. Click Save and Close.
Report Owners can also use the Inactive User Reporting workspace and dashboard to identify the outstanding reports awaiting review.
Additional considerations and options
Monitor the inactive user reporting application and questionnaire
Create Inactive User Config to monitor the Inactive Users Config Application and the Inactive User Reporting questionnaire. Two extra configs are included with your license at no charge for this purpose.
-
Archer recommends that you create a configuration to monitor the Inactive Users Config application and Inactive User Reporting questionnaire to ensure Report Owners are actively monitoring the inactive users.
-
The Report Owner for this configuration is typically sent to Archer Administrators as they likely know who to contact to find replacements.
Alternate access models
Option A: any user as a report owner
To allow any user in your organization to potentially be a Report Owner rather than managing access to the IUR: Report Owners group, perform the following steps:
Update the “Default Role” access role to allow the following:
-
Read access to Inactive User Configurations content records.
Note: Optionally add other options such as email, export, print, and saving personal reports
-
Read/Update to Inactive User Reports content records
Note: Optionally add other options such as email, export, print, and saving personal reports
Update the Report Owner(s) field in the Inactive Users Configuration:
-
In the Field Population section perform the following:
-
Click Lookup and add All Users. Optionally add All Groups if you want to allow groups to be Report Owners
-
Update the Report Owner(s) field in the Inactive User Reports questionnaire:
-
In the Field Population section perform the following:
-
Click Lookup and add All Users. Optionally add All Groups if you want to allow groups to be report owners.
-
Ensure each row has Update access to the records.
-
Update the Inactive User Reporting workspace access.
-
Change the access from Private to Public.
Option B: report owners access to update configs
To allow Report Owners to update/manage the Config records where they are listed as the Report Owner, perform the following steps:
Update the “Inactive User Reporting - Report Owners” access role to allow the following:
-
Update access to Inactive User Configurations content records
Update the Report Owner(s) field in the Inactive User Reports Config application:
-
In the Field Population section perform the following:
-
Ensure the “IUR: Report Owners” row has Update access to the records.
-
Manual setup of inactive user config records without the custom object
These are instructions are only needed if you plan to manually create/edit Inactive User Config records instead of using the setup custom object button. The following steps allow you to obtain the necessary field IDs and set the fields in the config records.
-
Obtain the module ID for the application or questionnaire
-
Go to the Applications/Questionnaires page
-
From the menu bar, click
. -
Under Application Builder, click Applications or Questionnaires.
-
-
Hover over the application or questionnaire name you want to monitor.
Note: The ID is in the lower right corner.
Findings application example: 167
-
Using Notepad or other editor, paste the value to use later. Example:
-
-
Obtain the field IDs for each Record Permission or User/Group field you want to monitor.
-
While managing the application or questionnaire, click the Fields tab.
-
Hover over the desired Record Permission or User/Group field to monitor.
-
Using Notepad or other editor, paste the value to use later.
-
Click X to close the field.
-
Repeat the steps for other Record Permission or User/Group fields you want to monitor.
-
If you intend to use an existing numeric field to filter records or created a new field from the steps above AND you are configuring configs manually (without the custom object setup button), obtain the field ID for the calculated field:
In the Fields tab, hover your mouse over the field name and the Field ID will be shown in the lower-right corner.
CALC_IsOpen field example: 23438
Using Notepad or other editor, paste the value since you will need the information later.


