Archer Individual Accountability Management
The Archer Individual Accountability Management offering enables organizations to hold individuals accountable for their conduct and competence, helping reduce consumer harm and support regulatory compliance. It supports the management of accountability for key individuals across the organization and provides insights into accountability coverage for Executives and Operational Teams. This solution helps address regulatory requirements and reduce risk by delivering full visibility into individuals’ backgrounds, eligibility, and related information.Important: The information in this publication is provided "as is". Archer makes no representations or warranties of any kind with respect to the information in this publication, and specifically disclaims implied warranties of merchantability or fitness for a particular purpose. Client is solely responsible for ensuring that the installation of the application is performed in a secure manner. Archer recommends clients perform a full security evaluation prior to implementation.
Archer Exchange: With the Archer Exchange, the Archer team and our trusted partners have created a broad selection of supplemental, value-added offerings to help you get your unique risk management program on the right path, right from the start. You can leverage the Archer Exchange offerings to expand the use of Archer solutions into new business processes and address specific industry, geographic, regulatory, or technical requirements. The Archer Exchange features a fast and agile development cycle, enabling quick delivery of new and updated offerings for trending issues and connections to innovative technologies.
On this page
Release notes
Release version | Release date | Notes |
Archer Individual Accountability Management 2024.11 | February 2025 |
|
Archer Individual Accountability Management 6.12 P4 | February 2023 | Initial release |
Overview
Accountability is quickly becoming a top-of-mind issue for many financial organizations both in Australia and EMEA. With regulations, like SMCR (Senior Managers and Certification Regime) in EMEA and FAR (Financial Accountability Regime) in Australia, it is important to understand individual responsibilities (especially Senior Management and/or Executives) and hold them accountable to assigned responsibilities. These regulations were put in place to provide a governance process that will reduce harm to consumers and strengthen market integrity by making organizations hold individuals accountable for their conduct and competence.
With SMCR and FAR, regulated firms are required to identify senior managers, executives, and key employees. The organization must allocate responsibilities to these individuals, draw together responsibility maps, and ensure that the individuals are fit and proper for their roles. The organization must also meet conduct and certification rules established by the regulator.
The Financial Accountability Regime (FAR) is a regulatory framework implemented in Australia to enhance accountability within the financial sector requiring senior executives and directors of financial institutions to be accountable for their actions and decisions, particularly concerning matters related to financial stability, customer outcomes, and compliance with regulations. FAR aims to improve transparency, governance, and risk management practices among financial institutions. Financial institutions in Australia are subjected to FAR requirements for reporting and disclosure.
By incorporating Archer Australian Regulatory Correspondence into Archer Individual Accountability Management, Australian customers can gain access to pre-configured FAR regulatory form templates for regulatory communications, guaranteeing compliance with their regulatory obligations.
Individual accountability is now a global concept and is becoming a regulatory focus area around the world. Regulated firms are being required to identify senior managers, executives, and certain key employees, allocate responsibilities to those individuals, draw together responsibility maps for the firm, and ensure that they are fit and proper for their roles, and meet conduct and certification rules established by the regulator.
Key features and benefits
With Archer Individual Accountability Management organizations can do the following.
Identify key individuals and roles within the organization to track accountability.
Document accountability, attestations, regulatory communication, and related events affecting accountability.
Define prescribed responsibilities and attach to individual accountability.
Document and track all notifications and communication with regulators.
Submit FAR regulatory forms and capture regulatory correspondence with Archer Australian Regulatory Correspondence
The benefits of Archer Individual Accountability Management include the following.
Give confidence to Executives and operational teams alike with current insights into accountability coverage.
Full visibility into individual background, eligibility and performance.
High-level view of organizational accountability coverage.
User guide
User: Compliance Manager
Create a new Contacts Record.
From the menu bar, click on the dropdown beside Individual Accountability Management Workspace.
Under Individual Accountability Management > Contacts, click on New Record.
Provide the following information:
In the General Information Section:
Select “Yes” in “Does Contact Require Accountability Management?” field.
Enter data in fields “Name (First)”, “Name (Last)”, “Email (Business)”, “Hire Start Date”, “Employment Status”, “Company”.
Provide any other details available.
In Individual Accountability Tab:
Identify any related committee memberships, incidents, conflicts of interest, findings, sanctions etc., if available.
Click on Save.
User: Compliance Manager
- From the menu bar, click on the dropdown beside Individual Accountability Management Workspace.
Under Individual Accountability Management > Committee Memberships, click on New Record.
Enter data in fields “Committee Name”, “Committee Purpose”, “Committee Date Formed”, "Accountability Statements".
Click on Save.
User: Compliance Manager
Task 1. Create a new qualification assessment record
Method 1
From the menu bar, click on the dropdown beside Individual Accountability Management Workspace.
Under Individual Accountability Management -> Qualification Assessments, click on New Record.
Select the target accountable person.
Click on Apply.
Method 2
Edit an Accountable Person’ s Contact record.
Under the Individual Accountability tab Qualification Assessments section, click on Add New for Qualification Assessments.
Task 2. Complete qualification assessment record
Provide the following information:
Enter data in fields “Qualification Check Name”, “Qualification Date”, “Qualification Expiration Date”, “Qualification Result”, “Qualification Documentation Attachment” or “Qualification Documentation (Link)” in Qualification Check section.
Add comments if any under Comments section.
Click Save.
Overall Qualification Assessment Result is displayed in the Qualification Assessments section of Contacts record.
User: Compliance Manager
From the menu bar, click on the dropdown beside Individual Accountability Management Workspace.
Under Individual Accountability Management >Accountabilities, click on New Record.
Provide the following information:
Enter details in fields “Accountability Name”, “Accountability Description” in General Information section.
Add related risks, controls (Control Procedures), obligations (Control Standards), Third Party Contracts if any.
Click on Save.
User: Compliance Manager
From the menu bar, click on the dropdown beside Individual Accountability Management Workspace.
Under Individual Accountability Management >Significant Related Entity, click on New Record.
Enter details in fields “Significant Related Entity Name”, “Description”, “Significant related Entity Start date”, “Significant related Entity End date”, “ABN”, select “Parent Entity” in General Information section.
Click on Save.
User: Compliance Manager
From the menu bar, click on the dropdown beside Individual Accountability Management Workspace.
Under Individual Accountability Management > Accountability Statement, click on New Record.
Enter details in the Accountable Person & Position section. “Position/Role” and “Accountable Person” fields are required.
Enter data in field “Accountabilities” in Assigned Accountabilities section.
Click on Add New to assign accountabilities.
Report the Start Date and Select an Accountability. (Only one Accountability can be selected at a time)
Save the Record.
Return to Accountability Statements record.
Repeat Step a - Step d for each accountability if you want to assign multiple accountabilities.
Assign Committee memberships if needed.
Provide any additional information as needed on the Accountability Statement and click save.
If there is any Significant Related Entity responsibility for the accountable person, it can be assigned by adding data in Significant Related Entity section. To assign SRE responsibility follow the below mentioned steps
Click On Add New.
Select or add Significant related Entity and report the start date of the accountable person against the SRE, enter the responsibility details and save the record.
Return to Accountability Statements record.
Repeat Step a - Step c for each SRE if you want to assign multiple SRE responsibility.
Click on Save.
The record will be enrolled in the workflow to track the progress.
User: Compliance Manager
Edit an Accountability Statement.
Click Add New under Delegates section.
A new Accountability Statement record will open.
Select "Yes" in the field "Is this Accountability Statement for Delegation?", under General Information & Review section.
Select the Type of Delegation:
Temporary - Select if delegate is temporary.
Permanent - Select if delegate is permanent.
Follow Step 3 – Step 9 from create Accountability Statements section.
Return & Save the main Accountability Statement record.
Create a new Accountability Acknowledgement Record
User: Compliance Manager
Method 1
From the menu bar, click on the dropdown beside Individual Accountability Management Workspace.
Under Individual Accountability Management ->Accountability Acknowledgements, click on New Record.
Select the target accountability statement.
Click on Apply.
Method 2
Edit a fully defined Accountability Statement.
Click on “Add New” in “Accountability Acknowledgements” field in Acknowledgement section.
Complete Accountability Acknowledgements Record
Provide due date, if any, in field “Due Date” in General Information section.
Click on the “Send Acknowledgement" button at the top of the record.
An accountable Person will be notified that Accountable Statement is ready for Acknowledgement.
Acknowledge Accountability Statement
User: Accountable Person
Edit Accountability Acknowledgement.
Verify the Accountability Statement.
Under Action dropdown at the top, select “Sign Acknowledgement”.
In the Signature pop-up, provide password and click on OK.
Acknowledgement Status shows Approved.
Verify Acknowledgement for Accountability Statements
User: Compliance Manager
Edit Accountability Acknowledgement.
Verify the Accountability Acknowledgement.
Select “Approved” in field “Review Status” in General Information section.
Acknowledgement Overall Status is marked as Approved.
Import Scanned Accountability Statement
If Accountability Acknowledgements is captured outside of Archer do the following:
User: Compliance Manager
Edit an Accountability Statement.
Click “Add New” in the field “Scanned Accountability Statement” under Acknowledgement section.
Click on “Select File(s)” button in the pop-up window and import the scan copy of the acknowledged and signed accountability statement. Click on OK.
Click on Save.
User: Compliance Manager
Edit an Accountability Statement.
Notify the Regulator of the Accountability Statement update.
Click “Add New” for Regulatory Communication/FAR Regulatory Correspondence** under the Regulatory Communication tab to track the regulatory communication.
Click on “Submitted to Regulator” under Actions dropdown.
Track the right status of the Regulatory Communication by selecting the right status from the Actions drop-down:
Awaiting Review - after receiving confirmation from Regulator.
Changes Required - when changes are required to the Accountability Statement. The Status of Accountability Statement will go to Update Required while the Compliance Officer works on the changes to submit back to the Regulator.
Approved & Active - when the regulator has completed the review and approved the Accountability Statement. A copy of the Accountability Statement will be captured under the Historical Accountability Statement tab.
Once the record is Approved & Active, it will be copied and captured in the Historical Accountability Statements.
Note: For FAR Regulatory Reporting, Archer Australian Regulatory Correspondence must be installed to view the Australian Regulatory Correspondence application.
User: Compliance Manager
Edit Approved Accountability Statement.
If any changes are needed, click on the button "Update Required". Record will re-enroll in workflow and changes can be made.
User: Compliance Manager
Edit Approved Accountability Statement.
To retire the accountability statement, select "Yes" in field "Retire Accountability Statement?" in the General Information Section and click on Save.
Administrator guide
Prerequisites (system requirements)
Components | Prerequisites |
|---|---|
Archer solution areas | Archer Regulatory & Corporate Compliance Management |
Archer use cases |
|
Archer applications |
|
Uses custom objects | No |
Requires Archer on-demand application (ODA) license | Zero (0) Archer On-Demand Application licenses are required. |
Requires Archer license | Additional licensing fees apply for Archer Individual Accountability Management. Please contact Archer Sales Representative for more information and pricing. |
Archer requirements | Archer Platform Release 2024.11 and later |
Supported Archer environments |
|
Compatible use cases & applications
Application | Use Case | Primary Purpose(s) of the Relationship |
Contacts | Enterprise Catalog | To identify the Accountable Person. This serves as a central repository for contact information, is utilized across multiple areas of Archer, and contains information that is often leveraged by other use cases. |
Findings | Issues Management | To identify and track any findings related to Accountable Persons or Accountability Statements. |
Application | Use Case | Primary Purpose(s) of the Relationship |
|---|---|---|
Australian Regulatory Correspondence | Archer Australian Regulatory Correspondence | Create FAR regulatory reporting forms and track FAR regulatory communications related to Accountable Persons and Entities. |
COI Registry | Archer Conflict of Interest Management | Identify/map any conflicts of interest related to the Accountable Person. |
Company | Enterprise Catalog | Identify employer details for Accountable Persons. |
Contracts | Third Party Catalog | Identify contracts related to Accountabilities. |
Control Procedures | Controls Assurance Program Management; Data Governance; Top-Down Assessment; IT Controls Assurance; Information Security Management System; PCI Management; IT Risk Management | Identify control procedures related to Accountability Statements. |
Control Standards | Policy Program Management | Identify any obligations related to the accountabilities and accountability statements. |
Document Repository | Archer Documentation Request Tracking | Store documents relating to Accountability Statements. |
Evidence Repository
| Controls Assurance Program Management; IT Controls Assurance; Audit Engagements & Workpapers | Identify sanctions related to an Accountable Person |
Incidents
| Incident Management | Identify incidents related to the Accountability Statements/Accountable Persons. |
Policies | Policy Program Management | Identify policies related to Accountability Statements. |
Regulatory Communication | Privacy Program Management | Track regulatory communications from the compliance officer in relation to the Accountability Statements and related Accountable Person. |
Risk Register | Risk Catalog; Top-Down Assessment; IT Risk Management; Information Security Management System; Operational Scenario Analysis | Identify any risks related to the Accountability Statements and Accountable Persons. |
Task Management | Task Management | Identify tasks assigned to Accountable Persons. |
Components
Architecture diagram
The following diagram shows the relationships between the applications in Archer Individual Accountability Management.
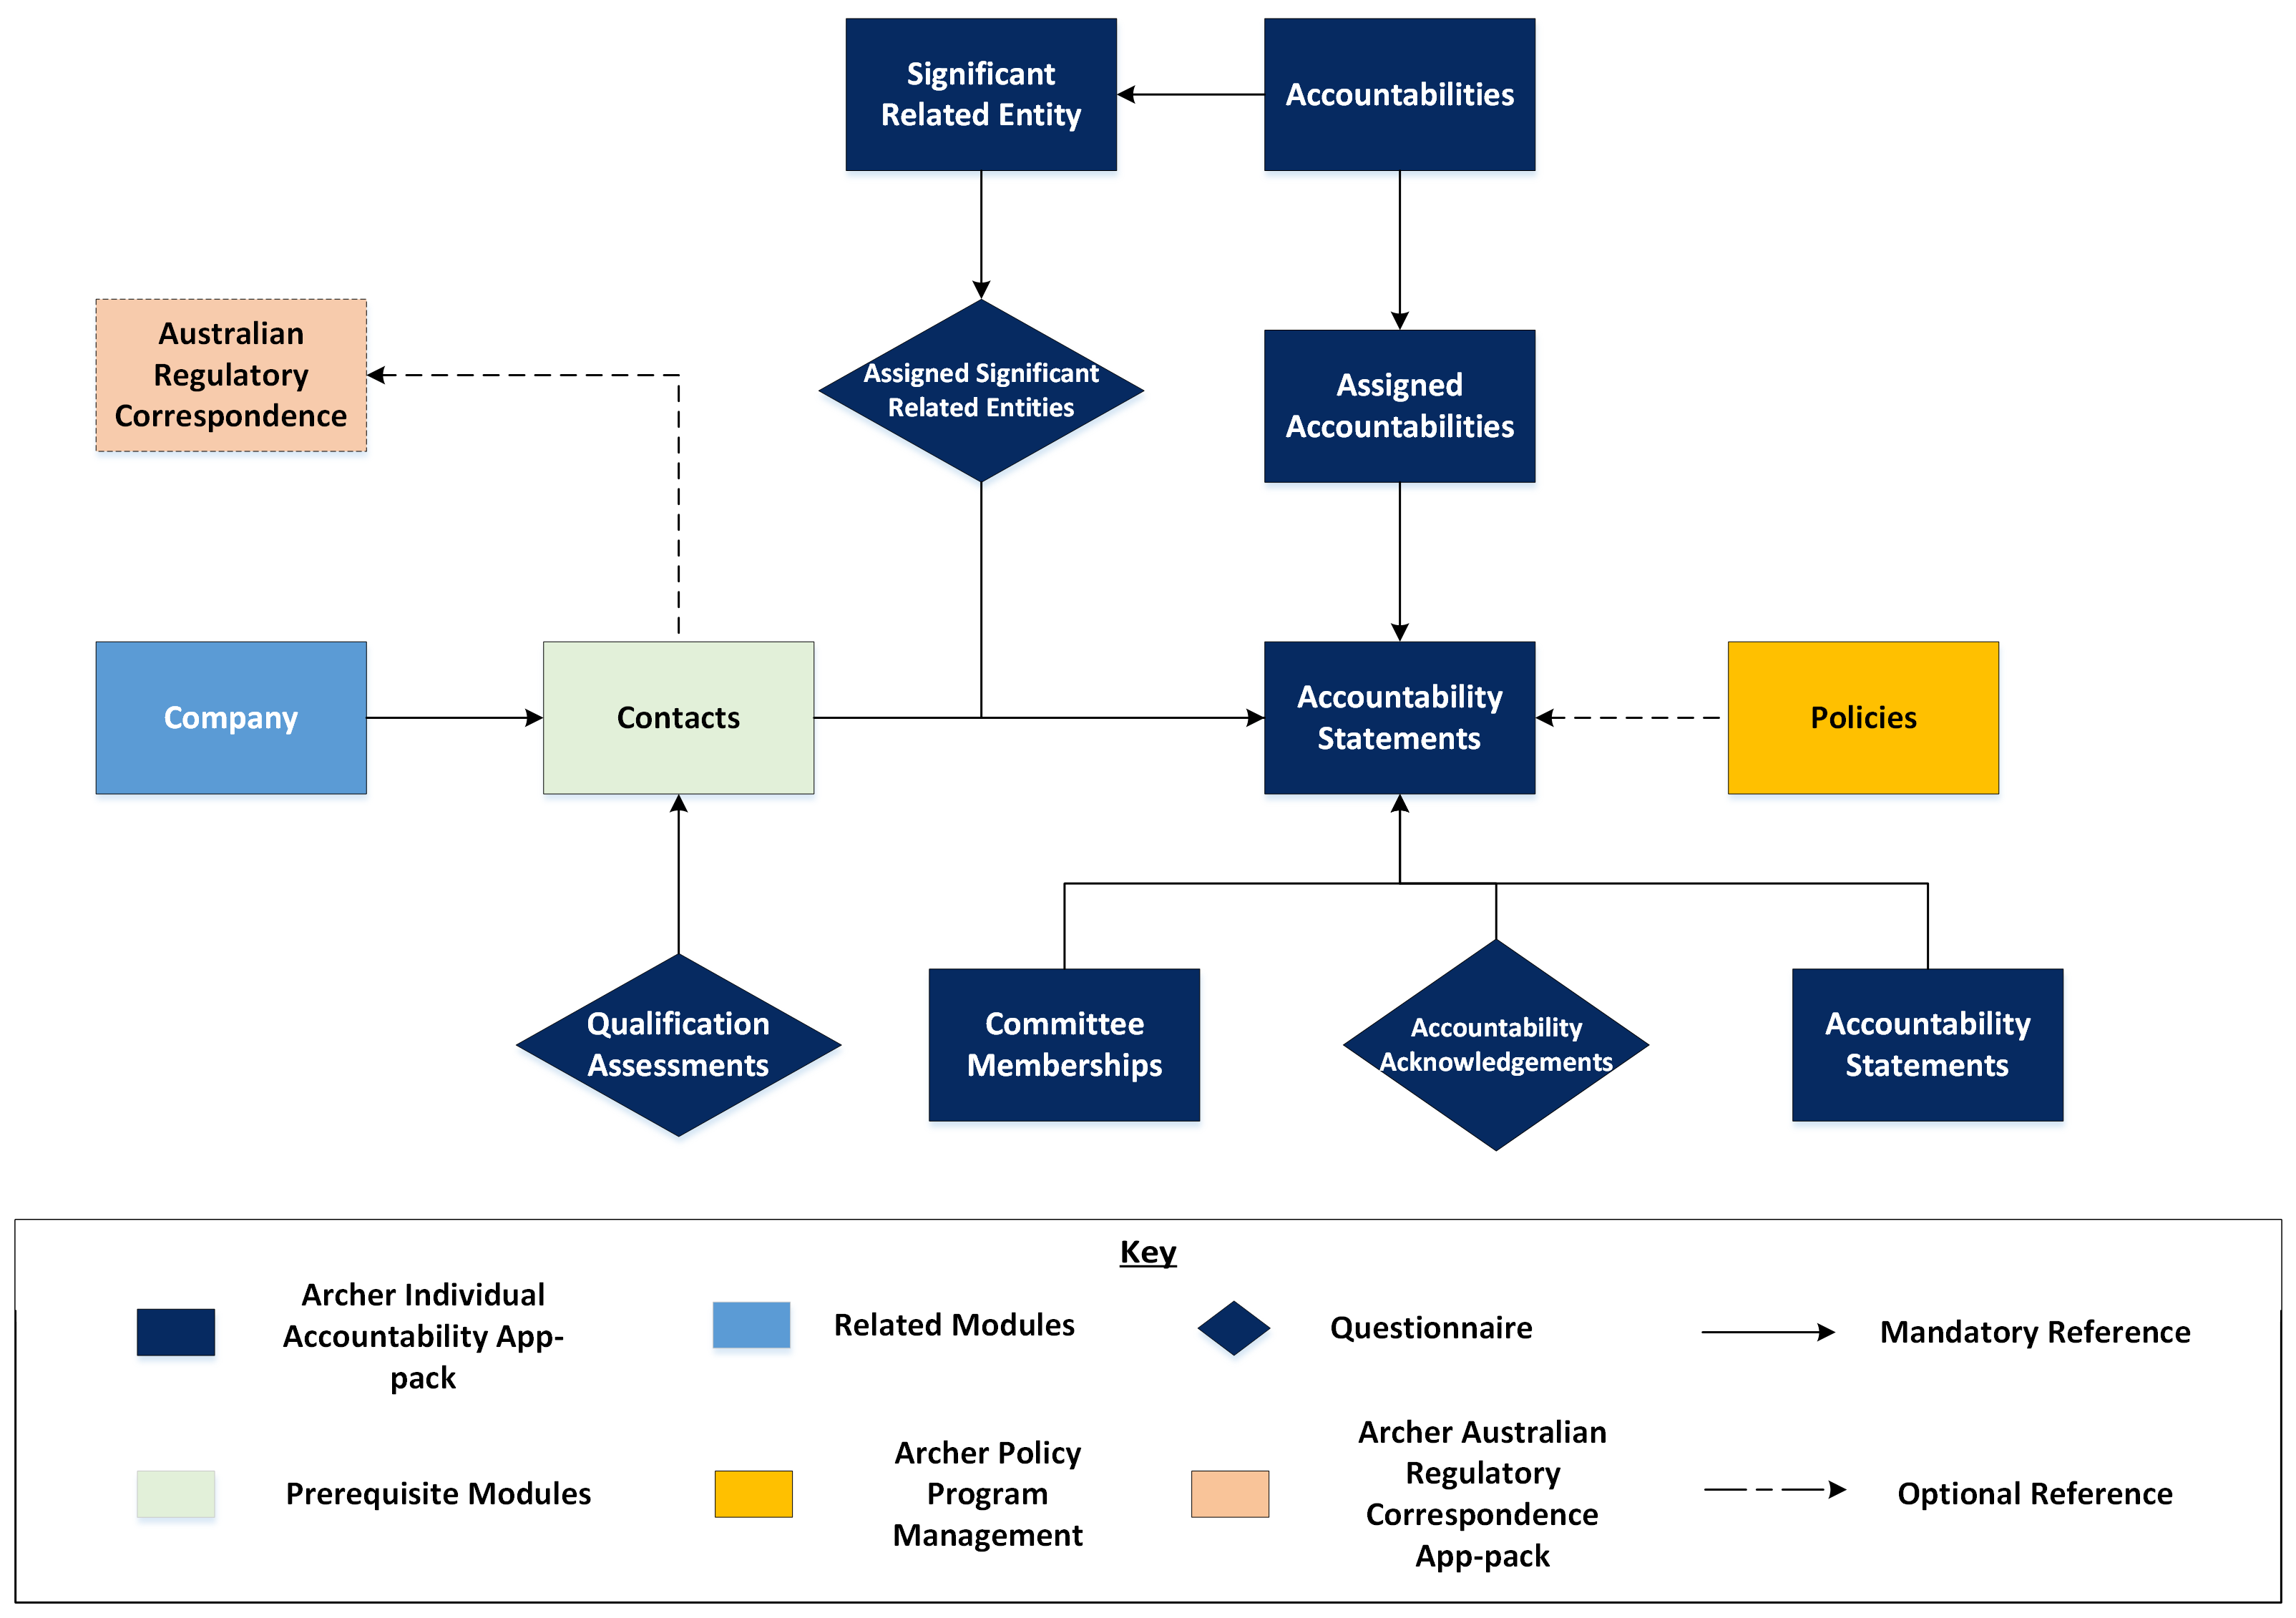
Note: Australian Regulatory Correspondence application is only available if Archer Australian Regulatory Correspondence package is taken. This application is specific to the Financial Accountability Regime (FAR) of Australia.
Process diagram
The following diagram shows the general workflow of the applications:

Applications & questionnaires
Application | Description |
|---|---|
Contacts | The Contacts application is used to identify the Accountable Person. This serves as a central repository for contact information, is utilized across multiple areas of Archer, and contains information that is often leveraged by other use cases. |
Accountability Statements | The Accountability Statements application documents the Accountable Person, their accountabilities or responsibilities, their Significant Related Entities and a qualification assessment to determine if the Accountable Person is qualified to perform their role. The Accountability Statement application also identifies delegates for accountabilities and documents the Accountability Statement’s review and approvals and communication with the Regulators. |
Accountabilities | The Accountabilities application documents the Accountabilities within an organization. It also captures whether the Accountability is a Key Function or not for an Entity. |
Committee Memberships | The Committee Memberships application documents Committees, their purpose, and members. |
Accountability Acknowledgements | The Accountability Acknowledgements questionnaire documents attestation from the Accountable Person for the Accountability Statement. |
Qualification Assessments | The Qualification Assessments questionnaire captures required qualification checks and results for the Accountable Person. |
Historical Accountability Statements | The Historical Accountability Statements application documents the historic details of the Accountability Statement like Accountable Person, their accountabilities or responsibilities. |
Assigned Accountabilities | The Assigned Accountabilities Applications documents who is responsible for those Accountabilities, tying them to an Accountable Person. It also captures the start & end date of an accountable person against each accountability. |
Significant Related Entity | This application captures the Significant Related Entity details related to an Entity, their start date & end date. |
Assigned Significant Related Entity | This Questionnaire documents accountable person's responsibility / accountability, their start date & end date against each Significant Related Entity. |
Personas & access roles
The following table describes the functions that make up the application’s organization roles. Depending on the organization of your company, these functions and responsibilities may vary.
Function | Description |
|---|---|
Compliance Officer | The Compliance Officer is responsible for documenting the Accountable Persons, responsibilities, impacted areas, reporting structure, and other key information as it pertains to the individual and their responsibilities. They are also responsible for vetting the Accountable Person and providing a statement of responsibilities or accountability statement in the case of a regulatory breach. Compliance Officers are also the point of contact with the Regulators. |
Accountable Person | The Accountable Person is assigned responsibilities for their role and will sign the attestation for their role and responsibilities. This person can be an Executive, Senior Manager, or any key individual within the organization that needs to provide and track accountability. |
Install Archer Individual Accountability Management
Note: The Archer Individual Accountability Management package contains “Contacts” core application. Please read the documentation for list of changes added to the Contacts application. It is recommended that users perform analysis on choosing whether to install the changes through package or perform manual changes.
Prepare for the installation.
Obtain the installation package.
Read and understand the "Packaging Data" topic in the Archer Platform Help.
Apply the latest license file in the Archer Control Panel.
Test the installation. Test the application according to your company standards and procedures, to ensure that the use case works with your existing processes.
Install the package
Installing a package requires that you import the package file, map the objects in the package to objects in the target instance, and then install the package.
There is no Undo function for a package installation. Packaging is a powerful feature that can make significant changes to an instance. Back up the instance database before installing a package. This process enables a full restoration if necessary.
An alternate method for undoing a package installation is to create a package of the affected objects in the target instance before installing the new package. This package provides a snapshot of the instance before the new package is installed, which can be used to help undo the changes made by the package installation. New objects created by the package installation must be manually deleted.
From the menu bar, click
 > Application Builder > Install Packages.
- In the Available Packages section, click Import.
- Click Add New, then locate and select the package file that you want to import.
- Click OK.
The package file is displayed in the Available Packages section and is ready for installation.
Important: This step is required only if FAR Regulatory Correspondence is already present in your system, and you are installing this package.
From the menu bar, click
> Application Builder > Install Packages.- In the Available Packages section, locate the package you want to map.
- In the Actions column, click
 for that package.
The analyzer examines the information in the package. The analyzer automatically matches the system IDs of the objects in the package with the objects in the target instance and identifies objects from the package that are successfully mapped to objects in the target instance, objects that are new or exist but are not mapped, and objects that do not exist (the object is in the target but not in the source).
When the analyzer is complete, the Advanced Package Mapping page lists the objects in the package file and corresponding objects in the target instance.
- On the Advanced Mapping page, click to open each category and review the icons next to each object to determine which objects you must map manually.
The following table describes the icons. Icon
Name
Description

Awaiting Mapping Review
Indicates that the system could not automatically match the object or one of its children to a corresponding object in the target instance.
Objects marked with this icon must be mapped manually.
New objects should not be mapped. Select Do Not Map from the drop-down menu to clear this icon for an individual object, or click Do Not Map to clear the icon for all unmapped objects.

Mapping Completed
Indicates that the object and all children are mapped to objects in the target instance, or that they have been marked as Do Not Map. Nothing more needs to be done with these objects in Advanced Package Mapping.
Note: You can run the mapping process without mapping all objects. The
icon is for informational purposes only. - For objects awaiting mapping review, do one of the following:
- To map each object individually, use the drop-down menu in the Target column to select the object in the target instance to which you want to map the source object. To leave an object unmapped, select Do Not Map in the Target column.
- To automatically map all objects in a category that have different system IDs but the same object name as an object in the target instance, click Auto Map. Select whether to ignore case and spaces when matching object names. Click OK.
- To mark all unmapped objects as Do Not Map, click Do Not Map.
(Optional) Click
 to enable filter fields that you can use to find specific objects in each mapping category. To undo your mapping selections, click Undo, then select whether to undo all mappings in the category or only the mappings on a single page. If you choose to undo all mappings, you will be returned to the categories list.
- (Optional) To save your mapping selections and return to the categories list without committing changes to the target instance, click
 .
. - After you review and map all objects, click Execute.
- Select I understand the implications of performing this operation. Click OK.
When the mapping is complete, the Import and Install Packages page displays.
Important: Advanced Package Mapping modifies the system IDs in the target instance. You must update any Data Feeds and Web Service APIs that use these objects with the new system IDs.
All objects from the source instance are installed in the target instance unless the object cannot be found or is flagged to not be installed in the target instance. A list of conditions that may cause objects not to be installed is provided in the Log Messages section. A log entry is displayed in the Package Installation Log section.
- From the menu bar, click > Application Builder > Install Packages.
- In the Available Packages section, locate the package file that you want to install, and click the file name or
 at end of the row to open the Options menu.
 - In the Selected Components section, click the Lookup button to open the Package Selector window.
- To select all components, select the top-level checkbox.
- To install only specific global reports in an already installed application, select the checkbox associated with each report that you want to install.
Note: Items in the package that do not match an existing item in the target instance are selected by default.
- Under the Translation Option drop-down menu, select an option for each selected component. To use the same Translation Option for all selected components, select a method from the top-level drop-down list.
The Translation Option is enabled only when a language is selected.The following table describes the options. Option
Description
Full Install
Installs the component and its translations from the selected languages.
Translations Only
Only installs the translations from the selected languages.
- Under the Install Method drop-down menu, select an option for each selected component. To use the same Install Method for all selected components, select a method from the top-level drop-down list.
The following table describes the options. Option
Description
Create New Only
Only creates new fields and other elements in the applications, questionnaires, workspaces, data feeds, and dashboards specified in the package file. This option does not modify any existing elements on your instance of Archer. This is useful when you want to add functionality to an existing application, questionnaire, workspace, dashboard, data feed, or access role, but you do not want to risk making any unwanted changes to the existing elements of workspaces, data feeds, or dashboards.
Note: The Create New Only option does not apply to access roles or languages.
Create New and Update
Updates all elements in the applications, questionnaires, workspaces, data feeds, and dashboards as specified in the package file. This includes adding new elements and updating existing elements.
Note: The Create New and Update option does not apply to access roles or languages.
- Under the Install Option drop-down menu, select an option for each selected component. To use the same Install Option for all selected components, select an option from the top-level drop-down list.
The following table describes the options. Option
Description
Do not Override Layout
Installs the component, but does not change the existing layout. This is useful if you have a lot of custom fields and formatting in your layout that you do not want to risk losing.
You may have to modify the layout after installing the package to use the changes made by the package.
Note: The Do not Override Layout option does not apply to access roles or languages.
Override Layout
Updates the layout as specified in the package file, overwriting the existing layout.
Note: The Override Layout option does not apply to access roles or languages.
- Click Continue to advance to the next object category in the Package Selector, and repeat steps 4 to 6. After reviewing all object categories, click OK.
- To deactivate target fields and data-driven events that are not in the package, in the Post-Install Actions section, select the Deactivate target fields and data-driven events that are not in the package checkbox. To rename the deactivated target fields and data-driven events with a user-defined prefix, select Apply a prefix to all deactivated objects, and enter a prefix. This can help you identify any fields or data-driven events that you may want to review for cleanup post-install.
- Click Install.
- Click OK.
From the menu bar, click
> Application Builder > Install Packages.- In the Package Installation Log section, click the package that you want to view.
- In the Package Installation Log page, in the Object Details section, click View All Errors.
Note: To view individual logs, in the Errors column of the log you want to view, click the Failures link or Warnings link. Clicking View All Errors, Failures, or Warnings opens the specific errors on a different page.
- Click the Export icon to export the log file.
- Click Close.
For a list of packaging installation log messages and remediation information for common messages, see Package Installation Log Messages.
Perform required post-installation steps for new users
For existing installations of Archer Individual Accountability Management, follow the steps in the Upgrading Archer Individual Accountability Management section.
For initial installations of the Archer Individual Accountability Management, follow the steps below to identify and remove any unnecessary fields and data feeds.
Go to Accountabilities application and search for “Related Accountability Statements (OLD)” field. This field can be deleted, or it can be inactivated.
Go to Accountability Statements application and search for “Accountabilities (OLD)” field. This field can be deleted, or it can be inactivated.
Go to Historical Accountability Statements application and search for “Accountabilities (OLD)” field. This field can be deleted, or it can be inactivated.
Go to Manage Data Feeds and search for “Map Accountabilities & Accountability Statements in Assigned Accountabilities” feed. Please delete this feed or keep it inactive. This feed is designed to migrate data for existing customers.
Set up data feeds
Go to the Manage Data Feeds page.
From the menu bar, click
.Under Integration, click Data Feeds.
In the Manage Data Feeds section, locate and select the Historical Accountability Statements data feed.
From the General tab in the General Information section, select Active in Active check box.
Click the Source Connection tab. Complete the fields in the Log On Properties section as follows: In the URL field, type: YourServerName/VirtualDirectoryName/
In the Transport Configuration section User Name and Password fields, type the username and password of a Platform user that has access to all the records on the instance
In the Instance field, type the name of the Platform instance from which the data feed is coming (this is the instance name as you enter it on the Login window).
Verify that except for the Historical Accountability Statements, key field values are not missing from the data feed setup window.
Click Save.
Note: If Incidents is available please note, Incidents is mapped to Incident ID (System Tracking ID). Incident ID is Application Tracking Id by default. Create a new System Tracking ID field in Incidents and map to the Incident > field Id from source.
Important: This data feed contains custom xslt. Please do not load default xslt into it.
Important: A data feed must be active and valid to successfully run.
As you schedule your data feed, the Data Feed Manager validates the information. If any information is invalid, an error message is displayed. You can save the data feed and correct the errors later; but the data feed does not process until you make corrections.
Go to the Schedule tab of the data feed that you want to modify.
From the menu bar, click
.Under Integration, click Data Feeds.
Select the data feed.
Click the Run Configuration tab.
Go to the Schedule section and complete frequency, start and stop times, and time zone.
(Optional) To override the data feed schedule and immediately run your data feed, Click Run Now.
Click Save.
Upgrade Archer Individual Accountability Management
The Archer Individual Accountability Management 2024.11 release required architectural changes to meet FAR regulatory reporting requirements. As a result, some application relationships have been updated. The details of these changes are outlined below:
Assign Committee Memberships to Accountability Statement: A new cross-reference has been introduced to support Committee Memberships assigned to Accountability Statements instead of the Accountable Person.
Assign Accountabilities to Accountability Statement: The Assigned Accountabilities application has been introduced to capture additional details about accountabilities assigned to Accountable Persons, such as start and end dates. Previously, the Accountabilities application was used to assign accountabilities to the Accountability Statement; it is now designated for documenting the organization's accountabilities.
To implement these changes, we have introduced new cross-references and incorporated them into the layout. Existing cross-references have been renamed or removed from the layout. Details of the modifications to the previous fields are provided below.
Application Name | Field Name Changed From | Field Name Changed To |
Accountabilities | Related Accountability Statements Type: Cross reference | Related Accountability Statements (OLD) |
Accountability Statements | Accountabilities Type: Related Records | Accountabilities (OLD) |
Historical Accountability Statements | Accountabilities Type: Related Records | Accountabilities old |
Performing required post-installation steps for existing users
After the package installation, changes to the old cross-reference fields will be reflected as outlined above. However, the name and alias for the newly introduced fields will need to be updated as detailed below.
Go to Accountabilities application and search for Related Accountability Statements(1) field.
Type: Related Records
Available reference: Accountability Statements
Change the field Name to “Related Accountability Statements”
Change the Alias to “Related_Accountability_Statements”.
Note: This is required for FAR regulatory reporting. This alias is used in mail merges.
Save the field.
Go to Accountability Statements application and search for Accountabilities(1) field.
Type: Cross reference
Available Reference: Assigned Accountabilities
Change the field Name to “Accountabilities”
Change the Alias to “Accountabilities”.
Note: This is required for FAR regulatory reporting. This alias is used in mail merges.
Save the field.
Go to Historical Accountability Statements and search for Accountabilities (1) field.
Type: Cross reference
Available reference: Assigned Accountabilities
Change the field Name to “Accountabilities”
Change the Alias to “Accountabilities”.
Note: This is required for FAR regulatory reporting. This alias is used in mail merges.
Save the field.
The architectural changes affect the existing data. Data migration is required to align with the new changes. Please follow the steps outlined below for the migration process.
Step 1: Configure “Map Accountabilities & Accountability Statements in Assigned Accountabilities“ data feed
Go to the Manage Data Feeds page.
From the menu bar, click
.Under Integration, click Data Feeds.
Locate & select the Map Accountabilities & Accountability Statements in Assigned Accountabilities data feed.
Make sure the Target is "Assigned Accountabilities" application. Then click on the source connection tab. Complete the fields in the Log on Properties section as follows: In the URL field, provide Yourservername/VirtualdirectoryName/
In the Transport configuration section provide UserName and Password of a platform user that has access to all the records on the instance.
In the Instance field, provide the current instance name.
Make sure you have installed "Create Records in Assigned Accountabilities" report in Accountability Statements application.
This feed contains custom xslt. Please do not load default xslt.
Verify the mapping as mentioned in the table.
Source
Target
AccountabilityStatementTrackingID
Accountability Statements -> Tracking ID
AccountabilitiesTrackingID
Accountability -> Tracking ID
Verify that except for the Assigned Accountabilities, key field values are Tracking ID for Accountability Statements & Accountabilities.
Activate & save the data feed.
Run only one time to migrate the data. After completion of the feed please inactivate the feed.
Validate the data.
Step 2: Configure “Map Committee Memberships with Accountability Statements“ data feed
Create a report in Contacts application with the following fields:
Select “Name (Full) from contacts.
Click on Add New relationship and select Accountability Statements. Add “Position/Role” & “Tracking ID” from Accountability Statements application.
Click on Add New relationship and select Committee Memberships. Add “Committee Name” & “Tracking ID” field from the Committee memberships application.
Search the result.
Save the report.
Go to Manage Data Feeds page and click on Add New to create a data feed.
In the General Information Section
Provide the feed name.
Select Feed Type as Standard
Select Target Application as Accountability Statements.
Select Service Account Name.
In the Source Connection tab
Select Transport Method as Archer Web Services Transporter.
Under LogOn Properties section enter the URL.
Under Transport Configuration Section, select Search Type as Report ID, provide the guid of the report created in the step1 in Report ID, enter Instance, enter User Name & Password of a platform user that has access to all the records in that instance.
In the Source Parsing tab Click on Load XSLT, select default xslt and click on load.
In the source Definition tab click on the import icon, select Run search and click on Run Now.
After loading the source go to Data map tab -> Field Map
Under source fields expand the Relationship for Accountability Statements and map the Tracking ID field with Tracking ID.
Under source fields expand the Relationship for Committee Memberships and map the Tracking ID field with Committee Memberships -> Tracking ID. (Populate target fields with empty source field values & Append source field values needs to be selected in target field configuration)
In the Key Field Definition select Tracking ID field as key field for both Accountability Statements & Committee Memberships.
In the Run Configuration tab under Target Record Processing, select only “Update existing record, if a matching record is found” & “Ignore data validation rules for the target application”. And select “Ignore” if matching record is not found.
Activate & Save the data feed.
Run only one time to migrate the data. After completion of the feed please inactivate the feed.
Validate the data.
Step 3: Update Dashboard Names
With the Archer Individual Accountability Management 2024.11 release, existing classic dashboards were updated to next generation dashboards.
To update the IAM Operational Dashboard, follow the steps mentioned below
Go to Manage Dashboards and search for IAM Operational Dashboard. Open the Classic Dashboard and change the name to “Zz IAM Operational Dashboard” , change the alias, change the status to Inactive and save the dashboard. Return to Manage Dashboard and search for IAM Operational Dashboard(1), type will be Dashboard. Open it and change the name to “IAM Operational Dashboard”, change the alias to “IAM_Operational_Dashboard” and save it.
To update IAM Task Driver dashboard, follow the steps mentioned below
Go to Manage Dashboards and search for IAM Task Driver dashboard. Open the Classic Dashboard and change the name to “Zz IAM Task driver”, change the alias, change the status to Inactive and save the dashboard.
Return to Manage Dashboard and search for IAM Task Driver(1), type will be Dashboard. Open it and change the name to “IAM Task Driver”, change the alias to “IAM_Task_Driver” and save it.
To update the Individual Accountability Management Workspace, go to Manage Workspace & search for the Individual Accountability Management. Open it, go to Dashboards section, remove the dashboards starting with Zz. Save the workspace.
Task 5: Set up data feed
Once the upgrade is complete, follow the steps in the Setting up Data Feed section. The data feed will need to be configured.
Configure the Archer Individual Accountability Management
Configure contacts application
This section provides guidance on configuring changes to the Contacts application when it is not installed through the installation package or when only new components are created without layout modifications during the package installation.
Go to Solutions under Administration Menu: Administration > Application Builder >Solutions
Open “Individual Accountability Management”.
Under Applications section click Add New and select Contacts.
Click OK.
Verify Contacts is visible in the Application section.
Click on Save and Close.
Go to Applications under Administration Menu: Administration > Application Builder > Applications.
Open Contacts Application to update the field as shown in the table.
Field Name | Field Type | Update Required |
Type | Values List | Add new hierarchical values “Executive Director, Non-Executive Director” under the “Employee” value. |
Go to Applications under Administration Menu: Administration > Application Builder > Applications.
Open Contacts Application to make the necessary changes.
Field Name | Field Type | Configuration Details | Note |
Does Contact Require Accountability Management? | Values list | Description: This field is used to identify if the contact record is for an Accountable Person Values: Yes. If contacts is majorly used for IAM or if required default to Yes. |
|
Hire Start Date | Date | Description: Used to capture when the hiring process was started for the contact. No default value. | This field is required if FAR Reporting is applicable. |
Employment End Date | Date | Alias: Employment_End_Date No default value. | This field is required if FAR Reporting is applicable. |
GetUserID | Text | Calculation: GETUSERS([Archer User Account]) | This field is required if FAR is applicable. |
Overall Qualification Assessment Result | Values List | Description: This field is used to display the overall result of the qualification assessments. Values: Global Values list “Overall Qualification Assessment Result” Calculation: IF(COUNTA([Qualification Assessments])>0, IF(COUNTIF(REF([Qualification Assessments],[Qualification Result]),VALUEOF(REF([Qualification Assessments],[Qualification Result]),"Ineligible"))>0, VALUEOF([Overall Qualification Assessment Result],"Does Not Meet Expectation"), IF(COUNTIF(REF([Qualification Assessments],[Qualification Result]), VALUEOF(REF([Qualification Assessments],[Qualification Result]),"Cleared"))=COUNTA([Qualification Assessments]), VALUEOF([Overall Qualification Assessment Result],"Meets Expectation"), VALUEOF([Overall Qualification Assessment Result],"Check Pending") ) ), VALUEOF([Overall Qualification Assessment Result],"Check Pending") ) |
|
Company Name Helper | Text | Calculation: REF([Company],[Company]) |
|
Date of Birth | Date | Alias: Date_of_Birth No default value. | This field is required if FAR Reporting is applicable. |
Director Identification Number | Text | Alias: Director_Identification_Number | This field is required if FAR Reporting is applicable. |
(Optional) Regulatory Communications | Cross Reference | Target Application: Regulatory Communications Display Type: Grid Display/Look Up Fields:
| If Australian Regulatory Correspondence is needed, then create a cross reference to Australian Regulatory Correspondence. |
(Optional) Breach Incidents | Cross Reference | Target Application: Incidents Display Type: Grid Display/Look Up Fields:
|
|
(Optional) Conflicts of Interest | Cross Reference | Target Application: COI Registry Display Type: Grid Display/Look Up Fields:
|
|
(Optional) Evidence Repository | Cross Reference | Target Application: Evidence Repository Display Type: Grid Display/Look Up Fields:
|
|
Findings (Contacts) | Related records | Target Application: Findings Display Type: Grid Display/Look Up Fields:
|
|
Accountability Statements | Related records | Target Application: Accountability Statements Display Type: Grid Display/Look Up Fields:
| This field should be available post-package installation. |
Qualification Assessments | Related records | Available Reference: Qualification Assessments Display Type: Grid Display/Look Up Fields:
| This field should be available post-package installation. |
If the following layout changes have not been configured previously, complete the following steps.
Go to Applications under Administration Menu: Administration > Application Builder > Applications.
Open Contacts Application and make the following changes.
Place the following fields in the General Information Section:
Hire Start Date, Does Contact Require Accountability Management? and Division (off layout field), Date of Birth, Employment End Date, Director Identification Number
Create new tab "Individual Accountability" under Contact Details tab set.
Create a new section Qualification Assessments
Section Properties: Check “Show Panel Text”
Panel Text: Background checks need to be performed. The employee must clear all checks in order to act as an Accountable Person. In addition to updating the status for each check, please upload any supporting documentation.
Move the following fields to Qualification Assessments section:
Overall Qualification Assessment Result
Qualification Assessments
Move the following fields under this tab:
Accountability Statements, Regulatory Communications, Breach Incidents, Findings (Contacts), Conflicts of Interest, Evidence Repository.
Go to Applications under Administration Menu: Administration > Application Builder > Applications.
Open Contacts Application and complete the following steps:
Update Existing Action:
Hide Advanced Contact Fields Action. Do not display Hire Start Date, Division, Date of Birth, Employment End Date, Director Identification Number in General Information Section and all new sections under Individual Accountability tab.
Create the following new Data Driven Events:
Rule: Is This Contact For Accountable Person = Yes
Criteria: Does Contact Require Accountability Management? = Yes.
New Action:
Action Type: Apply Conditional Layout.
Action Name: Accountable Person Layout
Layout Configuration: Require Hire Start Date, Employment Status, Company. Display Date of Birth, Employment End Date, Director Identification Number and all sections under Individual Accountability tab.
Qualified User/Groups:
At minimum: IAM Groups.
Maximum: Everyone
Go to Contacts Application Advanced Search:
From the menu bar, click Individual Accountability Management.
Under Individual Accountability Management Solution, click the Advanced Search beside Contacts application.
Select Statistics Mode check box in Fields to display section.
Select Count of Exception Description in Fields in Display.
In Filters add the following:
Overall Qualification Assessment Result Contains Check Pending
Does Contact Require Accountability Management? Contains Yes
In Statistics Drill Down Options select the following fields for display:
Name (Full)
Email (Business)
Qualification Assessments
Overall Qualification Assessment Result
Click on Search button.
Select “Chart Only” and “Featured Metric” in the Chart tool bar in the search results page.
Click on Save.
Provide Report Name as “Pending Accountable Person Qualifications”.
In Report Type section select “Global Report”.
Click on Save.
Go to Administration > Workspaces and Dashboards > Global iViews
Open Qualifications Pending iView.
Under Options section select the report “Pending Accountable Person Qualifications.
Click Save.
Configure Accountability Statements & Accountability Acknowledgements
Go to Administration > Applications > Accountability Statements
Go to Default Layout Rules listing page.
Find & Inactivate the following rule:
Rule Name : [Override FAR Requirements] != Blank
If the Contacts application is not installed via the installation package, certain components will not be properly installed due to missing fields in the Contacts application. The following updates are required after package installation to address the issue.
Update Qualification Assessment Result calculation:
Calculation: REF([Accountable Person],[Overall Qualification Assessment Result])
Update Institution/Employer Name calculation:
Calculation: REF([Accountable Person],[Company Name Helper])
Update Accountable Person (cross reference) grid display.
Add Hire Start Date to the display fields.
Troubleshooting
After package installation if Assigned Accountabilities & Significant Related Entity applications are appearing as On-Demand Applications (ODA), Ensure the installation package is the most recent version stated on the Archer Exchange and reinstall the package.
Certification environment
Date tested: February 2025
Product Name | Version Information | Operating System |
|---|---|---|
Archer | 2024.11 | Virtual Appliance |