Archer IoT Project Readiness
Companies see value in IoT technology and data collection to improve process and analyze trends to optimize processes; however, 35 percent of customers’ site security concerns as a top barrier to IoT implementation. IoT products are extremely broad - examples include flow sensors, traffic sensors, fitness trackers, connected light bulbs, and more. IoT technology is being integrated in all sectors of business, which leads to new network vulnerabilities and security challenges. It is important to keep track of the risks imparted by these technologies.
-
IoT projects increase risk and vulnerability due to increased network entry points.
-
IoT devices must be compliant with corporate policies.
-
Organizations should manage data privacy and IT Security risks.
-
IoT projects must be vetted to ensure overall system integration capability.
The Archer IoT Project Readiness offers customers to document IoT Projects within the organization, allowing customers to prioritize the IoT projects around their business goals and needs. This offering captures the project risks and approvals for implementation. It also helps organizations ensure compliance with corporate policies and regulatory requirements.
On this page
Release notes
Release 6.12
|
Document Version |
Published Date |
Notes |
|---|---|---|
|
1.0 |
February 2020 |
Initial release on Archer Exchange |
|
1.1 |
April 2023 |
Recertification |
Overview of Archer IoT Project Readiness
Key features and benefits
The Archer IoT Project Readiness offering enables organizations to:
-
Document and track IoT projects and IoT solutions infrastructure.
-
Identify IoT project concerns.
-
Track mitigation strategies regarding concerns with IoT projects.
-
Document approvals for IoT project implementation.
-
Monitor IoT project status.
Benefits include:
-
Consistent and repeatable process for managing projects and approvals.
-
Faster cycle times by addressing project risks prior to implementation.
-
Understanding and minimizing impacts to the organization through mitigating project risks.
Prerequisites (ODA and system requirements)
|
Components |
Prerequisites |
|---|---|
|
Archer Solution Area(s) |
IT & Security Risk Management |
|
Archer Use Case(s) |
Archer Issues Management |
|
Archer Applications |
Requirements for the installation and operation of Archer IoT Project Readiness includes the following applications:
|
|
Uses Custom Application |
Yes |
|
Requires On-Demand License |
Yes. The Archer IoT Project Readiness App-Pack requires one (1) On-Demand Application license. |
|
Archer Requirements |
Archer 6.12 and later |
Compatible use cases and applications
Related applications
|
Application |
Use Case |
Primary Purpose(s) of the Relationship |
|---|---|---|
|
Business Unit
|
Business Asset Catalog |
|
|
Business Processes |
Business Asset Catalog |
|
|
Contacts |
Business Asset Catalog |
|
|
Products and Services |
Business Asset Catalog |
|
|
Applications |
IT Asset Catalog |
|
|
Devices |
IT Asset Catalog |
|
|
Facilities |
IT Asset Catalog |
|
|
Control Standards |
Policy Program Management (Regulatory and Corporate Compliance/IT Security Risk Management) |
|
|
Control Procedures |
Controls Assurance Program Management; Data Governance (Regulatory and Corporate Compliance) or Top-Down Assessment(Enterprise & Operational Risk Management) or IT Controls Assurance; IT Risk Management; Information Security Management System; PCI Management(IT Security Risk Management) |
|
|
Authoritative Sources |
Policy Program Management (Regulatory and Corporate Compliance/IT Security Risk Management) |
|
|
Third Party Profile |
Third Party Catalog; Third Party Risk Management; Third Party Engagement (Third Party Management) or Operational Scenario Analysis (Operational Scenario Analysis) |
|
|
Engagements |
Third Party Catalog; Third Party Risk Management; Third Party Engagement (Third Party Management) |
|
|
Engagement Risk Assessments |
Third Party Risk Management (Third Party Management) |
|
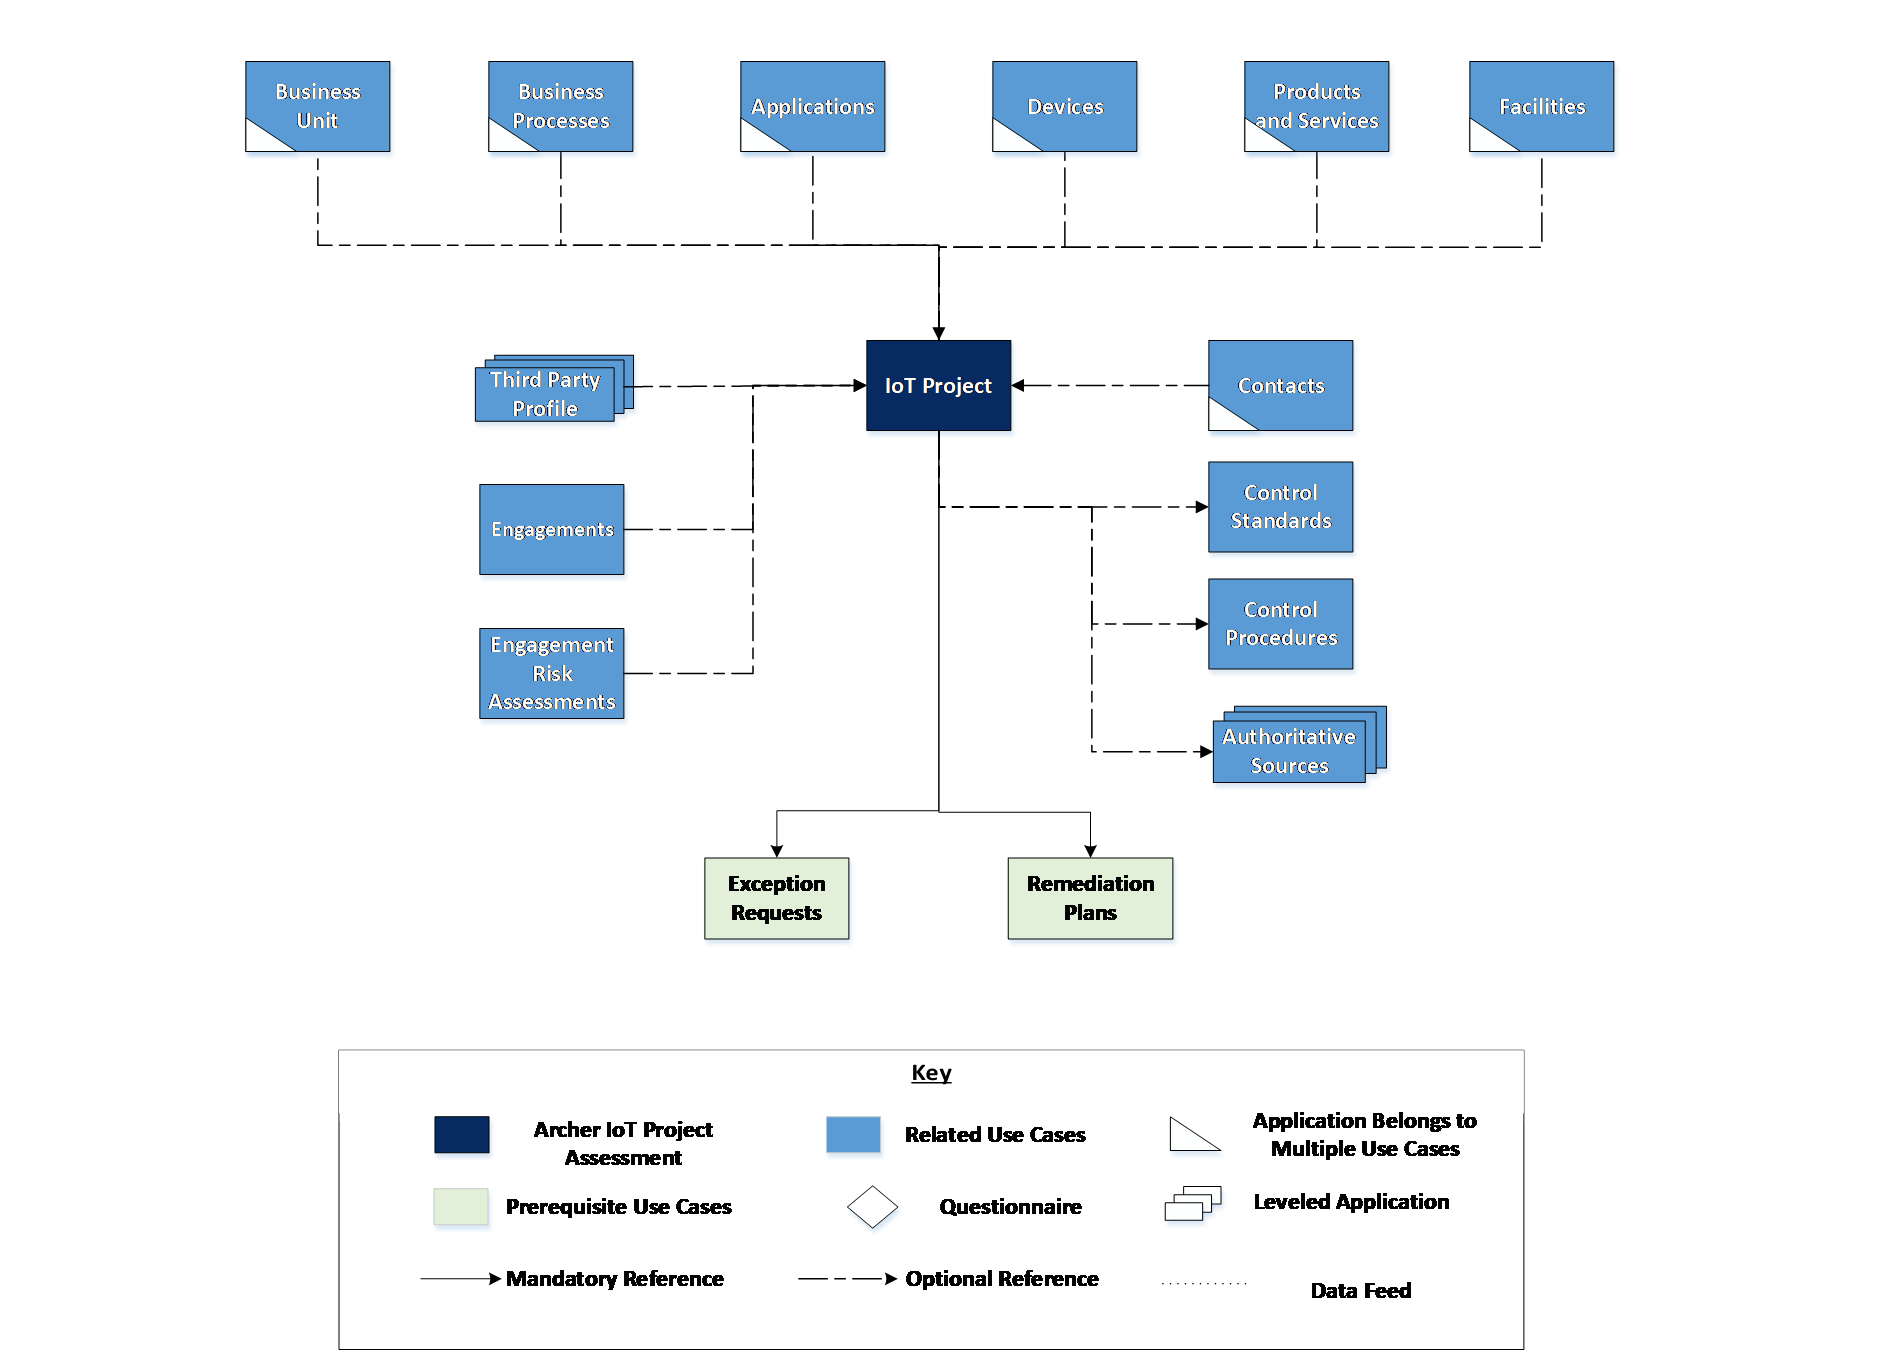
Archer IoT Project Readiness components
Architecture diagram
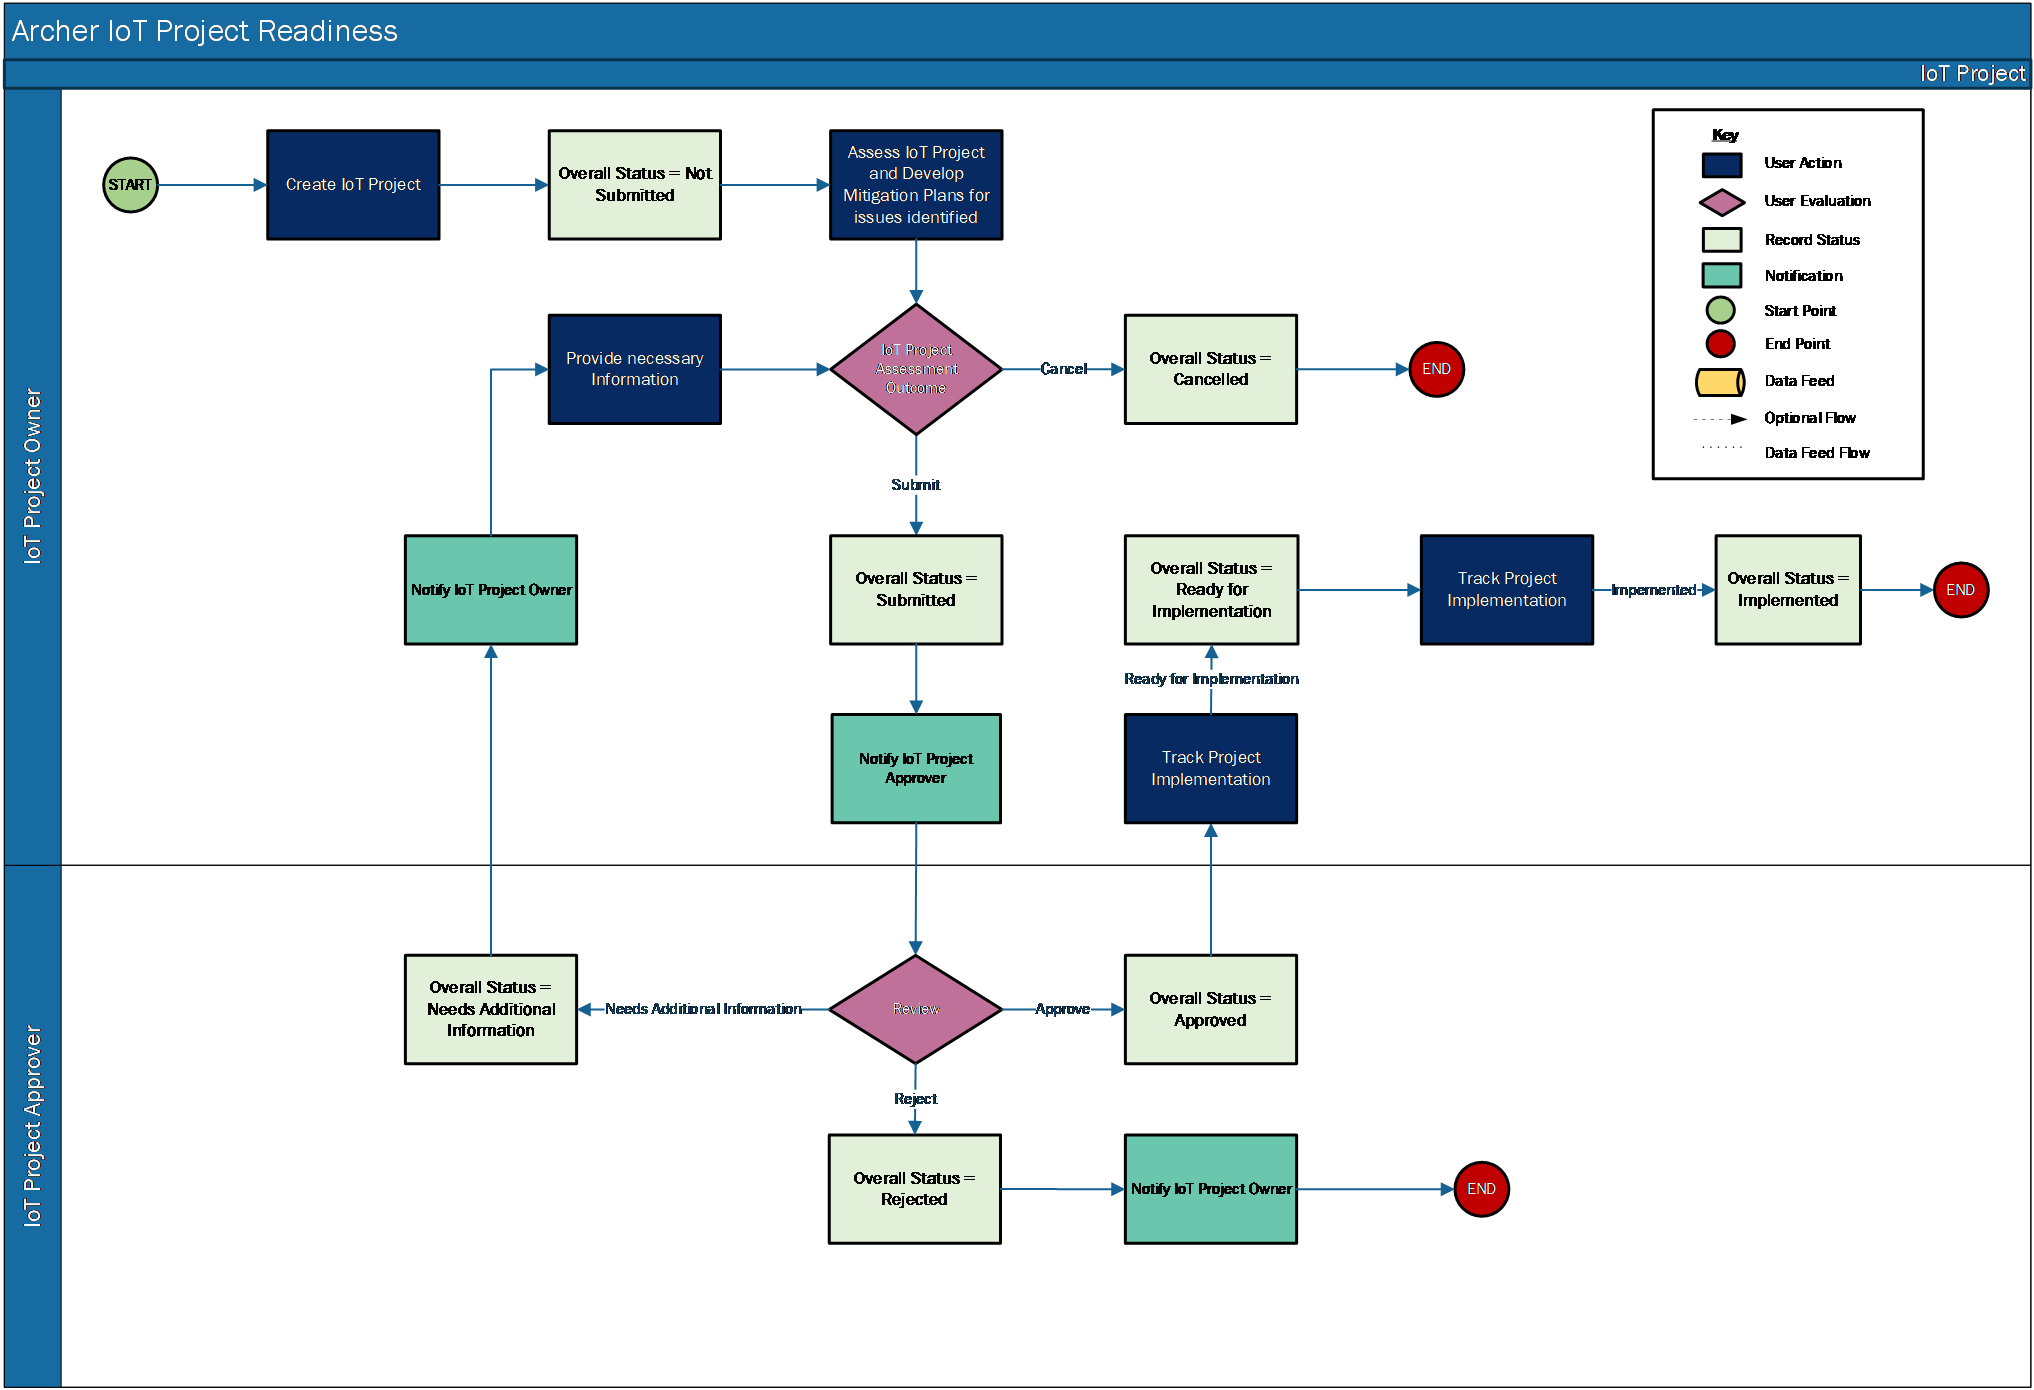
Swim lane diagram
Applications
|
Application |
Description |
|---|---|
|
IoT Project |
The IoT Project application documents information regarding the infrastructure for the IoT project, stakeholders, and project risk assessment. It captures the remediation plans, exception requests, and approvals for implementation. |
Personas and access roles
The following table describes the functions that make up the application’s organization roles. Depending on the organization of your company, these functions and responsibilities may vary.
|
Function |
Description |
|---|---|
|
IoT Project Owner |
Mainly responsible for documenting IoT projects and obtaining approval. They could also be responsible for IoT project evaluation, risk evaluation, and implementation. This person may be someone in the IT department. |
|
IoT Project Approver |
Responsible for reviewing and approving IT projects, including IoT projects. Also responsible for overseeing system integration and capabilities for all IT projects. This person may be a manager in the IT department. |
|
Executive |
Monitor IT project compliance, exceptions, and risks. This person may be a C-level executive. |
|
Applications |
IoT Project: Owner |
IoT Project: Approver |
IoT Project: Read Only |
|---|---|---|---|
|
IoT Project |
CRU* |
CRU* |
R |
|
Remediation Plans |
CRU |
CRU |
R |
|
Exceptions Requests |
CRU |
CRU |
R |
|
Business Units |
R |
R |
R |
|
Business Processes |
R |
R |
R |
|
Applications |
R |
R |
R |
|
Devices |
R |
R |
R |
|
Products and Services |
R |
R |
R |
|
Facilities |
R |
R |
R |
|
Third Party Profile |
R |
R |
R |
|
Engagements |
R |
R |
R |
|
Engagement Risk Assessments |
R |
R |
R |
|
Contacts |
R |
R |
R |
|
Controls Standards |
R |
R |
R |
|
Control Procedures |
R |
R |
R |
|
Authoritative Sources |
R |
R |
R |
C = Create, R = Read, U = Update, D = Delete, * Indicates Record Permissions
Note: Members of the groups IoT Project: Owner, IoT Project: Approver and IoT Project: Executives should at least have read access at record level for the applications related to the IoT Project to view or select related records.
Installing Archer IoT Project Readiness
Installation overview
Complete the following tasks to install the offering.
Step 1: Prepare for the installation
-
Ensure that your Archer system meets the following requirements:
-
Archer Platform version 6.12
-
-
Read and understand the "Packaging Data" section of Archer Help.
Step 2: Install the package
Installing a package requires that you import the package file, map the objects in the package to objects in the target instance, and then install the package. See Installing the Application Package for complete information.
Step 3: Test the installation
Test the application according to your company standards and procedures, to ensure that the use case works with your existing processes.
Installing the package
Task 1: Back up your database
There is no Undo function for a package installation. Packaging is a powerful feature that can make significant changes to an instance. Archer strongly recommends backing up the instance database before installing a package. This process enables a full restoration if necessary.
An alternate method for undoing a package installation is to create a package of the affected objects in the target instance before installing the new package. This package provides a snapshot of the instance before the new package is installed, which can be used to help undo the changes made by the package installation. New objects created by the package installation must be manually deleted.
Task 2: Import the package
-
Go to the Install Packages page.
-
From the menu bar, click
 .
. -
Under Application Builder, click Install Packages.
-
-
In the Available Packages section, click Import.
-
Click Add New, then locate and select the package file that you want to import.
-
Click OK.
The package file is displayed in the Available Packages section and is ready for installation.
Task 3: Map objects in the package
-
From the menu bar, click
> Application Builder > Install Packages. - In the Available Packages section, locate the package you want to map.
- In the Actions column, click
 for that package.
The analyzer examines the information in the package. The analyzer automatically matches the system IDs of the objects in the package with the objects in the target instance and identifies objects from the package that are successfully mapped to objects in the target instance, objects that are new or exist but are not mapped, and objects that do not exist (the object is in the target but not in the source).
When the analyzer is complete, the Advanced Package Mapping page lists the objects in the package file and corresponding objects in the target instance.
- On the Advanced Mapping page, click to open each category and review the icons next to each object to determine which objects you must map manually.
The following table describes the icons. Icon
Name
Description

Awaiting Mapping Review
Indicates that the system could not automatically match the object or one of its children to a corresponding object in the target instance.
Objects marked with this icon must be mapped manually.
New objects should not be mapped. Select Do Not Map from the drop-down menu to clear this icon for an individual object, or click Do Not Map to clear the icon for all unmapped objects.

Mapping Completed
Indicates that the object and all children are mapped to objects in the target instance, or that they have been marked as Do Not Map. Nothing more needs to be done with these objects in Advanced Package Mapping.
Note: You can run the mapping process without mapping all objects. The
icon is for informational purposes only. - For objects awaiting mapping review, do one of the following:
- To map each object individually, use the drop-down menu in the Target column to select the object in the target instance to which you want to map the source object. To leave an object unmapped, select Do Not Map in the Target column.
- To automatically map all objects in a category that have different system IDs but the same object name as an object in the target instance, click Auto Map. Select whether to ignore case and spaces when matching object names. Click OK.
- To mark all unmapped objects as Do Not Map, click Do Not Map.
-
(Optional) Click
 to enable filter fields that you can use to find specific objects in each mapping category. To undo your mapping selections, click Undo, then select whether to undo all mappings in the category or only the mappings on a single page. If you choose to undo all mappings, you will be returned to the categories list.
 - (Optional) To save your mapping selections and return to the categories list without committing changes to the target instance, click
 .
. - After you review and map all objects, click Execute.
- Select I understand the implications of performing this operation. Click OK.
When the mapping is complete, the Import and Install Packages page displays.
Important: Advanced Package Mapping modifies the system IDs in the target instance. You must update any Data Feeds and Web Service APIs that use these objects with the new system IDs.
Task 4: Install the package
All objects from the source instance are installed in the target instance unless the object can not be found or is flagged to not be installed in the target instance. A list of conditions that may cause objects not to be installed is provided in the Log Messages section. A log entry is displayed in the Package Installation Log section.
-
Go to the Install Packages page.
-
From the menu bar, click
. -
Under Application Builder, click Install Packages.
-
-
In the Available Packages section, locate the package file that you want to install, and click Install.
-
In the Configuration section, select the components of the package that you want to install.
-
To select all components, select the top-level checkbox.
-
To install only specific global reports in an already installed application ,select the checkbox associated with each report that you want to install.
-
Note: Items in the package that do not match an existing item in the target instance are selected by default.
-
In the Configuration section, under Install Method, select an option for each selected component. To use the same Install Method for all selected components, select a method from the top-level drop-down list.
Note: If you have any existing components that you do not want to modify, select Create New Only. You may have to modify those components after installing the package to use the changes made by the package.
-
In the Configuration section, under Install Option, select an option for each selected component. To use the same Install Option for all selected components, select an option from the top-level drop-down list.
Note: If you have any custom fields or formatting in a component that you do not want to lose, select Do not Override Layout. You may have to modify the layout after installing the package to use the changes made by the package.
-
To deactivate target fields and data-driven events that are not in the package, in the Post-Install Actions section, select the Deactivate target fields and data-driven events that are not in the package check box. To rename the deactivated target fields and data-driven events with a user-defined prefix, select the Apply a prefix to all deactivated objects check box, and enter a prefix. This can help you identify any fields or data-driven events that you may want to review for clean up post-install.
-
Click Install.
-
Click OK.
Task 5: Review the package installation log
-
Go to the Package Installation Log tab of the Install Packages page.
-
From the menu bar, click
. -
Under Application Builder, click Install Packages.
-
Click the Package Installation Log tab.
-
-
Click the package that you want to view.
-
In the Package Installation Log page, in the Object Details section, click View All Warnings.
Using Archer IoT Project Readiness
Task 1: Create a new IoT project
Users: IoT Project Owner
-
Go to the IoT Project record.
-
From the menu bar, click IoT Project Readiness.
-
Under Applications, click IoT Project.
-
Click New Record.
-
-
Fill in the following information in General Information section:
-
Enter IoT Project Name, Estimated Start Date and Estimated End Date of the project.
-
(Optional) Select Priority for the project.
-
(Optional) Select Stakeholders by clicking
 and selecting their user name.
 -
(Optional) Enter description of the project in Description.
-
(Optional) Provide business justification or business value in Business Context.
-
(Optional) Select Third Party Involved? as ‘Yes’ if third party is involved, else select ‘No’. Provide third party details in the Third Party Details tab displayed.
-
(Optional) Select Will the IoT Project collect PII data? as ‘Yes’ if IoT project is collecting PII data else select ‘No’.
-
-
Select IoT Project Approver in the Stakeholders and Approvals section by clicking
and selecting their username. -
Select IoT project scope in the Scope tab.
-
Once the record is complete, click Save in the Record Toolbar to save in record.
Task 2: Submit IoT project
Users: IoT Project Owner
-
Open the IoT Project you want to submit.
-
Click the Edit button in the top of the record.
-
Provide details of the IoT project in the Infrastructure and Implementation tab.
-
Complete risk assessment for the IoT project, in the Risk Assessment tab.
-
(Optional) Click Add New in the right corner of the Comments section and add comments.
-
(Optional) Attach any additional documentation or files in the Supporting Documentation field.
-
Provide assessment results and recommendation in the Overall Recommendation field, in theRisk Assessment tab.
-
Click on the Submit button at the top left of the screen.
Task 3: Review IoT project
Users: IoT Project Approver
-
Select the IoT Project you want to review from the Tasks section on your Task landing screen.
OR
Go to the IoT Project record.
-
From the menu bar, click IoT Project Readiness.
-
Under Applications, click IoT Project.
Select the IoT Project record in ‘Submitted’ Status.
-
-
Click the Edit button in the top of the record.
-
To Approve the IoT Project
-
Review the record and clickApprove from the Actions dropdown at the top left of the screen.
-
-
To request additional information from the IoT Project Owner:
-
Document the additional information requested in the Comments field.
-
Click Needs Additional Information from the Actions dropdown at the top left of the screen.
-
-
To Reject the IoT Project:
-
Document the Reason for Rejection in the Stakeholders and Approvals section.
-
Click Rejectfrom Action dropdown at the top left of the screen.
-
Task 4: Resubmit IoT project
Users: IoT Project Owner
-
Select the IoT Project record you want to resubmit from Tasks section on your Task landing screen
OR
Go to the IoT Project record.
-
From the menu bar, click IoT Project Readiness.
-
Under Applications, click IoT Project.
Select the IoT Project record in ‘Needs Additional Information’ Status.
-
-
Click the Edit button in the top of the record.
-
Check the comments in the Comments section.
-
Modify/Provide the required information in the appropriate section or tab.
-
Attach any additional documentation or files in the Supporting Documentation field, if requested.
-
Click |Add New| in the right corner of the Comments section and add comments, if required.
-
Click Resubmit from the Actions dropdown at the top left of the screen.
Task 5: Track IoT project implementation
Users: IoT Project Owner
-
Go to the IoT Project record.
-
From the menu bar, click IoT Project Readiness.
-
Under Applications, click IoT Project.
-
-
To mark the IoT project as Ready for Implementation do the following:
-
Select the IoT Project record in ‘Approved’ Status.
-
Click the Edit button in the top of the record.
-
Enter Implementation Plan in the Implementation Status section of Infrastructure and Implementation tab.
-
Enter Actual Start Date, Actual End Date and Actual Cost in the General Information Section. Make any other necessary changes to the record.
-
Change Implementation Status to Ready for Implementation in the Implementation Status section of the Infrastructure and Implementation tab.
-
Click Save in the Record Toolbar to save in record.
-
-
To mark the IoT project as Implemented do the following:
-
Select the IoT Project record in ‘Ready for Implementation’ Status.
-
Click the Edit button in the top of the record.
-
Enter Actual Start Date, Actual End Date and Actual Cost in General Information Section, if not provided.
-
Change Implementation Status to Implemented in the Implementation Status section of Infrastructure and Implementation tab.
-
Click Save in the Record Toolbar to save in record.
-
Task 6: Cancel IoT Project
Users: IoT Project Owner
-
Go to the IoT Project record.
-
From the menu bar, click IoT Project Readiness.
-
Under Applications, click IoT Project.
-
-
To cancel IoT project in “Not Submitted” stage:
-
Select the IoT Project record in ‘Not Submitted’ Status.
-
Click the Edit button in the top of the record.
-
Select Cancel Request? = Yes, in the Stakeholders and Approvals section.
-
Documentthe Reason for Cancellation in the Stakeholders and Approvals section.
-
Click Save in the Record Toolbar to save in record.
-
-
To cancel IoT project in “Needs Additional Information” stage:
-
Select the IoT Project record in ‘Needs Additional Information’ Status.
-
Click the Edit button in the top of the record.
-
Document the Reason for Cancellation in the Stakeholders and Approvals section.
-
Click Cancel from the Actions dropdown at the top left of the screen.
-
Certification environment
Date tested: April 2023
|
Product Name |
Version Information |
Operating System |
|---|---|---|
|
Archer |
6.12 |
Windows Server 2012 |