NTT ISMS Risk Assessment
Designing the right processes, organization, and templates during the initial setup of an Information Security Management System (ISMS) is a challenge. Rolling out ISMS in a big organization requires automating frequent manual steps, usability, easy reporting or access permissions to sensitive information.
NTT ISMS Risk Assessmenthelps organizations roll out and operate ISMS by assessing multiple assets throughout the organization, such as applications, locations, or business units. It extends NTT ISMS Control Assessment by adding a “Risk Assessment” workflow step. Risks are derived automatically from the “Classification” and “Control Assessment” workflow steps using approaches described in the ISO 2700x standards or NIST special publications. Using these results, organizations can prioritize budget better by addressing high risks first.
NTT ISMS Risk Assessment is designed to provide a multilingual user interface for end users. This includes both layout aspects (dashboards, field names or values in values lists, sections, and tabs) and content (control names and control statements).
On this page
Release history
Last updated: May 2020
Overview of ISMS Risk Assessment
Key features and benefits
The NTT ISMS Assessment App-Packenables the user to:
-
Evaluate the maximum impact resulting from a breach of a security objective (confidentiality, integrity, availability) based on a questionnaire or by inheriting from one or multiple assets.
-
Assess compliance with relevant controls (filtered by asset category, classification, and zone).
-
Prioritize remediation based on risks.
-
Define and track remediation plans.
With NTT ISMS Assessment, you can:
-
Assess assets with a streamlined process as part of the organization’s ISMS.
-
Gain insight into compliance violations of internal or external policies.
-
Prioritize budget without the need for a manual risk assessment.
-
Improve overall compliance and security.
Comparing NTT ISMS Risk Assessment to Archer ISMS use case
Archer Information Security Management System (ISMS) allows an organization to quickly scope its ISMS and document its Statement of Applicability for reporting and certification. You can also catalog individual resources related to your ISMS, including information assets, applications, business processes, devices, and facilities, and document and maintain related policies, standards, and risks. The Archer Use Case focuses on setting up the ISMS.
The NTT ISMS Assessment App-Packs operates the ISMS. Check your assets using a structured, consistent, and efficient approach to gain insight, identify gaps in compliance to internal or external policies, and to identify critical risks.
Prerequisites (and system requirements)
|
Components |
Recommended Software |
|---|---|
|
ODA License(s) |
ISMS Risk Assessment requires 2 ODA licenses. |
|
Archer |
Archer 6.6 P4 and later |
|
Prerequisite Required Use Cases |
Archer Issues Management |
|
Prerequisite Required App-Packs |
NTT ISMS Control Assessment |
|
Optional Use Cases |
Archer IT Risk Management |
Compatible Use Cases and Applications
Required Core Applications
The following applications are required prerequisites for this offering.
|
Application |
Use Case |
Primary Purpose(s) of the Relationship |
|
Remediation Plans |
Archer Issues Management |
|
|
Task Management |
NA |
|
Optional Related Core Applications
The following applications are optional. This offering can be related to these applications through cross-references.
|
Application |
Use Case |
Primary Purpose(s) of the Relationship |
|
Applications |
Archer IT Risk Management (Archer IT & Security Risk Management) |
|
|
Business Processes |
Archer IT Risk Management (Archer IT & Security Risk Management) |
|
|
Business Unit |
Archer Issues Management (Archer Audit Management) |
|
|
Companies |
Archer Issues Management (Archer Audit Management) |
|
|
Devices |
Archer IT Risk Management (Archer IT & Security Risk Management) |
|
|
Divisions |
Archer Issues Management (Archer Audit Management) |
|
|
Facilities |
Archer IT Risk Management (Archer IT &Security Risk Management) |
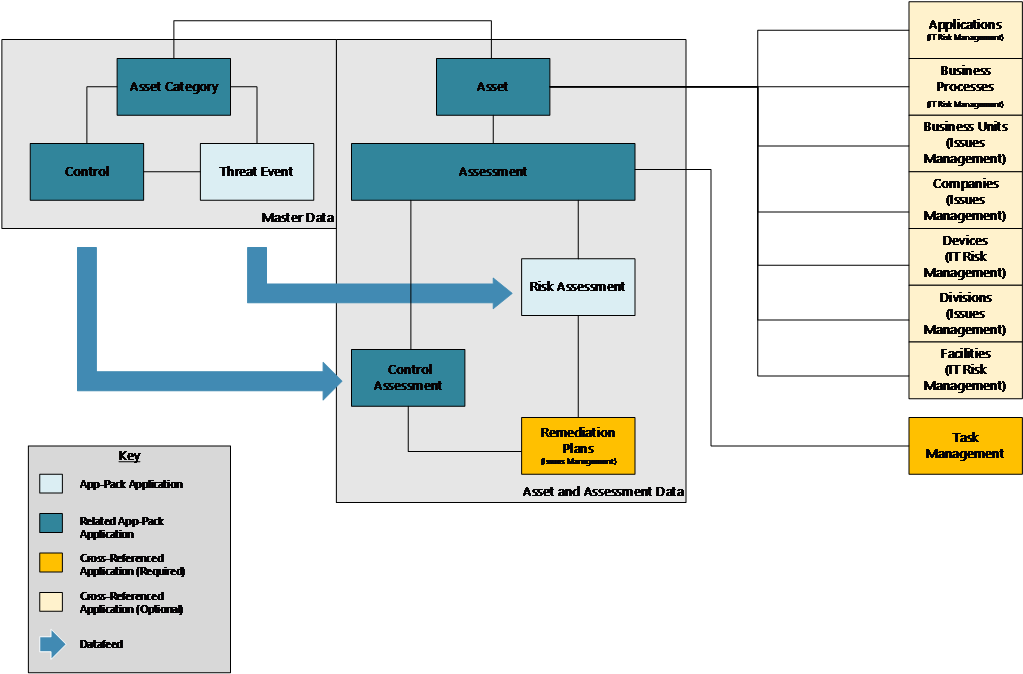
ISMS Risk Assessment components
Architecture diagram
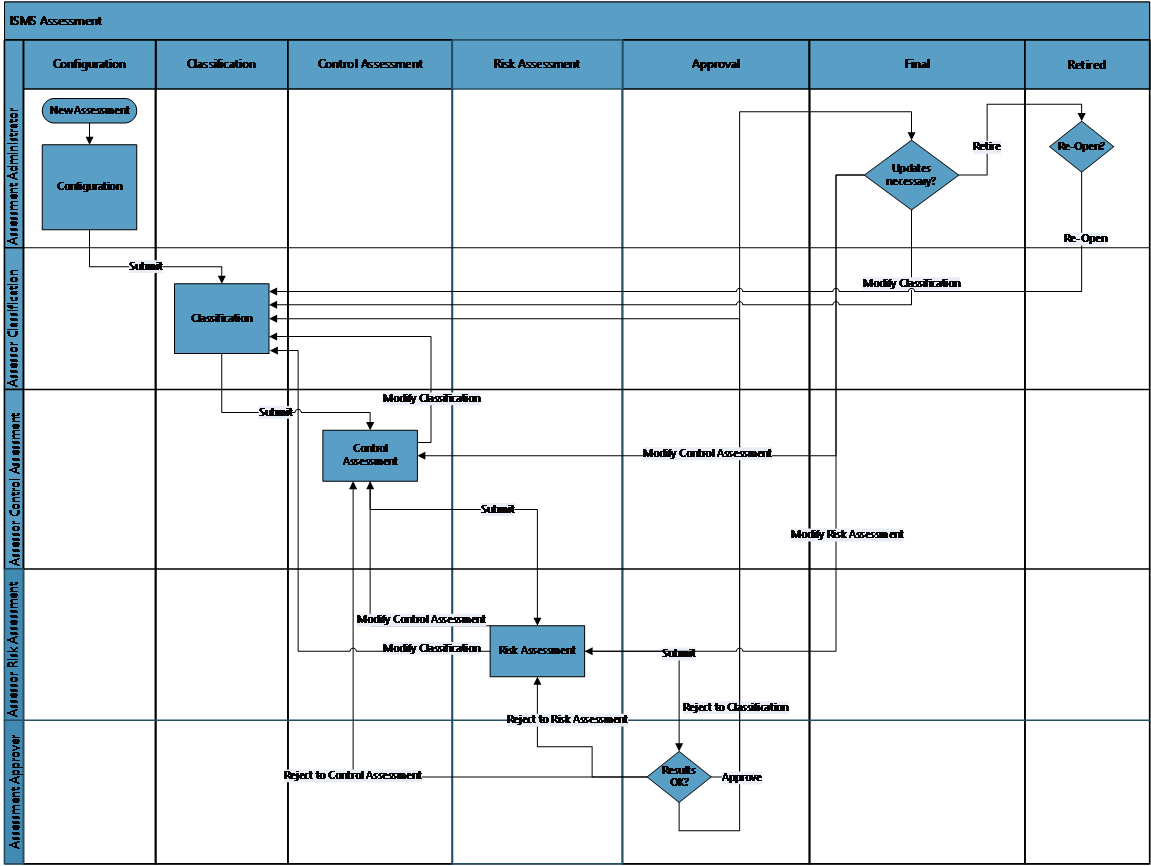
Swim Lane diagram
The following diagram shows the general workflow of the offering.
Applications
|
Application |
Solution |
Primary Purpose(s) of the Relationship |
|
Threat Event |
NTT ISMS Risk Assessment |
The Threat Event application is the central repository for ISMS related threat information. |
|
Risk Assessment |
|
The Risk Assessment application contains data copied from the Threat Event application. Risks (gross, net, residual) are calculated automatically based on the results of the “Classification” and “Control Assessment” workflow steps. Users can define Remediation Plans to mitigate risks. |
Related NTT ISMS Risk Assessment Applications
|
Application |
Description |
|
Asset |
The Asset application is the central repository of ISMS related asset information. It contains basic master data as well as classification information that can be used to inherit an assessment’s classification from (see Release history in chapter 4). |
|
Asset Category |
The Asset Category application contains types of assets like Web Application, Database Server, and Office Building. For each asset category, a set of relevant controls can be defined. |
|
Control/Control Category |
The leveled application Control/Control Category is the central repository for ISMS-related control information. |
|
Assessment |
The Assessment application is central to NTT ISMS Risk Assessment. The workflow contains the following:
|
|
Control Assessment/Control Category |
The leveled Control Assessment/Control Category application contains data copied from the Control/Control Category application. Users enter the implementation status of a control for specific assets. |
Personas and Access Roles
The following table describes the functions that make up the application’s organization roles. Depending on the functional roles of your organization, these functions and responsibilities may vary.
|
Function |
Description |
|
Assessment Administrator |
Creates new assessments, selects assets for assessments, grants access to assessors. Is authorized to reopen retired assessments. Group: ISMS Assessment Administrators |
|
Assessment Approver |
Reviews and approves assessments. Group: ISMS Assessment Approvers |
|
Assessor Control Assessment |
Assessor for the control assessment step in the workflow. Group: ISMS Assessors |
|
Assessor Classification |
Assessor for the classification step in the workflow. Group: ISMS Assessors |
|
Assessor Risk Assessment |
Assessor for the risk assessment step in the workflow. Group: ISMS Assessors |
|
Asset Administrator |
Manages data for assets. Group: ISMS Asset Administrators |
|
Master Data Administrator |
Manages data for asset categories, controls and control categories. Group: ISMS Master Data Administrators |
|
Security Manager |
Has read access to all data. Group: ISMS Security Managers |
|
Access Control Matrix |
|||||||||||
|---|---|---|---|---|---|---|---|---|---|---|---|
|
Group/Application |
Assessment |
Asset |
Asset Category |
Control |
Control Assessment |
Remediaton Plans |
Risk Assessment |
Threat Event |
|||
|
Assessment Administrators |
CRU |
R |
R |
R |
R |
|
R |
R |
|||
| Assessment Approvers |
RU |
R |
R |
R |
R |
R |
R |
R |
|||
|
Assessors |
RU |
R |
R |
R |
RU |
CRU |
RU |
R |
|||
|
Asset Administrators |
|
CRU |
R |
|
|
|
|
|
|||
|
Master Data Administrator |
|
|
CRU |
CRU |
|
|
|
CRU |
|||
|
Security Managers |
R |
R |
R |
R |
R |
R |
R |
R |
|||
Additionally, the following technical roles/groups have been defined:
|
Function |
Description |
|
Platform Owners |
Operations and support role for the whole Archer Platform. |
|
ISMS Assmt: Module Owners |
Operations and Support role for NTT ISMS Control Assessment and NTT ISMS Risk Assessment. |
|
ISMS Assmt: Data Feeds |
Technical role for all data feeds. |
Note: Platform Owners and ISMS Assmt: ISMS Module Owners groups are defined according to NTT’s best practice approaches for operational roles. Other Archer customers might have other approaches (seeRelease history in chapter 4).
Installing ISMS Risk Assessment
Prerequisites
As a prerequisite for installing ISMS Risk Assessment, ISMS Control Assessment must be installed completely following all the steps described in the corresponding Implementation Guide.
Installation overview
Complete the following tasks to install the application.
Step 1: Prepare for the installation
Ensure that your Archer system meets the following requirements: Archer Platform version 6.6 Patch 4
Step 2: Install the package
Installing a package requires that you import the package file, map the objects in the package to objects in the target instance, and then install the package. See Installing the Application Package for complete information.
Step 3: Set up data feeds
You must import and schedule each use case data feed that you want to use. See Setting Up Data Feeds for complete information.
Step 4: Test the installation
Test the application according to your company standards and procedures, to ensure that the use case works with your existing processes.
Installing the package
Task 1: Back up your database
There is no Undo function for a package installation. Packaging is a powerful feature that can make significant changes to an instance. Archer recommends backing up the instance database before installing a package. This process enables a full restoration if necessary.
An alternate method for undoing a package installation is to create a package of the affected objects in the target instance before installing the new package. This package provides a snapshot of the instance before the new package is installed, which can be used to help undo the changes made by the package installation. New objects created by the package installation must be manually deleted.
Task 2: Import the package
-
Go to the Install Packages page.
-
From the menu bar, click
 .
. -
Under Application Builder, click Install Packages.
-
-
In the Available Packages section, click Import.
-
Click Add New, then locate and select the package file that you want to import.
-
Click OK.
The package file is displayed in the Available Packages section and is ready for installation.
Task 3: Map objects in the package
Important: This step is required only if you are upgrading to a later version of ISMS Risk Assessment.
-
In the Available Packages section, select the package you want to map.
-
In the Actions column, click
 for that package.
The analyzer runs and examines the information in the package. The analyzer automatically matches the system IDs of the objects in the package with the objects in the target instances and identifies objects from the package that are successfully mapped to objects in the target instance, objects that are new or exist but are not mapped, and objects that do not exist (the object is in the target but not in the source).
Note: This process can take several minutes or more, especially if the package is large, and may time out after 60 minutes. This time-out setting temporarily overrides any IIS time-out settings set to less than 60 minutes.
When the analyzer is complete, the Advanced Package Mapping page lists the objects in the package file and corresponding objects in the target instance. The objects are divided into tabs, depending on whether they are found within Applications, Solutions, Access Roles, Groups, Sub- forms, or Questionnaires.
-
On each tab of the Advanced Mapping Page, review the icons that are displayed next to each object name to determine which objects require you to map them manually.
|
Icon |
Name |
Description |
|---|---|---|
|
|
Awaiting Mapping Review |
Indicates that the system could not automatically match the object or children of the object to a corresponding object in the target instance. Objects marked with this symbol must be mapped manually through the mapping process. Important: New objects should not be mapped. This icon should remain visible. The mapping process can proceed without mapping all the objects. Note: You can execute the mapping process without mapping all the objects. The |
|
|
Mapping Completed |
Indicates that the object and all child objects are mapped to an object in the target instance. Nothing more needs to be done with these objects in Advanced Package Mapping. |
|
|
Do Not Map |
Indicates that the object does not exist in the target instance or the object was not mapped through the Do Not Map option. These objects will not be mapped through Advanced Package Mapping, and must be remedied manually. |
|
|
Undo |
Indicates that a mapped object can be unmapped. This icon is displayed in the Actions column of a mapped object or object flagged as Do Not Map. |
4. For each object that requires remediation, do one of the following:
-
To map each item individually, on the Target column, select the object in the target instance to which you want to map the source object. If an object is new or if you do not want to map an object, select Do Not Map from the drop-down list.
Important: Ensure that you map all objects to their lowest level. When objects have child or related objects, a drill-down link is provided on the parent object. Child objects must be mapped before parent objects are mapped. For more details, see "Mapping Parent/Child Objects" in Archer Help.
-
To automatically map all objects in a tab that have different system IDs but the same object name as an object in the target instance, do the following:
-
In the toolbar, click Auto Map.
-
Select an option for mapping objects by name.
Option
Description
Ignore case
Select this option to match objects with similar names regardless of the case of the characters in the object names.
Ignore spaces
Select this option to match objects with similar names regardless of whether spaces exist in the object names.
-
Click OK.
The Confirmation dialog box opens with the total number of mappings performed. These mappings have not been committed to the database yet and can be modified in the Advanced Package Mapping page.
-
Click OK.
-
To set all objects in the tab to Do Not Map, in the toolbar, click Do Not Map.
Note: To undo the mapping settings for any individual object, click ![]() in the Actions column.
in the Actions column.
When all objects are mapped, the ![]() icon is displayed in the tab title. The
icon is displayed in the tab title. The ![]() icon is displayed next to the object to indicate that the object will not be mapped.
icon is displayed next to the object to indicate that the object will not be mapped.
5. Verify that all other objects are mapped correctly.
6. (Optional) To save your mapping settings so that you can resume working later, see "Exporting and Importing Mapping Settings" in Archer Help.
7. Once you have reviewed and mapped all objects, click ![]() .
.
8. Select I understand the implications of performing this operation and click OK.
The Advanced Package Mapping process updates the system IDs of the objects in the target instance as defined on the Advanced Package Mapping page. When the mapping is complete, the Import and Install Packages page is displayed.
Important: Advanced Package Mapping modifies the system IDs in the target instance. Any Data Feeds and Web Service APIs that use these objects will need to be updated with the new system IDs.
Task 4: Install the package
All objects from the source instance are installed in the target instance unless the object can not be found or is flagged to not be installed in the target instance. A list of conditions that may cause objects not to be installed is provided in the Log Messages section. A log entry is displayed in the Package Installation Log section.
-
Go to the Install Packages page.
-
From the menu bar, click
. -
Under Application Builder, click Install Packages.
-
-
In the Available Packages section, do the following:
-
Locate the package file you want to install.
-
In the Actions column, click
 .
.
-
-
In the Selected Components section, select the components of the package that you want to install.
-
To select all components, select the top-level checkbox.
-
To install only specific global reports in an already installed application, select the checkbox associated with each report that you want to install.
Note: Items in the package that do not match an existing item in the target instance are selected by default.
-
-
Click Lookup.
-
For each component section, do the following:
Note: To move onto another component section, click Continue or select a component section in the Jump To drop-down menu.
-
In the Install Method drop-down menu, select an install method for each selected component.
Note: If you have any existing components that you do not want to modify, select Create New Only. You may have to modify those components after installing the package to use the changes made by the package.
-
In the Install Option drop-down menu, select an install option for each selected component.
Note: If you have any custom fields or formatting in a component that you do not want to lose, select Do Not Override Layout. You may have to modify the layout after installing the package to use the changes made by the package.
-
-
Click OK.
-
To deactivate target fields and data-driven events that are not in the package, in the Post-Install Actions section, select the Deactivate target fields and data-driven events that are not in the package checkbox. To rename the deactivated target fields and data-driven events with a user-defined prefix, select the Apply a prefix to all deactivated objects checkbox, and enter a prefix. This can help you identify any fields or data-driven events that you may want to review for clean up post-install.
-
Click Install.
-
Click OK.
Task 5: Review the package installation log
-
Go to the Package Installation Log tab on the Install Packages page.
-
From the menu bar, click
. -
Under Application Builder, click Install Packages.
-
Click the Package Installation Log tab.
-
-
Click the package that you want to view.
-
In the Package Installation Log page, in the Object Details section, click View All Warnings.
Task 6: Activate workflow and bulk update existing jobs
-
Go to the Manage Applications page.
-
From the menu bar, click
. -
Under Application Builder, click Applications.
-
-
In the Applications section, select the Assessment Application.
-
On the Advanced Workflow Tab, click Activate in the top right corner of the page.
-
Click Save Workflow in the top left corner of the page.
-
Click the ‘…’ next to the Save Workflow button and select Bulk Update Jobs.
-
Check the I understand the risks box and click OK.
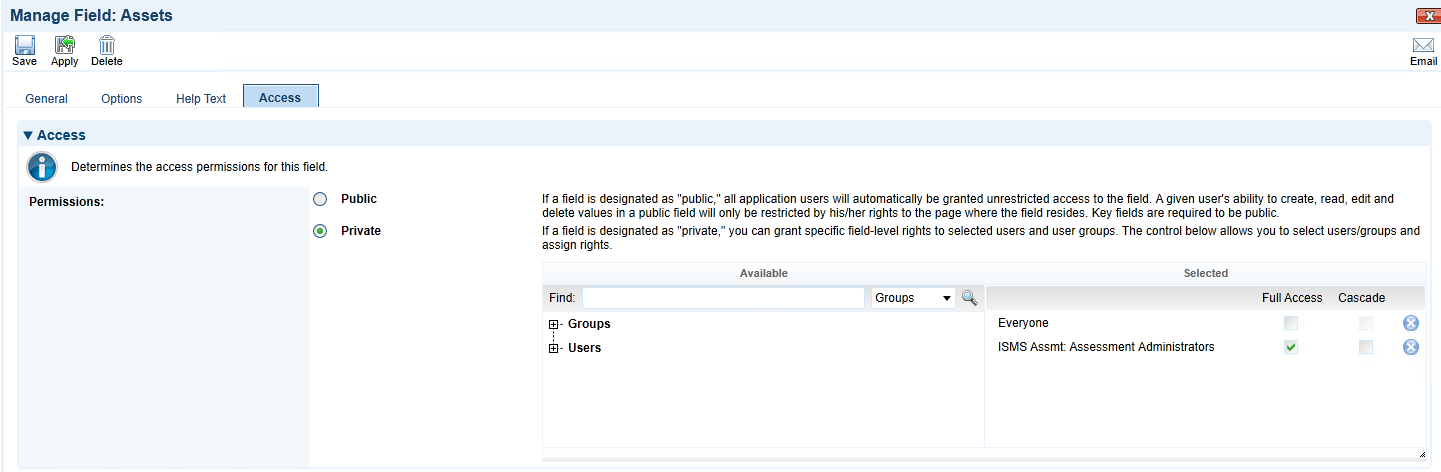
Task 7: Check private field configuration
-
Go to the Manage Applications page.
-
From the menu bar, click
. -
Under Application Builder, click Applications.
-
-
In the Applications section, select Assessment Application.
-
On the Fields tab, click Assets and go to the Access Tab.
-
If the configuration is different from the following screenshot, please correct it.
Setting up data feeds
Task 1: Configure data feeds
This section refers to the following data feeds:
-
ISMS - 0-Min-1 - 010 - Assessment - Update Control Assessment - A2A
-
ISMS - 0-Min-1 - 020 - Assessment - Update Risk Assessment - A2A
-
ISMS - 0-Min-1 - 030 - Assessment - Archive - A2A
-
ISMS - 0-Min-1 - 040 - Assessment - Update IRPF Helper Fields - A2A
Refer to the appendix section Release history for more information..
Repeat the following steps for each data feed:
-
Go to the Manage Data Feeds page.
-
From the menu bar, click
. -
Under Integration, click Data Feeds.
-
-
Select the data feed from the list.
-
From the General tab in the General Information section, in the Status field, select Active.
-
Click the Transport tab. Update the fields as follows:
-
Security Section:
-
In the URL field, type: YourServerName/VirtualDirectoryName/
-
-
Transport Configuration Section:
-
In the User Name and Password fields, type the username and password of the user you created as part of the installation of ISMS Control Assessment.
-
In the Instance field, type the name of the Platform instance in which NTT ISMS Risk Assessment has been installed.
-
-
-
Verify that key field values are not missing from the data feed setup window.
-
Click Save.
Task 2: Schedule a data feed
Important: A data feed must be active and valid to successfully run.
As you schedule your data feed, the Data Feed Manager validates the information. If any information is invalid, an error message is displayed. You can save the data feed and correct the errors later; but the data feed does not process until you make corrections.
-
Go to the Schedule tab of the data feed that you want to modify.
-
From the menu bar, click
. -
Under Integration, click Data Feeds.
-
Select the data feed.
-
Click the Schedule tab.
-
-
Go to the Recurrences section and complete frequency, start and stop times, and time zone.
-
(Optional) To override the data feed schedule and immediately run your data feed, in the Run Data Feed Now section, click Start.
-
Click Save.
Note: The data feeds already contain the schedule configuration set by NTT. Do not change this configuration without considering any potential consequences.
Configure the ISMS Risk Assessment
Different organizations have different approaches in their ISMS implementation. This results in different requirements for a tool used to support their ISMS roll out and operation. NTT ISMS Risk Assessment is built to be as flexible and generic as possible. The following tasks describe typical adaptations to NTT ISMS Risk Assessment that customers might implement to fully support their specific approaches. The offering includes a four-hour WebEx session with an NTT Lead Consultant detailing how to implement customer-specific requirements.
Task 1: Grant access to remediation plans
Create a new Record Permission Field ‘ISMS Assmt: Inherited Permissions’ in the application Remediation Plans (if this has not been done as part of the installation of NTT ISMS Control Assessment). Configure the new field or the existing field as follows:
-
Permission Model: Inherited/Unrestricted
-
Select the following fields from the Control Assessment application:
Data Feeds (A-RPF)
Security Manager (A-RPF)
Assessment Permissions R (I-RPF)
-
Select the following fields from the Risk Assessment application:
-
Data Feeds (A-RPF)
-
Security Manager (A-RPF)
-
Assessment Permissions R (I-RPF)
-
Task 2: Change ‘classification type’ field settings
In the Assessment application there is a Values List field Classification Type that determines the classification for the set of assets with the following values:
|
Value |
Description |
|---|---|
|
Manual Assessment |
Users select the maximum potential impact for each security objective. |
|
Inherit from Asset |
Archer derives the maximum impact from assets. |
|
Assessment with Questionnaire |
Users fill out a questionnaire. |
This field is not calculated out-of-the-box. NTT recommends changing this to make sure that all assessments have adequate data quality.
Multiple options include:
-
Select a static value (for example,VALUEOF([Classification Type],"Assessment with Questionnaire")).
-
Create an Assessment Type field in the application Assessment toderive the Classification Type from (for example,‘if assessment type = ‘Facility’ thenClassification Type = ‘Manual Assessment’’).
-
Create an Asset Type field in the application Asset to derive the Classification Type from (for example, if the Asset is an IT Application, use Assessment with Questionnaire; if the asset is a facility, use Manual Assessment’).
-
Promote field to a Global Values list and create a Classification Type field in the application Asset Category from which to derive the Classification Type.
Note: If the value is Inherit from Asset, other mechanisms must be implemented so that the maximum impact is set for each asset. Set the value by doing the following:
-
Configure these fields as required.
-
Use additional master data applications (ref. Release history in chapter 4).
Note: Check the calculation order after the change.
Task 3: Embed JavaScript libraries
Some custom objects use publicly available JavaScript libraries. To embed the custom objects, do the following:
Copy the custom objects to the company files folder (NTT best practice):
-
Copy all the files in the (3) JS Libraries folderin your company filesdirectory (for example,C:\inetpub\wwwroot\archer\company_files).
-
Change the file extension of all files to ‘.js’.
If copying the files to the server is not possible (for example, because you use a hosted environment), change the custom object code to load the files from a central repository:
Change the custom object code according to the mapping table:
|
Out-of-the-Box Code |
Replace with |
|---|---|
|
<script src="../company_files/raphael.min.js"></script> |
<script src="https://cdnjs.cloudflare.com/ajax/libs/raphael/2.2.8/raphael.min.js" integrity="sha256-BgmwZ6j044t3GCQhmJtpiHkUGVYzjapcGWjBH4dVnes=" crossorigin="anonymous"></script> |
|
<script src="../company_files/progressStep.min.js"></script> |
<script src="https://cdnjs.cloudflare.com/ajax/libs/progressStep/1.0.3/progressStep.min.js" integrity="sha256-1dgOX5j3o8UIzgSIRJb/f/Ui5AethNu8a2ClYa8pIXc=" crossorigin="anonymous"></script> |
|
<script src="../company_files/popper.min.js"></script> |
<script src="https://cdnjs.cloudflare.com/ajax/libs/popper.js/1.16.1/umd/popper.min.js" integrity="sha256-/ijcOLwFf26xEYAjW75FizKVo5tnTYiQddPZoLUHHZ8=" crossorigin="anonymous"></script> |
|
<script src="../company_files/tippy.all.min.js"></script> |
<script src="https://cdnjs.cloudflare.com/ajax/libs/tippy.js/3.4.1/tippy.all.min.js" integrity="sha256-iLOTBBYaCzN2utfyApj2yRw3ltH86LwYZrzOz3TTbyg=" crossorigin="anonymous"></script> |
In the following custom objects:
|
Custom Object |
Libraries |
Applications |
|---|---|---|
|
raphael.min.js progressStep.min.js |
Assessment |
|
|
popper.min.js tippy.all.min.js |
Assessment Asset Asset Category Control/Control Category Control Assessment Risk Assessment Threat Event |
If none of the options are acceptable, remove all the custom objects from the layout in all applications. All the features are used to improve user experience, none of the features are required for NTT ISMS Risk Assessment to function.
Task 4 (if necessary): Adapt platform owner and module owner groups
NTT built NTT ISMS Risk Assessment following its Implementation Best Practices. One of these is to define operational and support groups already during implementation. Because most Archer customers have multiple GRC processes (NTT calls them Modules) hosted in one Archer environment, NTT’s Best Practice is to define:
-
Platform Owner Group and Role (supporting all Modules).
-
Module-Specific Owner Group and Role for each Module (supporting a particular Module).
Other Archer customers might follow different Best Practices. These Groups and Roles are not necessary for NTT ISMS Risk Assessment to function. Adapt them according to your Best Practices or remove them.
-
Replace groups as:
-
Application Owners in all applications
-
Report Administrators in all applications
-
-
Replace groups in Access tab of:
-
All Dashboards
-
The ISMS Assessment Workspace
-
All History Log (Debug) fields
-
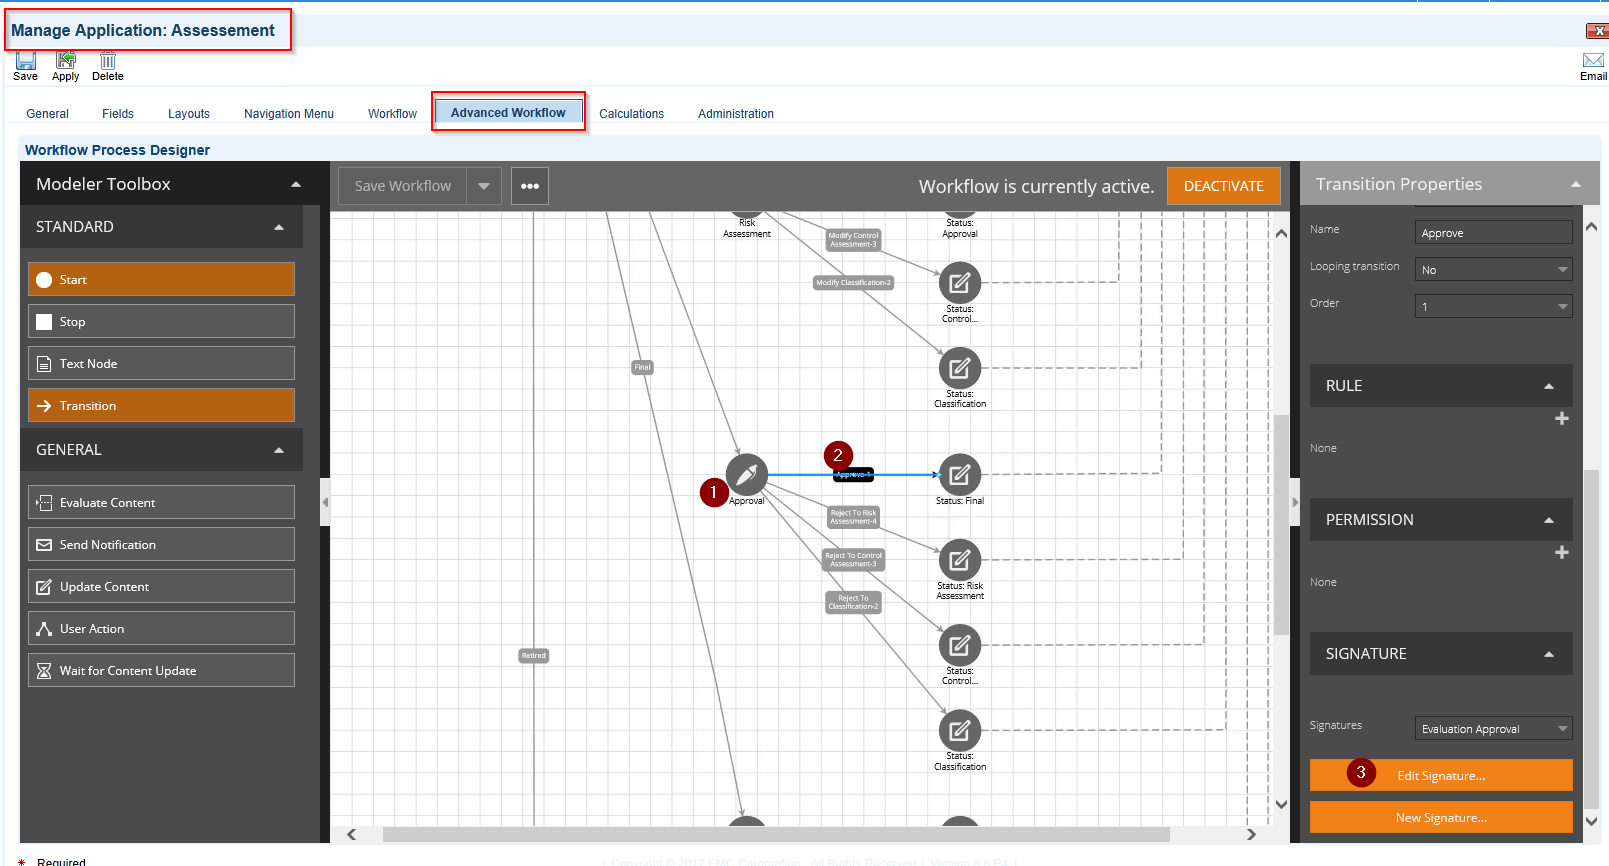
Task 5 (if necessary): Change signature type
The Assessment application uses the Advanced Workflow Signature feature to archive data after approval. Out-of-the-box the type is set to User Name/Password. If you use Single-Sign-On authentication, change this to One-Time PIN via Email:
-
On the Advanced Workflow Tab in application Assessment, go to the User Action Node Approval.
-
Click on transition Approve.
-
Click the Edit Signature button.
-
Change Type to One-Time PIN via Email.

Task 6 (if necessary): Multilanguage
NTT ISMS Risk Assessment is bilingual (English and German). This includes configuration aspects like fields, sections, tabs, workspaces, or dashboards using the Globalization feature within Archer. Additionally, users can integrate bilingual content-like controls. The following steps deactivate the second language:
-
Deactivate the following fields (Application/Level/Field) and remove them from Layout:
-
Control/Control Category/Control Category Name DE
-
Control Control/Control Name DE
-
Control/Control/Control Statement DE
-
Control Assessment/Control Category/Control Category Name DE
-
Control Assessment/Control/Control Name DE
-
Control Assessment/Control/Control Statement DE
-
Threat Event/Description DE
-
Threat Event/Name DE
-
Risk Assessment/Name DE
-
Risk Assessment/Description DE
-
Risk Assessment/Description DE – no format
-
-
Remove ‘<ntt_translate>‘ tags for the ‘German fields’ from the following calculated fields (see the following screenshot):
-
Control/Control Category/Control Category Name
-
Control/Control/Control Name
-
Control/Control/Control Statement
-
Control/Control/Control Summary
-
Control Assessment/Control Category/Control Category Name
-
Control Assessment/Control/Control Name
-
Control Assessment/Control/Control Statement
-
Control Assessment/Control/Control Summary
-
Threat Event/Name
-
Risk Assessment/Name
-
Risk Assessment/Description
-
Risk Assessment/Risk Summary
-
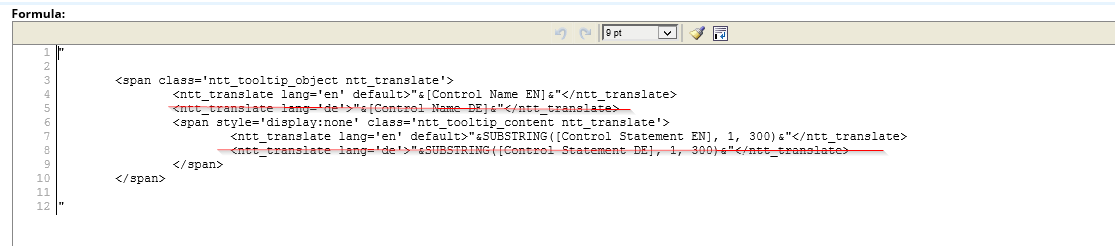
-
Remove <ntt_translate> tagswith lang=‘de’ in field Classification With Questionnaire Table in the application Assessment.
Add additional languages by creating new fields and adding them to the Calculated Fields mentioned above.
Task 7 (if necessary): Change impact, classification, likelihood and risk classes
NTT ISMS Risk Assessment includes three impact classes for Impact, Classification, Likelihood and Risk. Some organizations use a different set of classes. To support these requirements, change the following configurations:
-
Global Values lists (names, numeric values, translations):
-
ISMS Classification Confidentiality
-
ISMS Classification Integrity
-
ISMS Classification Availability
-
ISMS Impact
-
ISMS Level of Threat
-
ISMS Level of Vulnerability
-
ISMS Likelihood
-
ISMS Risk Level
-
-
Formula within the following fields in the application Assessment:
-
Classification Confidentiality
-
Classification Integrity
-
Classification Availability
-
Max Impact Confidentiality
-
Max Impact Integrity
-
Max Impact Availability
-
-
Formula within the following fields in the application Risk Assessment:
-
Likelihood (gross)
-
Likelihood (net)
-
Risk Level (gross)
-
Risk Level (net)
-
Risk Level (residual)
-
Task 8 (if necessary): Grant access to master data records
The Assets application has optional references to the following master data core applications:
-
Applications
-
Business Processes
-
Business Units
-
Companies
-
Devices
-
Divisions
-
Facilities
Some users already have read access to all records in these applications. If this is not the case and you want to use these optional references, consider granting this access to all NTT ISMS Risk Assessment user groups.
-
Add permission Content Record: Read for each of the master data applications that you are using to each of NTT ISMS Risk Assessment access roles.
-
Create a record permission field (Permission Model: Automatic) in each of the master data applications that you are using and add the access roles as Default Users/Groups.
Task 9 (Optional): Synchronize assets
Many Archer customers use core applications to manage master data for applications, business units, facilities, and so on. NTT chose a similar approach to define assets as Archer did in its Archer Audit Management use cases (application Assets is comparable to the Audit Entity application in the Audit Engagements and Workpapers use case).
Many Archer customers use Archer2Archer data feeds to synchronize data in the Audit Entity with data in the corresponding master data applications. This can also be done with the Asset application. Alternatively, a synchronization mechanism can be built directly with an external repository like a CMDB.
Task 10 (Optional): Synchronize control procedures
Many Archer customers use the core application Control Procedures to manage their controls. NTT built an ODA to manage controls for ISMS Assessment. It does not make sense to maintain data in two different applications manually. If you already use the Control Procedures application as your central repository for controls, you can build an Archer2Archer data feed to synchronize these data with the Asset application within ISMS Assessment.
Task 11 (Optional): Add additional master data applications
The out-of-the-box implementation of NTT ISMS Risk Assessment contains many fields in the Asset application that act as input for an assessment to filter relevant controls, including:
-
Zones
-
Maximum impact for all security objectives
-
Level of threat as input for risk assessment (ISMS Risk Assessment)
From a methodology point of view, these are attributes of each asset. In practice these attributes are often derived from other data to reduce effort and improve data quality.
The following architecture diagram outlines a setup a used to fit specific customer needs. Since this is a very customer-specific task, your setup may look different:
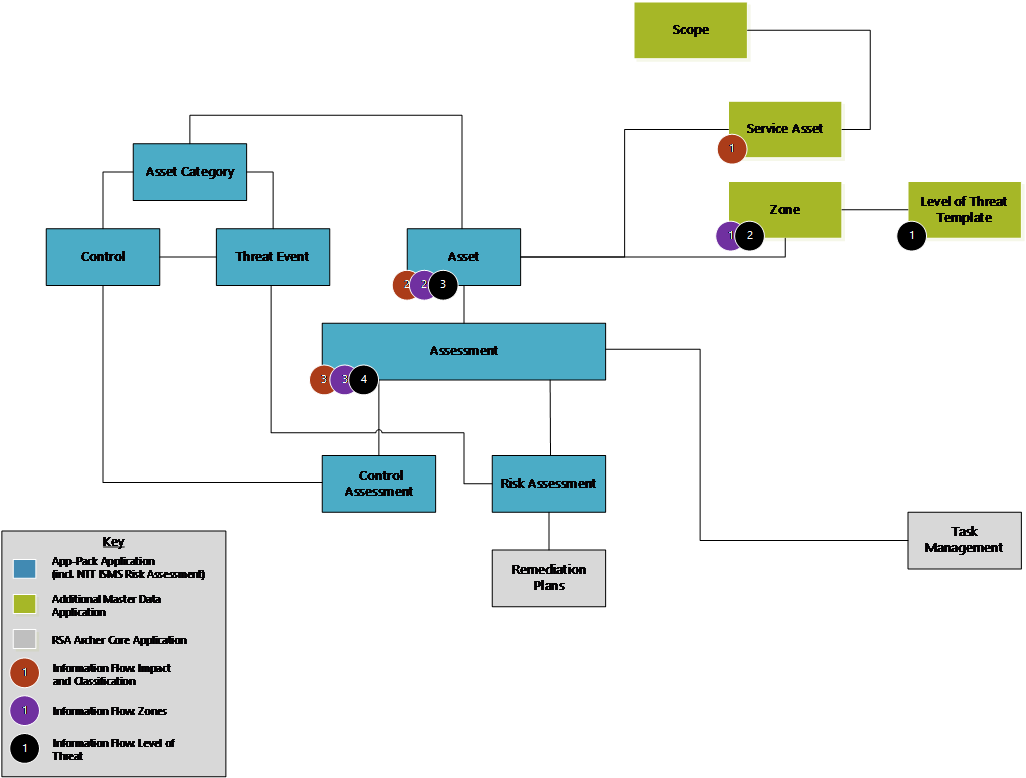
|
Additional Application |
Purpose |
|---|---|
|
Scope |
Record permissions related to some roles are defined here and derived all underlaying data. |
|
Service Asset |
Maximum impact is defined on a service asset level and derived to assets and assessments. |
|
Zone |
All zones (physical and network) for a scope. The Zones parameter is defined here and then derived to assets and assessments. |
|
Level of Threat Template |
Level of Threat (relevant for NTT ISMS Risk Assessment) parameters are defined here and then derived to zones, assets and assessments. |
Using ISMS Risk Assessment
Task 1 (Optional): Import sample content
As a starting point and to illustrate the basic concepts of NTT ISMS Risk Assessment, NTT provides sample data as part of the offering for the following applications:
-
Threat Event (based on NIST 800-30)
-
Control (based on NIST 800-53)
-
Control Category
-
Control
-
-
Asset Category
The following table gives instructions for the import:
|
File |
Target Application |
Non-Default Settings |
|---|---|---|
|
(1) Threat Events.csv |
Threat Event |
File Encoding = UTF-8 File Contains HTML Formatting |
|
(2) Control - Control Category.csv |
Control > Control Category |
|
|
(3) Control - Control.csv |
Control > Control |
|
|
(4) Control - Control - Effectiveness.csv |
Control > Control > Effectiveness |
File Encoding = UTF-8 File Contains HTML Formatting Application Field ‘Control ID’
|
|
(5) Asset Category.csv |
Asset Category |
File Encoding = UTF-8 File Contains HTML Formatting |
While performing data import for the subform file (4) Control - Control – Effectiveness.csv, disable the Required option for the related record field Control Category (Control Category ID) in the Controls application.
If you already imported the sample content as part of the installation of NTT ISMS Control Assessment, import the files as follows.
|
File |
Instruction |
|---|---|
|
(1) Threat Events.csv |
Import as described above |
|
(2) Control - Control Category.csv |
Do not import |
|
(3) Control - Control.csv |
Do not import |
|
(4) Control - Control - Effectiveness.csv |
Import as described above |
|
(5) Asset Category.csv |
Import type Update Existing Records with Name as Application Field |
Note: NTT does not guarantee that the mappings provided as part of the sample content are complete or correct for every customer. This sample content is not intended to be used as-is in a production environment. NTT assumes that every customer will use their own content or adapt the sample content to fit their specific needs.
Task 2: Define threat events (master data administrator)
Create the threat events and define which threat events are relevant (or in scope) for which assets. Two filter mechanisms are available to filter controls:
-
By Asset Category: for each Asset Category only a subset of threat events is relevant. Only threat events mapped to an Asset Category that is assigned to an Asset can be in scope. Example:
-
Social Engineering (Threat Event) does not make sense for an office building (Asset Category).
-
Denial of Service Attack (Threat Event) does not make sense for a third-party contractor (Asset Category).
-
-
By Zone: based on the Zone an asset resides in, only a subset of the threat events mapped to an Asset Category are relevant for this asset. Example:
-
Untargeted malware (Threat Event) is only relevant if the asset is accessible via the Internet (Zone).
-
Unauthorized physical access (Threat Event) is relevant for a restricted area (Zone).
-
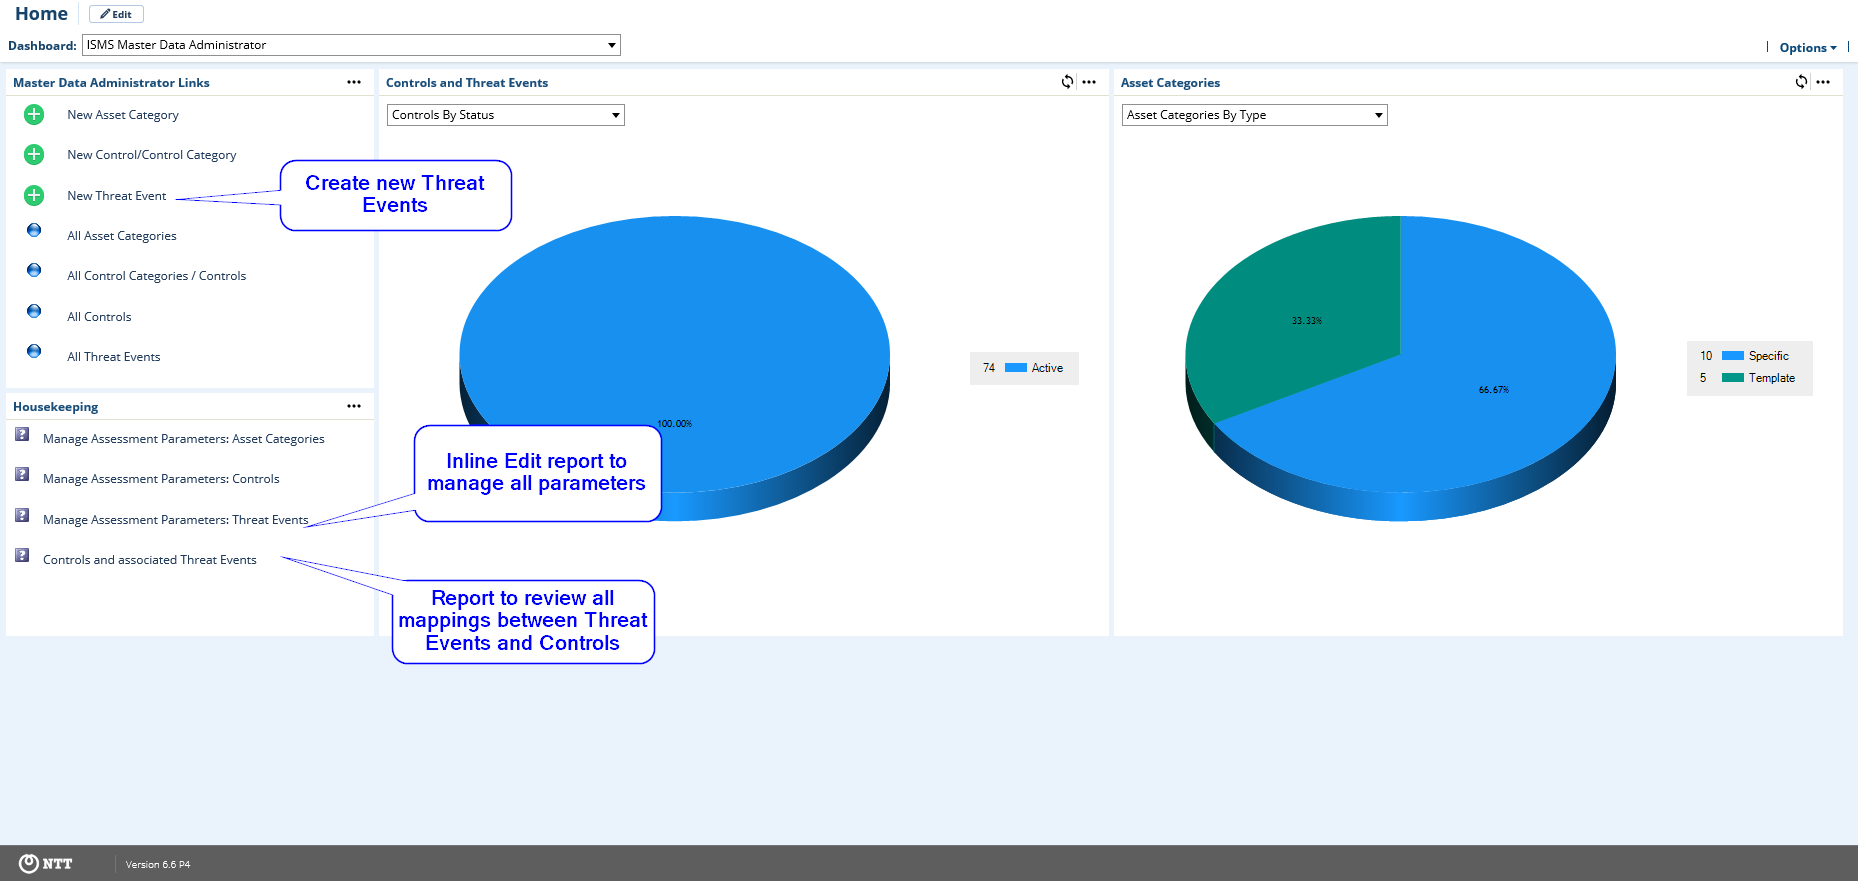
The Master Data Administrators have access to all these tasks from the ISMS Master Data Administrator dashboard:
Task 3: Define controls (master data administrator)
Create the controls and define which controls are relevant (or in scope) for which assets. Three filter mechanisms are available to filter controls:
-
By Asset Category: for each Asset Category only a subset of controls is relevant. Only controls mapped to an Asset Category that is assigned to an Asset can be in scope. Example:
-
Introducing encryption (Control) does not make sense for an office building (Asset Category).
-
Having a guard sitting at the entrance (Control) does not make sense for a database server (Asset Category).
-
-
By Classification: based on the maximum impact (and derived from that the classification) for each security objective, only a subset of the controls mapped to an Asset Category are relevant for this asset. Example:
-
Username/Password authentication (Control) is fine for systems managing internal data (Classification), but multi-factor authentication (Control) is required for systems managing confidential data (Classification).
-
A cluster setup (Control) is required only for systems having a ‘High’ classification for availability (Classification).
-
-
By Zone: based on the Zone an asset resides in, only a subset of the controls mapped to an Asset Category are relevant for this asset. Example:
-
A Web Application Firewall (Control) is only required if the asset is accessible via the Internet (Zone).
-
A CCTV surveillance system (Control) is required for an entrance to a restricted area (Zone).
-
The Master Data Administrators have access to all these tasks from the ISMS Master Data Administrator dashboard:

See Release history in Chapter 4.
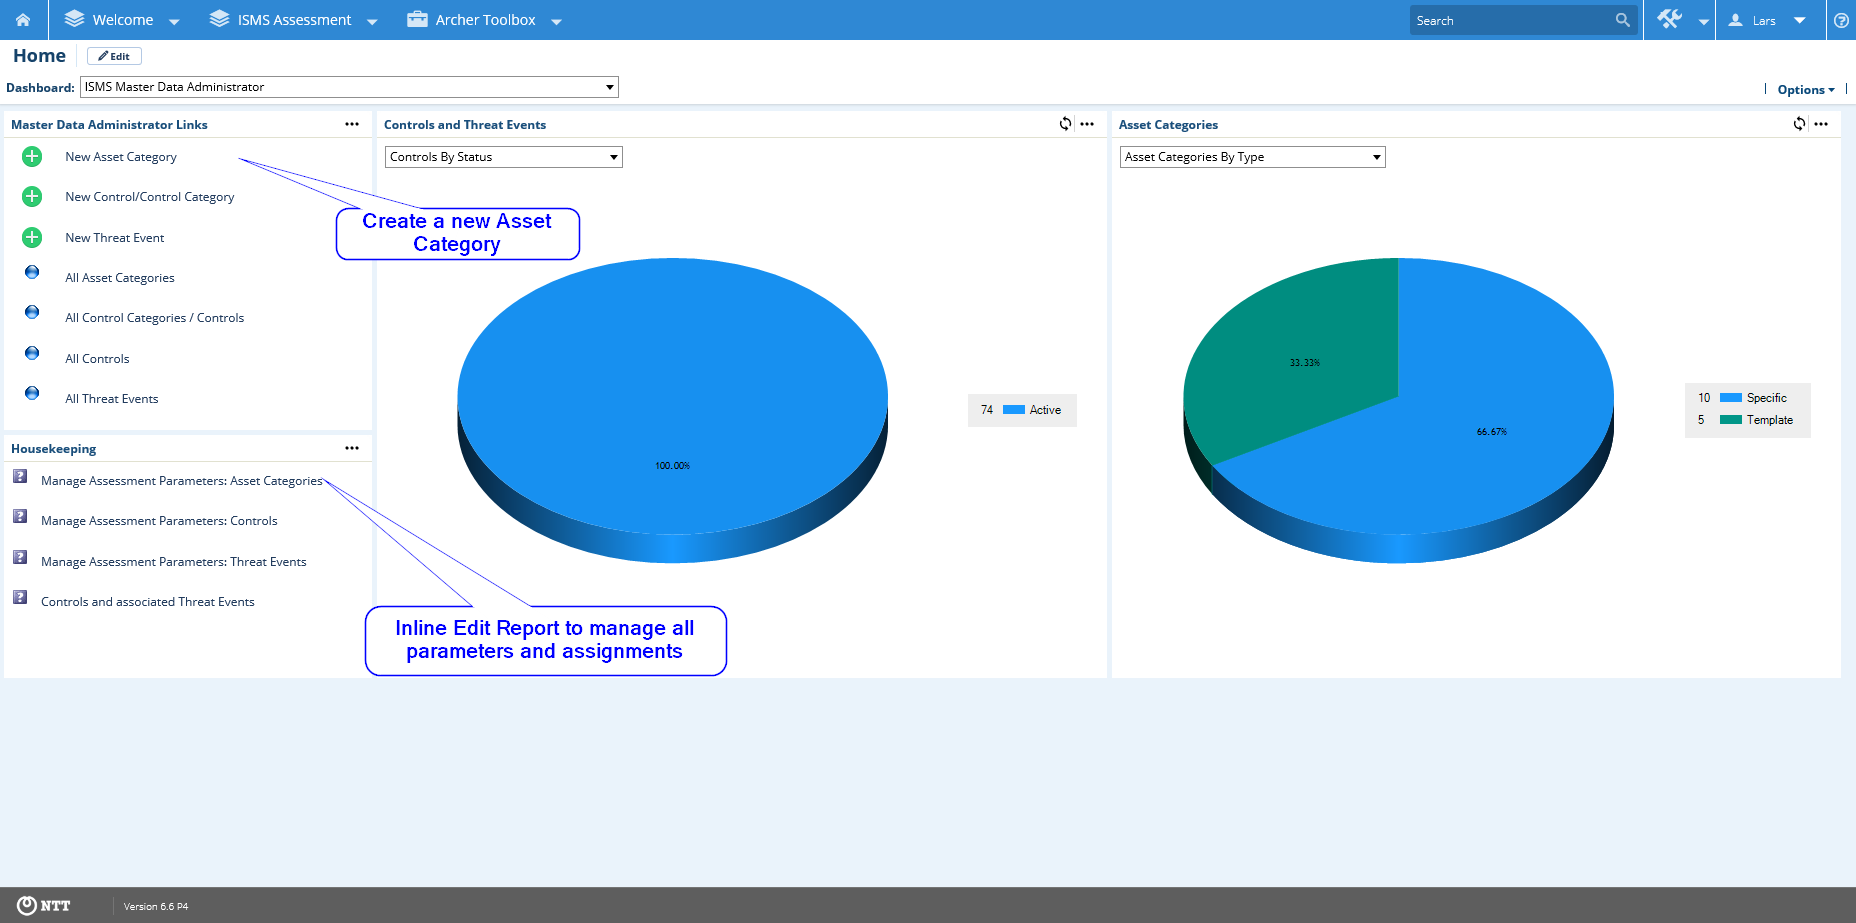
Task 4: Define asset categories (master data administrator)
In addition to Manage Controls, a Master Data Administrator also can define Asset Categories. As described in Release history, an Asset Category serves as a first filter mechanism to select controls relevant for an Asset. NTT implemented a two-layer approach (field Inheritance Type):
-
Assets can be assigned to specific asset categories.
-
Templates simplify the management of relevant controls as specific categories inherit controls from one or more templates.
The Master Data Administrators have access to all these tasks from the ISMS Master Data Administrator dashboard:
Task 5: Create assets (asset administrator)
An Asset Administrator can create and manage assets from the ISMS Asset Administrator dashboard:
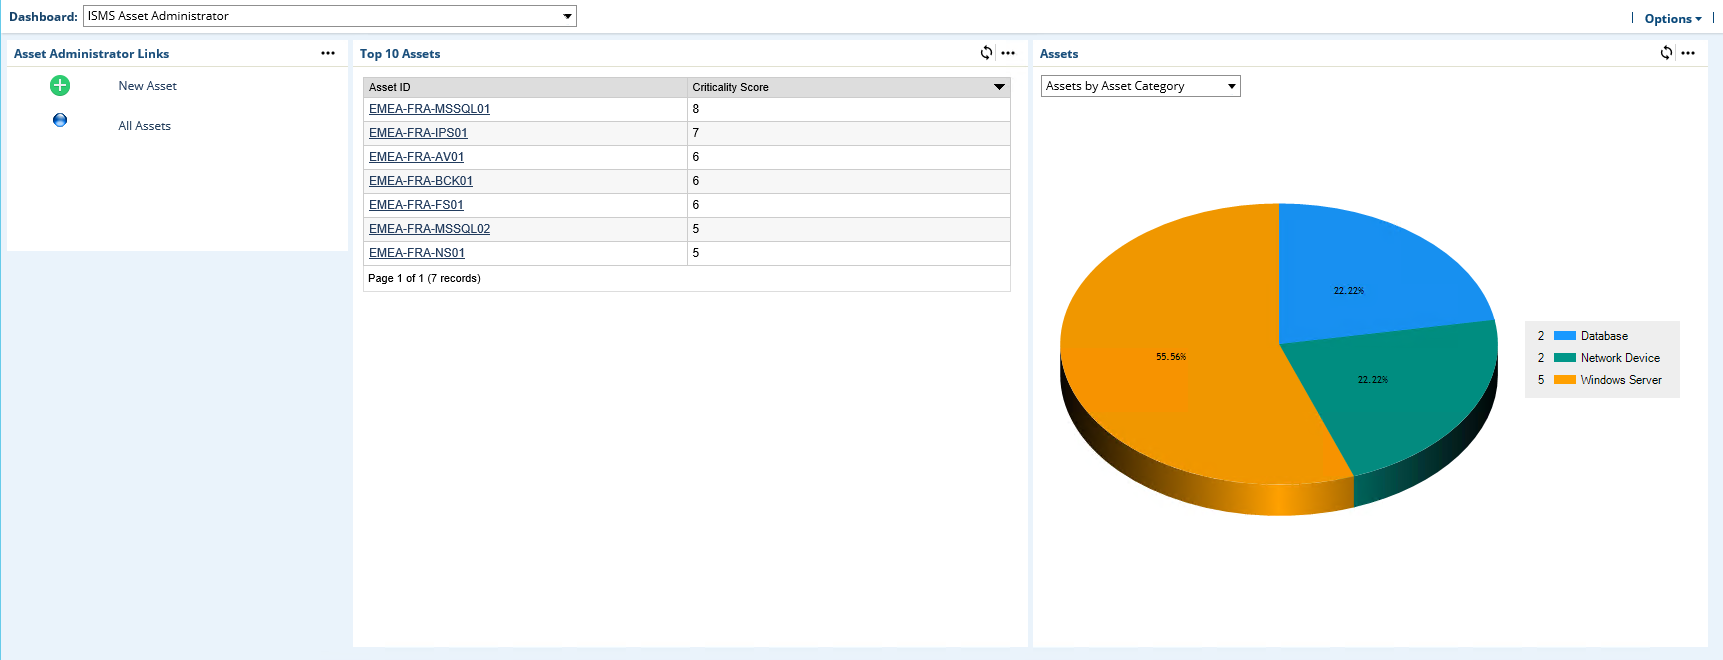
SeeRelease history in Chapter 4.
Task 6: Configure assessments (assessment administrator)
Assessment Administrators create and manage assessments from the ISMS Assessment Administrator dashboard. Assessment Administrators can:
-
Assign users to assessment specific roles:
-
Assessor Classification
-
Assessor Control Assessment
-
Assessor Risk Assessment
-
Assessment Approver
-
-
Assign Assets to Assessments
-
Refresh Control Assessment
-
Refresh Risk Assessment
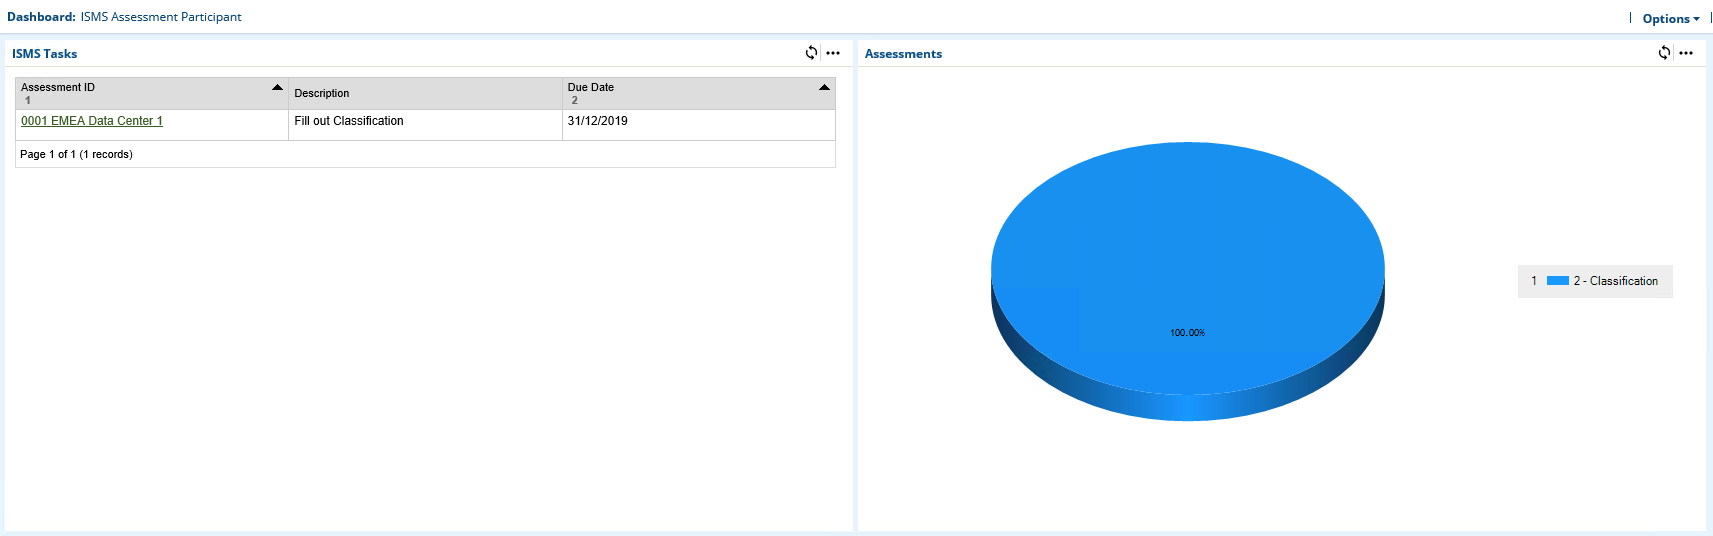
Task 7: Fill out assessments (assessor)
Assessments contain different steps filled out by different personas who all have access to their tasks from the ISMS Assessment Participant dashboard:
Fill out classification (assessor classification)
As described in Release history in Chapter 4, multiple approaches classify assets assigned to an assessment. The following screenshot shows the ‘Assessment with Questionnaire’ approach:
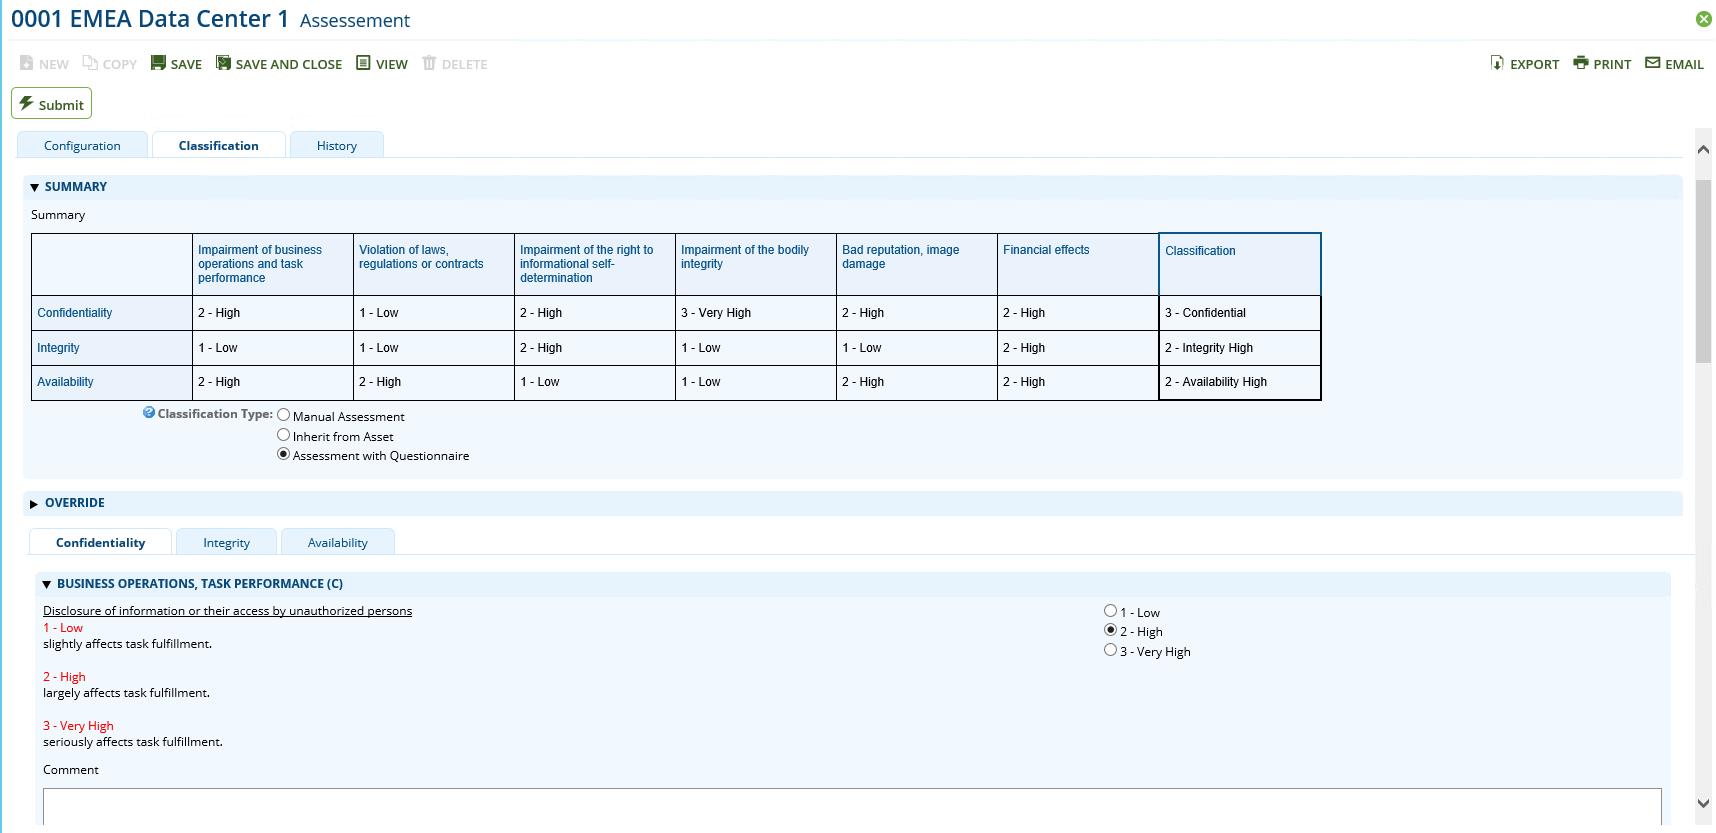
To finalize the classification step, click Submit and the assessment is set to a read-only mode until the data feedRelease history(Annex) created or updates the Control Assessment records.
See the ‘Classification’ step in the swim lane diagram in Chapter 2.
Fill out control assessment (assessor control assessment)
Assessors report the implementation status of all controls in a complete list (By Control tab):
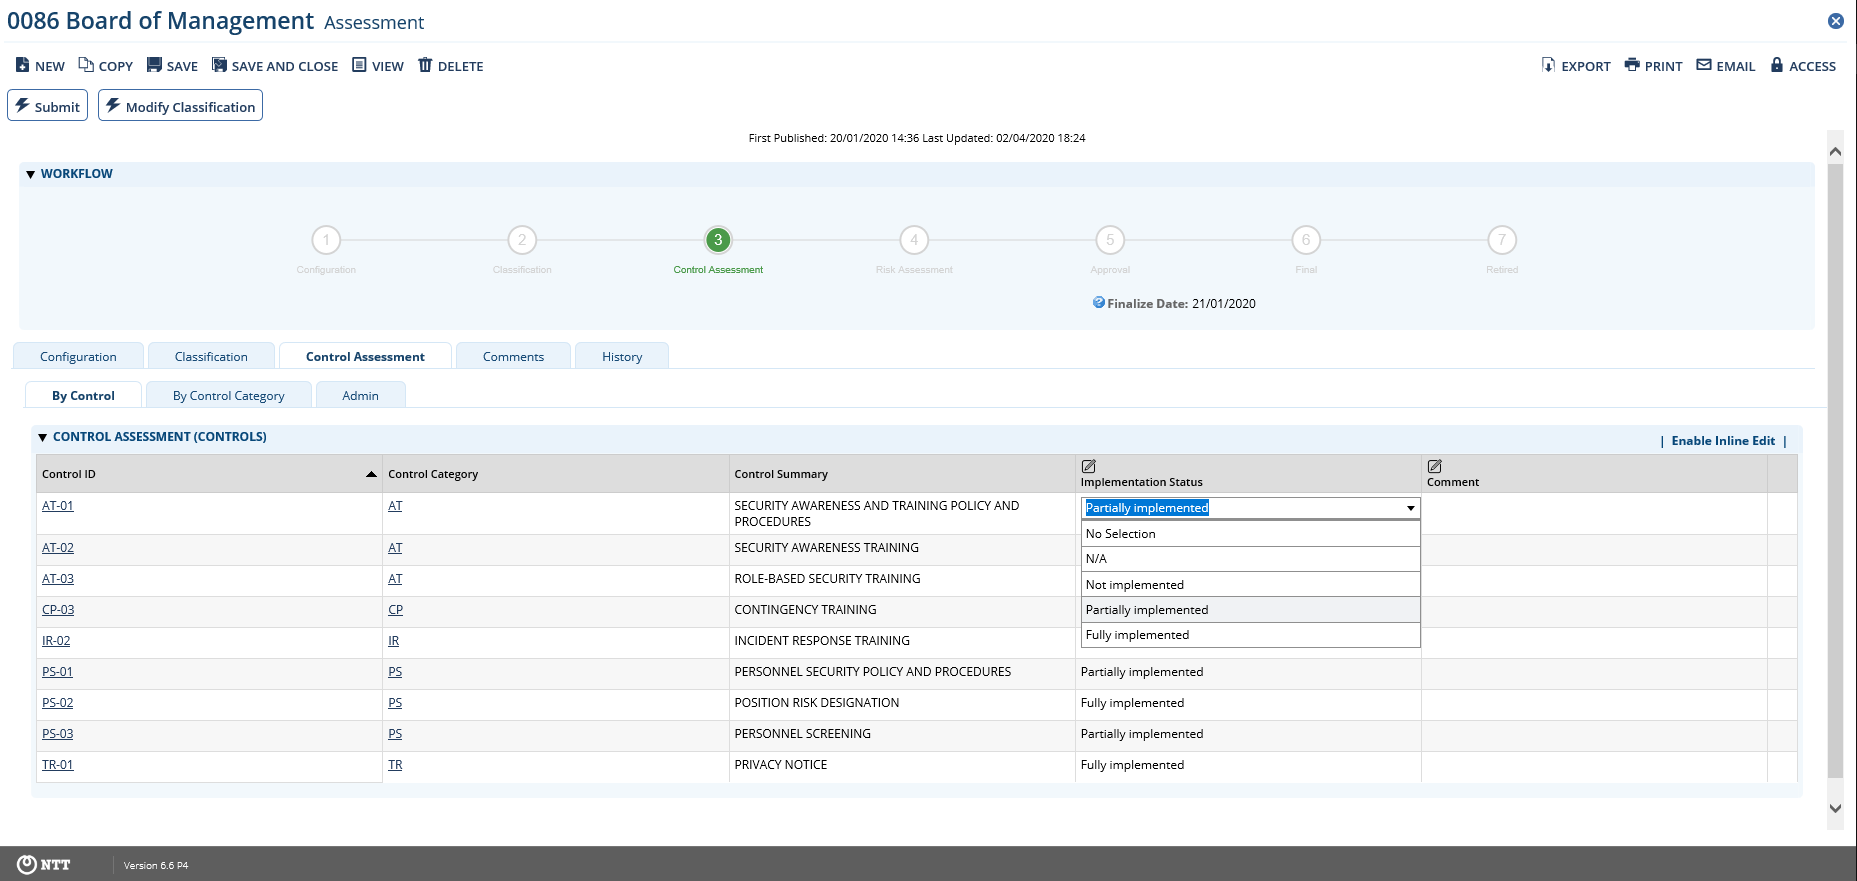
Users can open a control category record (By Control Category tab) and report back the same type of data for controls mapped to this control category. A chart gives an overview of the implementation status for each category:
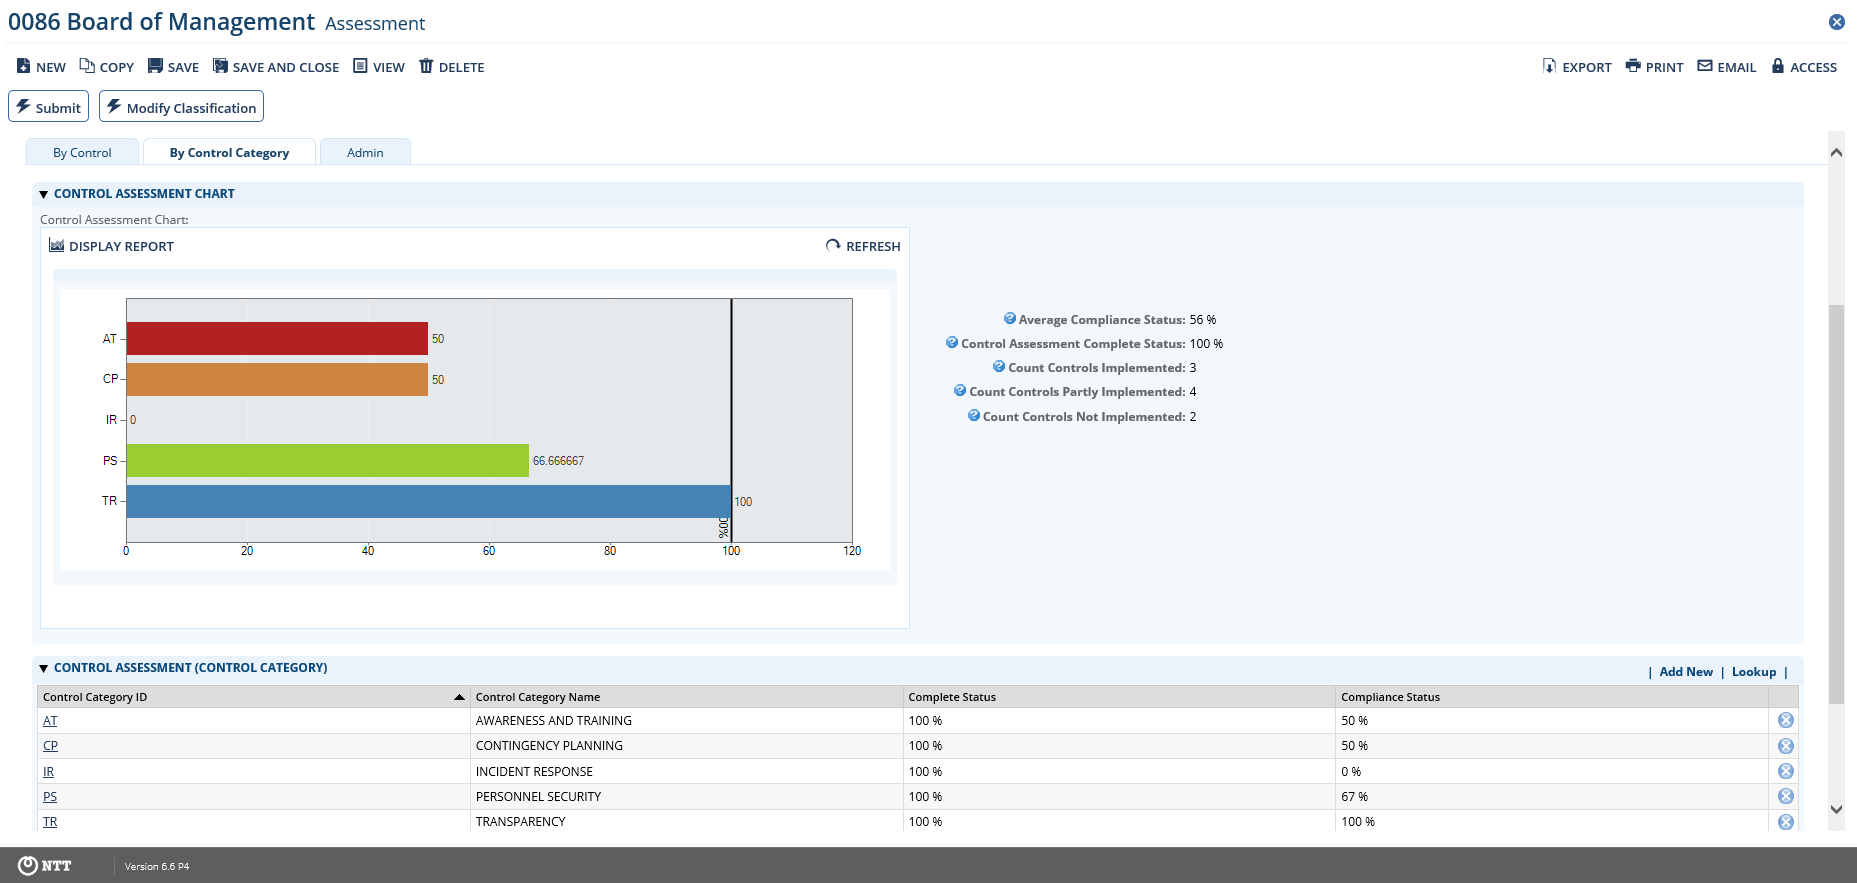
To finalize the Control Assessment step, click Submit and the assessment is set to a read-only mode until the data feed Release history (Annex) created or updates the Risk Assessment records.
See the Control Assessment step in the swim lane diagram in Chapter 2.
Fill out risk assessment (assessor risk assessment)
After the control assessment has been completed, Archer automatically calculates risks:
-
Gross Risk: risks without considering any controls
-
Net Risks: risks considering all controls currently implemented (fully or partially)
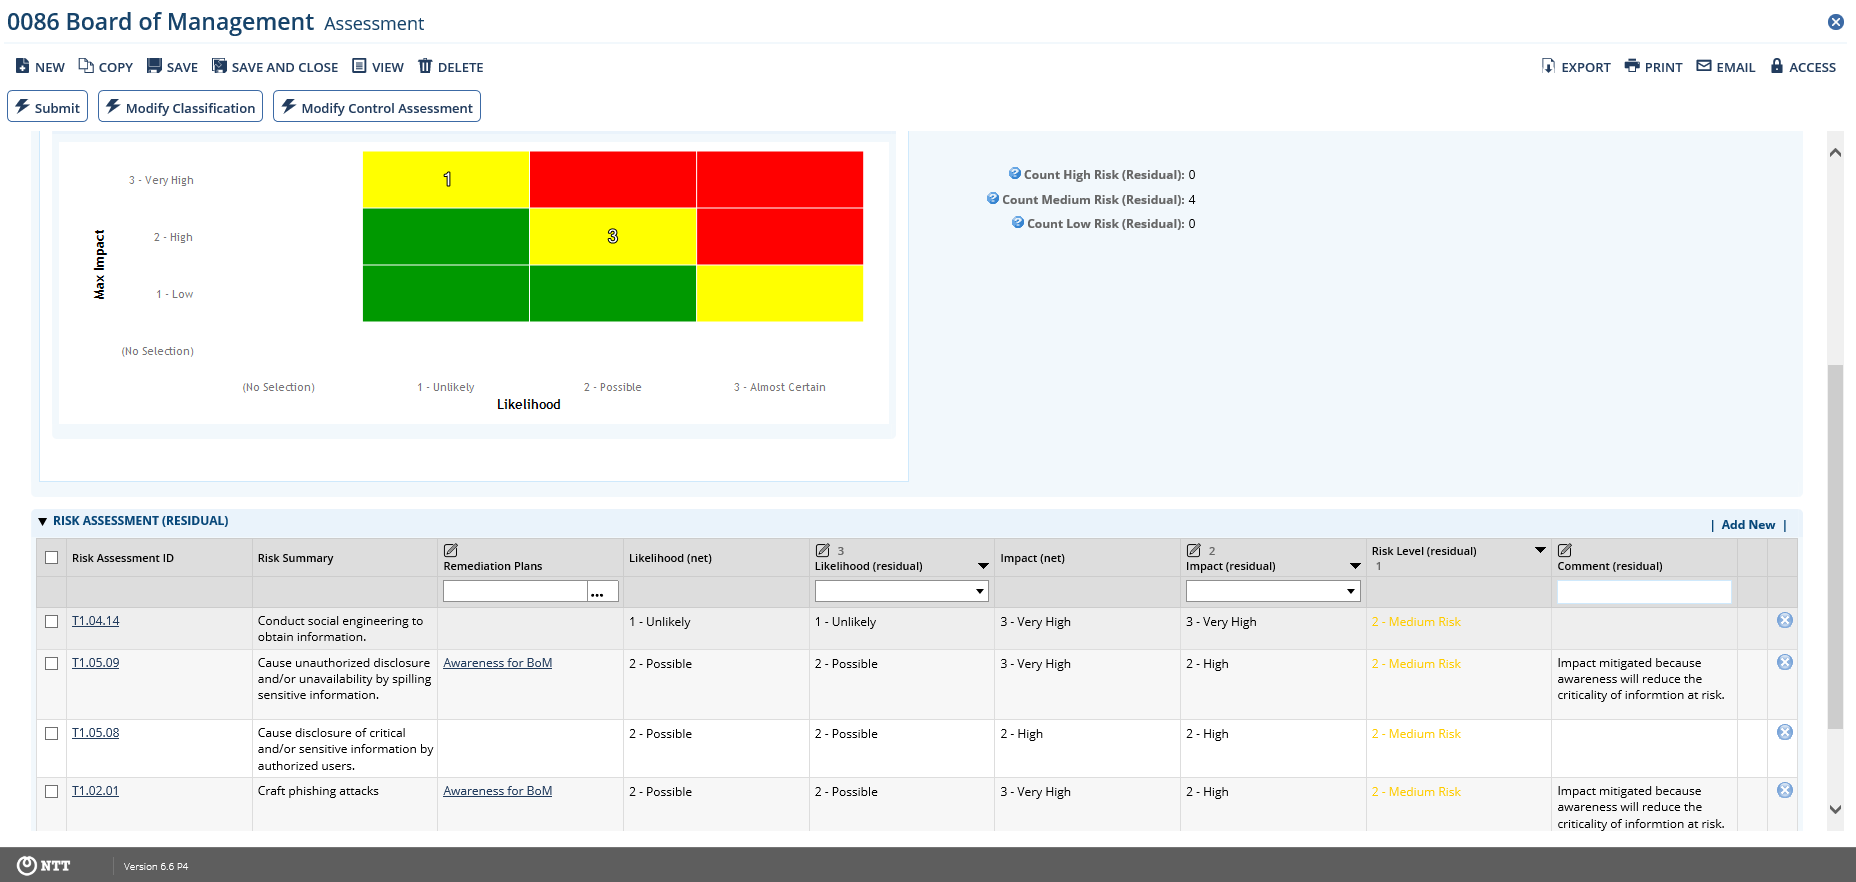
The grid for the net risks shows which controls contribute to the risk mitigation.
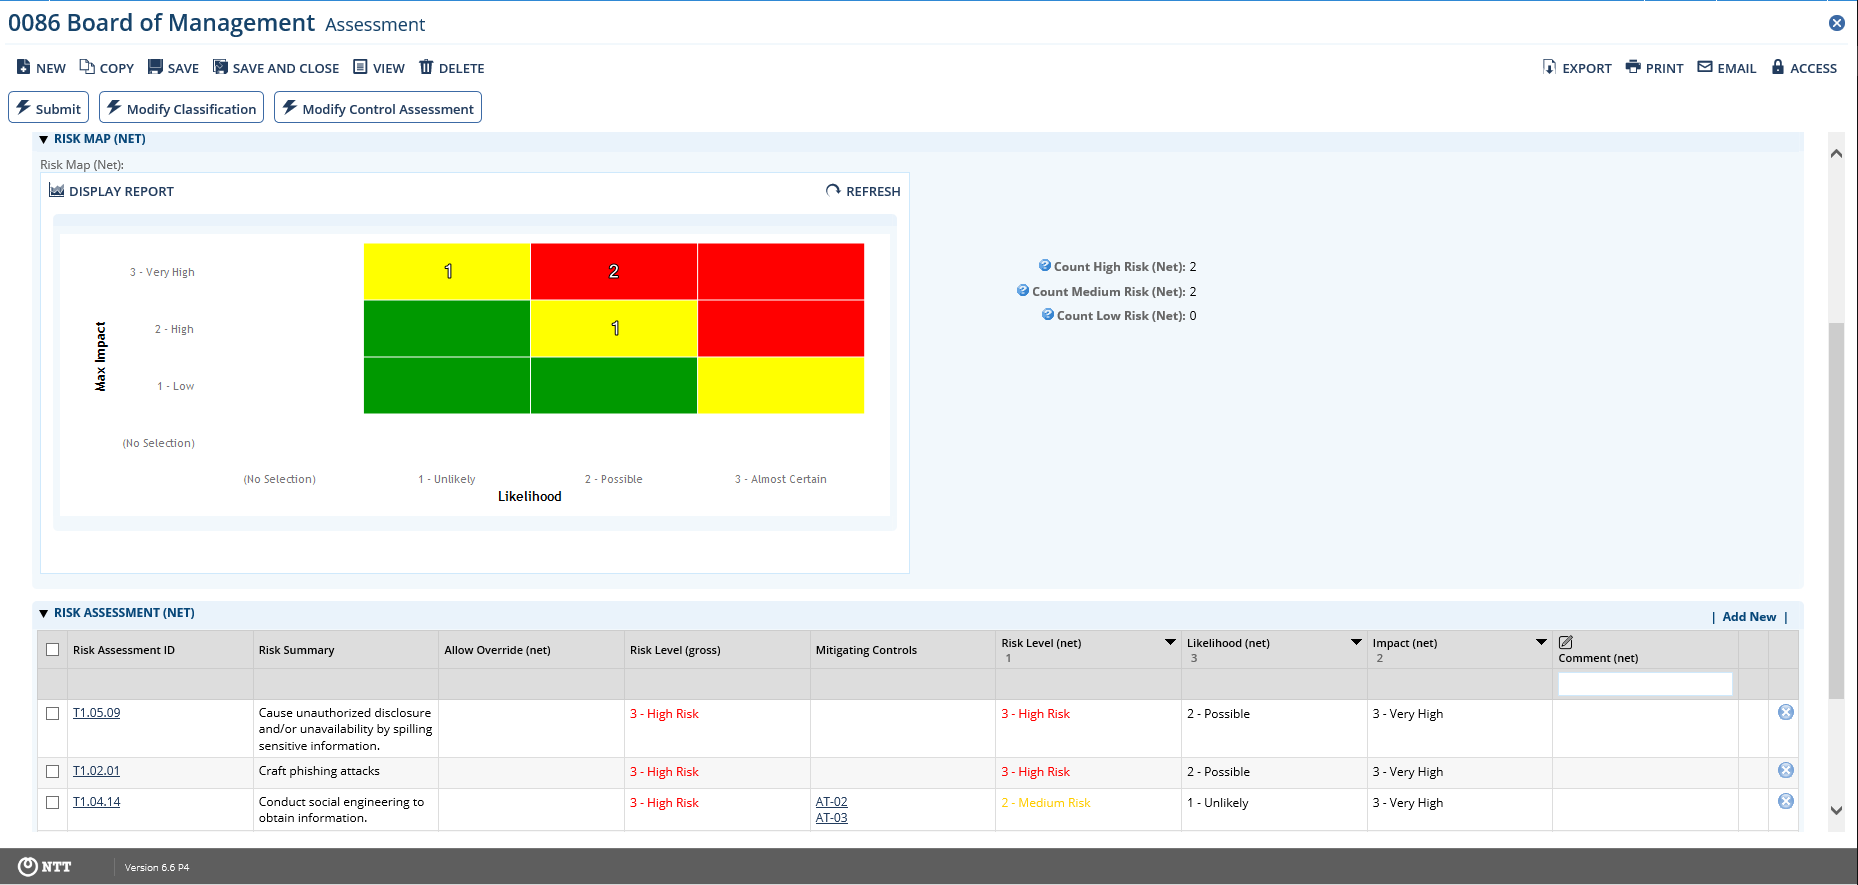
Assessors manually define remediation plans and assess both the residual likelihood and the residual impact after these remediation plans have been implemented completely.
To finalize the Risk Assessment step, click Submit.
See the Risk Assessment step in the swim lane diagram in Chapter 2.
Task 8: Approve assessments (assessment approver)
Assessment approvers have access to the Approval task from the ISMS Assessment Participant dashboard:
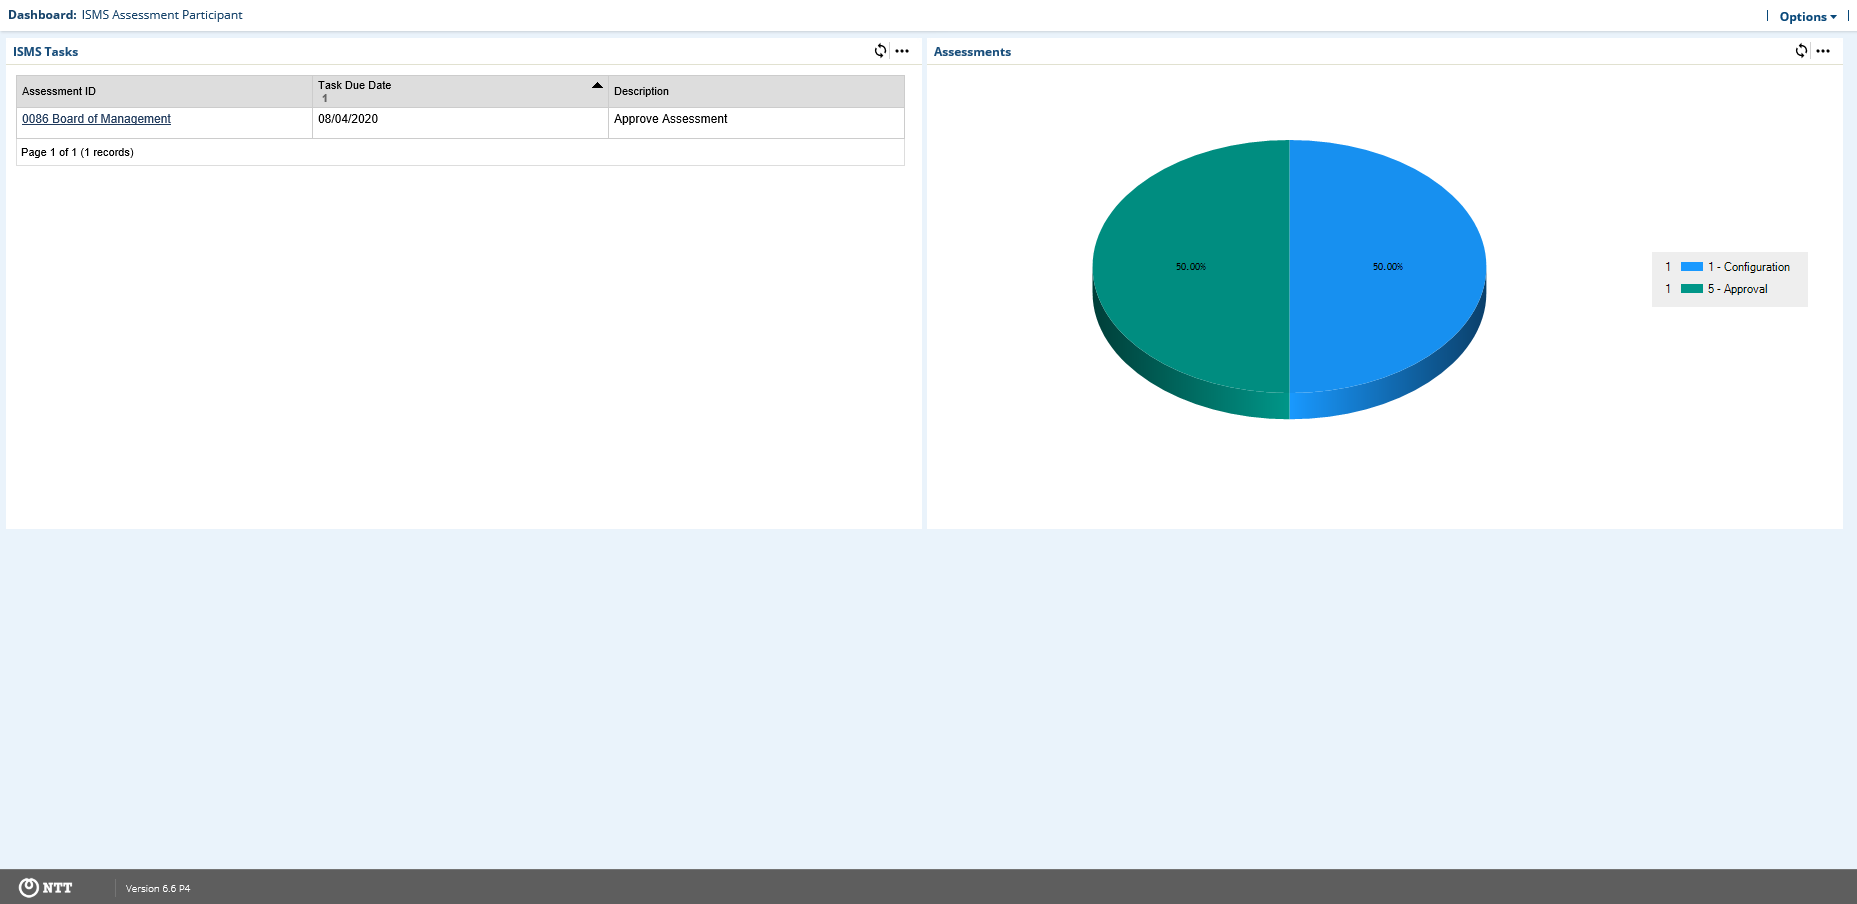
Review all the results and approve or reject the assessment:
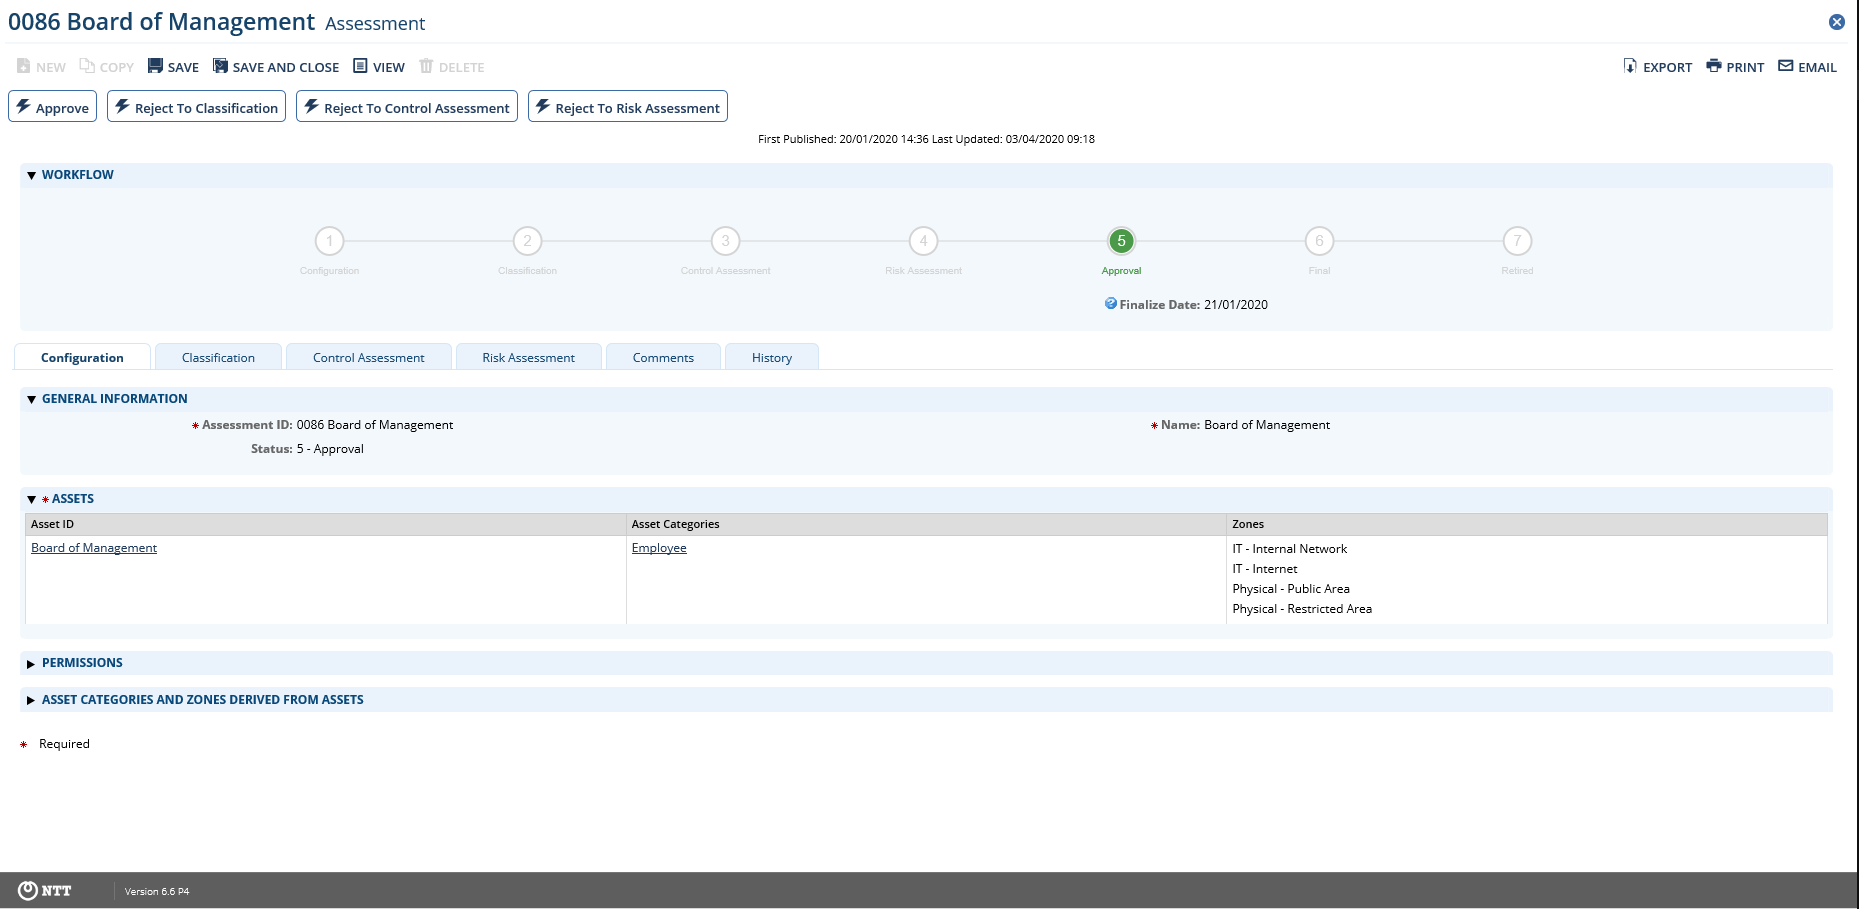
This task refers to the step Results OK in the swim lane diagram in Chapter 2.
Task 9: Reopen assessments (assessment administrator)
Assessment Administrators can reopen or retire assessments in status Final by clicking one of the buttons shown in the following screenshot.
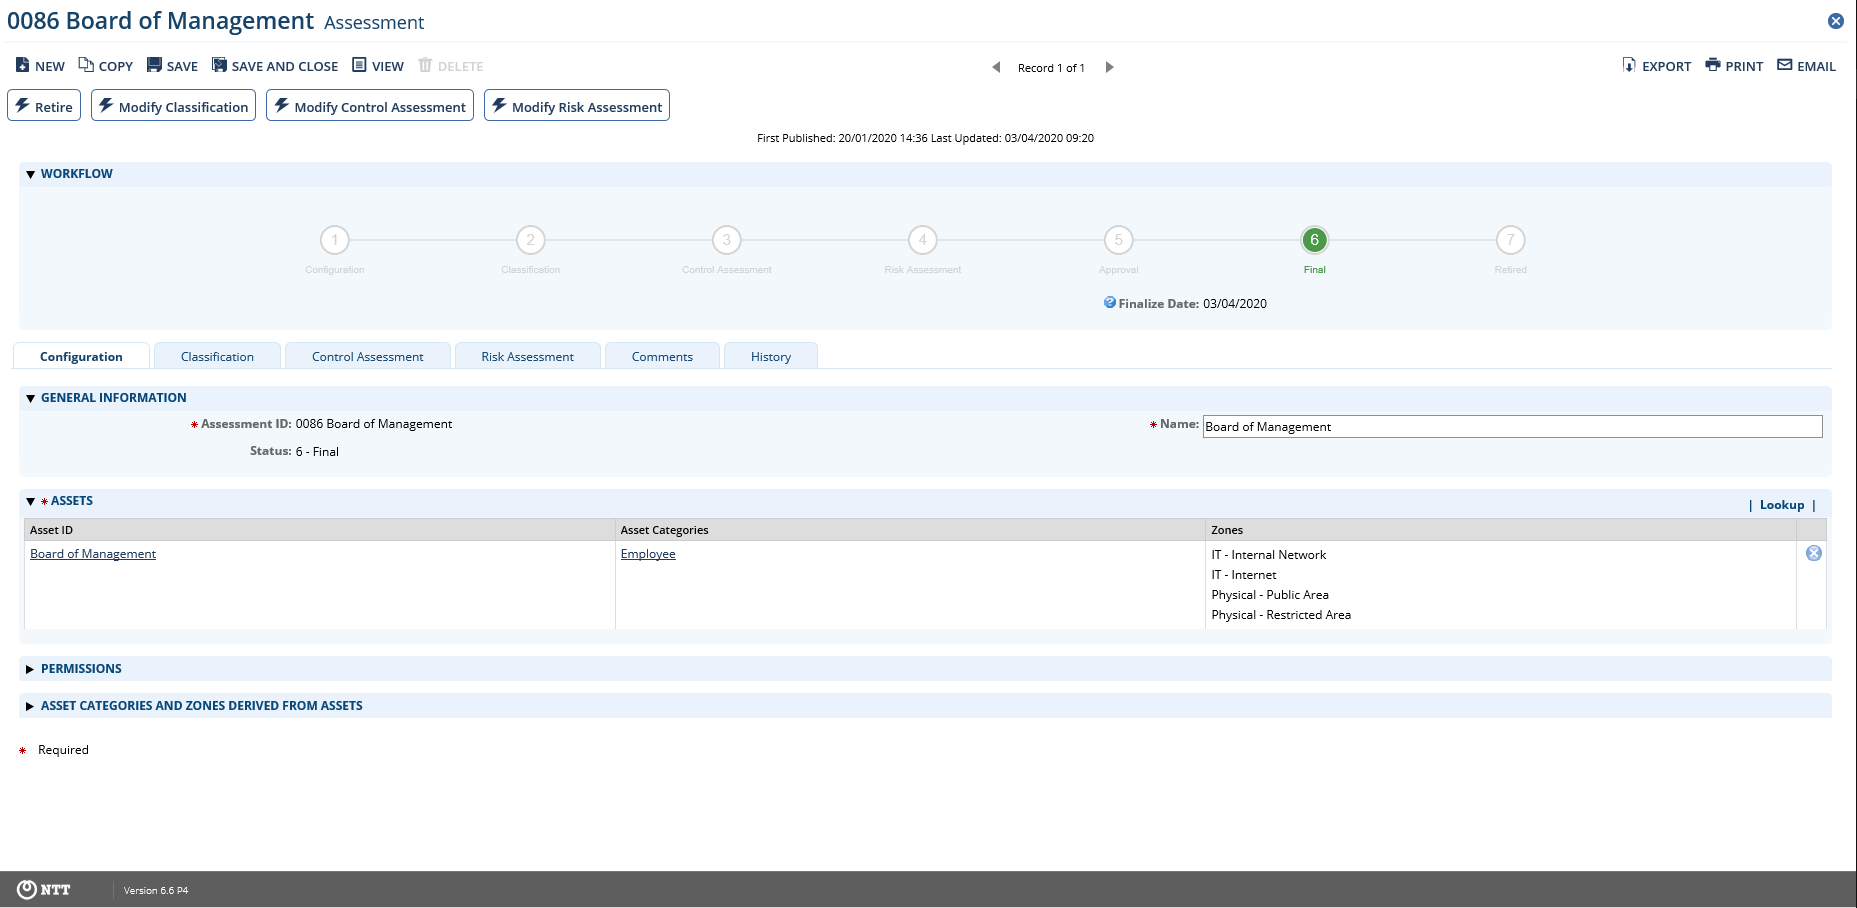
See the Updates necessary step in the swim lane diagram in Chapter 2.
Appendix
Data feeds
ISMS - 0-Min-1 - 010 - Assessment - Update Control Assessment - A2A
This data feed copies data from the leveled Control application to the leveled Control Assessment application. It is the first data feed running in a convoy of data feeds. It runs once every 10 minutes.
The data to be copied to the Control application is obtained by the report ZZ_ISMS - 0-Min-1 - 010 - Assessment - Update Control Assessment - A2A. The report returns data from cross-reference Controls in Scope in application assessment when it is triggered by either the workflow changing to step Control Assessment or by a manual refresh initiated by the user in the Admin sub-tab of the Control Assessment tab in the Assessment application.
The XSLT stylesheet in the data feed creates an XML document with the control data from the report. A flag value (Assessment_TriggerControlAssessmentUpdateDFAWF) is set 0 to indicate that the data feed has run. A cross-reference to the original record in the Control application is saved.
After the execution of the data feed the user can do the control assessment using the control data from cross-reference Controls in Scope copied by this data feed.
ISMS - 0-Min-1 - 020 - Assessment - Update Risk Assessment - A2A
This data feed copies data from the Threat application to the Risk Assessment application.
The data to be copied to application Control is obtained by the report ZZ_ISMS - 0-Min-1 - 020 - Assessment - Update Risk Assessment - A2A. The report returns data from cross-reference Controls in Scope in application assessment when it is triggered by either the workflow changing to step Risk Assessment or by a manual refresh initiated by the user in the Admin sub tab of the Risk Assessment tab in the Assessment application.
The XSLT stylesheet in the data feed creates an xml document with the threat data from the report. The stylesheet calculates the likelihood and impact from risks by using the report data to relate risks to controls. The stylesheet calculates gross and net values for likelihood and impact. A flag value (Assessment_TriggerRiskAssessmentUpdateDFAWF) is set 0 to indicate that the data feed has run. A cross-reference to the original record in the Threat Event application is saved.
After the execution of the data feed the user can do the risk assessment using the threat data from cross-reference Threat Events in Scope copied by this data feed and the likelihood and impact values calculated by this data feed.
ISMS - 0-Min-1 - 030 - Assessment - Archive - A2A
This data feed copies classification, control assessment and risk assessment data from the Assessment application to corresponding sub-forms inside the Assessment application. It also copies a selection of this data to fields in the Approved Versions sub tab of the History tab. These fields show the recently approved main assessment data.
The data to be copied to the sub-forms and the approved version fields is obtained by the report ZZ_ISMS - 0-Min-1 - 030 - Assessment - Archive - A2A. The report returns data from the Assessment application when it is triggered by the workflow changing to step Final.
The XSLT stylesheet in the data feed creates an xml document with the archive data from the report. A flag value (Assessment_TriggerArchive) is set 0 to indicate that the data feed has run.
After the execution of the data feed the user can view the archived data.
ISMS - 0-Min-1 - 040 - Assessment - Update IRPF Helper Fields - A2A
This data feed copies users from manual record permission fields inside the Assessment Application to helper permission fields in the same application. These helper permission fields are used to inherit permissions to the Control Assessment and Risk Assessment applications Users have update, read permissions, or both for Control Assessment and Risk Assessment only during the corresponding workflow step and they have only the minimum required permissions for the Assessment application.
The user and permission data are obtained by the report ZZ_ISMS - 0-Min-1 - 040 - Assessment –Update IRPF Helper Fields - A2A. The report returns the permission data from the Assessment application when it is triggered by a change of the manual record permission fields.
The XSLT stylesheet in the data feed creates an xml document with the permission data from the report. A flag value (TriggerPermissionUpdate_Current) is set to indicate that the data feed has run.
After the execution of the data feed the users have the required permissions for the Control Assessment application.
Custom objects
Workflow progress
This Custom Object generates a progress diagram to show the status of the assessment workflow process. Each workflow state is shown with the index number and the name. The status is indicated by a green circle and by green text. Depending on the language set in the user’s account properties, the name of the current language is used. The custom object uses shared libraries to draw the diagram and is managed by a calculated field (Workflow Helper).
Translation and design
This Custom Object generate a tooltip for each field that has ntt_translate tags. Depending on the current language of the browser, the ntt_translate tags matching the current language are used to construct the tooltip text. These tags are defined in calculated fields (e.g. ‘Control Name’ or ‘Control Summary’ in the application Control / Control)
Inline edit auto save
This Custom Object executes the click function of the ‘Save All’ element inside Inline Edit Grids.
Refresh status
This Custom Object shows a Refresh Status link when a Data Feed was triggered. When the user clicks on the link, the current web page in Archer is refreshed and the Refresh Status link is shown again in case the Data Feed has not completed yet. After the Data Feed is completed and a refresh happened on the page the link is no longer shown.
Applications using custom objects
|
Application/ Custom Object |
Workflow Progress |
Translation and Design |
Inline Edit Auto Save |
Refresh Status |
|---|---|---|---|---|
|
Assessment |
☒ |
☒ |
☒ |
☒ |
|
Asset |
☐ |
☒ |
☐ |
☐ |
|
Asset Category |
☐ |
☒ |
☐ |
☐ |
|
Control |
☐ |
☒ |
☒ |
☐ |
|
Control Assessment |
☐ |
☒ |
☒ |
☐ |
|
Risk Assessment |
☐ |
☒ |
☐ |
☐ |
|
Threat Events |
☐ |
☒ |
☐ |
☐ |