Karta NERC Compliance Management
Karta’s NERC Compliance Management app-pack captures and reports on all activities relevant to NERC standards using a custom-built application that can help tie the actions to appropriate requirements, reporting entities, locations, and documentation.
The solution helps users visualize important relationships between business assets and their respective NERC Requirements and leverage an Evidence Repository to identify and organize artifacts necessary for demonstrating NERC compliance.
On this page
Release notes
|
Release date |
Release version |
Notes |
|---|---|---|
|
February 2024 |
6.14 |
|
|
May 2020 |
6.4 SP1 |
Initial Release |
New and changed features
-
New ability to manage periodic, conditional obligations defined in NERC Requirements and Sub-Requirements
-
Create and manage a catalog of pre-configured NERC-related tasks.
-
Auto-generate and assign regularly recurring, NERC-specific deadlines, based on the definition stored within the catalog.
-
-
Streamlined design and usability of the NERC Reliability Standards application to reduce complexity and enable more flexible reporting across the key components: Standards and Requirements
-
New ability to manage investigations related to potential non-compliance of NERC standards and to export investigation results into the required NERC reporting template.
Overview
The North American Electric Reliability Corporation (NERC) is an international regulatory authority tasked with ensuring the North American Bulk Power system remains secure and reliable. NERC develops — and legally enforces — reliability standards to which all qualified power-generating and bulk transmission companies must adhere. Utilities and organizations required to comply with NERC regulations and laws have multiple options, including:
-
Manual processes (spreadsheets, word processing documents and email)
-
Generic Governance, Risk, and Compliance (GRC) tools
-
Isolated point solutions
While manual processes provide an adequate starting point for organizations to track, monitor, and remain compliant, such solutions quickly become inefficient as complexity increases, creating additional challenges. Generic GRC tools are costly, complex, and time-consuming for organizations to modify due to the nature of open GRC platforms. Few point solutions are available in the market, and are generally rigid, resulting in costly customizations to be performed at the expense of the organization. All such solutions fail to adequately address organizations’ needs of providing a customizable, scalable, and dynamic NERC compliance solution.
Benefits
The Karta NERC Compliance Management app-pack enables organizations to:
-
Reference NERC standards and requirements applicable to an organization’s registration or entity type.
-
Define review workflows and assessments to support the NERC reliability standards and the Mandatory Subject to Enforcement requirements.
-
Follow a systematic approach to identify, assess, treat, and monitor requirements, controls, evidence, and associated risks relevant to applicable entities.
-
Leverage a built-in evidence repository with supporting notifications and alerts for required NERC data.
-
Provide an aggregated dashboard and record level view of compliance data across the enterprise including all elements related to NERC compliance and remediation.
-
Generate RSAWs in real-time using compiled data from all related NERC standards and controls.
-
Provides Chief Executive Officers and senior leadership with:
-
Insights from an enterprise roll-up of NERC compliance performance
-
End-to-end accountability of which individuals are assigned to respond and provide evidence of NERC requirements.
-
Reinforcement of compliance process governance
-
Increased visibility of risks and events that may impact an organization’s ability to demonstrate NERC compliance.
-
-
Assists NERC Compliance managers by providing:
-
Increased autonomy and self-administration
-
Improved audit readiness, faster audit preparation, and an easier self-audit process
-
-
Helps the NERC implementation team with:
-
Faster implementation, training, and user adoption
-
Expands upon non-NERC compliance functions.
-
Improves the user experience for NERC compliance field staff requiring less effort to participate in the compliance process.
-
Prerequisites (ODA and system requirements)
|
Components |
Prerequisites |
|---|---|
|
Archer Solution Area(s) |
Regulatory Corporate and Compliance Management |
|
Archer Use Case(s) |
Archer Issues Management |
|
Archer Applications |
None |
|
Uses Custom Application |
Yes |
|
Requires On-Demand license |
Five (5) Archer On-Demand Application licenses and 2 Questionnaires are required |
|
Archer requirements |
Archer 6.14 and later |
|
Partner/Vendor Requirements |
Additional licensing fees from Karta may apply for this offering. For more information, contact Karta at sales@kartacorp.com. |
|
Operating System |
Windows Server 2012 R2 |
|
Database Server |
Microsoft SQL Server 2014 (64-bit) |
|
Services Server |
Java Runtime Environment (JRE) 8 (64-bit) |
|
Supported Archer Environments |
|
Compatible use cases and applications
Related applications
The following applications can help augment and support the use of the offering. While none of the following applications are required, creating references to these core applications can help enrich and augment the solution. These items are compatible and encouraged for use in a fully implemented solution.
|
Application |
Use Case |
Primary Purpose(s) of the Relationship |
|---|---|---|
|
Facilities |
IT Asset Catalog |
The Facilities application maintains a listing of all organizational facilities such as data centers, branches, etc. This application allows you to document and review all information associated with a specific facility, such as contact personnel, related incidents and technologies associated with the location. |
|
Business Units |
IT Asset Catalog |
Provide a detailed view of all activities related to specific business units. Accountability for NERC Events or Requirements can be referenced through a relationship with a record in the Business Units application. |
|
Devices |
IT Asset Catalog |
The Devices application serves as a central repository of knowledge about business critical devices. NERC evidence can be related to the devices responsible for support the requirement. |
|
Applications |
IT Asset Catalog |
The Applications application stores applications that support various organizational activities. NERC Evidence can be linked to related applications. |
|
Authoritative Sources
|
Policy Program Management |
Track activities to other regulations, if implemented can create relationships between NERC standards and other Authoritative Sources. |
|
Authoritative Sources
|
Policy Program Management |
Track activities to other regulations, if implemented can create relationships between NERC standards and other Authoritative Sources. |
|
Control Procedures |
Controls Monitoring Program Management or Policy Program Management |
Link existing control procedures to NERC requirements. |
|
Policies |
Policy Program Management |
Link existing, applicable policies to NERC requirements. |
|
Control Self Assessments |
IT Controls Assurance or Controls Assurance Program Management |
This questionnaire is used by control owners to indicate whether a specific process control procedure is implemented. The result is factored into the procedure's compliance rating. |
|
Design Test Results |
IT Controls Assurance or Controls Assurance Program Management |
This questionnaire is used to document the results of design tests which evaluate whether a specific process control procedure has been properly written to mitigate the related risks. The result factors into the procedure's compliance rating. |
|
Operating Test Results |
IT Controls Assurance or Controls Assurance Program Management |
This questionnaire is used to document the results of operating tests which evaluate whether a specific process control procedure has been properly implemented and is working as designed. The result factors into the procedure's compliance rating. |
|
Risk Hierarchy |
Enterprise Risk Management |
Link NERC requirements to Enterprise Level Risk statements and Intermediate Level Risk statements. |
|
Risk Register |
Enterprise Risk Management |
Relate Risks to Controls, NERC Requirements or both, for the monitoring of real time Residual Risk.
|
|
Engagements |
Third Party Engagements |
The Engagements application serves as the repository for all products and services provided by a third party to the organization. |
|
BC/DR Plans |
Business Continuity & IT Disaster Recovery Planning |
The BC/DR Plans application allows organizations to develop detailed business process recovery plans or ITDR plans utilizing automated workflow for plan approval and testing. |
Additional resources
The following additional resources are available for this application:
-
North American Electric Reliability Corporation (NERC): https://www.nerc.com
-
NERC Reliability Standards: https://www.nerc.com/pa/Stand/Reliability%20Standards%20Complete%20Set/RSCompleteSet.pdf
-
United States Federal Energy Regulatory Commission: https://www.ferc.gov/
-
Canada Energy Regulator: https://www.cer-rec.gc.ca/en/
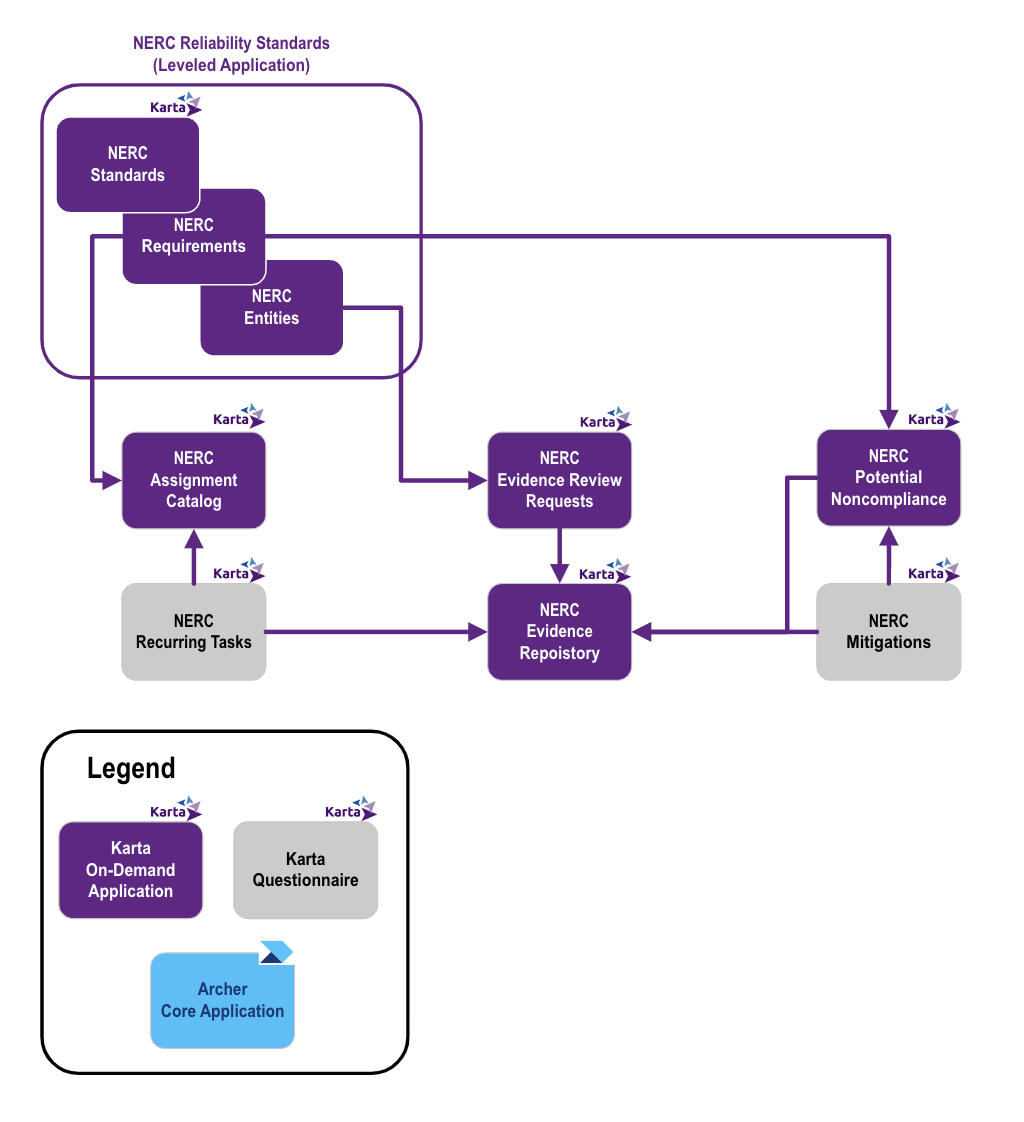
Karta NERC Compliance Management app-pack components
Architecture diagram
Core processes
Evidence management workflow
|
|
|
|
|
|
|
|---|---|---|---|---|---|
|
Evaluate |
Select |
Generate |
Prepare |
Upload |
Approve |
|
Quarterly, team members evaluate standards / requirements for changes and impacts to the business. |
Team members flag high priority items for inclusion within the evidence review cycle and specify a due date. |
Archer automation generates Evidence review requests for requirements that are flagged to be included within the scope. |
Subject matter experts and compliance owners prepare and refresh existing compliance narratives. Stakeholders determine what evidence needs to be provided. |
Final versions of evidence for this reporting period are loaded into Archer. Stakeholders summarize evidence for each requirement. |
Stakeholders formally sign off on each requirement’s: Process narrative. Evidence summary Provided evidence |


Potential noncompliance workflow
|
|
|
|
|
|
|
|---|---|---|---|---|---|
|
Identify |
Assign |
Investigate |
Approve |
Notify |
Remediate |
|
Individuals report concerns relating to NERC Compliance |
Staff review/amend initial submissions then:
|
Investigator researches the concern; uploads supporting documentation and conducts interviews. Upon completion, he/she makes a final determination and authors a conclusion. |
Leadership reviews the completed report and selects to “Approve” the contents or “Return” to the SME for revisions. |
Interested parties across the organization are notified if necessary. |
Mitigations are documented to resolve issues. If required a report will be filed with the appropriate regulatory agencies.
|


Recurring task workflow
|
|
|
|
|
|
|
|---|---|---|---|---|---|
|
Author |
Schedule |
Activate |
Generate |
Work |
Review |
|
Team members will define the properties of the task in an assignment catalog record. In addition, task ownership and relationships to NERC standards and processes can be added. |
Team members select the recurrence schedule for the task. Recurrence options include:
|
Team members enable the task for recurrence. |
Archer creates tasks, automatically, on a specific number of days before the define due date. The assignee is notified of the assignments. |
The task assignee updates the task with relevant details of the effort, upload any relevant evidence and mark the task as complete. |
Reviewers, if defined, inspect the results and evidence of the task. Reviewers can return tasks needing additional information back to task owner or, approve the work and close the task. |


Applications in Karta NERC Compliance Management app-pack
|
Application |
Description |
|---|---|
|
NERC Reliability Standards
|
|
|
NERC Evidence Review Requests
|
|
|
NERC Evidence Repository |
|
|
NERC Potential Noncompliance
|
|
|
NERC Mitigations |
Develop and track appropriate remediation steps to resolve the event and mitigate any future occurrences. |
|
NERC Assignments Catalog |
This application allows organizations to log and schedule work activities (assignments) related to following the NERC requirements. The catalog record captures the instructions for executing the recurring tasks, the entity (or entities) accountable for owning the task, and the logic for generating the questionnaire record, which captures the completion of a specific instance of the task. |
|
NERC Recurring Assignments |
This questionnaire allows individuals to document the completion of a scheduled instance of a NERC Assignment. This record is generated on a schedule defined by the related record in the NERC Assignments Catalog application. |
Personas and Access Roles
The following table describes the functions that make up the application’s organization roles. Depending on the organization of your company, these functions and responsibilities may vary.
|
Function |
Description |
|---|---|
|
NERC - Admin |
Associated with the NERC Compliance Administrator group. This role and group are listed as the Application/Questionnaire owners for the modules within the NERC Compliance solution. |
|
NERC - Manager |
Associated with the NERC Compliance Manager group. This role manages record data within the solution, identifies NERC requirements that are in-scope, creates NERC assessments, and approves NERC Evidence Assessments, NERC Procedure Assessments, and NERC Events. |
|
NERC - SME |
Associated with the NERC Compliance Operator group. Enters events, performs control procedures, and Evidence Assessments. |
|
NERC - Read |
Associated with the NERC Compliance Executive Read group. This role grants read access to records throughout the NERC solution. |
Installing Karta NERC Compliance Management app-pack
Installation overview
Complete the following tasks to install the offering.
Step 1: Prepare for the installation
-
Ensure that your Archer system meets the following requirements:
-
Archer Platform version 6.14
-
-
Read and understand "Packaging Data" in the Archer Platform Help.
Step 2: Install the package
Installing a package requires that you import the package file, map the objects in the package to objects in the target instance, and then install the package. For more information, see Installing the Packages.
Step 3: Set up data feeds
You must import the proprietary NERC content files and revisit the added data feeds to ensure they work within your environment. See Setting Up Data Feeds for complete information.
Step 4: Test the installation
Test the application according to your company standards and procedures, to ensure that the use case works with your existing processes.
Installing the package
The Karta NERC Compliance Management App-Pack is compatible with any Archer environment running Archer version 6.14 or later. The installation process follows the standard approach documented within the online Archer help documentation. Please be familiar with this content prior to completing the process.
Task 1: Back up your database
There is no undo function for package installation. Packaging is a powerful feature that can make significant changes to an instance. Archer strongly recommends that you back up the instance database before installing a package. This process enables a full restoration if necessary.
An alternate method for undoing a package installation is to create a package of the affected objects in the target instance before installing the new package. This package provides a snapshot of the instance before the new package is installed, which can be used to help undo the changes made by the package installation. You must manually delete new objects created by the package installation.
Task 2: Import the package
-
From the menu bar, click
 > Application Builder > Install Packages.
 -
In the Available Packages section, click Import.
-
Click Add New, then select the package file that you want to import.
-
Click OK.
The Available Packages section displays the package file and is ready for installation.
Task 3: Map objects in the package
Note: The following instructions assume you are installing the Karta NERC Compliance solution for the first time. If your environment has existing components that you would like to map to components within the Karta NERC Compliance Solution, please reach out to Karta for a consultation on mapping objects during the packaging process. If you are an existing user of the original Karta NERC solution package, please also connect with Karta for a complimentary, tailored conversation on how the current package will interact with your existing deployment.
Task 4: Install the package
All objects from the source instance are installed in the target instance unless the object cannot be found or is flagged to not be installed in the target instance. The Log Messages section provides a list of conditions that may cause objects not to be installed. The Package Installation Log section displays a log entry.
-
From the menu bar, click
> Application Builder > Install Packages. -
In the Available Packages section, locate the package file that you want to install, and click Install.
-
In the Selected Components section, click the Lookup button to open the Package Selector window.
-
To select all components, select the top-level checkbox.
-
To install only specific global reports in an already installed application, select the checkbox associated with each report that you want to install.
-
Note: Items in the package that do not match an existing item in the target instance are selected by default.
-
Under the Install Method drop-down menu, select an option for each selected component. To use the same Install Method for all selected components, select a method from the top-level drop-down list.
Note: If you have any existing components that you do not want to modify, select Create New Only. You may have to modify those components after installing the package to use the changes made by the package.
-
To deactivate target fields and data-driven events that are not in the package, in the Post-Install Actions section, select the Deactivate target fields and data-driven events that are not in the package checkbox. To rename the deactivated target fields and data-driven events with a user-defined prefix, select the Apply a prefix to all deactivated objects checkbox, and enter a prefix. This can help you identify any fields or data-driven events that you may want to review for cleanup post-install.
-
Click Install.
-
Click OK.
Task 5: Review the package installation log
-
From the menu bar, click
> Application Builder > Install Packages. -
In the Package Installation Log tab, click the package that you want to view.
-
In the Package Installation Log page, in the Object Details section, click View All Errors.
Note: To view individual logs, in the Errors column of the log you want to view, click the Failures link or Warnings link. Clicking View All Errors, Failures, or Warnings opens the specific errors on a different page.
-
Click the Export icon to export the log file.
-
Click Close.
Import Regulatory data and set up data feeds
Task 1: Import NERC regulatory data
A cornerstone of Karta’s NERC Compliance Management app-pack is the regulatory content provided by NERC. Quarterly, Karta assesses changes to the NERC published content and provides subscribed customers access to an update file.
Note: Please contact Karta and provide your NERC solution subscription information to receive the most recent file.
Files provided for the NERC regulatory data: (the X in the file names below will vary based on the launch date of your solution)
-
202X-QX_01_NERC_Standards.csv
-
202X-QX_02_NERC_Primary_Requirements.csv
-
202X-QX_03_NERC_SubRequirements.csv
Importing the files will use the standard Archer data import process, as described below.
Task 1.1: Import the NERC standards
-
After receiving the NERC .csv files, save them on your desktop.
-
Open your instance of Archer.
-
Navigate to Administration
> Integration > Data Imports. -
Select the “NERC Reliability Standards” application, the top level of the NERC Reliability Standards application.
-
In the Import File, browse to your desktop and select the “202X-QX_01_NERC_Standards.csv” file and select OK.
-
In the HTML Formatting field, select “File Contains HTML Formatting.”
-
Leave all the other default selections and click NEXT.
-
In the Import Type field, select “Create New Records.”
-
Assuming you have not changed the names of the solution fields, the import file should map exactly to the appropriate, existing field within the NERC Standards application.
-
Click NEXT.
-
Review the selected options and click IMPORT. Archer will kick off the import job and add the standards records to the application. Archer will provide a confirmation message when the import completes.
Task 1.2: Import the NERC primary requirements
-
Navigate to Administration
> Integration > Data Imports. -
Select the “NERC Requirements” application, the second level of the NERC Reliability Standards application.
-
In the Import File, browse to your desktop and select the “202X-QX_02_NERC_Primary_Requirements.csv” file.
-
In the HTML Formatting field, select “File Contains HTML Formatting.”
-
Leave all the other default selections and click NEXT.
-
In the Import Type field, select “Create New Records.”
-
Assuming you have not changed the names of the solution fields, the import file should map exactly to the appropriate, existing field within the NERC Requirements application.
-
Manually map the “NERC Reliability Standard” field from the CSV to Archer’s “NERC Reliability Standard (Standard Number)” option in the Application field dropdown menu.
-
Click Next.
-
Review the selected options and click Import. Archer will kick off the import job and add the requirements records to the application. Archer will provide a confirmation message when the import completes.
Task 1.3: Import the NERC sub-requirements
-
Navigate to Administration
> Integration > Data Imports. -
Select the “NERC Requirements” application, the second level of the NERC Reliability Standards application. (Tasks 1.2 and 1.3 are both imported into the second level “NERC Requirements)
-
In the Import File, browse to your desktop and select the “202X, l -QX_NERC_03_SubRequirements.csv” file.
-
In the HTML Formatting field, select “File Contains HTML Formatting.”
-
Leave all the other default selections and click NEXT.
-
In the Import Type field, select “Create New Records.”
-
Assuming you have not changed the names of the solution fields, the import file should map exactly to the appropriate, existing field within the NERC Requirements application.
-
Manually map the “NERC Reliability Standard” field from the CSV to Archer’s “NERC Reliability Standard (Standard Number)” option in the Application field dropdown menu.
-
Manually map the “Parent Requirement” field from the CSV to Archer’s “Parent Requirement (Requirement Number)” option in the Application field dropdown menu. This field is on the far right of the import field options.
-
Click Next.
-
Review the selected options and click Import. Archer will kick off the import job and add the requirements records to the application. Archer will provide a confirmation message when the import completes.
Task 2: Review data feeds
The Karta NERC Compliance Management app-pack includes three data feeds as part of the installation package. These data feeds are Archer Web Services Transporter, often referred to as “Archer-to-Archer” data feeds:
-
NERC Generate Evidence Request – designed to create records for tracking NERC compliance based off the NERC content applicable to your organization.
-
NERC Recurring Assignment – designed to generate task records for key, ongoing activities related to your NERC Compliance program.
-
NERC Reference Assignment – designed to generate task records for key, ongoing activities – that have parent tasks – related to your NERC Compliance program.
From the Manage Data feeds page, under the Integration menu, validate that these three data feeds were installed as part of the solution package during the package installation process. If the data feeds are not present, please contact Karta for assistance.
Task 3: Configure Archer to Archer data feeds
Archer-to-Archer Data Feeds require a user account to call the related Archer report and execute the create/update record logic defined in the data feed definition. As a best practice, data feed users should not be actual users of the system. As part of this solution, you will create a non-person, service user account used strictly to execute the Data Feeds. This user account will be configured and placed inside the newly created NERC – Administration group (see the Personas section in Chapter 2 of this document for more information on this group).
-
Create the Data Feed users. From the menu bar, click
. Access Control, then Users. -
Click Add New.
-
Sample Information: User Information in the client’s system does not need to be identical to what is suggested in the sample below. When configuring the transport settings of your data feed, be sure to use the defined user information you establish in the following steps.
-
First Name: NERC Compliance.
-
Middle Name: DFM.
-
Last Name: NERC_Service_Account.
-
Username: dfm_0001.
-
Enter a password of your choosing. Password complexity required.
-
Uncheck the box Force Password Change on Next Sign-In.
-
Ensure the service user account is configured with Security Parameter that will not require frequent password changes (as the password would also need to be changed in the Data Feeds configurations).
-
Make the account a member of the NERC - Admin group.
-
Click Save and Close.
-
Log out of the system.
-
Log in with the newly created service account.
-
Ensure that the NERC Compliance Management workspace displays. If not, contact Karta to help support troubleshooting your access issue.
-
Go to NERC Compliance Management workspace; click the down arrow to unroll the vertical menu.
-
From under the Applications list, locate the NERC Reliability Standards application’s reports (the fourth icon to the right of the name
 ), make sure the service account can see the report named: Data Feed: Generate Assignments.
 -
Log out as the service account and re-log in as the Archer System Administrator.
-
-
-
Specify the data feed parameters for your Archer environment. From the menu bar, click
.-
Under Integration, click Data Feeds.
-
Select the data feed.
-
On the General Tab click Active.
-
Click the Source Connection tab.
-
Update the Security Information
-
Provide the environment’s URL
-
-
Update the Transport Configuration
-
Update the Username, Password, and Instance values, corresponding with the Internal Service account credentials you specified in Step 2 of this task.
-
-
Click Save.
-
Repeat for the other two NERC Data Feeds.
-
-
Configure the desired Schedule Time for this data feed. The data feed, as designed, runs on a daily schedule. You may prefer this to run at a much faster rate. Please set the frequency at an internal that makes the most sense for your business processes.
Task 4: Schedule data feeds to run on the desired schedule
Important: A data feed must be active and valid to successfully run.
As you schedule your data feed, the Data Feed Manager validates the information. If any information is invalid, an error message is displayed. You can save the data feed and correct the errors later; but the data feed does not process until you make corrections.
-
Go to the Schedule tab of the data feed that you want to modify.
-
From the menu bar, click
. -
Under Integration, click Data Feeds.
-
Select the data feed.
-
Click the Run Configuration tab.
-
-
Go to the Recurrences section and complete frequency, start, and stop times, and time zone.
-
(Optional) To override the data feed schedule and immediately run your data feed, in the Run Data Feed Now section, click Start.
-
Click Save.
Test the installation
Test the Karta NERC Compliance Management app-pack according to your company standards and procedures, to ensure that the solution works with your existing processes. Some of the items that you may want to include in your testing are:
-
Customized objects and fields
-
Notifications - ensure that notifications are delivering as expected.
Configuring Karta NERC Compliance Management app-pack
Step 1: Organize and set up NERC Groups
When loading new groups into an environment via a package, Archer does not maintain the original parent/child relationships. The following groups are included with this build:
Task 1: Nest NERC Compliance Groups Under Parent Group
The NERC Compliance group is the parent group container. Upon completing the installation, you will need to nest the specific groups under this master group.
-
Under the administration options, navigate to the Access Control menu.
-
Open the “Groups” page.
-
Select “NERC Compliance.” The NERC Compliance group opens.
-
In the Members section, select to add the following groups as members of the NERC Compliance group:
-
NERC Compliance Administrator – The members of this group have Application/Questionnaire ownership rights within the solution, allowing them the ability to Create/Update/Delete module components such as fields, events, and layout objects.
-
NERC Compliance Manager – The members of this group have complete access, including delete permissions, to all records within the NERC Compliance solution.
-
NERC Compliance Operator – The members of this group have virtually full access to all parts of the NERC Compliance solution.
-
NERC Compliance Executive Read – The members of this group have Read Only access to all parts of the NERC Compliance solution.
-
-
For future groups you may create for managing NERC, place those groups as members of the “NERC Compliance” group. While this group will serve as a container for other groups, it is not intended that any individual be a direct member of this parent group.
-
Click Save to complete the update.
Task 2: Populate NERC Groups with Relevant Staff
Various processes within the NERC solution require specific users to be members of certain groups. Before you can fully utilize the NERC solution, you must populate each group with at least one user.
-
Under the administration options, navigate to the Access Control menu.
-
Open the “Groups” page.
-
Select one of the specific NERC Compliance groups, such as “NERC Compliance Administrator.” The group opens.
-
In the Members section, select one or more individuals to be a member of this group.
-
Click Save to complete the update.
-
Repeat these steps for all other NERC groups so that each group has a minimum of one member.
Step 2: Activate advanced workflows
By default, Advanced Workflows are inactivated by packaging and need to be reactivated after the installation is complete.
-
From the menu bar, the menu bar, click the Administration
icon. -
Under Application Builder, click Applications, and then scroll down to NERC Potential Noncompliance.
-
Click the Advanced Workflow tab.
-
Click Activate, then Save Workflow.
-
Once done, click Save. This will close the NERC Potential Noncompliance application.
-
Repeat the same process to activate the Advanced Workflow for the following components:
-
NERC Evidence Requests
-
NERC Recurring Assignments
-
NERC Mitigation Information
-
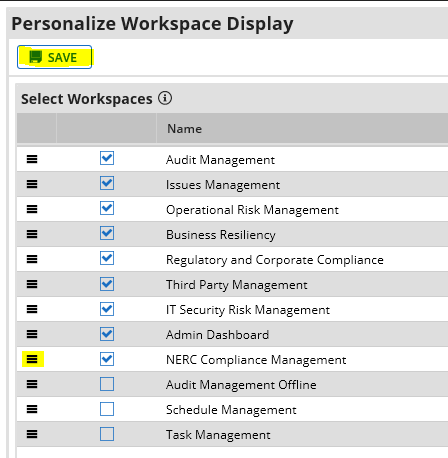
Step 3: Personalize the workspace display
The NERC Compliance Management workspace may appear lower in the list of Workspaces displayed at the top of the Archer homepage after the installation. The ordering of the workspace tab strip is a task done by each individual user. Moving up the NERC Compliance Management workspace in the view does not move the workspace for all users.
-
Each user will click his/her username at the top right hand side of the Archer homepage and select Workspaces Display.
-
At the Personalize Workspace Display window, click the little triple bar icon to the left of the workspace to move, and then drag it up higher in the list. Once done click Save.
Step 4: Define NERC entities
Some organizations must report NERC compliance across multiple operating units. Often one company will be accountable for managing multiple, unique NERC registration codes. In these cases, these organizations would need to report separate evidence – one for each of the unique entities – per NERC requirement.
If you organization operates in this manner, you can enter the names of your NERC entities within the NERC: Entity Global Values list. When completing processes in the solution, you can select to identify which entity the process relates to. If your organization reports as only one entity, you can select to deactivate this field.
To update the entity list within the NERC Compliance solution, complete the following steps:
-
From the menu bar, the menu bar, click the Administration
icon. -
Under Application Builder, click Global Values Lists, and then scroll down to NERC: Entity.
-
Click the Edit icon for the placeholder value, “Entity 1.”
-
In the Text Value field, type the name of your NERC Entity.
-
Click Save. The value of your NERC entity will now be updated.
-
Repeat this process to update the name of the placeholder value, “Entity 2.”
-
If you have additional entities to define, click the ADD NEW button and identify additional entities.
-
When you have all your entities defined, click SAVE AND CLOSE from the top of the Manage Global Values List – NERC: Entity page. Your changes will be saved.
Note: In some situations, your organization’s Archer environment may already have the concepts of a NERC Entity defined in one of the Business Assets applications, such as Companies, Divisions or even Facilities. If this is the case, you may consider retiring the default NERC Entity fields within the solution and replacing this field with a Cross-Reference field to the appropriate application. Please contact Karta for a complimentary evaluation if this scenario applies to you.
Using the Karta NERC Compliance Management App-Pack
Task 1: Manage NERC requirements
Based on the type of NERC Functional Entity of your organization, differing NERC requirements will be applicable. Using the NERC solution, you can easily select the requirements that will be in scope for your program.
Task 1.1: Specify applicable NERC requirements
User: NERC Compliance Manager
-
On the Archer homepage, from the top navigation menu bar, click the NERC Compliance Management Workspace, then in the dashboard banner, select to view the “NERC Audit Readiness” dashboard.
-
In the NERC Quick Links iView, click “Identify Applicable NERC Requirements.” A list of all “4. Mandatory Subject to Enforcement” NERC requirements will display.
-
In the “Refine By” menu on the left-hand side of the page, select the Functional Entity code(s) that are applicable to your organization. For example, if your organization is a “Generation Owner,” you would select the GO checkbox.
-
After selecting all the relevant entity codes, click the Apply button. The report listing will update to only display NERC requirement records that are related to the selected functional entities.
Note: If your functional entity filter selections returned more than 250 records, you will need to repeat the following steps for every page of the search results.
-
Click Options on the right-hand header of the report.
-
Under the resulting menu, select “Enable Bulk Update.” The screen will update and now show checkboxes next to the listed requirements records.
-
Select the heading check box next to the “NERC Standard ID” field, as shown below. All the records within this specific page of search results will be selected.

-
Underneath the Applicable field header, select the value “Yes” from the dropdown menu.
-
Click the Save Changes link.
-
Archer will then execute job that updates the Applicable value for all selected records to be “Yes.” Archer will display a Status menu detailing the progress on the record updates. This may take a few minutes. You will receive a notification when the job is complete. There is no need to remain on this page.
Task 1.2: Enter NERC entities
User: NERC Compliance Manager
-
On the Archer homepage, from the top navigation menu bar, click the NERC Compliance Management Workspace, then in the dashboard banner, select to view the “NERC Audit Readiness” dashboard.
-
In the centered, Featured Metric display, click the number that specifies the number of applicable NERC Standards. A list of NERC standards displays.
-
Click the Standard ID value of the NERC standard you want to work with. Details of the NERC standard appear on screen.
-
Scroll down on the page and click the Requirement ID of the NERC Requirement you want to work with. Details of the NERC Requirement appear on screen.
-
Click the Edit button. The page converts to edit mode.
-
Scroll down on the page to the NERC Entity Reference(s) grid and then click the Add New link on the right-hand side of the page. A new NERC Entity record displays.
-
Select the appropriate NERC Entity (defined in Chapter 4, Step 4 of this guide).
-
Select a NERC Requirement Owner and a NERC Compliance Manager for the record.
-
In the NERC Responsible Entity field, select the NERC Functions for your organization (GO, GOP, etc.)
-
In the “Original Compliance Narrative” field, enter a statement summarizing how your organization can demonstrate compliance with this requirement.
-
In the Current Scope field, select “Yes.”
-
In the Applicable field, select “Yes.”
-
If desired, select the Business Area that relates to this record.
-
At the top of the page, click Save and Close. You will be brought back to the Standard record, also click Save and Close. The record is now created within the system.
Note: Populating multiple NERC Entities can be completed through the Archer Data Import functionality. With a data import, you can quickly create entity records for all of your in-scope NERC Requirements (and their corresponding NERC Entity) with a single set of steps. For advice on setting up a data import to support the creation of your NERC Entities, please reach out to Karta for a complimentary consultation.
Task 1.3: Launch an evidence request
User: NERC Administrator
Based on the schedule frequency you established for the “NERC: Generate Evidence Request” data feed, Archer will identify these new records labeled as “Applicable” NERC standards AND “Current Scope” and automatically generate NERC Evidence Request records – linked to the master NERC Requirement – for you to associate with your own internal processes and evidence for demonstrating NERC Compliance.
If you want to create these records immediately, and not wait for the data feed to run, go to the “Manage Data Feeds” page and select Run Now for the NERC: Generate Evidence Request data feed.
Task 2: Review the NERC evidence review request
Task 2 and its sub-tasks describe how to access the NERC Evidence Request record and how to link new or existing NERC Evidence Repository records.
Task 2.1: Open the NERC evidence review request record
User: NERC Compliance Manager & NERC Compliance Operator
-
To open an NERC Evidence Review Request record from the Archer homepage, go to the top navigation menu bar, click the NERC Compliance Management Workspace, then the NERC Audit Readiness solution, and click the NERC Evidence Request application. This will open a listing of NERC Evidence Request records in the system.
-
Select a NERC Evidence Request record by clicking the NERC Review ID. The Review ID has a hyperlink to the NERC Evidence Request record.
-
On the top of the NERC Evidence Request record, inside the General Information section, under the NERC Evidence Request tab, the following fields are directly related to the master NERC Reliability Requirement record:
-
Requirement Statement
-
Measure
-
-
Prior to submitting the record, you must populate values within the NERC Compliance Response and NERC Compliance Summary sections. To make changes to the record, click the EDIT button.
The following table identifies what is expected within all fields that are required to be populated prior to publishing your working requirement record.
|
Field Name |
Expected Content |
|---|---|
|
Compliance Narrative |
This field contains your organization’s summary of how it is achieving the goals of the NERC requirement. If the NERC requirement represents the “what” for demonstrating NERC compliance, your Process Narrative represents the “how.” |
|
Evidence Summary |
Summarizes the related evidence that is used to demonstrate compliance. Often this field is used to specify page numbers or specific locations within the attached documents, so that a reviewer would know exactly where to look within the evidence file. (This field is typically populated after the linking the evidence for the request. That process is detailed in Task 2.2 of this procedure.) |
|
NERC Compliance Manager |
This individual is accountable for ensuring the compliance activities are completed. This person will be the “Reviewer” on any related assessments. |
|
NERC Requirement Owner |
This individual is the subject matter expert within your organization for this activity. Often this may be a person within the frontlines of your organization that works directly with the referenced subject matter. This person will be the “Submitter” on any related assessments. |
|
In-Scope Functional Entity |
Select which NERC functional entity is applicable to the evidence request. For example, if the related evidence is demonstrating compliance for the “Generation Owner” portion of your organization, select “GO” from the list of options. |
-
At any point, you may click SAVE or SAVE AND CLOSE at the top of the record to save your changes.
Task 2.2: Create a new NERC Evidence record within NERC Evidence Request
User: NERC Compliance Manager & NERC Compliance Operator
-
To create a new NERC Evidence Repository record from the NERC Evidence, Request record, under the NERC Evidence section, locate the NERC Evidence field and click Add New.
-
The NERC Evidence Repository: Add New Record window will open.
-
Go to the General Information tab inside the Document section. The Document Date is automatically populated by the system. Give the record a unique name inside the Document Name field. Fill out the following fields:
-
Category
-
Document Version
-
Category
-
Description of Applicability
-
The last field on the Document Information section, Document Location, is a unique selection values list to select a storage location for the NERC Evidence.
-
When selecting the value Archer, a required attachment field is displayed. Click Add New on the right hand side of the attachment field to attach document(s).
-
Click Select File(s). Multiple files may be selected at a time. Once the files have been selected, click OK. The focus returns to the NERC Evidence Repository record.
-
When you click Server Folder, a required text field displays. Enter the UNC path in the Document UNC Path field that specifies where the evidence file is located within your environment.
-
When clicking the value SharePoint, a required text field displays. Enter the link to the SharePoint file you are associated with this piece of evidence.
-
-
In the Document Review section, fill in the Evidence Provider/Submitter field. This is person in charge of gathering the evidence. This field defaults to the record creator, but can be changed if needed. The Compliance Manager/Reviewer populates automatically with the listed compliance manager from the parent NERC Evidence Review Request record.
-
After you have provided all the required values for your piece of evidence, click SAVE AND CLOSE at the top of the page. Your record is saved and you will be taken back to the NERC Evidence Review Request record.
Task 2.3: Approve an evidence request
User: NERC Compliance Manager & NERC Compliance Operator
-
Once all the fields are populated and you have associated one or more evidence records with your evidence request, you can select to submit the record into the workflow for approval. To start the approval process, click the SUBMIT button at the top of the page. This action will save your changes and advance the record to the SME review stage.
-
As the NERC Requirement owner, you are responsible for completing the SME review. After a NERC Evidence Review Request is submitted into the workflow, you will receive a notification instruction you to review the information. To open the record, click the hyperlink located in the email you received. The record will open in view mode.
-
Click Edit at the top of the page.
-
Review the information within the record and make any final changes – if necessary – to the content.
-
Once you are ready to make an approval decision, click Actions at the top of the screen and select “Approve.” The record will advance to the corresponding next step in the workflow.
-
As the NERC Compliance Owner, you are responsible for clicking the compliance review. Please note that the compliance review stage is a Read Only stage. If you have issues with any information, you will need to “Reject” the content back to a previous stage for edits and changes.
-
Once you are ready to make an approval decision, click the Actions button at the top of the screen and select "Approve." (You can also select “Reject” if necessary.) The record will be completed and exit the workflow. The record is now listed with a status value of, "4". Approved". All users that participated in the review process will receive an email notification.
Task 2.4: Create an RSAW in NERC evidence request using mail merge
User: NERC Compliance Manager & NERC Compliance Operator
A Reliability Standard Audit Worksheet (RSAW) can be generated from the completed NERC Evidence Request application using the Archer Mail Merge feature.
-
From the NERC Evidence Request record, whether in Edit or View mode, click the Export icon
 .
. -
A NERC Evidence Request: Export Options window opens.
-
In the Report Templates (top section) of the window, click Generate RSAW Requirement Text. Archer will take the record information and export it to a customer's Microsoft Word document.
-
In the Export Complete pop-up window, select click here.
-
Archer will download the file to your machine.
-
Either save to disk or open the resulting file.
Task 3: Creating/Reporting an Issue of Potential Noncompliance
User: NERC Compliance Manager & NERC Compliance Operator
A NERC Potential Noncompliance record can be created the following ways:
-
The Archer homepage top Navigation Menu.
-
The Archer NERC Compliance Dashboards Quick Links.
The sub-tasks 3.1 and 3.2 will show how to create a NERC Potential Noncompliance (PNC) from these different locations. Sub tasks 3.4 and 3.5 are the next steps that will address how to submit and review a NERC PNC record.
Task 3.1: Creating a NERC PNC from the Archer homepage navigation menu
User: NERC Compliance Manager & NERC Compliance Operator
-
From the Archer homepage, in the top navigation menu bar, click the NERC Compliance Management Workspace, then the NERC Issues solution, and scroll down to the NERC Potential Noncompliance application. Click the very first icon with a plus sign to Create New Record.
-
A new NERC Potential Noncompliance record opens.
-
Enter a Concern Description, the Date Concern Began and who the concern is being Reported By. (By default, the user creating the record is listed as the user reporting the concern.) The PNC ID field will be populated by the system upon the record's first save.
-
Inside the Record Lookup window, use the Search option to search for a NERC Requirement.
-
Go to Show Filters in the Record Lookup window.
-
When using filters, one can filter on any one or multiple fields. Enter information in a field to search on and click the little funnel icon.
-
Choose NERC Requirements records by clicking the checkboxes to the left.
-
Once the NERC Requirements have been checked marked (selected), click the OK button at the bottom right corner of the Record Lookup window.
-
Upon clicking OK, the Record Lookup window will close, and the focus will be back inside the NERC PNC record.
-
-
The NERC Requirements selected in the previous step will now display inside the NERC Applicable Requirement field.
-
When done, click the SUBMIT button at the top of the page. The record will be entered into the Investigation workflow stage.
-
Go to Task 3.3 of this document.
Task 3.2: Creating a NERC PNC from the Archer issue management quick links
User: NERC Compliance Manager & NERC Compliance Operator
-
From the Archer homepage, in the top navigation menu bar, click the NERC Compliance Management Workspace, then select any of the NERC Dashboards
-
At the top of a NERC Dashboard click the Report NERC Concern link in the Quick Links section.
-
Enter a Concern Description, the Date Concern Began and who the concern is being Reported By. (By default, the user creating the record is listed as the user reporting the concern.) The PNC ID field will be populated by the system upon the first save of the record.
-
Inside the Record Lookup window, use the Search option to search for a NERC Requirement.
-
Go to Show Filters in the Record Lookup window.
-
When using filters, one can filter on any one or multiple fields. Enter information in a field to search on and click the little funnel icon.
-
Choose NERC Requirements records by clicking the checkboxes to the left.
-
Once the NERC Requirements have been checked marked (selected), click the OK button at the bottom right corner of the Record Lookup window.
-
Upon clicking OK, the Record Lookup window will close, and the focus will be back inside the NERC PNC record.
-
-
The NERC Requirements selected in the previous step will now display inside the NERC Applicable Requirement field.
-
When done, click the SUBMIT button at the top of the page. The record will be entered into the Investigation workflow stage.
-
Go to Task 3.3 of this document.
Task 3.3: NERC PNC - Assignment
User: NERC Compliance Manager
The NERC PNC record has two workflow stages, once a record is submitted to the workflow it will need to undergo the investigation stage and the review stage. Once enrolled in Advanced Workflow, the NERC PNC record cannot be taken out of the Workflow.
-
In the Workflow Details section enter the responsible parties: Investigator and Reviewer for managing the NERC Concern.

-
Click Save and Close.
Task 3.4: NERC PNC - Investigator
User: NERC Compliance Manger (Investigator)
-
Once the record has been submitted it will enter the investigation stage of the workflow. It is the Investigator’s responsibility to complete the remainder of the PNC record.
-
In the NERC Categorization section enter:
-
Registration
-
Applicable Reliability Functions
-
Potential Noncompliance Regions
-
Date Event Occurred
-
Applicable Parts
-
The investigator will be able to access the NERC Submission tab, which contains a variety of questions regarding the details of the event causing the NERC Concern. The investigator will have to perform an investigation and record their responses to each of the questions in the NERC Submission tab.
-
Once the Investigator is satisfied with the investigation, they can then enter their Final Decision for the PNC record in the NERC Categorization section of the NERC Potential Noncompliance tab. This decision is the investigator’s determination of whether or the concern resulted in actual noncompliance.
-
In the Supporting Documentation section, the Investigator can attach new or existing NERC Evidence Repository records inside the Evidence and Attachments field.
-
To attach existing NERC Evidence Repository records, click the Lookup button at the far right hand side of the Evidence and Attachments field.
-
Inside the Record Lookup window, use the Search option to search for a NERC Evidence Repository record(s).
-
Go to Show Filters in the Record Lookup window.
-
When using filters, you can filter any single or multiple fields. Enter the information about a record, and then click the filter.
-
Once the NERC Evidence Repository records have been check-marked (selected), click OK in Record Lookup window.
-
Upon clicking OK, the Record Lookup window closes and the focus is inside the NERC PNC record where the NERC Evidence Repository record is now attached.
-
-
To attach a new NERC Evidence Repository records, click the Add New button at the far right hand side of the Evidence and Attachments then follow the same procedure done from the NERC Evidence Request as shown inside Task 2.1 of this document.
-
If the PNC Investigator is ready to submit the Event for review; click Actions in the NERC Event record. From the Actions menu select Approve.
Task 3.5: NERC PNC - Mitigation
If the PNC records Final Decision was Did not Result in Noncompliance: Skip to section 3.6 NERC PNC – Reviewer.
If the PNC records Final Decision was Did Result in Noncompliance: Section 3.5 NERC PNC – Mitigation must be completed before the section 3.6 Review. Mitigations are plans for resolving the issue of noncompliance and actions to take to ensure a future problem does not occur.
-
Navigate to the NERC Mitigations tab of the record.
-
Click Add New on the NERC Mitigation Information gird. A new NERC Mitigation record opens.
-
Provide the following information for the mitigation record:
-
Mitigation Name
-
Type of Milestone task
-
Mitigation Owner
-
Mitigation Review
-
Description of action
-
Date of Planned completion
-
-
When all core values of the mitigation record are complete, you can advance the record into the workflow, and notify the listed Mitigation Owner by click the SUBMIT button. This action saves your changes and starts the workflow process.
Once submitted in the workflow, the Mitigation Owner can return to this record and provide status updates within the Activity Log field. The individual can also provide evidence of completion of the mitigation within the Supporting Evidence field.
When the mitigation is completed, the Mitigation Owner should complete the following steps:
-
Open the assigned mitigation record and click the Edit button.
-
In the Date – Actual Completion field, enter the date when the task was finished.
-
Click the Actions button and select, “Submit for Review.” This step saves the record and advances it to the Mitigation Review for review.
-
At this point the Mitigation Reviewer can use the Actions button to either “Approve” and close out the mitigation or select “Reject” to send it back to the Mitigation Owner for additional work.
-
Once “Approved,” the record moves to a “Complete” status and the stakeholders can return to the NERC Potential Noncompliance record and close out that effort.
Task 3.6: NERC PNC - Reviewer
Once record has been approved by the investigator and any mitigations have been finalized, the Compliance Managers (Reviewer) will have read only access to the entire record to view the investigation.
User: NERC Compliance Manager
-
At any point, the Reviewer has the ability to leave a Comment on the comments-sub form, which can be information about why they are choosing to Approve/Return the PNC record.
-
Once the Reviewer has reviewed the information they click the Edit button on the top left hand side of the record. From the Action menu, the Reviewer can select to “Approve” the content OR “Return” the record to the Investigator for additional updates.
-
If the Reviewer selects to return the record to the investigator, they are required to leave a comment as the justification to return the record.

-
Once the Reviewer clicks Actions and selects Return, the record becomes read only for the Reviewer and editable again for the Investigator.
-
An email notification is then sent to the Investigator so they can correct the NERC PNC record accordingly.
-
Once the Investigator resubmits the NERC PNC record, they lose edit access to the NERC PNC record, while the Reviewer regains edit access to the record.
-
An email notification will be sent to the Reviewer informing them the NERC PNC record was re-submitted.
-
Upon approving the NERC PNC record, the Status field automatically changes to Approved. The NERC PNC review is complete.
Task 3.7: Create a NERC Align Template Using Mail Merge
User: NERC Compliance Manager
A NERC Align template can be generated from the completed NERC Potential Noncompliance application using the Archer Mail Merge feature. This file can be used to self-report issues to NERC to disclose events that have occurred within your organization.
-
From the NERC Potential Noncompliance record, whether in Edit or View mode, click the Export icon
. -
A NERC Potential Noncompliance: Export Options window opens.
-
In the Report Templates (top section) of the window, click Generate NEC Align Template. Archer will take the record information and export it to a customer Microsoft Word document.
-
In the Export Complete pop up window, select click here.
-
Archer will download the file to your machine.
-
Either save to disk or open the resulting file.
Task 4: Create NERC Assignment Catalog Records
In the NERC Assignment Catalog application, a user can capture details of a specific work assignment. This record acts as a parent or master record from which the solution will automatically generate individual records in the NERC Recurring Assignments questionnaire with their appropriate future due dates based on the specified pattern. Assignees can then monitor these future obligations and record relevant details of the work completed.
User: NERC Compliance Manager
-
On the Archer homepage, from the top navigation menu bar, click the NERC Compliance Management Workspace, then the NERC Compliance solution, and scroll down to the NERC Assignment Catalog application. Click Create New Record.
-
In the new window NERC Assignment Catalog: Add New Record, inside the General Information section, populate the following fields:
-
Assignment Name (used to establish a unique name for the record)
-
Assignee (person responsible for completing the assignment)
-
Assignment Owner (person responsible for the supervision of the assignment completion)
-
Status (Active will generate recurring instances, based on the parameters; Inactive will not)
-
Domain (what regulatory domain is the reason for the assignment)
-
Initial Due Date (the only Due Date, or first Due Date in a series to be generated)
-
Instructions (instructions that need to be performed to complete the task)
-
Are there reference tasks? (if there are any related tasks that have to be completed adjacent to this one)
-
Make use of optional fields as needed
-
-
In the Recurrence section, populate the fields to define how often recurring tasks should be generated:
-
Recurrence Subject Line (Unique name for the recurring task that will be created)
-
Recurrence Type (Regular, On-Demand, Dependent)
-
Recurrence Pattern (Daily, Weekly, Monthly, Yearly)
-
Recurrence Frequency (numeric; 1=every month, 2=every other month, etc.)
-
Minimum Open Assignment (the number of assignments that should exist at one time)
-
-
In the Workflow & Escalation Notifications section:
-
Required Review Stages (Number of people who will be required to review the completion of the assignment from 0 to 5)
-
Escalation Notification 1/2 (Management who should receive notifications if the assignments are nearing their due date without being completed)
-
-
In the Relationships section you can add connections to other records within Archer such as: NERC Requirements, Authoritative Sources, Facilities and Devices.
-
Click Save or Save and Close. The data feed can now use the provided information to begin generating the NERC Recurring Assignment(s).
-
Once Saved, the Recurring Assignments section field will display details of the Recurring Assignments as they are generated, and ultimately worked to completion by the Assignee.
Based on the schedule frequency you established for the “NERC: Generate Recurring Assignments” data feed, Archer will identify these new records and automatically generate NERC Recurring Assignment record – linked to the master NERC Assignment Catalog record – for you to complete. If you want to create these records immediately, and not wait for the data feed to run, go to the “Manage Data Feeds” page and select Run Now for the NERC: Generate Recurring Assignments data feed.
Task 5: Completing NERC recurring assignments
User: NERC Assignment Assignee
-
On the Archer homepage, from the top navigation menu bar, click the NERC Compliance Management Workspace, then the NERC Compliance solution, and scroll down to the NERC Recurring Assignments questionnaire. Click the Assignment ID to open a specific instance of an assignment.
-
Review details of the assignment, instructions, and information in related records. When the work has been completed, edit this record, record a review of the task completed in the Summary and Evidence Review field.
-
Once the task is completed and the Summary and Evidence Review field has been updated, the user can Submit the record. If the number of Required Review Stages was equal to 0, the record will be closed as completed. If the record contained 1 or more Required Review Stages, then proceed to the following section.
User: NERC Assignment Reviewer
-
If you are listed as a Reviewer on a recurring assignment, you will receive a notification that an assignment has been submitted for review.
-
On the Archer homepage, from the top navigation menu bar, click the NERC Compliance Management Workspace, then the NERC Compliance solution, and scroll down to the NERC Recurring Assignments questionnaire. Click the Assignment ID to open a specific instance of an assignment.
-
Open the recurring assignment record assigned to you for review. Review the information, if necessary, perform a physical check as to whether the task was completed correctly.
-
You will have the ability to either Approve or Reject the assignment record. In the actions menu in the top left-hand corner, select the appropriate option.
-
If Rejected: the record will be returned to the assignee, and they will be required to re-submit the task. To Reject an assignment, you must leave a comment explaining the reasoning for your rejection.
If Approved: the record will move to the next reviewer in the workflow, if it is the final review stage, then the record will be closed and marked as Completed.
Certification environment
Date tested: February 2024
|
Product name |
Version information |
Operating system |
|---|---|---|
|
Archer |
6.14 |
Windows |