Archer Model Risk Management
Archer Model Risk Management helps organizations establish sound governance processes around the models they use to run their business on a day to day basis. The solution enables organizations to more effectively track and manage the process of models. Using this solution, organizations are better able to track and prioritize the different types of change requests, capturing requested by information, model inventory (meta-data) that relates to a specific model, analyzing and mapping the impacted business units, model certifications and approval information, completion dates and visibility of all the model statuses by centralizing all the requests. In addition, graphical dashboards provide professional looking reports to inform personas of pending action items, model performance monitoring, and number of findings by status.
On this page
Release history
| Last updated | Update type | Summary |
|---|---|---|
| May 2022 | New and changed features |
|
Overview
Key features and benefits
With Archer Model Risk Management, you can:
-
Document the organization’s model inventory and model documentation.
-
Track model and model inventory changes.
-
Track model validation and approvals.
-
Formally certify that the model inventory is complete and up to date.
-
Document validation findings.
-
Analyze model performance indicators.
-
Decommission models as needed.
Benefits include:
-
Consistent and repeatable process for documenting, validating, and managing changes to models
-
Reduced unauthorized changes to the model
-
Improved accuracy of models
-
Reduced likelihood of the model including outdated information
-
Reduced financial penalties, financial losses, or unforeseen risks due to model inaccuracies or insufficient testing
-
Improved visibility into the health and status of the model inventory
Prerequisites (ODA and system requirements)
|
Components |
Prerequisites |
|---|---|
|
Archer use cases |
Business Asset Catalog IT Asset Catalog |
|
Archer applications |
Business Unit |
|
On-Demand Licenses |
1 to 3 Archer On-Demand Application (ODA) licenses are required for Archer Model Risk Management depending on use case implementation.
|
|
Archer requirements |
Archer 6.10 and later |
Related Applications
|
Application |
Use case |
Primary purpose of the relationship |
|---|---|---|
|
Findings |
Issues Management |
Track any model findings. |
|
Metrics |
Key Indicator Management |
Link Model Inventory to Metrics Application |
|
Metric Results |
Key Indicator Management |
Link Model Inventory to Metric Results Application |
|
Discussions |
Archer Discussion Forums App-Pack (Exchange Offering) |
To track discussions related to model inventory. |
Archer Model Risk Management components
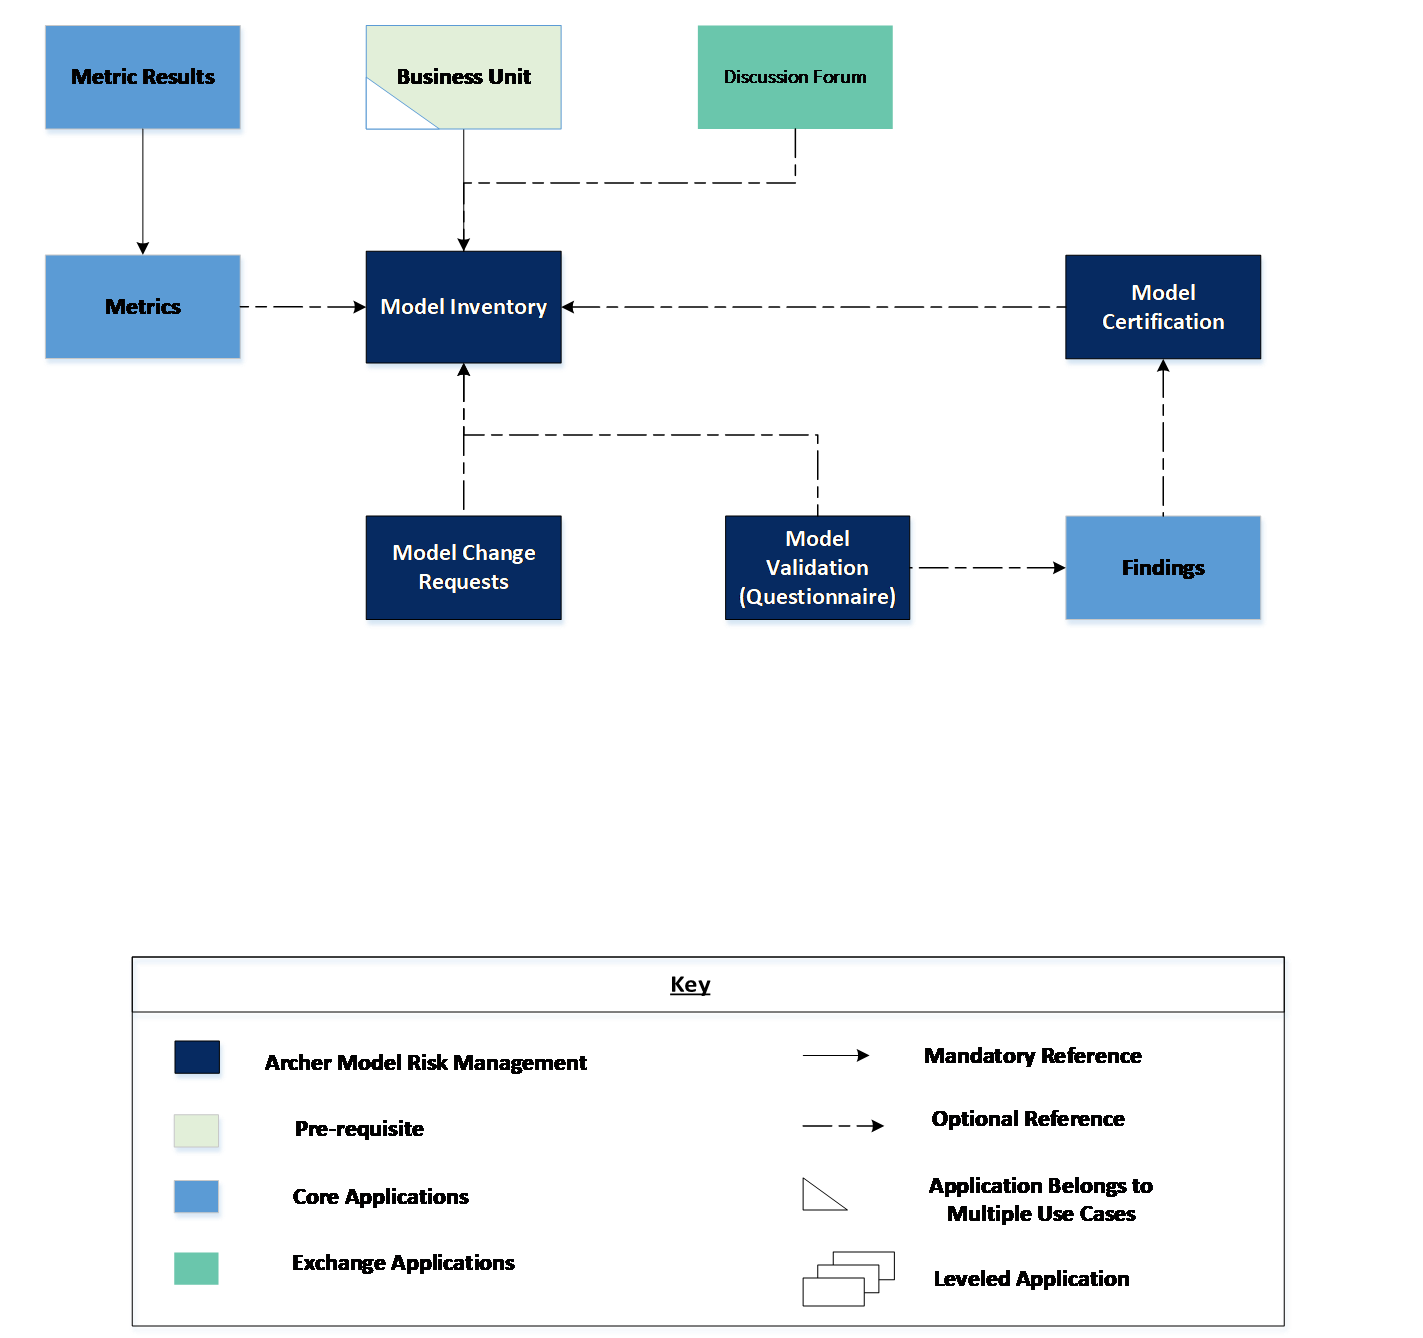
Architecture diagram
The following diagram shows the architecture for Model Risk Management.
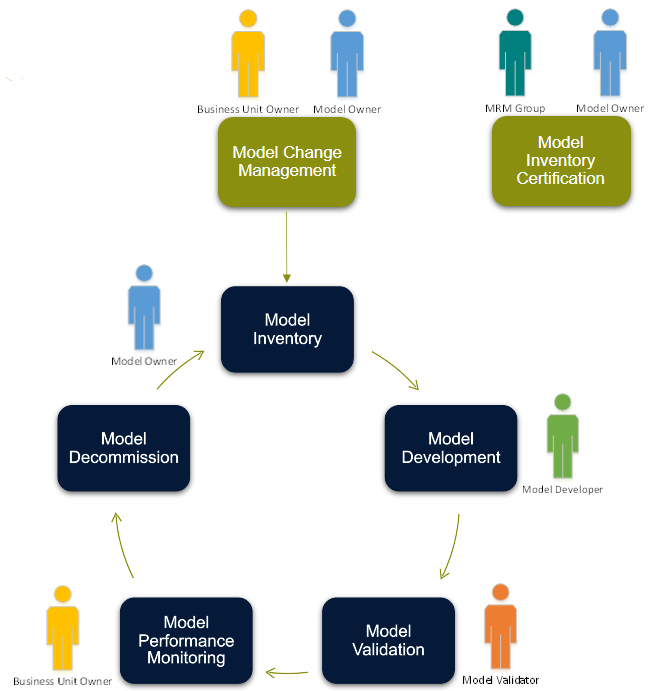
Process diagram
The following diagram shows the business process for the Model Risk Management.
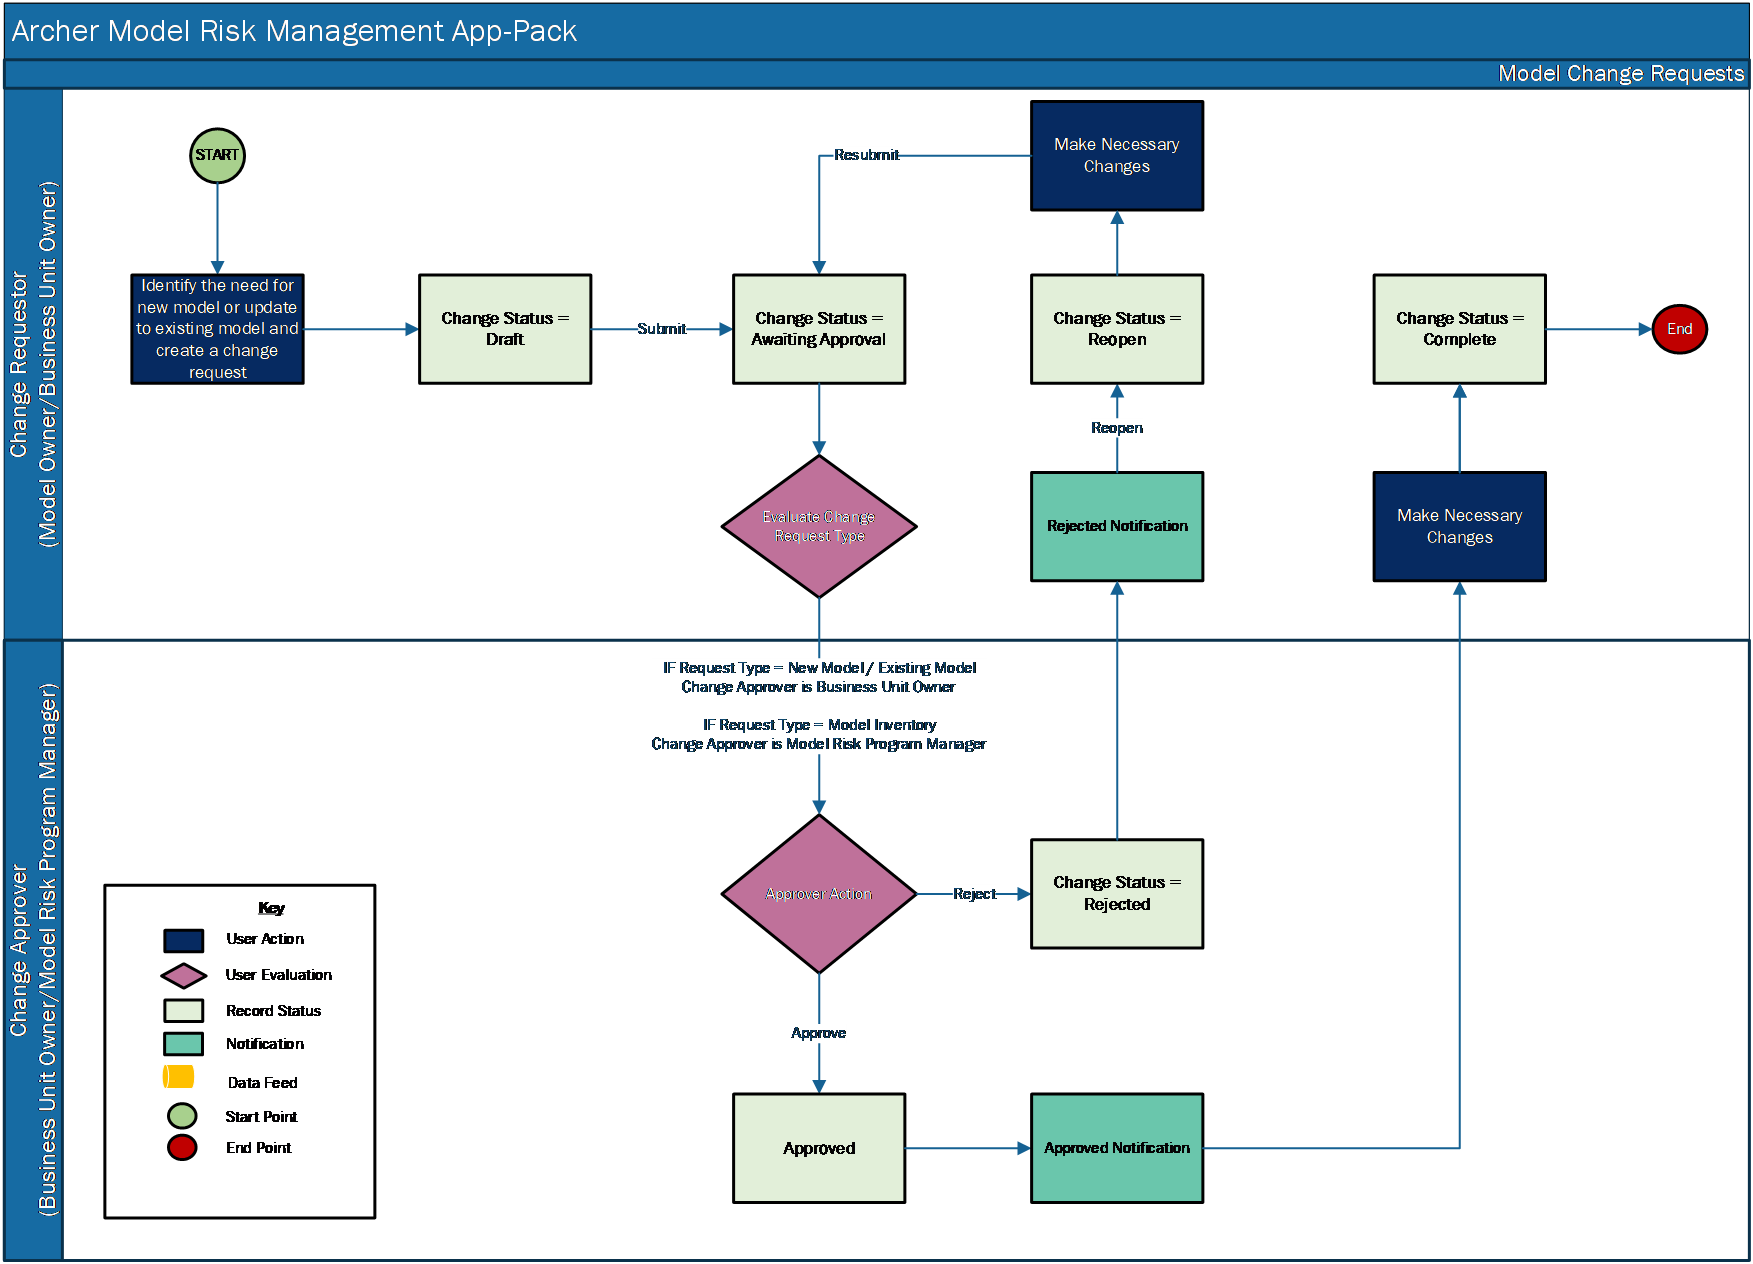
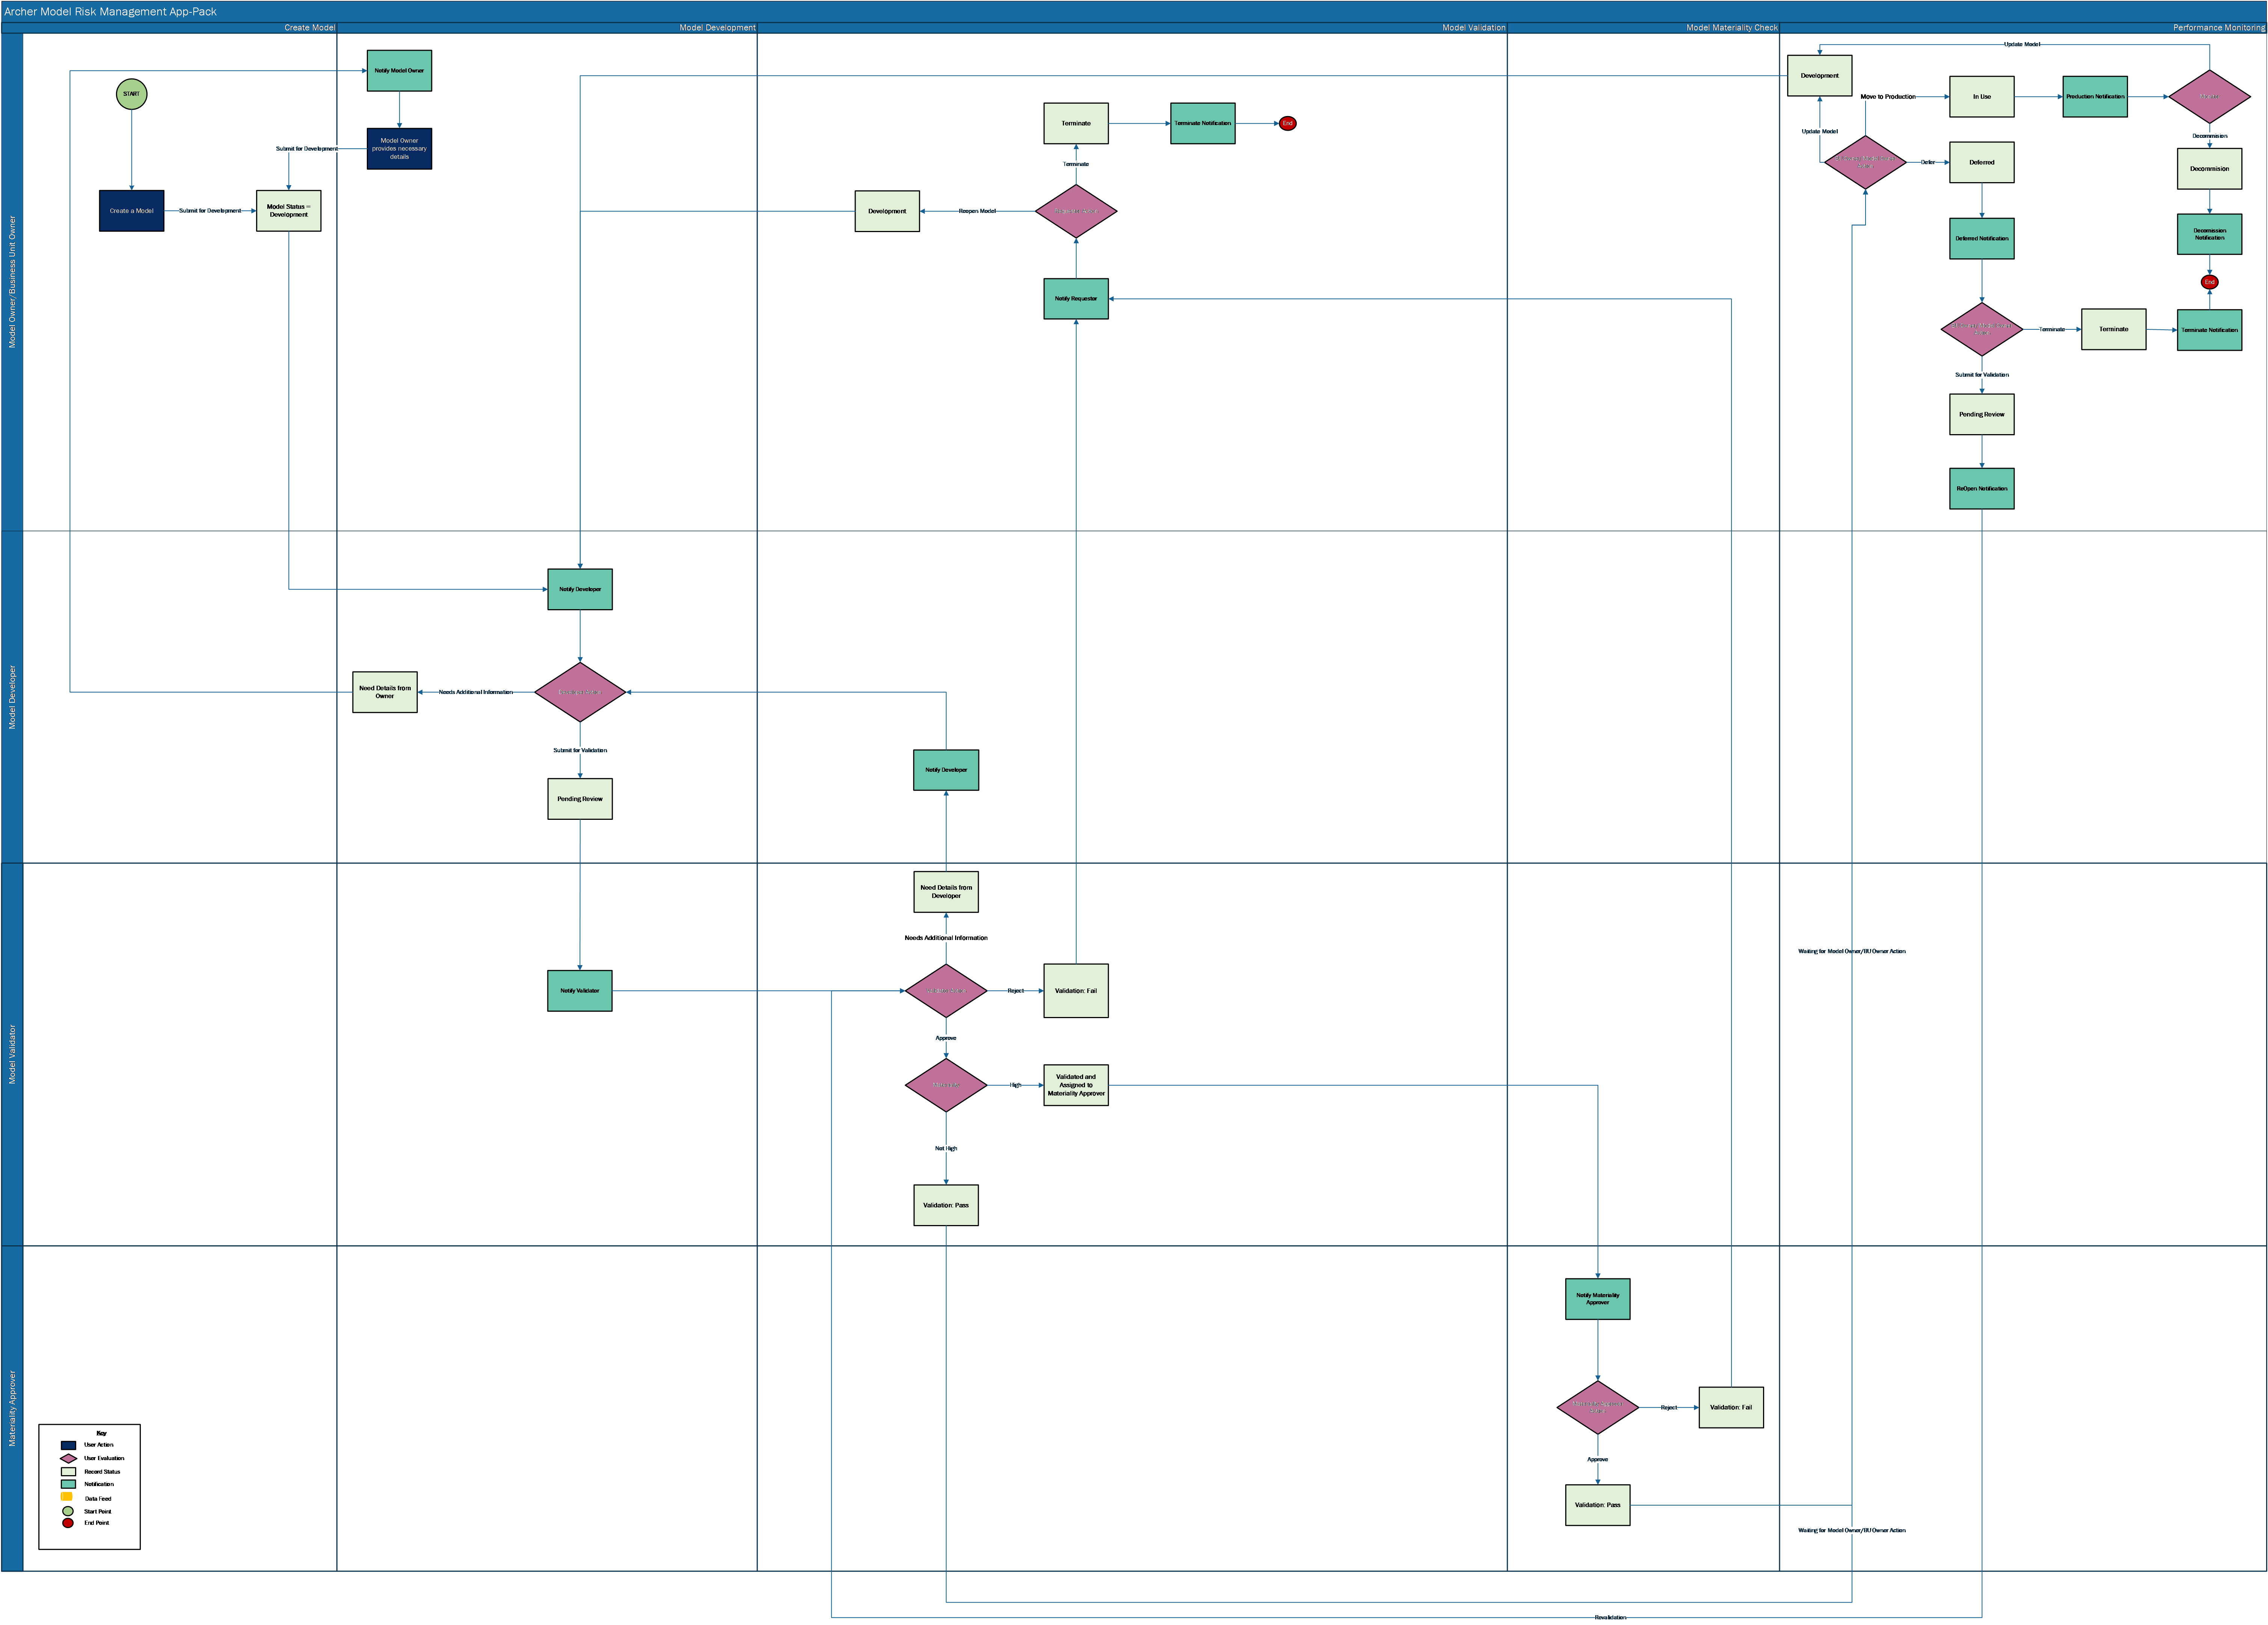
The following diagrams show the processes for each of the modules.
Model Change Requests (optional)
Model Inventory
Model Certification (optional)

Applications
The following tables lists the applications in Model Risk Management.
|
Application |
Description |
|---|---|
|
Model Change Requests |
The Model Change Requests application allows users to document the Model change requirements and rationale and obtain approvals to complete the requested change. If model change requests are tracked outside of archer then this application is not required. |
|
Model Inventory |
The Model Inventory application allows users to document key model information (meta-data) such as name, description, type, complexity, business criticality, risk calculation, and related model dependencies. |
|
Model Certification |
The Model Certification application allows users to certify that the Model Inventory is complete and up-to-date periodically. This optional application is required if model certifications are performed in Archer. |
|
Model Validation |
Model Validation is a questionnaire that all users to capture high level tasks and outcomes and a description of the tools used to validate the model. This optional questionnaire is required if model validations are performed in Archer. |
Personas and access roles
The following table describes the functions that make up the application’s organization roles. Depending on the organization of your company, these functions and responsibilities may vary.
|
Function |
Description |
|---|---|
|
Model Owner / Business Unit Manager |
Model owners are first line of defense (business unit) managers. For example, a model used to decide who qualifies for a credit card would be owned by the credit card department manager. A model used to decide who qualifies for an automobile loan would be owned by the consumer loan department manager. A model used to estimate the amount of money to be set aside for loan losses across a loan portfolio would be owned by the chief loan officer. The actual owner varies based upon the size of the organization and individual reporting lines. It is possible that, where applicable, the Chief Risk Officer could own all of the risk-related models. Business Unit Manager owns the business process, and would therefore own the model to address or solve this business problem |
|
Model Developer |
The Model Developer owns the tools that create the actual mathematical model or algorithm. They own how to solve the problem via a mathematical representation of the problem, which helps the business make decisions. |
|
Model Validator |
Model Validators are likely second line of defense risk managers or, in very large organizations, another individual in the business unit that owns the model. Due to segregation of duties controls, this person must be different than the Model Developer or Model Owner. They can be in the same business unit. |
|
Model Risk Program Manager |
The Model Risk Program Manager is responsible for ensuring the model inventory is up-to-date. They initiate the annual certifications and ensure validations are performed on schedule. In some organizations, the Model Risk Program Manager can monitor the model performance and submit model performance metrics. |
|
Executive Management |
The Executive Management team ensures that there are internal controls for model risk. Informed executive management understands the operating models in the organization, what they do, how significant they are, have assurance there is adequate change control of models, are involved in approval of assumptions used as inputs to models, and must be sure that the organization avoids third line of defense and regulator criticism. |
|
Materiality Approver |
The Users in Materiality Approver field belongs to Business Unit Owner group. Model Validator assigns a Materiality Approver when the Model Materiality value is High. Materiality Approvers are generally part of Business Unit Owner group. |
Permissions chart
The following table describes the permissions for the applications.
|
Application |
Model Owner / Business Unit Owner |
Model Developer |
Model Validator |
Model Risk Program Manager |
Model Executive Management |
|---|---|---|---|---|---|
|
Model Change Requests |
CRU* |
R |
R |
RU* |
R |
|
Model Inventory |
CRU* |
RU |
RU |
RU* |
R |
|
Model Validation |
R |
R |
CRU* |
R |
R |
|
Model Certification |
RU* |
R |
R |
CRU* |
R |
C = Create, R = Read, U = Update, D = Delete
* Indicates Record Permissions
*Members of the Model Risk Management groups should also be assigned to the EM: Read Only group under Enterprise Management to allow selection of Business Unit.
Using Archer Model Risk Management
Model Change requests
If users do not wish to utilize the model change requests application provided with the app-pack, please skip to Release history section.
Task 1: Create a Model Change request
Users: Model Owner / Business Unit Owner
-
Create a Model Change Request record.
-
From the menu bar, click Archer Model Risk Management.
-
Under Model Risk Management Applications, click Model Change Requests.
-
Under More Options, click New Record.
-
-
In the General Information section, enter all pertinent information related to the request.
-
Enter a descriptive Change Name.
-
Select Change Type, Change Significance field values by clicking the down arrow next to the field and making your selection.
-
(Optional) Select Request Change Start Date and Change End Date by clicking the calendar icon next to the field.
-
Click Add New in the Target Model field and add any New Model records (Change Type = New Model) to the request.
-
Click Lookup in the Target Model field and add any existing Model records (Change Type = Existing Model / Model Inventory) to the request.
-
(Optional) Click Add New in Comments field to add any additional comments to the record.
-
Enter a descriptive Change Rationale Description, Design and Operation Impacts in Model Change Details section if the Change Type = Existing Model.
-
Enter a descriptive Change Rationale Description in Model Change Details section if the Change Type = Model Inventory.
-
(Optional) Click Add New in the Supporting Documentation field and add attachments or documentation to the record.
-
Click save to save the record in draft mode.
-
In the Change Status field in General Information section, select Awaiting Approval and click on save to submit the request to Change Approver.
Task 2: Reviewing a Model Change request
Users: Business Unit Owner / Model Risk Program Manager
Note: IF Request Type = New Model / Existing Model then Change Approver is Business Unit Owner.
Note: IF Request Type = Model Inventory then Change Approver is Model Risk Program Manager
-
Open the model inventory record awaiting approval.
-
Click Edit in the top of the record browser.
-
Approve or Reject the request.
-
To approve the request:
-
Review the details from General Information, Change Details section.
-
(Optional) Click Add New in the Supporting Documentation field and add attachments or documentation to the record.
-
(Optional) Click Add New in the Comments field to add additional comments to the record.
-
Select Approved in Change Status field in the General Information Section and click on Save.
-
-
To reject the request:
-
If the request has already been made, select Yes in the Duplicate Change Request? field and select the duplicate record in Duplicate Request Record in the Workflow and Approvals section.
-
Click Add New in the Comments field and provide the reason.
-
Select Rejected in Change Status field in the General Information Section and click on Save.
-
-
-
Click Save in the Record Toolbar.
Task 3: Completing the Model Change request
Users: Change Requestor (Model Owner / Business Unit Owner)
-
Open the Approved Change request.
-
Click Edit in the top of the record browser.
-
To complete the request:
-
Ensure the requested changes are complete in the target record.
-
(Optional) Click Add New in Comments field to add any additional comments to the record.
-
Select Completed in Change Status field in the General Information Section and click on Save.
-
Task 4: Cancel a Model Change request
Users: Change Requestor
-
Click the Change Request number in the record browser page and select Change Request to cancel.
-
Click Edit in the top of the record browser.
-
Click Add New in the Comments field to add comments to the record.
-
Select Canceled in Change Status field in the General Information Section and click on Save.
Task 5: Resubmitting a Model Change request
Users: Change Requestor
-
From the record browser page, select the Change Request which is in Rejected status.
-
Click Edit in the top of the record browser.
-
Select Reopen in Change Status field in the General Information Section and click on Save.
-
In the General Information, Change Details section, make the required changes.
-
(Optional) In the Supporting Documentation field, add attachments or documentation to the record by clicking Add New
-
Select Awaiting Approval in Change Status field in the General Information Section and click on Save.
Model inventory
Task 1: Create a new Model
Users: Model Owner / Business Unit Owner
-
Create a Model Inventory record.
-
From the menu bar, click Model Risk Management.
-
Under Model Risk Management Applications, click Model Inventory.
-
Under More Options, click New Record.
-
-
In the General Information section, enter all pertinent information related to the Model.
-
Enter a descriptive Model Name, Model Version.
-
Select Model Type, Model Category, Priority, Model Implementation form field values by clicking the down arrow next to the field and making your selection.
-
Enter a descriptive Purpose of the Model.
-
Select Business Unit Owner, Model Risk Program Manager in the model management section.
-
Add an Approved Change Request to proceed further with Model Inventory workflow. Do one of the following:
-
Add a new Model change request to the model by clicking Add New in the Model Change Requests field.
-
Add existing Approved Model change request record to the model by clicking Lookup in the Model Change Requests field.
-
-
Select the Active Business Units, Owning Business Unit by clicking
 and selecting respective record in the Model Usage section.
 -
(Optional) Add any existing Dependent Model records to the model inventory by clicking Lookup in the Dependent Models field in the Related Models section.
-
(Optional) Add any existing Pre-Requisite Model records to the model inventory by clicking Lookup in the Pre-Requisite Models field in the Related Models section.
-
Click Save in the Record Toolbar to save in Draft mode.
-
Click Submit for Development in the top left of the screen to submit the record to Model Developer.
Task 2: Model development
Users: Model Developer
-
Open the Model inventory record in development.
-
From the menu bar, click Model Risk Management.
-
Under Dashboards, click Model Developer.
-
View the list of records in Models Requiring Developer Attention.
-
-
Click Edit in the top of the record browser.
-
To Submit the model for validation:
-
From the model management section, select a user in the Model Developer field and click on save.
-
Add Documentation details like Document Name, Document Version, Document Type and attachment files to the model record by clicking Add New in the Model Documentation sub-form field.
-
(Optional) Click Add New in Comments field to add additional comments.
-
Click Submit for Validation in the top left of the screen.
-
-
To Request Additional Information
-
From the model management section, select a user in the Model Developer field and click on save.
-
Click Add New in the Comments field, enter details about additional information being requested.
-
Click Need Additional Information in the Actions dropdown top left of the screen.
-
Task 3: Model validation
Users: Model Validator
-
Open a Model Inventory record.
-
From the menu bar, click Model Risk Management.
-
Under Dashboards, click Model Validator.
-
View the list of records in Model Validation Queue.
-
-
Select the Model inventory record by clicking the Model Name from the report.
-
Click Edit in the top of the record browser.
-
Do one of the following:
-
Approve the model.
-
From the model management section, select a user in the Model Validator field.
-
Complete the Model ratings section by selecting Model Risk, Model Complexity, Model Materiality field values by clicking the down arrow next to the field and making your selection.
-
If Model Materiality is High, select Materiality Approver from the model management section.
-
Select Validation frequency field values by clicking the down arrow next to the field and making your selection.
-
Perform/track validation result using one of the below methods:
-
Click Add New in the Model Validation questionnaire field in validation tab, and add Validation details like model validation planning, Impact analysis, evaluation of conceptual soundness, ongoing monitoring, and outcomes analysis to the model record.
-
If Model Validation Questionnaire is not being utilized, select the Validation Status = Complete and Validation Result = Pass manually in the Validation Tab. Add any validation comments in the Comments section and validation documentation in the Model Documentation section.
-
-
(Optional) Add additional comments to the record in the Comments field.
-
Click Save in the Record Toolbar.
-
Confirm Latest Validation Results are Pass to approve the model
-
Click Approve in the Actions dropdown top left of the screen.
-
-
Request Additional Information.
-
Select a user in the Model Validator field from the model management section.
-
Complete the Model ratings section by selecting Model Risk, Model Complexity, Model Materiality field values by clicking the down arrow next to the field and making your selection.
-
If Model Materiality is High, select Materiality Approver from the model management section.
-
Select Validation frequency field values by clicking the down arrow next to the field and making your selection.
-
Perform/track validation result using one of the below methods:
-
Click Add New in the Model Validation questionnaire field in validation tab, and add Validation details like model validation planning, Impact analysis, evaluation of conceptual soundness, ongoing monitoring, and outcomes analysis to the model record.
-
If Model Validation Questionnaire is not being utilized, select the Validation Status and Validation Result manually in the Validation Tab. Add any validation comments in the Comments section and validation documentation in the Model Documentation section.
-
-
In the Comments field, click Add New enter details about the additional information being requested.
-
Click Need Additional Information in the Actions dropdown top left of the screen.
-
-
Reject the Model
-
From the model management section, select user in the Model Validator field.
-
Complete the Model ratings section by selecting Model Risk, Model Complexity, Model Materiality field values by clicking the down arrow next to the field and making your selection.
-
If Model Materiality is High, select Materiality Approver from the model management section.
-
Select Validation frequency field values by clicking the down arrow next to the field and making your selection.
-
Perform/track validation result using one of the below methods:
-
Click Add New in the Model Validation questionnaire field in validation tab, and add Validation details like model validation planning, Impact analysis, evaluation of conceptual soundness, ongoing monitoring, and outcomes analysis to the model record.
-
If Model Validation Questionnaire is not being utilized, select the Validation Status = Complete and Validation Result = Fail manually in the Validation Tab. Add any validation comments in the Comments section and validation documentation in the Model Documentation section.
-
-
In the Comments field, click Add New and enter the reason for rejection.
-
Click Save in the Record Toolbar.
-
Confirm latest Validation Results are Fail to reject the model.
-
Click Reject in the Actions dropdown top left of the screen.
-
Model Validation Questionnaire (optional)
-
Select the Validation Status field value to In Progress by clicking the down arrow next to the field and making your selection.
-
Save the record.
-
Fill the Model Validation Planning section, Impact Analysis tabs.
-
Complete the Questions in Evaluation of conceptual soundness and ongoing monitoring sections.
-
Complete the Outcomes Analysis sub-form.
-
Click Save in the Record Toolbar.
-
If the Validation Results is Fail, a Findings Record can be created from the Findings Section.
-
To change the validation results, select Pass/Fail from [Override Validation Results] field and enter reason in [Override Comments] field.
-
Once the record is Complete, from General Information section, set the Validation Status field value to Completed.
-
Save the record.
Task 4: Model Materiality is high
Users: Materiality Approver
-
Open a Model Inventory record.
-
From the menu bar, click Model Risk Management.
-
Under Dashboards, select Model Business Unit Owner.
-
Select the Model inventory record that is in Validated and Assigned to Materiality Approver status in Models Requiring Attention iView.
-
-
Click Edit in the top of the record browser.
-
Review the Model Ratings section, Validation tab.
-
Do one of the following:
-
Approve the Model.
-
(Optional)Add additional comments to the record in the Comments field.
-
Click Approve in the Actions dropdown top left of the screen.
-
-
Reject the Model.
-
Enter the reason for rejection in the Comments field.
-
Click Reject in the Actions dropdown top left of the screen.
-
Task 5: Model performance monitoring
Users: Model Risk Program Manager
-
Open a Model Inventory record.
-
From the menu bar, click Model Risk Management.
-
Under Model Risk Management Applications, click Model Inventory.
-
-
Select the Model inventory record in “In Use” status.
-
Click Edit in the top of the record browser.
-
Navigate to Performance Monitoring tab. Do one of the following:
-
In the Performance Monitoring Section, select Model Performance Reporting Frequency, Model Performance and Model Performance Reporting Date. Based on performance frequency update the Model Performance rating. A trending chart is available to view the performance trending based on the performance rating.
-
Add New Metrics details to the model record by clicking Add Newin the Metrics field.
-
Add Existing Metrics details to the model record by clicking Lookupin the Metrics field.
-
Click Save in the Record Toolbar.
Task 6: Model certification
Refer to Model Certification for verification and completion process after Model Certification creation.
Manually Create Model Certification from Model Inventory
Users: Model Risk Program Manager
-
Open a Model Inventory record.
-
From the menu bar, click Model Risk Management.
-
Under Model Risk Management Applications, click Model Inventory.
-
-
Select the Model inventory record in “In Use” status.
-
Click the Edit in the top of the record browser.
-
Navigate to Certification tab. Select Certification frequency field values by clicking the down arrow next to the field and making your selection.
-
Add a new certification record manually by clicking Add New in the Model Certification field.
-
Click Save in the Record Toolbar.
Create/Maintain Model Certification schedule for automatic creation of certifications.
Note: “Create Certifications” schedule is provided in the package. Users can either use this or create a new schedule as per their requirements. Below are sample instructions to create a new schedule. Please refer to online help for details on Bulk Schedules.
Users: Model Risk Program Manager
-
Create/Maintain Model Certification schedule for automatic creation of certifications.
-
From the menu bar, click Archer Model Risk Management.
-
Under Applications, click Model Inventory.
-
Under More Options, click Schedules.
-
-
Click on Add New under in the Bulk Actions Schedules page.
-
Provide the schedule Name.
-
Select Notifications behavior for the schedule.
-
Select the schedule in the Recurrences section.
-
In filter sections, define the filters for the certification generation. Eg: Model Status = In Use and Model Tier = Tier 1.
-
Save the schedule.
-
Click on Add New in Bulk Actions section.
-
In the New Bulk Action page, General Information Section:
-
Provide Action Name.
-
Change Type to Bulk Create References.
-
Set status of the Action to Active.
-
-
In the New Bulk Action page, Bulk Create Configuration section:
-
In Reference Field select Related Model Certifications.
-
In Group By select Model Risk Program Manager, Business Unit Owner/Model Owner (depending on who you want as the Approver for the certification). Select any grouping fields as per your requirement.
-
-
In the New Bulk Action page, Field Value Expression section:
-
Match Certification Owner to Model Risk Program Manager.
-
Match Certification Approver to Model Owner/Business Unit Owner.
-
If required, set Certification Status to In Progress
-
-
Save the Bulk Action and go back to the Bulk Schedule.
-
Change Status of the schedule to Active and click on Save.
Task 7: Decommission a Model
Users: Model Owner / Business Unit Owner
-
Open a Model Inventory record.
-
From the menu bar, click Model Risk Management.
-
Under Model Risk Management applications, click Model Inventory.
-
-
Select the Model inventory record in “In Use” status.
-
Click Edit in the top of the record browser.
-
Navigate to the Conclusion tab.
-
Capture the details to decommission model in the Reason Model Decommissioned field.
-
Click Decommission Model in the Actions dropdown top left of the screen.
Task 8: Defer a Model
Users: Model Owner / Business Unit Owner
-
Open a Model Inventory record.
-
From the menu bar, click Model Risk Management.
-
Under Model Risk Management applications, click Model Inventory.
-
-
Select the Model inventory record in Validation: Pass status.
-
Click the Edit in the top of the record browser.
-
Navigate to Conclusion tab.
-
Capture the details to defer model in the Reason Model Deferred field.
-
Click Defer Model in the Actions dropdown top left of the screen.
Task 9: Terminate a Model
Users: Model Owner / Business Unit Owner
-
Open a Model Inventory record.
-
From the menu bar, click Model Risk Management.
-
Under Model Risk Management applications, click Model Inventory.
-
-
Select the Model inventory record in Validation: Fail or Deferred status.
-
Click the Edit in the top of the record browser.
-
Navigate to Conclusion tab.
-
Capture the details to Terminate model in the Reason Model Terminated field.
-
Click Terminate Model in the Actions dropdown top left of the screen.
Task 10: Update a Model
Users: Model Owner / Business Unit Owner
Model Owner / Business Unit Owner can update the Model if there are changes with respect to the current model version. If there is a new version of the Model, create a New Model Inventory record.
-
Open a Model Inventory record.
-
From the menu bar, click Model Risk Management.
-
Under Model Risk Management applications, click Model Inventory
-
-
Select the Model inventory record in Validation: Pass or In Use status.
-
Click the Edit in the top of the record browser. Model Owner / Business Unit Owner should submit a change request record with change type Existing Model. The Business Unit Owner approves the change request submitted from the above step. If changes are tracked outside of Archer update the model change requests section in Inventory tab with appropriate information.
-
Return to model inventory record and click Update Model in the Actions dropdown top left of the screen. By clicking Update Model, the model status changes to Development.
Task 11: Update a Model inventory
Users: Model Risk Program Manager
Model Risk Program Manager can update the information in Model Inventory record if there are changes with respect to general information section, model usage section, and related modelssection.
-
Open a Model Inventory record.
-
From the menu bar, click Model Risk Management.
-
Under Model Risk Management applications, click Model Inventory
-
-
Select the Model inventory record in Development, Validation: Pass or In Use status.
-
Click the Edit in the top of the record browser. Business Unit Owner / Model Owner should submit a change request record with change type Model Inventory.
-
Approve the change request submitted from the above step. If changes are tracked outside of Archer, update the model change requests section in Inventory tab with appropriate information.
-
Return to model inventory record and make the necessary changes in general information section, model usage section, and related models section.
Task 12: Reopen a Model
Users: Model Owner / Business Unit Owner
Model Owner / Business Unit Owner can reopen the Model when the Model Validation has failed.
-
Open the Model Inventory record.
-
From the menu bar, click Model Risk Management.
-
Under Model Risk Management applications, click Model Inventory.
-
-
Select the Model inventory record with the Validation: Fail status.
-
Click Edit in the top of the record browser.
Model Owner / Business Unit Owner should submit a change request record with change type Existing Model.
Business Unit Owner approves the change request submitted from the above step.
If changes are tracked outside of Archer, update the model change requests section in Inventory tab with appropriate information.
-
Return to model inventory record and click Reopen Model in Actions dropdown top left of the screen. By clicking on Reopen Model, the model status changes to Development.
Model certification
Task 1: Manually create Model certifications from Model certification
Users: Model Risk Program Manager
-
Add a new certification record manually.
-
From the menu bar, click Model Risk Management.
-
Under Model Risk Management Applications, click Model Certification.
-
Under More Options, click New Record.
-
-
In the General Information Section, select the Models from the Model Inventory List by clicking Lookup.
-
Select Certification Approver, in Review Section.
-
Click Save in the Record Toolbar.
-
Select In Progress in Certification Status and click on Save to submit certification to Approver.
Task 2: Verify the Model certification
Users: Business Unit Owner/Model Owner
-
Open a Model Certification record.
-
From the menu bar, click Model Risk Management.
-
Under Model Risk Management applications, click Model Certification.
-
-
Select the Model inventory record in “In Progress” status.
-
Click the Edit in the top of the record browser.
-
Review the Model Inventory List. Do one of the following:
-
Approve the Model Certification.
-
Select the checkbox “I Confirm that the Model Inventory List is Accurate” from the Acknowledge field in review section.
-
Select Approved in the Certification Status field in General Information section.
-
-
Reject the Model Certification.
-
Capture the details to Reject the model inventory list in the Certification Comments section.
-
(Optional) Create a New Findings record by either:
-
Clicking Add New in the Findings section, or
-
Selecting an existing Findings record by clicking Lookup in the Findings section
-
-
Select Rejected in the Certification Status field in General Information section.
-
Task 3: Complete the Model certification
Users: Model Risk Program Manager
-
Open a Model Certification record.
-
From the menu bar, click Model Risk Management.
-
Under Model Risk Management applications, click Model Certification.
-
-
Select the Model Certification record in Approved or Rejected status.
-
Click the Edit in the top of the record browser.
-
(Optional)In the General Information section, add additional comments to the record in the Certification Comments section.
-
Select Completed in the Certification Status field in General Information section.
Installing Archer Model Risk Management
Complete the following procedure to install the offering.
Task 1: Prepare for the installation
-
Ensure that your Archer system meets the following requirements:
-
Archer Platform version 6.10 or later.
-
-
Download the ODA install package from the Archer Exchange on the Archer Community.
-
Obtain the Data Dictionary for the ODA by contacting your Archer Account Representative. The Data Dictionary contains the configuration information for the use case.
-
Read and understand the "Packaging Data" section of the Archer Help.
Task 2: Install the package
Installing a package requires that you import the package file, map the objects in the package to objects in the target instance, and then install the package.
Step1: Backup your database
There is no Undo function for a package installation. Packaging is a powerful feature that can make significant changes to an instance. Archer strongly recommends backing up the instance database before installing a package. This process enables a full restoration if necessary.
An alternate method for undoing a package installation is to create a package of the affected objects in the target instance before installing the new package. This package provides a snapshot of the instance before the new package is installed, which can be used to help undo the changes made by the package installation. New objects created by the package installation must be manually deleted.
Step 2: Import the package
-
Go to the Install Packages page.
-
From the menu bar, click
 .
. -
Under Application Builder, click Install Packages.
-
-
In the Available Packages section, click Import.
-
Click Add New, then locate and select the package file that you want to import.
-
Click OK.
The package file is displayed in the Available Packages section and is ready for installation.
Step 3: Map objects in the package
Important: This step is required only if you are upgrading to a later version of the ODA.
-
In the Available Packages section, select the package you want to map.
-
In the Actions column, click
 for that package.
The analyzer runs and examines the information in the package. The analyzer automatically matches the system IDs of the objects in the package with the objects in the target instances and identifies objects from the package that are successfully mapped to objects in the target instance, objects that are new or exist but are not mapped, and objects that do not exist (the object is in the target but not in the source).
Note: This process can take several minutes or more, especially if the package is large, and may time out after 60 minutes. This time-out setting temporarily overrides any IIS time-out settings set to less than 60 minutes.
When the analyzer is complete, the Advanced Package Mapping page lists the objects in the package file and corresponding objects in the target instance. The objects are divided into tabs, depending on whether they are found within Applications, Solutions, Access Roles, Groups, Sub- forms, or Questionnaires.
-
On each tab of the Advanced Mapping Page, review the icons that are displayed next to each object name to determine which objects require you to map them manually.
|
Icon |
Name |
Description |
|---|---|---|
|
|
Awaiting Mapping Review |
Indicates that the system could not automatically match the object or children of the object to a corresponding object in the target instance. Objects marked with this symbol must be mapped manually through the mapping process. Important: New objects should not be mapped. This icon should remain visible. The mapping process can proceed without mapping all the objects. Note: You can execute the mapping process without mapping all the objects. The |
|
|
Mapping Completed |
Indicates that the object and all child objects are mapped to an object in the target instance. Nothing more needs to be done with these objects in Advanced Package Mapping. |
|
|
Do Not Map |
Indicates that the object does not exist in the target instance or the object was not mapped through the Do Not Map option. These objects will not be mapped through Advanced Package Mapping, and must be remedied manually. |
|
|
Undo |
Indicates that a mapped object can be unmapped. This icon is displayed in the Actions column of a mapped object or object flagged as Do Not Map. |
-
For each object that requires remediation, do one of the following:
-
To map each item individually, on the Target column, select the object in the target instance to which you want to map the source object. If an object is new or if you do not want to map an object, select Do Not Map from the drop-down list.
Important: Ensure that you map all objects to their lowest level. When objects have child or related objects, a drill-down link is provided on the parent object. Child objects must be mapped before parent objects are mapped. For more details, see "Mapping Parent/Child Objects" in Archer Help.
-
To automatically map all objects in a tab that have different system IDs but the same object name as an object in the target instance, do the following:
-
-
In the toolbar, click Auto Map.
-
Select an option for mapping objects by name.
Option
Description
Ignore case
Select this option to match objects with similar names regardless of the case of the characters in the object names.
Ignore spaces
Select this option to match objects with similar names regardless of whether spaces exist in the object names.
-
Click OK. The Confirmation dialog box opens with the total number of mappings performed. These mappings have not been committed to the database yet and can be modified in the Advanced Package Mapping page.
-
Click OK.
-
To set all objects in the tab to Do Not Map, in the toolbar, click Do Not Map.
Note: To undo the mapping settings for any individual object, click
 in the Actions column.
-
When all objects are mapped, the ![]() icon is displayed in the tab title. The
icon is displayed in the tab title. The ![]() icon is displayed next to the object to indicate that the object will not be mapped.
icon is displayed next to the object to indicate that the object will not be mapped.
-
Verify that all other objects are mapped correctly.
-
(Optional) To save your mapping settings so that you can resume working later, see "Exporting and Importing Mapping Settings" in Archer Help.
-
Once you have reviewed and mapped all objects, click
 .
. -
Select I understand the implications of performing this operation and click OK.
The Advanced Package Mapping process updates the system IDs of the objects in the target instance as defined on the Advanced Package Mapping page. When the mapping is complete, the Import and Install Packages page is displayed.
Important: Advanced Package Mapping modifies the system IDs in the target instance. Any Data Feeds and Web Service APIs that use these objects will need to be updated with the new system IDs.
Step 4: Install the package
All objects from the source instance are installed in the target instance unless the object can not be found or is flagged to not be installed in the target instance. A list of conditions that may cause objects not to be installed is provided in the Log Messages section. A log entry is displayed in the Package Installation Log section.
-
Go to the Install Packages page.
-
From the menu bar, click
. -
Under Application Builder, click Install Packages.
-
-
In the Available Packages section, locate the package file that you want to install, and click Install.
-
In the Configuration section, select the components of the package that you want to install.
-
To select all components, select the top-level checkbox.
-
To install only specific global reports in an already installed application, select the checkbox associated with each report that you want to install.
-
Note: Items in the package that do not match an existing item in the target instance are selected by default.
-
In the Configuration section, under Install Method, select an option for each selected component. To use the same Install Method for all selected components, select a method from the top-level drop-down list.
Note: If you have any existing components that you do not want to modify, select Create New Only. You may have to modify those components after installing the package to use the changes made by the package.
-
In the Configuration section, under Install Option, select an option for each selected component. To use the same Install Option for all selected components, select an option from the top-level drop-down list.
Note: If you have any custom fields or formatting in a component that you do not want to lose, select Do not Override Layout. You may have to modify the layout after installing the package to use the changes made by the package.
-
To deactivate target fields and data-driven events that are not in the package, in the Post-Install Actions section, select the Deactivate target fields and data-driven events that are not in the package checkbox. To rename the deactivated target fields and data-driven events with a user-defined prefix, select the Apply a prefix to all deactivated objects checkbox, and enter a prefix. This can help you identify any fields or data-driven events that you may want to review for cleanup post-install.
-
Click Install.
-
Click OK.
Step 5: Review the package installation log
-
Go to the Package Installation Log tab of the Install Packages page.
-
From the menu bar, click
. -
Under Application Builder, click Install Packages.
-
Click the Package Installation Log tab.
-
-
Click the package that you want to view.
-
In the Package Installation Log page, in the Object Details section, click View All Warnings.
Manually Activate the advanced workflow in Model Inventory Application.
Task 3: Set up data feeds
You must import and schedule each use case data feed that you want to use. See Setting Up Data Feeds for complete information.
Task 4: Test the installation
Test the application according to your company standards and procedures, to ensure that the use case works with your existing processes.
Configuring the Archer Model Risk Management
Complete the following tasks to configure Model Risk Management.
Task 1: Create Open Model Findings Featured Metric Report
-
Go to Findings Application Advanced Search:
-
From the menu bar, click Issues Management.
-
Under Solutions, click Issues Management.
-
Under Applications, click Findings.
-
In the Findings default results page, click Modify.
-
-
Select Statistics Mode check box in Fields to display section.
-
Select Count of Name in Fields in Display.
-
In Filters add the following:
-
In the Fields to Evaluate section add the following:
-
Model Inventory Does Not Contain No Selection
-
Model Validation (Findings) Does Not Contain No Selection
-
Model Certification (Findings) Does Not Contain No Selection
-
Overall Status Does Not Contain Closed
-
-
In the Advanced Operator Logic field type (1 or 2 or 3) and 4.
-
-
Click Search .
-
In the Chart tool bar in the search results page select Chart Only and Featured Metric.
-
Click Save.
-
In the Report Name field type Open Model Findings.
-
In the Report Type section select Global Report.
-
Click Save.
Task 2: Update the Model Risk Executive Management dashboard
-
Go to Global iViews:
-
From the menu bar, click Administration.
-
Under Workspaces and Dashboards, select Global iViews.
-
-
Open iView Open Model Findings.
-
Select report Open Model Findings.
-
Click Save.
Verify if Open Model Findings iView is visible. If it is not visible complete the following procedure.
-
-
From the menu bar, click Archer Model Risk Management.
-
Under Dashboards, select Model Risk Executive Management.
-
-
Go to Model Risk Executive Management Dashboard:
-
Click on the Dashboard options Ellipses and click on Add iView content.
-
Select the radio button “Select from Global iView Library”.
-
Select iView “Open Model Findings” and click on OK.
-
Place the iView below High Materiality Models iView.
-
Click on Save to save the dashboard changes.
Upgrading Archer Model Risk Management
If you are upgrading from a previous version, review the following information.
-
Advanced workflow
The Advanced workflow in your Model Inventory application will be replaced with the advanced workflow from the package.
There is no advanced workflow in the Model Change Requests and Model Certifications applications from the package. Upon package installation users will retain their existing advanced workflow for these applications.
-
If Override Layout(s) was selected in package selector for the components during package installation, changes will only be applicable to their 01 Default Layout. Other layouts will remain unchanged.
Before you upgrade
Before you upgrade from a previous version, complete the following items.
-
Upgrade customers are suggested to perform impact analysis due to the changes before performing the package installation.
-
If you have not customized the application and want to utilize the latest package, prior to package install delete the data driven events in all layouts and perform Create New and Update for the components.
-
If you have customized the application as per your organization’s requirement, then do only Create New during package install.
-
Review the data dictionary for detailed list of all components in package.
-
Review the following table to understand the changes in the Model Risk Management app-pack 6.10 revision.
|
Application |
Changes Made |
|---|---|
|
Model Change Requests |
Level Name: Updated typo in application-level alias name from “Model Change Request” to “Model Change Request” Advanced Workflow: Removed Advance Workflow from application to allow easy customization for customers. Layouts:
Fields: New Fields:
Deleted Fields: The following fields were removed as they are no longer required due to removal of advanced workflow and addition of comments sub-form.
Notifications: New Subscription Notifications:
Deleted Notifications: Following On-demand notifications related to the advanced workflow have been removed:
Reports: Following new reports were created:
|
|
Model Inventory |
Advanced Workflow:
Layouts:
Fields: New Fields:
Modified Fields:
Deleted Fields:
Reports: Following new reports were created:
Schedules:
|
|
Model Certifications |
Advanced Workflow: Removed advanced workflow from the application. Layouts:
Fields: New Fields:
Deleted Fields:
Notifications: New Subscription notifications:
Modified Notifications: Updated the following notifications email recipients:
Deleted Notifications: The following On-demand notifications related to the advanced workflow which was removed:
Reports: All the reports were updated with new Certification Owner and Certification Approverin fields to display and filters as applicable. |
|
Model Risk: Comments (Sub-form) |
|
|
Model Risk: Documentation (Sub-Form) |
|
|
Workspace |
|
|
iViews |
Following are no longer available in package are they have been removed from the dashboards:
|
Certification environment
Date tested: April 2022
|
Product Name |
Version Information |
Operating System |
|---|---|---|
|
Archer Suite |
6.10 |
Virtual Appliance |