HCL Regulatory Interactions Management
Compliance teams within different organizations spread across industry verticals, work toward achieving regulatory requirements through different regulatory compliance, control assurance, and monitoring programs. These compliance teams manage and respond to regulatory interactions such as information, investigation and inspection requests, meeting notes and outcomes, formal orders, and other correspondences.
The HCL Regulatory Interactions Management offering streamlines the process of an organization’s interactions with regulatory bodies, enabling them to efficiently maintain a repository of such requests along with their responses and ensure organizational readiness toward meeting underlying compliance requirements through other linked assurance processes.
On this page
Release history
Last updated: November 2019
Overview of HCL Regulatory Interactions Management App-Pack
Key features and benefits
The HCL Regulatory Interactions Management offering enables organizations to:
-
Register any regulatory interactions, identify internal respondents, and track responses to closure within stipulated timelines.
-
Consolidate responses and supporting evidence from different departments within the organization.
-
Review and approval through legal teams for external communication readiness.
-
Trigger regulatory reviews, policy change requests, findings, associated actions, and establishment of linkages to impacted risks and controls due to the regulatory interaction observations.
-
Perform effective governance of responses through personalized dashboards for different members of compliance, functional, and legal teams.
-
Maintain Repository of historical regulatory communications for future references.
Benefits include:
-
Streamlined process for maintenance of regulatory interactions in a centralized tool-based repository rather than email or Excel.
-
Efficient response consolidation, review, and approval processes within an organization.
-
Enablement of organizational preparedness toward regulatory inspections, investigations, and compliance to other regulatory requirements leading to effective compliance risk management.
Prerequisites (and ODA system requirements)
|
Components |
Recommended Software |
|---|---|
|
On-Demand License(s) |
HCL Regulatory Interactions Management App-Pack requires 3 ODA licenses |
|
Archer |
Archer 6.6 P1 HF1 and later |
|
Prerequisite Use Cases |
Archer Enterprise Catalog Archer Issues Management |
|
Linked Use Cases |
Policy Program Management Corporate Obligations Management Risk Catalog |
Compatible Use Cases and Applications
|
Application |
Use Case |
Primary Purpose(s) of the Relationship |
|---|---|---|
|
Company |
Enterprise Catalog |
Capture company which received any interaction request from regulator |
|
Division |
Enterprise Catalog |
Identifies impacted divisions in scope of a regulatory interaction and subsequent response. |
|
Business Unit |
Enterprise Catalog |
Links to Business Units within scope of a regulatory interaction and subsequent response. |
|
Contacts |
Enterprise Catalog |
Provides the compliance team with a selection list for capturing internal review meeting participants prior to external communication with regulator. |
|
Findings |
Issues Management |
Capture any risk or compliance issues identified within organizations internal |
|
Remediation Plans |
Issues Management |
Track remediation of identified issues during a regulatory interaction process. |
Optional related Applications
The following applications from optional linked use cases provide additional functionality toward other areas within compliance risk management.
|
Application |
Use Case |
Primary Purpose(s) of the Relationship |
|---|---|---|
|
Regulatory Intelligence Items |
Corporate Obligations Management |
Capture intelligence gained through regulatory interactions which require further analysis for impact to organization. |
|
Regulatory Intelligence Review |
Corporate Obligations Management |
Conducting review and impact analysis of identified intelligence during a regulatory interaction |
|
Policy Change Request |
Policy Program Management |
Tracking any changes to existing policies identified as impacted during intelligence review. |
|
Control Standard |
Policy Program Management |
Identify impacted control standards that need alignment with any regulatory changes identified during an interaction. |
|
Risk Register |
Risk Catalog |
Establish linkage to enterprise and operational risks residing within Risk register related to a particular regulatory interaction. |
HCL Regulatory Interactions Management App-Pack components
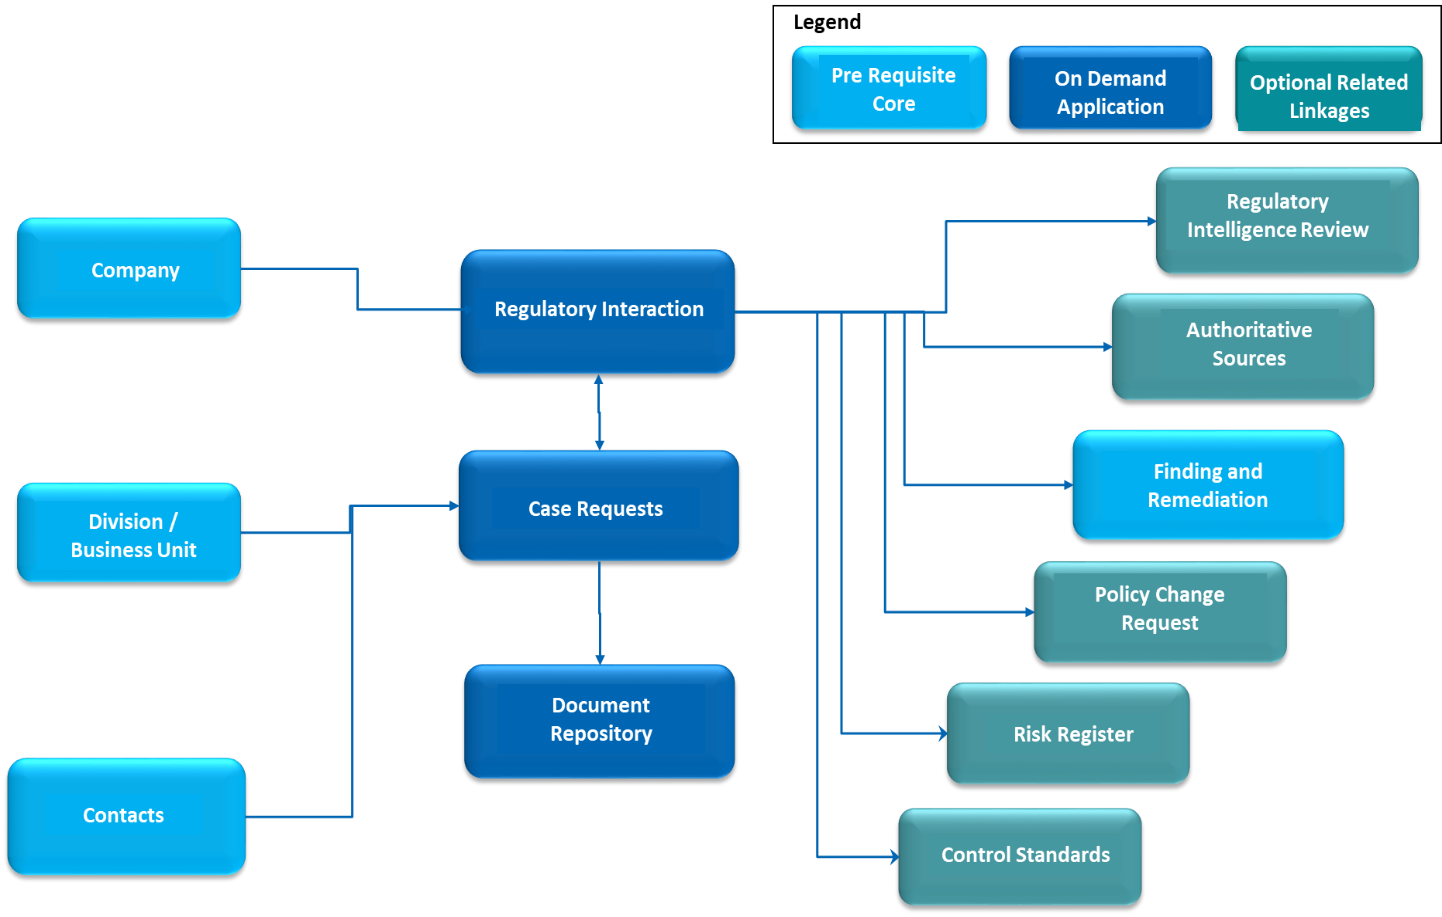
Architecture diagram
The following diagram shows the relationship between the applications in HCL Regulatory Interactions Management App-Pack.
Figure 1: Solution Functional Design
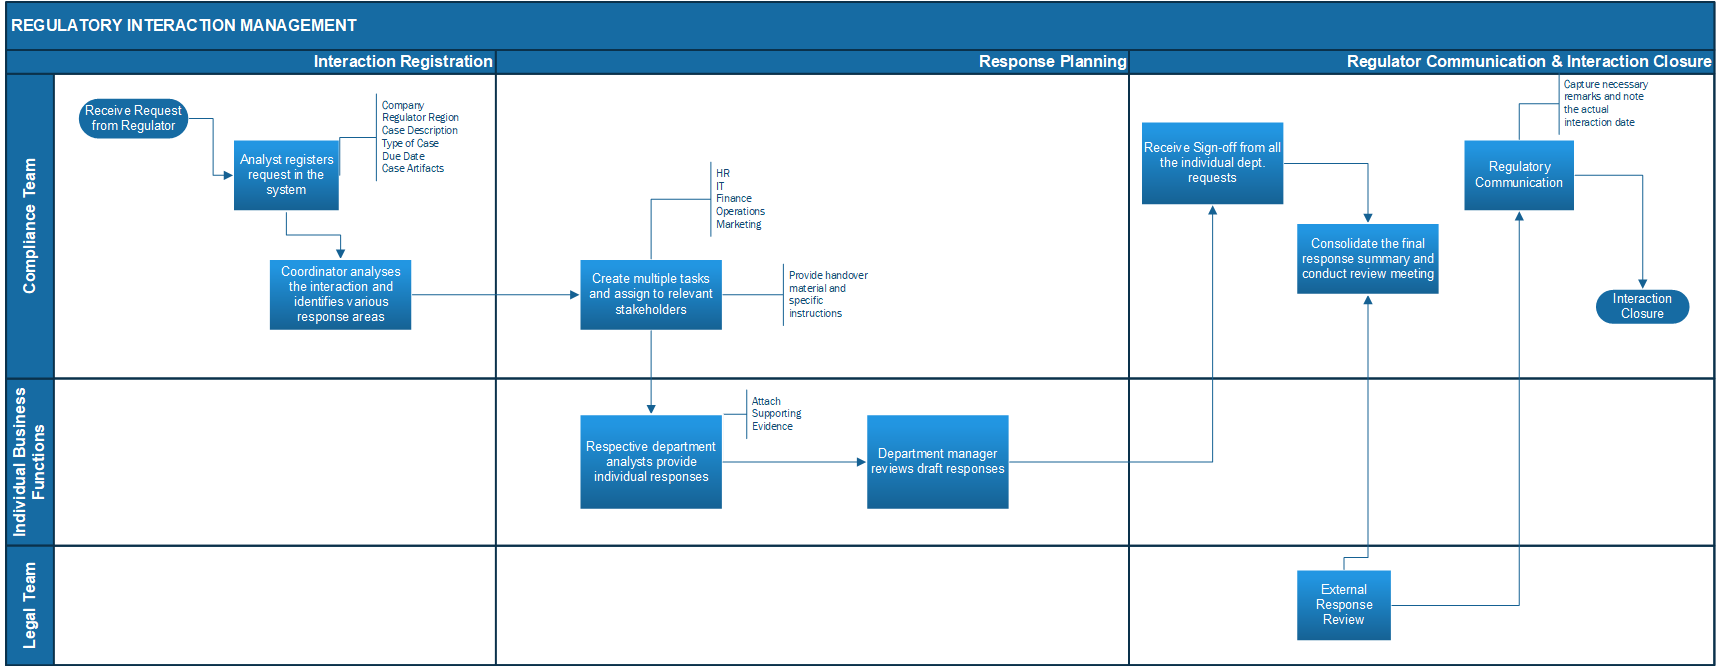
Swim Lane diagram
The following diagram shows the general workflow of the HCL Regulatory Interactions Management App-Pack.
Figure 2: Regulatory Interactions Management Process
Applications
The following table describes the applications in Archer HCL Regulatory Interactions Management.
|
Application |
Description |
|---|---|
|
Regulatory Interactions |
This module enables compliance team to:
|
|
Case Requests |
Case requests are individual tasks identified from a regulatory interaction and assigned to respective departments for response and evidence consolidation. Automated notifications and persona-based governance dashboards ensure that case requests are responded by Analysts and reviewed by their mangers within the due dates aligning to the parent Regulatory interactions. |
|
Document Repository |
Document repository modules helps in maintenance of relevant meta data including document version, authors, type etc. during
|
Personas and Access Roles
The following table describes the functions that make up the HCL Regulatory Interactions Management App-Pack organization roles. Depending on the functional roles of your organization, these functions and responsibilities may vary.
|
Function |
Description |
|---|---|
|
Compliance Analyst |
Compliance analyst registers new regulatory cases from the regulator and captures basic details including general information (regulatory body, due dates, background, etc.) along with organizational alignment and submit the interactions to a compliance coordinator for internal response consolidation. The compliance analyst also finalizes response consolidation and conducts reviews with legal teams before external regulatory communication. |
|
Compliance Coordinator |
On the basis of details procured through the Compliance Analyst, the coordinator performs a detailed impact analysis and assigns prioritized tasks to individual departments along with case handover documents. The Coordinator ensures that all departments respond before their due dates, aligning with external communication deadlines. |
|
Department Admin |
Business Administrators from respective departments like HR, IT , Admin etc., who ensure the allocation of unassigned case requests to respective department analysts and managers. |
|
Department Analyst |
Department Analyst is the first point of contact who is assigned to an individual case request generated from a regulatory interaction and provided with case handover material. The Analyst oversees initial response and evidence collection and submits them for review. |
|
Department Manager |
Department line manager ensures that all case responses and evidences from analysts are complete and accurate to be reused by the compliance team for regulatory communication. |
|
Legal Team |
Legal team reviews all final responses with the compliance team before external communication is triggered with the regulator and for all subsequent interactions after the initial response. |
Personas and Access Roles
The following table describes the functions that make up the application’s organization roles. Depending on the organization of your company, these functions and responsibilities may vary.
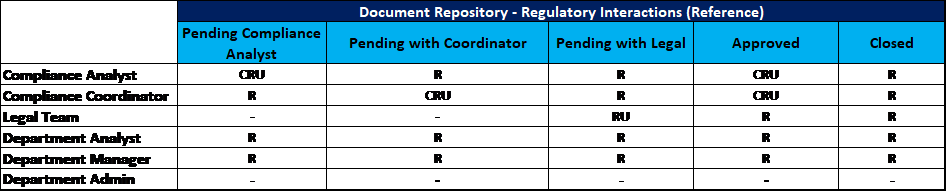
Figure 3: Permissions for Regulatory Interactions Module
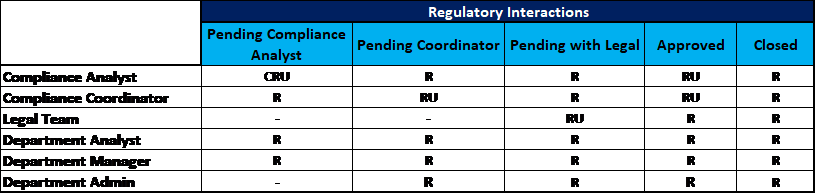
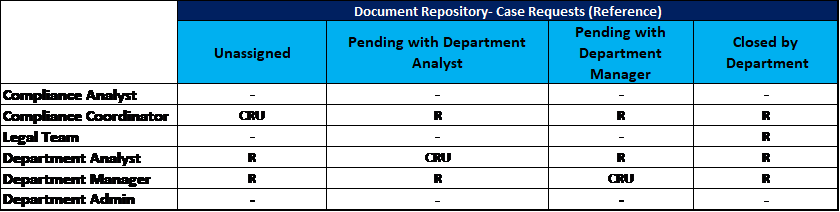
Figure 4: Permissions for Case Request Module
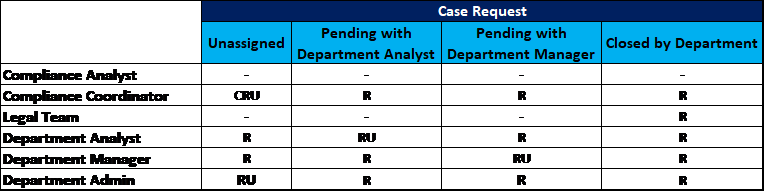
Figure 5: Permissions for Document Repository Module
Note: Respective users will require appropriate access to the related modules at the application and record levels to perform necessary actions during workflow.
Installing HCL Regulatory Interactions Management App-Pack
Step 1: Prepare for the installation
-
Ensure that your Archer system meets the following requirements:
-
Archer Platform version 6.6 P1 HF1 and above
-
Obtain the solution package from CFS-GRC-PMG@HCL.COM
-
-
Read and understand the "Packaging Data" section of Archer Help.
Step 2: Install the package
Installing a package requires that you import the package file, map the objects in the package to objects in the target instance and then install the package. See “Installing the Application Package” for complete information.
Step 3: Test the installation
Test Archer Product Security Development Assessment app-pack according to your company standards and procedures, to ensure that it works with your existing processes.
Installing the HCL Regulatory Interactions Management Package
Step 1: Back up your database
There is no Undo function for a package installation. Packaging is a powerful feature that can make significant changes to an instance. Archer strongly recommends backing up the instance database before installing a package. This process enables a full restoration if necessary.
An alternate method for undoing a package installation is to create a package of the affected objects in the target instance before installing the new package. This package provides a snapshot of the instance before the new package is installed, which can be used to help undo the changes made by the package installation. New objects created by the package installation must be manually deleted.
Step 2: Import the package
-
Go to the Install Packages page.
-
From the menu bar, click
 .
. -
Under Application Builder, click Install Packages.
-
-
In the Available Packages section, click Import.
-
Click Add New, then locate and select the package file that you want to import.
-
Click OK.
The package file is displayed in the Available Packages section and is ready for installation.
Step 3: Map objects in the package
Important: This step is required only if you are upgrading to a later version of Regulatory Interaction management.
-
In the Available Packages section, select the package you want to map.
-
In the Actions column, click
 for that package.
The analyzer runs and examines the information in the package. The analyzer automatically matches the system IDs of the objects in the package with the objects in the target instances and identifies objects from the package that are successfully mapped to objects in the target instance, objects that are new or exist but are not mapped, and objects that do not exist (the object is in the target but not in the source).
Note: This process can take several minutes or more, especially if the package is large, and may time out after 60 minutes. This time-out setting temporarily overrides any IIS time-out settings set to less than 60 minutes.
When the analyzer is complete, the Advanced Package Mapping page lists the objects in the package file and corresponding objects in the target instance. The objects are divided into tabs, depending on whether they are found within Applications, Solutions, Access Roles, Groups, Sub- forms, or Questionnaires.
-
On each tab of the Advanced Mapping Page, review the icons that are displayed next to each object name to determine which objects require you to map them manually.
|
Icon |
Name |
Description |
|---|---|---|
|
|
Awaiting Mapping Review |
Indicates that the system could not automatically match the object or children of the object to a corresponding object in the target instance. Objects marked with this symbol must be mapped manually through the mapping process. Important: New objects should not be mapped. This icon should remain visible. The mapping process can proceed without mapping all the objects. Note: You can execute the mapping process without mapping all the objects. The |
|
|
Mapping Completed |
Indicates that the object and all child objects are mapped to an object in the target instance. Nothing more needs to be done with these objects in Advanced Package Mapping. |
|
|
Do Not Map |
Indicates that the object does not exist in the target instance or the object was not mapped through the Do Not Map option. These objects will not be mapped through Advanced Package Mapping, and must be remedied manually. |
|
|
Undo |
Indicates that a mapped object can be unmapped. This icon is displayed in the Actions column of a mapped object or object flagged as Do Not Map. |
-
For each object that requires remediation, do one of the following:
-
To map each item individually, on the Target column, select the object in the target instance to which you want to map the source object. If an object is new or if you do not want to map an object, select Do Not Map from the drop-down list.
Important: Ensure that you map all objects to their lowest level. When objects have child or related objects, a drill-down link is provided on the parent object. Child objects must be mapped before parent objects are mapped. For more details, see "Mapping Parent/Child Objects" in Archer Help.
-
To automatically map all objects in a tab that have different system IDs but the same object name as an object in the target instance, do the following:
-
In the toolbar, click Auto Map.
-
Select an option for mapping objects by name.
Option
Description
Ignore case
Select this option to match objects with similar names regardless of the case of the characters in the object names.
Ignore spaces
Select this option to match objects with similar names regardless of whether spaces exist in the object names.
-
Click OK.
The Confirmation dialog box opens with the total number of mappings performed. These mappings have not been committed to the database yet and can be modified in the Advanced Package Mapping page.
-
Click OK.
-
-
To set all objects in the tab to Do Not Map, in the toolbar, click Do Not Map.
Note: To undo the mapping settings for any individual object, click ![]() in the Actions column.
in the Actions column.
When all objects are mapped, the ![]() icon is displayed in the tab title. The
icon is displayed in the tab title. The ![]() icon is displayed next to the object to indicate that the object will not be mapped.
icon is displayed next to the object to indicate that the object will not be mapped.
-
Verify that all other objects are mapped correctly.
-
(Optional) To save your mapping settings so that you can resume working later, see "Exporting and Importing Mapping Settings" in Archer Help.
-
Once you have reviewed and mapped all objects, click
 .
. -
Select I understand the implications of performing this operation and click OK.
The Advanced Package Mapping process updates the system IDs of the objects in the target instance as defined on the Advanced Package Mapping page. When the mapping is complete, the Import and Install Packages page is displayed.
Important: Advanced Package Mapping modifies the system IDs in the target instance. Any Data Feeds and Web Service APIs that use these objects will need to be updated with the new system IDs.
Step 4: Install the package
All objects from the source instance are installed in the target instance unless the object can not be found or is flagged to not be installed in the target instance. A list of conditions that may cause objects not to be installed is provided in the Log Messages section. A log entry is displayed in the Package Installation Log section.
-
Go to the Install Packages page.
-
From the menu bar, click
. -
Under Application Builder, click Install Packages.
-
-
In the Available Packages section, locate the package file that you want to install, and click Install.
-
In the Selected Components section, select the components of the package that you want to install.
-
To select all components, select the top-level checkbox.
-
To install only specific global reports in an already installed application, select the checkbox associated with each report that you want to install.
-
Note: Items in the package that do not match an existing item in the target instance are selected by default.
-
Click Lookup.
-
For each component section, do the following:
Note: To move onto another component section, click Continue or select a component section in the Jump To drop-down menu.
In the Install Method drop-down menu, select an install method for each selected component.
Note: If you have any existing components that you do not want to modify, select Create New Only. You may have to modify those components after installing the package to use the changes made by the package.
In the Install Option drop-down menu, select an install option for each selected component.
Note: If you have any custom fields or formatting in a component that you do not want to lose, select Do not Override Layout. You may have to modify the layout after installing the package to use the changes made by the package.
-
Click OK.
-
To deactivate target fields and data-driven events that are not in the package, in the Post-Install Actions section, select the Deactivate target fields and data-driven events that are not in the package check box. To rename the deactivated target fields and data-driven events with a user-defined prefix, select the Apply a prefix to all deactivated objects check box, and enter a prefix. This can help you identify any fields or data-driven events that you may want to review for clean up post-install.
-
Click Install.
-
Click OK.
Step 5: Review the package installation log
-
Go to the Package Installation Log tab of the Install Packages page.
-
From the menu bar, click
. -
Under Application Builder, click Install Packages.
-
Click the Package Installation Log tab.
-
-
Click the package that you want to view.
-
In the Package Installation Log page, in the Object Details section, click View All Warnings.
Using HCL Regulatory Interactions Management App-Pack
Task 1: Registration of regulatory interaction
Upon receipt of a regulatory communication request, the compliance analyst registers it within Regulatory Interactions ODA capturing details like Case Title, Organizational Unit, Region, Regulator Contact Details, Case Supporting Documents, Interaction Type, Response Due Date, etc. The analyst assigns the Interaction to the Compliance Coordinator who conducts a detailed impact analysis and identifies internal departments’ participation toward the regulatory interaction requirements.
Task 2: Response planning and distribution
The Compliance Coordinator identifies internal departments like HR, Finance, IT, Operations etc. and initiation of respective tasks within the Case Request ODA bearing priorities and due dates aligning with overall interaction timelines. The Compliance Coordinator provides impact analysis and handover documentation to respective teams for consumption and toward individual response and evidence consolidation.
Task 3: Response consolidation and review
Once analysts are assigned case requests, preliminary responses and evidences are provided, which undergoes a department line manager review before consideration from the Compliance Coordinator. Automated notifications ensure that department analysts and managers are accountable for timely responses for respective requests. The Compliance Coordinator then consolidates and compiles a final response to be reviewed by a legal team.
Task 4: Regulatory communication and interaction closure
The compliance team sends the relevant response and evidences toward response to a regulatory request. Also, any review meeting notes, closure and follow up information can be captured by the compliance team for future references. The Compliance team documents any learning from a best-practice perspective which can feed into the operational processes and internal control structure of the organization.
Task 5: Governance through persona-based dashboards
Persona-based governance dashboards for Compliance, Department, and Legal teams provide meaningful insights related to organizational impact, work queue management, aging and overdue metrics to ensure that all regulatory interactions and underlying case requests are tracked to closure within stipulated timelines.