Archer Scripts Timesheet
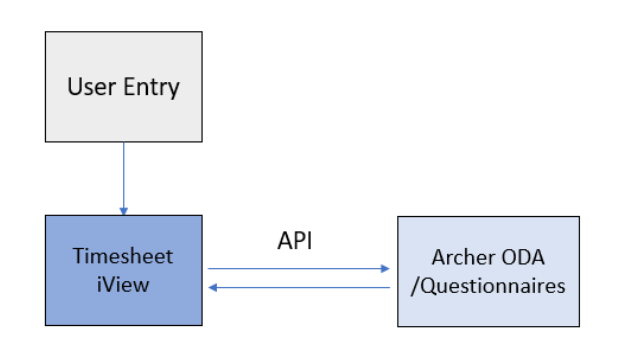
This solution enables Archer users to enter time in a weekly view and store the hours by day with projects stored in any applications within Archer. Users can pick projects already in Archer and also define projects they need to track hours against.
The app-pack uses an Archer ODA to store the time data, which can be integrated through cross-referenced fields to any applications within Archer. Reports/Permissions can also be configured easily using Archer’s native features.
On this page
Release history
Last updated: May 2020
Overview
Benefits
With the Archer Scripts Timesheet application, you can:
-
Enable users to quickly enter time on a weekly view with total hours by day, by project, and by week.
-
Enter day-based time entries similar to popular time tracking software outside of Archer.
-
Integrate with records in existing Archer applications, select existing records on which the users are working.
-
Predefine projects, such as holidays, personal days, create any values lists and start to use them on the tracking tool.
-
Save time entries within an Archer ODA, which can be referenced by other Archer applications.
-
Support the timesheet approval process.
-
Custom validate logic available, such as min and max hours per day or per week, and across all projects per user.
Prerequisites
|
Components |
Recommended Software |
|---|---|
|
ODA License |
Archer Scripts Timesheet App-Pack requires 1 ODA license and 2 Questionnaires. |
|
Operating System |
Same as client’s Archer environment |
|
Database Server |
Same as client’s Archer environment |
|
Services Server |
Java Run time Environment (JRE) 8 (64-bit) |
|
Archer |
Archer 6.4 P2 and later |
|
Use Cases |
All use cases |
Compatible Use Cases and Applications - Related Applications
|
Application |
Use Case |
Primary Purpose(s) of the Relationship |
|---|---|---|
|
All applications |
All use cases |
|
Note: As part of default implementation there are cross-references to applications such as Audit Engagement and BC/DR Plans. These can be customized per customer’s requirement.
Components
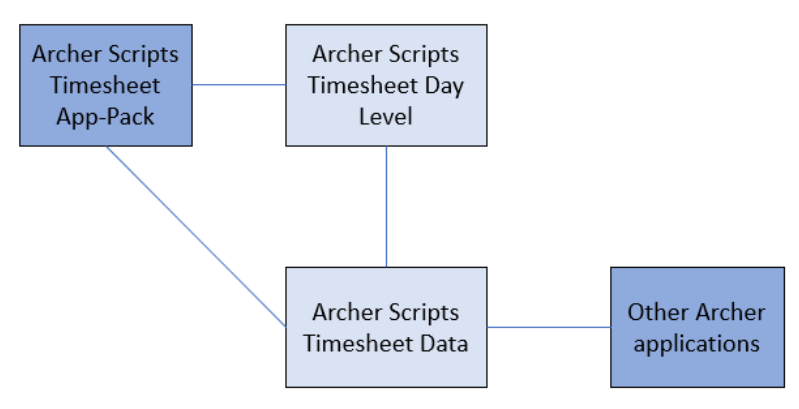
Architecture diagram
App-Pack architecture diagram
Applications
|
Application |
Description |
|---|---|
|
Archer Scripts Timesheet App-Pack |
This application stores the time tracking week level and approval. |
|
Archer Scripts Timesheet Day Level |
This questionnaire stores the time tracking day level. |
|
Archer Scripts Timesheet Data |
This questionnaire stores the time tracking projects level. |
Personas and Access Roles
Additional groups can be defined as needed.
|
Groups |
Description |
|---|---|
|
Time: Reviewers |
This group grants users access to approve assigned requests. |
|
Time: Submitters |
This group grants users access to submit requests. |
|
Time: Read Only |
This group grants users read access to all records. |
Installing Archer Scripts Timesheet App-Pack
Complete the following tasks to install the application.
Task 1: Prepare for the installation
-
Ensure that your Archer system meets the following requirements:
-
Archer Platform version 6.4P2 or higher
-
-
Go to Archer Exchange to obtain information on how to download the Timesheet App-Pack directly from Archer Scripts along with supporting documentation (you may be required to sign up or log in)
-
Read and understand the "Packaging Data" section of Archer Help.
Task 2: Install the package
Installing a package requires that you import the package file, map the objects in the package to objects in the target instance, and then install the package. See Installing the Application Package for complete information.
Task 3: Create reports in related applications
For each of the cross-referenced applications used in the timesheet, a report needs to be created. See Create reports in related applications (the ones to be referenced).
Task 4: Test the installation
Test the application according to your company standards and procedures to ensure that the use case works with your existing processes.
Installing the package
Task 1: Backup your database
There is no Undo function for a package installation. Packaging is a powerful feature that can make significant changes to an instance. Archer strongly recommends backing up the instance database before installing a package. This process enables a full restoration if necessary.
An alternate method for undoing a package installation is to create a package of the affected objects in the target instance before installing the new package. This package provides a snapshot of the instance before the new package is installed, which can be used to help undo the changes made by the package installation. New objects created by the package installation must be manually deleted.
Task 2: Import the package
-
Go to the Install Packages page.
-
From the menu bar, click
 .
. -
Under Application Builder, click Install Packages.
-
-
In the Available Packages section, click Import.
-
Click Add New, then locate and select the package file that you want to import.
-
Click OK. The package file is displayed in the Available Packages section and is ready for installation.
Task 3: Map objects in the package (Not needed for the first time install)
Important: This step is required only if you are upgrading to a later version of Archer Scripts Timesheet App-Pack.
-
In the Available Packages section, select the package you want to map.
-
In the Actions column, click
 for that package.
The analyzer runs and examines the information in the package. The analyzer automatically matches the system IDs of the objects in the package with the objects in the target instances and identifies objects from the package that are successfully mapped to objects in the target instance, objects that are new or exist but are not mapped, and objects that do not exist (the object is in the target but not in the source).
Note: This process can take several minutes or more, especially if the package is large, and may time out after 60 minutes. This time-out setting temporarily overrides any IIS time-out settings set to less than 60 minutes.
When the analyzer is complete, the Advanced Package Mapping page lists the objects in the package file and corresponding objects in the target instance. The objects are divided into tabs, depending on whether they are found within Applications, Solutions, Access Roles, Groups, Sub- forms, or Questionnaires.
-
On each tab of the Advanced Mapping Page, review the icons that are displayed next toe ach object name to determine which objects require you to map them manually.
|
Icon |
Name |
Description |
|---|---|---|
|
|
Awaiting Mapping Review |
Indicates that the system could not automatically match the object or children of the object to a corresponding object in the target instance. Objects marked with this symbol must be mapped manually through the mapping process. Important: New objects should not be mapped. This icon should remain visible. The mapping process can proceed without mapping all the objects. Note: You can execute the mapping process without mapping all the objects. The |
|
|
Mapping Completed |
Indicates that the object and all child objects are mapped to an object in the target instance. Nothing more needs to be done with these objects in Advanced Package Mapping. |
|
|
Do Not Map |
Indicates that the object does not exist in the target instance or the object was not mapped through the Do Not Map option. These objects will not be mapped through Advanced Package Mapping, and must be remedied manually. |
|
|
Undo |
Indicates that a mapped object can be unmapped. This icon is displayed in the Actions column of a mapped object or object flagged as Do Not Map. |
-
For each object that requires remediation, do one of the following:
-
To map each item individually, on the Target column, select the object in the target instance to which you want to map the source object. If an object is new or if you do not want to map an object, select Do Not Map from the drop-down list.
Important: Ensure that you map all objects to their lowest level. When objects have child or related objects, a drill-down link is provided on the parent object. Child objects must be mapped before parent objects are mapped. For more details, see "Mapping Parent/Child Objects" in Archer Help.
-
To automatically map all objects in a tab that have different system IDs but the same object name as an object in the target instance, do the following:
-
In the toolbar, click Auto Map.
-
Select an option for mapping objects by name.
Option
Description
Ignore case
Select this option to match objects with similar names regardless of the case of the characters in the object names.
Ignore spaces
Select this option to match objects with similar names regardless of whether spaces exist in the object names.
-
Click OK.
The Confirmation dialog box opens with the total number of mappings performed. These mappings have not been committed to the database yet and can be modified in the Advanced Package Mapping page.
-
Click OK.
-
To set all objects in the tab to Do Not Map, in the toolbar, click Do Not Map.
Note: To undo the mapping settings for any individual object, click
 in the Actions column.
-
-
When all objects are mapped, the ![]() icon is displayed in the tab title. The
icon is displayed in the tab title. The ![]() icon is displayed next to the object to indicate that the object will not be mapped.
icon is displayed next to the object to indicate that the object will not be mapped.
-
Verify that all other objects are mapped correctly.
-
(Optional) To save your mapping settings so that you can resume working later, see "Exporting and Importing Mapping Settings" in Archer Help.
-
Once you have reviewed and mapped all objects, click
 .
. -
Select I understand the implications of performing this operation and click OK.
The Advanced Package Mapping process updates the system IDs of the objects in the target instance as defined on the Advanced Package Mapping page. When the mapping is complete, the Import and Install Packages page is displayed.
Important: Advanced Package Mapping modifies the system IDs in the target instance. Any Data Feeds and Web Service APIs that use these objects will need to be updated with the new system IDs.
Task 4: Install the package
All objects from the source instance are installed in the target instance unless the object can not be found or is flagged to not be installed in the target instance. A list of conditions that may cause objects not to be installed is provided in the Log Messages section. A log entry is displayed in the Package Installation Log section.
-
Go to the Install Packages page.
-
From the menu bar, click
. -
Under Application Builder, click Install Packages.
-
-
In the Available Packages section, locate the package file that you want to install, and click Install.
-
In the Configuration section, select the components of the package that you want to install.
-
To select all components, select the top-level checkbox.
-
To install only specific global reports in an already installed application, select the checkbox associated with each report that you want to install.
-
Note: Items in the package that do not match an existing item in the target instance are selected by default.
-
In the Configuration section, under Install Method, select an option for each selected component. To use the same Install Method for all selected components, select a method from the top-level drop-down list.
Note: If you have any existing components that you do not want to modify, select Create New Only. You may have to modify those components after installing the package to use the changes made by the package.
-
In the Configuration section, under Install Option, select an option for each selected component. To use the same Install Option for all selected components, select an option from the top-level drop-down list.
Note: If you have any custom fields or formatting in a component that you do not want to lose, select Do not Override Layout. You may have to modify the layout after installing the package to use the changes made by the package.
-
To deactivate target fields and data-driven events that are not in the package, in the Post-Install Actions section, select the Deactivate target fields and data-driven events that are not in the package checkbox. To rename the deactivated target fields and data-driven events with a user-defined prefix, select the Apply a prefix to all deactivated objects check box, and enter a prefix. This can help you identify any fields or data-driven events that you may want to review for cleanup post-install.
-
Click Install.
-
Click OK.
Task 5: Review the package installation log
-
Go to the Package Installation Log tab of the Install Packages page.
-
From the menu bar, click
. -
Under Application Builder, click Install Packages.
-
Click the Package Installation Log tab.
-
-
Click the package that you want to view.
-
In the Package Installation Log page, in the Object Details section, click View All Warnings.
Note: If the users don’t have access to Audit Engagements and BC/DR Plans then installation errors might occur.
Create reports in related applications (the ones to be referenced)
For each of the cross-referenced applications used in the timesheet, you must create a report.
Reportsmust be created with the name “Archer Scripts Timesheet App-Pack - Get All Names for Selection”
Using Archer Scripts Timesheet App-Pack
Task 1: Time track iView user interface
-
Click the Timesheet workspace. Wait for the scripts to be loaded.
Here are explations of each section of the workspace:
-
Select the application where you are tracking time against. The list will display the cross-referenced fields created in the time tracking ODA, plus predefined values lists.
Audit Engagement and BC/DR Plans are 2 examples of cross-referenced fields.
Non-billable and Security Specific Category are 2 examples of predefined values lists.
-
Once the above field is selected, the specific values will be displayed here. In the case of cross-referenced field, the records display within this app; record permissions are applied here. For values list, the values will be displayed. Click ADD PROJECT to add the entries to the timesheet grid section. Multiple projects can be selected.
Note: Customers can request customized restrictions to the hours enter. For example, they can limit the entry to be not over certain numbers, or to require it to be at least certain number of hours, otherwise the system will not allow submission. This requires custom development work from Archer Scripts LLC.
-
Displays the application (or values list) and the records/projects selected from above.
-
This section displays the hours worked for the selected projects. Enter hours within the cells. Click SUBMIT or SAVE DRAFT before submitting for review.
-
(Optional) Submitter Comment can be stored here.
-
This field automatically displays the submitter’s username, which will be used when the ODA records are created. Please note the username will not be displayed if username Inclusion is not enabled in the Archer Control Panel for the instance.
-
Reviewer field, currently is a manual pick list. This can be set automatically upon client’s requests. Can be tailored to client’s specific requirements, example can be reviewer from Contacts app.
Note: All users except the current logged in user are available in dropdown as part of the default configuration.
-
Once ready, click SUBMIT, API will run and create ODA records. The Status becomes Submitted, waiting for review.
Task 2: Timesheet ODA and review
Once the timesheet is submitted, API will create ODA records in the following ODAs and questionnaires.
-
Archer Scripts Timesheet App-Pack. Stores the weekly info, where day level information from “Archer Scripts Timesheet Day Level” is rolled up. It displays the total hours from all related day levels. This level also has the Review process built in. The reviewer receives notification when the timesheet was submitted from the iView. The reviewers will perform the review and set the review status under the Approval section.
-
Archer Scripts Timesheet Day Level. Stores the day info, where the Projects information from “Archer Scripts Timesheet Data” are rolled up.
-
Archer Scripts Timesheet Data. Stores the project information.