Archer Speak Up
The Archer Speak Up App-pack allows Users without access to Archer to generate records in Archer Engage. The records are replicated in Archer. With Archer Engage, Users can submit anonymous requests.
This offering is provided through the Archer Exchange to enhance your existing Archer implementation. To learn more about this offering, please visit the Product Listing on the Archer Exchange.
On this page
Release notes
| Release Date | Release Version | Notes |
| February 2019 | Archer 6.4 SP1 | Initial Release |
| December 2021 | Archer 6.9 SP3 P2 |
|
| November 2023 | Archer 6.14 |
|
Overview of Archer Speak-Up
About Archer Speak-Up
Business Users have a desire to communicate to management information in the form of ideas, incidents, issues, risks, etc. Users need a method to report this information to management, but they might not know exactly how to classify the information or where to submit it. Management does not want all users to have access to all Archer applications to create new information. For example, a Business User observes a market initiative by a competitor in which they feel is a risk to the organization. They would like to make management aware of the risk but do not have a way to easily communicate the information and track the activity.
This solution meets both requirements, providing users with an application to communicate information with Management and allow for use of workflow to review or approve the reported information.
Key features and benefits
The Archer Speak Up app-pack allows customers to:
-
Empower users to Speak Up regarding the business.
-
Provide ownership and accountability for information reported.
-
Employ a consistent governance process for reporting information.
-
Be informed of organizational risks related to Speak Up requests.
-
Inspire everyone to own risk.
Prerequisites (ODA and system requirements)
The following table lists the components and prerequisites for Archer Speak Up.
|
Components |
Prerequisites |
|
Archer Solution Area(s) |
N/A |
|
Archer Use Case(s) |
N/A |
|
Archer Applications |
N/A |
|
Uses Custom Application |
Yes |
|
Requires On-Demand License |
Yes. 1 On-Demand License is required. |
|
Archer Requirements |
Archer 6.14 and later |
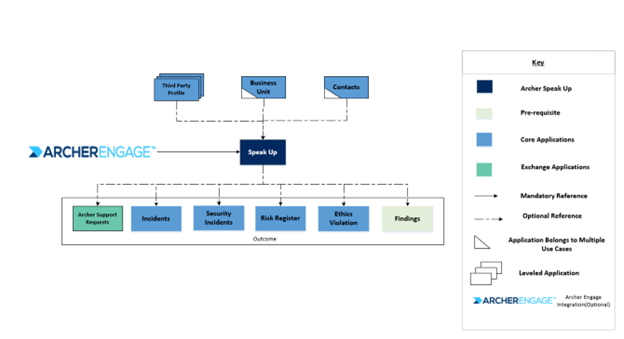
Compatible Use Cases and Applications
Related Applications
|
Application |
Use Case |
Primary Purpose of the Relationship |
|
Business Unit |
Archer Issues Management, Archer Business Impact Analysis, Archer Third Party Catalog, Archer IT Asset Catalog, Archer Business Asset Catalog, Archer Key Indicator Management, Policy Program Management, Cyber Incident & Breach Response, ESG Management |
Requests can be tied to a business unit. |
|
Contacts |
Audit Engagements & Workpapers, Incident Management, Business Continuity and IT Disaster Recovery Planning, Third Party Catalog, IT Asset Catalog, Policy Program Management, IT Controls Assurance, IT Risk Management, Cyber Incident & Breach Response, Policy Program Management, Controls Assurance Program Management, Data Governance, Business Asset Catalog, Loss Event Management, Operational Risk Management |
Any complaints against Employees can be tracked against them. |
|
Third Party Profile |
Third Party Catalog, Third Party Risk Management, Third Party Engagement |
Any complaints against third party can be tracked against their profile. |
|
Findings |
Issues Management, Cybersecurity Maturity Model Certifications |
Any Issues can be documented and tracked |
|
Risk Register |
Business Continuity and IT Disaster Recovery Planning, Information Security Management System, IT Risk Management, Risk Catalog, Top-Down Assessment |
Risks can documented and tracked. |
|
Incidents |
Incident Management |
Incidents can be created and resolved. |
|
Security Incidents |
Cyber Incident & Breach Response |
Cyber Incidents can be tracked effectively. |
|
Ethics Violation |
Incident Management, Financial Controls Monitoring |
Any violations in ethics can be documented and tracked for appropriate action. |
|
Archer Support Requests |
Archer Support Requests (Exchange Offering) |
Any support requests be tracked against them. |
Archer Speak Up components
Architecture diagram
The following diagram shows the architecture of the offering.
Download the source file of the diagram here: Archer Speak Up Architecture Diagram
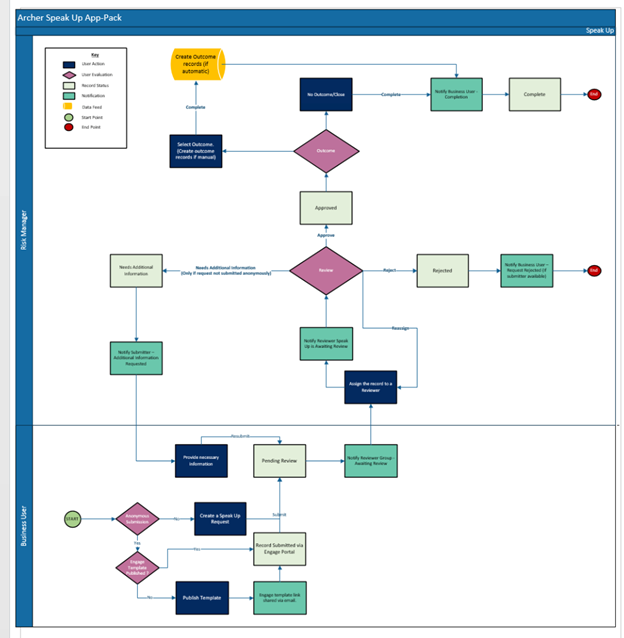
Process diagram
The following diagram shows the procss of the offering.
Download the source file of the diagram here: Archer Speak Up Process Diagram
Applications
|
Application |
Description |
|
Speak Up application |
The Speak Up application allows Business Users to communicate to Management information to such as ideas, incidents, issues, risks, ethics violations, and complaints. It tracks the type of request and outcome. |
Personas and Access Roles
The following table describes the functions that make up the application’s organization roles. Depending on the organization of your company, these functions and responsibilities may vary.
|
Function |
Description |
|
Business User |
1st line of defense responsible for submitting Speak Up requests. The target audience is internal employees or contractors across the organization. Business users are not intended to be customers or external users to the organization. |
|
Risk Manager |
2nd line of defense user managing the approval of Speak Up requests and determining the outcome to track remediation |
|
Executive Management |
Monitors Speak Up requests in relation to organizational risks. |
Permissions chart
|
Application |
Speak Up: General Access |
Speak Up: Risk Manager |
|
Speak Up |
CRU |
CRU |
|
Contacts |
|
R |
|
Ethics Violation |
|
CRU |
|
Findings |
|
CRU |
|
Incidents |
|
CRU |
|
Risk Register |
|
CRU |
|
Security Incidents |
|
CRU |
|
Third Party Profile |
|
R |
|
Archer Support Request |
|
CRU |
C = Create, R = Read, U = Update, D = Delete
*Members of the Speak Up groups should have minimum read access to the related applications, if available.
Installing Archer Speak Up
Installation overview
Step 1: Prepare for the installation
-
Ensure that your Archer system is Archer Platform version 6.14 or later.
-
Obtain the Data Dictionary for the ODA by contacting your Archer Account Representative. The Data Dictionary contains the configuration information for the offering.
-
Read and understand "Packaging Data" in the Archer Platform Help.
Step 2: Install the package
Installing a package requires that you import the package file, map the objects in the package to objects in the target instance, and then install the package. For more information, see Installing the Package.
Step 3: Set up the data feeds
You must import and schedule each use case data feed that you want to use. See Setting Up Data Feeds.
Step 4: Test the installation
Test the installation according to your company standards and procedures, to ensure that the use case works with your existing processes.
Installing the package
Task 1: Back up your database
There is no undo function for package installation. Packaging is a powerful feature that can make significant changes to an instance. Archer strongly recommends that you back up the instance database before installing a package. This process enables a full restoration if necessary.
An alternate method for undoing a package installation is to create a package of the affected objects in the target instance before installing the new package. This package provides a snapshot of the instance before the new package is installed, which can be used to help undo the changes made by the package installation. You must manually delete new objects created by the package installation.
Task 2: Import the package
-
From the menu bar, click
 > Application Builder > Install Packages.
 -
In the Available Packages section, click Import.
-
Click Add New, then select the package file that you want to import.
-
Click OK.
The Available Packages section displays the package file and is ready for installation.
Task 3: Map objects in the package
Important: This step is required only if you are upgrading to a later version of the offering.
-
From the menu bar, click
> Application Builder > Install Packages. -
In the Available Packages section, select the package you want to map.
-
In the Actions column, click
 for that package.
The analyzer runs and examines the information in the package. The analyzer automatically matches the system IDs of the objects in the package with the objects in the target instances and identifies objects from the package that are successfully mapped to objects in the target instance, objects that are new or exist but are not mapped, and objects that do not exist (the object is in the target but not in the source).
Note: This process can take several minutes or more, especially if the package is large, and may time out after 60 minutes. This time-out setting temporarily overrides any IIS time-out settings set to less than 60 minutes.
-
When the analyzer is complete, the Advanced Package Mapping page lists the objects in the package file and corresponding objects in the target instance. The objects are divided into tabs, depending on whether they are found within Applications, Solutions, Access Roles, Groups, Sub- forms, or Questionnaires.
On each tab of the Advanced Mapping Page, review the icons next to each object to determine which objects you must map manually.
Icon
Name
Description

Awaiting Mapping Review
Indicates that the system could not automatically match the object or children of the object to a corresponding object in the target instance.
Objects marked with this icon must be mapped manually through the mapping process.
Important: New objects should not be mapped. This icon should remain visible. The mapping process can proceed without mapping all the objects.
Note: You can run the mapping process without mapping all the objects. The
icon is for informational purposes only.
Mapping
Completed
Indicates that the object and all child objects are mapped to an object in the target instance. There are no further steps required with these objects in Advanced Package Mapping.

Do Not
Map
Indicates that the object does not exist in the target instance, or the object was not mapped through the Do Not Map option. These objects will not be mapped through Advanced Package Mapping and must be remedied manually.

Undo
Indicates that a mapped object can be unmapped. This icon is displayed in the Actions column of a mapped object or object flagged as Do Not Map.
-
For each object that requires remediation, do one of the following:
-
To map each item individually, on the Target column, select the object in the target instance to which you want to map the source object. If an object is new or if you do not want to map an object, select Do Not Map from the drop-down list.
Important: Ensure that you map all objects to their lowest level. When objects have child or related objects, the parent object provides a drill-down link. You must map child objects before parent objects. For more details, see "Mapping Parent/Child Objects" in the Archer Platform Help.
-
To automatically map all objects in a tab that have different system IDs but the same object name as an object in the target instance, do the following:
-
In the toolbar, click Auto Map.
-
Select an option for mapping objects by name:
Option
Description
Ignore case
Select this option to match objects with similar names regardless of the case of the characters in the object names.
Ignore spaces
Select this option to match objects with similar names regardless of whether spaces exist in the object names.
-
Click OK.
The Confirmation dialog box opens with the total number of mappings performed. These mappings have not been committed to the database yet and can be modified in the Advanced Package Mapping page.
-
Click OK.
-
To set all objects in the tab to Do Not Map, in the toolbar, click Do Not Map.
To undo the mapping settings for any individual object, in the Actions column, click Undo.
When all objects are mapped, the ![]() icon is displayed in the tab title. The
icon is displayed in the tab title. The ![]() icon is displayed next to the object to indicate that the object will not be mapped.
icon is displayed next to the object to indicate that the object will not be mapped.
-
Verify that all other objects are mapped correctly.
-
(Optional) To save your mapping settings so that you can resume working later, see "Importing and Exporting Mapping Settings" in the Archer Platform Help.
-
Once you have reviewed and mapped all objects, click Execute.
-
Select I understand the implications of performing this operation and click OK.
The Advanced Package Mapping process updates the system IDs of the objects in the target instance as defined on the Advanced Package Mapping page. When the mapping is complete, the Import and Install Packages page is displayed.
Important: Advanced Package Mapping modifies the system IDs in the target instance. You will need to update any Data Feeds and Web Service APIs that use these objects, with the new system IDs.
Task 4: Install the package
All objects from the source instance are installed in the target instance unless the object cannot be found or is flagged to not be installed in the target instance. The Log Messages section provides a list of conditions that may cause objects not to be installed. The Package Installation Log section displays a log entry.
-
From the menu bar, click
 > Application Builder > Install Packages.
 -
In the Available Packages section, locate the package file that you want to install, and click Install.
-
In the Selected Components section, click the Lookup button to open the Package Selector window.
-
To select all components, select the top-level checkbox.
-
To install only specific global reports in an already installed application, select the checkbox associated with each report that you want to install.
Note: Items in the package that do not match an existing item in the target instance are selected by default.
-
-
Under the Install Method drop-down menu, select an option for each selected component. To use the same Install Method for all selected components, select a method from the top-level drop-down list.
Note: If you have any existing components that you do not want to modify, select Create New Only. You may have to modify those components after installing the package to use the changes made by the package.
-
To deactivate target fields and data-driven events that are not in the package, in the Post-Install Actions section, select the Deactivate target fields and data-driven events that are not in the package checkbox. To rename the deactivated target fields and data-driven events with a user-defined prefix, select the Apply a prefix to all deactivated objects checkbox, and enter a prefix. This can help you identify any fields or data-driven events that you may want to review for cleanup post-install.
-
Click Install.
-
Click OK.
Task 5: Review the package installation log
-
From the menu bar, click
> Application Builder > Install Packages. -
In the Package Installation Log tab, click the package that you want to view.
-
In the Package Installation Log page, in the Object Details section, click View All Errors.
Note: To view individual logs, in the Errors column of the log you want to view, click the Failures link or Warnings link. Clicking View All Errors, Failures, or Warnings opens the specific errors on a different page.
-
Click the Export icon to export the log file.
-
Click Close.
Setting up Data Feeds
Import the data feeds in the following order:
-
Speak Up: Create Ethics Violation
-
Speak Up: Create Findings
-
Speak Up: Create Risk
-
Speak Up: Create Incident
-
Speak Up: Create Security Incident
-
Speak Up: Create Support Request
Task 1: Import a data feed
-
Go to the Manage Data Feeds page.
-
From the menu bar, click
. -
Under Integration, click Data Feeds.
-
-
In the Manage Data Feeds section, click Import.
-
Locate and select the .dfx5 file for the data feed.
-
From the General tab in the General Information section, in the Status field, select Active.
-
Click the Transport tab. Complete the fields in the Transport Configuration section as follows: In the URL field, type: YourServerName/VirtualDirectoryName/ws/search.asmx
-
In the User Name and Password fields, type the username and password of a Platform user that has API access and access to all the records on the Platform instance (from which the data feed is coming).
-
In the Instance field, type the name of the Platform instance from which the data feed is coming (this is the instance name as you enter it on the Login window).
-
Verify that key field values are not missing from the data feed setup window.
-
Click Save.
Task 2: Schedule a data feed
A data feed must be active and valid to successfully run. A successful data feed run processes all input data, completes all expected record updates, and does not report any failures in the Run Details Report.
Validating a data feed
The Data Feed Manager validates the information when a data feed is scheduled. If any information is invalid, the data feed displays an error message. You can save the data feed and correct the errors later, but the data feed does not process until you make corrections.
Running a data feed
You can set up data feeds to run automatically at regular intervals. This reduces the time and effort required to import data from an external file.
You can initiate data feeds at various times and configure them to run in regular increments for an indefinite period of time.
You can run the data feed immediately.
To prevent excess server load, schedule data feeds on a staggered basis. You can schedule a maximum of 10 data feeds to run at a time. If more than 10 data feeds are scheduled, each remaining data feed runs as the previous one completes.
Setting up a reference data feed
A reference feed allows you to specify another feed. This indicates to the Data Feed Service that this feed will start running as soon as the referenced feed completes successfully.
-
Go to the Run Configuration tab > Schedule section.
-
Do one of the following to schedule your data feed.
-
Run on Schedule. You can configure your data feed to run on a defined schedule.
-
Run After. The Data Feed Services starts the current data feed after the referenced data feed is completed successfully.
-
Run Now.
-
-
To save the data feed, click Save or Save and Close.
Configuring Archer Engage for Archer Speak Up
Note: This section is only valid if Engage for Business Users integration is required.
A new layout is added which when published to Engage becomes a record page template in the Engage Portal. It can be used to create multiple records in Archer without having the need to login to Archer. Once the record is created the remaining steps can be done in Archer. Users can submit speak up records anonymously via Archer Engage portal.
Task 1: Enable Publish template feature
-
From the Administration Bar click Applications to open the application list.
-
Click on the Speak Up.
-
Click on the design tab.
-
From the layout object list select and place the publish template custom object on the layout.
-
Custom object configuration can be found in the Archer Engage documentation in the Archer Help Center.
-
Save the layout.
Task 2: Publish Template
-
Go to the Speak Up Registry record.
-
From the menu bar, click Speak up.
-
From the Dropdown, click Speak Up.
-
From the Dropdown, click Speak Up.
-
In the Speak Up record browser, click New Record.
-
-
Publish the template.
-
From the layout. Click on publish.
-
After publishing is successful and email will be sent to the configured user.
-
-
Remove the Publish Template custom object from the layout via requesting an administrator.
Task 3: Update Template
To update the Record Page in Archer Engage, complete the following:
-
Enable Delete button to remove the exiting template by following the below steps:
-
From the Administration Bar click Applications.
-
Click on the Speak Up.
-
Click on the design tab.
-
From the layout object list select and place the Delete template custom object on the layout.
-
Custom object configuration can be found in the Archer Engage documentation in the Archer Help Center.
-
Save the layout.
-
-
Delete the template by following the bellow steps:
-
From the menu bar, click Speak Up.
-
From the Dropdown, click Speak Up.
-
From the Dropdown, click Speak Up.
-
In the Speak Up record browser, click New Record.
-
In the record page click on delete template.
-
-
After deletion is successful the record template will be removed from engage.
-
Remove the Publish Template custom object from the layout.
-
To publish the new updated template, follow the steps mentioned in the Task 1.
Upgrading Archer Speak Up
For the Archer Speak Up 6.14 release, the Speak up application has been updated to enable publishing of the templates to the Archer Engage portal. If you are upgrading from Speak up version 6.12 or earlier to version 6.14 or later, be aware of the following changes.
A new layout is added which when published to Engage becomes a record page template. It can be used to create multiple records in Archer without having the need to login into Archer. Once the record is created the next steps can be done in Archer.
The following table describes the changes in the Archer Speak Up 6.14 release.
| Item | Field | Change Made |
| Custom Object |
Publish Template |
Added new custom object to enable publishing of the template to engage portal. |
| Custom Object |
Delete Template |
Added new custom object to delete template published to engage portal. |
| AWF | Anonymous Submission = Yes |
Rule updated to bypass manual submission in case Submitted By contains No selection. For users submitting request on behalf of others. |
| Layout Name |
000: Default layout |
DDE added to make ‘Submitter Name’ and ‘Submitter Email’ required in case the ‘Submitted By’ contains No Selection. |
| Layout Name |
Engage Layout |
Added New layout which will be sent to Engage as a template. |
| Dashboards | Risk Manager Dashboard |
|
| Dashboards | Executive Management Dashboard |
|
Using Archer Speak Up
Task 1: Create Speak Up Request
User: Business User
Non-Anonymous Speak Up Request
-
Go to the Archer Speak Up Record
-
From the menu bar, click Archer Speak Up.
-
Under Solutions, click Archer Speak Up.
-
Under Applications, Speak Up.
-
In the Speak Up record browser, click New Record.
-
-
Enter Following Information in the Speak Up Request Section.
-
[Title]: Short name of the request
-
[Description]: Provide the detailed information regarding your request in Description Text box.
-
[Date of Occurrence]: If there is any date associated with this request, provide it here.
-
If you are submitting the request on behalf of a different user, select the user in [Submitted By] file. If the user is not an archer user provide name and email id of the submitter in fields [Submitter Name] and [Submitter Email].
-
[Supporting Documentation]: Attach Supporting Documentation if any.
-
-
Click on Save or Save and Close to save changes to keep the record in Draft stage and enroll in workflow.
-
After record is enrolled in workflow, click on Submit in the Actions dropdown to submit request.
Request Type: Anonymous Speak Up Request (via Archer Engage)
Note: Publishing of the Archer layout to Archer Engage must be completed before following the steps below.
-
Login into the Archer Engage portal.
-
From the left panel select create new.
-
Select the Organization, Report name and the Language.
-
Fill in the following information:
-
[Title]: Short name of the request
-
[Description]: Provide the detailed information regarding your request in Description Text box.
-
[Date of Occurrence]: If there is any date associated with this request, provide it here.
-
[Anonymous Submission]: Set as Yes to hide of the submitter fields.
-
[Submitter Name]: Name of the submitter or person on whose behalf the request is being submitted.
-
[Submitter Email]: email of the submitter or person on whose behalf the request is being submitted.
-
Note: The steps above enable the creation of a record in Archer. Once the record is submitted, the record is created in Archer and the remaining tasks should be performed in Archer.
Task 2: Assign Reviewer to the Speak Up Request
User: Speak Up: Risk Manager
-
Go to the Archer Speak Up Record
-
From the menu bar, click Archer Speak Up.
-
Click on Risk Manager Dashboard under Dashboards.
-
In the Review Queue iView, click on Request ID to open the record.
-
Click on Edit.
-
-
Select Reviewer in [Reviewer] field.
-
Click on Save button to assign reviewer.
-
Assigned Reviewer will receive a notification to review the Speak Up request.
Task 3: Review the Speak Up Request
User: Reviewer
The assigned Reviewer is responsible for conducting the review, determining the outcome and completing the request. The assigned Reviewer can request additional information from the Submitter or approve or reject the request.
-
Go to the Archer Speak Up Record
-
To Review navigate to Workflow & Approvals Section:
-
Select [Priority] in the Priority field.
-
[Request Type]: Select Idea, Complaint or Issue depending upon the request.
-
If a complaint was submitted, select who the complaint was raised against in [Compliant Against] field in complaint details section.
-
Employee: select the [Employee Name] or [Employee], [Employee Email] (if user is not available in [Employee Name] Popup).
-
Third Party: provide [Third Party Name] and/or select [Related Third Party] (if this field is visible).
-
-
-
[Business Unit]: Select Business Unit this request might belong to.
-
To Approve:
-
Select outcome in [Outcome] field to submit the request to the appropriate team. If user wishes to determine outcome at a later stage, they can skip to step iii. Outcomes can be one of the following:
-
Cyber Incident - Report any Incidents
-
Operational Incident - Report any Security Incidents
-
Issue - Track any Findings
-
Risk - Report any Risks
-
Ethics Violation - Report any Ethics Violations
-
Archer Support Request - Request any Archer Changes.
-
Close - Close the request and input comments in the Other text box.
-
-
To generate the outcome automatically, select "Yes" in the Create Outcome Automatically? field. Otherwise, select "No".
-
Select Approve in the Actions dropdown.
-
If outcome is determined and created, the Speak Up request status will change to Complete and the Submitter will receive a notification. Otherwise, the Speak Up request will change to Approved Status. The Reviewer will need to perform Task 4.
-
-
To Reject the Request –
-
Document the Reason for Not Approving in Workflow & Approvals section.
-
Select Reject in the Actions dropdown.
-
-
To Request Additional Information - (Additional information can only be requested when the Speak Up request was not submitted anonymously)
-
The Reviewer will need to review the information.
-
Provide comments regarding additional information required in Reason for Not Approving field.
-
Select Needs Additional Information in the Actions dropdown.
-
-
To Reassign –
-
Select new Reviewer in Workflow & Approvals section.
-
Select Reassign in the Actions dropdown.
-
-
Task 4: Determine Outcome
User: Reviewer
Reviewer can determine the outcome after approval to complete the request if not done during the approval of the request.
-
Go to the Archer Speak Up Record.
-
To Review navigate to Workflow & Approvals Section:
-
Select outcome in [Outcome] field to submit the request to the appropriate team. Outcomes can be one of the following:
-
Cyber Incident - Report any Incidents
-
Operational Incident - Report any Security Incidents
-
Issue - Track any Findings
-
Risk - Report any Risks
-
Ethics Violation - Report any Ethics Violations
-
Archer Support Request - Request any Archer Changes.
-
Close - Close the request and input comments in the Other text box.
-
-
To generate the outcome automatically, select "Yes" in the Create Outcome Automatically? field. Otherwise, select "No".
-
Click the Complete button in the top left of the screen.
-
Once the outcome record is generated, Overall status will change to Completed and the Submitter will receive a notification.
-
Certification environment
Date Tested: November 2023
|
Product Name |
Version Information |
Operating System |
|
Archer |
6.14 |
Virtual Appliance |