Archer Strategic Planning App-Pack
Organizations often struggle with turning their corporate vision into reality, especially when change occurs, and Strategies and plans must be adjusted. The organizational vision and mission are typically well-established and don’t change. However, Strategies and plans often do change, and do so frequently. Without a coordinated approach for managing Strategic Planning, a breakdown in execution can occur, and keep the organization from attaining its goals.
Archer Strategic Planning is focused at closing the gap between:
-
Strategies formulated at executive levels
-
Operational Plans that include tactical tasks
-
Metrics that measure the organization's effectiveness at achieving the plan
Defining an approach to manage the ongoing relationship between Strategies, Strategic Plans, Operational Plans, and Metrics through regular review, feedback, and improvement closes the organization's gap for successful attainment of the corporate mission and goals.
Archer Exchange: With the Archer Exchange, the Archer team and our trusted partners have created a broad selection of supplemental, value-added offerings to help you get your unique risk management program on the right path, right from the start. You can leverage the Archer Exchange offerings to expand the use of Archer solutions into new business processes and address specific industry, geographic, regulatory, or technical requirements. The Archer Exchange features a fast and agile development cycle, enabling quick delivery of new and updated offerings for trending issues and connections to innovative technologies.
On this page
Release notes
Last updated: December 2054
| Release Date | Release Version | Notes |
|---|---|---|
| December 2025 | Archer 2024.11 |
|
|
September 2024 |
Archer 2024.08 |
Updates:
|
|
May 2018 |
Archer 6.4 |
Initial Release |
Overview
Key features and benefits
Establishing a consistent, centralized process for managing Strategic Planning increases the consistency of development and execution of Strategies and its related plans.
With Archer Strategic Planning, you can:
-
Simplify the process of developing and executing Strategies, Strategic Plans, Operational Plans and its activities.
-
Provide an audit trail capturing who created, executed, and reviewed the Strategy, Strategic Plans, and Operational Plans.
-
Track the performance of Strategies through metrics and periodic reviews.
-
Provide role-based access control restricting personnel to information and tasks necessary to perform their job.
-
Reduce time associated with capturing the Strategy analysis, SWOT analysis, and financial information.
-
Store all Strategy information in a centralized location controlled by access roles.
-
Capture the changes related to Strategy, Strategic Plan, and Operational Plans through change requests.
-
Simplify the communication process through an automated notification process.
Benefits include:
-
Structured Strategic Planning process that enables top down execution of Operational Plans
-
Increased likelihood of meeting objectives
-
Visibility into current state of business performance and Operational Plans
-
Increased likelihood the organization executes the Strategies
-
Consistent method for evaluating performance across functional areas
-
Assurance that Strategies become an actionable Operational Plan
-
Achievement of measurable actions within Operational Plans
Key terminology
Vision: Defining what the organization wants to be, or how it wants the world in which it operates to be. It is a long-term view and concentrates on the future.
Mission: The fundamental purpose of an organization or an enterprise, briefly describing why it exists and what it does to achieve its vision.
Corporate Objectives: Describe what a company expects to accomplish throughout a measurable period of time, such as 1-5 years. Corporate objectives typically cross the organizational boundaries.
Strategies: High- to medium-level goals designed to support the corporate objectives of an organization. Strategies are defined by corporate officers, for example CEO, CFO, and CIO. Strategies are related to specific goals or address several goals, corporate objectives, or both. The process requires looking at where the organization is now and where its corporate objectives indicate it wants to be, and identifying Strategies to get there. Organizations develop and document their Strategies and resulting Strategic Plans, and associate them to elements such as the organization or company, division or business unit, and to Strategic Plans, scorecards, and metrics. Strategies can change over multiple planning cycles to react to changing market conditions or new business opportunities. Strategies are regularly reviewed to determine whether they are being achieved. Strategies can cover a wide array of topics, including financial, business growth, acquisition or development, human resources, partner development, and product or service-related goals.
Strategic Plan: Used to provide focus and direction and can be used to communicate the direction of the organization to stakeholders. Strategic Plans are futuristic in nature and generally cover a longer term (may be up to 1 to 5 years). Strategic Plans consist of goals describing the organization in a specified number of years, and Strategies to reach the goals. There could be multiple Strategic Plans for a single Strategy. Strategic Plans includes financial planning, which creates a high-level perspective of revenue, expenses, balance sheet items and cash flows to show the financial impact of different Strategic alternatives. The plans can also include other operational areas as well.
Operational Plan: A tactical plan that describes in detail how the organization is going to achieve its Strategic Plan. Organizations frequently start their annual planning process with a Strategic Plan, which is then followed by Operational Plans that turn the Strategic Plans into tactical plans and steps. Operational Plans typically include operational, financial, and marketing tasks, and are performed at the business unit level. Some organizations develop Operational Plans by product and service. Each Operational Plan should be tied to a specific Strategy, or can be coordinated to support multiple Strategies. Operational Plans should be very specific in nature, and tied to success criteria and supporting metrics.
Periodic Business Review: Reviews the performance and achievement of the Strategies, Strategic Plans, and Operational Plans on a periodic basis. Strategic and Operational Plans can be updated based on the outcome of the reviews. Although the functionality implies quarterly reviews, they can be performed at any frequency designated by the organization.
Metrics: Document KPIs, identify their source, and tie them to corporate objectives, Strategies, Strategic Plans, and Operational Plans.
Strategic Planning: An organization's process of identifying its future direction and Strategy, and allocating resources in pursuit of that future direction.
Strategic Management: An organization's process of continuous planning, executing, monitoring, analyzing, and assessing all that is necessary for an organization to meet its goals and objectives in pursuit of a future direction.
Objectives: Quantifiable milestones and targets to demonstrate achievement of goals.
Goals: The Strategic direction of an organization.
Creator: Initiates the Strategy, Strategic Plan, and Operational Plan in system. The Creator canal so act as an owner.
Owner: Responsible for overall development, execution, and completion of Strategy, Strategic Plan, and Operational Plan.
Approver: Evaluates the Strategy, Strategic Plan, and Operational Plan. Approver can approve the plan, request additional information from the Owner, or reject the plan.
Application: Database that stores a specific type of data record, for example, policies, assessments, assets, threats, vulnerabilities, and controls.
Authorized User: A user who has logged into the system and has a right to perform an operation. The system knows the identity and permissions granted to this individual.
Cross-Reference: A field type that allows users to create associations between records in the same application (internal references) or records in two separate applications (external references). By adding a cross-reference to an application, the system automatically adds a Related Record field.
Dashboard: With reports defined and saved in the inventory of system reports, those identified as Global Reports can be added to dashboards. Each dashboard can include one of many reports in the format they were saved.
Notifications: Emails sent from Archer to Users or Groups based on a schedule or a change in the record status.
Record: A collection of field values. Records are stored within applications, sub-forms, or questionnaires.
Report: Saved search criteria that you can run again at a later time. In Archer, the construct for reports is a combination of a query and its related output presentation options. The data returned is filtered by user permissions, allowing users to see only the data for which they have been granted access.
Sub-Form: For one application, administrators can develop multiple sub-forms to hold all related data. Sub-forms can be shared across applications; however, changing a sub-form affects all applications using that sub-form.
Task: An action item that assigned to a user in relation to the Strategic Planning development and execution.
User: Any person who uses and is registered within the system. In this guide, the user is assumed to be an employee using Archer Strategic Planning Management solution.
User Profile: Preferences of the registered user saved within the system.
Workspace: Display mechanism that provides the user with a way to access their data.
Prerequisites (ODA and system requirements)
|
Components |
Prerequisites |
|---|---|
|
Archer Solution Area(s) |
Archer Enterprise and Operational Risk Management |
|
Archer Applications and Use Cases |
|
|
Uses Custom Objects |
No |
| Archer On-Demand Applications License | Zero (0) Archer On-Demand Application licenses required |
|
Archer Licensing
|
Additional licensing fees apply for the Archer Strategic Planning app-pack. Please contact Archer Sales Representative for more information and pricing. |
|
Archer Platform Requirements |
Archer Platform Release 2024.11 and later |
|
Supported Archer Environments |
The following Archer environments are supported:
|
Compatible Use Cases and Applications
The following use case connection can be established to enhance the capabilities of the Archer Strategic Planning Management app-pack.
|
Application |
Use Case |
Primary Purposes of the Relationship |
|---|---|---|
|
Corporate Objectives |
Policy Program Management Operational Risk Management Controls Monitoring Program Management |
If using Corporate Objectives in any of the use case mentioned, then Corporate Objectives can cross-reference to the Strategies application. |
|
Business Processes |
Audit Engagement & Workpapers Controls Assurance Program Management Policy Program Management Business Impact Analysis IT Controls Assurance Data Governance IT Risk Management Top-Down Assessment Bottom-Up Risk Assessment Federal Assessments & Authorization |
If using Business Processes in any of the use case mentioned, then Business Processes can cross-reference to the Operational Plans application. |
|
Products and Services |
Business Continuity and IT Disaster Recovery Planning Third Party Risk Management Cyber Incident & Breach Response Controls Monitoring Program Management Bottom-Up Risk Assessment |
If using Products and Services in any of the use case mentioned, then Products and Services can cross-reference to the Operational Plans application. |
|
Metrics
|
Key Indicator Management |
Metrics can cross reference to Strategies, Strategic Plans and Operational Plans applications. |
|
Metric Results |
Key Indicator Management |
Metric Results can cross reference to Strategies, Strategic Plans and Operational Plans applications. |
|
Findings |
Issues Management Federal Assessments & Authorizations |
Findings can cross reference to Strategies, Strategic Plans and Operational Plans applications. |
|
Change Requests |
Issues Management | Captures changes and approvals to Strategies, Strategic Plans, and Operational Plans that have already been approved for execution. |
Components
Architecture diagram
The following diagram shows the relationship between the applications in Archer Strategic Planning.
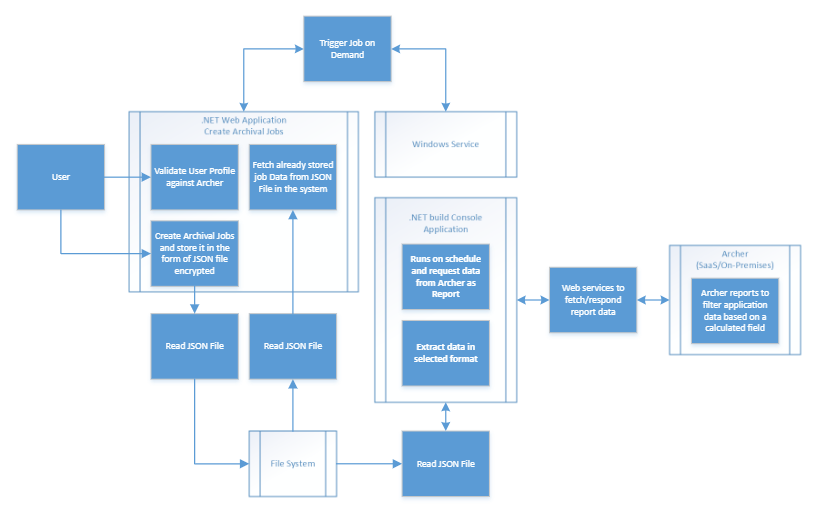
Note: Business Processes and Products and Services applications are not cross referenced to Operational Plans in Archer Strategic Planning Install package. These are optional applications that can be used to enhance the capabilities of the Operational Plans.
Process diagram
Strategies
The Archer Strategic Planning process begins when the Strategies Manager creates a new record in the Strategies application. The Strategy Creator is the user who creates the Strategy, and the Strategy Owner is selected by the user in the Strategy Owner field for the Strategy. The Strategy Creator and Strategy Owner can be the same user. However, both have the same record permissions for the Strategy record.
The following are the workflow tasks:
-
Create Strategy Record – Strategy Owner/Creator
-
Perform Strategy Analysis – Strategy Owner
-
Submit for Strategic Plan Development – Strategy Owner
-
Develop Strategic Plans and Submit for Operational Plan Development – Strategic Plan Owner
-
Develop and Approve Operational Plans – Operational Plan Owner/Approver
-
Develop and Approve Strategic Plans – Strategic Plan Owner/Approver
-
Approve Strategy for Execution – Strategy Owner
-
Execute Strategy – Strategy Owner
-
Execute Strategic Plan – Strategic Plan Owner
-
Execute Operational Plan – Operational Plan Owner
When a Strategy status is waiting on Approval, Ready for Execution, or In Execution, the Strategy Owner can't defer or cancel the Strategy. When all the related Strategic Plans executed, the Strategy Owner can complete the Strategy execution.
The following diagram shows the general workflow of the Strategies application.

Strategic plans
The Strategic Plan process begins when the Strategic Plan Managers receive a notification to develop Strategic Plans for the related Strategy. Strategic Plan Managers create new records in the Strategic Plans application. The Strategic Plan Creator is the user who creates the Strategic Plan, and the Strategic Plan Owner is selected in the Strategic Plan Owner field for the Strategic Plan. The Strategic Plan Creator and Strategic Plan Owner can be the same user. However, both have the same record permissions for the Strategic Plan record.
The following are the workflow tasks:
-
Create Strategic Plan Record – Strategic Plan Owner/Creator
-
Perform Strategic Plan Analysis – Strategic Plan Owner
-
Submit for Operational Plan Development – Strategic Plan Owner
-
Develop and Approve Operational Plans and Operational Plan Activities – Operational Plan Owner/Approver
-
Approve Strategic Plan for Execution – Strategic Plan Approver
Note: The Strategic Plan Approver can request additional information from the Strategic Plan Owner
-
Approve Strategy for Execution – Strategy Owner
-
Execute Strategy – Strategy Owner
-
Execute Strategic Plan – Strategic Plan Owner
-
Execute Operational Plan – Operational Plan Owner
When a Strategic Plan is no longer in development, the Strategic Plan Owner can cancel the Strategic Plan. When all the related Operational Plans have executed, the Strategic Plan Owner can complete the Strategic Plan execution.
The following diagram shows the general workflow of the Strategic Plans application.

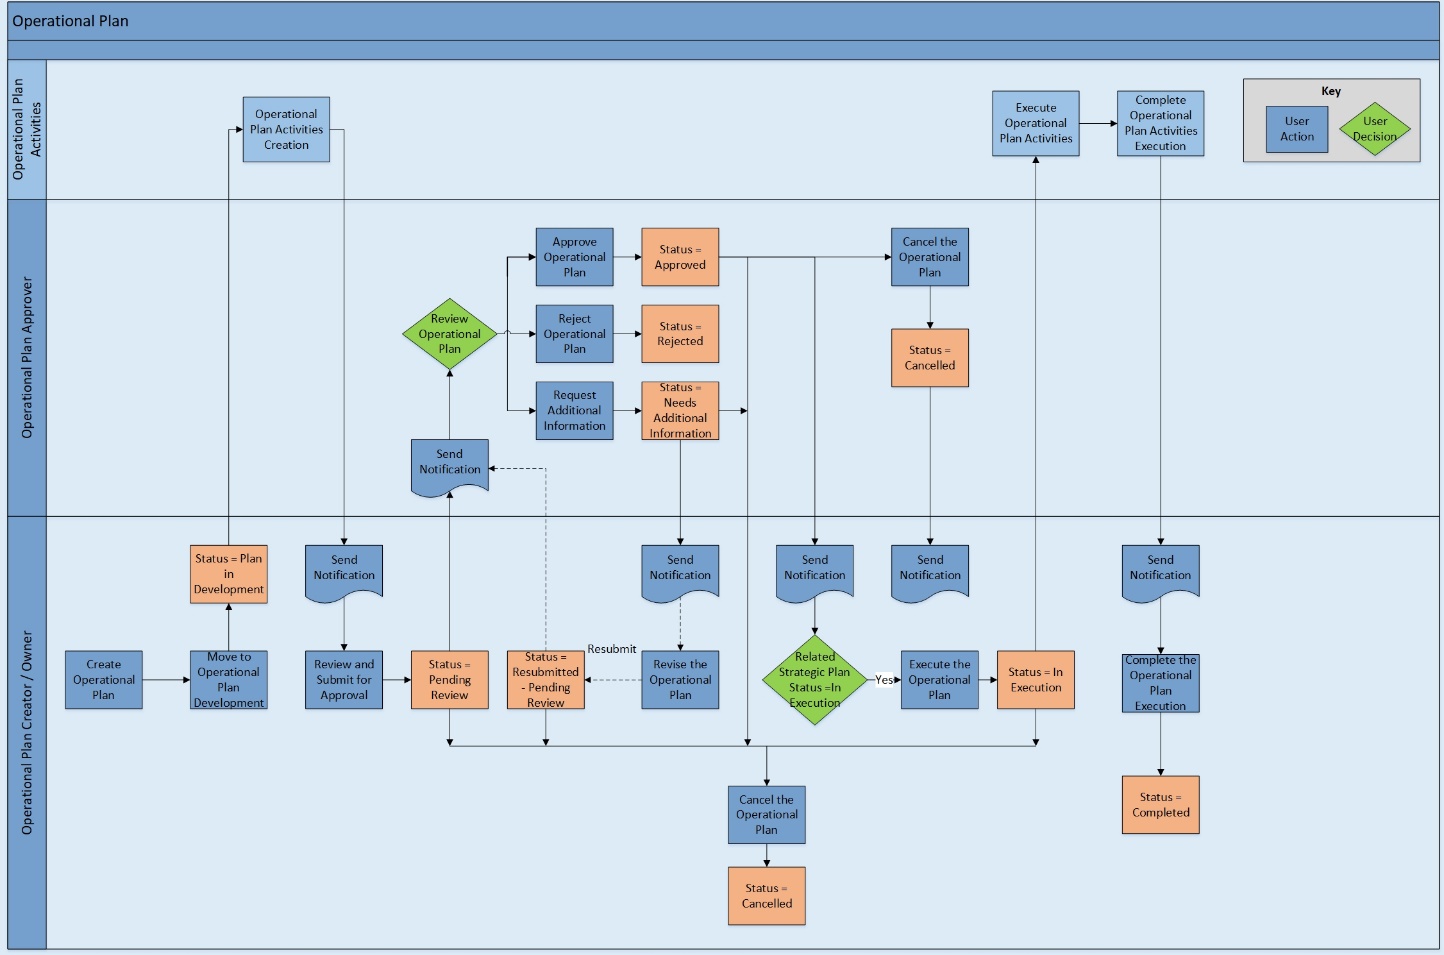
Operational plans
The Operational Plan process begins when the Operational Plan Managers receive a notification to develop Operational Plans for the related Strategic Plan. Operational Plan Managers create new records in the Operational Plans application. The Operational Plan Creator is the user who creates the Operational Plan and the Operational Plan Owner is selected in the Operational Plan Owner field for the Operational Plan. The Operational Plan Creator and Operational Plan Owner can be the same user. However, both have the same record permissions for the Operational Plan record.
The following are the workflow tasks:
-
Create Operational Plan Record and Update Status to Development – Operational Plan Owner/Creator
-
Develop Operational Plan Activities – Operational Plan Owner
-
Submit Operational Plan for Approval – Operational Plan Owner
-
Approve Operational Plan for Execution – Operational Plan Approver
Note: The Operational Plan Approver can request additional information from the Operational Plan Owner
-
Approve Strategic Plan for Execution – Strategic Plan Approver
-
Approve Strategy for Execution – Strategy Owner
-
Execute Strategy – Strategy Owner
-
Execute Strategic Plan – Strategic Plan Owner
-
Execute Operational Plan – Operational Plan Owner
When an Operational Plan is no longer in development, the Operational Plan Owner can cancel the Operational Plan. When all the related Operational Plan Activities have executed, the Operational Plan Owner can complete the Operational Plan execution.
The following diagram shows the general workflow of the Operational Plans application.
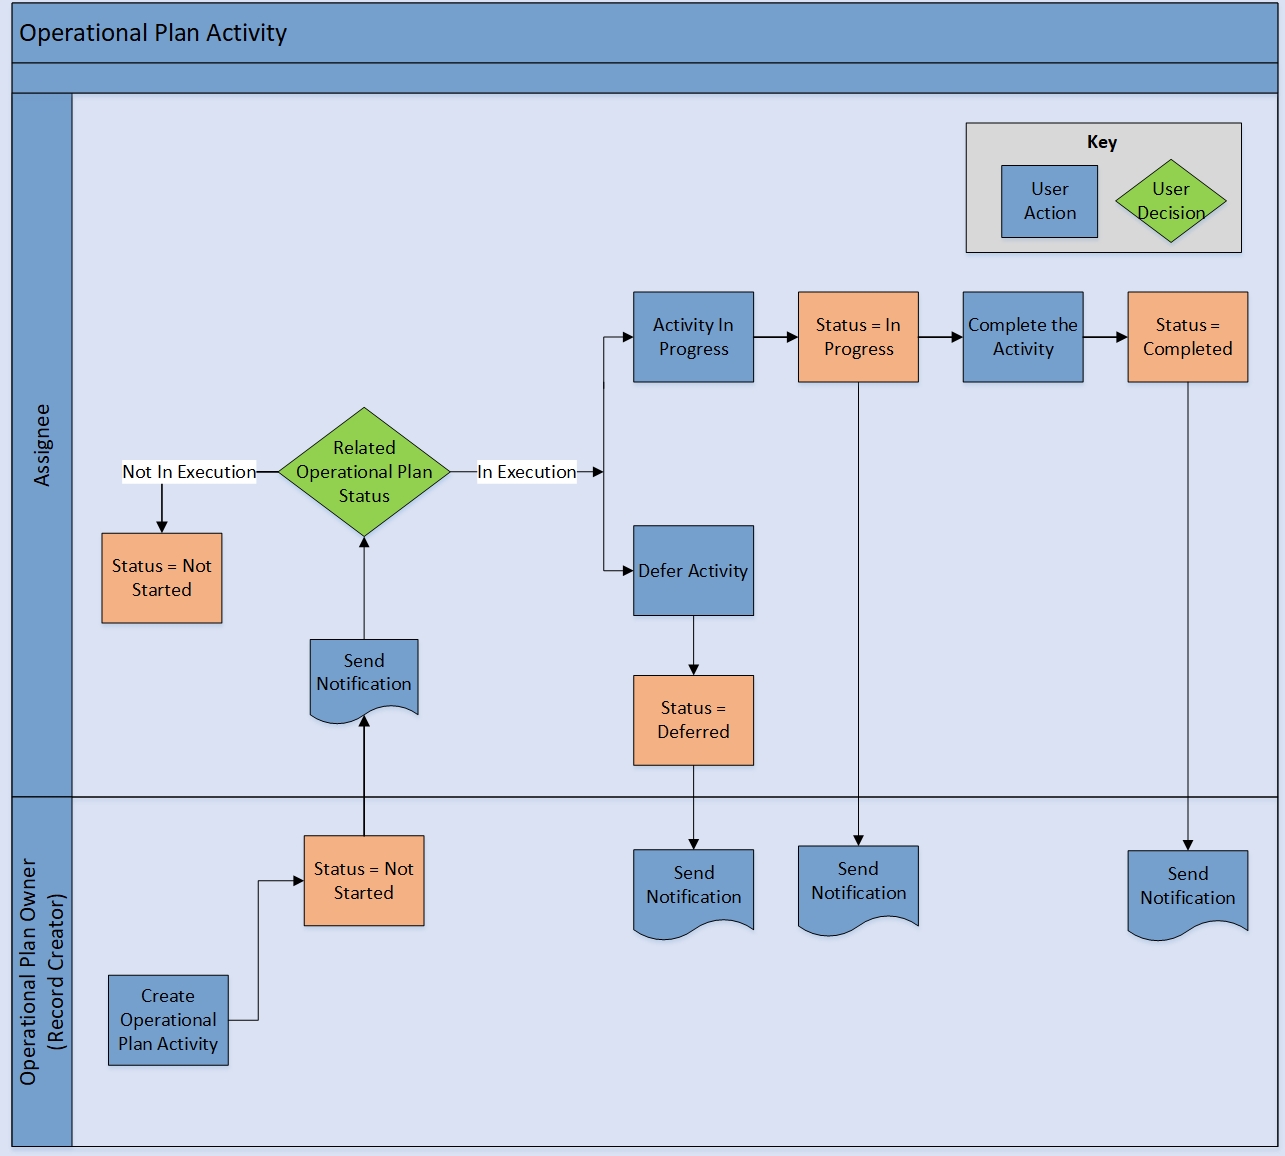
Operational plan activities
The Operational Plan Activity process begins when the Operational Plan Owner creates a new record and assigns it to a user in the Operational Plans Activities application. When the Operational Plan Activity is created, the Assignee receives a notification. When the status of the related Operational Plan is in execution, the Assignee can begin working on the activity, defer it, or complete it.
The following diagram shows the general workflow of the Operational Plans Activities application.
Applications
The following table describes theapplications in Archer Strategic Planning.
|
Application |
Description |
|---|---|
|
Strategies |
Captures Strategies from development to completion. Includes Strategy analysis, evaluation, plan approval, and supporting Strategic Plans. |
|
Strategic Plans |
Captures Strategic Plans from development to completion. Includes Strategic Plan analysis, evaluation, plan approval, and supporting Operational Plans. |
|
Operational Plans |
Captures Operational Plans from development to completion. Includes Operational Plan activities and Operational Plan approval. |
|
Operational Plan Activities |
Captures tasks that form the Operational Plan
|
Personas and Access Roles
The following table describes the functions that make up the application’s organization roles. Depending on the organization of your company, these functions and responsibilities can vary.
|
Function |
Description |
|---|---|
|
Strategies Manager |
This role is responsible for managing the corporate Strategies and assuring they are managed and measurable. They assign accountability to assure that the Strategies are achieved. |
|
Strategic Planning Manager |
This role defines the Strategic Plans required for the organization to execute the Strategies. |
|
Operational Planning Manager |
This role manages the Operational Plans and execution, assigns tasks, defines and maintains metrics, and maintains Operational Plan progress and status. |
|
Strategic Planning Executives |
Set corporate objectives and Strategies. They request visibility as to whether these objectives are being achieved on a periodic basis. |
Permissions chart
|
Application |
Strategies Manager |
Strategic Planning Manager |
Operational Planning Manager |
Strategies Executives |
|---|---|---|---|---|
|
Corporate Objectives |
R |
R |
R |
R |
|
Strategies |
CRUD* |
R |
R |
R |
|
Strategic Plans |
RU* |
CRUD* |
R |
R |
|
Operational Plans |
RU* |
R |
CRUD* |
R |
|
Operational Plan Activities |
RU* |
RU* |
CRUD* |
R |
|
Change Requests |
CRUD* |
CRUD* |
CRUD* |
R |
|
Company |
R |
R |
R |
R |
|
Division |
R |
R |
R |
R |
|
Business Unit |
R |
R |
R |
R |
|
Metrics |
CRU* |
CRU* |
CRU* |
R |
|
Metric Results |
CRU* |
CRU* |
CRU* |
R |
|
Findings |
CRU* |
CRU* |
CRU* |
R |
C = Create, R = Read, U = Update, D = Delete
Permissions marked with an asterisk (*) indicate record level permissions.
Upgrading Archer Strategic Planning App-Pack
With the release of Archer Strategic Planning 2024.11, the app-pack has transitioned to a licensed offering. This means it is no longer using Archer On-Demand Applications (ODA).application.
Organizations upgrading to Archer Strategic Planning 2024.11 and later will need to follow the steps below:
-
Purchase offering through Archer Sales Representative
-
Refresh the license key upon completion of purchase
-
Download installation package from myArcher
-
Proceed with installation steps below
Upon installation, the ODAs will beconverted to core applications.
Note: Before upgrading, it is essential to perform animpact analysison anycustomized configurations. Adata dictionaryis provided to support this process.
Installing Archer Strategic Planning App-Pack
Complete the following tasks to install the application.
Task 1: Prepare for the installation
-
Ensure that your Archer system is using Archer Platform Release 2024.11.
-
Download the install package.
-
Read and understand the “Packaging Data” section of Archer Help.
Task 2: Install the package
Installing a package requires that you import the package file, map the objects in the package to objects in the target instance, and then install the package. See “Installing the Application Package” for complete information.
Task 3: Test the installation
Test the offering according to your company standards and procedures, to ensure that it works with your existing processes.
Installing the offering
Step 1: Back up your database
Archer strongly recommends backing up the instance database before installing a package. Packaging is a powerful feature that can make significant changes to an instance. There is no Undo function for a package installation. Backing up the instance database enables a full restoration if necessary.
An alternate method for undoing a package installation is to create a package of the affected objects in the target instance before installing the new package. This package provides a snapshot of the instance before the new package is installed, which can be used to help undo the changes made by the package installation. New objects created by the package installation must be manually deleted.
Step 2: Import the package
-
Go to the Install Packages page.
-
From the menu bar, click
 .
. -
Under Application Builder, click Install Packages.
-
-
In the Available Packages section, click Import.
-
Click Add New, then locate and select the package file to import.
-
Click OK.
The package file is displayed in the Available Packages section and is ready for installation.
Step 3: Map objects in the Package
-
In the Available Packages section, select the package you want to map.
-
In the Actions column, click
 for that package.
The analyzer runs and examines the information in the package. The analyzer automatically matches the system IDs of the objects in the package with the objects in the target instances, and identifies objects from the package that are successfully mapped to objects in the target instance, objects that are new or exist but are not mapped, and objects that do not exist, meaning the object is in the target but not in the source.
Note: This process can take several minutes or more, especially if the package is large, and may time out after 60 minutes. This time-out setting temporarily overrides any IIS time-out settings set to less than 60 minutes.
When the analyzer is complete, the Advanced Package Mapping page lists the objects in the package file and corresponding objects in the target instance. The objects are divided into tabs, depending on whether they are found within Applications, Solutions, Access Roles, Groups, Sub- forms, or Questionnaires.
-
On each tab of the Advanced Mapping Page, review the icons displayed next to each object name to determine which objects require you to map them manually.
|
Icon |
Name |
Description |
|---|---|---|
|
|
Awaiting Mapping Review |
Indicates that the system could not automatically match the object or children of the object to a corresponding object in the target instance. Objects marked with this symbol must be mapped manually through the mapping process. Note: The system does not map new objects, and this icon remains visible in these cases. Important: The mapping process can proceed without mapping all the objects. The |
|
|
Mapping Completed |
Indicates that the object and all child objects are mapped to an object in the target instance. Nothing more needs to be done with these objects in Advanced Package Mapping. |
|
|
Do Not Map |
Indicates that the object does not exist in the target instance, or the object was not mapped through the Do Not Map option. These objects are not mapped through Advanced Package Mapping, and must be remedied manually. |
|
|
Undo |
Indicates that a mapped object can be unmapped. This icon is displayed in the Actions column of a mapped object or object flagged as Do Not Map. |
-
For each object that requires remediation, do one of the following:
-
Map each item individually.
-
On the Target column, select the object in the target instance to which you want to map the source object. If an object is new or if you do not want to map an object, select Do Not Map from the drop-down list.
Important: Ensure that you map all objects to their lowest level. When objects have child or related objects, a drill-down link is provided on the parent object. Child objects must be mapped before parent objects are mapped. For more details, see "Mapping Parent/Child Objects" in Archer Help.
-
-
Automatically map all objects in a tab that have different system IDs but the same object name as an object in the target instance.
-
-
In the toolbar, click Auto Map.
-
Select an option for mapping objects by name.
Option
Description
Ignore case
Select this option to match objects with similar names regardless of the case of the characters in the object names.
Ignore spaces
Select this option to match objects with similar names regardless of whether spaces exist in the object names.
-
Click OK.
The Confirmation dialog box opens with the total number of mappings performed. These mappings have not been committed to the database yet and can be modified in the Advanced Package Mapping page.
-
Click OK.
-
Set all objects in the tab to Do Not Map.
-
-
In the toolbar, click Do Not Map.
Note: To undo the mapping settings for any individual object, click ![]() in the Actions column.
in the Actions column.
When all objects are mapped, the ![]() icon displays in the tab title. The
icon displays in the tab title. The ![]() icon displays next to the object to indicate that the object is not mapped.
icon displays next to the object to indicate that the object is not mapped.
-
Verify that all other objects are mapped correctly.
-
(Optional) To save your mapping settings and resume working later, see "Exporting and Importing Mapping Settings" in Archer Help.
-
Once you have reviewed and mapped all objects, click
 .
.
-
Select I understand the implications of performing this operation and click OK.
The Advanced Package Mapping process updates the system IDs of the objects in the target instance as defined on the Advanced Package Mapping page. When the mapping is complete, the Import and Install Packages page is displayed.
Important: Advanced Package Mapping modifies the system IDs in the target instance. Any Data Feeds and Web Service APIs that use these objects must be updated with the new system IDs.
Step 4: Install the package
All objects from the source instance are installed in the target instance unless the object can not be found, or is flagged to not be installed in the target instance. A list of conditions that can cause objects not to be installed is provided in the Log Messages section. A log entry is displayed in the Package Installation Log section.
-
Go to the Install Packages page.
-
From the menu bar, click
. -
Under Application Builder, click Install Packages.
-
-
In the Available Packages section, locate the package file to install, and click Install.
-
In the Configuration section, select the components of the package to install.
-
To select all components, select the top-level checkbox.
-
To install only specific global reports in an already installed application, select the checkbox associated with each report that you want to install.
-
Note: Items in the package that do not match an existing item in the target instance are selected by default.
-
In the Configuration section, under Install Method, select an option for each selected component. To use the same Install Method for all selected components, select a method from the top-level drop-down list.
Note: If you have any existing components that you do not want to modify, select Create New Only. You may have to modify those components after installing the package to use the changes made by the package.
-
In the Configuration section, under Install Option, select an option for each selected component. To use the same Install Option for all selected components, select an option from the top-level drop-down list.
Note: If you have any custom fields or formatting in a component that you do not want to lose, select Do not Override Layout. You may have to modify the layout after installing the package to use the changes made by the package.
-
To deactivate target fields and data-driven events that are not in the package, go to the Post-Install Actions section, and select the Deactivate target fields and data-driven events that are not in the package check box. To rename the deactivated target fields and data-driven events with a user-defined prefix, select the Apply a prefix to all deactivated objects check box, and enter a prefix. This helps identify any fields or data-driven events that to review for clean up post-install.
-
Click Install.
-
Click OK.
Step 5: Review the package installation log
-
Go to the Package Installation Log tab of the Install Packages page.
-
From the menu bar, click
. -
Under Application Builder, click Install Packages.
-
Click the Package Installation Log tab.
-
-
Click the package that you want to view.
-
In the Package Installation Log page, in the Object Details section, click View All Warnings.
Manually activate Advanced Workflow by clicking Active button in ‘Advance Workflow’ tab in Strategies, Strategic Plans, Operational Plans, and Change Requests applications.
Configuring Archer Strategic Planning App-Pack
Task 1: Update Archer Strategic Planning Solution
After installing Archer Strategic Planning package, the applications Corporate Objectives, Company, Division, Business Units, Metrics, Metric Results, and Findings must be added manually to Archer Strategic Planning solution; otherwise, these applications do not display in Archer Strategic Planning solution mega menu.
To add the applications to Strategic Planning solution:
-
Go to Administration > Application Builder > Solutions
-
Open Archer Strategic Planning solution
-
Click Add New in Applications section
-
Select the Applications
-
Click Ok
-
Save the Archer Strategic Planning solution.
Task 2: Update Record Permissions / Assign Group Member
All personas of Strategic Planning solution must have access to Company, Division, and Business Units records. Do one of the following:
-
Assign members of the Strategic Planning groups(Strategic Planning: Executives, Strategies Manager, Strategic Planning Manager, and Operational Planning Manager)to the EM: Read Only group under Enterprise Management.
-
Update the Default Record Permissions field of Company, Division and Business Units applications by providing default read access to Strategic Planning groups.
To view the hierarchy relation of Strategy, Strategic Plan, and Operational Plan, click Related after opening any Strategy, Strategic Plan, or Operational Plan record.
Task 3: Configure Change Requests (Optional)
It is recommended to create a change request prior to making change to the Approved Strategies, Strategic Plans and Operational Plans. To track change requests in Archer you can configure Change Requests Core application
If you would like to utilize change requests core application do the following:
-
Update field Content Type
-
Add values Strategies, Strategic Plans, Operational Plans
-
-
Place the Strategies, Strategic Plans, Operational Plans References on layout.
-
Create DDEs to display these CRs upon the value selection
-
Rule Content Type = Strategies
-
Action: ACL - Require Strategies
-
-
Rule Content Type = Strategic Plans
-
Action: ACL - Require Strategic Plans
-
-
Rule Content Type = Operational Plans
-
Action: ACL - Require Operational Plans
-
-
-
Create new manual permissions:
-
Strategic Planning Record Permission:
-
Default assignee - Strategic Planning: Executives
-
Rule:
-
Name: If Content Type does not contains Strategies / Strategic Plans / Operational Plans
-
Filter: Content Type Does Not Contain Strategies / Strategic Plans / Operational Plans
-
Do not assign any Read Update or Delete permissions
-
-
-
Task 4: Change Requests ODA Configuration and Upgrade Instructions for Existing Users (Optional)
If Change Request on-demand application from the initial version of the Strategic Planning package is available, users can either continue using it or can migrate to core Change Requests application.
Option 1: To use the existing on-demand application do the following:
-
Go to Administration > Application Builder >Application
-
Open Strategies Application.
-
Search for "Contains Approved Change Request?" field and go to calculation.
-
In the calculation replace the Change Requests (core) reference with the existing Change Requests (On-demand) reference, also change the "Status" value to "Approved" in the IF condition of the formula.
-
Validate the formula and save it.
-
Repeat step1 to step 5 in "Strategic Plans" & "Operational Plans" applications.
To use the existing Change Requests on-demand application it requires changes on "Strategies Manager Dashboard", "Strategic Planning Manager Dashboard", "Operational Planning Manager Dashboard" and "Strategies Executive Dashboard". Do the following:
-
Go to Administration > Workspaces and Dashboards > Dashboards
-
Search for "Strategies Manager Dashboard" and open it.
-
Click on "Change Management Requests" widget.
-
On the Right side replace the existing reports with "Change management Requests pending for my action" and "Approved Change Requests - Pending For My Action" and save it.
-
Repeat step 1 -to step 4 for "Strategic Planning Manager Dashboard", "Operational Planning Manager Dashboard" and "Strategies Executive Dashboard".
Option 2: To use Change Requests Core application, do the following:
-
Configure the Core Change Requests application as per Task 3.
-
Create any ongoing/draft change requests in the core application.
-
Migrate any necessary change requests for ongoing strategies/strategic plans/operational plans to Core application.
-
Once necessary data is available in core Change requests application, On-demand version of Change Requests can be Archived. Data in the archived application will still be available for viewing but data cannot be modified.
Using Archer Strategic Planning App-Pack
Create user accounts
User: Strategies Manager
-
Go to Manage Users page.
-
From the menu bar, click
. -
Under Access Control, click Users.
-
-
Click Add New.
-
In the General Information section, enter:
-
The name of the user
-
The user name for log on
-
The domain
-
-
(Optional) In the Contact Information section, enter the default email address and any other pertinent information for contacting the user.
-
(Optional) In the Localization section, enter the time zone, locale, and language if the location and language of the user is different from the system.
-
In the Account Maintenance section, enter the user password and assign the security parameter for this user.
-
(Optional) Select the Send user a notification with password information checkbox if you want to send the user an email notification of the password change.
Note: The Default Email address is used for the notification email. If you do not select this checkbox, you must inform the user of the new password.
-
(Optional) In the Notes section, record any additional information about the user account. For example, list hours of availability, or preferences for how the user should be contacted. Account notes appear when users click a linked user name in Archer to view the user profile.
-
In the Groups tab, select ‘SP: Strategies Manager’ group through the lookup option.
-
Click Save.
User: Strategic Planning Manager
-
Go to the Manage Users page.
-
From the menu bar, click
. -
Under Access Control, click Users.
-
-
Click Add New.
-
In the General Information section, enter the name of the user, the user name for log on, and the domain.
-
(Optional) In the Contact Information section, enter the default email address and any other pertinent information for contacting the user.
-
(Optional) In the Localization section, enter the time zone, locale, and language if the location and language of the user is different from the system.
-
In the Account Maintenance section, enter the user password and assign the security parameter for this user.
-
(Optional) Select the Send user a notification with password information checkbox if you want to send the user an email notification of the password change.
Note: The Default Email address is used for the notification email. If you do not select this checkbox, you must inform the user of the new password.
-
(Optional) In the Notes section, record any additional information about the user account. For example, list hours of availability, or preferences for how the user should be contacted. Account notes appear when users click a linked user name in Archer to view the user profile.
-
In the Groups tab, select ‘SP: Strategic Planning Manager’ group through the lookup option.
-
Click Save.
User: Operational Planning Manager
-
Go to the Manage User page.
-
From the menu bar, click
. -
Under Access Control, click Users.
-
-
Click Add New.
-
In the General Information section, enter the name of the user, the user name for log on, and the domain.
-
(Optional) In the Contact Information section, enter the default email address and any other pertinent information for contacting the user.
-
(Optional) In the Localization section, enter the time zone, locale, and language if the location and language of the user is different from the system.
-
In the Account Maintenance section, enter the user password and assign the security parameter for this user.
-
(Optional) Select the Send user a notification with password information checkbox if you want to send the user an email notification of the password change.
Note: The Default Email address is used for the notification email. If you do not select this checkbox, you must inform the user of the new password.
-
(Optional) In the Notes section, record any additional information about the user account. For example, list hours of availability, or preferences for how the user should be contacted. Account notes appear when users click a linked user name in Archer to view the user profile.
-
In the Groups tab, select ‘SP: Operational Planning Manager’ group through the lookup option.
-
Click Save.
Strategies
Task 1: Create a Strategy record
Users: Strategies Manager
-
Create a Strategy record.
-
From the menu bar, click Archer Strategic Planning.
-
Under Solutions, click Archer Strategic Planning.
-
Under Applications, click Strategies.
-
In the Strategies record browser, click New Record.
-
-
Enter Strategy name and Select Category, Priority in the General Information section.
-
Select the related Companies and Divisions by clicking
 and selecting respective records through the lookup.
 -
Enter the Description and Assumptions about the Strategy.
-
Select the Strategy Owner and Stakeholders in the Roles and Responsibilities section.
-
Select the Target Start Date and Target End Date in the Target Vs Actual Dates section.
-
Add the goals of the Strategy in the Strategy Goals section.
-
Select the related Upstream Strategy and Downstream Strategy records through lookup, if required, in the Related Strategies section.
-
Select the related Corporate Objectives in the Corporate Objectives tab.
-
In Strategy Analysis tab, enter the SWOT Analysis, Current State and Scenario Planning details. Create or Lookup any Findings, if required.
-
In Financial Planning tab, enter the Estimated Revenue, Estimated Budget, and Estimated Cost for a Strategy (Optional).
-
In Key Performance tab, create a metrics record in Metrics field to track the performance of a Strategy (Optional).
-
Upload any documentation related to a Strategy in the Supporting Documentation field.
-
Click ‘Submit for Strategic Plan Development’.
Task 2: Submit Strategy for approval
Users: Strategy Owner
-
Ensure all the related Strategic Plans have been developed and approved by the respective Strategic Plan Owner and Approver.
-
Ensure [Related Strategic Plans Dev Status] field value is Approved.
-
Perform the Strategy Evaluation in Strategy Evaluation tab.
-
Click ‘Submit for Approval’ button.
Task 3: Review the Strategy
Users: Strategy Owner
To approve a Strategy:
-
Review the Related Strategic Plans, Operational Plans, and related Operational Plan Activities.
-
(Optional) Provide comments in Strategy Owner Review Comments field.
-
Click Approve for Execution.
To defer a Strategy:
-
Enter the reason for deferring the Strategy in Defer/Cancel Reason field in Workflow Details section.
-
Click Defer Strategy.
To cancel a Strategy:
-
Enter the reason for canceling the Strategy in Defer/Cancel Reason field in Workflow Details section.
-
Click the Cancel Strategy.
Task 4: Execute the Strategy
Users: Strategy Owner
-
Review the information in Related Strategic Plans, Operational Plans, and its related Operational Plan Activities.
-
Click Execute Strategy.
Task 5: Complete the Strategy
Users: Strategy Owner
-
Select [Strategy Completion] and [Strategy Achievement] field values.
-
Review the execution status of Related Strategic Plans, Operational Plans, and related Operational Plan Activities.
-
Ensure [Related Strategic Plans Execution Status] field value is Completed.
-
Click Complete Execution.
Task 6: Reopen the Strategy
Users: Strategy Owner
-
Select the Strategy record that is in Deferred status.
-
Click Reopen Strategy.
Task 7: Export a Strategy record (mail merge)
Users: Strategy Owner, Strategy Creator, and Stakeholders
-
Go to the application record browser that contains the record you want to export.
-
To export a record, select the record to export, and click Export.
-
Select the ‘Strategic Planning Mail Merge’ template in Report Templates.
-
Click the Click Here button to access the exported file.
-
Click Open to open the exported file.
-
Close the Export Complete message.
-
Close the Export Options dialog box.
Strategic Plans
Task 1: Create a Strategic Plan record
Users: Strategic Planning Manager
-
Create a Strategic Plan record.
-
From the menu bar, click Archer Strategic Planning.
-
Under Solutions, click Archer Strategic Planning.
-
Under Applications, click Strategic Plans.
-
In the Strategic Plans record browser, click New Record.
-
-
Enter Strategic Plan name.
-
In the General Information section, select Priority, Review Due Date.
-
Select the related Divisions and Business Units records by clicking
and selecting respective records through the lookup. -
Enter the Description of the Strategic Plan.
-
In the Target Vs Actual Dates section, select the Target Start Date and Target End Date.
-
In the Roles and Responsibilities section, select the Strategic Plan Owner, Strategic Plan Approver, and the Stakeholders.
-
Select the Related Strategies through the lookup.
-
Select the related Upstream Strategic Plan and Downstream Strategic Plan records through lookup if required in the Related Strategic Plans section.
-
In the Strategic Plan Objectives section, add the objectives of the Strategic Plan.
-
In Strategy Plan Analysis tab, enter the SWOT Analysis, Current State, and Scenario Planning details.
-
If required, create or Lookup any Findings.
-
-
(Optional) In Financial Planning tab, enter the Estimated Revenue, Estimated Budget, and Estimated Cost for a Strategic Plan.
-
(Optional) In Key Performance Indicators tab, create a metrics record in Metrics field to track the performance of a Strategic Plan.
-
In the Supporting Documentation field, upload any documentation related to the Strategic Plan.
-
Click Submit for Operational Plan Development in the top left of the screen.
Task 2: Submit Strategic Plan for review
Users: Strategic Plan Owner
-
Review the Strategic Plan information in all sections and tabs, and modify or add any missing information.
-
Review the Related Operational Plans, Strategic Plan Analysis, Financial Planning, and Key Performance Indicators tabs, and modify or add any data if required.
-
In the Strategic Plan Evaluation tab, perform the evaluation of the Strategic Plan.
-
In the Supporting Documentation field, upload any documents related to the Strategic Plan.
-
Add any comments in the Comments section.
-
Click Submit for Review in the top left of the screen.
Task 3: Review the Strategic Plan
Users: Strategic Plan Approver
To approve a Strategic Plan:
-
Review details in all the sections of the Strategic Plan.
-
Review the Operational Plans.
-
(Optional) Document any notes in the Review Comments field in Workflow Details section.
-
Click Approve in the top left of the window.
To request additional information:
-
Review details in all the sections of the Strategic Plan.
-
Review the Operational Plans.
-
Document the additional information being request in the Review Comments field in Workflow Details section.
-
Click Needs Additional Information in the top left of the window.
To reject a Strategic Plan:
-
Review details in all the sections of the Strategic Plan.
-
Review the Operational Plans.
-
Document the reason for rejecting the Strategic Plan in the Review Comments field in Workflow Details section.
-
Click Reject in the top left of the window.
Task 4: Resubmit the Strategic Plan
Users: Strategic Plan Owner
-
Check the Review Comments in Workflow Details section.
-
Modify or provide the required information in the appropriate section or tab.
-
Attach any additional documentation or files in the Supporting Documentation field, if requested.
-
Add your comments in the Comments section, if required.
-
When finished revising the request, click Resubmit Strategic Plan in the top left of the screen.
Task 5: Execute the Strategic Plan
Users: Strategic Plan Owner
-
Ensure the related Strategy status is In Execution before executing the Strategic Plan.
-
Click Execute Strategic Plan in the top left of the screen.
Task 6: Complete the Strategic Plan
Users: Strategic Plan Owner
-
Select [Strategic Plan Completion] and [Strategic Plan Achievement] field values.
-
Ensure the execution status of all Related Operational Plans execution is completed.
-
Ensure [Related Operational Plans Execution Status] field value is completed.
-
(Optional) In Key Performance Indicators tab, update the metrics in Metrics section.
-
Click Complete Execution in the top left of the screen.
Task 7: Cancel the Strategic Plan
Users: Strategic Plan Owner
-
Provide the details for canceling the request in Cancel Reason field in Workflow Details section.
-
Click Cancel Strategic Plan in the top left of the window.
Operational Plans
Task 1: Create the Operational Plan record
Users: Operational Planning Manager
-
Create the Operational Plan record.
-
From the menu bar, click Archer Strategic Planning.
-
Under Solutions, click Archer Strategic Planning.
-
Under Applications, click Operational Plans.
-
In the Operational Plans record browser, click New Record.
-
-
Enter Operational Plan name.
-
In the General Information section, select Priority, Review Due Date
-
Select the related Business unit record through the lookup.
-
Enter the Description of the Operational Plan.
-
Select the Target Start Date and Target End Date in the Target Vs Actual Dates section.
-
In the Roles and Responsibilities section, select the Operational Plan Owner, Operational Plan Approver, and Stakeholders
-
Select the Related Strategic Plan through the lookup.
-
In the Related Operational Plans section, select the related Upstream Operational Plan and Downstream Operational Plan records through lookup, if required.
-
(Optional) In the Financial Planning tab, enter the Estimated Revenue, Estimated Cost, and Estimated Budget for an Operational Plan (Optional).
-
In the Key Performance tab, create a metrics record in Metrics field to track the performance of an Operational Plan.
-
In the Supporting Documentation field, upload any documentation related to the Operational Plan.
-
Click Move To Development in the top left of the screen.
Task 2: Submit Operational Plan for review
Users: Operational Plan Owner
-
In the Operational Plan Activities tab, Create Operational Plan Activities related to the current Operational Plan and assign to the respective users.
Note: All activities are reviewed by the Operational Plan Approver once the Operational Plan is submitted for review.
-
Review the Operational Plan information in all sections and tabs, and modify or add any missing information.
-
(Optional) In the Financial Planning tab, enter the Estimated Revenue, Estimated Cost, and Estimated Budget for an Operational Plan.
-
In Key Performance tab, create metrics record in Metrics field to track the performance of an Operational Plan.
-
In the Supporting Documentation field, upload any document related to an Operational Plan.
-
Add any comments to the Comments section.
-
Click Submit for Review in the top left of the screen.
Task 3: Review the Operational Plan
Users: Operational Plan Approver
To approve the operational plan
-
Review the details in all the sections of the Operational Plan.
-
Review the Operational Plan Activities.
-
(Optional) In the Workflow Details section, in the Review Comments field, document any notes.
-
Click Approve in the top left of the window.
To request additional information
-
Review the details in all the sections of the Operational Plan.
-
Review the Operational Plan Activities.
-
In the Workflow Details section, in the Review Comments field, document the additional information being requested.
-
Click Needs Additional Information in the top left of the window.
To reject the operational plan
-
Review the details in all the sections of the Operational Plan.
-
Review the Operational Plan Activities.
-
In the Workflow Details section, in the Review Comments field, document the reason for rejecting the Operational Plan.
-
Click Reject in the top left of the window.
Task 4: Resubmit the Operational Plan
Users: Operational Plan Owner
-
In the Workflow Details section, check the Review Comments.
-
Modify or provide the required information in the appropriate section or tab.
-
In the Supporting Documentation field, attach any additional documentation or files, if requested.
-
In the Comments section, add comments, if required.
-
Click Resubmit Operational Plan in the top left of the screen.
Task 5: Execute the Operational Plan
Users: Operational Plan Owner
-
Ensure the related Strategic Plan status is In Execution before executing the Operational Plan.
-
Click Execute Operational Plan in the top left of the screen.
Task 6: Complete the Operational Plan
Users: Operational Plan Owner
-
Select [Operational Plan Completion] and [Operational Plan Achievement] field values.
-
Ensure all related Operational Plan activities are completed.
-
(Optional)In Financial Planning tab, provide the Actual Revenue, Actual Cost, and Actual Budget for the Operational Plan.
-
(Optional)In Key Performance Indicators tab, update the metrics in Metrics section.
-
Click Complete Operational Plan in the top left of the screen.
Task 7: Cancel the Operational Plan
Users: Operational Plan Owner
-
In the Workflow Details section, in the Cancel Reason field, provide details for canceling the request.
-
Click Cancel Operational Plan in the top left of the window.
Operational Plan Activities
Task 1: Create the Operational Plan Activity record
Users: Operational Plan Owner
-
Create the Operational Plan Activity record.
-
From the menu bar, click Archer Strategic Planning.
-
Under Solutions, click Archer Strategic Planning.
-
Under Applications, click Operational Plan Activities.
-
In the Operational Plan Activities record browser, click New Record.
-
-
In the General Information section, enter Activity name, Priority, Due Date, and Description.
-
In the Assigned To field, select the user to assign the activity.
-
In the Related Operational Plan field, select the related Operational Plan record through lookup.
-
In the Dates section, enter the Target Start Date and Target End Date.
-
Click Save, or Save and Close.
Task 2: Execute the Operational Plan Activity
Users: Assignee
-
In the General Information section, review the details.
-
(Optional) In the Dates section, select the Projected Start Date and Projected End Date.
-
(Optional) In the Comments section, provide any comments.
-
Change the Status value to In Progress.
-
Click Save, or Save and Close.
Task 3: Complete the Operational Plan Activity
Users: Assignee
-
Set the Status value to Completed.
-
(Optional) In the Comments section, provide any comments.
-
Click Save, or Save and Close.
Task 4: Defer the Operational Plan Activity
Users: Assignee
-
Change the Status value to Deferred.
-
In the Defer Reason field, provide the reason.
-
Click Save, or Save and Close.
Certification environment
Date Tested: December 2025
| Product Name | Release Information | Operating System |
|---|---|---|
|
Archer |
2024.11 |
Windows |