Archer Strategic Risk Management
The Archer Strategic Risk Management app‑pack enables organizations to document and assess strategic risks, link them directly to impacted strategies, and prioritize mitigation actions based on risk exposure and preparedness. Users can monitor strategic risks continuously, execute and track remediation plans, and gain clear visibility into how risks and opportunities affect strategic outcomes—helping leadership protect objectives, improve decision‑making, and strengthen organizational resilience.
Archer Exchange: With the Archer Exchange, the Archer team has created a broad selection of supplemental, value-added offerings to help you get your unique risk management program on the right path, right from the start. You can leverage the Archer Exchange offerings to expand the use of Archer solutions into new business processes and address specific industry, geographic, regulatory, or technical requirements.
On this page
Overview
Organizations at every level struggle to see when strategic risks begin to threaten the successful execution of their business strategy. Market shifts, regulatory changes, competitive pressures, leadership transitions, and emerging technologies can quickly undermine strategic objectives if they are not identified, assessed, and addressed early. Traditional risk management approaches often operate in silos and fail to connect risks directly to strategy, leaving leadership with limited visibility, delayed insights, and reactive decision‑making. As a result, organizations face increased exposure to disruption, missed opportunities, and reduced resilience in an increasingly complex and uncertain environment.Strategic Risk Management addresses this challenge by connecting risk awareness directly to strategic planning and execution. It enables organizations to understand how internal and external events may impact strategic objectives, determine when risks exceed tolerance, and proactively respond—turning uncertainty into informed action and, in some cases, competitive advantage.
Key features & benefits
Archer Strategic Risk Management provides the following features.:
-
Consistent and repeatable process for identifying and mitigating strategic risk
-
Strategic risk alignment with the organization's risk tolerance
-
Understanding of the level of preparedness against risks that impact the organization
-
A minimized strategic risk for successful strategy execution
Application: Database that stores a specific type of data record, for example, policies, assessments, assets, threats, vulnerabilities, and controls.
Authorized User: A user who has logged into the system and has a right to perform some operation. The system knows the identity and permissions granted to this individual.
Cross-Reference: A field type that allows users to create associations between records in the same application (internal references) or records in two separate applications (external references). By adding a cross-reference to an application, the system automatically adds a Related Record field.
Dashboard: With reports defined and saved in the inventory of system reports, those identified as Global Reports can be added to dashboards. Each dashboard can include one of many reports in the format they were saved.
Notifications: Emails sent from Archer to Users or Groups, based on a schedule or a change in the record status.
Record: A collection of field values, stored within applications, sub-forms, or questionnaires.
Report: Saved search criteria that can be run again later. In Archer, the construct for reports is a combination of a query and its related output presentation options. The data returned is filtered by a user permission, allowing users to see only the data for which they have been granted access.
Sub-Form: For one application, administrators can develop multiple sub-forms to hold all related data. Sub-forms can be shared across applications; however, changing a sub-form affects all applications using that sub-form.
Task: Action items that have been assigned to a user in relation to the Support Request.
User: Any person who uses and is registered within the system. In this guide, the user is assumed to be an employee using Archer Support Requests.
User Profile: Preferences of the registered user that are saved within the system.
Workspace: Display mechanism that provides the user with a way to access their data.
User guide
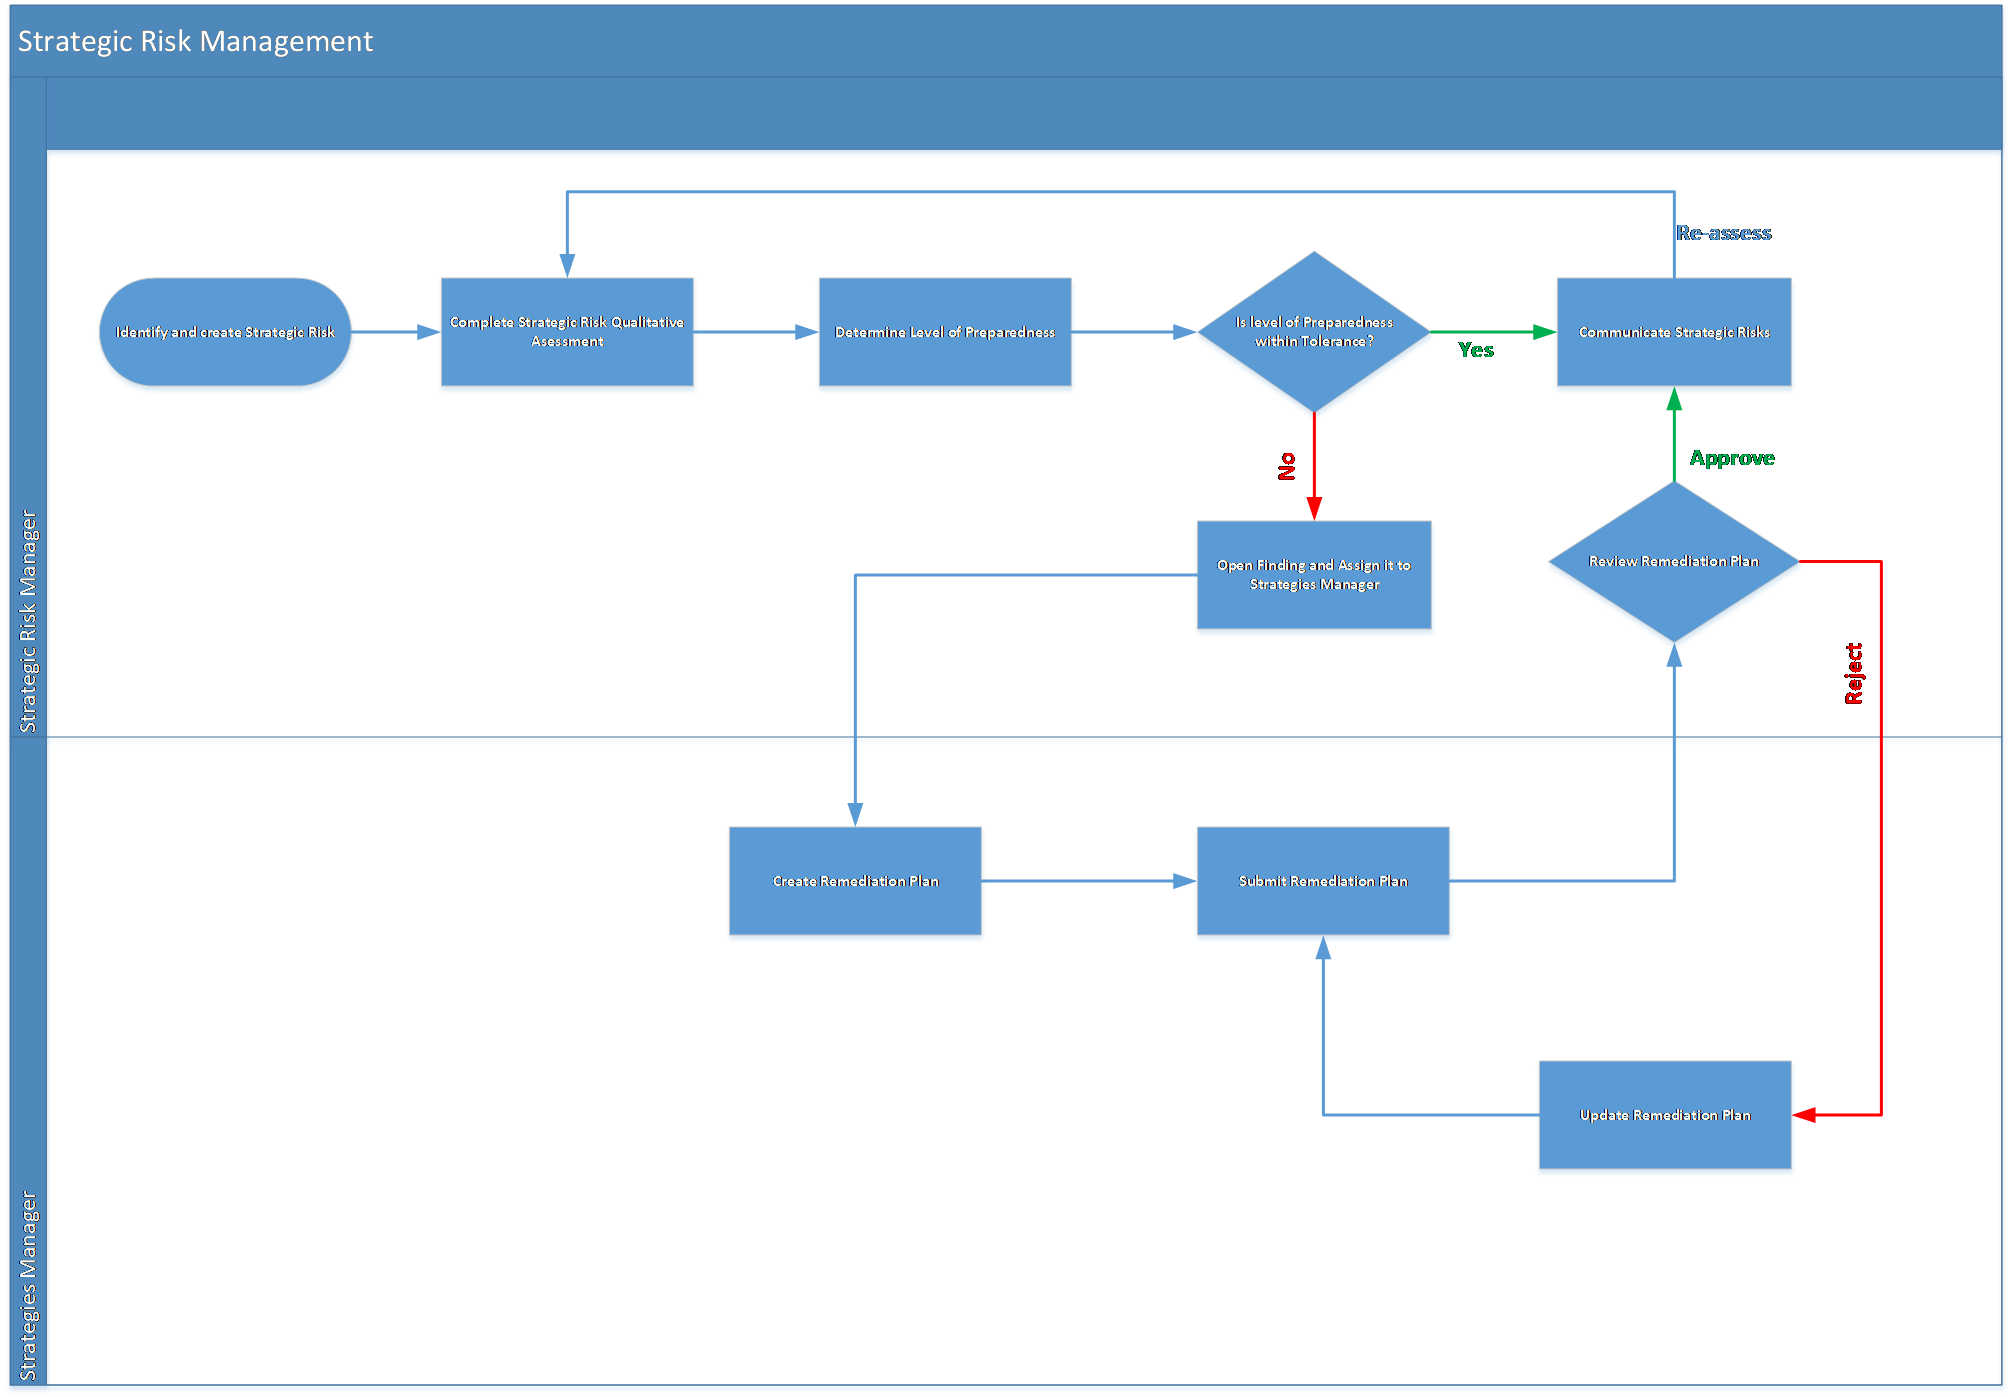
Users: Strategic Risk Manager
-
Enter Strategic Risk, Description, Strategic Risk Categories, Priority, Review Frequency in the General Information section.
-
Enter Stakeholders and Strategies Manager, if available, in the Stakeholders section.
-
Provide any other necessary details.
-
To save the strategic risk profile, click the Save button in the top left of the screen. At this stage profile is created and strategic risk manager will have to perform risk assessment.
Users: Strategic Risk Manager
-
To generate Strategic Risk assessment, click on Generate Risk Assessment button at the top left of the screen.
-
Once the Strategic Risk assessment is generated, it can be accessed through the Strategic Risk Assessment section of the Risk Assessment tab. At this point, the Assessment Status is Not Started.
Users: Strategic Risk Manager
-
Edit Strategic Risk record.
-
Enter Inherent Impact, Inherent Likelihood, Residual Impact, Residual Likelihood in Strategic Risk Assessment Section in Risk Assessment tab.
-
Click on Save Changes button at the top of the page or Save button at the end of the row in Strategic Risk Assessment section.
-
Click on Save in Strategic Risk record.
-
Inherent and Residual Risk values from the latest assessment will be populated in Strategic Risk Summary section. Assessment Status in Assessment Summary section in Risk Assessment tab will change to In Progress.
Users: Strategic Risk Manager
-
Edit strategic risk record.
-
Provide status for SR: Analysis Completed in Strategic Risk Assessment section under Risk Assessment tab.
-
Select status N/A, if risk analysis is not required.
-
Select status In Progress, if risk analysis is in progress.
-
Select status Complete, if risk analysis is complete.
-
Click on Save Changes button at the top of the page or Save button at the end of the row in Strategic Risk Assessment section.
-
-
Provide status for SR: Responsibilities Defined in Strategic Risk Assessment section under Risk Assessment tab.
-
Select status N/A, if not required.
-
Select status In Progress, if the board is still being briefed.
-
Select status Complete, if responsibilities have been defined.
-
Click on Save Changes button at the top of the page or Save button at the end of the row in Strategic Risk Assessment section.
-
-
Provide status for SR: Board Briefed in Strategic Risk Assessment section under Risk Assessment tab.
-
Select status N/A, if not required.
-
Select status In Progress, if the responsibilities are being defined.
-
Select status Complete, if the board has been briefed.
-
Click on Save Changes button at the top of the page or Save button at the end of the row in Strategic Risk Assessment section
-
-
Provide status for Remediation Plan Created in Strategic Risk Assessment Section under Risk Assessment tab.
-
Select status N/A, if not remediation plan is not required.
-
If remediation plan is required for the strategic risk,
-
Click on Add New or Look Up at the right corner of Findings section in Related Findings tab. To add a new finding, assign Strategies Manager in Assigned To field in finding when adding a new finding. The Strategies Manager is responsible for creating a remediation plan.
-
Select status In Progress, if remediation plan is under development.
-
-
Select status Under Review, if remediation plan is Awaiting Review from the Strategic Risk Manager.
-
Select status Complete, if remediation plan has been Approved or Rejected.
-
Click on Save Changes button at the top of the page or Save button at the end of the row in Strategic Risk Assessment section.
-
-
Level of Preparedness from the latest assessment will be populated in Level of Preparedness section.
-
If Risk Ratings, SR: Analysis, SR: Board Briefed, SR: Responsibilities Defined and Remediation Plan Created are complete then Assessment status will change to Complete.
Note: Findings and Remediation Plans utilize the out-of-the-box workflow. In addition, to relate Findings to Strategies through the Archer Strategic Planning App-Pack, create a cross-reference to the Strategies application and add it to the Findings layout.
Users: Strategic Risk Manager
-
Provide status for Remediation Plan In Execution in Strategic Risk Assessment section under Risk Assessment tab.
-
Select status N/A, if a remediation plan was not required.
-
Select status In Progress, if remediation plan is in execution.
-
Select status Complete, if remediation plan has been executed.
-
-
Click on Save Changes button at the top of the page or Save button at the end of the row in Strategic Risk Assessment section.
Users: Strategic Risk Manager
-
To provide an Overall Recommendation regarding the Strategic Risk in scope.
-
Edit Strategic Risk record.
-
Complete the Overall Recommendation in Level of Preparedness section.
-
Click Save.
-
-
To export the Overall Recommendation Report.
-
Click on Export at the top right corner of the Strategic Risk record page.
-
Click on Archer Strategic Risk Overall Recommendation report.
-
Users: Strategic Risk Manager
-
Click on Generate Strategic Risk Assessment button at the top right corner of the page.
-
Once the strategic risk assessment is generated, it can be accessed through the Strategic Risk Assessment section of the Risk Assessment tab. The Assessment Status is Not Started.
Administrator guide
Prerequisites (ODA &system requirements)
|
Components |
Recommended Software |
|---|---|
|
Archer Solution Area(s) |
Enterprise & Operational Risk Management |
|
Archer Use Case(s) |
Archer Issues Management |
|
Archer Application(s) |
|
| Uses Custom Objects | No |
| Requires Archer On-Demand Application (ODA) licenses | One (1) Archer On-Demand Application license required |
|
Archer requirements |
Archer Platform Release 6.5 P2 and later |
| Supported Archer Environments |
|
Compatible use cases & applications - related applications
|
Application |
Use case |
Primary purpose of the relationship |
|---|---|---|
|
Strategies |
Archer Strategic Planning |
|
|
Control Procedures |
Archer IT Controls Assurance, Archer Information Security Management System, Archer PCI Management, Archer IT Risk Management, Archer Controls Assurance Program Management, Archer Data Governance, Archer Top-Down Assessment, Archer Federal Assessments & Authorization |
|
|
Business Unit |
Archer Issues Management, Archer Business Impact Analysis, Archer Third Party Catalog, Archer Policy Program Management, Archer Cyber Incident & Breach Response, Archer Key Indicator Management, Archer IT Asset Catalog **, Archer Business Asset Catalog **, Archer Federal Assessments & Authorizations, Archer Federal Continuous Monitoring |
|
|
Business Process |
Archer Audit Engagements & Workpapers, Archer Business Impact Analysis, Archer IT Risk Management, Archer Controls Assurance Program Management, Archer Data Governance, Archer Top-Down Assessment, Archer Policy Program Management, Archer IT Controls Assurance, Archer Business Asset Catalog **, Archer Risk Assessment Management, Archer Federal Assessments & Authorizations, Archer Federal Continuous Monitoring |
|
|
Risk Register |
Archer Information Security Management System, Archer IT Risk Management, Archer Risk Catalog, Archer Top-Down Assessment |
|
|
Corporate Objectives |
Archer Policy Program Management, Archer Controls Monitoring Program Management, Archer Business Asset Catalog, Archer Operational Risk Management |
|
Components
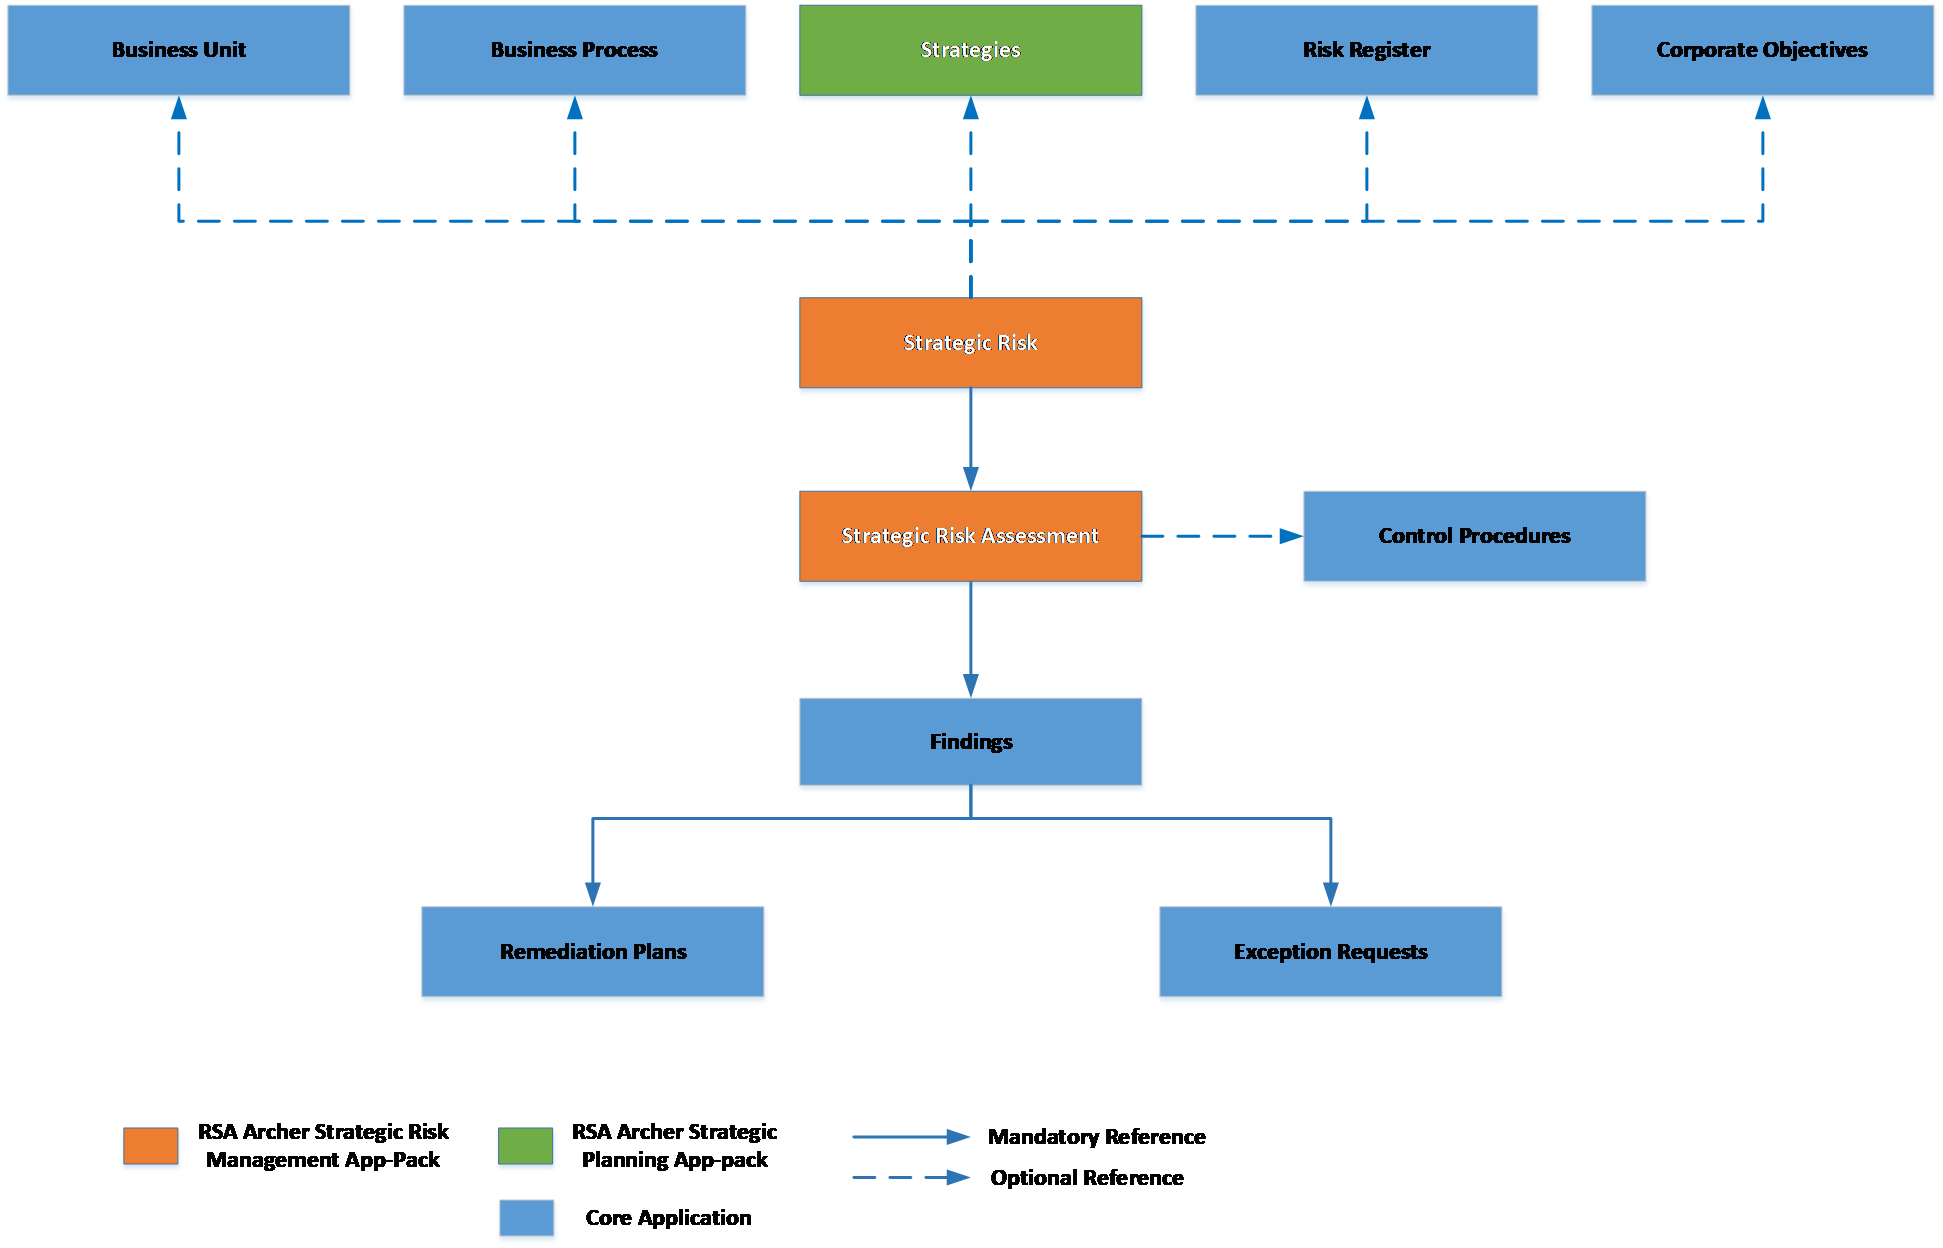
Architecture diagram
The following diagram shows the relationship between the applications in Archer Strategic Risk Management.
Process diagram
The following diagram shows the general workflow of the App-Pack.
Applications
The following table describes the applications in Archer Strategic Risk Management.
|
Application |
Description |
|---|---|
|
Strategic Risk |
The Strategic Risk application documents all the information when a strategic risk is identified, captures an overview of the strategic risk assessment, and findings and remediation plans resulting from the assessment. |
|
Strategic Risk Assessment |
The Strategic Risk Assessment is a questionnaire used to determine the likelihood and impact of the risk and the level of preparedness. Controls can be referenced, if available, to minimize the risk. |
Personas & access roles
The following table describes the functions that make up the application’s organization roles. Depending on the organization of your company, these functions and responsibilities may vary.
|
Persona |
Description |
How many (per Information System)? |
Optional / Required
|
|---|---|---|---|
|
Strategic Risk Manager |
Responsible for identifying the strategic risk, conducting risk assessment, evaluating the organization’s level or preparedness, approving action plans, and monitoring and communicating results. This could be someone mandated from the Board, Risk Management, or another division. |
Can be more than one |
Required |
|
Strategies Manager |
Responsible for working with the appropriate teams to develop and implement action plans. This could be someone who owns or executes a strategy. |
Can be more than one |
Optional |
Permissions chart
|
Applications |
SRM: Risk Manager |
SRM: Strategies Manager |
SRM: Read Only |
|---|---|---|---|
|
Strategic Risk |
CRU |
R |
R |
|
Strategic Risk Assessment |
CRU |
R |
R |
|
Findings |
CRU |
RU |
R |
|
Remediation Plans |
CRU |
CRU |
R |
|
Exception Requests |
CRU |
CRU |
R |
|
Strategies |
R |
R |
R |
|
Control Procedures |
R |
R |
R |
|
Risk Register |
R |
R |
R |
|
Corporate Objectives |
R |
R |
R |
|
Business Unit |
R |
R |
R |
|
Business Process |
R |
R |
R |
C = Create, R = Read, U = Update, D = Delete
Users should at least have read access at record level for the applications related to Strategic Risk.
Install Archer Strategic Risk Management
-
Prepare for the installation.
-
Obtain the installation package.
-
Read and understand the "Packaging Data" topic in the Archer Platform Help.
-
Apply the latest license file in the Archer Control Panel.
-
-
Test the installation. Test the application according to your company standards and procedures, to ensure that the use case works with your existing processes.
Install the package
Installing a package requires that you import the package file, map the objects in the package to objects in the target instance, and then install the package.
There is no Undo function for a package installation. Packaging is a powerful feature that can make significant changes to an instance. Back up the instance database before installing a package. This process enables a full restoration if necessary.
An alternate method for undoing a package installation is to create a package of the affected objects in the target instance before installing the new package. This package provides a snapshot of the instance before the new package is installed, which can be used to help undo the changes made by the package installation. New objects created by the package installation must be manually deleted.
-
From the menu bar, click
 > Application Builder > Install Packages.
 - In the Available Packages section, click Import.
- Click Add New, then locate and select the package file that you want to import.
- Click OK.
The package file is displayed in the Available Packages section and is ready for installation.
Important: This step is required only if FAR Regulatory Correspondence is already present in your system, and you are installing this package.
-
From the menu bar, click
> Application Builder > Install Packages. - In the Available Packages section, locate the package you want to map.
- In the Actions column, click
 for that package.
The analyzer examines the information in the package. The analyzer automatically matches the system IDs of the objects in the package with the objects in the target instance and identifies objects from the package that are successfully mapped to objects in the target instance, objects that are new or exist but are not mapped, and objects that do not exist (the object is in the target but not in the source).
When the analyzer is complete, the Advanced Package Mapping page lists the objects in the package file and corresponding objects in the target instance.
- On the Advanced Mapping page, click to open each category and review the icons next to each object to determine which objects you must map manually.
The following table describes the icons. Icon
Name
Description

Awaiting Mapping Review
Indicates that the system could not automatically match the object or one of its children to a corresponding object in the target instance.
Objects marked with this icon must be mapped manually.
New objects should not be mapped. Select Do Not Map from the drop-down menu to clear this icon for an individual object, or click Do Not Map to clear the icon for all unmapped objects.

Mapping Completed
Indicates that the object and all children are mapped to objects in the target instance, or that they have been marked as Do Not Map. Nothing more needs to be done with these objects in Advanced Package Mapping.
Note: You can run the mapping process without mapping all objects. The
icon is for informational purposes only. - For objects awaiting mapping review, do one of the following:
- To map each object individually, use the drop-down menu in the Target column to select the object in the target instance to which you want to map the source object. To leave an object unmapped, select Do Not Map in the Target column.
- To automatically map all objects in a category that have different system IDs but the same object name as an object in the target instance, click Auto Map. Select whether to ignore case and spaces when matching object names. Click OK.
- To mark all unmapped objects as Do Not Map, click Do Not Map.
-
(Optional) Click
 to enable filter fields that you can use to find specific objects in each mapping category. To undo your mapping selections, click Undo, then select whether to undo all mappings in the category or only the mappings on a single page. If you choose to undo all mappings, you will be returned to the categories list.
 - (Optional) To save your mapping selections and return to the categories list without committing changes to the target instance, click
 .
. - After you review and map all objects, click Execute.
- Select I understand the implications of performing this operation. Click OK.
When the mapping is complete, the Import and Install Packages page displays.
Important: Advanced Package Mapping modifies the system IDs in the target instance. You must update any Data Feeds and Web Service APIs that use these objects with the new system IDs.
All objects from the source instance are installed in the target instance unless the object cannot be found or is flagged to not be installed in the target instance. A list of conditions that may cause objects not to be installed is provided in the Log Messages section. A log entry is displayed in the Package Installation Log section.
- From the menu bar, click > Application Builder > Install Packages.
- In the Available Packages section, locate the package file that you want to install, and click the file name or
 at end of the row to open the Options menu.
 - In the Selected Components section, click the Lookup button to open the Package Selector window.
- To select all components, select the top-level checkbox.
- To install only specific global reports in an already installed application, select the checkbox associated with each report that you want to install.
Note: Items in the package that do not match an existing item in the target instance are selected by default.
- Under the Translation Option drop-down menu, select an option for each selected component. To use the same Translation Option for all selected components, select a method from the top-level drop-down list.
The Translation Option is enabled only when a language is selected.The following table describes the options. Option
Description
Full Install
Installs the component and its translations from the selected languages.
Translations Only
Only installs the translations from the selected languages.
- Under the Install Method drop-down menu, select an option for each selected component. To use the same Install Method for all selected components, select a method from the top-level drop-down list.
The following table describes the options. Option
Description
Create New Only
Only creates new fields and other elements in the applications, questionnaires, workspaces, data feeds, and dashboards specified in the package file. This option does not modify any existing elements on your instance of Archer. This is useful when you want to add functionality to an existing application, questionnaire, workspace, dashboard, data feed, or access role, but you do not want to risk making any unwanted changes to the existing elements of workspaces, data feeds, or dashboards.
Note: The Create New Only option does not apply to access roles or languages.
Create New and Update
Updates all elements in the applications, questionnaires, workspaces, data feeds, and dashboards as specified in the package file. This includes adding new elements and updating existing elements.
Note: The Create New and Update option does not apply to access roles or languages.
- Under the Install Option drop-down menu, select an option for each selected component. To use the same Install Option for all selected components, select an option from the top-level drop-down list.
The following table describes the options. Option
Description
Do not Override Layout
Installs the component, but does not change the existing layout. This is useful if you have a lot of custom fields and formatting in your layout that you do not want to risk losing.
You may have to modify the layout after installing the package to use the changes made by the package.
Note: The Do not Override Layout option does not apply to access roles or languages.
Override Layout
Updates the layout as specified in the package file, overwriting the existing layout.
Note: The Override Layout option does not apply to access roles or languages.
- Click Continue to advance to the next object category in the Package Selector, and repeat steps 4 to 6. After reviewing all object categories, click OK.
- To deactivate target fields and data-driven events that are not in the package, in the Post-Install Actions section, select the Deactivate target fields and data-driven events that are not in the package checkbox. To rename the deactivated target fields and data-driven events with a user-defined prefix, select Apply a prefix to all deactivated objects, and enter a prefix. This can help you identify any fields or data-driven events that you may want to review for cleanup post-install.
- Click Install.
- Click OK.
-
From the menu bar, click
> Application Builder > Install Packages. - In the Package Installation Log section, click the package that you want to view.
- In the Package Installation Log page, in the Object Details section, click View All Errors.
Note: To view individual logs, in the Errors column of the log you want to view, click the Failures link or Warnings link. Clicking View All Errors, Failures, or Warnings opens the specific errors on a different page.
- Click the Export icon to export the log file.
- Click Close.
For a list of packaging installation log messages and remediation information for common messages, see Package Installation Log Messages.
Troubleshooting guidelines
If users do not have any of the optional applications, they will receive warnings related to those modules. Users can ignore those warnings or take action if required. Operations are not be affected due to these warnings/errors.
For example, below are few warnings/failures which might be observed if users do not have the Strategies Application (Archer Strategic Planning App-Pack):
-
Warning for Access Roles “SRM: Risk Manager”, “SRM: Strategies Manager”, “SRM: Read Only”: Access rights to the following page could not be configured due to missing module: Strategies.
-
Minor failure for report Strategic Risks by Strategies: Strategic Risks by Strategies report could not be created. There are no display fields for this report.
-
Minor failure for Impacted Strategies: Field Impacted Strategies could not be saved due to inability to identify the related module.
-
Warnings for reports: Warnings regarding missing Impacted Strategies field or fields from Strategies application (Category, Priority, Strategy, Status and Strategy owner fields) from Archer Strategic Planning App-Pack.
-
Warning for Inherited User/Group field Strategy Owners: Strategy Owner was not found in the target instance and was removed from field: Strategy Owners.
If users do not have any of the optional applications following changes can be made post-installation, you can make the folloiwng changes to keep the layout neat.
-
If Strategies is not available:
-
Move Strategic Owner off layout in Default layout of Strategic Risk Application.
-
Remove iView: Strategies affected by Strategic Risk from Strategic Risk Manager Dashboard.
-
Remove report My Strategic Risk by Residual Risk and Strategies from My Strategic Risk Summary iView in Strategies Manager.
-
Remove Impacted Strategies section from Archer Strategic Risk Overall Recommendation Report Mail Merge template.
-
-
If Business Unit is not available: Remove Strategic Risks by Business Unit iView from SRM: Executives Dashboard.
-
If Control Procedures are not available:
-
Remove Strategic Risk and Related Controls iView from SRM: Executives Dashboard
-
Remove Related Controls section from Mail Merge template.
-
Certification environment
Date tested: May 2019
| Product Name | Version Information | Operating System |
| Archer | 6.5 P2 | Windows |