TUV Rheinland OpenSky Entitlement Review
The solution presented is meant to facilitate the review of Entitlements across applications, devices and systems. Permissions are tracked by association to a Group or Role following best practice of Role Based Access Control (RBAC).
On this page
Release history
Last updated: August 2018
Overview of Entitlement Reviews
About the Entitlement Reviews solution
There are risk ratings assigned to the CRUD rights granted to a role called Assigned Permission Risk Rating. There are also risk ratings that are derived from the associated asset. The two ratings are then calculated together to establish an Entitlement Risk rating. What this does is allow the Risk rating of the associated asset scale the Entitlement Risk so that entitlements on critical or high risk assets are weighed heavier than low risk assets.
Asset Rating * Entitlement Rating
So critical assets with High permission risk ratings show more risk than Low risk assets with high entitlement risk. This allows the reviewers to focus on what is most important first.
Entitlement Risk Rating Chart
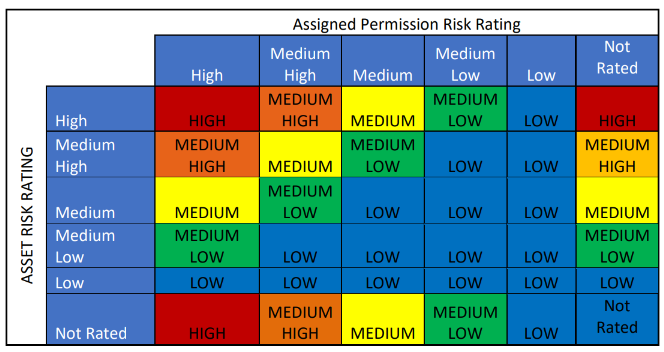
On the Entitlement Review, the overall Risk Rating of the Review takes the average of all the entitlements given to a user. This will ensure that users that have more access in more applications will bubble up in the priority list. The solution allows you to prioritize which entitlements should be reviewed first by calculating Entitlement Risk. This factors in what asset is in question, what is that assets risk rating and what levels of access the user has within that asset.
Future releases may include integrations with other HR systems to retrieve user data to populate the Contacts. There may also be integrations with Entitlement Management Applications and frameworks to pull in data around what the entitlements for a given user are. This first release sets the stage for a solution that is poised to grow.
Benefits
With the application, you will be able to:
-
Document entitlements within the IT organization
-
Review the Entitlements periodically for accuracy and changes
-
Prioritize reviews to complete the more critical or risk entitlements first
-
View Entitlement Risk across the Organization
Prerequisites (ODA and system requirements)
|
Components |
Recommended Software |
|---|---|
|
ODA License |
Entitlement Management requires 2 ODA licenses |
|
Operating |
Windows Server 2012 R2 |
|
System Database |
Microsoft SQL Server 2014 (64-bit) |
|
Services Server |
Java Runtime Environment (JRE) 8 (64-bit) |
|
Archer |
Archer 6.4 Patch 2 and later |
|
Use Cases |
IT Risk Management and Issues management |
Compatible Use Cases and Applications
Related Applications
|
Application |
Primary Purpose(s) of the Relationship |
|---|---|
|
Contacts |
Can be used to identify key individuals for business Continuity |
|
Applications |
Used as a potential target a user may have entitlements on |
|
Devices |
Used as a potential target a user may have entitlements on |
|
Information Assets |
Used as a potential target a user may have entitlements on |
|
Storage Devices |
Used as a potential target a user may have entitlements on |
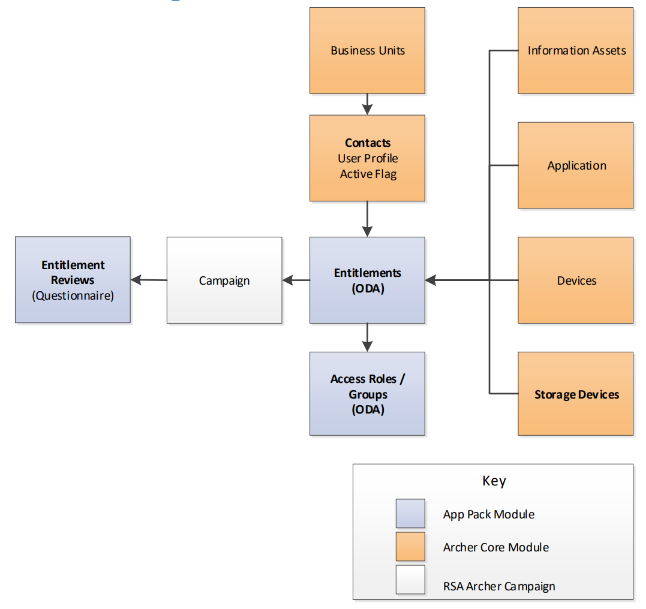
Entitlement Reviews Solution components
Architecture diagram
Swim Lane diagram
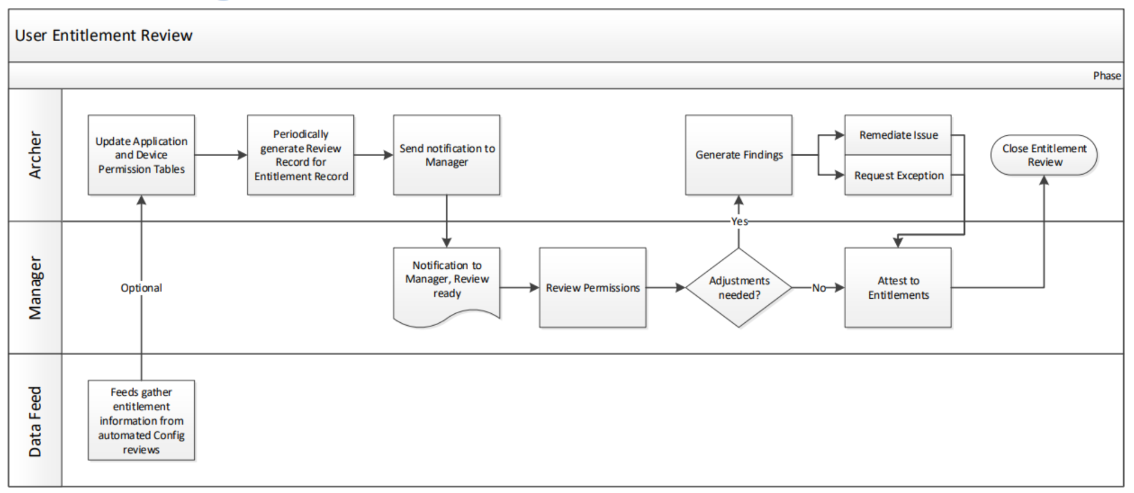
Note: This solution does not generate Findings from the Entitlement Reviews application. At this time, any updates to an entitlement are expected to be made before sign-off of the entitlement review.
Applications
|
Application |
Description |
Type |
|---|---|---|
|
Access Roles and Groups |
This application is used to define roles and groups used to assign access to applications, devices and/or systems |
ODA |
|
Entitlements |
The application is used to aggregate a user with one or more Access Rolls and Groups to illustrate the access that the user has. |
ODA |
|
Entitlement Review |
This is a questionnaire that is used to allow a manager to review the entitlements and either approve/acknowledge or update. |
Questionnaire |
|
Contacts |
The Contacts application serves as a central repository for contact information, is utilized across multiple areas of Archer, and contains information that is often leveraged by other use cases. Updates to a profile record within this application automatically propagate in any records where that contact information is displayed. |
Core |
Personas and Access Roles
The following table describes the functions that make up the application’s organization roles. Depending on the organization of your company, these functions and responsibilities may vary.
|
Function |
Description |
|---|---|
|
Entitlement: Approver |
Reviews Entitlement reviews, uses dashboards to manage the overall Entitlement Process |
|
Entitlement: Manager |
Creates entitlement records, completes entitlement reviews periodically, updating as entitlements as needed. |
|
Entitlement: Read Only |
Allowed to see/read Entitlements, Entitlement Reviews and Access Roles and Groups records. Note: This role is not implemented at this time) |
|
EM: Read Only |
Existing group that is leveraged to grant visibility to enterprise assets |
|
Access Control Matrix |
||||||||
|---|---|---|---|---|---|---|---|---|
|
Role/Group |
Entitlements |
Entitlement Review |
Access Roles and Groups |
Applications |
Devices |
Information Asset |
Storage Device |
Contacts |
|
Entitlement: Approver |
R |
RU |
R |
|
|
|
|
|
|
Entitlement: Manager |
CRU |
CRU |
CRU |
|
|
|
|
|
|
Entitlement: Read Only |
R |
R |
R |
|
|
|
|
|
|
EM: Read Only |
|
|
|
R |
R |
R |
R |
R |
|
Everyone |
|
|
|
|
|
|
|
R |
Installing Entitlement Reviews App Pack
Installation overview
Complete the following tasks to install the application.
Task 1: Prepare for the installation
-
Ensure that your Archer system meets the following requirements:
-
Archer version 6.4 Patch 2
-
-
Read and understand the "Packaging Data" section of the Archer Help.
Task 2: Set up groups
You must create any groups used by the solution that do not exist. They will be used during the package install process and should be created prior to installation.
Task 3: Install the package
Installing a package requires that you import the package file, map the objects in the package to objects in the target instance, and then install the package. See Installing the ApplicationPackage for complete information.
Task 4: Populate groups
You must populate the groups that were built with the appropriate users.
Task 5: Test the installation
Test the application according to your company standards and procedures, to ensure that the use case works with your existing processes.
Installing the package
Task 1: Back up your database
There is no Undo function for a package installation. Packaging is a powerful feature that can make significant changes to an instance. Archer strongly recommends backing up the instance database before installing a package. This process enables a full restoration if necessary.
An alternate method for undoing a package installation is to create a package of the affected objects in the target instance before installing the new package. This package provides a snapshot of the instance before the new package is installed, which can be used to help undo the changes made by the package installation. New objects created by the package installation must be manually deleted.
Task 2: Create the roles and groups needed
-
Log into your Archer Instance. From the administration section, navigate Administration > Access Control > Groups
-
Create the group “Entitlements”
-
Create the group “Entitlements: Read Only” and place it in the “Entitlements” group.
-
Create the group “Entitlements: Manager” and place it in the “Entitlements” group.
-
Create the group “Entitlements: Approver” and place it in the “Entitlements” group.
-
-
From the administration section, navigate Administration > Access Control > Roles
-
Create the Role Entitlements: Read Only
-
In the “Rights” tab of the “Manage Access Roles” screen, for the applications “Entitlements”, “Entitlement Reviews” and “Access Roles and Groups”:
-
Check “Read” checkbox for the Content Record page name
-
Check “Create”, “Read” and “Update” on the Save Reports
-
-
-
Create the Role “Entitlements: Approver”
-
In group assignments section, select “Entitlements: Approver”
-
In the “Rights” tab of the “Manage Access Roles” screen, for the applications “Entitlements Reviews”:
-
Check “Read” and “Update” checkbox for the Content Record page name
-
Check “Create”, “Read” and “Update” on the Save Reports
-
-
In the “Rights” tab of the “Entitlements” and “Access Roles and Groups”:
-
Check “Read” checkbox for the Content Record page name
-
Check “Create”, “Read” and “Update” on the Save Reports
-
-
-
Create the Role “Entitlements: Manager”
-
In group assignments section, select the “Entitlements: Manager”
-
In the “Rights” tab of the “Manage Access Roles” screen, for the applications “Entitlements”, “Entitlement Reviews” and “Access Roles and Groups”:
-
Check Create “Read” and “Update” checkbox for the Content Record page name
-
Check “Create”, “Read” and “Update” on the Save Reports
-
-
-
Task 3: Import the package
Go to the Archer Exchange (https://community.rsa.com/docs/DOC-95910) to obtain information on how to download the Entitlement Management Application Pack directly from TUV Rheinland OpenSky along with supporting documentation (you may be required to sign up or login in). Please ensure you are properly licensed to use the Application Package and any dependent solutions/Use Cases.
-
Go to the Install Packages page.
-
From the menu bar, click
 .
. -
Under Application Builder, click Install Packages.
-
-
In the Available Packages section, click Import.
-
Click Add New, then locate and select the package file that you want to import.
-
Click OK.
The package file is displayed in the Available Packages section and is ready for installation.
Task 4: Map objects in the package
Important: This step is required only if you are upgrading to a later version of Entitlement Review.
-
In the Available Packages section, select the package you want to map.
-
In the Actions column, click
 for that package.
The analyzer runs and examines the information in the package. The analyzer automatically matches the system IDs of the objects in the package with the objects in the target instances and identifies objects from the package that are successfully mapped to objects in the target instance, objects that are new or exist but are not mapped, and objects that do not exist (the object is in the target but not in the source).
Note: This process can take several minutes or more, especially if the package is large, and may time out after 60 minutes. This time-out setting temporarily overrides any IIS time-out settings set to less than 60 minutes.
When the analyzer is complete, the Advanced Package Mapping page lists the objects in the package file and corresponding objects in the target instance. The objects are divided into tabs, depending on whether they are found within Applications, Solutions, Access Roles, Groups, Sub- forms, or Questionnaires.
-
On each tab of the Advanced Mapping Page, review the icons that are displayed next to each object name to determine which objects require you to map them manually.
|
Icon |
Name |
Description |
|---|---|---|
|
|
Awaiting Mapping Review |
Indicates that the system could not automatically match the object or children of the object to a corresponding object in the target instance. Objects marked with this symbol must be mapped manually through the mapping process. Important: New objects should not be mapped. This icon should remain visible. The mapping process can proceed without mapping all the objects. Note: You can execute the mapping process without mapping all the objects. The |
|
|
Mapping Completed |
Indicates that the object and all child objects are mapped to an object in the target instance. Nothing more needs to be done with these objects in Advanced Package Mapping. |
|
|
Do Not Map |
Indicates that the object does not exist in the target instance or the object was not mapped through the Do Not Map option. These objects will not be mapped through Advanced Package Mapping, and must be remedied manually. |
|
|
Undo |
Indicates that a mapped object can be unmapped. This icon is displayed in the Actions column of a mapped object or object flagged as Do Not Map. |
-
For each object that requires remediation, do one of the following:
-
To map each item individually, on the Target column, select the object in the target instance to which you want to map the source object. If an object is new or if you do not want to map an object, select Do Not Map from the drop-down list.
Important: Ensure that you map all objects to their lowest level. When objects have child or related objects, a drill-down link is provided on the parent object. Child objects must be mapped before parent objects are mapped. For more details, see "Mapping Parent/Child Objects" in the Archer Help.
-
To automatically map all objects in a tab that have different system IDs but the same object name as an object in the target instance, do the following:
-
In the toolbar, click Auto Map.
-
Select an option for mapping objects by name.
Option
Description
Ignore
case
Select this option to match objects with similar names regardless of the case of the characters in the object names.
Ignore
spaces
Select this option to match objects with similar names regardless of whether spaces exist in the object names.
-
Click OK.
The Confirmation dialog box opens with the total number of mappings performed. These mappings have not been committed to the database yet and can be modified in the Advanced Package Mapping page.
-
Click OK.
-
-
To set all objects in the tab to Do Not Map, in the toolbar, click Do Not Map.
Note: To undo the mapping settings for any individual object, click
 in the Actions column.
When all objects are mapped, the ![]() icon is displayed in the tab title. The
icon is displayed in the tab title. The ![]() icon is displayed next to the object to indicate that the object will not be mapped.
icon is displayed next to the object to indicate that the object will not be mapped.
-
Verify that all other objects are mapped correctly.
-
(Optional) To save your mapping settings so that you can resume working later, see "Exporting and Importing Mapping Settings" in Archer Help.
-
Once you have reviewed and mapped all objects, click
 .
.
-
Select I understand the implications of performing this operation and click OK.
The Advanced Package Mapping process updates the system IDs of the objects in the target instance as defined on the Advanced Package Mapping page. When the mapping is complete, the Import and Install Packages page is displayed.
Important: Advanced Package Mapping modifies the system IDs in the target instance. Any Data Feeds and Web Service APIs that use these objects will need to be updated with the new system IDs.
Task 5: Install the package
All objects from the source instance are installed in the target instance unless the object cannot be found or is flagged to not be installed in the target instance. A list of conditions that may cause objects not to be installed is provided in the Log Messages section. A log entry is displayed in the Package Installation Log section.
-
Go to the Install Packages page.
-
From the menu bar, click
. -
Under Application Builder, click Install Packages.
-
-
In the Available Packages section, locate the package file that you want to install, and click Install.
-
In the Configuration section, select the components of the package that you want to install.
-
To select all components, select the top-level checkbox.
-
To install only specific global reports in an already installed application, select the checkbox associated with each report that you want to install.
Note: Items in the package that do not match an existing item in the target instance are selected by default.
-
In the Configuration section, under Install Method, select an option for each selected component. To use the same Install Method for all selected components, select a method from the top-level drop-down list.
Note: If you have any existing components that you do not want to modify, select Create New Only. You may have to modify those components after installing the package to use the changes made by the package.
-
In the Configuration section, under Install Option, select an option for each selected component. To use the same Install Option for all selected components, select an option from the top-level drop-down list.
Note: If you have any custom fields or formatting in a component that you do not want to lose, select Do not Override Layout. You may have to modify the layout after installing the package to use the changes made by the package.
-
To deactivate target fields and data-driven events that are not in the package, in the Post- Install Actions section, select the Deactivate target fields and data-driven events that are not in the package checkbox. To rename the deactivated target fields and data-driven events with a user-defined prefix, select the Apply a prefix to all deactivated objects checkbox, and enter a prefix. This can help you identify any fields or data-driven events that you may want to review for cleanup post-install.
-
Click Install.
-
Click OK.
Task 6: Review the package installation log
-
Go to the Package Installation Log tab of the Install Packages page.
-
From the menu bar, click
. -
Under Application Builder, click Install Packages.
-
Click the Package Installation Log tab.
-
-
Click the package that you want to view.
-
In the Package Installation Log page, in the Object Details section, click View All Warnings.
Depending on what solutions you have licensed, you may receive errors where there may be dependencies on unlicensed solutions such as this:
|
Contacts |
Report |
Base Resource Utilization Report |
Warning |
Display field: 15387 was not found in the target instance and was removed from report: Base Resource Utilization Report. |
|---|
Configure the Entitlement Reviews solution
Task 1: Prepare managers group
The Entitlement Managers will be the ones that are actually creating the Entitlement records and reviewing them periodically. They need to be part of the “Entitlement: Manager” group and “EM: Read Only” group in order to create and edit records as needed.
-
For each Business Unit record, specify the Business Unit Manager in the Business Unit record by selecting a user using the record lookup field.
-
Export a list of the Business units and include the following fields:
-
Business Unit
-
Business Unit Manager
-
-
Navigate to Administrator > Access > Control Groups > Entitlements >Select the “Entitlement: Manager” group.
-
Ensure that all users in the exported list are selected in the Members section.
Task 2: Prepare the approvers group
The approvers in this solution can be individuals or groups. Whoever is to approve the review records will need to be part of the “Entitlements: Approvers” group and “EM: Read Only”. This will allow them to see the Entitlements and Access Roles and Groups records but not edit them. They will be able to edit the Entitlement Reviews records.
-
Put together the list of users that are to be approvers in the solution.
-
Navigate to Administrator > Access > Control Groups > Entitlements >Select the “Entitlement: Approvers” group.
-
Ensure that all users in list are selected in the Members section.
Using Entitlement Reviews solution
Task 1: Create a new Entitlement Record
User: Entitlement Manager
Use this step to create a new entitlement record. An entitlement record selects a user, selects an asset, and then lists and groups or roles that grant access to that asset.
-
Go to the Entitlement Reviews workspace and in the dashboard, find the “User Entitlements Quick Links iView” and click on the “Add Entitlement Record”
-
Select a [Contact] from the ellipses.
-
You can add any pertinent [Additional Detail] about the entitlement that is being created
-
You should fill in the [Associated Login] as some systems might reflect a different name for that user than their standard username.
-
Select [Asset Type] from the dropdown.
-
Select the asset (Device, Application, Information asset or Storage Device) from the ellipses.
-
For applications you can specify sub applications as necessary
-
For Device and Storage Device you can specify the pertinent folder/path if desired
-
-
Once you have saved the record, assuming the Access Roles and Groups are specified, and the asset is selected, Archer will calculate the [Entitlement Risk Rating] for you. This is used to help prioritize reviews to ensure that the Entitlement Reviews are prioritized as they should be.
Task 2: Create an Entitlement Reviews Record
User: Campaign driven or Entitlement Manager
You would normally set up a campaign to create numerous Entitlement Reviews records based on criteria of the Contact record or the Entitlement record. Please refer to the Archer Help to get more information on creating campaigns. You can also create Entitlement Reviews records one at a time, manually. Here we will cover the manual creation of an Entitlement Reviews record.
-
Go to the Entitlement Reviews workspace and in the dashboard, find the “User Entitlement Quick Links iView” and click on the “Add Entitlement Review Record”
-
Use the ellipses to select the Contact to create the Entitlement Review record for.
-
This will bring up a dialog where you are presented a list of users from which to select. You will see an entitlement summary next to their name. You can use the Search to narrow down the resultant set of users. Once you have made your selection click “OK”
-
This will return you to the Add New Record page where you will see your selection. Click “Apply”.
-
Select the Submitter and Reviewer of the record
-
Select Save or Save and Close
Task 3: Review an Entitlement Reviews Record
User: Entitlement Manager
-
Navigate to an Entitlement Reviews record by clicking on the Questionnaire ID
-
You could click on a review from the work queue in the dashboard
-
You could click on the results from an advanced search
-
You could click on a link from a notification
-
-
Review the “Target” section and confirm that the user specified has the appropriate entitlements assigned to them. If you need to investigate more, you may click into each of the Entitlements to get additional detail on that particular entitlement. If changes are needed, please update the Entitlement Records accordingly. (additional steps may be required to sync the Entitlements outlined in Archer with the assets associated)
-
Select the Attestation choice that reflect the outcome of the review.
-
Set the Submission Status to “Submitted”
-
Select “Save” or “Save and Close”
Task 4: Approve an Entitlement Review
User: Entitlement: Approver
-
Navigate to an Entitlement Reviews record by clicking on the Questionnaire ID
-
You could click on a review from the work queue in the dashboard
-
You could click on the results from an advanced search
-
You could click on a link from a notification
-
-
Verify the Review is complete and accurate:
-
Review the Target section information.
-
Review the Submitter information and verify it is appropriate.
-
Verify that the submission status is submitted.
-
Confirm the Submit date is populated and accurate.
-
-
Select the Review Status as appropriate:
-
Select Approved if everything looks OK and you believe the review is complete and accurate.
-
Select Rejected if the review has issues, items that are inaccurate or need correction.
You may have to coordinate with the Submitter to have them implement any changes and then resubmit the record for your approval again.
-