AWS IAM Access Analyzer
The AWS IAM Access Analyzer Integration is an offering provided through the Archer Exchange to enhance your existing Archer implementation. The Archer Exchange provides offerings to expand the use of Archer solutions into new business processes and address specific industry, geographic, regulatory, or technical requirements.
Archer Exchange: With the Archer Exchange, the Archer team and our trusted partners have created a broad selection of supplemental, value-added offerings to help you get your unique risk management program on the right path, right from the start. You can leverage the Archer Exchange offerings to expand the use of Archer solutions into new business processes and address specific industry, geographic, regulatory, or technical requirements. The Archer Exchange features a fast and agile development cycle, enabling quick delivery of new and updated offerings for trending issues and connections to innovative technologies.
On this page
Release history
|
Release Version |
Published Date |
Notes |
|---|---|---|
|
Archer 6.7 |
July 2024 |
Resigned JavaScript file |
|
Archer 6.7 |
December 2021 |
Resigned JavaScript file |
|
Archer 6.7 |
February 2020 |
Initial Release |
Overview
AWS IAM Access Analyzer integration informs which resources in your account that are sharing with external principals as per the configured IAM policies. It does this by using logic-based reasoning to analyze resource-based policies in your AWS environment. An external entity can be another AWS account, a root user, an IAM user or role, a federated user, an AWS service, an anonymous user, or other entity that you can use to create a filter. Access Analyzer generates a finding for each instance of a resource-based policy that grants access to a resource in your zone of trust (your account) to an external entity.
When analyzing the policies, if Access Analyzer identifies one that grants access to an external principal that isn't within zone of trust, it generates a finding. Each finding includes details about the resource, the external entity that has access to it, and the permissions granted so that you can take appropriate action.
Key features & benefits
The AWS IAM Access Analyzer Integration with Archer allows you to automatically import finding data directly into on-demand applications for Cloud Risk Monitoring. The integration allows users to view findings linked to the cloud resources. The integration then delivers the tools you need to analyze these findings, automatically notify responsible personnel, and proactively address issues before they impact your organization. Additionally, Archer produces real-time reports and user-specific dashboards to view these findings and their impact to your organization, and to monitor the overall status of your cloud risk monitoring program.
Requirements
|
Components |
Requirement |
|---|---|
|
Archer Solution |
Archer IT & Security Risk Management |
|
Archer use cases |
The following use cases can take advantage of the information provided by the AWS IAM Access Analyzer integration: (Optional)
|
|
Requires On-Demand license |
Yes. Requires two (2) On-Demand Applications license. |
|
On-Demand Applications |
Two On-Demand Applications are required.
|
|
Prerequisite applications |
Requirements for the installation and operation of this integration includes the following applications:
|
|
Archer requirements |
Archer release 6.7 or later |
|
AWS IAM Access Analyzer requirements |
Valid AWS IAM Access Analyzer license is required. |
|
Supported Platform version |
This offering has been developed for and validated on Archer Platform release 6.7. |
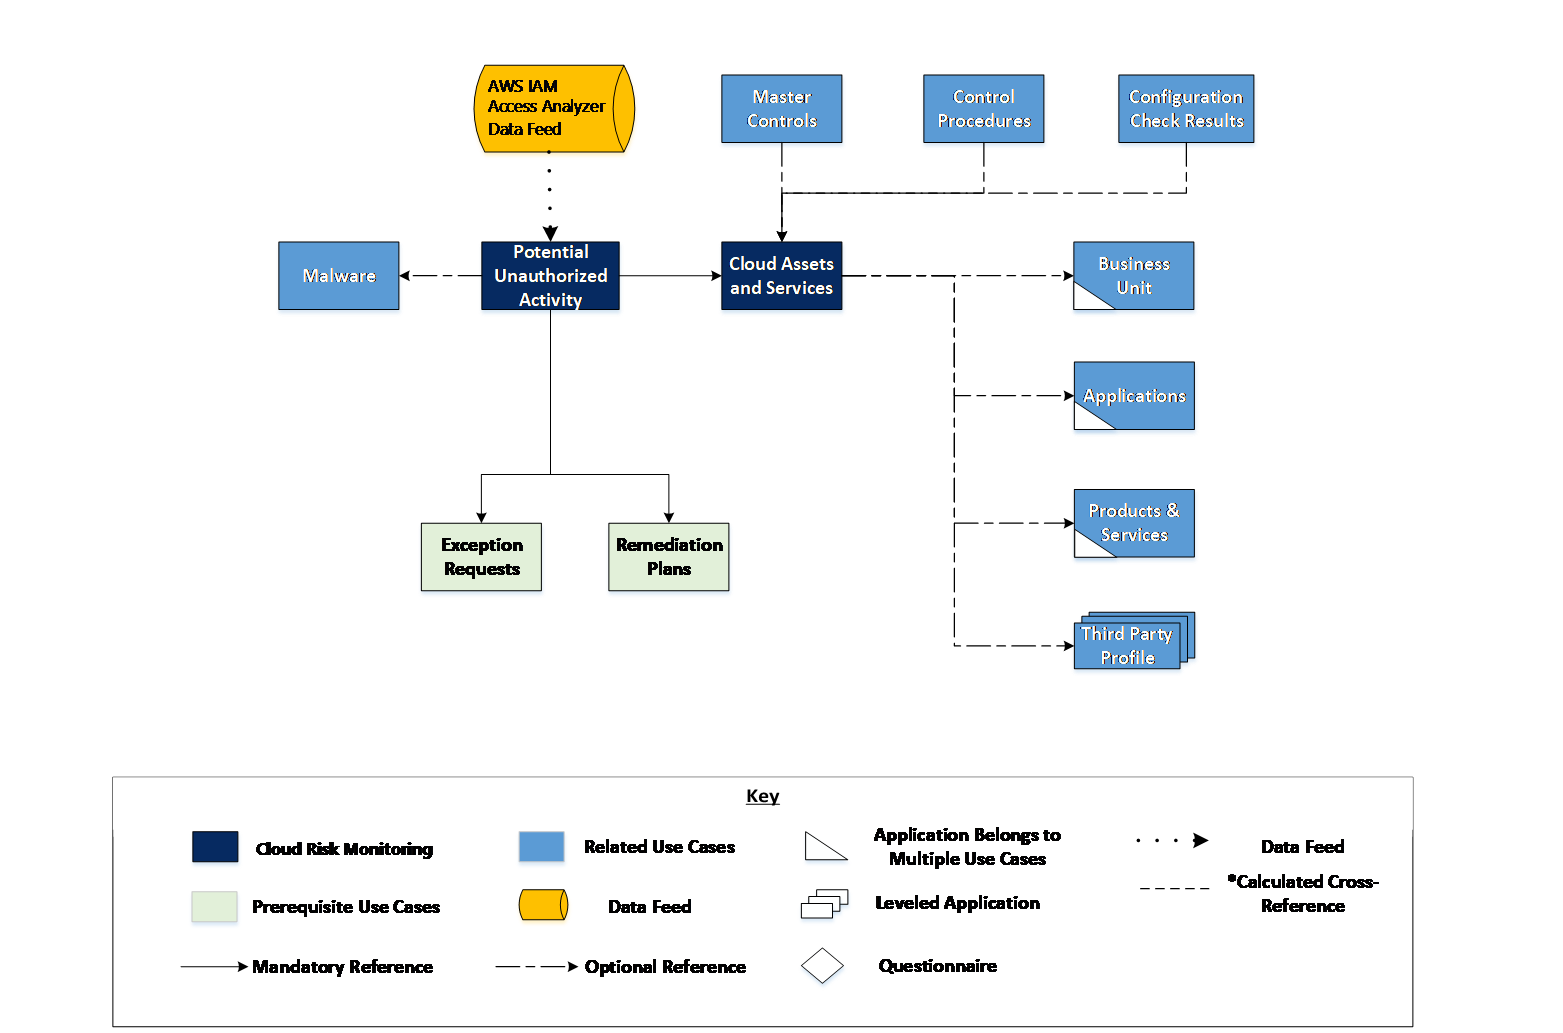
Components
Architecture diagram
Integration diagram
The following diagram provides an overview of the interaction between AWS IAM Access Analyzer and Archer. 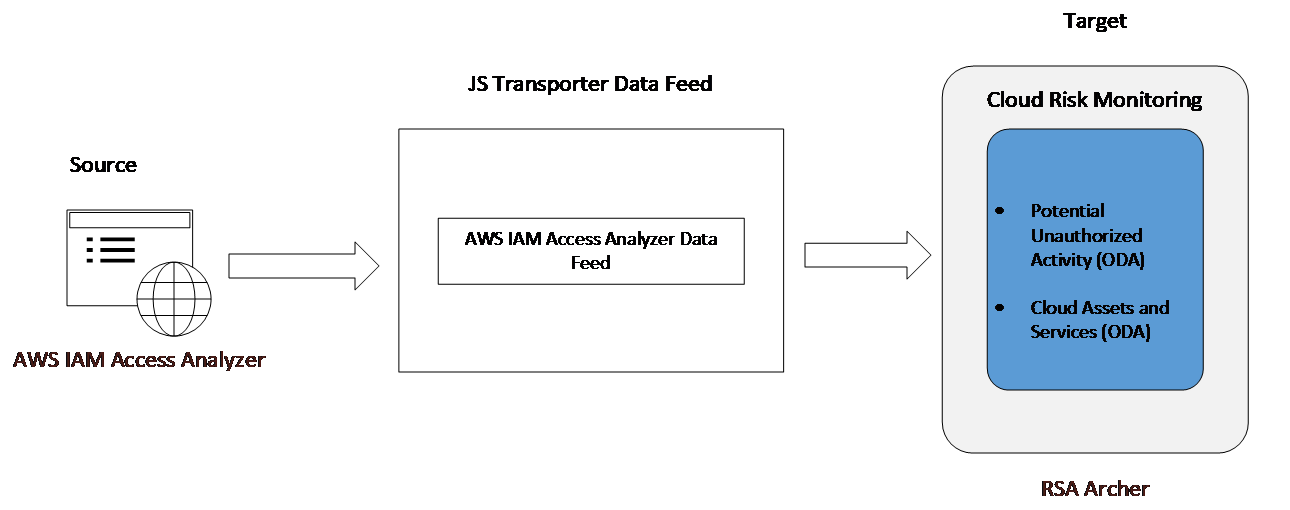
The integration process follows the following flow:
-
The Archer data feed for the AWS IAM Access Analyzer Integration pulls the findings data from the source: AWS IAM Access Analyzer and imports the data into Target: Potential Unauthorized Activity and Cloud Assets and Services ODA.
-
When the user logins into the AWS IAM Access Analyzer URL, a list of all the findings and a list of resources in your account that you are sharing with external principals available are visible.
Install & configure AWS IAM Access Analyzer
Configure AWS IAM Access Analyzer
This section provides instructions for configuring the AWS IAM Access Analyzer offering with the Archer Platform. This document is not intended to suggest optimum installations or configurations.
It is assumed that the reader has both working knowledge of all products involved, and the ability to perform the tasks outlined in this section. Administrators should have access to the product documentation for all products to install the required components.
All AWS IAM Access Analyzer endpoint links must be working prior to the integration. Perform the necessary tests to confirm that this is true before proceeding.
Important: The integration described in this guide is being provided as a reference implementation for evaluation and testing purposes. It may or may not meet the needs and use cases for your organization. If additional customizations or enhancements are needed, it is recommended that customers contact Archer Help for assistance.
Access Analyzer analyzes only policies that are applied to resources in the same AWS Region in which it is enabled. To monitor all resources in your AWS environment, you must create an analyzer to enable Access Analyzer in each Region where you're using supported AWS resources.
Obtain the AWS access keys by contacting the AWS administrator. The access key will be used later in the Data Feed Configuration section.
AWS access keys consist of two parts:
-
The access key identifier. This key can be seen in the IAM console wherever access keys are listed, such as on the user summary page.
-
The secret access key. This is provided when you initially create the access key pair. Just like a password, it cannot be retrieved later. If you lose your secret access key, then you must create a new access key pair.
To enable Access Analyzer in a Region, you must create an analyzer in the Region where you want to monitor access to your resources.
To create an analyzer:
-
Open the IAM console at https://console.aws.amazon.com/iam/.
-
Choose Access Analyzer.
-
Choose Create Analyzer.
-
On the Create Analyzer page, confirm that the Region displayed is the Region where you want to enable Access Analyzer.
-
Enter a name for the analyzer.
-
(Optional) Add any tags that you want to apply to the analyzer.
-
Choose Create Analyzer.
When you create an analyzer to enable Access Analyzer, a service-linked role named AWSAccessAnalyzerServiceRole is created in your account.
Note: AWS allows you to create only one analyzer per account per Region. Access Analyzer is Regional so it must be enabled in each Region independently.
For more information on AWS Access Analyzer, please follow this link: https://docs.aws.amazon.com/IAM/latest/UserGuide/what-is-access-analyzer.html
Configure Archer
-
Prepare for the installation.
-
Download the installation package from myArcher.
-
Read and understand the "Packaging Data" section of Archer Help.
-
Apply the latest license file by opening the Archer Control Panel.
-
- Install the package. (If you are upgrading from ODA applications, they will be automatically converted to licensed applications during the installation process.)
-
Test the installation. Test the application according to your company standards and procedures, to ensure that the use case works with your existing processes.
Installing a package requires that you import the package file, map the objects in the package to objects in the target instance, and then install the package.
There is no Undo function for a package installation. Packaging is a powerful feature that can make significant changes to an instance. Back up the instance database before installing a package. This process enables a full restoration if necessary.
An alternate method for undoing a package installation is to create a package of the affected objects in the target instance before installing the new package. This package provides a snapshot of the instance before the new package is installed, which can be used to help undo the changes made by the package installation. New objects created by the package installation must be manually deleted.
-
From the menu bar, click
 > Application Builder > Install Packages.
 - In the Available Packages section, click Import.
- Click Add New, then locate and select the package file that you want to import.
- Click OK.
The package file is displayed in the Available Packages section and is ready for installation.
Important: This step is required only if FAR Regulatory Correspondence is already present in your system, and you are installing this package.
-
From the menu bar, click
> Application Builder > Install Packages. - In the Available Packages section, locate the package you want to map.
- In the Actions column, click
 for that package.
The analyzer examines the information in the package. The analyzer automatically matches the system IDs of the objects in the package with the objects in the target instance and identifies objects from the package that are successfully mapped to objects in the target instance, objects that are new or exist but are not mapped, and objects that do not exist (the object is in the target but not in the source).
When the analyzer is complete, the Advanced Package Mapping page lists the objects in the package file and corresponding objects in the target instance.
- On the Advanced Mapping page, click to open each category and review the icons next to each object to determine which objects you must map manually.
The following table describes the icons. Icon
Name
Description

Awaiting Mapping Review
Indicates that the system could not automatically match the object or one of its children to a corresponding object in the target instance.
Objects marked with this icon must be mapped manually.
New objects should not be mapped. Select Do Not Map from the drop-down menu to clear this icon for an individual object, or click Do Not Map to clear the icon for all unmapped objects.

Mapping Completed
Indicates that the object and all children are mapped to objects in the target instance, or that they have been marked as Do Not Map. Nothing more needs to be done with these objects in Advanced Package Mapping.
Note: You can run the mapping process without mapping all objects. The
icon is for informational purposes only. - For objects awaiting mapping review, do one of the following:
- To map each object individually, use the drop-down menu in the Target column to select the object in the target instance to which you want to map the source object. To leave an object unmapped, select Do Not Map in the Target column.
- To automatically map all objects in a category that have different system IDs but the same object name as an object in the target instance, click Auto Map. Select whether to ignore case and spaces when matching object names. Click OK.
- To mark all unmapped objects as Do Not Map, click Do Not Map.
-
(Optional) Click
 to enable filter fields that you can use to find specific objects in each mapping category. To undo your mapping selections, click Undo, then select whether to undo all mappings in the category or only the mappings on a single page. If you choose to undo all mappings, you will be returned to the categories list.
 - (Optional) To save your mapping selections and return to the categories list without committing changes to the target instance, click
 .
. - After you review and map all objects, click Execute.
- Select I understand the implications of performing this operation. Click OK.
When the mapping is complete, the Import and Install Packages page displays.
Important: Advanced Package Mapping modifies the system IDs in the target instance. You must update any Data Feeds and Web Service APIs that use these objects with the new system IDs.
All objects from the source instance are installed in the target instance unless the object cannot be found or is flagged to not be installed in the target instance. A list of conditions that may cause objects not to be installed is provided in the Log Messages section. A log entry is displayed in the Package Installation Log section.
- From the menu bar, click > Application Builder > Install Packages.
- In the Available Packages section, locate the package file that you want to install, and click the file name or
 at end of the row to open the Options menu.
 - In the Selected Components section, click the Lookup button to open the Package Selector window.
- To select all components, select the top-level checkbox.
- To install only specific global reports in an already installed application, select the checkbox associated with each report that you want to install.
Note: Items in the package that do not match an existing item in the target instance are selected by default.
- Under the Translation Option drop-down menu, select an option for each selected component. To use the same Translation Option for all selected components, select a method from the top-level drop-down list.
The Translation Option is enabled only when a language is selected.The following table describes the options. Option
Description
Full Install
Installs the component and its translations from the selected languages.
Translations Only
Only installs the translations from the selected languages.
- Under the Install Method drop-down menu, select an option for each selected component. To use the same Install Method for all selected components, select a method from the top-level drop-down list.
The following table describes the options. Option
Description
Create New Only
Only creates new fields and other elements in the applications, questionnaires, workspaces, data feeds, and dashboards specified in the package file. This option does not modify any existing elements on your instance of Archer. This is useful when you want to add functionality to an existing application, questionnaire, workspace, dashboard, data feed, or access role, but you do not want to risk making any unwanted changes to the existing elements of workspaces, data feeds, or dashboards.
Note: The Create New Only option does not apply to access roles or languages.
Create New and Update
Updates all elements in the applications, questionnaires, workspaces, data feeds, and dashboards as specified in the package file. This includes adding new elements and updating existing elements.
Note: The Create New and Update option does not apply to access roles or languages.
- Under the Install Option drop-down menu, select an option for each selected component. To use the same Install Option for all selected components, select an option from the top-level drop-down list.
The following table describes the options. Option
Description
Do not Override Layout
Installs the component, but does not change the existing layout. This is useful if you have a lot of custom fields and formatting in your layout that you do not want to risk losing.
You may have to modify the layout after installing the package to use the changes made by the package.
Note: The Do not Override Layout option does not apply to access roles or languages.
Override Layout
Updates the layout as specified in the package file, overwriting the existing layout.
Note: The Override Layout option does not apply to access roles or languages.
- Click Continue to advance to the next object category in the Package Selector, and repeat steps 4 to 6. After reviewing all object categories, click OK.
- To deactivate target fields and data-driven events that are not in the package, in the Post-Install Actions section, select the Deactivate target fields and data-driven events that are not in the package checkbox. To rename the deactivated target fields and data-driven events with a user-defined prefix, select Apply a prefix to all deactivated objects, and enter a prefix. This can help you identify any fields or data-driven events that you may want to review for cleanup post-install.
- Click Install.
- Click OK.
-
From the menu bar, click
> Application Builder > Install Packages. - In the Package Installation Log section, click the package that you want to view.
- In the Package Installation Log page, in the Object Details section, click View All Errors.
Note: To view individual logs, in the Errors column of the log you want to view, click the Failures link or Warnings link. Clicking View All Errors, Failures, or Warnings opens the specific errors on a different page.
- Click the Export icon to export the log file.
- Click Close.
For a list of packaging installation log messages and remediation information for common messages, see Package Installation Log Messages.
Configure the AWS IAM Access Analyzer Data Feed
AWS IAM Access Analyzer Data Feed is a JavaScript transporter data feed that retrieves data (Findings and Resource-related data) from the AWS IAM Access Analyzer API URL and creates and updates the records in the Archer Potential Unauthorized Activity and Cloud Assets and Services application.
The data feed must be configured. After setting up the data feed, you can schedule them to run as needed per your organization’s requirements. For more information on Scheduling Data Feeds, see the Scheduling Data Feeds section.
Configure the JavaScript Transporter settings
-
In the Archer Control Panel, on the General tab, go to the JavaScript Transporter section.
-
Open the Archer Control Panel.
-
Go to Instance Management and select All Instances.
-
Select the instance you want to use.
-
On the General tab, go to the JavaScript Transporter section.
-
-
In the Max Memory Limit field, set the value to 2048 MB (2 GB).
-
In the Script Timeout field, set the value to 120 minutes (2 hours).
-
(Optional) If you want to allow only digitally signed JavaScript files in the data feed, enable Require Signature.
-
In the JavaScript Transporter Settings section, select the checkbox Require Signature. A new empty cell appears in the Signing Certificate Thumbprints section
-
In the Signing Certificate Thumbprints section, double-click an empty cell.
-
Enter the digital thumbprint of the trusted certificate used to sign the JavaScript file.
Note: For information on how to obtain digital thumbprints, see Obtaining Digital Thumbprints.
Important: If you enable Require Signature and specify no thumbprints, no JavaScript files will be accepted by the system.
-
(Optional) If you want to add additional thumbprint sources, repeat steps b-c for each thumbprint.
-
-
On the toolbar, click Save.
Obtain Digital Thumbprints
When running JavaScript data feeds, you can set the Archer instance to only allow digitally signed JavaScript files from trusted sources for security considerations.
For a certificate to be trusted, all the certificates in the chain, including the Root CA Certificate and Intermediate CA certificates, must be trusted on both the Web Server and Services Server machines.
Archer Technologies LLC cert in the Trusted Root CA Store
Archer Technologies LLC certificate is not present on every machine’s root by default.
-
On the JavaScript file, right-click and select Properties.
-
Click the Digital Signatures tab.
-
From the Signature List window, select Archer Technologies LLC.
-
Click the Details button.
-
Click View Certificate.
-
Click Install Certificate.
-
Select Local Machine.
-
Click Next.
-
Select Place all certificates in the following store and click Browse.
-
Select Trusted Root Certification Authorities and click OK.
-
Click Next.
-
Click Finish.
-
-
-
Upon successful import, click OK.
Obtain a Certificate Thumbprint
-
In the Archer Control Panel environment, open the Manage Computer Certificates program.
-
Click Start.
-
Type: certificate
-
From the search results, click Manage Computer Certificates.
-
-
Ensure that your trusted source certificates are in the Certificates sub-folder of the Trust Root Certification Authorities folder.
-
In the Certificates sub-folder, double-click the Archer Technologies LLC certificate that contains the thumbprint you want to obtain.
-
Verify that the certificate is trusted.
-
In the Certificate window, click the Certification Path tab.
-
Ensure that the Certificate Status windows displays the following message:
This certificate is OK
Note: If the Certificate Status windows displays something different, follow the on-screen instructions.
-
-
Obtain the trusted certificate thumbprint.
-
In the Certificate window, click the Details tab.
-
Select the Thumbprint field. The certificate's digital thumbprint appears in the window.
-
Copy the thumbprint.
-
Set up the AWS IAM Access Analyzer Data Feeds
Important: For more information, see Configure the JavaScript Transporter Settings.
-
In the Archer Control Panel, go to the Manage Data Feeds page.
-
From the menu bar, click
. -
Under Integration, click Data Feeds.
-
-
Locate and select the: AWS IAM Access Analyzer Data Feed.
Note: If you are unable to locate the Data Feed. Revisit the package installation section and make sure the data feed component has been included during the installation of the package.
-
Click Open.
-
In the General Information section, in the Status field, select Active.
-
Click the Transport tab.
-
In the Transport Configuration section, do the following:
-
Click Upload
-
From the Upload JavaScript File dialog, click Add New.
-
Locate and select the signed-AWSIAMAccessAnalyzer.js file.
-
Click Open.
-
From the Upload JavaScript File dialog, click OK.
-
-
In the Custom Parameters section, enter key values. The following table describes the value for each key in Custom Parameters.
|
Key |
Value |
|---|---|
|
apiSecret |
[Valid value] Default = [empty] (Required) |
|
apiCredential |
[Valid value] Default = [empty] (Required) |
|
region |
[Valid value] Default = [empty] (Required) |
|
Proxy |
[Valid value] Default = [empty] (Optional) |
-
The additional parameter shown below provides valid options for the Custom Parameters section for the current JavaScript file.
|
Key |
Value |
|---|---|
|
verifyCerts |
[Valid value of true/false] Default = False |
-
The additional parameter shown below provides valid Filter options for the Custom Parameters section for the current JavaScript file. All the Filter Options are internally using Contains operator and are Case Sensitive. To filter the data on multiple values, use comma (“,”) as a separator. For Example, to fetch Findings of status “ACTIVE” and “RESOLVED” from AWS Access Analyzer use Filter with “status” as a Key and Value as ACTIVE, RESOLVED. Below are the supported filter types.
|
Key |
Value |
|---|---|
|
resource |
[Valid value] Default = [empty] (Optional) |
|
status |
[Valid value] Default = [empty] (Optional) |
|
resourceType |
[Valid value] Default = [empty] (Optional) |
|
principalAWS |
[Valid value] Default = [empty] (Optional) |
|
principalFederated |
[Valid value] Default = [empty] (Optional) |
|
principalCanonicalUser |
[Valid value] Default = [empty] (Optional) |
|
conditionCognitoIdentity |
[Valid value] Default = [empty] (Optional) |
|
conditionGoogleAccount |
[Valid value] Default = [empty] (Optional) |
|
conditionPrincipalArn |
[Valid value] Default = [empty] (Optional) |
|
conditionPrincipalOrgID |
[Valid value] Default = [empty] (Optional) |
|
conditionSourceAccount |
[Valid value] Default = [empty] (Optional) |
|
conditionSourceArn |
[Valid value] Default = [empty] (Optional) |
|
conditionSourceIp |
[Valid value] Default = [empty] (Optional) |
|
conditionSourceVpc |
[Valid value] Default = [empty] (Optional) |
|
conditionSourceVpce |
[Valid value] Default = [empty] (Optional) |
|
conditionUserId |
[Valid value] Default = [empty] (Optional) |
|
conditionFacebookapp_id |
[Valid value] Default = [empty] (Optional) |
|
conditionkmsCallerAccount |
[Valid value] Default = [empty] (Optional) |
|
conditionEventSourceToken |
[Valid value] Default = [empty] (Optional) |
|
conditionS3encryptionid |
[Valid value] Default = [empty] (Optional) |
|
conditionAmazonapp_id |
[Valid value] Default = [empty] (Optional) |
|
error |
[Valid value] Default = [empty] (Optional) |
For each key type, determine whether you want it to be Protected or Plain Text. Selecting Protected encrypts the key value for the specified key in the log. In the Data Feed Setup window, verify that the key fields are present.
-
Click Save.
Steps 11, 12, and 13 are optional steps and only needed to troubleshoot or cross verification Field mapping of source and target fields will be pre-configured with the imported data feed.
-
Click the Data Map tab.
-
In the Field Map sub-tab, configure all the source fields (new and modified) to the target Control Standards fields.
|
Source Field |
Target Field |
|---|---|
|
Actions->Action |
Actions |
|
AnalyzedAt |
Last Observed Date |
|
Analyzer_Name |
AWS Access Analyzer Name |
|
Resource->accountid |
AWS Account ID (Zone Of Trust) |
|
Conditions->Condition->Label |
Condition: Label |
|
Conditions->Condition->Value |
Condition: Value |
|
Source |
Condition: Source |
|
UpdatedAt |
Condition: Last Updated At |
|
Created_Date |
Created Date |
|
Description |
Description |
|
Error |
Error Information |
|
Finding_ID |
ID |
|
Principals->Principal->Id |
Principal ID |
|
Principals->Principal->Type |
Principal Type |
|
Public_Access |
Public Access |
|
Region |
Cloud Asset or Service Name: Region |
|
Resources-> accountid |
Cloud Asset or Service Name: Account ID |
|
Resources-> partition |
Cloud Asset or Service Name: Partition |
|
Resources-> region |
Cloud Asset or Service Name: Region |
|
Resources-> resourcearn |
Cloud Asset or Service Name: Cloud Asset Or Service ID |
|
Resources-> resourcename |
Cloud Asset or Service Name: Resource Name |
|
Resources-> service |
Cloud Asset or Service Name: Service Type |
|
Resources-> Source |
Cloud Asset or Service Name: Last Updated By |
|
Resources-> Type |
Cloud Asset or Service Name: Resource Type |
|
Resources-> UniqueKey |
Cloud Asset or Service Name: Cloud Asset Or Service Unique Key |
|
Source |
Source |
|
Status |
AWS Record State |
|
Title |
Title |
|
UpdatedAt |
Last Updated Date |
-
In the Key Field Definitions Sub tab, add the “ID” as key field for Control Standards and Sub-Obligations.
Note: AWS IAM Access Analyzer enables per account per region basis. In each region, in the case of IAM roles - findings information is duplicated. If a customer tries to fetch the findings information from all the regions into Cloud Risk Monitoring on-demand applications by using multiple data feeds, roles findings information will be duplicated by default. To avoid the duplicated information, Customer needs to use the filter by Resource types
Schedule Data Feeds
When you schedule a data feed, the Data Feed Manager validates the information. If any information is invalid, an error message will display. You can save the data feed and correct the errors later, but that data feed is not processed until the errors are rectified.
Important: A data feed must be active and valid to successfully run.
-
Go to the Schedule tab of the data feed that you want to modify.
-
From the menu bar, click
. -
Under Integration, click Data Feeds.
-
Select the data feed you want to modify.
-
Click the Schedule tab.
-
-
In the Recurrences section, enter the frequency, start and stop times, and time zone for the data feed.
-
(Optional) In the Run Data Feed Now section, click Start to override the data feed schedule and run the data feed immediately.
-
Click Save.
The following table describes the fields in the Recurrences section.
|
Field |
Description |
|---|---|
|
Frequency |
Specifies the interval in which the data feed runs.
|
|
Every |
Specifies the interval of the frequency in which the data feed runs. |
|
Start Time |
Specifies the time the data feed begins running. |
|
Start Date |
Specifies the date on which the data feed schedule begins. |
|
Time Zone |
Specifies the time zone in of the server that runs the data feed. |
-
Test the data feed to ensure that all finding details from AWS IAM Access Analyzer were imported into the Potential Unauthorized Activity and Cloud Assets and Services application. If testing fails, try verifying the data feed and rerun. If you experience multiple failures, please contact your Archer Help.
Certification environment
Date tested: February 2020
|
Product name |
Version information |
Operating System |
|---|---|---|
|
Archer Suite |
Release 6.7 and later |
Virtual Appliance |
|
AWS IAM Access Analyzer |
NA |
NA |