AWS Security Hub
The AWS Security Hub Integration is an offering provided through the Archer Exchange to enhance your existing Archer implementation.
Archer Exchange: With the Archer Exchange, the Archer team has created a broad selection of supplemental, value-added offerings to help you get your unique risk management program on the right path, right from the start. You can leverage the Archer Exchange offerings to expand the use of Archer solutions into new business processes and address specific industry, geographic, regulatory, or technical requirements.
On this page
Release history
|
Release Version |
Published Date |
Notes |
|---|---|---|
|
Archer 6.7 |
July 2024 |
Resigned JavaScript file |
|
Archer 6.7 |
January 2022 |
Resigned JavaScript file |
|
Archer 6.7 |
May 2020 |
Initial Release |
Overview
AWS Security Hub creates a centralized view of your security and compliance posture across multiple AWS services, such as AWS Identity and Access Management Access Analyzer, Amazon GuardDuty, AWS Firewall Manager, AWS partner offerings, and many more. Native to Security Hub, Amazon CloudWatch Event rules allow you to prioritize and group findings into tickets or automated remediation systems. Findings in Security Hub are presented using the standardized AWS Security Finding Format across all sources. This removes the need for burdensome data conversion.
About GuardDuty
GuardDuty is a managed threat detection service that uses machine learning to safeguard critical AWS accounts and services from malicious activity and other security threats. GuardDuty monitors activities and logs issues within the AWS environment, provides recommended remediation actions, and assigns numeric severity values to these issues. Issues are then categorized into three severity levels based on the criticality and type of threat detected. It provides continuous monitoring and alerts for threats, such as crypto-currency mining, compromised credentials, API calls from malicious IPs, and more. GuardDuty offers seamless integration with AWS CloudWatch Events and Lambda to provide automated remediation actions.
Key features and benefits
AWS Security Hub enables you to:
-
Reduce effort to capture and prioritize security findings across AWS services and partner offerings.
-
Continuously generate findings from AWS accounts and services into a centralized location.
-
Correlate and prioritize findings across AWS and partner offerings in a standardized format.
-
Customize CloudWatch Events creation to filter and route key data to several target streams.
-
Identify accounts or resources that require attention through frequent configuration and compliance checks.
-
Automate a threat detection service that continuously monitors your AWS accounts for potential malicious activity and vulnerabilities.
-
Track trends, potential issues, and take necessary steps to fix critical issues.
Requirements
|
Component |
Requirement |
|---|---|
|
Archer Solution |
IT Security Risk Management |
|
Archer Use Case |
Issues Management, IT Controls Assurance (prerequisites) |
|
Archer Applications |
Configuration Checks, Configuration Check Results, Exception Requests, Remediation Plans |
|
Custom Applications |
Potential Unauthorized Activity, Cloud Assets and Services |
|
Requires On-Demand license |
Two on-demand applications are required. |
Integration components
This section contains high-level integration design information.
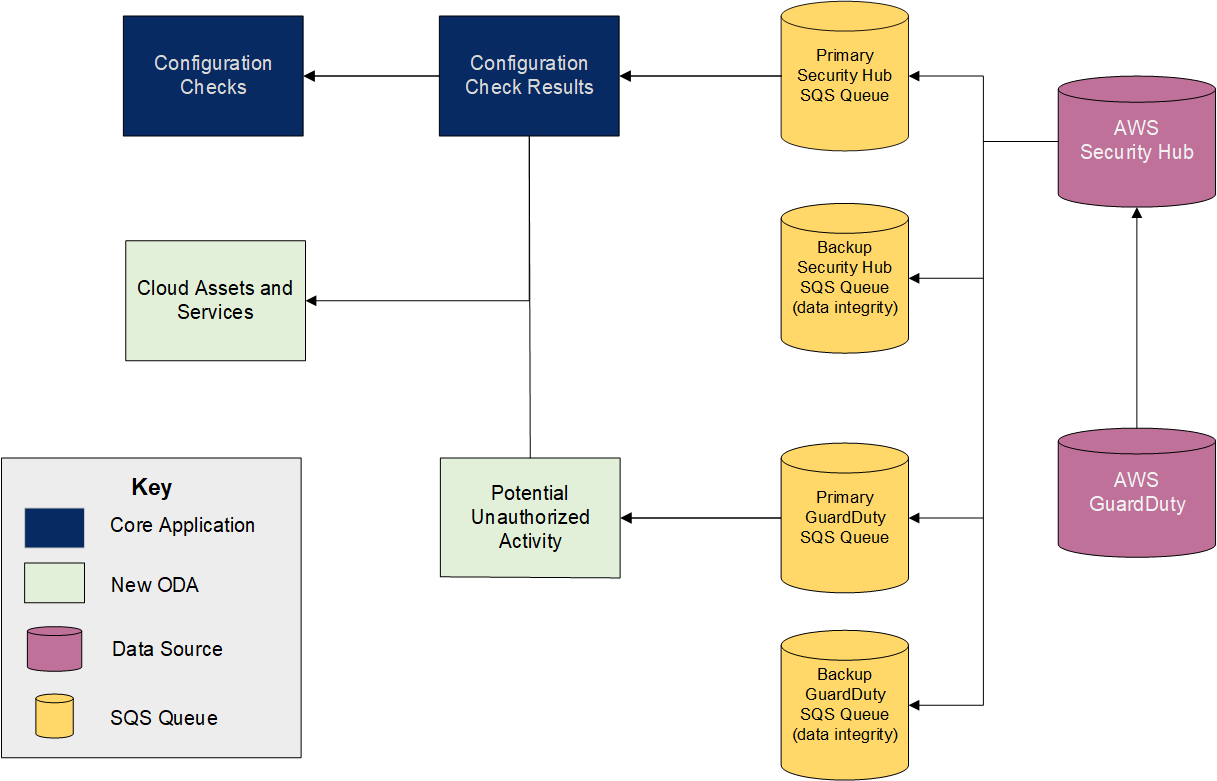
Integration diagram
The following diagram shows the relationships between the applications, SQS queues, and data sources in the AWS Security Hub integration.
Applications
|
Application |
Description |
|---|---|
|
Cloud Assets and Services |
The Cloud Assets and Services on-demand application provides a centralized and searchable repository of your organization's cloud infrastructure. You can track the compliance status of key cloud assets and services, assign criticality ratings, and monitor potential unauthorized activity. Cloud assets and services can be automatically created and updated through scans from AWS, Rapid7, NVD, Qualys, Security Center, and more. Key metrics such as resource type, service type, compliance status, and criticality rating provide the ability to identify and monitor the most crucial assets and services to your organization. |
|
Potential Unauthorized Activity |
The Potential Unauthorized Activity on-demand application archives suspected malicious activity detected on cloud assets and services. Scan results from sources such as AWS GuardDuty and IAM Access Analyzes identify and prioritize threats such as crypto-currency mining, compromised credentials, and suspected theft found on your cloud infrastructure. Suspected malicious events are categorized by severity and priority, and recommendations for remediation provide actionable details for resolution. |
|
Configuration Checks |
The Configuration Checks core application is used to facilitate the automated control testing of technical control procedures utilizing an automated assessment technology. To automate the compliance testing of a technical control procedure, a relationship between the control procedure and the external configuration assessment must be created. This application stores the external checks provided by the assessment technology and allows the company to map their technical control procedures in Archer to the check performed by the external system. |
|
Configuration Check Results |
The Configuration Check Results core application stores the scan results fed into Archer through the Data Feed Manager to assess compliance with specified technology baselines. These records contain the date of the scan, the device scanned, the configuration check that was performed, and the result of the check. The user may then address any instances of noncompliance through an exception request or remediation plan. |
|
Exception Requests |
The Exception Requests core application allows you to manage the process of granting and expiring exceptions to policies and control standards. Through built-in workflow, the application enables you to ensure that all exceptions are properly reviewed. You can also report on exceptions across the enterprise, monitoring them by control, department, or severity, to visualize the impact of policy exceptions on the business and its compliance posture. |
|
Remediation Plans |
The Remediation Plans core application allows you to centrally manage multiple findings and track actual and estimated remediation costs and timeframes. Relating multiple findings in the context of remediation plans allows you to identify larger issues and support informed decision making. Integration with the Archer Threat Management solution and third-party scanning tools also enables you to capture vulnerability and malicious code alerts and the results of automated configuration checks. |
Access Roles and Record permissions
|
Access Role |
Description |
|---|---|
|
Cloud Administrator |
This role serves as the administrator for the Cloud Risk Monitoring solution, providing create, read, update, and delete access rights to the Potential Unauthorized Activity, Cloud Assets and Services, and Configuration Checks applications. They also have read and update rights to the Configuration Check Results application. The Cloud Administrator is typically responsible for management of their organization’s cloud infrastructure. |
|
Cloud Security Analyst |
This role provides create, read, and update access to the Configuration Check Results and Potential Unauthorized Activity applications, and read access to the Configuration Checks and Cloud Assets and Services applications. The Cloud Security Analyst is responsible for managing and mitigating risks facing their cloud infrastructure and services. |
Dashboards
|
Dashboard |
Description |
|---|---|
|
AWS Security Hub |
The AWS Security Hub dashboard provides a high-level overview of compliance checks and suspected unauthorized activity found on your cloud infrastructure. You can review issues by severity and priority, review cloud resources by type and criticality, open findings, and the distribution of active security findings by configuration check. |
|
AWS GuardDuty |
The AWS GuardDuty dashboard provides a summary of potential unauthorized activity observed on your cloud infrastructure. You can review these findings by severity, monitor issues pending your action, view the distribution of findings across your cloud assets, and identify key trends. |
Data Feeds
|
Data Feed |
Description |
|---|---|
|
AWS GuardDuty – JST Data Feed |
The AWS GuardDuty – JST data feed is a JavaScript Transporter feed that imports AWS GuardDuty findings from Amazon Simple Queue Service (SQS) queues. The data feed is configured to create new records when no match is found against the preconfigured data feed key, and to update records when new data is found. GuardDuty findings are stored in the Potential Unauthorized Activity application, and associated Cloud infrastructure is recorded in the Cloud Assets and Services application. If you want to change the preconfigured data feed key, you may do so in the provided XSLT. |
|
AWS Security Hub – JST Data Feed |
The AWS Security Hub – JST data feed is a JavaScript Transporter feed that imports AWS Security Hub findings from Amazon Simple Queue Service (SQS) queues. The data feed is configured to create new records when no match is found against the preconfigured data feed key, and to update records when new data is found. Security Hub findings are stored in the Configuration Check Results application, and associated Cloud infrastructure is recorded in the Cloud Assets and Services application. If you want to change the preconfigured data feed key, you may do so in the provided XSLT. |
Configuring AWS Security Hub
This section provides instructions for configuring AWS Security Hub with the Archer Platform. This document is not intended to suggest optimum installations or configurations.
It is assumed that the reader has both working knowledge of all products involved, and the ability to perform the tasks outlined in this section. Administrators should have access to the product documentation for all products in order to install the required components.
All AWS Security Hub components must be installed and working prior to the integration. Perform the necessary tests to confirm that this is true before proceeding.
Important: The integration described in this guide is being provided as a reference implementation for evaluation and testing purposes. It may or may not meet the needs and use cases for your organization. If additional customizations or enhancements are needed, it is recommended that customers contact Archer Professional Services for assistance.
You must obtain an access key and secret key from AWS Security Hub prior to configuring the data feeds. To obtain these keys, perform the following steps:
-
Log in to AWS Security Hub.
-
From the Services menu, select IAM from the Security, Identity, & Compliance section.
-
In the Access Management section, click Users.
-
Select the username that will be responsible for initiating API calls from Archer to AWS Security Hub.
-
Click the Security Credentials tab.
-
In the Access Keys section, click Create Access Key. After you create the access key, the system provides you with a secret key.
-
Choose to download the .csv file to save the access key ID and secret access key.
Note: Once this dialog box is closed, you will not have access to the secret key.
For more information on managing access keys, see the following AWS documentation: Managing AWS Access Keys for IAM Users (https://docs.aws.amazon.com/IAM/latest/UserGuide/id_credentials_access-keys.html).
Configure AWS Options
Enable AWS Security Hub for your account through the AWS Console. AWS has extensive documentation around Security Hub and the different products and services that integrate with it.
-
Log in to the AWS Console.
-
Under Application Integration, go to Simple Queue Service.
-
Click Create New Queue.
-
Enter a queue name. There are character limitations for the queue name.
-
Select Standard Queue.
-
Click Configure Queue.
-
Set your preferred Queue Attributes. Depending on the frequency at which you set your feed to run, you may need to adjust the Message Retention Period to ensure your messages are not removed prior to the next scheduled feed execution.
-
Click Create Queue.
-
Log in to the AWS Console.
-
From the Services menu, under Management & Governance, go to CloudWatch.
-
In the left panel, select Rules.
-
Click Create Rule.
-
Select Event Pattern.
-
From the Build Event Pattern to Match Events by Service drop-down field, select Custom Event Pattern.
-
Populate your preferred event pattern to filter the findings to be copied to the SQS queue. For example, the following code routes all GuardDuty findings to the queue:
{
"source": [
"aws.securityhub"
],
"detail-type": [
"Security Hub Findings - Imported"
],
"detail": {
"findings": {
"ProductArn": [
"arn:aws:securityhub:us-east-2::product/aws/guardduty"
]
}
}
}
As an additional example, the following code filters all Security Hub findings with a Compliance Status of Failed:
{
"source": [
"aws.securityhub"
],
"detail-type": [
"Security Hub Findings - Imported"
],
"detail": {
"findings": {
"ProductArn": [
"arn:aws:securityhub:us-east-2::product/aws/securityhub"
],
"Compliance": {
"Status": [
"FAILED"
]
}
}
}
}
-
After establishing your event pattern, click Add Target* to point to the previously created SQS queue.
-
Choose SQS Queue from the drop-down field, and then use the Queue* drop-down field to go to the target queue.
-
Click Configure Details.
-
Enter a name and description for the rule.
-
Click Create Rule to commit the configuration.
-
Log in to the AWS Console.
-
Under Management & Governance, go to CloudFormation.
-
From the Create Stack drop-down field, select With New Resources (Standard).
-
Choose the appropriate selection from the Prepare Template options.
Note: If you already have the source JSON or YAML template created, select Template is Ready.
-
In the Template Source field, specify how the service should retrieve the template (likely uploading the template unless you have your files stored in a separate S3 bucket).
-
Enter the URL to the S3 or browse to your template file. Example JSON template files are provided in the integration package.
-
Click Next.
-
Enter a Stack name. Spaces are not allowed.
-
Enter any parameters that may have been configured within the CloudFormation template.
-
Click Next.
-
Provide any additional stack options as required.
-
Click Next.
-
Review the options provided in the previous pages.
-
Click Create Stack.
-
Review the stack events to confirm successful object creation. Configuration errors result in a rollback of the stack.
You can adjust the settings on the SQS queue and/or CloudWatch Event Rule as required by manually navigating to those respective objects within the AWS console and adjusting the options according to your needs.
Additionally, you can choose to configure Server-side encryption (SSE) with your SQS queues. For more information on SSE, see the following AWS documentation: Encryption at Rest (https://docs.aws.amazon.com/AWSSimpleQueueService/latest/SQSDeveloperGuide/sqs-server-side-encryption.html).
Configuring Archer
Before you install the AWS Security Hub integration package and data feeds in Archer, you must install all prerequisite use cases and download the following configuration files from the Archer Community:
-
Archer 6.7 AWS Security Hub Integration Install Package.zip
-
AWS Security Hub – JST.dfx5
-
AWS GuardDuty – JST.dfx5
For more information on installing the prerequisite use cases, see “Installing Issues Management” and “Installing IT Controls Assurance” in the Archer Online Documentation.
Install the package
The following tasks detail how to import and install the Archer AWS Security Hub Integration package.
There is no Undo function for a package installation. Packaging is a powerful feature that can make significant changes to an instance. It is strongly recommended to back up the instance database before installing a package. This process enables a full restoration if necessary.
An alternate method for undoing a package installation is to create a package of the affected objects in the target instance before installing the new package. This package provides a snapshot of the instance before the new package is installed, which can be used to help undo the changes made by the package installation. New objects created by the package installation must be manually deleted.
-
Go to the Install Packages page.
-
From the menu bar, click
 .
. -
Under Application Builder, click Install Packages.
-
-
In the Available Packages section, click Import.
-
Click Add New.
-
Locate and select the package that you want to import.
-
Click OK.
The package file is displayed in the Available Packages section and is ready for installation.
-
In the Available Packages section, select the package you want to map.
-
In the Actions column, click
 for that package.
The analyzer runs and examines the information in the package. The analyzer automatically matches the system IDs of the objects in the package with the objects in the target instances and identifies objects from the package that are successfully mapped to objects in the target instance, objects that are new or exist but are not mapped, and objects that do not exist (the object is in the target but not in the source).
Note: This process can take several minutes or more, especially if the package is large, and may time out after 60 minutes. This time-out setting temporarily overrides any IIS time-out settings set to less than 60 minutes. When the analyzer is complete, the Advanced Package Mapping page lists the objects in the package file and corresponding objects in the target instance. The objects are divided into tabs, depending on whether they are found within Applications, Solutions, Access Roles, Groups, Sub-forms, or Questionnaires.
-
On each tab of the Advanced Mapping page, review the icons that are displayed next to each object name to determine which objects require you to map them manually.
|
Icon |
Name |
Description |
|---|---|---|
|
|
Awaiting Mapping Review |
Indicates that the system could not automatically match the object or children of the object to a corresponding object in the target instance. Objects marked with this symbol must be mapped manually through the mapping process. Important: New objects should not be mapped. This icon should remain visible. The mapping process can proceed without mapping all the objects. Note: You can execute the mapping process without mapping all the objects. The |
|
|
Mapping Completed |
Indicates that the object and all child objects are mapped to an object in the target instance. Nothing more needs to be done with these objects in Advanced Package Mapping. |
|
|
Do Not Map |
Indicates that the object does not exist in the target instance or the object was not mapped through the Do Not Map option. These objects will not be mapped through Advanced Package Mapping and must be remedied manually. |
|
|
Undo |
Indicates that a mapped object can be unmapped. This icon is displayed in the Actions column of a mapped object or object flagged as Do Not Map. |
-
For each object that requires remediation, do one of the following:
-
To map each item individually, on the Target column, select the object in the target instance to which you want to map the source object. If an object is new or if you do not want to map an object, select Do Not Map from the drop-down list.
Important: Ensure that you map all objects to their lowest level. When objects have child or related objects, a drill-down link is provided on the parent object. Child objects must be mapped before parent objects are mapped. For more details, see “Parent and Child Object Mapping” in the Archer Online Documentation.
-
To map all objects in a tab automatically that have different system IDs but the same object name as an object in the target instance, do the following:
-
In the toolbar, click Auto Map.
-
Select an option for mapping objects by name:
Option
Description
Ignore case
Select this option to match objects with similar names regardless of the case of the characters in the object names.
Ignore spaces
Select this option to match objects with similar names regardless of whether spaces exist in the object names.
-
Click OK.
The confirmation dialog box opens with the total number of mappings performed. These mappings have not been committed to the database yet and can be modified in the Advanced Package Mapping page.
-
Click OK.
-
-
-
To set all objects in the tab to Do Not Map, in the toolbar, click Do Not Map.
Note: To undo mapping settings for any individual object, click
 in the Actions column.
When all objects are mapped, the
 icon is displayed in the tab title. The
  icon is displayed next to the object to indicate that the object will not be mapped.
-
Verify that all other objects are mapped correctly.
-
(Optional) To save your mapping settings so that you can resume working later, see “Exporting and Importing Mapping Settings” in the Archer Online Documentation.
-
Once you have reviewed and mapped all objects, click
 .
. -
Select “I understand the implications of performing this operation,” and then click OK.
The Advanced Package Mapping process updates the system IDs of the objects in the target instance as defined on the Advanced Package Mapping page. When the mapping is complete, the Import and Install Packages page is displayed.
Important: Advanced Package Mapping modifies the system IDs in the target instance. Any Data Feeds and Web Service APIs that use these objects will need to be updated with the new system IDs.
All objects from the source instance are installed in the target instance unless the object cannot be found or is flagged to not be installed in the target instance. A list of conditions that may cause objects not to be installed is provided in the Log Messages section. A log entry is displayed in the Package Installation Log section.
-
Go to the Install Packages page.
-
From the menu bar, click
. -
Under Application Builder, click Install Packages.
-
-
In the Available Packages section, do the following:
-
Locate the package file that you want to install.
-
In the Actions column, click
 .
.
-
-
In the Selected Components section, select the components of the package that you want to install.
Note: Items in the package that do not match an existing item in the target instance are selected by default.
-
Click Lookup.
-
For each component section, do the following:
Note: To move on to another component section, click Continue or select a component section in the Jump To drop-down menu.
-
In the Install Method drop-down menu, select an install method for each selected component.
Note: If you have any existing components that you do not want to modify, select Create New Only. You may have to modify those components after installing the package to use the changes made by the package.
-
In the Install Option drop-down menu, select an install option for each selected component.
Note: For any custom fields or formatting in a component that you do not want to lose, select Do not Override Layout. If necessary, modify the layout after installing the package to use the changes made by the package.
-
Click OK.
-
To deactivate target fields and data-driven events that are not in the package, in the Post-Install Actions section, select the Deactivate target fields and data-driven events that are not in the package checkbox. To rename the deactivated target fields and data-driven events with a user-defined prefix, select the Apply a prefix to all deactivated objects checkbox, and enter a prefix. This can help you identify any fields or data-driven events that you may want to review for cleanup post-install.
-
Click Install.
-
Click OK.
-
Go to the Install Packages page.
-
Click the Package Installation Log tab.
-
Click the package that you want to view.
-
In the Package Installation Log page, in the Object Details section, click View All Errors.
For a list of packaging installation log messages and remediation information for common messages, see “Package Installation Log Messages” in the Archer Online Documentation.
Before you upload a JavaScript file, you must configure JavaScript Transporter settings in the Archer Control Panel.
-
Open the Archer Control Panel.
-
Go to Instance Management and select All Instances.
-
Select the instance.
-
On the General tab, go to the JavaScript Transporter section.
-
In the Max Memory Limit field, set the value to 2048 MB (2 GB).
-
In the Script Timeout field, set the value to 120 minutes (2 hours).
-
Require Signature is enabled by default on install. Signed Certificate Thumbprints are required for all Hosted clients.
-
In the Signing Certificate Thumbprints section, add a thumbprint for each digitally signed JavaScript file.
-
Double-click an empty cell in the Signing Certificate Thumbprints section.
-
Enter the digital thumbprint of the trusted certificate used to sign the JavaScript file.
Note: For more information on how to obtain digital thumbprints, see Digital Thumbprints.
Important: If you enable Require Signature and do not specify thumbprints, JavaScript files will not be accepted by the system.
-
-
-
On the toolbar, click Save.
When running JavaScript data feeds, you can set the system to only allow digitally signed JavaScript files from trusted sources for security considerations.
For a certificate to be trusted, all the certificates in the chain including the Root CA Certificate and Intermediate CA certificates must be trusted on both the Web Server and Services Server machines.
Archer Technologies LLC certificate is not present on every machine’s root by default.
-
On the JavaScript file, right-click and select Properties.
-
Click the Digital Signatures tab.
-
From the Signature List window, select Archer Technologies LLC.
-
Click the Details button.
-
Click View Certificate.
-
Click Install Certificate.
-
Select Local Machine.
-
Click Next.
-
Select Place all certificates in the following store, and click Browse.
-
-
Select Trusted Root Certification Authorities, and click OK.
-
Click Next.
-
Click Finish.
-
Upon successful import, click OK.
-
On the Web Server and Services Server machines, open the Manage Computer Certificates program.
-
Launch “certmgr” from the Start menu.
-
Navigate to Certificates – Local Computer > Trusted Root Certification Authorities > Certificates.
-
-
Verify that the certificate is trusted.
-
Double-click the Archer Technologies LLC certificate.
-
In the Certificate window, click the Certification Path tab.
-
Ensure that the Certificate Status windows displays the following message: “This certificate is OK.”
Note: If the Certificate Status windows displays something different, follow the on-screen instructions.
-
-
Obtain the trusted certificate thumbprint.
-
In the Certificate window, click the Details tab.
-
Scroll to and select the Thumbprint field. The certificate's digital thumbprint appears in the window.
-
Copy the thumbprint.
Note: For information on adding digital thumbprints, see Step 7a of Configure the JavaScript Transporter Settings regarding where thumbprint is relevant.
-
Setting Up AWS Security Hub Data Feeds
The AWS Security Hub Integration includes two data feeds:
-
AWS Security Hub – JST
-
AWS GuardDuty – JST
Important: Before you upload a JavaScript file, configure JavaScript Transporter settings in the Archer Control Panel. For more information, see Configure the JavaScript Transporter Settings.
Note: The AWS Security Hub – JST Data feed is scheduled to run daily by default. For more information about modifying the schedule, see Schedule Data Feeds.
-
Log in to your company instance.
-
Go to the Manage Data Feeds page:
-
From the menu bar, click
. -
Under Integration, click Data Feeds.
-
-
Locate and select the AWS Security Hub – JST.dfx5 data feed file.
-
Verify settings in the General tab.
-
In the General Information section, set the Status field to Active.
-
In the Feed Information section, confirm that the Target field is set to Configuration Check Results.
-
-
Click the Transport tab.
-
In the Transport section, in the Transport Method field, select JavaScript Transporter.
-
In the Transport Configuration section, click Upload.
-
Locate and select the signed-AWS_SQS_1.0.13.js JavaScript file.
-
-
In the Custom Parameters section, enter the following key values:
|
Key |
Value |
|---|---|
|
accountNumber |
[Insert the AWS Security Hub account number] |
|
accessKey |
[Insert the AWS Security Hub account access key] |
|
secretKey |
[Insert the AWS Security Hub account secret key] |
|
batchDelete |
Enter one of the following values:
Entering “true” will delete messages from the SQS queue as they are ingested into Archer. Note: batchDelete is not case sensitive but must be spelled correctly for the data feed to function properly. |
|
queueName |
[Insert the name of the SQS queue that findings will be pulled from] |
|
awsRegion |
[Insert the name of the region that the SQS queues and AWS Security Hub are established in] |
-
The following additional parameter is a valid option for the Custom Parameters section:
|
Key |
Type |
Value |
|---|---|---|
|
proxy |
Protected |
[Insert the URL of the proxy server] Note: This key should only be entered if you use a proxy server. If you are an Archer Hosted (SaaS) customer, this key is required, and you must contact Archer Technical Support to configure this parameter. |
-
Click Save.
Important: Before you upload a JavaScript file, configure JavaScript Transporter settings in the Archer Control Panel. For more information, see Configure the JavaScript Transporter Settings.
Note: The AWS GuardDuty – JST Data feed is scheduled to run daily by default. For more information about modifying the schedule, see Schedule Data Feeds.
-
Log in to your company instance.
-
Go to the Manage Data Feeds page:
-
From the menu bar, click
. -
Under Integration, click Data Feeds.
-
-
Locate and select the AWS GuardDuty – JST.dfx5 data feed file.
-
Verify settings in the General tab.
-
In the General Information section, set the Status field to Active.
-
In the Feed Information section, confirm that the Target field is set to Potential Unauthorized Activity.
-
-
Click the Transport tab.
-
In the Transport section, in the Transport Method field, select JavaScript Transporter.
-
In the Transport Configuration section, click Upload.
-
Locate and select the signed-AWS_SQS_1.0.13.js JavaScript file.
-
-
In the Custom Parameters section, enter the following key values:
|
Key |
Value |
|---|---|
|
accountNumber |
[Insert the AWS Security Hub account number] |
|
accessKey |
[Insert the AWS Security Hub account access key] |
|
secretKey |
[Insert the AWS Security Hub account secret key] |
|
batchDelete |
Enter one of the following values:
Entering “true” will delete messages from the SQS queue as they are ingested into Archer. Note: batchDelete is not case sensitive but must be spelled correctly for the data feed to function properly. |
|
queueName |
[Insert the name of the SQS queue that findings will be pulled from] |
|
awsRegion |
[Insert the name of the region that the SQS queues and AWS Security Hub are established in] |
-
The following additional parameter is a valid option for the Custom Parameters section:
|
Key |
Type |
Value |
|---|---|---|
|
proxy |
Protected |
[Insert the URL of the proxy server] Note: This key should only be entered if you use a proxy server. If you are an Archer Hosted (SaaS) customer, this key is required, and you must contact Archer Technical Support to configure this parameter. |
-
Click Save.
Important: A data feed must be active and valid to successfully run.
As you schedule your data feed, the Data Feed Manager validates the information. If any information is invalid, an error message appears. You can save the data feed and correct the errors later, but the data feed does not process until you make corrections.
-
Go to the Schedule tab of the data feed that you want to modify.
-
From the menu bar, click
. -
Under Integration, click Data Feeds.
-
Select the data feed.
-
Click the Schedule tab.
-
-
Go to the Recurrences section and complete frequency, start and stop times, and time zone. The following table describes the fields in the Recurrences section.
|
Field |
Description |
|---|---|
|
Frequency |
Specifies the interval in which the data feed runs, for example, Minutely, Hourly, Daily, Weekly, Monthly, or Reference.
|
|
Every |
Specifies the interval of the frequency in which the data feed runs. |
|
Start Time |
Specifies the time the data feed starts running. |
|
Start Date |
Specifies the date on which the data feed schedule begins. |
|
Time Zone |
Specifies the time zone in of the server that runs the data feed. |
-
(Optional) To override the data feed schedule and immediately run your data feed, in the Run Data Feed Now section, click Start.
-
Click Save.
Using AWS Security Hub
You can use the AWS Security Hub integration to ingest findings from AWS with predefined intervals. The source of each finding determines which application the data is populated in. AWS Security Hub findings are populated in the Configuration Check Results application, and AWS GuardDuty findings are populated in the Potential Unauthorized Activity application.
The AWS Security Hub integration delivers AWS Security Hub findings to the Configuration Check Results application. The AWS Security Hub dashboard provides you with a quick snapshot of active findings and any findings that are pending Exception Request or Remediation Plan review. There are multiple iViews that provide a breakdown by severity, specific check, and overall counts to locate your specific findings quickly. AWS performs compliance scans multiple times per day, so the accuracy of the findings within Archer are based on the frequency of the data feeds.
Complete the following steps to remediate your AWS-specific Configuration Check Results.
-
Go to the AWS Security Hub dashboard.
-
Using the provided iViews, choose which grouping you want to evaluate and select it to open the report. For example, if you want to review all Critical findings, you can select the corresponding severity in the Active Security Hub Findings by Severity iView. The drill-in report shows you if there are any associated Exception Requests or Remediation Plans.
-
Choose whether you want to remediate an individual Configuration Check Result record or remediate records in groups using Bulk Create or Bulk Update, and do one of the following:
-
To create an individual remediation:
-
Select the Scan ID of the individual Configuration Check Results record that you want to remediate.
-
Click Edit.
-
Click the Remediation tab.
-
Click Add New in either the Remediation Plan section or the Exception Requests section based on your preferred method.
Note: Both processes follow the pre-defined workflow as provided with the Archer Issues Management use case, along with any customization that may have been applied to the out-of-the-box configuration.
-
Enter information in the new record, then click Save and Close.
-
Click Save and Close to save your changes and exit.
-
-
To create a new Remediation Plan or Exception Request through bulk remediation:
-
From the drill-in report, click the Options drop-down menu, and select Enable Bulk Create.
-
Select the check box next to each Configuration Check Results record you want to link to a new Exception Requests or Remediation Plan record.
-
Click Create New Reference.
-
In the Create New Record window, do the following:
-
Click the Reference Field lookup.
-
Choose either Remediation Plan or Exception Requests.
-
Enter information in the required fields.
-
Click Submit. Once you click Submit, a Status window indicates the number of records that are being created.
-
Click Close.
-
-
-
To add Configuration Check Results to an existing Remediation Plan or Exception Request through bulk remediation:
-
From the drill-in report, click the Options drop-down menu, and select Enable Bulk Update.
-
Select the check box next to each Configuration Check Results record you want to link to an existing Exception Requests or Remediation Plan record.
-
In either the Exception Requests or Remediation Plan columns, click the icon to perform a content lookup.
-
Select the check box next to each Exception Requests or Remediation Plan record for which you want to associate the Configuration Check Results records.
-
Click OK.
-
Click Save Changes.
-
The AWS Security Hub integration delivers AWS GuardDuty findings to the Potential Unauthorized Activity application. AWS GuardDuty findings may not constitute a scenario in which a remediation action must be taken, however, they indicate deviance from normal activity patterns. The AWS GuardDuty dashboard separates findings by type. There are multiple iViews that provide a breakdown by severity, specific check, and overall counts to locate your specific findings quickly. AWS GuardDuty findings can be generated at any time, so it is recommended to run your data feeds frequently enough to act quickly in the event of necessary remediation.
Complete the following steps to remediate your AWS GuardDuty findings.
-
Go to the AWS GuardDuty dashboard.
-
Using the provided iViews, choose which grouping you want to evaluate and select it to open the report. For example, if you want to review all Critical findings, you can select the corresponding severity in the Active GuardDuty Findings by Severity iView. The drill-in report shows you if there are any associated Exception Requests or Remediation Plans.
-
Choose whether you want to remediate an individual Potential Unauthorized Activity record or remediate records in groups using Bulk Create or Bulk Update, and do one of the following:
-
To create an individual remediation:
-
Select the Scan ID of the individual Potential Unauthorized Activity record that you want to remediate.
-
Click Edit.
-
Click the Remediation tab.
-
Click Add New in either the Remediation Plan section or the Exception Requests section based on your preferred method.
Note: Both processes follow the pre-defined workflow as provided with the Archer Issues Management use case, along with any customization that may have been applied to the out-of-the-box configuration.
-
Enter information in the new record, then click Save and Close.
-
Click Save and Close to save your changes and exit.
-
-
To create a new Remediation Plan or Exception Request through bulk remediation:
-
From the drill-in report, click the Options drop-down menu, and select Enable Bulk Create.
-
Select the check box next to each Potential Unauthorized Activity record you want to link to a new Exception Requests or Remediation Plan record.
-
Click Create New Reference.
-
In the Create New Record window, do the following:
-
Click the Reference Field lookup.
-
Choose either Remediation Plan or Exception Requests.
-
Enter information in the required fields.
-
Click Submit. Once you click Submit, a Status window indicates the number of records that are being created.
-
Click Close.
-
-
-
To add Potential Unauthorized Activity records to an existing Remediation Plan or Exception Request through bulk remediation:
-
From the drill-in report, click the Options drop-down menu, and select Enable Bulk Update.
-
Select the check box next to each Potential Unauthorized Activity record you want to link to an existing Exception Requests or Remediation Plan record.
-
In either the Exception Requests or Remediation Plan columns, click the icon to perform a content lookup.
-
Select the check box next to each Exception Requests or Remediation Plan record for which you want to associate the Potential Unauthorized Activity records.
-
Click OK.
-
Click Save Changes.
-
Certification environment
Date tested: April 2020
|
Product Name |
Version Information |
Operating System |
|---|---|---|
|
Archer |
6.7 |
Virtual Appliance |
|
AWS Security Hub |
April 2020 |
SaaS |