Black Kite Vendor Cyber Risk
This integration is an offering provided through the Archer Exchange to enhance your existing Archer implementation. The Archer Exchange provides offerings to expand the use of Archer solutions into new business processes and address specific industry, geographic, regulatory, or technical requirements.
Black Kite provides a secure platform that spans the entirety of the third-party risk management life cycle for cyber risk professionals looking to quantify and maintain visibility of their risk exposure. This document tries to elaborate on the installation and setup process of the Black Kite Archer transporter data feed, including risk score fields and their counterpart descriptions that can be consumed.
Archer Exchange: With the Archer Exchange, the Archer team has created a broad selection of supplemental, value-added offerings to help you get your unique risk management program on the right path, right from the start. You can leverage the Archer Exchange offerings to expand the use of Archer solutions into new business processes and address specific industry, geographic, regulatory, or technical requirements.
On this page
Release notes
|
Release date |
Release version |
Notes |
|---|---|---|
|
August 2025 |
2024.11 (6.15.0.4.2) |
|
|
Release date |
Release version |
Notes |
|---|---|---|
|
February 2024 |
6.14 |
Re-Signed JavaScript file. |
|
February 2024 |
6.14 |
|
|
November 2022 |
6.14 |
Initial release |
New and changed features
-
Two more Black Kite vendor ratings are now supported with the data feed; Breach Index and Ransomware Index.
-
A notification text is added to the implementation guide to handle adding Black Kite CA certificate as a parameter to the data feed configuration.
-
A notification text is added to the implementation guide for JS timeout value suggestion with respect to the number of vendors monitored on the Black Kite on the IRM Archer Control Panel.
-
Support Archer SaaS environment
Fixed issues
|
Component |
Issue ID |
Description |
|---|---|---|
|
Rate Limiting |
1 |
Waiting periods are inserted in order to be aligned with the rate-limiting applied on the Black Kite ingress network. |
|
Incorrect Compliance Naming Handling |
2 |
Some of the compliance standard names conflict with the XPath queries Archer produces. Therefore, characters empty space and dots are replaced with character dash inside the compliance standard names before outputting. |
|
Error Handling |
3 |
Two error handlings are added to the JS code to handle expired Black Kite vendor licenses and incomplete vendor scan status. |
Overview
Key features & benefits
With the offering, you will be able to:
-
Fetch and analyze various Black Kite cyber risk ratings of a Third-Party Profile under your portfolio, enhancing your 3rd party risk management.
-
Having cyber risk ratings inside the Archer platform, you will easily create workflows and reports.
Prerequisites (ODA and system requirements)
|
Components |
Prerequisites |
|---|---|
|
Archer Solution Area(s) |
Archer Third Party Governance |
|
Archer Use Case(s) |
Archer Third Party Management |
|
Archer Applications |
Third Party Catalog |
|
Uses Custom Objects |
No |
|
Requires On-Demand license |
No |
|
Archer requirements |
Archer 2024.11 and later |
|
Partner/Vendor Requirements |
Valid Black Kite License is required. Additional fees may apply. Contact support@blackkite.com for more information. |
Compatible use cases and applications
|
Application |
Use case |
Primary purpose(s) of the relationship |
|---|---|---|
|
Third Party Profile |
Third-Party Risk Management Helps you track your third parties, manage the relationships, identify risks early, monitor their performance, and promptly address issues that arise. |
|
Components
Architecture diagram
Here are the context scope and container/component diagrams to understand the data feed integration that Black Kite provides on the Archer Platform.
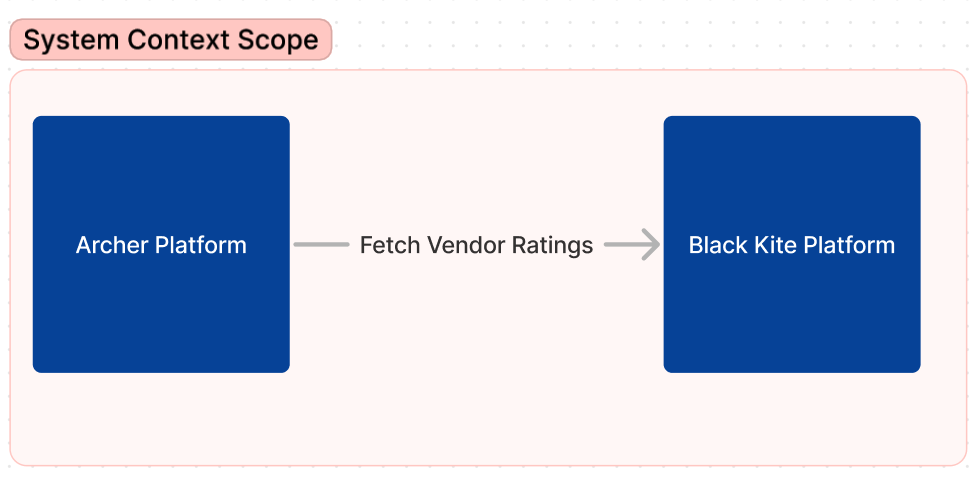
The above figure depicts the high-level diagram of Black Kite’s Vendor Cyber Risk integration for the Archer Platform.
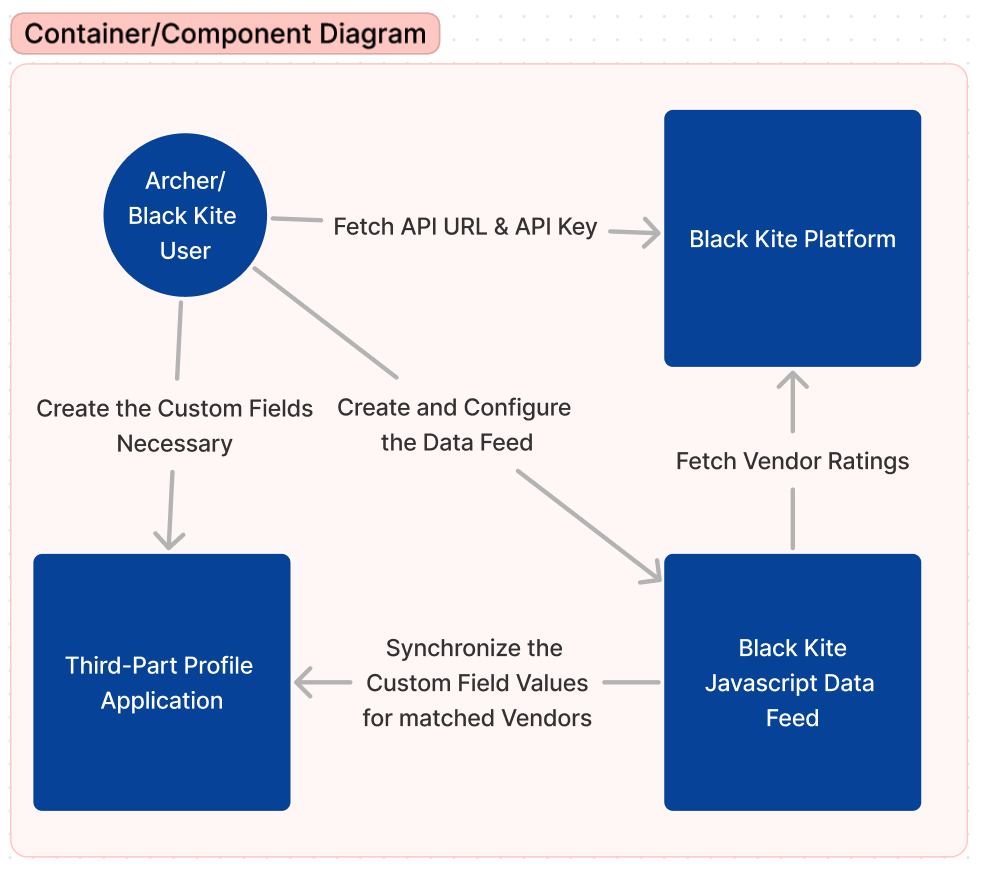
The above figure shows more detailed component level design. The architecture is quite simple. The persona is a valid both Black Kite and Archer platform user. After fetching the Black Kite’s DF package, the Black Kite API URL and API-Key for an authorized access, the user creates custom fields on the TPP application on Archer Platform and sets the layout.
Then the user creates and configures the JS Data Feed on the Archer Platform.
Depending on the configuration the JS Data Feed runs and synchronizes the custom fields on the TPP layout. After successful sync, when the user clicks on any matched vendor on the Third-Party Management module, the synced Black Kite provided rating values will appear on the Archer Platform.
Applications
The offering doesn’t contain an application. It’s a basic data feed integration targeting the Archer Third Party Profile core application.
For the list of Black Kite fields please refer the Impacted fields section.
Impacted fields
The following fields are custom Archer target fields that you may only create a subset of it under your Archer instance in Third Party Profile application and consume their values from their Black Kite’s counterpart source fields.
|
Archer target field |
Black Kite source field |
|---|---|
|
Black Kite Last Status |
LastStatus |
|
Black Kite Company Name |
CompanyName |
|
Black Kite Domain |
CompanyDomain |
|
Black Kite Dashboard Link |
DashboardLink |
|
Black Kite FocusTags |
FocusTags |
|
Black Kite Technical Rating (%) |
RiskScore_GradeOver100 |
|
Black Kite Technical Rating Letter |
RiskScore_GradeLetter |
|
Black Kite Ransomware Index (RSI) |
RansomwareIndex |
|
Black Kite Data Breach Index (DBI) |
BreachIndex |
|
Black Kite Technical Dashboard Link |
N/A |
|
BK Patch Management |
PatchManagement_GradeOver100 |
|
BK DNS Health |
DNSHealth_GradeOver100 |
|
BK Email Security |
EmailSecurity_GradeOver100 |
|
BK Application Security |
ApplicationSecurity_GradeOver100 |
|
BK CDN Security |
CDNSecurity_GradeOver100 |
|
BK DDoS Resiliency |
DDoSResiliency_GradeOver100 |
|
BK Website Security |
WebsiteSecurity_GradeOver100 |
|
BK Network Security |
NetworkSecurity_GradeOver100 |
|
BK SSL/TLS Strength |
SSLTLSStrength_GradeOver100 |
|
BK Brand Monitoring |
BrandMonitoring_GradeOver100 |
|
BK Credential Mgmt. |
CredentialMgmt_GradeOver100 |
|
BK IP Reputation |
IPReputation_GradeOver100 |
|
BK Hacktivist Shares |
HacktivistShares_GradeOver100 |
|
BK Fraudulent Apps |
FraudulentApps_GradeOver100 |
|
BK Social Network |
SocialNetwork_GradeOver100 |
|
BK Fraudulent Domains |
FraudulentDomains_GradeOver100 |
|
BK Information Disclosure |
InformationDisclosure_GradeOver100 |
|
BK Web Ranking |
WebRanking_GradeOver100 |
|
BK Attack Surface |
AttackSurface_GradeOver100 |
|
Black Kite Compliance Rating (%) |
ComplianceValueAvgOver100 |
|
Black Kite Compliance Confidence (%) |
ComplianceConfidenceAvgOver100 |
|
Black Kite Compliance Completeness (%) |
ComplianceCompletenessAvgOver100 |
|
Black Kite Compliance Dashboard Link |
N/A |
|
Black Kite FAIR Annualized ($) |
FairAnnualLossExposureAvg |
|
Black Kite FAIR Min ($) |
FairAnnualLossExposureMin |
|
Black Kite FAIR Max ($) |
FairAnnualLossExposureMax |
|
Black Kite FAIR Loss Magnitude ($) |
FairLossMagnitude |
|
Black Kite FAIR Loss Event Frequency |
FairLossEventFrequency |
|
Black Kite FAIR Dashboard Link |
N/A |
Personas and Access Roles
The following table describes the functions that make up the application’s organization roles. Depending on the organization of your company, these functions and responsibilities may vary.
|
Function |
Description |
|---|---|
|
Configuration |
|
|
Auditor |
|
Installing Black Kite Vendor Cyber Risk Package
There is no undo function for package installation. Packaging is a powerful feature that can make significant changes to an instance. Archer strongly recommends that you back up the instance database before installing a package. This process enables a full restoration if necessary.
An alternate method for undoing a package installation is to create a package of the affected objects in the target instance before installing the new package. This package provides a snapshot of the instance before the new package is installed, which can be used to help undo the changes made by the package installation. You must manually delete new objects created by the package installation.
-
From the menu bar, click
 > Application Builder > Install Packages.
 -
In the Available Packages section, click Import.
-
Click Add New, then select the package file that you want to import.
-
Click OK.
The Available Packages section displays the package file and is ready for installation.
Important: This step is required only if you are upgrading to a later version of [ODA name].
-
From the menu bar, click
> Application Builder > Install Packages. -
In the Available Packages section, select the package you want to map.
-
In the Actions column, click
 for that package.
The analyzer runs and examines the information in the package. The analyzer automatically matches the system IDs of the objects in the package with the objects in the target instances and identifies objects from the package that are successfully mapped to objects in the target instance, objects that are new or exist but are not mapped, and objects that do not exist (the object is in the target but not in the source).
Note: This process can take several minutes or more, especially if the package is large, and may time out after 60 minutes. This time-out setting temporarily overrides any IIS time-out settings set to less than 60 minutes.
-
When the analyzer is complete, the Advanced Package Mapping page lists the objects in the package file and corresponding objects in the target instance. The objects are divided into tabs, depending on whether they are found within Applications, Solutions, Access Roles, Groups, Sub- forms, or Questionnaires.
On each tab of the Advanced Mapping Page, review the icons next to each object to determine which objects you must map manually.
|
Icon |
Name |
Description |
|---|---|---|
|
|
Awaiting Mapping Review |
Indicates that the system could not automatically match the object or children of the object to a corresponding object in the target instance. Objects marked with this icon must be mapped manually through the mapping process. Important: New objects should not be mapped. This icon should remain visible. The mapping process can proceed without mapping all the objects. Note: You can run the mapping process without mapping all the objects. The |
|
|
Mapping Completed |
Indicates that the object and all child objects are mapped to an object in the target instance. There are no further steps required with these objects in Advanced Package Mapping. |
|
|
Do Not Map |
Indicates that the object does not exist in the target instance, or the object was not mapped through the Do Not Map option. These objects will not be mapped through Advanced Package Mapping and must be remedied manually. |
|
|
Undo |
Indicates that a mapped object can be unmapped. This icon is displayed in the Actions column of a mapped object or object flagged as Do Not Map. |
-
For each object that requires remediation, do one of the following:
-
To map each item individually, on the Target column, select the object in the target instance to which you want to map the source object. If an object is new or if you do not want to map an object, select Do Not Map from the drop-down list.
Important: Ensure that you map all objects to their lowest level. When objects have child or related objects, the parent object provides a drill-down link. You must map child objects before parent objects. For more details, see "Mapping Parent/Child Objects" in the Archer Platform Help.
-
To automatically map all objects in a tab that have different system IDs but the same object name as an object in the target instance, do the following:
-
-
In the toolbar, click Auto Map.
-
Select an option for mapping objects by name.
Option Description Ignore case Select this option to match objects with similar names regardless of the case of the characters in the object names. Ignore spaces Select this option to match objects with similar names regardless of whether spaces exist in the object names.
-
Click OK. The Confirmation dialog box opens with the total number of mappings performed. These mappings have not been committed to the database yet and can be modified in the Advanced Package Mapping page.
-
Click OK.
-
To set all objects in the tab to Do Not Map, in the toolbar, click Do Not Map.
Note: To undo the mapping settings for any individual object, in the Actions column, click Undo.
-
-
When all objects are mapped, the
 icon is displayed in the tab title. The
  icon is displayed next to the object to indicate that the object will not be mapped.
 -
Verify that all other objects are mapped correctly.
-
(Optional) To save your mapping settings so that you can resume working later, see "Importing and Exporting Mapping Settings" in the Archer Platform Help.
-
Once you have reviewed and mapped all objects, click Execute.
-
Select I understand the implications of performing this operation and click OK.
The Advanced Package Mapping process updates the system IDs of the objects in the target instance as defined on the Advanced Package Mapping page. When the mapping is complete, the Import and Install Packages page is displayed.
Important: Advanced Package Mapping modifies the system IDs in the target instance. You will need to update any Data Feeds and Web Service APIs that use these objects, with the new system IDs.
All objects from the source instance are installed in the target instance unless the object cannot be found or is flagged to not be installed in the target instance. The Log Messages section provides a list of conditions that may cause objects not to be installed. The Package Installation Log section displays a log entry.
-
From the menu bar, click
> Application Builder > Install Packages. -
In the Available Packages section, locate the package file that you want to install, and click Install.
-
In the Selected Components section, click the Lookup button to open the Package Selector window.
-
To select all components, select the top-level checkbox.
-
To install only specific global reports in an already installed application, select the checkbox associated with each report that you want to install.
-
Note: Items in the package that do not match an existing item in the target instance are selected by default.
-
Under the Install Method drop-down menu, select an option for each selected component. To use the same Install Method for all selected components, select a method from the top-level drop-down list.
Note: If you have any existing components that you do not want to modify, select Create New Only. You may have to modify those components after installing the package to use the changes made by the package.
-
To deactivate target fields and data-driven events that are not in the package, in the Post-Install Actions section, select the Deactivate target fields and data-driven events that are not in the package checkbox. To rename the deactivated target fields and data-driven events with a user-defined prefix, select the Apply a prefix to all deactivated objects checkbox, and enter a prefix. This can help you identify any fields or data-driven events that you may want to review for cleanup post-install.
-
Click Install.
-
Click OK.
-
From the menu bar, click
 > Application Builder > Install Packages.
 -
In the Package Installation Log tab, click the package that you want to view.
-
In the Package Installation Log page, in the Object Details section, click View All Errors.
Note: To view individual logs, in the Errors column of the log you want to view, click the Failures link or Warnings link. Clicking View All Errors, Failures, or Warnings opens the specific errors on a different page.
-
Click the Export icon to export the log file.
-
Click Close.
-
The Archer_Black_Kite_Risk_Score_2024.11_Installation_Package consists of the following components:
-
Third Party Profile application
-
Black Kite Risk Score Data Feed
-
-
Please select ‘Override Layout’ for Third Party Profile application while installing the Black Kite package.
Installing Black Kite Vendor Cyber Risk Integration
The following data feed is used as part of the Black Kite Integration process:
The data feed must be configured. After setting up the data feed, you can schedule it to run as needed per your organization’s requirements. For more information on scheduling the data feed, see the Scheduling Data Feed section.
Before you upload a JavaScript file, you must configure JavaScript Transporter settings in the Archer Control Panel.
-
On the General tab, go to the JavaScript Transporter section.
-
Open the Archer Control Panel.
-
Go to Instance Management and select All Instances.
-
Select the instance you want to use.
-
On the General tab, go to the JavaScript Transporter section.
-
-
In the Max Memory Limit field, set the value to 2048 MB (2 GB).
-
In the Script Timeout field, set the value to 120 minutes (2 hours).
-
(Optional) If you want to allow only digitally signed JavaScript files in the data feed, enable Require Signature.
-
In the JavaScript Transporter Settings section, select the checkbox Require Signature. A new empty cell appears in the Signing Certificate Thumbprints section.
-
In the Signing Certificate Thumbprints section, double-click an empty cell.
-
Enter the digital thumbprint of the trusted certificate used to sign the JavaScript file.
Note: For information on how to obtain digital thumbprints, see Obtaining Digital Thumbprints.
Important: If you enable Require Signature and specify no thumbprints, no JavaScript files will be accepted by the system.
-
(Optional) If you want to add additional thumbprint sources, repeat steps 4b-4c for each thumbprint.
-
-
On the toolbar, click Save.
When running JavaScript data feed, you can set the Archer instance to only allow digitally signed JavaScript files from trusted sources for security considerations.
For a certificate to be trusted, all the certificates in the chain, including the Root CA certificate and Intermediate CA certificates, must be trusted on both the Web Server and Services Server machines.
Note: Archer Technologies LLC certificate is not present on every machine’s root by default.
-
On the JavaScript file, right-click and select Properties.
-
Click the Digital Signatures tab.
-
From the Signature List window, select Archer Technologies LLC.
-
Click the Details button.
-
Click View Certificate.
-
Click Install Certificate.
-
Select Local Machine.
-
Click Next.
-
Select Place all certificates in the following store and click Browse.
-
Select Trusted Root Certification Authorities and click OK.
-
Click Next.
-
Click Finish.
-
-
-
Upon successful import, click OK.
-
In the Archer Control Panel environment, open the Manage Computer Certificates program.
-
Click Start.
-
Type: certificate
-
From the search results, click Manage Computer Certificates.
-
-
Ensure that your trusted source certificates are in the Certificates subfolder of the Trust Root Certification Authorities folder.
-
In the Certificates subfolder, double-click the Archer Technologies LLC certificate that contains the thumbprint you want to obtain.
-
Verify that the certificate is trusted.
-
In the Certificate window, click the Certification Path tab.
-
Ensure that the Certificate Status window displays the following message: This certificate is OK.
Note: If the Certificate Status window displays something different, follow the on-screen instructions.
-
-
Obtain the trusted certificate thumbprint.
-
In the Certificate window, click the Details tab.
-
Select the Thumbprint field. The certificate's digital thumbprint appears in the window.
-
Important: Synchronizing the Black Kite monitored company risk numbers with the TPPs on Archer takes time. As a rule of thumb, it takes a minute to synchronize 10 companies. Script Timeout should be adjusted to according to the number of companies monitored under your tenant on Black Kite. So, if you monitor 100 companies under your Black Kite tenant, then script timeout should be no less than 10 minutes. As another example, if you monitor 1000 companies under your Black Kite tenant, then script timeout should be no less than 100 minutes.
Important: Before you upload a JavaScript file, configure the JavaScript Transporter settings in the Archer Control Panel. For more information, see Configure the JavaScript Transporter Settings.
-
Go to the Manage Data Feeds page.
-
From the menu bar, click
. -
Under Integration, click Data Feeds.
-
-
Search and open Black Kite Risk Score Data Feed.
-
In the General Information section, in the Status field, select Active.
-
Click the Transport tab.
-
In the Transport Configuration section, do the following:
-
Click Upload.
-
From the Upload JavaScript File dialog, click Add New.
-
Locate and select the ‘signed-BlackKite_Archer_v6.2.js’ file.
-
Click Open.
-
From the Upload JavaScript File dialog, click OK.
-
-
In the Custom Parameters section, enter key values. The following table describes the value for each key in Custom Parameters.
|
Key |
Value |
Remarks |
|---|---|---|
|
blackkite_apikey |
[Valid value] Default = [empty] |
It contains the Black Kite authentication API token. To use the Black Kite API endpoints, the JavaScript needs the API-KEY defined for your company in the Black Kite portal. Don't hesitate to contact your Black Kite representative or send an email to support@normshield.com to get your unique API-KEY. |
|
blackkite_url |
[Valid value] Default = [https://app.blackkitetech.com/api/v1/] |
The Black Kite serves two versions of API endpoints: v1 and v2. The Archer Data Feed consumes API v1. |
|
blackkite_proxy |
|
proxy parameter which you can use for your proxy needs |
|
blackkite_verifycerts |
[Valid value] Default=[empty] |
parameter which you can use to disable SSL validations. Please set this value to false for debugging purposes only. |
|
blackkite_timeout |
[Valid value] Default=[empty] |
shows the TCP connection timeout which is 2 minutes by default. Set this to higher values when you get timeouts |
Note: The listed values are in place by default. They can be configured to suit your environment.
Important: The keys and values are case-sensitive and cannot include extra spaces at the end of the strings.
For each key type, determine whether you want it to be Protected or Plain Text. Selecting Protected encrypts the key value for the specified key in the log.
-
Click Save.
-
Click the Run Configuration tab.
-
Go to Tokens section.
-
Verify token values.
The following table describes token values to verify.
-
|
Token |
Value |
|---|---|
|
BatchContentSave |
1000 |
|
LastRunTime |
(Populated by feed) |
|
LastFileProcessed |
(Populated by feed) |
|
PreviousRunContext |
(Populated by feed) |
Note: For more information about tokens, see Data Feed Tokens in the Archer Online Documentation.
-
Click on the Data Map tab and click on the Key Field Definition sub-tab. Here, there are two options. You can either select the existing "Third Party Name" or you can select newly created custom "Black Kite Domain" to be used as a match criterion. By Default, the “Third Party Name” domain is selected.
-
Option 1: The first option means the matching will be done on vendor names, which will obviously be a weak matching criterion. For example, if there's a 3rd party vendor with a name Google in Archer, we can only match and synchronize its related risk scores if there's also a vendor name Google monitored on the Black Kite. A mismatch in the name, for example 'Google Inc' instead of 'Google' will make synchronization fail.
-
Option 2: The second option is more reliable because domain names are unique on Black Kite for classifying the vendors. But when this option is selected a manual job pertains. For a successful match, since Black Kite Domain is a newly created custom field, one should Edit the vendor in question and fill out this field.
Note: If you will follow the second option, don't map 'Third Party Name' to CompanyName field on the field map tab. Otherwise, your matching vendors' names will be overridden with the ones from the Black Kite.
-
-
Click Save.
When you schedule a data feed, the Data Feed Manager validates the information. If any information is invalid, an error message will display. You can save the data feed and correct the errors later, but that data feed is not processed until the errors are rectified.
Important: A data feed must be active and valid to successfully run.
-
Go to the Schedule tab of the data feed that you want to modify.
-
From the menu bar, click
. -
Under Integration, click Data Feeds.
-
Select the data feed that you want to modify.
-
Click the Schedule tab.
-
-
In the Recurrences section, enter the frequency, start and stop times, and time zone for the data feed.
-
(Optional) In the Run Data Feed Now section, click Start to override the data feed schedule and run the data feed immediately.
-
Click Save.
The following table describes the fields in the Recurrences section.
|
Field |
Description |
|---|---|
|
Frequency |
Specifies the interval in which the data feed runs.
|
|
Every |
Specifies the interval of the frequency in which the data feed runs. |
|
Start Time |
Specifies the time the data feed begins running. |
|
Start Date |
Specifies the date on which the data feed schedule begins. |
|
Time Zone |
Specifies the time zone in of the server that runs the data feed. |
-
Navigate to the Data Map tab and verify the following mapping of the Source and Target fields.
|
Source Fields |
Target Fields (Custom BlackKite) |
|---|---|
|
Black Kite Last Status |
LastStatus |
|
Black Kite Company Name |
CompanyName |
|
Black Kite Domain |
CompanyDomain |
|
Black Kite Dashboard Link |
DashboardLink |
|
Black Kite FocusTags |
FocusTags |
|
Black Kite Technical Rating (%) |
RiskScore_GradeOver100 |
|
Black Kite Technical Rating Letter |
RiskScore_GradeLetter |
|
Black Kite Ransomware Index (RSI) |
RansomwareIndex |
|
Black Kite Data Breach Index (DBI) |
BreachIndex |
|
Black Kite Technical Dashboard Link |
N/A |
|
BK Patch Management |
PatchManagement_GradeOver100 |
|
BK DNS Health |
DNSHealth_GradeOver100 |
|
BK Email Security |
EmailSecurity_GradeOver100 |
|
BK Application Security |
ApplicationSecurity_GradeOver100 |
|
BK CDN Security |
CDNSecurity_GradeOver100 |
|
BK DDoS Resiliency |
DDoSResiliency_GradeOver100 |
|
BK Website Security |
WebsiteSecurity_GradeOver100 |
|
BK Network Security |
NetworkSecurity_GradeOver100 |
|
BK SSL/TLS Strength |
SSLTLSStrength_GradeOver100 |
|
BK Brand Monitoring |
BrandMonitoring_GradeOver100 |
|
BK Credential Mgmt. |
CredentialMgmt_GradeOver100 |
|
BK IP Reputation |
IPReputation_GradeOver100 |
|
BK Hacktivist Shares |
HacktivistShares_GradeOver100 |
|
BK Fraudulent Apps |
FraudulentApps_GradeOver100 |
|
BK Social Network |
SocialNetwork_GradeOver100 |
|
BK Fraudulent Domains |
FraudulentDomains_GradeOver100 |
|
BK Information Disclosure |
InformationDisclosure_GradeOver100 |
|
BK Web Ranking |
WebRanking_GradeOver100 |
|
BK Attack Surface |
AttackSurface_GradeOver100 |
|
Black Kite Compliance Rating (%) |
ComplianceValueAvgOver100 |
|
Black Kite Compliance Confidence (%) |
ComplianceConfidenceAvgOver100 |
|
Black Kite Compliance Completeness (%) |
ComplianceCompletenessAvgOver100 |
|
Black Kite Compliance Dashboard Link |
N/A |
|
Black Kite FAIR Annualized ($) |
FairAnnualLossExposureAvg |
|
Black Kite FAIR Min ($) |
FairAnnualLossExposureMin |
|
Black Kite FAIR Max ($) |
FairAnnualLossExposureMax |
|
Black Kite FAIR Loss Magnitude ($) |
FairLossMagnitude |
|
Black Kite FAIR Loss Event Frequency |
FairLossEventFrequency |
|
Black Kite FAIR Dashboard Link |
N/A |
-
Test the application according to your company standards and procedures, to ensure that the use case works with your existing processes. See Testing the Data Feed for complete information.
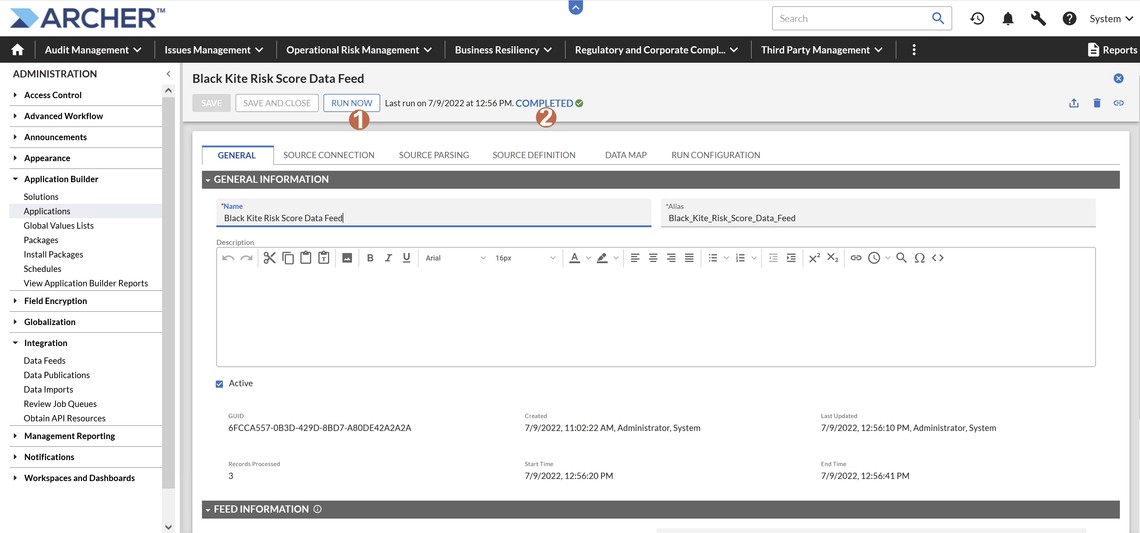
-
You can click on the Run Data Feed Now button to check that everything works smoothly. Wait to see the Completed message as shown below.
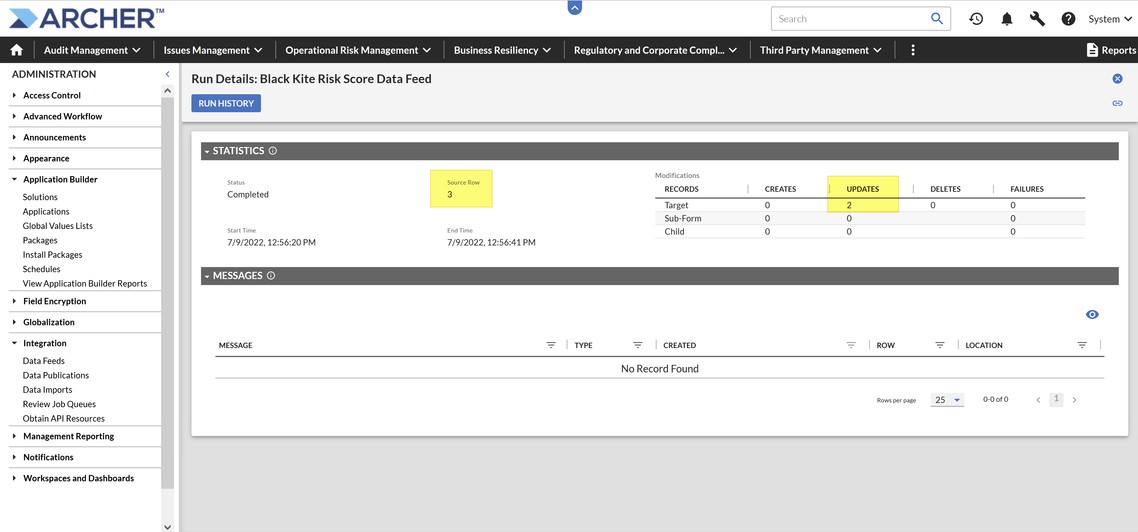
-
By clicking the Completed link, you can see the details of the job. If you come across with any failure here, then the Archer XML log files (possibly located under the Archer\Logging\InstanceName directory) that includes JobFramework in their name may shed some lights on the root cause of the problems.
-
Now you can open a Third Party profile, such as below, and see the updated Black Kite ratings if a successful matching occurred.
4. Synchronized ratings on the TPP page 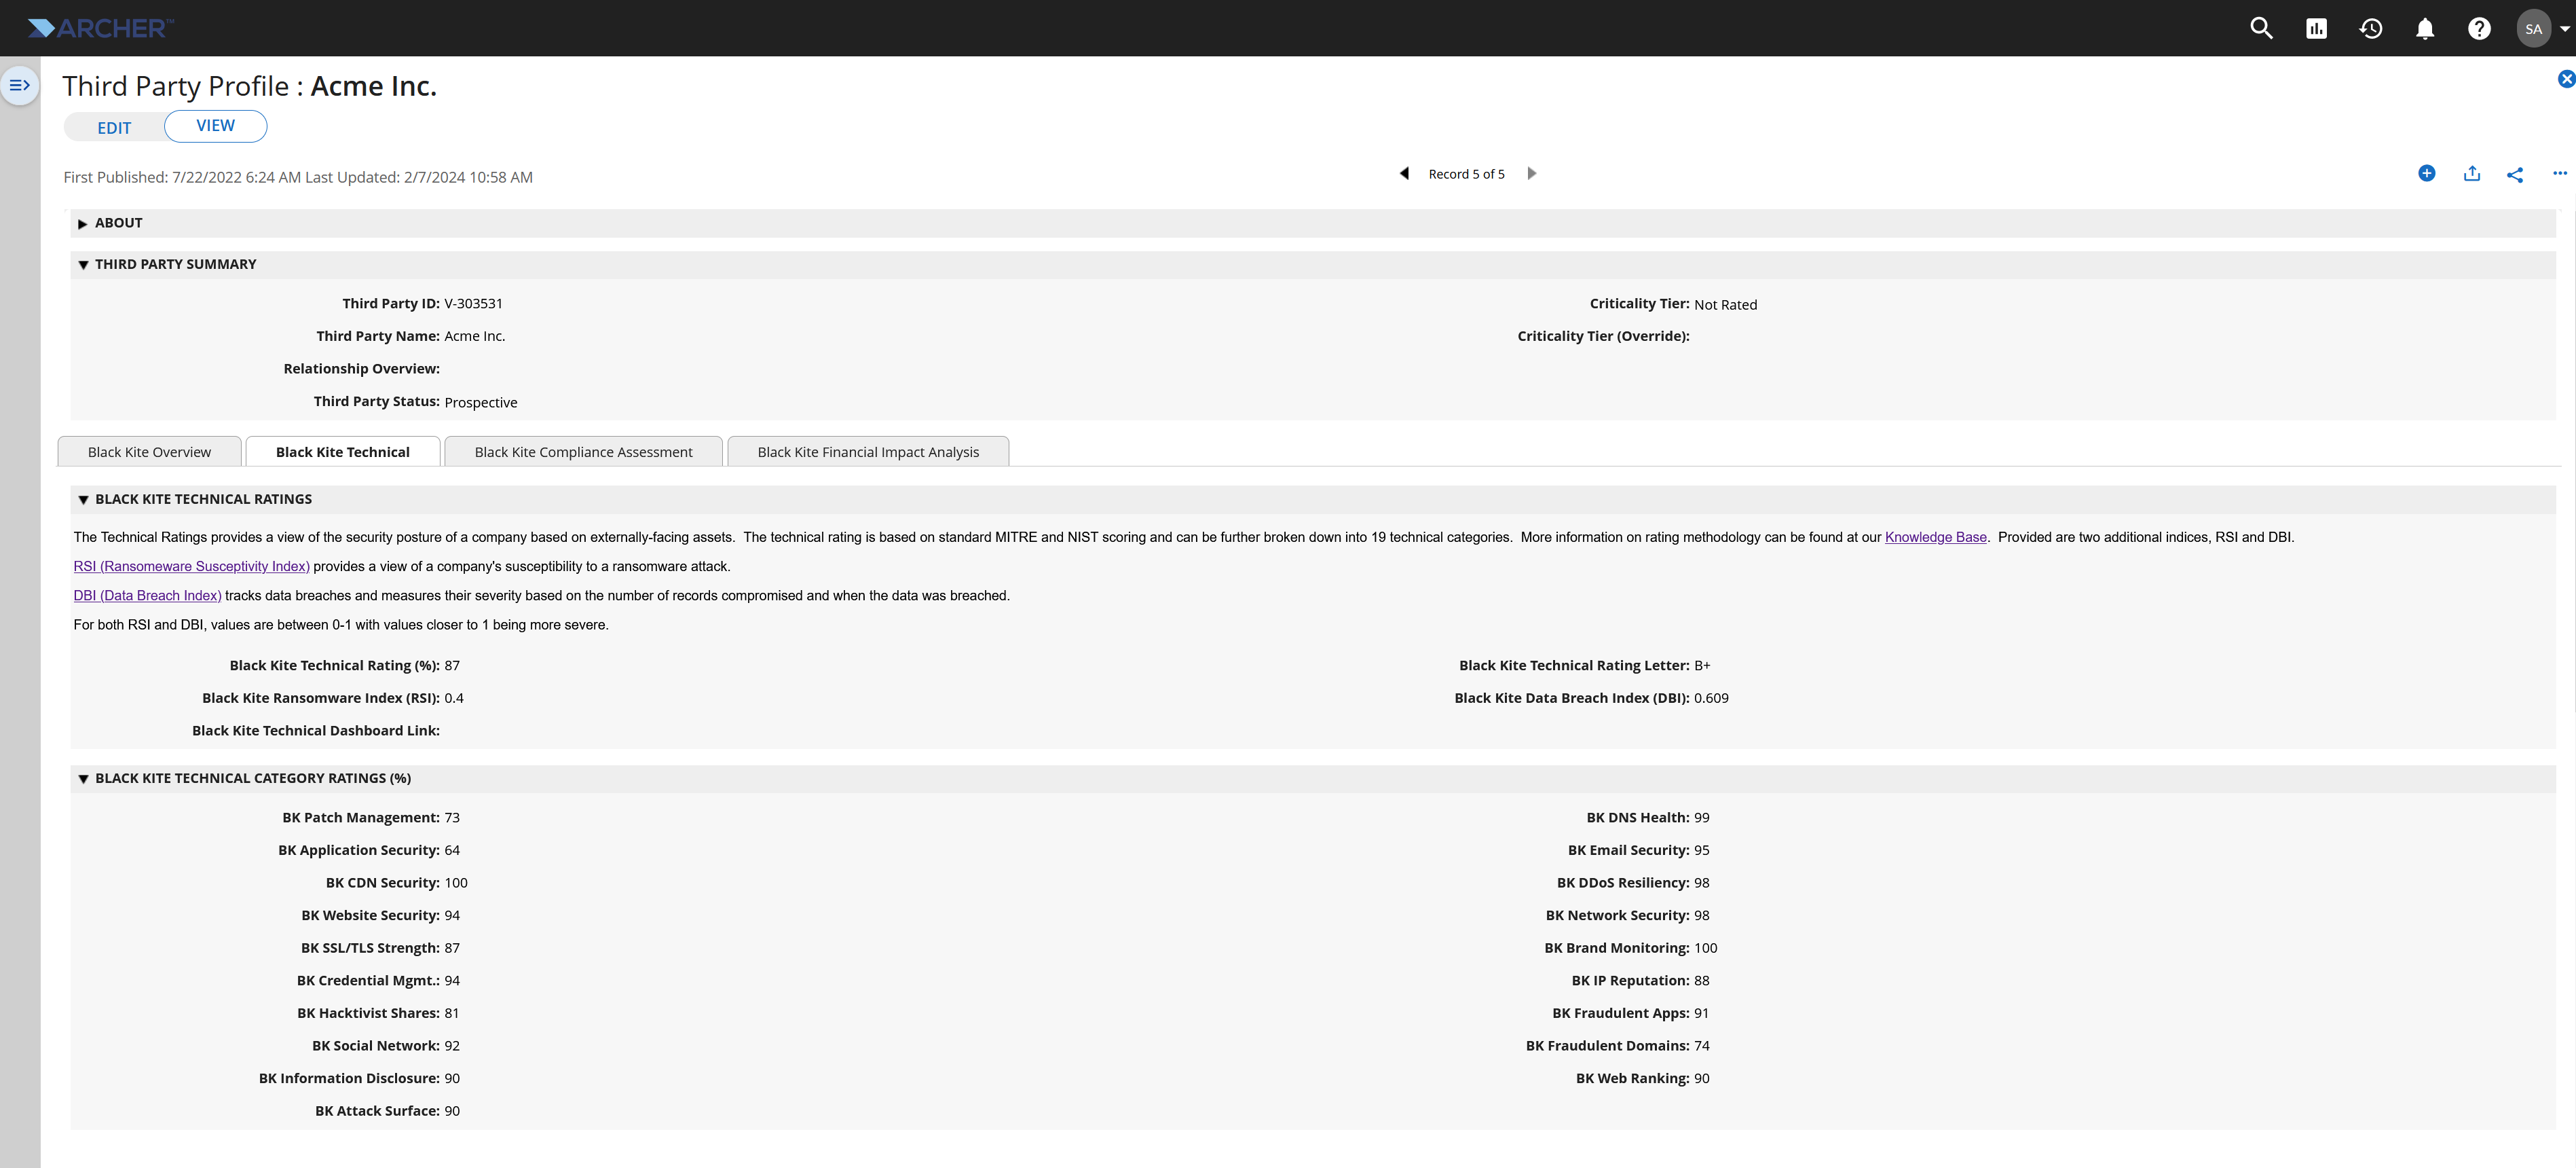
Important: Rarely the ratings presented at the https://app.blackkitetech.com/ portal and the ones here may differ due to the periodic synchronization times and/or mathematical rounding applied at the Archer side by the Data Feed JS code. The latter difference is negligible.
Using Black Kite Vendor Cyber Risk Integration
The Data Feed that the Black Kite provides synchronizes the cyber risk ratings of a matching vendor on the Third Party Profile page.
Assume you both have defined google.com as both a vendor in Black Kite and on Archer. In order to see cyber risk ratings of Google just open vendor page as shown in Figure below.
Figure – Synchronized ratings on the TPP page
Let’s say that you are sure that you monitor the same vendor both on the Archer and Black Kite but no data is presented on the Black Kite related fields. If you used ‘Black Kite Domain’ as the Key Field Definition instead of the Third Party Name, then you can Edit the vendor and update the Black Kite Domain field value to match the vendor you monitor on the Black Kite portal. After the update and next successful synchronization, the values will be synchronized and appear on the Archer page.
Figure – Using Black Kite Domain as the Key Field under the Data Feed settings 
The default setting for the Key Field is ‘Third Party Name’. When you use ‘Black Kite Domain’ instead, just like above, the matching of vendors will be done using the domains, not the name of the vendor.
Certification environment
Date tested: August 2025
|
Product name |
Version information |
Operating system |
|---|---|---|
|
Archer Suite |
2024.11.02, 2025.02.01, 2025.08 |
Virtual Appliance |
|
Black Kite |
NA |
NA |