Caveris ICAS
The Caveris ICAS (Information and Cyber Assurance Suite) software solution executes and tracks every Cyber protection measure across the entire organization, both automated & manual, to give businesses a comprehensive and fully representative view of their Cybersecurity. Business dashboards show how effective Cybersecurity Controls are in mitigating common Cyber threats and a quantitative rating of an organization’s Security Posture. Caveris ICAS Automation Manager modules automate granular assurance checks against technology infrastructures by ingesting data from any source and applying configurable logic to identify anomalies and areas of non-compliance.
On this page
Release notes
Last updated: May 2021
Release 1.0
The current out-of-the-box Integration only pulls Archer Control Procedures that are associated with a Business Unit, Devices, and Applications. Please contact Caveris if you would like to pull all Archer Control Procedures into Caveris ICAS without any dependencies.
Overview of the Caveris integration
Benefits
The Caveris ICAS integration with Archer enables organizations to:
-
Pull Archer Control Procedures into Caveris ICAS and map to Controls.
-
The status of the Control and any Control notes in Caveris ICAS will be synced back to the Control Self Assessments questionnaire in Archer.
-
Reduce Cyber risk from technology misconfigurations and inconsistency.
-
Continually enforce Cybersecurity controls through automation.
-
Reveal previously hidden Cyber risk by correlating technology exposures.
-
Show effectiveness of Cybersecurity Controls in mitigating Cyber threats.
-
Automate low level technology checks against any technology infrastructure.
Requirements
|
Components |
Requirement |
|---|---|
|
Archer Solution |
|
|
Archer Use Case(s) |
|
|
Archer Applications |
|
|
Uses Custom Application |
No |
|
Requires On-Demand License |
No |
|
Archer Requirements |
Archer release 6.9 SP1 P2 |
|
Caveris Requirements |
Valid Caveris license is required |
Compatible use cases and applications
Applications
|
Application |
Description |
|---|---|
|
Control Self Assessments |
This questionnaire is used by control owners to indicate whether a specific process control procedure is implemented. The result is factored into the procedure's compliance rating. |
|
Control Procedures |
The Control Procedures application supports the Archer Regulatory & Corporate Compliance Use Cases. It serves as a central repository for instances of control procedures, baselines and activities that are mapped to corporate Master Controls, establishing the foundation for enterprise-wide risk monitoring and compliance measurement. Control Procedures are categorized into two types: Technical and Process. Based on the selected type, different pieces of information are captured and different testing options are made available. |
Impacted use case(s)
|
Archer Use Case(s) |
|---|
|
IT Controls Assurance |
|
Controls Assurance Program Management |
|
Information Security Management System |
|
PCI Management |
|
IT Risk Management |
|
Data Governance |
|
Top-Down Assessment |
|
Federal Assessments & Authorization |
Impacted Archer fields
|
Archer Application |
Archer Field |
Caveris Field |
|---|---|---|
|
Control Self Assessments |
Control Procedure Cross Reference Field |
NA (references Archer Control Procedure in Archer) |
|
Control Self Assessments |
Assessment – Implemented or Not Implemented |
Control_Status |
|
Control Self Assessments |
Caveris Notes Field |
Control_Notes |
Additional resources
The following additional resources are available for this application:
-
Caveris ltd: https://www.caveris.co.uk
Caveris integration components
Integration diagram
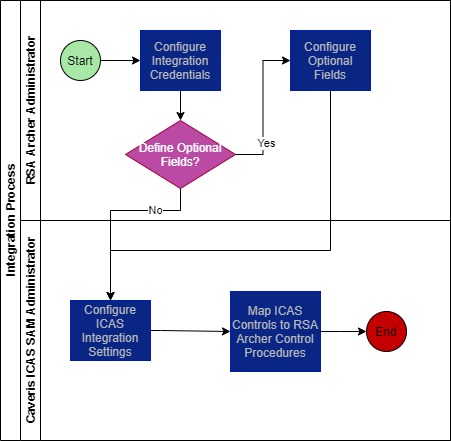
Configuring Archer
Task 1: Configure integration credentials
Within Archer, configure a user account and password that will be used by the integration to authenticate against the Archer API. The user should be configured with a ‘System Administrator’ Security Parameter.
-
Go to the Manage Applications page.
-
From the menu bar, click
 .
. -
Under Access Control, click Users.
-
-
In Manage Users, click Add New.
-
Fill in the required information and assign the account with the System Administrator Security Parameter.
-
Click Save. (Assign the user with applicable Groups/Roles if necessary)
Task 2 (optional): Add a new text field to the control self assessments questionnaire
Within Archer, on the Control Self Assessments Questionnaire, add a new Text field and name it “Caveris Control Notes”, or something similar. This Text Field will be filled with Control Notes provided by Controls run in Caveris.
-
Go to the Manage Questionnaires page.
-
From the menu bar, click
. -
Under Application Builder, click Questionnaires.
-
-
In Manage Questionnaires, search for and click on Control Self Assessments.
-
Navigate to the Fields tab and click on Add New.
-
Create a new Text field to hold Caveris Control Notes and click Save.
-
Add the field to the Questionnaire layout and click Apply/Save.
-
Add this field to all layouts associated with the Control Self-Assessment questionnaire if needed.
Note: If this task is not done, then the Archer Control Procedure Status will still be updated as appropriate, but no supporting notes from the Caveris Control Instance will be available in Archer.
Configuring Caveris
Step 1: Configure the integration settings
This step configures the basic integration settings (Archer access credentials, etc.) in Caveris Security Assurance Manager.
Task 1: Login to Caveris security assurance manager
-
Login to Caveris security assurance manager.
Note: You will need to be logged in as an Admin user for this step.
Task 2: Configure the settings for the integration with Archer
-
After logging in as Administrator to the Caveris Security Assurance Manager, click on the username drop-down menu and navigate to Administration.
-
In the Administration screen, select Archer (bottom left).
-
Click Add and input required parameters to create an Archer Integration
-
URL – Archer endpoint
-
Instance – Archer instance name
-
User Domain (optional depending on pre-existing Archerconfiguration)
-
Username
-
Password
Note: The Archer environments end point needs to be public facing for the integration to connect successfully.
-
Caveris will now begin its synchronization with Archer to pull back Application entries, Control Procedures and Questionnaires. This could take a few minutes.
-
Once the synchronization is finished the status of the integration will transition into the Ready to Configure state.
Step 2: Map Caveris controls to Archer control procedures
This step configures Caveris Security Assurance Manager with the mappings necessary to update the correct Archer Control Procedures and associated Control Self-Assessment Questionnaires.
Task 1 (if required): Update and/or confirm Archer field value settings
Clicking on the Edit icon you can see the Archer Connection settings, and in the section titled ‘Form Field settings’, you will see the configuration for self-assessments that has been automatically generated by the synchronization process.
Note: The‘Form Field settings’can be edited if required but should be correct for an out-of-the-box Archer deployment.
Task 2: Map Caveris controls to Archer control procedures
-
To begin mapping Caveris Controls to Control Procedures click on the ‘Ready to Configure’ Status icon of the integration.
-
You will now be shown a mapping screen. Caveris Controls are shown on the left-hand side, filtered by Domain and Infrastructure. Archer Control Procedures are shown on the right-hand side, filtered by Archer Level and Item.
-
To create a mapping, drag and drop an Control Procedure over a Caveris control. The selected Caveris control will highlight with a doted green surround.
-
Upon dropping the Control Procedure on the Caveris Control the node will expand and show the added entry, this could take a few seconds. Repeating this procedure allows multiple Control Procedures to be mapped to an individual Caveris control or to multiple Caveris controls (or both).
Note: The mapping has not yet been applied at this point.To remove a mapping, drag and drop a Control Procedure entry from under a Caveris Control on the left-hand side back over to right-hand side table.
-
To Apply any changes click Apply and confirm this choice via the pop-up.
-
By expanding the Caveris Control on the left-hand side, you will see that the mapping has been correctly applied.
Using the Caveris integration
Step 1: Test the integration
This step takes you through the process to manually test and confirm the integration is working. With a mapping in place you can now confirm the integration is working by running one of the controls for which you defined a mapping in Chapter 3, Step 2, Task 2, Actions 3, 4 & 5.
Task 1: Log in to Caveris security assurance manager and navigate to control centre
-
Login to Caveris Security Assurance Manager.
-
Navigate to Caveris Control Centre via Operations>Control Centre.
-
From within the tree, choose a manual Caveris Control for which you previously created a mapping. In the Centre panel you will see that there are no Active Control Instances.
Note: You will only be able to run a manual control, any automated controls can only be initiated by their associated automated data source. To complete this task you must be logged in as the user that is the owner of the control you are going to run, if that is not the case you should log out and log back in as that user.
Task 2: Run a manual control
-
To run the control, click the Play button in the tree next to the control name.
-
Once you have started the Control running:
-
You will get a brief pop-up confirmation
-
You will see the green ‘Play’ button transition to a red ‘Stop’ button
-
You will see the Control shown in the Active Control Instances list (centre panel).
Task 3: Complete the manual control – how to complete a manual control in Caveris
-
To complete the Control, navigate to Messages
-
Select the appropriate message within the list (it should be at, or near the top).
-
Then click ‘Go to Task’.
-
The form will be displayed on the right-hand side.
-
Input Control Notes and Documentation Reference URL within the form. Only data from the Control Notes field will be sent into the Archer Control Self-Assessment Caveris Notes field if it exists (see Chapter 2, Step 1, Task 2). Additionally, the Control Procedure – Control Self-Assessmentquestionnaire implementation status will be updated upon form submission.
Note: File URL/Upload is optional, this data is not sent into Archer.
Task 4: Confirm that the Archer control procedure has been updated
-
In Archer you will now be able to see that the Control Procedure that is mapped to the Caveris Control will have an updated implementation status in the questionnaire.
-
Additionally, if configured in Chapter 2, Step 1, Task 2, the Caveris Control Notes will be available under the Archer Caveris Notes section in the self-assessment questionnaire.
Step 2: Further mapping of Caveris controls to Archer control procedures
Once you have set-up, tested, and confirmed that the integration is functioning as expected, you will want to complete the process by adding all necessary mappings to the configuration. This step shows how to amend the mappings in Caveris Security Assurance Manager between Caveris Controls and Archer Control Procedures and associated Control Self-Assessment Questionnaires.
Task 1: Login to Caveris security assurance manager
-
Login to the Caveris Security Assurance Manager portal.
Note: You will need to be logged in as an Admin user for this step.
Task 2: Access the existing mapping configuration
-
After logging in as Administrator to the Caveris Security Assurance Manager, click on the username drop-down menu and navigate to Administration.
-
In the Administration screen, select Archer (bottom left).
-
The Archer integration will show a status of Configured once a mapping has been created. Click on the Configured status to create/remove any further mappings, as per Chapter 3,Step 2, Task 2, Actions 3, 4, 5 & 6
Certification environment
Date tested: May 2021
|
Product Name |
Version Information |
Operating System |
|---|---|---|
|
Archer |
6.9 SP1 P2 |
Windows |
|
Caveris ICAS |
Contact Caveris |
Cloud |