Cential AI Hub
This integration is an offering provided through the Archer Exchange to enhance your existing Archer implementation. The Archer Exchange provides offerings to expand the use of Archer solutions into new business processes and address specific industry, geographic, regulatory, or technical requirements.
Cential AI does not provide the installation package on the Archer Exchange. Clients must contact Cential AI Support at support@cential.ai to obtain the installation package and complete the installation.
On this page
Release notes
|
Release Date |
Archer Platform Release |
Notes |
|---|---|---|
|
August 2024 |
2024.06 |
Initial Release |
About Cential AI Hub Integration
The Cential AI Hub is designed to address significant inefficiencies and challenges within the Governance, Risk, and Compliance (GRC) sector. Traditional GRC processes are often manual, time-consuming, and error-prone, requiring extensive human effort for tasks such as risk assessment, policy formulation, and third party profiling. This leads to increased costs, delays, and a higher likelihood of human error, which can impede an organization's ability to ensure compliance with regulatory requirements and manage risks effectively.
The purpose of the Cential AI Hub is to drive efficiency by integrating advanced Large Language Models (LLMs) like ChatGPT to Archer via the Cential AI Hub. The offering provides AI-driven automation to make GRC-related tasks more efficient, such as:
-
Risk Register Automation: Automatically generates detailed risk statements, baseline inherent likelihood, impacts with reasoning, and related laws and regulations.
-
Policy Generation: Automatically drafts policy standards, definitions, references, and control standards for related regulatory requirements.
-
Third-Party Profiles: Generates comprehensive vendor profiles, including industry data, competitors, and risk considerations.
-
Third-Party SOC 2 Report AI Review: Provide a SOC 2 report in PDF or Word format and the AI Hub will work with the AI LLM to automatically extract key details, such as the period of coverage, included trust services criteria, and the third-party attestation firm's opinion, and complete the necessary review fields in Archer.
By addressing these issues, the Cential AI Hub integration helps organizations streamline their GRC processes, reduce manual workload, and ensure compliance more effectively, ultimately leading to significant time and cost savings.
Key features and benefits
With the Cential AI Hub you will be able to:
-
Utilizes Large Language Models (LLMs) to process information and generate content for Third Party Profiles, Third Party SOC 2 reports, Policies, and Risks
-
Includes data filtering to ensure protection for sensitive data
Prerequisites
The following table lists the components and prerequisites for the Cential AI Hub Integration.
|
Components |
Prerequisites |
|---|---|
|
Archer Solution Area(s) |
|
|
Archer Use Case(s) |
Depending on the offering usage, more than one of the following use cases may be required:
|
|
Archer Applications |
|
|
Uses Custom Objects |
No |
|
Requires Archer On-Demand License |
This offering does not require any ODAs. |
|
Archer Platform Requirements |
Archer Platform Release 2024.06 and later |
|
Supported Archer Environments |
Note: Archer SaaS clients can leverage this offering but cannot install the offering in the Archer SaaS environment. The offering must be installed on a client owned and managed server that can communicate with the Archer instance. |
|
Partner/Vendor Requirements |
Valid Cential AI Hub license is required. Additional fees may apply. |
Compatible use cases and applications
The following table shows additional features that are available if you have the specified use cases licensed.
For information on these Archer use cases, see the Archer Solutions Help.
Related applications
The following table lists the related applications for Cential AI Hub Integration.
| Application | Use Case | Primary Purposes of the Relationship |
|---|---|---|
|
Risk Register |
Top-Down Assessment, IT Risk Management, Information Security Management System |
Automatically generate detailed risk statements and link related laws and regulations based on a brief risk description. |
|
Policy |
Policy Program Management, IT Policy Program Management |
Automatically create policy standards, definitions, and control standards aligned with regulatory requirements, driving compliance and reducing manual effort. |
|
Third Party Profile |
Third Party Profile, Third Party Catalog, Third Party Risk Management, Third Party Engagement, Operational Scenario Analysis, Audit Engagements & Workpapers |
Automatically gather and compile third-party data, including industry size, competitors, and risk considerations for business engagements. |
|
Engagements |
Engagements, Third Party Catalog, Third Party Risk Management, Third Party Engagement, Operational Scenario Analysis, Audit Engagements & Workpapers |
Automatically review SOC 2 reports, extract critical details such as known qualifications, trust services criteria, and period of report. |
Impacted use cases
The following table lists the impacted use cases for Cential AI Hub Integration.
| Archer Use Cases |
|---|
|
Top-Down Risk Assessment |
|
IT Risk Management |
|
Information Security Management System (ISMS) |
|
Policy Program Management |
|
Third Party Catalog |
|
Third Party Risk Management |
Impacted fields (Integrations only)
| Archer Application | Archer Target Field | (Partner/Vendor Name) Source Field |
|---|---|---|
|
Third Party Profile |
Suggested Industry |
Suggested Industry |
|
Third Party Profile |
Suggested Number of Employees |
Suggested Number of Employees |
|
Third Party Profile |
NAICS Code |
NAICS Code |
|
Third Party Profile |
SIC Code |
SIC Code |
|
Third Party Profile |
DUNS Number |
DUNS Number |
|
Third Party Profile |
Ticker Symbol |
Ticker Symbol |
|
Third Party Profile |
Description |
Description |
|
Third Party Profile |
Relationship Overview |
Relationship Overview |
|
Third Party Profile |
General Risk Considerations |
General Risk Considerations |
|
Policies |
Policy Scope |
Policy Scope |
|
Policies |
Policy Purpose |
Policy Purpose |
|
Policies |
Policy Statement |
Policy Statement |
|
Risk Register |
Risk |
Risk Statement |
|
Risk Register |
Inherent Likelihood Justification |
Likelihood |
|
Risk Register |
Inherent Impact Justification |
Impact |
|
Engagements |
Report Period Start Date |
Suggested Report Period Start Date |
|
Engagements |
Report Period End Date |
Suggested Report Period End Date |
|
Engagements |
SOC 2 Report Type |
SOC 2 Report Type |
|
Engagements |
Trust Services Criteria Included |
Trust Services Criteria Included |
|
Engagements |
Auditor’s Name |
Auditor’s Name |
|
Engagements |
Auditor’s Opinion |
Auditor’s Opinion |
|
Engagements |
Opinion Notes |
Opinion Notes |
|
Engagements |
Services Covered |
Services Covered |
| Engagements |
Included Systems |
Included Systems |
Additional Resources
The following additional resources are available for this offering:
-
Third-party website: https://cential.co/cential-ai-hub/
Cential AI Hub Integration components
Architecture diagram
The following diagram shows the relationships between the applications that make up the Cential AI Hub Integration.

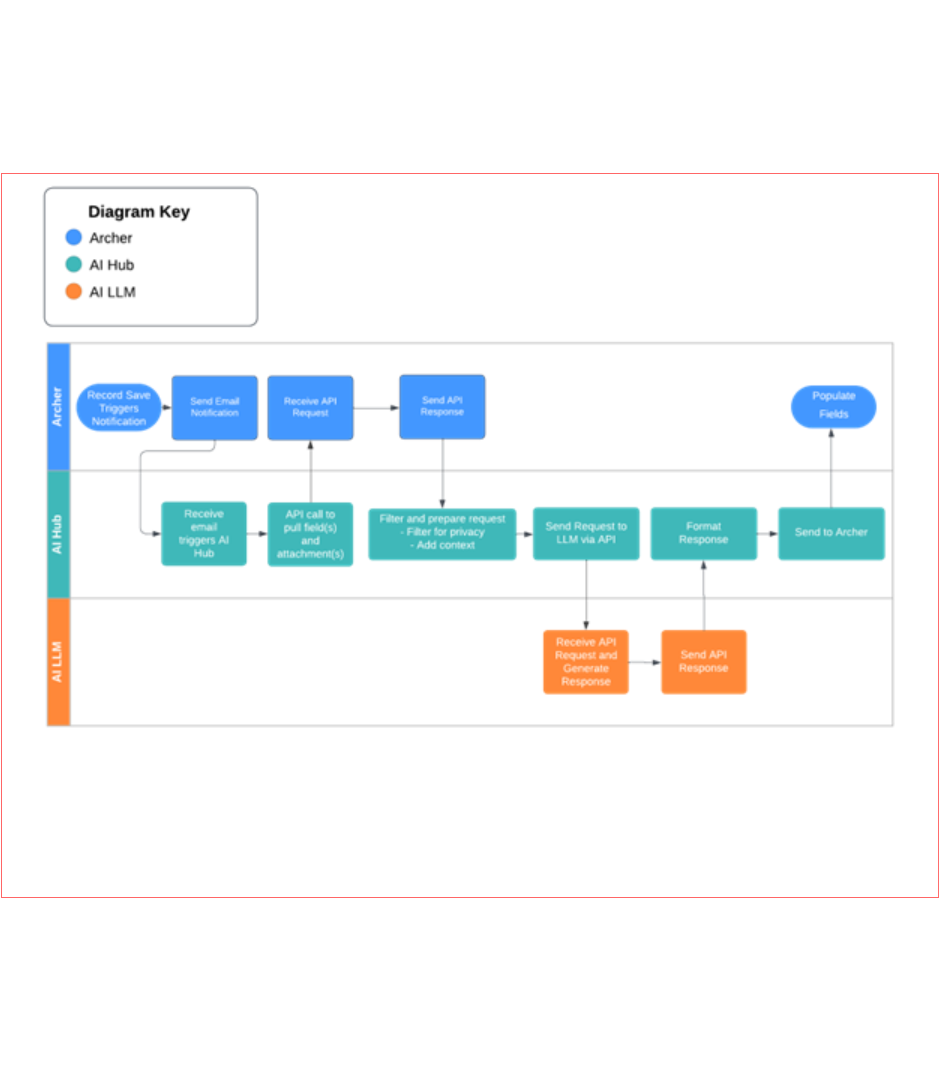
Process diagram
The AI Hub process begins when a user creates and saves a record with the “Queue from AI Hub” checkbox field checked in one of the applications listed in the following section. The AI Hub API call is then triggered, and the following workflow occurs:
Personas and access roles
| Persona | Description |
|---|---|
|
Cential AI Hub Integration |
Group and Role that provides content record create, read, and update to the included applications as listed above for the AI Hub Integration user. |
Installing Cential AI Hub Integration
Security Considerations
The information in this publication is provided "as is". Archer makes no representations or warranties of any kind with respect to the information in this publication, and specifically disclaims implied warranties of merchantability or fitness for a particular purpose. Client is solely responsible for ensuring that the installation of the application is performed in a secure manner. Archer recommends clients perform a full security evaluation prior to implementation.
Clients are responsible for deploying all components of the package within their environment and assume all risks associated with the installation. Additional support can be reached at support@cential.ai.
Installation Overview
Complete the following tasks to install the Cential AI Hub Integration.
-
Ensure that your Archer system meets the following requirements
-
Archer Platform version 2024.06 and later.
-
-
Obtain the installation package from Cential AI.
-
Read and understand "Packaging Data" in the (Undefined variable: ArcherVariables.pro) Platform Help.
Step 2: Install the package
Installing a package requires that you import the package file, map the objects in the package to objects in the target instance, and then install the package.
This step is optional as the ODA is a new one and is not interacting with any existing use case applications.
There is no Undo function for a package installation. Packaging is a powerful feature that can make significant changes to an instance. Back up the instance database before installing a package. This process enables a full restoration if necessary.
An alternate method for undoing a package installation is to create a package of the affected objects in the target instance before installing the new package. This package provides a snapshot of the instance before the new package is installed, which can be used to help undo the changes made by the package installation. New objects created by the package installation must be manually deleted.
-
From the menu bar, click
 > Application Builder > Install Packages.
 - In the Available Packages section, click Import.
- Click Add New, then locate and select the package file that you want to import.
- Click OK.
The package file is displayed in the Available Packages section and is ready for installation.
Important: This step is required only if you are upgrading to a later version of Archer Scripts LLC UI Enhancement Toolkit.
-
From the menu bar, click
> Application Builder > Install Packages. - In the Available Packages section, locate the package you want to map.
- In the Actions column, click
 for that package.
The analyzer examines the information in the package. The analyzer automatically matches the system IDs of the objects in the package with the objects in the target instance and identifies objects from the package that are successfully mapped to objects in the target instance, objects that are new or exist but are not mapped, and objects that do not exist (the object is in the target but not in the source).
When the analyzer is complete, the Advanced Package Mapping page lists the objects in the package file and corresponding objects in the target instance.
- On the Advanced Mapping page, click to open each category and review the icons next to each object to determine which objects you must map manually.
The following table describes the icons. Icon
Name
Description

Awaiting Mapping Review
Indicates that the system could not automatically match the object or one of its children to a corresponding object in the target instance.
Objects marked with this icon must be mapped manually.
New objects should not be mapped. Select Do Not Map from the drop-down menu to clear this icon for an individual object, or click Do Not Map to clear the icon for all unmapped objects.

Mapping Completed
Indicates that the object and all children are mapped to objects in the target instance, or that they have been marked as Do Not Map. Nothing more needs to be done with these objects in Advanced Package Mapping.
Note: You can run the mapping process without mapping all objects. The
icon is for informational purposes only. - For objects awaiting mapping review, do one of the following:
- To map each object individually, use the drop-down menu in the Target column to select the object in the target instance to which you want to map the source object. To leave an object unmapped, select Do Not Map in the Target column.
- To automatically map all objects in a category that have different system IDs but the same object name as an object in the target instance, click Auto Map. Select whether to ignore case and spaces when matching object names. Click OK.
- To mark all unmapped objects as Do Not Map, click Do Not Map.
-
(Optional) Click
 to enable filter fields that you can use to find specific objects in each mapping category. To undo your mapping selections, click Undo, then select whether to undo all mappings in the category or only the mappings on a single page. If you choose to undo all mappings, you will be returned to the categories list.
 - (Optional) To save your mapping selections and return to the categories list without committing changes to the target instance, click
 .
. - After you review and map all objects, click Execute.
- Select I understand the implications of performing this operation. Click OK.
When the mapping is complete, the Import and Install Packages page displays.
Important: Advanced Package Mapping modifies the system IDs in the target instance. You must update any Data Feeds and Web Service APIs that use these objects with the new system IDs.
All objects from the source instance are installed in the target instance unless the object cannot be found or is flagged to not be installed in the target instance. A list of conditions that may cause objects not to be installed is provided in the Log Messages section. A log entry is displayed in the Package Installation Log section.
- From the menu bar, click > Application Builder > Install Packages.
- In the Available Packages section, locate the package file that you want to install, and click the file name or
 at end of the row to open the Options menu.
 - In the Selected Components section, click the Lookup button to open the Package Selector window.
- To select all components, select the top-level checkbox.
- To install only specific global reports in an already installed application, select the checkbox associated with each report that you want to install.
Note: Items in the package that do not match an existing item in the target instance are selected by default.
- Under the Translation Option drop-down menu, select an option for each selected component. To use the same Translation Option for all selected components, select a method from the top-level drop-down list.
The Translation Option is enabled only when a language is selected.The following table describes the options. Option
Description
Full Install
Installs the component and its translations from the selected languages.
Translations Only
Only installs the translations from the selected languages.
- Under the Install Method drop-down menu, select an option for each selected component. To use the same Install Method for all selected components, select a method from the top-level drop-down list.
The following table describes the options. Option
Description
Create New Only
Only creates new fields and other elements in the applications, questionnaires, workspaces, data feeds, and dashboards specified in the package file. This option does not modify any existing elements on your instance of Archer. This is useful when you want to add functionality to an existing application, questionnaire, workspace, dashboard, data feed, or access role, but you do not want to risk making any unwanted changes to the existing elements of workspaces, data feeds, or dashboards.
Note: The Create New Only option does not apply to access roles or languages.
Create New and Update
Updates all elements in the applications, questionnaires, workspaces, data feeds, and dashboards as specified in the package file. This includes adding new elements and updating existing elements.
Note: The Create New and Update option does not apply to access roles or languages.
- Under the Install Option drop-down menu, select an option for each selected component. To use the same Install Option for all selected components, select an option from the top-level drop-down list.
The following table describes the options. Option
Description
Do not Override Layout
Installs the component, but does not change the existing layout. This is useful if you have a lot of custom fields and formatting in your layout that you do not want to risk losing.
You may have to modify the layout after installing the package to use the changes made by the package.
Note: The Do not Override Layout option does not apply to access roles or languages.
Override Layout
Updates the layout as specified in the package file, overwriting the existing layout.
Note: The Override Layout option does not apply to access roles or languages.
- Click Continue to advance to the next object category in the Package Selector, and repeat steps 4 to 6. After reviewing all object categories, click OK.
- To deactivate target fields and data-driven events that are not in the package, in the Post-Install Actions section, select the Deactivate target fields and data-driven events that are not in the package checkbox. To rename the deactivated target fields and data-driven events with a user-defined prefix, select Apply a prefix to all deactivated objects, and enter a prefix. This can help you identify any fields or data-driven events that you may want to review for cleanup post-install.
- Click Install.
- Click OK.
-
From the menu bar, click
> Application Builder > Install Packages. - In the Package Installation Log section, click the package that you want to view.
- In the Package Installation Log page, in the Object Details section, click View All Errors.
Note: To view individual logs, in the Errors column of the log you want to view, click the Failures link or Warnings link. Clicking View All Errors, Failures, or Warnings opens the specific errors on a different page.
- Click the Export icon to export the log file.
- Click Close.
For a list of packaging installation log messages and remediation information for common messages, see Package Installation Log Messages.
Step 3: Test the installation
Test the application according to your company standards and procedures, to ensure that the use case works with your existing processes.
Configuring Cential AI Hub Integration
Cential AI does not provide the installation package on the Archer Exchange. Clients must contact Cential AI Support at support@cential.ai to obtain the installation package and complete the installation. Clients are responsible for deploying all components of the package within their environment and assume all risks associated with the installation. Additional support can be reached at support@cential.ai.
-
While logged in with an account with access administration access to Archer, access the admin panel and select Access Control -> Users
-
Click Add New
-
Complete the required fields: First Name, Last Name, User Name, and Password. “aihub” is the suggested default username, but the username can be any name the organization prefers.
-
Complete the email field. Assign the email address: [archer@clientinstance.centialaihub.com]
Note: “clientinstance” will be replaced by the name of your organization’s AI Hub instance. Contact support@cential.ai if you do not have your instance name.
-
Select the Group tab, click “Lookup”, and find the group named “Cential AI Hub Integration”.
-
Select the group, click OK, and click Save and Close
Note: The archer platform URL, service account username, and service account password will need to be provided to Cential AI to configure the integration to the AI Hub.
Using Cential AI Hub Integration
Risk Register
While logged in with any User with Create and Edit content access to the Risk Register:
-
Go to the Risk Register.
-
From the menu bar, click
 .
. -
Find and click the applicable solution and use case that contain the Risk Register.
(Example: Operational Risk Management->Top Down Assessment->Risk Register.
-
-
Click
 , New Record.
 -
Populate the Risk field (required field).
-
Check the box for “Send to AI Hub.”
-
Click Save.
-
Return the record to "View" mode.
-
Wait 1-3 minutes for the AI Hub to interact with the LLM and provide the response.
-
Click
and then "Recalculate". -
Review the populated fields and continue as desired.
Repeat the same steps while in the Policies, Engagements, and Third Party Profile applications, and the Cential AI Hub will function similarly. It will automatically populate the fields listed in the Impacted fields section above in this document.
Certification environment
Date Tested: August 2024
|
Product Name |
Release Information |
Operating System |
|---|---|---|
|
Archer |
2024.06 |
Virtual Appliance |
|
Cential AI Hub |
- |
Virtual Appliance |