CORL Vendor Risk Management Integration
This integration is an offering provided through the Archer Exchange to enhance your existing Archer implementation. The Archer Exchange provides offerings to expand the use of Archer solutions into new business processes and address specific industry, geographic, regulatory, or technical requirements.
Cential and CORL do not provide the package and scripts openly in the marketplace and must be contacted to obtain the offering. Please email CORL Support at support@corlcustomersupport.zendesk.com for the complete installation package.
On this page
Overview
CORL provides a clearinghouse of 80,000+ vendors and their assessment data enabling reuse of vendor assessments. The integration of CORL's platform with Archer, facilitated by Cential, is a significant advancement for organizations using Archer and CORL. This integration aims to enhance third-party risk management processes by automating and streamlining risk assessments and workflows between CORL and Archer, allowing for a seamless workflow between Archer and CORL’s TPRM platform and managed services.
The primary purpose of this integration is to bridge the data and workflow between Archer and CORL's specialized third-party risk management platform and services capabilities. By establishing a seamless data exchange integrated with the Archer workflow, this integration ensures that risk assessments initiated in Archer can be completed and analyzed within CORL, with results seamlessly fed back into Archer. This closed-loop system enhances the accuracy, efficiency, and comprehensiveness of risk management activities.
Key features and benefits
With the CORL Vendor Risk Management Integration, organizations can:
-
Enable Archer users to request third-party risk assessment for a vendor be completed by CORL
-
Utilize CORL Cleared vendor information to complete risk assessment
-
Use APIs to monitor for daily risk assessment result updates
-
Pass risk assessment results back to Archer
Prerequisites (ODA and system requirements)
|
Components |
Prerequisites |
|
Archer Solution Area(s) |
Third Party Governance |
|
Archer Use Case(s) |
Third Party Catalog Third Party Engagement |
|
Archer Applications |
Third Party Profile Engagements Contacts |
|
Uses Custom Application |
No |
|
Requires Archer On-Demand License |
No |
|
Archer requirements |
Archer Platform Release 2024.06 and later |
|
Partner/Vendor Requirements |
Valid License is required for CORL |
|
Supported Archer Environments |
|
Compatible use cases and applications
Related applications
| Application |
Use Case |
Primary Purposes of the Relationship |
|---|---|---|
|
Third Party Profile |
Third Party Catalog Third Party Engagement |
The Third Party Profile application is used to document all the third party relationships used by an organization. In this application, the organizational structure of the third party relationship is established, third party contacts documented, and relationship manager, risk analyst, and procurement / legal officer accountabilities are created. |
|
Engagements |
Third Party Catalog Third Party Engagement |
The Engagements application serves as the repository for all products and services provided by a third-party to the organization. Engagements are documented by type, description; and business unit; are associated with the third party delivering the engagement; the associated contracts and business processes and are assigned to an engagement owner and manager. |
|
Contacts |
IT Asset Catalog |
The Contacts application serves as a central repository for contact information, enabling management to document information about the personnel involved in key organizational tasks, such as device administration and business process ownership. |
Impacted use cases
|
Archer Use Cases |
|
Third Party Engagement |
|
Third Party Catalog |
Impacted fields (Integrations only)
| Archer Application |
Archer Target Field |
(Partner/Vendor Name) Source Field |
|---|---|---|
|
Contacts |
Name(First) |
First Name |
|
Contacts |
Name(First) |
Last Name |
|
Contacts |
Job Title |
Title |
|
Contacts |
Bus. Country |
Country Code |
|
Contacts |
Phone (Business Main) |
Phone Number |
|
Contacts |
Phone Extension (Business Main) |
Phone Extension |
|
Contacts |
Email (Business) |
|
|
Engagements |
Assessment Category |
Assessment Category |
|
Engagements |
Assessment Type |
Assessment Type |
|
Engagements |
Product or Service |
Is this a request for a vendor product or service? |
|
Engagements |
Medical Device |
Is the product a medical device? |
|
Engagements |
Product/Service Location |
At what location is this product/service being implemented? |
|
Engagements |
Engagement Name |
Product or Service Name |
|
Engagements |
Model or Version Identifier |
Model or Version Identifier |
|
Engagements |
Product URL |
Product URL |
|
Engagements |
Description |
Product or Service Description |
|
Engagements |
Engagement Owner.First Name |
Business Stakeholder Contact First Name |
|
Engagements |
Engagement Owner.Last Name |
Business Stakeholder Contact Last Name |
|
Engagements |
Engagement Owner.Title |
Business Stakeholder Contact Department |
|
Engagements |
Engagement Owner.Phone Number |
Business Stakeholder Contact Phone Number |
|
Engagements |
Engagement Owner.Email |
Business Stakeholder Contact Email |
|
Engagements |
CORL Q1 |
Implementation Environment |
|
Engagements |
CORL Q2 |
Data Types |
|
Engagements |
CORL Q3 |
Storage Location Access Types |
|
Engagements |
CORL Q4 |
Network Access Type |
|
Engagements |
CORL Q5 |
Estimate Volume of Records |
|
Engagements |
CORL Q6 |
Business Impact |
|
Engagements |
CORL Q7 |
Vendor Inherent Risk Rating |
|
Engagements |
CORL Q8 |
Obtain Scoping Information |
|
Engagements |
CORL Q9 |
Obtain Control Information |
|
Engagements |
Assessment Comments |
Assessment Comments |
|
Engagements |
Engagement ID |
Assessment ID |
|
Engagements |
Engagement Name |
Assessment Name |
|
Engagements |
CORL Stage |
Stage |
|
Engagements |
CORL Status |
Status |
|
Engagements |
Risk Rating Score |
Risk Rating Score |
|
Engagements |
Risk Rating Summary |
Risk Rating Summary |
|
Engagements |
Risk Rating Recommended Action |
Risk Rating Recommended Action |
|
Engagements |
Impact Level |
Impact Level |
|
Engagements |
Impact Level Category |
Impact Level Category |
|
Third Party Profile |
Third Party Name |
Vendor Name |
|
Third Party Profile |
Website |
Vendor URL |
|
Third Party Profile |
CORL Vendor ID |
Vendor Correlation ID |
|
Third Party Profile |
Third Party ID |
Vendor ID |
|
Third Party Profile |
Country |
Vendor Headquarters Country |
|
Third Party Profile |
State |
Vendor Headquarters State |
| Third Party Profile | Third Party Contact Information | Vendor Contact |
Additional Resources
The following additional resources are available for this offering:
-
CORL: https://corltech.com/
-
CORL Help Center: https://corlcustomersupport.zendesk.com/hc/en-us
Components
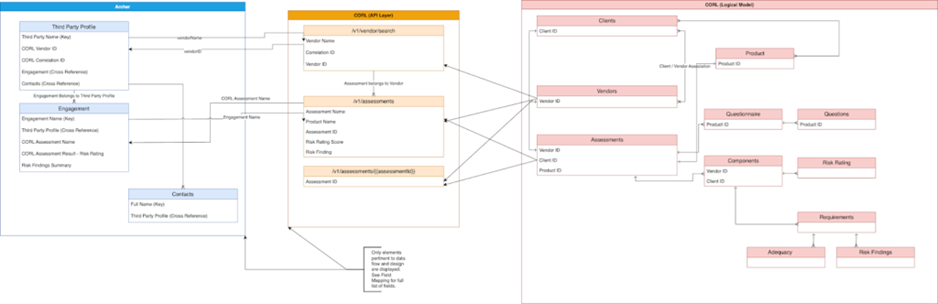
Architecture diagram
The following diagram shows the relationships between the applications that make up the CORL Vendor Risk Management Integration.
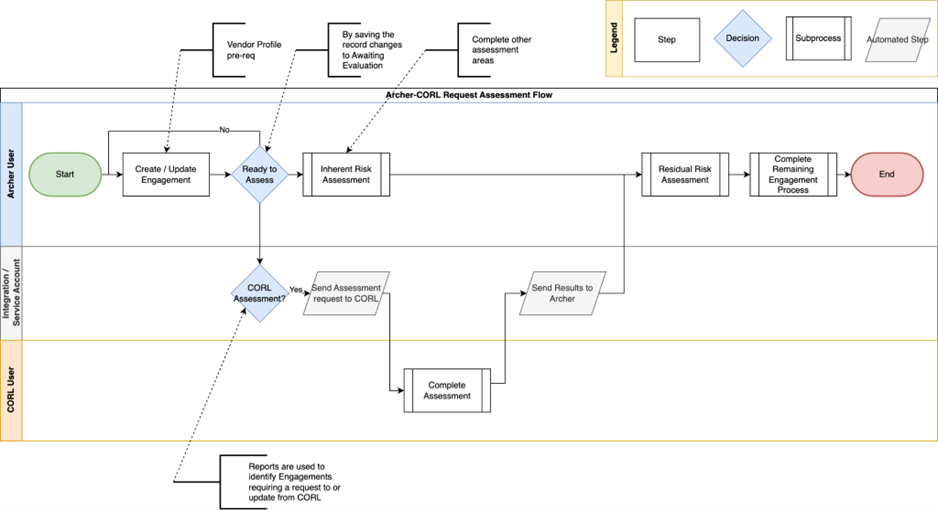
Process diagram
Third Party Risk Management Users can create a CORL Assessment by completing the following steps:
-
Create a new Engagement record in Archer
-
Check the CORL Assessment checkbox field
-
Locate and complete the fields contained within the CORL Inherent Risk Assessment tab. Note: There are fields that are read only and are editable only by the integration
-
Once the integration is scheduled to run, the assessment request will carry over to the CORL application
-
As updates become available, the integration will pull the updates from CORL and import them into Archer. Fields updated are found under the CORL Assessment Status and CORL Risk Summary sections of the CORL Information Security Risk tab.
Note: There are not any workflow dependencies configured to wait for CORL results. Engagements advanced workflow will function as it does out of box.
The following diagram shows the general workflow of the application:
Applications
The CORL Vendor Risk Management Integration does not require any On-Demand Applications.
Personas and Access Roles
The following table describes the functions that make up the application’s organization roles. Depending on the organization of your company, these functions and responsibilities may vary.
All access roles provided by the Third Party Use Cases are preserved. The only additional role provided is the “CORL API Integration” role, which serves to enable service account access to all engagement and third party profile records.
| Function | Description |
|---|---|
| CORL API Integration | Provides read and update access to Engagements and Third Party profiles. |
| Archer User | Third Party Use Case user with create and update access to the Engagements application. |
Installing CORL Vendor Risk Management Integration
Security Considerations
The information in this publication is provided "as is". Archer makes no representations or warranties of any kind with respect to the information in this publication, and specifically disclaims implied warranties of merchantability or fitness for a particular purpose. Client is solely responsible for ensuring that the installation of the application is performed in a secure manner. Archer recommends clients perform a full security evaluation prior to implementation.
Installation Overview
Complete the following tasks to install the offering.
-
Ensure that your Archer system meets the following requirements:
-
Archer Platform version 2024.06
-
-
Read and understand "Packaging Data" in the (Undefined variable: ArcherVariables.pro) Platform Help.
Installing a package requires that you import the package file, map the objects in the package to objects in the target instance, and then install the package. For more information, see Overview.
Test the application according to your company standards and procedures, to ensure that the use case works with your existing processes.
Installing the package
There is no Undo function for a package installation. Packaging is a powerful feature that can make significant changes to an instance. Back up the instance database before installing a package. This process enables a full restoration if necessary.
An alternate method for undoing a package installation is to create a package of the affected objects in the target instance before installing the new package. This package provides a snapshot of the instance before the new package is installed, which can be used to help undo the changes made by the package installation. New objects created by the package installation must be manually deleted.
-
From the menu bar, click
 > Application Builder > Install Packages.
 - In the Available Packages section, click Import.
- Click Add New, then locate and select the package file that you want to import.
- Click OK.
The package file is displayed in the Available Packages section and is ready for installation.
Important: This step is required only if you are upgrading to a later version of the offering.
-
From the menu bar, click
> Application Builder > Install Packages. - In the Available Packages section, locate the package you want to map.
- In the Actions column, click
 for that package.
The analyzer examines the information in the package. The analyzer automatically matches the system IDs of the objects in the package with the objects in the target instance and identifies objects from the package that are successfully mapped to objects in the target instance, objects that are new or exist but are not mapped, and objects that do not exist (the object is in the target but not in the source).
When the analyzer is complete, the Advanced Package Mapping page lists the objects in the package file and corresponding objects in the target instance.
- On the Advanced Mapping page, click to open each category and review the icons next to each object to determine which objects you must map manually.
The following table describes the icons. Icon
Name
Description

Awaiting Mapping Review
Indicates that the system could not automatically match the object or one of its children to a corresponding object in the target instance.
Objects marked with this icon must be mapped manually.
New objects should not be mapped. Select Do Not Map from the drop-down menu to clear this icon for an individual object, or click Do Not Map to clear the icon for all unmapped objects.

Mapping Completed
Indicates that the object and all children are mapped to objects in the target instance, or that they have been marked as Do Not Map. Nothing more needs to be done with these objects in Advanced Package Mapping.
Note: You can run the mapping process without mapping all objects. The
icon is for informational purposes only. - For objects awaiting mapping review, do one of the following:
- To map each object individually, use the drop-down menu in the Target column to select the object in the target instance to which you want to map the source object. To leave an object unmapped, select Do Not Map in the Target column.
- To automatically map all objects in a category that have different system IDs but the same object name as an object in the target instance, click Auto Map. Select whether to ignore case and spaces when matching object names. Click OK.
- To mark all unmapped objects as Do Not Map, click Do Not Map.
-
(Optional) Click
 to enable filter fields that you can use to find specific objects in each mapping category. To undo your mapping selections, click Undo, then select whether to undo all mappings in the category or only the mappings on a single page. If you choose to undo all mappings, you will be returned to the categories list.
 - (Optional) To save your mapping selections and return to the categories list without committing changes to the target instance, click
 .
. - After you review and map all objects, click Execute.
- Select I understand the implications of performing this operation. Click OK.
When the mapping is complete, the Import and Install Packages page displays.
Important: Advanced Package Mapping modifies the system IDs in the target instance. You must update any Data Feeds and Web Service APIs that use these objects with the new system IDs.
All objects from the source instance are installed in the target instance unless the object cannot be found or is flagged to not be installed in the target instance. A list of conditions that may cause objects not to be installed is provided in the Log Messages section. A log entry is displayed in the Package Installation Log section.
- From the menu bar, click > Application Builder > Install Packages.
- In the Available Packages section, locate the package file that you want to install, and click the file name or
 at end of the row to open the Options menu.
 - In the Selected Components section, click the Lookup button to open the Package Selector window.
- To select all components, select the top-level checkbox.
- To install only specific global reports in an already installed application, select the checkbox associated with each report that you want to install.
Note: Items in the package that do not match an existing item in the target instance are selected by default.
- Under the Translation Option drop-down menu, select an option for each selected component. To use the same Translation Option for all selected components, select a method from the top-level drop-down list.
The Translation Option is enabled only when a language is selected.The following table describes the options. Option
Description
Full Install
Installs the component and its translations from the selected languages.
Translations Only
Only installs the translations from the selected languages.
- Under the Install Method drop-down menu, select an option for each selected component. To use the same Install Method for all selected components, select a method from the top-level drop-down list.
The following table describes the options. Option
Description
Create New Only
Only creates new fields and other elements in the applications, questionnaires, workspaces, data feeds, and dashboards specified in the package file. This option does not modify any existing elements on your instance of Archer. This is useful when you want to add functionality to an existing application, questionnaire, workspace, dashboard, data feed, or access role, but you do not want to risk making any unwanted changes to the existing elements of workspaces, data feeds, or dashboards.
Note: The Create New Only option does not apply to access roles or languages.
Create New and Update
Updates all elements in the applications, questionnaires, workspaces, data feeds, and dashboards as specified in the package file. This includes adding new elements and updating existing elements.
Note: The Create New and Update option does not apply to access roles or languages.
- Under the Install Option drop-down menu, select an option for each selected component. To use the same Install Option for all selected components, select an option from the top-level drop-down list.
The following table describes the options. Option
Description
Do not Override Layout
Installs the component, but does not change the existing layout. This is useful if you have a lot of custom fields and formatting in your layout that you do not want to risk losing.
You may have to modify the layout after installing the package to use the changes made by the package.
Note: The Do not Override Layout option does not apply to access roles or languages.
Override Layout
Updates the layout as specified in the package file, overwriting the existing layout.
Note: The Override Layout option does not apply to access roles or languages.
- Click Continue to advance to the next object category in the Package Selector, and repeat steps 4 to 6. After reviewing all object categories, click OK.
- To deactivate target fields and data-driven events that are not in the package, in the Post-Install Actions section, select the Deactivate target fields and data-driven events that are not in the package checkbox. To rename the deactivated target fields and data-driven events with a user-defined prefix, select Apply a prefix to all deactivated objects, and enter a prefix. This can help you identify any fields or data-driven events that you may want to review for cleanup post-install.
- Click Install.
- Click OK.
-
From the menu bar, click
> Application Builder > Install Packages. - In the Package Installation Log section, click the package that you want to view.
- In the Package Installation Log page, in the Object Details section, click View All Errors.
Note: To view individual logs, in the Errors column of the log you want to view, click the Failures link or Warnings link. Clicking View All Errors, Failures, or Warnings opens the specific errors on a different page.
- Click the Export icon to export the log file.
- Click Close.
For a list of packaging installation log messages and remediation information for common messages, see Package Installation Log Messages.
Configuring the CORL Vendor Risk Management Integration
Cential and CORL do not provide the package and scripts openly in the marketplace and must be contacted to obtain the offering. Please email CORL Support at support@corlcustomersupport.zendesk.com for the complete installation package. Clients are responsible for deploying all components of the installation package within their environment and assume all risks associated with the installation. Additional support can be reached at integrationsupport@centialconsulting.com.
A fully deployed CORL Vendor Risk Management Integration with Archer will result in the following components being deployed in either Archer or server:
-
Third Party Profile fields
-
Engagement fields
-
Third Party Profile report
-
0 CORL New Vendors
-
-
Engagement Reports:
-
0 CORL Engagements to Request
-
0 CORL Engagements to Update
-
-
Python package containing configuration file, scripts, and schema
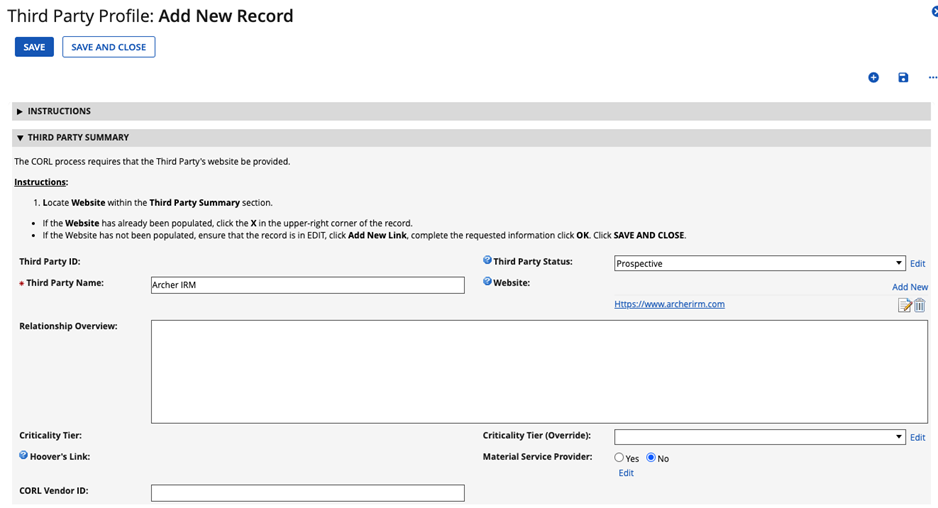
Once configured, Archer Engagements and Third Party Profiles will resemble the layouts given in the screenshots below:
Third Party Profile:
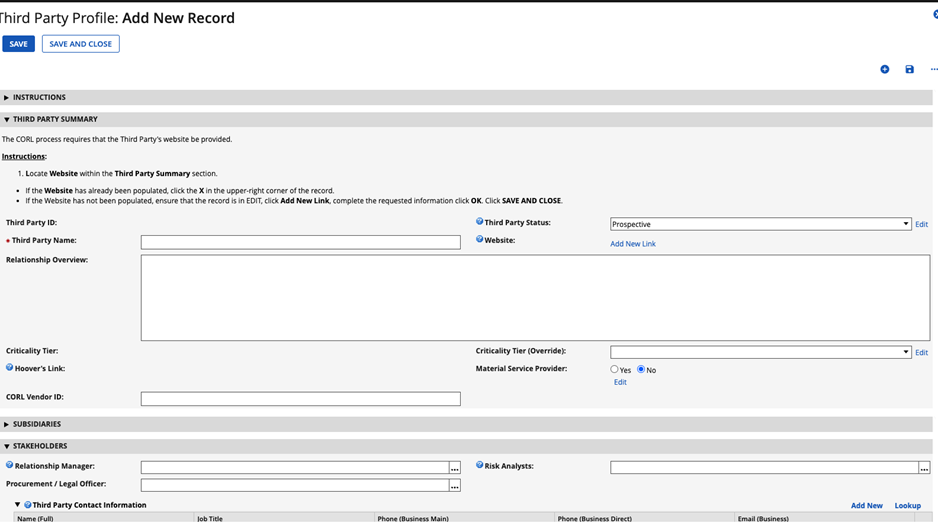
Notice the CORL Vendor ID at the bottom left of the Third Party Summary section.
Engagements:
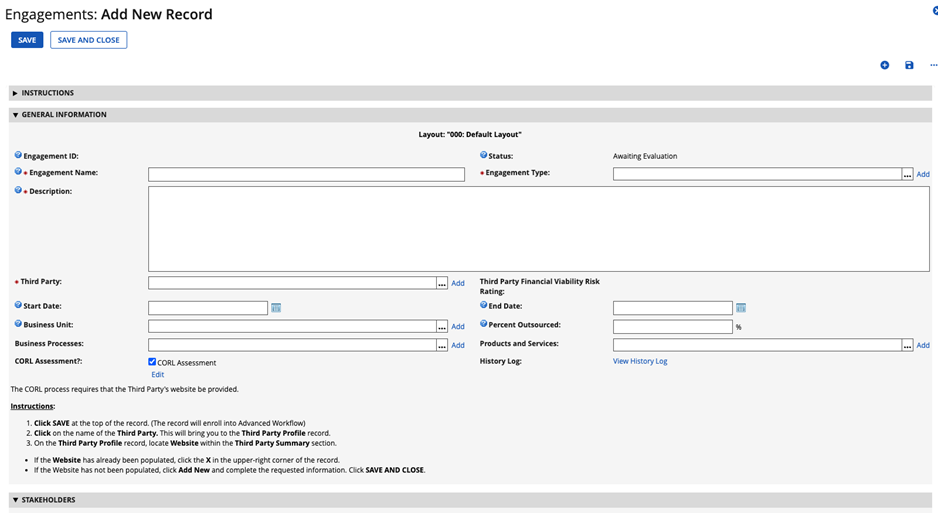
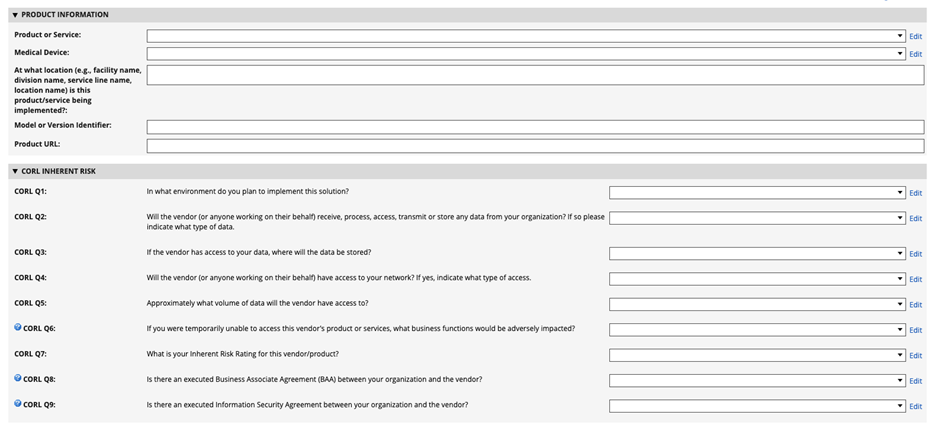

The Engagements application layout includes a CORL Assessment checkbox along with a new tab and sections containing CORL-specific fields.
The integration script can be deployed to a Python-compatible on-premises server (e.g., Windows) or cloud-based server (e.g. Google Cloud or AWS). Users of the Archer-CORL integration application are responsible for hosting the .py integration file.
The integration script will require a scheduler to kick-off. Example schedulers include Microsoft Task Scheduler, Google Cloud Scheduler, or AWS CloudWatch Event.
When running the integration, a keyword will need to be provided that tells the script which execution path to follow. These keywords are:
-
archer_validate
-
corl_validate
-
vendors
-
archer_corl
-
corl_archer
The script can take multiple arguments, and once operational it is recommended to run vendors, archer_corl, and corl_archer so that all third parties, assessment requests, and assessment results are kept up to date between platforms.
Configuring the Integration Script
Deploying the integration to your preferred environment should require little to no updates to the source code*, and should instead be fulfilled through the provided configuration (.conf) file.
The table below describes the variables used in the configuration file.
| Variable Name | Description |
|---|---|
|
log_filename |
Name for the log file. |
|
log_size |
Maximum size for the log file. |
|
max_num_logs |
Number of logs kept in local directory. |
|
server |
Archer address / URL (e.g., www.archer-dev123.com) |
|
instance |
Archer instance (e.g., PROD) |
|
arch_username |
Username for the Service Account that will log into Archer |
|
cred_id |
Archer account identifier for any credential manager |
|
tpp_report_guid |
Report GUID for Third Party Profiles |
|
archer_to_corl_guid |
Report GUID for Engagements requiring an assessment request |
|
corl_to_archer_guid |
Report GUID for Engagements requiring updates from CORL |
|
module_tpp |
Third Party Profile application number |
|
module_eng |
Engagements application number |
|
module_con |
Contacts application number |
|
wsdl_accesscontrol |
Access Control WSDL for Archer Web Services |
|
wsdl_field |
Field WSDL for Archer Web Services |
|
wsdl_module |
Module WSDL for Archer Web Services |
|
wsdl_accessrole |
Access Role WSDL for Archer Web Services |
|
wsdl_general |
General WSDL for Archer Web Services |
|
wsdl_record |
Record WSDL for Archer Web Services |
|
wsdl_search |
Search WSDL for Archer Web Services |
|
vendor_mapping |
Field mapping between CORL API and Third Party Profile fields. Each mapping contains a GUID, and for fields being updated in the integration the field type ID is also listed. |
|
contacts_mapping |
Field mapping between CORL API and Contact fields. Each mapping contains a GUID, and for fields being updated in the integration the field type ID is also listed. |
|
engagement_mapping |
Field mapping between CORL API and Engagement fields. Each mapping contains a GUID, and for fields being updated in the integration the field type ID is also listed. |
|
corl_client |
CORL client-facing URL |
|
corl_api |
CORL API-facing URL |
|
corl_item_name |
Credential manager reference name |
|
key |
Credential manager key name |
|
score_tolerance |
Vendor search result tolerance level. This tolerance level can be any decimal value between 0 and 1. (examples: 0, .1, .45, 1) |
|
lookback |
Time filter on CORL results in Days. Must be an integer. |
CORL provides developer workspace access for creating and managing CORL API keys. Note that keys must be periodically refreshed. Follow the instructions below for generating a key. Additional instructions can be found here: https://corl-portal.zendesk.com/hc/en-us/articles/17437443600411-Creating-an-API-Key
-
Navigate to the “API Key Manager” page (https://uat-client.corltech.com/api-key-manager)
-
Login to Client portal (client.corltech.com)
-
Navigate to the “Help and Support” Page
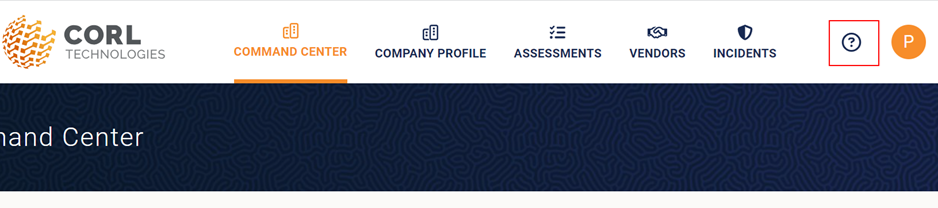
-
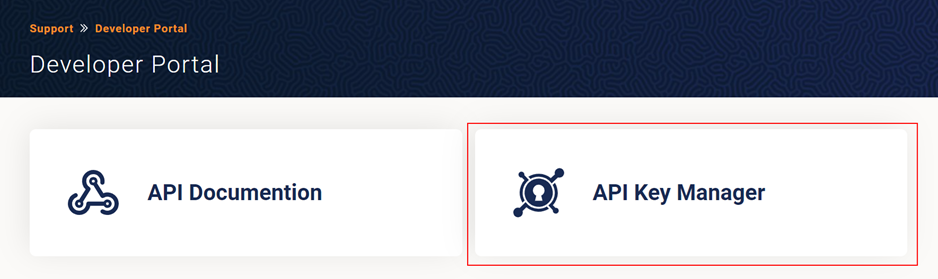
Navigate to the “Developer Portal”

-
Select “API Key Manager”
-
-
Create a new API Key for your corresponding system application
-
Select “Create New API Key”
-
Name your API key (the name is not used for anything by the CORL system)
-
-
Copy the API key value from the CORL portal to your application
Upgrading CORL Vendor Risk Management Integration
This chapter has been intentionally left blank and will be completed as updates have been made to this offering
Using CORL Vendor Risk Management Integration
Having a Third Party Profile record available is a prerequisite for requesting a new assessment in CORL. Outlined below are the steps required to create a new Third Party Profile.
Archer Third Party use case User:
-
Navigate to the Third Party Profile application:
-
Create a new record
-
Fill out the Vendor Name and Website
-
Click Save
-
-
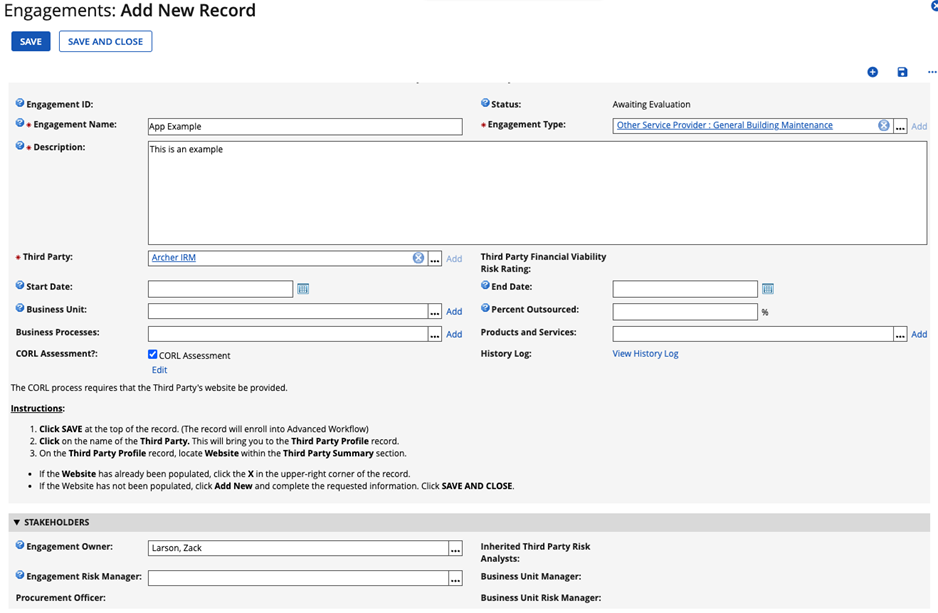
Create (or add) Third Party Contact Information
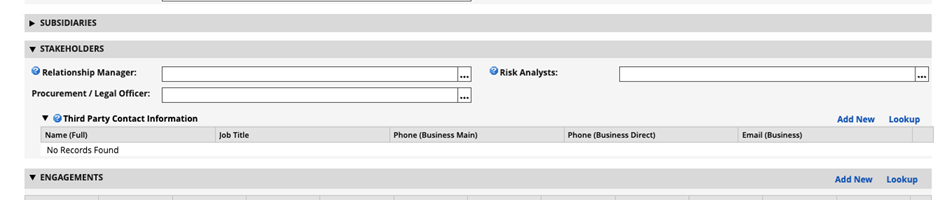
When adding a new contact, confirm the following fields are filled out:
-
Name (First)
-
Name (Last)
-
Email (Business)
-
Job Title
-
Phone (Business Main)

-
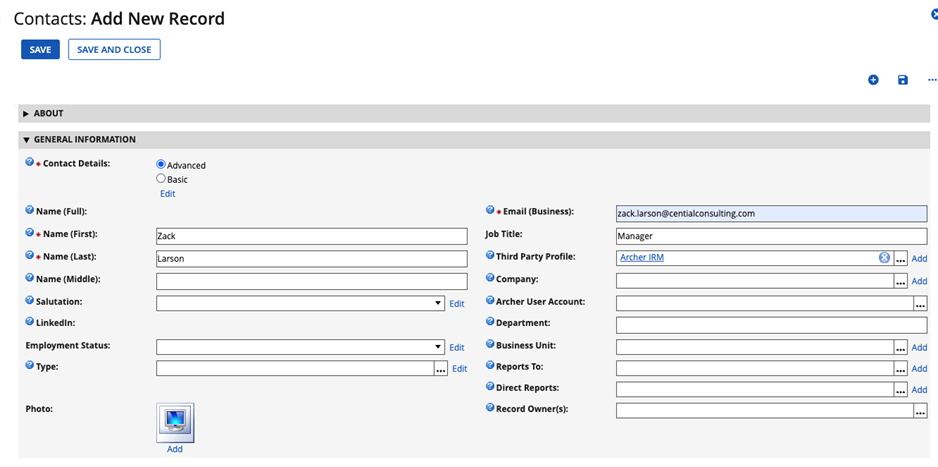
Navigate to Engagements:
-
Create a new record
-
Fill out any required fields but ensure the Engagement Name, Description, Third Party, and Engagement Owner have been provided.
-
Click the “CORL Assessment?” checkbox
-
Save the record
-
-
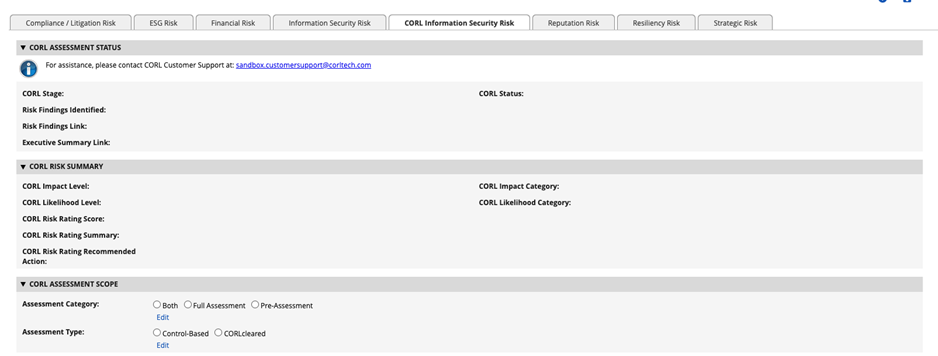
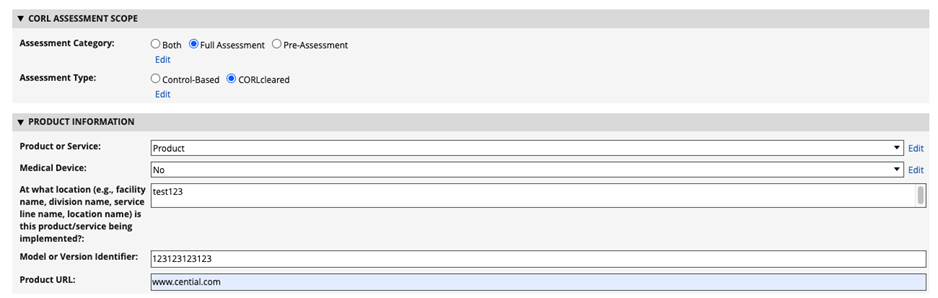
Scroll down and locate the CORL Information Security Risk tab
-
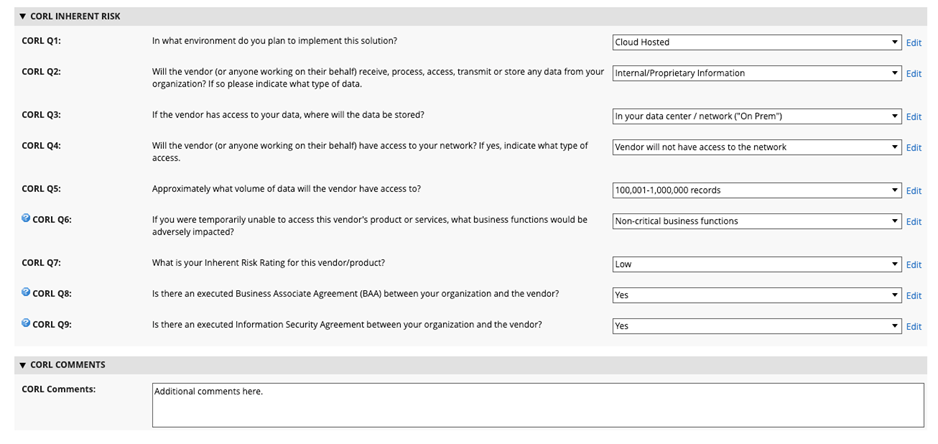
Complete the CORL Assessment Scope, Product Information, CORL Inherent Risk, and CORL Comments sections
-
Save the record
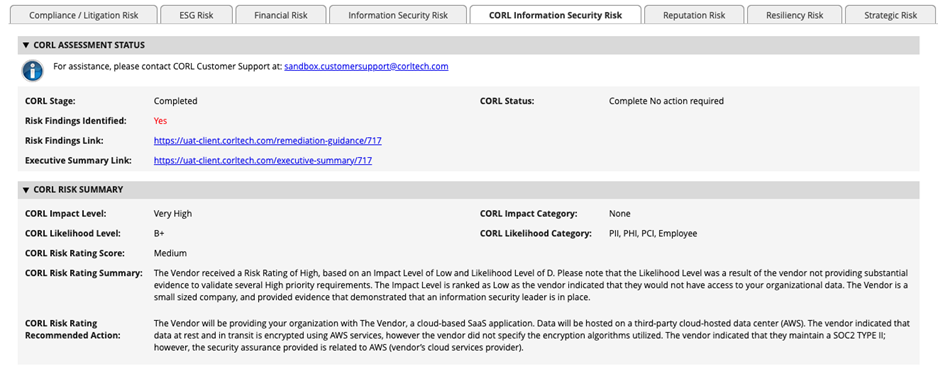
As results become available in CORL, they will be imported into the related Archer Engagement record.
Here is an example of what the results may look like in the CORL Assessment Status and CORL Risk Summary sections under the CORL Information Security Risk tab:
Certification environment
Date Tested: August 2024
|
Product Name |
Release Information |
Operating System |
|
Archer Suite |
2024.06 |
Virtual Appliance |
|
CORL |
- |
Virtual Appliance |