Demisto Enterprise
The Archer integration with Demisto enables better coordination and faster response to security incidents using Demisto orchestration playbooks. The integration provides analysts all the key information and prescriptive instructions they need to resolve incidents and can be used to maintain and close the Archer ticket as part of the resolution process.
On this page
Release history
Last updated: November 2017
Solution summary
|
Partner integration overview |
|
|---|---|
|
Archer Solution |
IT & Security Risk Management |
|
Archer Use Case |
Security Incident Management |
|
Archer Applications |
Security Incidents |
|
Uses Custom Application |
No |
|
Requires On-Demand License |
No |
Solution overview
Benefits
-
Out-of-the-box integration and sample playbooks to integrate with Archer for ticket management
-
Create, modify or close tickets and response playbooks through Demisto incident investigations
-
Fetch and respond to Archer application tickets as they are created using Demisto ultra-fast playbooks.
-
Demisto Enterprise integrates with Archer for the following use cases:
-
Runs queries on applications as well as records
-
Pull Archer ticket information as soon as its created in the system
-
Update Archer tickets with the required information back from Investigation.
-
-
Demisto comes preinstalled with the Archer integration which uses a mix of Archer Web Services (REST & SOAP) APIs to implement the following actions:
-
Creates a new content record in the given application.
-
Delete existing content record in the given application.
-
Gets all application fields by application ID.
-
Gets information about a content record in the given application.
-
Gets application details or list of all applications.
-
Search for records inside the given application.
-
Updates existing content record in the given application.
-
Returns mapping from list value name to list value ID.
-
Customers can connect to any Archer application and create, update and manage tickets using the integration.
-
Examples
The following are example scenarios for the integration between Demisto and Archer:
Get Archer tickets and alerts, related incidents using Demisto playbooks
Demisto polls Archer for new tickets every minute. Once a new tickets comes in, Demisto triggers a new incident, chooses a playbook according to incident metadata, and starts running it automatically. The playbook enriches the Archer Ticket Data for any external IP addresses and domains using reputation sources, cross-checks them against the internal IOC database aggregated from ISACs and threat feeds. If it sees any hits - the playbook will raise the severity of the incident.
To get Incidents, use the application ID for Security Incidents (application ID = 433 in this example)
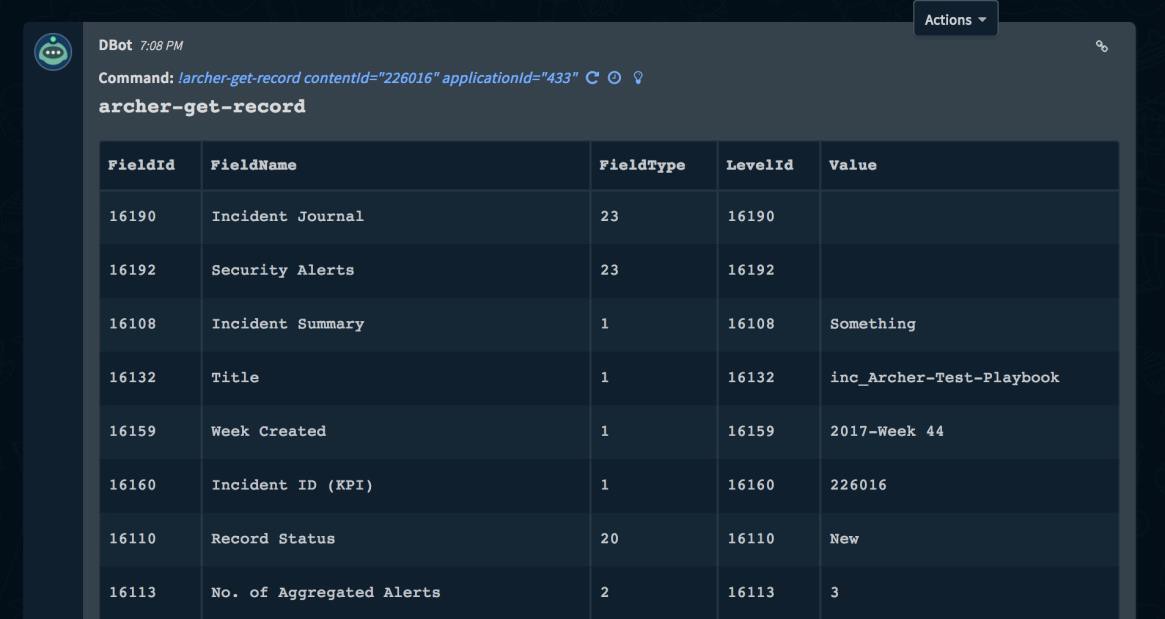
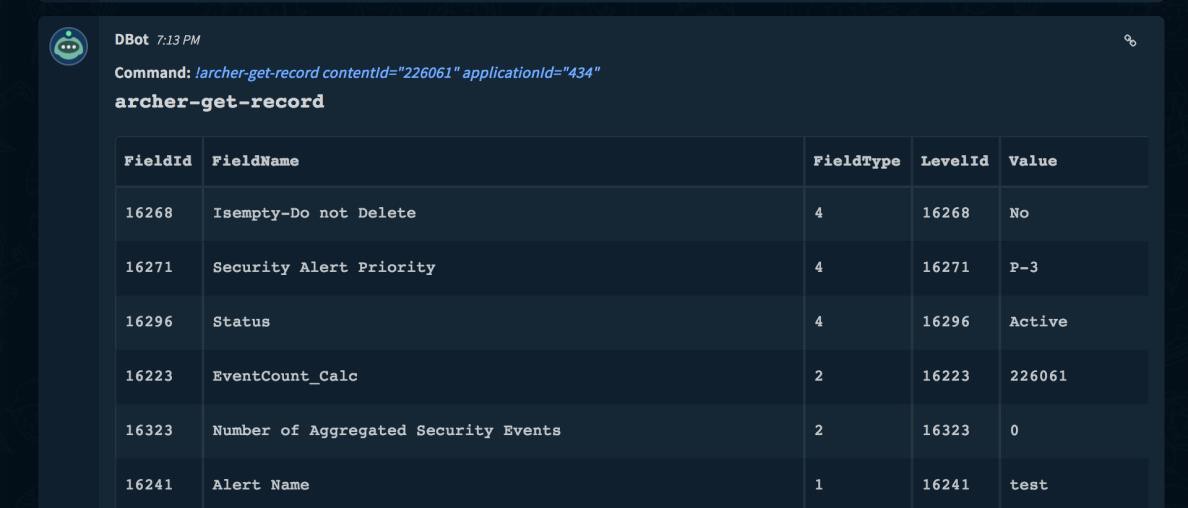
To get associated alerts, use the application ID for Security Alerts (application ID = 434 in this example) in `archer-get-record`
Update Archer Security Incidents
Information gathered from another alerting source can be used to create or update Archer Security Incidents:
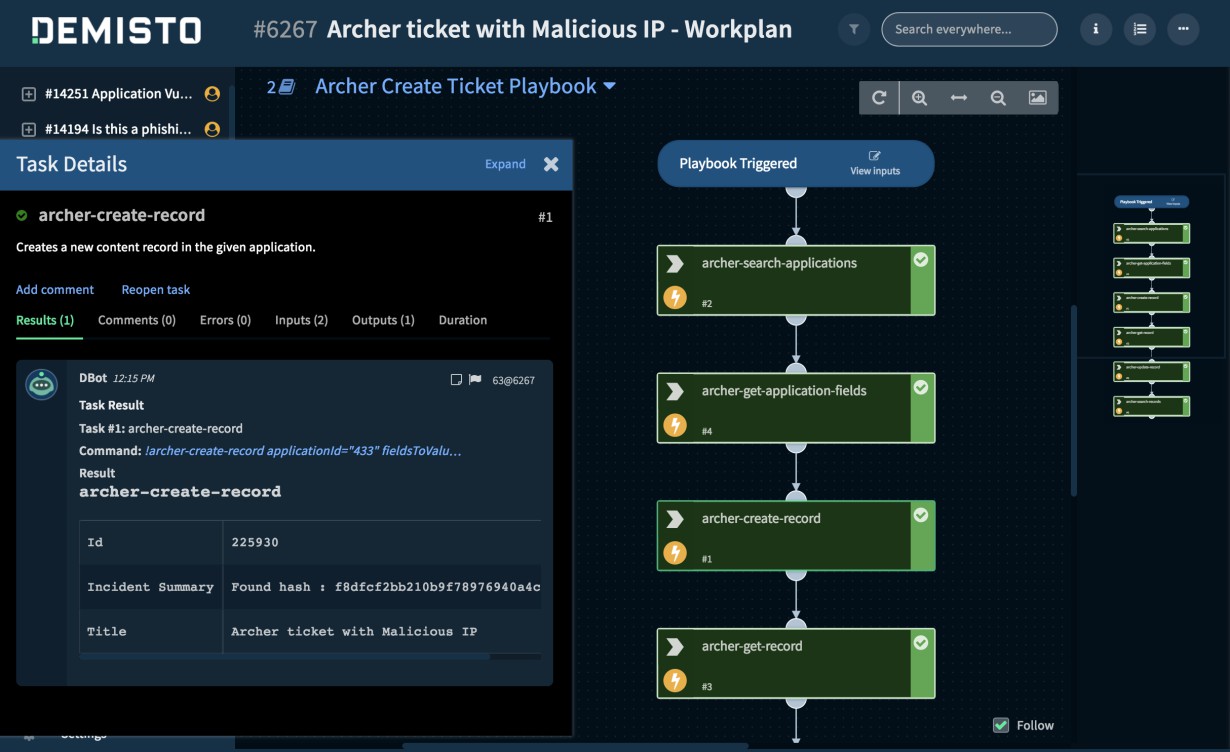
The output of the ticket creation task can be used in other related task like sending the responder of the ticket information an email with all the information that has been found.

Archer configuration
Before you begin
This section provides instructions for configuring Demisto with Archer. This document is not intended to suggest optimum installations or configurations.
It is assumed that the reader has both working knowledge of all products involved, and the ability to perform the tasks outlined in this section. Administrators should have access to the product documentation for all products to install the required components.
-
All Demisto and Archer components must be installed and working prior to the integration. Perform the necessary tests to confirm that this is true before proceeding.
-
Archer web services must be enabled for Demisto to use Archer REST and SOAP APIs;
-
The Archer account(s) must have appropriate role-permissions† to use the REST & SOAP APIs, as well as the Archer target application.
Important: The configuration shown in this Implementation Guide is for example and testing purposes only. It is not intended to be the optimal setup for the device. It is recommended that customers make sure Demisto Enterprise is properly configured and secured before deploying to a production environment. For more information, please refer to the Demisto Enterprise documentation or website.
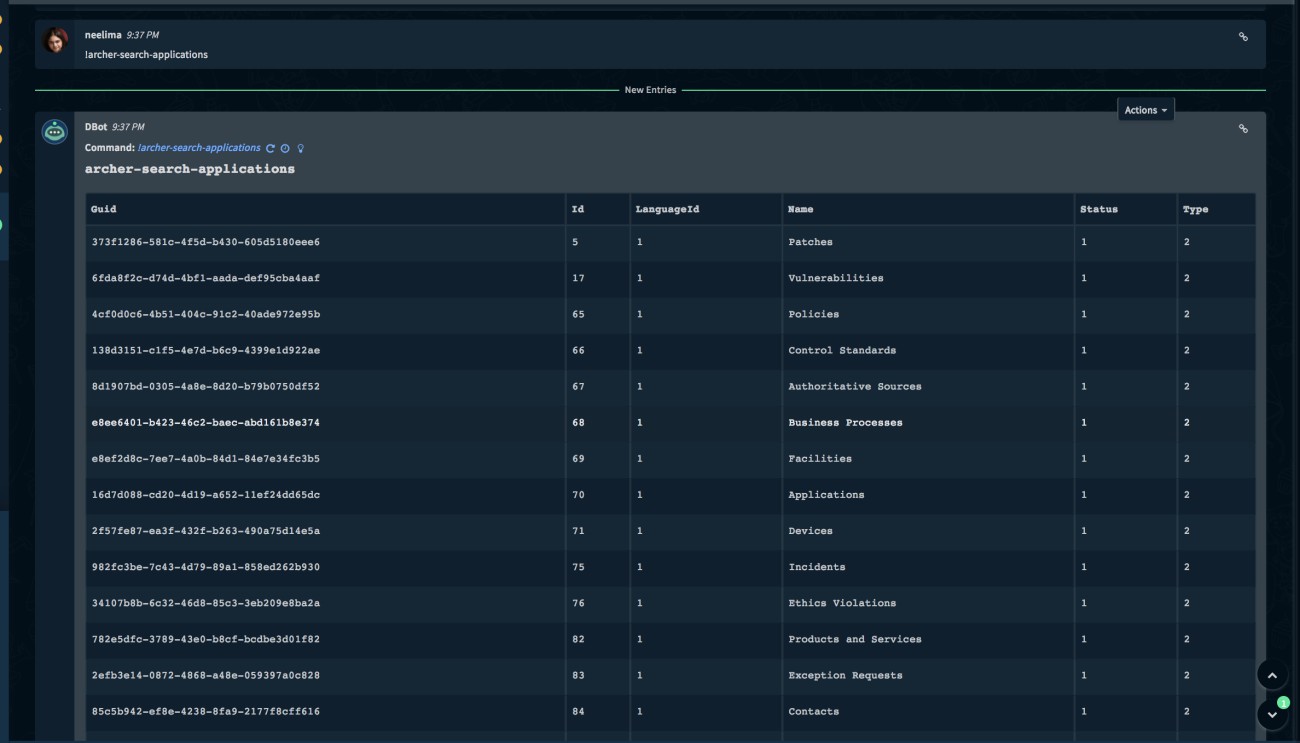
Archer offers several applications that are connected to each other using the application name and content id. Demisto provides commands to list all applications and then get associated records for each application. In many cases, Archer Applications are interconnected to each other. For instance, the Security Incidents application is an independent application from the Security Alerts application in Security Incidents UI. Associated alerts for a given incident can be referred to by using their own application number and unique IDs.
-
The application ID can be used to refer to unique records from each application like Security Incidents or Related Incidents.
-
Archer application names can be viewed in Archer by navigating to Administration > Application Builder > Manage Applications as well.
-
Each application has an identifying field, that can be captured by getting the list of applications and looking for ID=6.
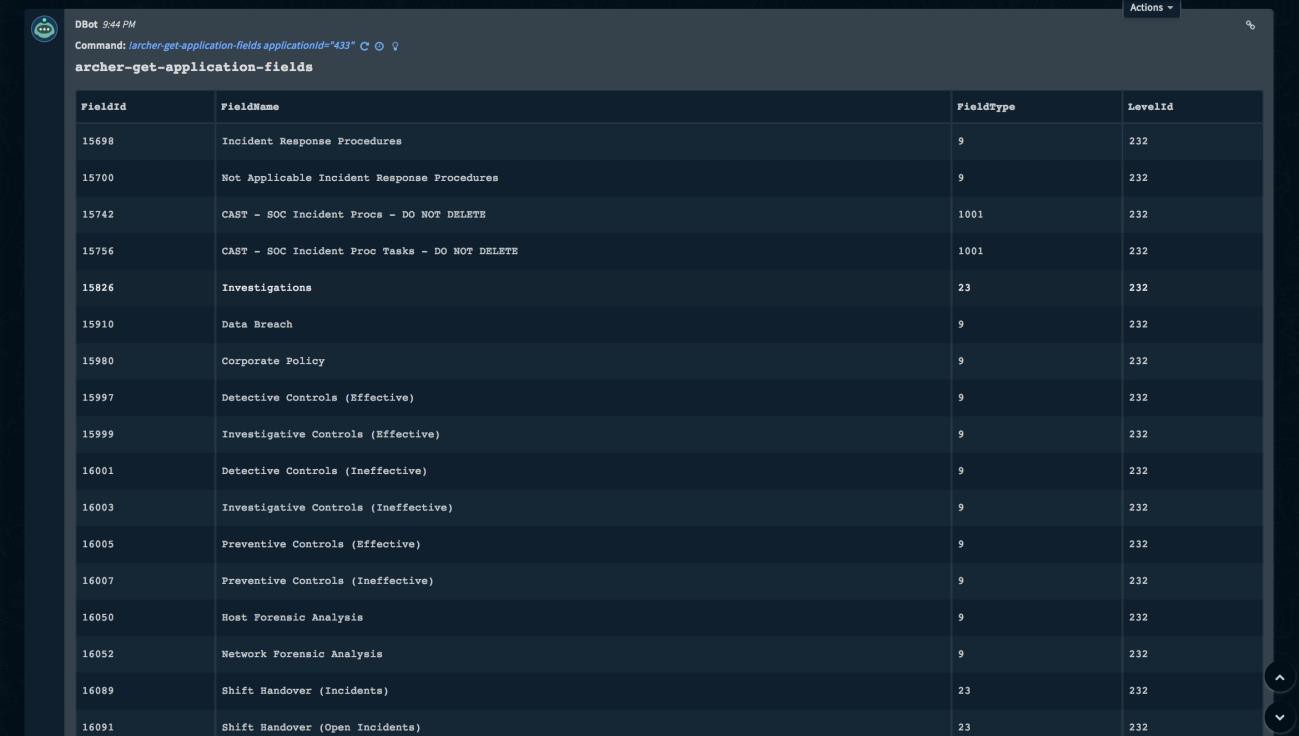
4. Application IDs, Application Names, Field IDs, etc. are all needed to configure the Archer integration in subsequent steps.
Demisto Enterprise configuration
-
Deploy Demisto Enterprise 3.x version and above.
-
Go to Settings > Integrations > Servers & Services.
-
Locate the Archer integration by searching for it using the search box on the top of the page.
-
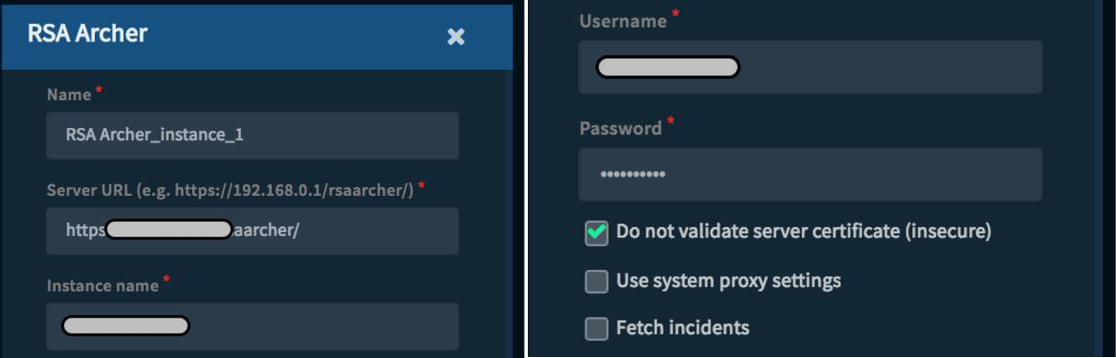
Click Add instance to create and configure a new integration. You should configure the following settings:
|
Name |
A textual name for the integration instance |
|---|---|
|
Server URL |
The server where the integration resides. |
|
Instance name |
A name for this instance of this integration. |
|
Username/Password |
Credentials for the Archer Instance |
|
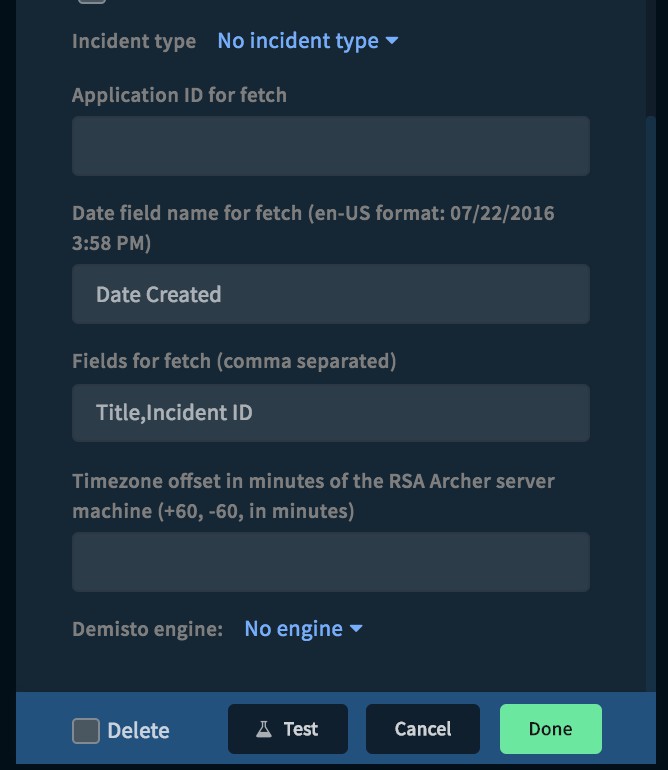
Fetch incidents |
Mark this option to fetch incidents from this integration. Set the Incident type that incidents from this integration will be regarded as along with the Application ID, Date field name, and Fields for fetch. |
|
Application ID for fetch |
Archer Application from which to fetch the Incidents from |
|
Date field name for fetch |
The fetch works on a time window. This field time value will be used to get the next set of incidents to be fetched |
|
Fields for fetch |
The fields of the incident to be fetched. If left empty all fields will be fetched. |
|
Timezone offset in minutes of the Archer server machine (+60, - 60, in minutes) |
Set the Incident time difference between the Archer server and the Demisto server if applicable. |
|
Do not validate server certificate |
Select to avoid server certification validation. You may want to do this in case Demisto cannot validate the integration server certificate (due to missing CA certificate) |
|
Use system proxy settings |
Use the proxy settings of the system to contact the Archer server. |
|
Demisto engine |
If relevant, select the engine that acts as a proxy to the server. Engines are used when you need to access a remote network segments and there are network devices such as proxies, firewalls, etc. that prevent the Demisto server from accessing the remote networks. For more information on Demisto engines see: https://demisto.zendesk.com/hc/en-us/articles/226274727-Settings-Integrations-Engines |
-
Press the Test button to validate the connection. After completing the test successfully, press the Done button.
-
Here you can see Archer command examples for assistance with configuring the integration. If you are experiencing issues with the service configuration, please contact Demisto support at support@demisto.com
-
Create Security Incident record with “Numeric” field:
!archer-create-record applicationId=433 fieldsToValues="{"Title" : ”<title>”, "Incident Summary" : ”<summary>”, ”Numeric" : "2"}"
-
Update Security Incident priority:
!archer-update-record contentId=<id> applicationId="433" fieldsToValues="{"Priority_Override" : [”P-0”], "Priority Override Justification" : ”<justification>”}”
-
Create record with “External Link” field:
!archer-create-record applicationId=433 fieldsToValues="{"Title" : ”<title>”, "Incident Summary" : ”<summary>”, "External Link" : [{"value" : ”<link title>”, "link" : ”<url>”}]}”
-
Create Incident Journal Entry: The command format for adding a journal entry to a specific security incident is as follows:
!archer-create-record applicationId="435" fieldsToValues="{"Journal Entry" : ”<text>”, "Security Incident" : [”<id of related security incident>”]}”
-
Certification environment
Date tested: October 2017
|
Product name |
Version information |
Operating system |
|---|---|---|
|
Archer |
6.2 |
Windows 2012 |
|
Demisto Enterprise |
3.0 |
|