EDCI
The EDCI Integration is an offering provided through the Archer Exchange to enhance your existing Archer implementation.
This integration is an offering provided through the Archer Exchange to enhance your existing Archer implementation. The Archer Exchange provides offerings to expand the use of Archer solutions into new business processes and address specific industry, geographic, regulatory, or technical requirements.
To learn more, see EDCI Integration on the Archer Exchange.
On this page
Release history
|
Release Version |
Published Date |
Notes |
|---|---|---|
|
Archer 2024.09 |
September 2025 |
The JavaScript Transporter in Data Feed Manager has been updated to use Fetch instead of Request. Fetch is a modern JavaScript API for making HTTP requests, offering a simpler and more powerful alternative to the older Request library. For more information, see the following blog post: Data Feed Manager JavaScript Transporter Scripts Require Update. |
|
Archer 2024.09 |
January 2025 |
Initial release. |
Overview
The ESG Data Convergence Initiative (EDCI) is an industry partnership for private equity firms. EDCI has developed a standardized set of metrics designed to help private equity firms collect and report ESG performance data across their investment portfolios. This framework provides a unified approach for the private equity industry to measure and communicate ESG performance of their portfolio companies.
Archer ESG Portfolio Management fully integrates the EDCI framework into its solution. The new EDCI Integration offering enables private equity clients, who are EDCI members, to automate the reporting of EDCI metrics directly from Archer ESG Portfolio Management. This integration includes API connectivity with EDCI, allowing private equity firms to efficiently collect, store, manage, and report their portfolio companies’ ESG metrics through Archer ESG Portfolio Management.
Key features and benefits
-
Enables automatic transfer of ESG data to EDCI for reporting via an established API
-
Provides streamlined integration capabilities with EDCI, allowing for the transmission of aggregated data for each portfolio company
Prerequisites (ODA and system requirements)
|
Components |
Prerequisites |
|
Archer Solution Area(s) |
ESG
|
|
Archer Use Case(s) |
Archer ESG Portfolio Management |
|
Archer Applications |
EDCI Annual Reports, Portfolio Company, ESG Portfolio Company Metrics, ESG Metric Results |
|
Uses Custom Objects |
No |
|
Requires On-Demand license |
No |
|
Archer requirements |
Archer 2024.09 and later |
|
Partner/Vendor Requirements |
You need credentials from EDCI to access the API functionality. You can request credentials at benchmarksupport@esgdc.org. |
Impacted use case(s)
|
Archer Use Case(s) |
|
Archer ESG Portfolio Management |
Components
Architecture diagram
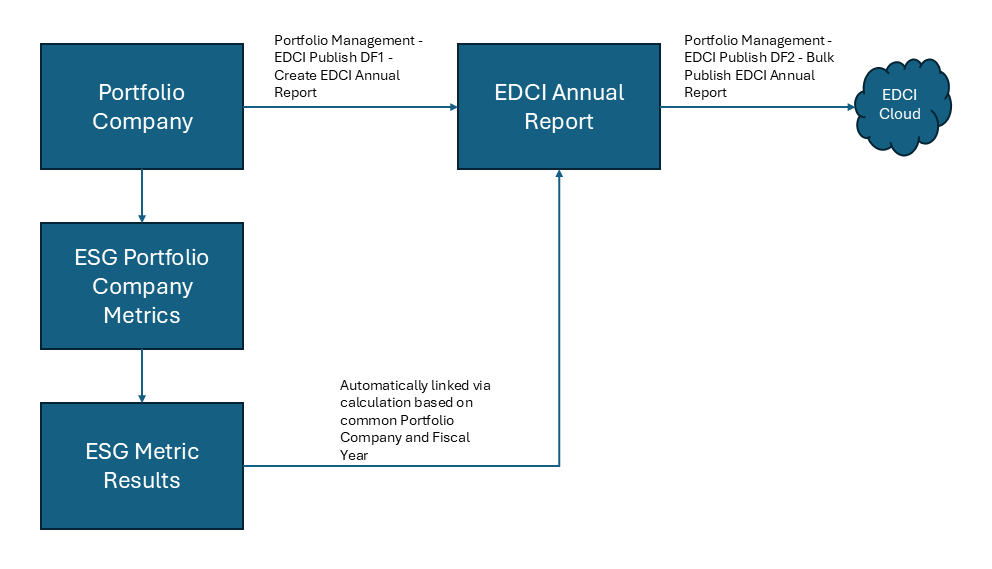
The following diagram shows the relationships between the applications that make up the EDCI integration.
Applications
|
Application |
Description |
|
EDCI Annual Reports |
Provides annual aggregation of EDCI Metrics of Portfolio Companies, including their emissions, energy consumption, and employee structure. Note: By default, the year runs from January to December, but this can be set in the Target Portfolio Company or the top-level General Partner record. |
Personas and access roles
| Persona | Description |
|---|---|
|
ESG Administrators |
Users responsible for the set up and day to day management of the ESG solution. These tasks include replicating the organization structure within the solution, setting up the users, making the required metrics available to the organization for collection, and sending out ad-hoc materiality assessments. |
|
ESG Executives |
Executives with responsibility for ESG and sustainability. Their focus is the reports that can be created from the ESG solution. These users use information obtained from the materiality assessment to decide which standards are most appropriate for the organization to use for ESG reporting. They can then use the reports to see how well the organization is tracking against its metric threshold targets at the individual facility, business unit, division, country, region, and overall organization levels. |
|
ESG Read-Only |
Users with read-only access to all levels of the ESG Management solution. |
Dashboard
|
Application |
Description |
|
EDCI Information |
Displays trends of energy consumption, GHG emissions, and employees grouped by FTE and leadership. |
Data Feeds
The use case provides the following data feeds. For instructions on setting up the feeds, see Setting Up Data Feeds.
|
Data Feed |
Description |
|---|---|
|
EDCI Publish DF1 - Create EDCI Annual Report |
This Archer-to-Archer feed creates new records in the EDCI Annual Reports application for portfolio companies. |
|
EDCI Publish DF 2 - Bulk Publish EDCI Annual Report |
This JavaScript feed publishes EDCI Annual Report records to EDCI. |
Installing and configuring the integration
Complete the following tasks to install the EDCI integration.
-
Ensure that your Archer system meets the following requirements:
-
Archer 2024.06 and later
-
-
Download the installation package from the Archer Community.
- Archer 2024.09 EDCI Integration Install Package.zip.
Note: The data feeds are included in the package file. The signed JavaScript file is a separate file.
-
Read and understand "Packaging Data" in the Archer Platform Help.
Step 2: Install the package
Installing a package requires that you import the package file, map the objects in the package to objects in the target instance, and then install the package.
There is no Undo function for a package installation. Packaging is a powerful feature that can make significant changes to an instance. Back up the instance database before installing a package. This process enables a full restoration if necessary.
An alternate method for undoing a package installation is to create a package of the affected objects in the target instance before installing the new package. This package provides a snapshot of the instance before the new package is installed, which can be used to help undo the changes made by the package installation. New objects created by the package installation must be manually deleted.
-
From the menu bar, click
 > Application Builder > Install Packages.
 - In the Available Packages section, click Import.
- Click Add New, then locate and select the package file that you want to import.
- Click OK.
The package file is displayed in the Available Packages section and is ready for installation.
Important: This step is required only if you are upgrading to a later version of the offering.
-
From the menu bar, click
> Application Builder > Install Packages. - In the Available Packages section, locate the package you want to map.
- In the Actions column, click
 for that package.
The analyzer examines the information in the package. The analyzer automatically matches the system IDs of the objects in the package with the objects in the target instance and identifies objects from the package that are successfully mapped to objects in the target instance, objects that are new or exist but are not mapped, and objects that do not exist (the object is in the target but not in the source).
When the analyzer is complete, the Advanced Package Mapping page lists the objects in the package file and corresponding objects in the target instance.
- On the Advanced Mapping page, click to open each category and review the icons next to each object to determine which objects you must map manually.
The following table describes the icons. Icon
Name
Description

Awaiting Mapping Review
Indicates that the system could not automatically match the object or one of its children to a corresponding object in the target instance.
Objects marked with this icon must be mapped manually.
New objects should not be mapped. Select Do Not Map from the drop-down menu to clear this icon for an individual object, or click Do Not Map to clear the icon for all unmapped objects.

Mapping Completed
Indicates that the object and all children are mapped to objects in the target instance, or that they have been marked as Do Not Map. Nothing more needs to be done with these objects in Advanced Package Mapping.
Note: You can run the mapping process without mapping all objects. The
icon is for informational purposes only. - For objects awaiting mapping review, do one of the following:
- To map each object individually, use the drop-down menu in the Target column to select the object in the target instance to which you want to map the source object. To leave an object unmapped, select Do Not Map in the Target column.
- To automatically map all objects in a category that have different system IDs but the same object name as an object in the target instance, click Auto Map. Select whether to ignore case and spaces when matching object names. Click OK.
- To mark all unmapped objects as Do Not Map, click Do Not Map.
-
(Optional) Click
 to enable filter fields that you can use to find specific objects in each mapping category. To undo your mapping selections, click Undo, then select whether to undo all mappings in the category or only the mappings on a single page. If you choose to undo all mappings, you will be returned to the categories list.
 - (Optional) To save your mapping selections and return to the categories list without committing changes to the target instance, click
 .
. - After you review and map all objects, click Execute.
- Select I understand the implications of performing this operation. Click OK.
When the mapping is complete, the Import and Install Packages page displays.
Important: Advanced Package Mapping modifies the system IDs in the target instance. You must update any Data Feeds and Web Service APIs that use these objects with the new system IDs.
All objects from the source instance are installed in the target instance unless the object cannot be found or is flagged to not be installed in the target instance. A list of conditions that may cause objects not to be installed is provided in the Log Messages section. A log entry is displayed in the Package Installation Log section.
- From the menu bar, click > Application Builder > Install Packages.
- In the Available Packages section, locate the package file that you want to install, and click the file name or
 at end of the row to open the Options menu.
 - In the Selected Components section, click the Lookup button to open the Package Selector window.
- To select all components, select the top-level checkbox.
- To install only specific global reports in an already installed application, select the checkbox associated with each report that you want to install.
Note: Items in the package that do not match an existing item in the target instance are selected by default.
- Under the Translation Option drop-down menu, select an option for each selected component. To use the same Translation Option for all selected components, select a method from the top-level drop-down list.
The Translation Option is enabled only when a language is selected.The following table describes the options. Option
Description
Full Install
Installs the component and its translations from the selected languages.
Translations Only
Only installs the translations from the selected languages.
- Under the Install Method drop-down menu, select an option for each selected component. To use the same Install Method for all selected components, select a method from the top-level drop-down list.
The following table describes the options. Option
Description
Create New Only
Only creates new fields and other elements in the applications, questionnaires, workspaces, data feeds, and dashboards specified in the package file. This option does not modify any existing elements on your instance of Archer. This is useful when you want to add functionality to an existing application, questionnaire, workspace, dashboard, data feed, or access role, but you do not want to risk making any unwanted changes to the existing elements of workspaces, data feeds, or dashboards.
Note: The Create New Only option does not apply to access roles or languages.
Create New and Update
Updates all elements in the applications, questionnaires, workspaces, data feeds, and dashboards as specified in the package file. This includes adding new elements and updating existing elements.
Note: The Create New and Update option does not apply to access roles or languages.
- Under the Install Option drop-down menu, select an option for each selected component. To use the same Install Option for all selected components, select an option from the top-level drop-down list.
The following table describes the options. Option
Description
Do not Override Layout
Installs the component, but does not change the existing layout. This is useful if you have a lot of custom fields and formatting in your layout that you do not want to risk losing.
You may have to modify the layout after installing the package to use the changes made by the package.
Note: The Do not Override Layout option does not apply to access roles or languages.
Override Layout
Updates the layout as specified in the package file, overwriting the existing layout.
Note: The Override Layout option does not apply to access roles or languages.
- Click Continue to advance to the next object category in the Package Selector, and repeat steps 4 to 6. After reviewing all object categories, click OK.
- To deactivate target fields and data-driven events that are not in the package, in the Post-Install Actions section, select the Deactivate target fields and data-driven events that are not in the package checkbox. To rename the deactivated target fields and data-driven events with a user-defined prefix, select Apply a prefix to all deactivated objects, and enter a prefix. This can help you identify any fields or data-driven events that you may want to review for cleanup post-install.
- Click Install.
- Click OK.
-
From the menu bar, click
> Application Builder > Install Packages. - In the Package Installation Log section, click the package that you want to view.
- In the Package Installation Log page, in the Object Details section, click View All Errors.
Note: To view individual logs, in the Errors column of the log you want to view, click the Failures link or Warnings link. Clicking View All Errors, Failures, or Warnings opens the specific errors on a different page.
- Click the Export icon to export the log file.
- Click Close.
For a list of packaging installation log messages and remediation information for common messages, see Package Installation Log Messages.
Step 3: Set up the data feed
-
From the menu, click
> Integration > Data Feeds. -
If you did not install the data feeds through the package, import the file.
- On the data feed listing page, click
 .
. - Locate and select the .dfx5 file for the data feed.
- On the data feed listing page, click
- Select the data feed you want to configure.
-
On the General tab, in the General Information section, select Active.
-
On the Source Connection tab, follow the set of steps below based on the transport type.
Note: Before you upload a JavaScript file, you must configure the JavaScript Transporter settings in the Archer Control Panel. For more information, see "JavaScript Transporter Settings" in the Archer Control Panel Help.
-
In the Transport Configuration section, select the JavaScript file you want to upload.
Archer provides a JavaScript sample in the Transport Configuration section, describing each part of the script, and how to configure each part for your environment.
-
From the Transport Configuration section, click
-
In the Upload JavaScript File dialog, click Add New.
-
Navigate to and select the applicable JavaScript file below and click Open.
-
EDCI_Ingress_1.0.0.js
-
-
In the Upload JavaScript File dialog, and click OK.
-
-
Important: If the JavaScript Transporter has been set up in the Archer Control Panel to only allow digitally signed JavaScript files from trusted sources, you can only select digitally signed JavaScript files from trusted sources. For more details, see "Configuring JavaScript Transporter Settings" in the Archer Control Panel Help.
-
In the Custom Parameters section, enter the following custom parameters you want to reference within the selected JavaScript file.
The following table lists the data feed custom parameters for the feed. Key
Value
baseUrl
[Insert the base URL of your Archer instance]
archerUser
[Insert user account name that has read access to all EDCI Annual Report records]
archerPass
[Insert password for the archerUser account name]
archerInstance
[Insert the name of your Archer instance]
edciUrl
[Insert the EDCI API URL]
ousername
[Insert the OAuth username that you received from ECDI]
opassword
[Insert the OAuth password that you received from ECDI]
gpname
[Insert the GP name value that you received from ECDI]
gpkey
[Insert the GP key value that you received from ECDI]
ingressEndpoint
This value comes prepopulated in the feed.
-
The following table lists additional valid custom parameters. Key
Type
Value
verifyCerts
N/A
[true] or [false]
By default, this value is set to true. If you have configured Archer to use HTTPS, and the SSL certificate is self-signed or is another form of non-perfected SSL certificate from a top tier Certificate Authority, you must set this value to false.
-
Click the Data Map tab, then click the Field Map and Key Field Definitions tabs.
-
The data feed might map to objects and key fields in applications that you do not have licensed. Clicking on the Field Map and Key Field Definitions tabs allows the system to resolve these mappings.
A data feed must be active and valid to successfully run. A successful data feed run processes all input data, completes all expected record updates, and does not report any failures in the Run Details Report.
Validating a data feed
The Data Feed Manager validates the information when a data feed is scheduled. If any information is invalid, the data feed displays an error message. You can save the data feed and correct the errors later, but the data feed does not process until you make corrections.
Running a data feed
You can set up data feeds to run automatically at regular intervals. This reduces the time and effort required to import data from an external file.
You can initiate data feeds at various times and configure them to run in regular increments for an indefinite period of time.
You can run the data feed immediately.
To prevent excess server load, schedule data feeds on a staggered basis. Archer recommends scheduling a maximum of 10 data feeds to run at a time.
Setting up a reference data feed
A reference feed allows you to specify another feed. This indicates to the Data Feed Service that this feed will start running as soon as the referenced feed completes successfully.
-
Go to the Run Configuration tab > Schedule section.
-
Do one of the following to schedule your data feed.
-
Run on Schedule. You can configure your data feed to run on a defined schedule.
-
Run After. The Data Feed Services starts the current data feed after the referenced data feed completes successfully.
-
Run Now.
-
- Save the feed.
Step 4: Test the installation
Test the application according to your company standards and procedures, to ensure that the use case works with your existing processes.
Using the integration
The data in an EDCI Annual Report record is calculated based on underlying metric results that match both the portfolio company and the fiscal year.
- In the Portfolio Company application, verify that you have completed records for each portfolio company for which you want to create an EDCI Annual Report record.
- In any Portfolio Company record, click Initiate EDCI Functionality.
- From the Actions menu, select Create EDCI Annual Reports.
-
The "Portfolio Management - EDCI Publish DF1 - Create EDCI Annual Report" data feed runs and creates EDCI Annual Reports records for each active portfolio company as follows:
-
If a new portfolio company has an Initial Investment Year set, the feed will create reports for each year from the initial investment year through the current fiscal year.
-
If a new portfolio company does not have an Initial Investment Year set, the feel will create a report only for the current fiscal year.
-
For existing portfolio companies, the feed will create reports for the current fiscal year.
Note: The fiscal year is calculated based on the Fiscal Year Starting Month field, which can either be set in the Data Gathering Program record (where it is called Program Fiscal Year Starting Month) or in individual Portfolio Company records.
-
Each EDCI Annual Report record has a "Stage for Publish" field which defaults to "No".
When you're ready to send annual reports to the EDCI portal, set this field to "Yes" and the report will be processed by the "Portfolio Management - EDCI Publish DF2 - Bulk Publish EDCI Annual Report" data feed.
Note: You can inline edit this field or update it in bulk from the Search Results page.
When the feed runs, it automatically includes any other EDCI Annual Reports for the same fiscal year to ensure that all data for a given year is submitted.
Troubleshooting the integration
|
Error |
Resolution |
|---|---|
|
ERROR,Failed to Authenticate to Archer, Check Archer Credentials |
Verify the baseUrl, archerUser, archerPass, and archerInstance parameters that you entered in Set up the data feeds. |
|
Error: Received Webcall Error, Check EDCI Url |
Verify the edciUrl parameter that you entered in Set up the data feeds. |
|
Error: Error Publishing Records to EDCI Url. Error: Received 401 Unauthorized Error from Ingress Endpoint, Check EDCI Credentials: {"error":false,"message":"You are not authorised to access this resource"},Datafeed Failure due to error. |
Verify the ousername and opassword parameters that you entered in Set up the data feeds. |
|
Error: Error Publishing Records to EDCI Url. Error: Received 400 Error from Ingress Endpoint, Check EDCI GPName Credential: {"error":true,"message":"Invalid GP Key - Name combination"},Datafeed Failure due to error. |
Verify the gpname parameter that you entered in Set up the data feeds. |
|
Error: Error Publishing Records to EDCI Url. Error: Received 403 Forbidden Error from Ingress Endpoint, Check EDCI GPKey/Ingress Endpoint Url: {"error":true,"message":"You do not have enough permissions to access this resource"},Datafeed Failure due to error. |
Verify the gpkey parameter that you entered in Set up the data feeds. |
|
Error: Error Publishing Records to EDCI Url. Error: Received 403 Forbidden Error from Ingress Endpoint, Check EDCI GPKey/Ingress Endpoint Url: {"message":"Missing Authentication Token"},Datafeed Failure due to error. |
Verify the ingressEndpoint parameter that you entered in Set up the data feeds. |
|
datasetVersion field is required |
Missing datasetVersion |
|
uploadYear field is required |
Missing uploadYear |
|
companyID field is required |
Verify that the Company ID field is populated. |
|
year field is required |
Verify that the Year field is populated. |
|
year must be a valid year |
Verify that the Year field is set to a valid year. |
|
fundID field is required |
Verify that the Fund ID field is populated. |
|
percentGPOwnership field must be a value between 0 and 1 |
Verify that the Percent of GP Ownership field is set to a value between 0 and 1. |
|
percentFundOwnership field must be a value between 0 and 1 |
Verify that the Percent Fund Ownership field is set to a value between 0 and 1. |
|
primarySector field must be one of 'Consumer Goods, Extractives & Minerals Processing, Financials, Food & Beverage, Health Care, Infrastructure, Renewable Resources & Alternative Energy, Resource Transformation, Services, Technology & Communications, Transportation' invalid primarySector submitted for primaryIndustry |
Verify that the Primary Sector field is set to a valid value. |
|
primaryIndustry field must be one of: Advertising & Marketing, Aerospace & Defense, Agricultural Products, Air Freight & Logistics, Airlines, Alcoholic Beverages, Apparel, Accessories & Footwear, Appliance Manufacturing, Asset Management & Custody Activities, Auto Parts, Automobiles, Biofuels, Biotechnology & Pharmaceuticals, Building Products & Furnishings, Car Rental & Leasing, Casinos & Gaming, Chemicals, Coal Operations, Commercial Banks, Construction Materials, Consumer Finance, Containers & Packaging, Cruise Lines, Drug Retailers, E-commerce, Education, Electric Utilities & Power Generators, Electrical & Electronic Equipment, Electronic Manufacturing Services & Original Design Manufacturing, Engineering & Construction Services, Food Retailers & Distributors, Forestry Management, Fuel Cells & Industrial Batteries, Gas Utilities & Distributors, Hardware, Health Care Delivery, Health Care Distributors, Home Builders, Hotels & Lodging, Household & Personal Products, Industrial Machinery & Goods, Insurance, Internet Media & Services, Investment Banking & Brokerage, Iron & Steel Producers, Leisure Facilities, Managed Care, Marine Transportation, Meat, Poultry & Dairy, Media & Entertainment, Medical Equipment & Supplies, Metals & Mining, Mortgage Finance, Multiline and Specialty Retailers & Distributors, Non-Alcoholic Beverages, Oil & Gas - Exploration & Production, Oil & Gas - Midstream, Oil & Gas - Refining & Marketing, Oil & Gas - Services, Processed Foods, Professional & Commercial Services, Pulp & Paper Products, Rail Transportation, Real Estate, Real Estate Services, Restaurants, Road Transportation, Security & Commodity Exchanges, Semiconductors, Software & IT Services, Solar Technology & Project Developers, Telecommunication Services, Tobacco, Toys & Sporting Goods, Waste Management, Water Utilities & Services, Wind Technology & Project Developers |
Verify that the Primary Industry field is set to a valid value. |
|
currency field must be a valid ISO 4217 (3 characters currency code) |
Verify that the Currency field value is a valid ISO 4217 (3 character currency code) |
|
employeeSurvey field must be one of 'Y, N' |
Verify that the Employee Survey field is set to either Y or N. |
|
countryOfOperations field must be a valid country |
Invalid countryOfOperations Verify that the Country of Operations field is set to a valid country. |
|
countryOfDomicile field must be a valid country |
Verify that the Country of Domicile field is set to a valid country. |
Certification environment
Date Tested: September 2025
|
Product Name |
Version Information |
Operating System |
|
Archer |
2024.09 |
Virtual Appliance |