Everbridge
Everbridge is a world leading mass notification system. It allows instant notifications to be sent to contacts and groups, through different channels of communication like Email, Phone, SMS, and many more. The integration between Everbridge and Archer allows the creation and firing of Everbridge notifications from within the Archer Framework UI.
On this page
Revision notes
|
Document Version |
Published Date |
Notes |
|---|---|---|
|
1.0 |
November 2018 |
Initial Version |
|
1.1 |
February 2019 |
Show/Hide Credentials button removed to obscure/mask the user password. |
Solution summary
The integration between Everbridge and Archer is broken into multiple components:
Contacts Synchronization: This process synchronizes the notification contacts from Archer into Everbridge. Contacts are uploaded using the Everbridge API, via a CSV file that is exported from Archer.
Notification Creation and Firing: This real time integration component allows the authorized users to create and send immediate notification from within the Archer Framework.
Notification Response Update: This process updates the Archer framework with the results and responses summary of the notifications.
|
Partner Integration Overview |
|
|---|---|
|
Archer Solution |
Business Resiliency |
|
Archer Use Case |
Crisis Management |
|
Archer Applications |
Contacts, Emergency Notifications and Call Trees, Notification History, Crisis Events, Incidents |
|
Uses Custom Application |
Notification Recipient |
|
Requires On-Demand license |
Yes, 1 ODA |
Archer configuration
Before you begin
This section provides instructions for configuring Everbridge with Archer. This document is not intended to suggest optimum installations or configurations.
It is assumed that the reader has both working knowledge of all products involved, and the ability to perform the tasks outlined in this section. Administrators should have access to the product documentation for all products in order to install the required components.
All Everbridge components must be installed and working prior to the integration. Perform the necessary tests to confirm that this is true before proceeding.
Important: The interoperability described in this guide is provided as a reference. If attempting the integration 1) you should have extensive prior experience both working with the Everbridge API and troubleshooting custom integration code, and/or 2) have enlisted the assistance of Archer Professional Services for implementation.
Installing the Everbridge application package
The first step in enabling the Everbridge integration is to install the Everbridge Application Package that makes changes to some of the out of the box Archer applications in the Business Resiliency use case. To do this, perform the following steps:
-
Login into Archer. Go to Administration > Application Builder > Install Packages.
-
Click Import… Add New, and browse to the Everbridge Applications package file (Everbridge_Integration_installer_2016_v6.zip).
-
Review the Package Mapping settings and resolve any conflicts. It may not be possible to resolve 100% of the warnings due to custom fields, etc.
-
Click the Install button to install the package. Choose the Create New and Override Layout options for all items.
Important: You may see one or more errors when importing the application package. If this happens, re-run the package import.
Once the application package import is complete, there are additional required steps within Archer to configure applications and reports.
Configuring Archer applications
There are two Archer applications that are used in this part of the integration.
-
The Contacts application.
-
The Task Management application.
In this section, we will discuss only the fields and settings we need to setup as well as the reports in the Contacts application. Details about using this data in the integration utilities will be provided in later sections. Also of note in this section are the steps for finding Application, Field, and Values List IDs that are needed in the configuration utility.
Steps for finding Application, Field, and Values List IDs
Application
To find an Application ID, such as the ID for the Contacts application, browse to Administration > Application Builder > Applications. Hover/mouse over the application name, and the ID will be displayed in the lower right corner:

Field
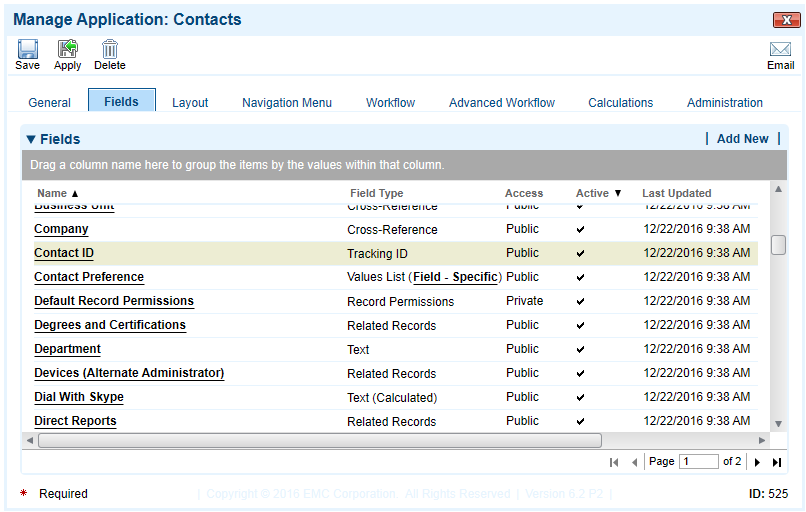
To find a Field ID, click on the application name in Manage Applications and go to the Fields tab Hover/mouse over the field name, and the ID will be displayed in the lower right corner:
Values List ID
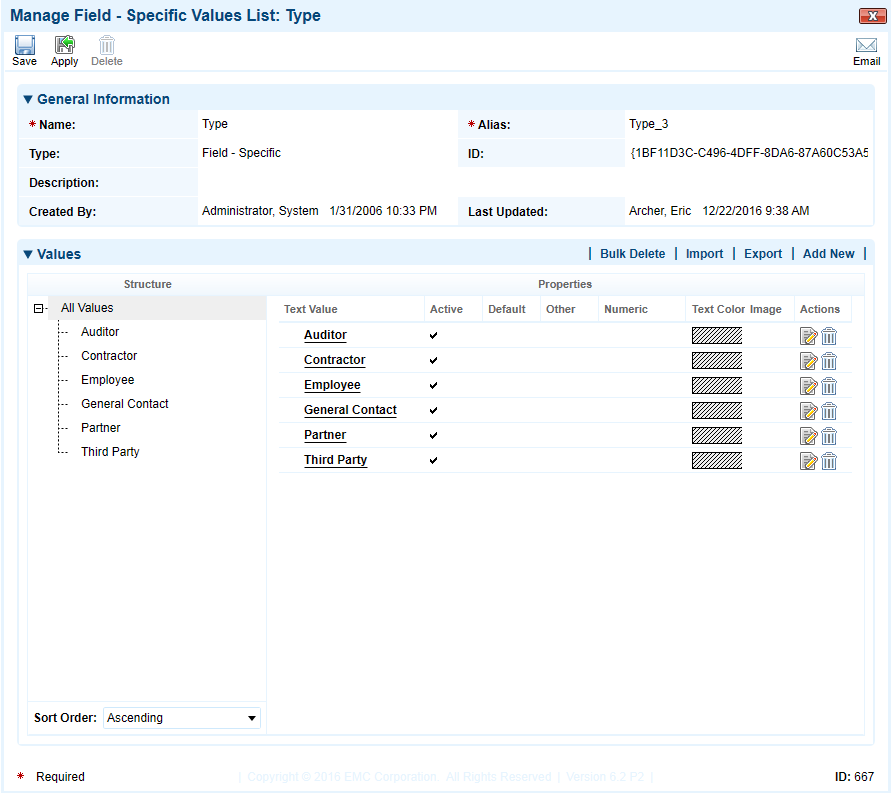
To find a Values List ID click the Field Specific or Global link (still from the Fields tab), which will allow you to go to the Values. Hover/mouse over the value name, and the ID will be displayed in the lower right corner:
Contacts application
This application contains the fields required in the CSV upload file. The fields will need to be identified and pulled in reports that identify the new and updated contacts. You will use an XSLT template to correctly create the CSV files that used to upload the contacts. For processing and setting up the integration utilities correctly, you will need the following information from the Contacts application:
-
Contacts Application ID: This is the numeric id for the Contacts application.
-
External ID Field: This is the numeric id for the External ID field in the Contacts application.
Important: This field is required, and MUST be populated for all users. One likely candidate for this field is the Contact ID field as this is a sequence id that is present for all contact records.
-
Everbridge ID Field: This is a text field that is used to identify if the contact is in Everbridge or not. Create this text field manually in the Contacts application.
Task management application
This application is used to notify administrators about any processing errors. It will create a Task Management record and attach all error processing results files to the record. The following fields are needed when preparing this application to be used by the integration.
-
Task Management Application ID: This is the numeric ID for the Task Management application.
-
Attachment Field ID: This is the attachment field that will be used to upload the error processing files.
-
Other Required Fields: Go to the Layout section of the Task Management application and make note of any other required fields. You will need to make note of the Field IDs for those fields as well.
Configuring Archer reports
There are two reports that need to be created as part of this integration. These reports will need to have a matching structure/layout, so it is recommended that you build one of the reports to your satisfaction, and then use that report as a template for building the other report, by changing the filters as needed. The reports will need to identify ALL fields needed in the CSV file.
-
New Contacts Report: This report identifies all new contacts that have not been created in Everbridge. The records are identified through the field Everbridge ID that mas manually create above. The search criteria are simple. If the field is blank, then the record is new.
-
Update Contacts Report: This report is exactly the same as the New Contacts Report. However, the criteria are different. It is recommend to pull records that were updated only since the last time the integration code ran (with some overlapping if needed). For example. this is a filter that pulls records that were updated in the last 2 days:
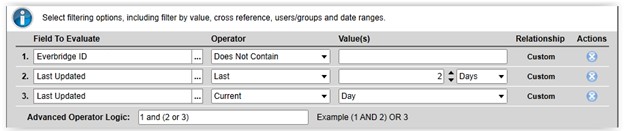
If you do not want any date limitation, delete filters 2, 3 and remove the Advanced Operator Logic. The main filter should not be changed. The report will need to pull records that are already in Everbridge. So the Everbridge ID (or whatever you called it) must not be blank.
You will need to obtain the GUIDs for each report. This is done by copying the GUID ID while saving the report:
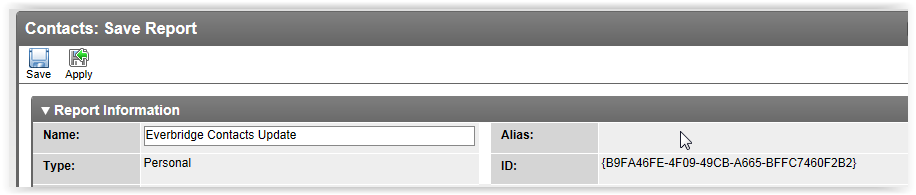
Make sure you do not copy the braces surrounding the GUID value. In the example above, the GUID is B9FA46FE-4F09-49CB-A665-BFFC7460F2B2. Save the GUIDs for each report for later use when populating the profile using the integration utility.
Everbridge contacts upload
Everbridge integration setup utility
Once you have finished preparing the Archer environment for integration, the next step is to begin working with the actual integration utilities. The first of these is the Everbridge Integration Setup utility (EverbridgeIntegrationUtility.exe). The setup utility contains the following four tabs, each of which is described in detail below:
Instance Notification & Results Setup
Resolve Applications and Fields
Important: The Everbridge Integration Setup utility (EverbridgeIntegrationUtility.exe) MUST always be run with full administrative rights. To do this, right-click on the executable and select Run as administrator.
Instance upload XSLT setup
This tab identifies all the fields and objects that will be used in the CSV file. Once the fields are identified, you can generate a shell XSLT template with all the fields that will be used in the CSV file.
Note: That there is not a precise 1-1 mapping between Everbridge field names and Archer field names, so this mapping is handled in the XSLT file itself.
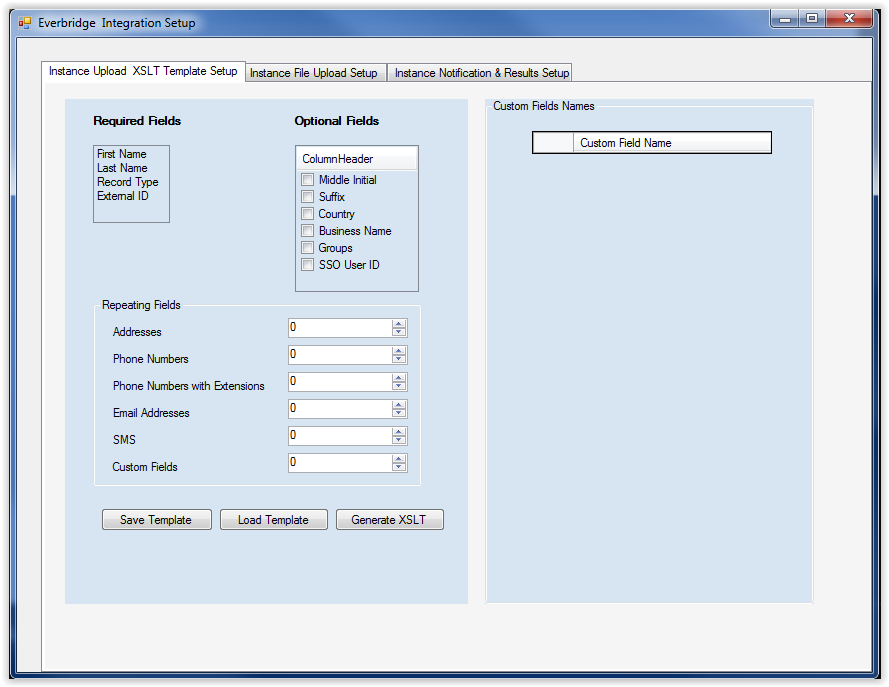
There are several components of this screen:
Required fields: These fields are required and will be included in the CSV file. You cannot select or deselect these 4 fields. The fields are:
-
First Name
-
Last Name
-
Record Type.
-
External ID
Optional Fields: This set of fields is optional. To include a field in the CSV file, just check the field.
-
Middle Initial.
-
Suffix
-
Country
-
Business Name
-
Groups
-
SSO User ID
Repeating Fields: This set of fields/objects can have multiple occurrences in the CSV file. Each occurrence will have a unique name (usually a sequence number added to the field or object name). To select a field or object, simply click on the numeric up or down arrows to select the number of occurrences. Each numeric control has a limit to how many occurrences are allowed.
-
Addresses: This object has a maximum occurrence of 5.
-
Phone Numbers: This object has a maximum occurrence of 6.
-
Phone Numbers with Extensions: This object has a maximum occurrence of 5.
-
Email Addresses: This field has a maximum occurrence of 3.
-
SMS: This object has a maximum occurrence of 2.
-
Custom Fields: This object has a maximum occurrence 20. Once you have selected the number of custom fields, you will need to enter the fields’ names exactly as they exist in Everbridge. You will enter the fields’ names in the grid on the right side of the screen. For example, if you entered 2 custom fields’, the grid will display 2 rows that need to be populated.
-
Save Template: This action allows you to save your settings in a JSON file. The default folder is the UploadFileSettings folder within the tool’s folder.
-
Load Template: This action allows you to load a saved template for updates or review. The default folder is the UploadFileSettings folder within the tool’s folder.
-
Generate XSLT: This option generate the files needed for uploading the CSV files using the EvervridgeContactsUpdate.exe tool. The action generates 2 files that are saved in the XSLT_Files folder within the tool’s folder. The action will ask you to name the file. The file name MUST be the instance name. Consult the next section for important information on the structure of the XSLT file and how it should be used.
XSLT files
Before proceeding to the second tab, you must ensure that the XSLT template is generating the upload CSV in the expected format. This will normally require additional manual editing of the XSLT file itself. The mapping relationship is established between the Everbridge field names to Archer fields by using the Archer field GUID. For example, here are the XSLT entries for the First Name and Last Name required fields:
<!-- Template for field : First Name Field is required -->
<xsl:call-template name="display_csv_field">
<xsl:with-param name="field" select="Field[@guid='a8a3aeea-be9b-475b- ac1a-3974214e2f2e']/."/>
</xsl:call-template>
<xsl:value-of select="$delim" />
<!-- Template for field : Last Name Field is required -->
<xsl:call-template name="display_csv_field">
<xsl:with-param name="field" select="Field[@guid='4a61d741-cfe3-40e3- 9248-f72558a3d77c']/."/>
</xsl:call-template>
<xsl:value-of select="$delim" />
Note: The following format in the XSLT for fields that are values lists:
<!-- Template for field : Country -->
<xsl:call-template name="display_csv_field">
<xsl:with-param name="field" select="Field[@guid='99a94480-4a00-4e20- bab9-62c33559fea6']/ListValues/ListValue/."/>
</xsl:call-template>
<xsl:value-of select="$delim" />
Note: The following format for a user account (SSO User ID)
<!-- Template for field : SSO User ID -->
<xsl:call-template name="display_csv_field">
<xsl:with-param name="field" select="Field[@guid='86662603-1226-4262- 8fad-e91476fc92aa']/Users/User/."/>
</xsl:call-template>
<xsl:value-of select="$delim" />
Comment out or remove any fields that are not being used. The field GUIDs in the XSLT should match and be in the same order as the New Contacts/Update Contacts report in Archer.
Important: If you are obtaining Field GUIDs directly from the Archer interface, ensure that they are entered in all lowercase as in the examples above.
Once you have completed the review of the XSLT file, perform the following steps:
Important: The steps below are not required to perform the integration, but are presented as a troubleshooting step for ensuring the CSV output is correct.
-
Pull the New Contacts report from Archer using a transport-only datafeed or via the Archer API (https://<Archer_Server>/ws/search.asmx?op=SearchRecordsByReport with report GUID and session token). Save the results to an XML file.
-
Run the saved XML report through an XML transformation tool using the XSLT file you modified above.
-
The output file will be a CSV file without the column headers (the .hdr file contains the column headers.) Review this output to ensure the CSV upload file is properly formatted and contains the data you expect.
Important: Do not proceed to the next tab of the Everbridge Setup Utility until you have resolved any errors with the CSV output file.
-
Once the CSV file is being properly generated, you may proceed to the second tab of the Everbridge Setup Utility, Instance File Upload Setup.
Instance file upload setup
This tab handles the instance profile setup on both the Archer Platform and Everbridge. The instance information, once completed, is saved in the Windows registry under the HKEY_LOCAL_MACHINE\SOFTWARE key. The registry keys can be generated by the utility by clicking on the Setup Registry button. To complete the necessary information for this tab of the Everbridge Setup Utility, perform the following steps:
-
Click the Setup Registry button. This creates the necessary registry keys.
-
Complete the Archer Credentials section. Ensure that these credentials are correct by logging in with the specified Archer user.
-
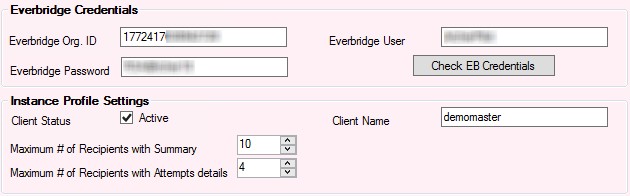
Complete the Everbridge Credentials section.
Once this portion is completed, you can click the Check EB Credentials if you wish, to ensure the connection is successful.
-
Complete the Contacts Application Setup section.
You will need the Contacts application and Field IDs as describe in the Contacts Application section above. You will also need the Report GUIDs as described in the Configuring Archer Reports section above.
-
Complete the Task Management Application Setup section:

You will need the Task Management Application ID, and Attachment Field ID as described in the Task Management Application section above. The Fields XML section defines the other required fields for the Task Management Application.
In the example above you can see we have different fields.
-
Field with ID 2247: This is a text field (type 1). This field represents the Description
field. The contents of the field are set as “EB Error Attached”.
-
Fields with IDs 2241, 17139: These are the values list (type 4) fields Status, Priority, and their associated values (Not Started and Normal, respectively).
-
Field with ID 17138: This is a text field (type 1). This field represents the Subject field.
The contents of the field as set as the value Subject.
-
Click the Test TM - Get Level button. If this section has been configured properly, you will see the Task Level get populated (102 in the example above).
-
Complete the Instance Profile Settings:
-
Client Status: Check this field to set the profile to Active. Uncheck to set to inactive.
-
Run Schedule: This option determines the run schedule for the contacts upload. The schedule has 2 options.
-
Daily: The contacts upload process will be executed every day Monday-Sunday.
-
Weekly: This contact upload process will be executed every Sunday.
-
Client Name: This box allows you to provide your company name and save it in the profile. Though it is not used in the processing, it helps add more metadata and clarity when dealing with numeric instance names.
-
-
Now that all sections of this tab have been filled out, click the Add/Update Registry button. This process should complete without any errors. If there are any error messages, make note of them and ensure they are resolved before proceeding to the Instance Notifications & Results Setup tab.
Once the details on this page have been successfully saved to the registry, you will be able to enter the Client Instance name and click Lookup Instance to retrieve or modify the saved settings.
Instance notifications & results setup
Credentials & instance sub tab
This tab is used to populate the Archer credentials, Everbridge credentials, and instance profile status. The Archer user accounts need to be unique for each part of the integration (Notification User and Results User). To complete the information required for this sub tab, perform the following steps:
-
Enter the Archer Notification User and Archer Results User credentials. The Archer Instance Credentials should be the same as the previous tab:

Click the Check Archer Notification Connection or Check Archer Results Connection buttons to test the connection.
-
The values for Everbridge Credentials and Instance Profile Settings will be exactly the same as the previous tab
-
Maximum # of Recipients with Summary: This field determines the maximum number of recipients’ details (without delivery attempts information) that will be created for a notification. If a notification has more recipients than this setting, no recipients’ records will be created for the notification. For example, if the value is set to 20 recipients and a notification has 21 recipients, the integration will not create any recipients’ records in Archer for the notification. If the number of recipients is 20 or less, then the integration will create records for each one of those recipients with summary details for the recipient. Please be aware that each notification in Archer has a field (Results Level of Detail) to determine the results level of detail.
-
Summary Only: This is the default option. Only notification results and summary is populated in the Notification History application record.
-
Recipient Detail: If selected, a record will be created for each recipient (provided that the number of recipients does not exceed the maximum # of recipients with summary) in the Notification Recipient application.
-
Recipient Detail with Attempts: If selected, a record will be created for each recipient (provided that the number of recipients does not exceed the maximum # of recipients with attempts detail) in the Notification Recipient application. Each recipient record will have the delivery attempts information added to the record upon completion or stoppage of the notification.
-
Maximum # of Recipients with Attempts details: This field determines the maximum number of recipients’ details (with delivery attempts information) that will be created for a notification. If a notification has more recipients than this setting, no recipients’ records will be created for the notification. For example, if the value is set to 20 recipients and a notification has 21 recipients, the integration will not create any recipients’ records in Archer for the notification. This setting value cannot exceed the Maximum # of Recipients with Summary.
-
Once the required information has been entered on this tab, click the Add/Update Registry button to save your changes.
EB paths and bridges sub tab
This tab extracts the active contacts Paths (delivery channels in Archer) and the active conference bridges from the Everbridge instance. The functionality in this tab is used to synchronize the values between the Everbridge instance and the Archer instance. Everbridge will be the source and Archer will replicate the values that exist in Everbridge.

The notification application has two values lists fields that will be updated using the resulting files from this tab.
-
Delivery Channels: This required field is used to select the different contact paths to be used in the notification. The Get Notification Paths button will generate the active paths in the Everbridge instance and create an import file called deliveryPathsValuesList.xml. This file needs to be imported into this field. The file will be placed in the NotificationConfiguration\{instance} folder. The file will look like this:

If there are existing values lists in the field, you may want to inactivate them or delete them. The integration will match the selections based on the name of the values list. If a values list value does not match what is in Everbridge, it will be ignored. If new contact paths are added or removed from Everbridge, you will need to recreate the files and import the new values and inactivate the deleted ones.
-
Conference Bridge: This field is used to select the conference bridge to be used in the notifications where the notification type is Conference Bridge. The Get Conference Bridges button will generate the active conference bridges in the Everbridge instance and create an import file called conferenceBridgesValuesList.xml. This file needs to be imported into this field. The file will be placed in the NotificationConfiguration\{instance} folder. The file will look like this:

If there are existing values lists in the field, you may want to inactivate them or delete them. The integration will match the selections based on the name of the values list. If a values list value does not match what is in Everbridge it will be ignored. If new contact paths are added or removed from Everbridge, you will need to recreate the files and import the new values and inactivate the deleted ones.
The Web API application will check the notification record selections for the conference bridge and the delivery paths and match them against the configuration files AllDeliveryPaths.json and AllConferenceBridges.json. It will use the name of the values lists to match the selections and properly setup the notification for Everbridge. It is extremely important that the json files and the values lists fields are not updated or modified outside the setup process mentioned in this document.
Archer configuration file sub tab
-
Click the Load Configuration button. The action creates a local copy of the template configuration file (Fields.xml) and places it inside the instance’s folder NotificationConfiguration\{instance}. It also loads the file in the utility to allow you to modify the GUIDs as needed.
-
Make note of the External ID field GUID and update it if necessary. This should be the same GUID that is used for the External ID field under the Contacts application. It is the same field that is used in the upload file to identify the contacts in Everbridge.
-
Click Save Configuration. This action saves the Fields.xml copy.
-
Click Create Numeric Field IDs. This action creates the file ArcherConfiguration.xml in the instance’s folder. The file will contain all the applications and fields’ numeric IDs. It will also add all the values lists associated with the values lists fields.
Resolve applications and fields
The final tab, Resolve Applications and Fields can be used to retrieve some of the Application IDs and GUIDs that are used in previous sections. This is not a required step, as it can be leveraged more as a utility to programmatically retrieve data rather than doing it manually.
Everbridge contacts upload
The console application EverbridgeContactsUpdate.exe performs the actual contacts upload to Everbridge. This application needs to run on a schedule once a day.
Important: The Everbridge Contacts Upload utility (EverbridgeIntegrationUtility.exe) MUST always be run with full administrative rights. To do this, right-click on the executable, and select Run as administrator.
The application will search the registry for active instances under the HKEY_LOCAL_MACHINE\SOFTWARE\ARCHER\Everbridge\Upload key.
Contact data is pulled through report templates that identify new and updated contacts.
A task scheduler can be used to run this application once a day. This console application can run on a daily schedule and on demand.
-
Automated Daily Run: The execution checks for the day of the week to check if we need to run the instances that were setup Daily and/or Weekly. If the run day is Sunday, all active instance will be processed (instances setup to run Weekly and Daily) will run. All other days will run the active instances that are setup to run Daily.
-
On Demand Run: This run can accept command line parameters or just run like the automated daily run. You can specify to run all schedules, daily schedules, weekly schedules, or specific clients only. You can also run the code to initialize the folders required for processing before starting to use the application for processing.
Instances that are active and have all valid initialization files and folders will qualify for processing.
Initialization
Before running the application for the first time to process instances, an initialization is required. This is done using the following command from the command line prompt:
EverbridgeContactsUpdate.exe -i
This creates the Logs and Instances folders within the application folder.
Execution
The application can be run in 6 different ways using parameters (or none). The commands need to run from the command line prompt.
-
Initialization parameter [-i]: This is run once to create all necessary folders for processing.
EverbridgeContactsUpdate.exe -i
-
Run Daily instances parameter [-daily]: This parameter runs the active daily scheduled instances.
EverbridgeContactsUpdate.exe -daily
-
Run Weekly instances parameter [-weekly]: This parameter run the active weekly scheduled instances
EverbridgeContactsUpdate.exe -weekly
-
Run All instances parameter [-all]: This parameter runs all the active daily and weekly scheduled instances.
EverbridgeContactsUpdate.exe -all
-
Run defined instances: Process all Instances are provided as parameters separated by spaces.
EverbridgeContactsUpdate.exe {Instance} {Instance} {Instances}
-
Run scheduled instances for the day: This processes all instances scheduled to run on that day. No parameters are required.
EverbridgeContactsUpdate.exe
Instances folder setup
All instances should be created under the Instances folder within the application's folder.
Each instance will have its own processing folder. The folder name should match the instance’s name that is used to connect to Archer.
For example, if the instance in SaaS is 555555, then the instance folder name will be 555555.
If the client's instance name is demomaster for a non-SaaS client, then that the instance folder name will demomaster.
There will be four files that need to exist inside each instance folder. The four files will be generated by the Everbridge Integration Setup Utility as described above.
-
<instance_name>.xslt: This file contains the transformation XSLT file that will be used to transform the contacts records to CSV format required by Everbridge.
-
<instance_name>.xslt.hdr: This file contains the header row for the CSV file that will be used in the contacts upload. This file is generated by the setup application and requires no modifications.
-
<instance_name>NewSearchOptions.xml: This file is contains the new contacts report search XML. The original report is created in Archer but the setup application retrieves the report's search criteria, modifies it and saves it in this file. The application will use this search XML to run the report in batches of 10000 records per page. Please note that any updates to the report criteria or content will require regenerating this file using the setup application.
-
<instance_name>UpdateSearchOptions.xml: This file is contains the updated contacts report search XML. The original report is created in Archer but the setup application retrieves the report's search criteria, modifies it and saves it in this file. The application will use this search XML to run the report in batches of 10000 records per page. Please note that any updates to the report criteria or content will require regenerating this file using the setup application.
The four files need to exist in order for the instance to be processed. They should not be removed.
Other folders
Each instance folder will have extra folders that are generated by the application automatically that will contain processing data. The folders are as follows:
-
Error Files: This folder contains any error files that might result from processing each CSV file. The error files will be attached to a Task Management record that is created as means to notify the system administrators with the contacts processing errors.
-
ArcherRecordsFiles: This folder contains temporary files that are generated during the processing of the CSV files. Those files will be removed and cleared each time the instance is processed.
-
Reports: This folder contains the resulting CSV files that will be uploaded to Everbridge.
Logging information
The application provides logging information in 2 ways.
-
Log files: Processing information is logged in the file EverbridgeContactsUpdate.log within the Logs folder. The file is rolled daily. The default logging allows logs to roll for 30 days. The log file contains logging information as well as errors.
-
System Events logs: The application logs processing errors to the System Events log. The application event log is called EBContacts.
Everbridge notification setup
Everbridge web app setup
Archer / Everbridge integration leverages a distinct web site to facilitate calls to the Everbridge API for notification generation. This site acts as a web service for the activation of Notifications (Emergency Notifications and Call Trees record) within Archer.
Deployment
The Everbridge Web App is deployed through IIS’s Web Deploy functionality. More information about the Web Deploy package can be found in the file EverbridgeArcher.deploy-readme.txt.
Important: If you do not have the IIS Web Deploy service installed, you can also deploy the application using the Non Web Deploy Package folder.
The files are in the EB REST Service folder are created by the extraction of the applications package. The package contains several files:
-
EBRestService.deploy.cmd
-
EBRestService.deploy-readme.txt
-
EBRestService.SetParameters.xml
-
EBRestService.SourceManifest.xml
-
EBRestService.zip
To deploy the package, perform the following steps using the IIS import plugin.
-
Create a new web site in IIS and define the content directory and the binding as needed. You can assign an application pool or leave the one created for you by IIS.
-
Click on the new web site from the left pane and select Import Application under Deploy.
-
Browse to the EB WebAPI folder and select the EBRestService.zip file. Click Next.
-
Make sure all content is selected. Click Next.
-
Select an application path if you wish, or you can just enter none. Click Next.
-
Click Finish.
-
Make sure you are using the correct application pool. The application pool’s version needs to be .Net v4.0 framework. You can modify the application pool for the application by clicking on Application Pools -> Select the required pool -> Advanced Settings -> Update Framework version to v4.0.
-
Change the identity as needed. The application will need to have access to:
-
The shared notifications folder. This folder will be defined in the Web.Config file.
-
Instances, Logs, and Notifications folders within the App_Data folder.
-
Ability to write to the system Event Logs.
-
The system’s registry.
To accommodate all the access above, you may want to use a custom account with sufficient access to read and write to the folders and read from the registry.
-
-
Test the application by selecting Browse application.
Shared notifications folder setup
Upon successful notification, the service will create a notification file that is placed in a shared folder to be consumed by the update results service part of the integration.
-
Select a network shared folder that will be used specifically by the integration.
-
Make sure the Web API service or custom account has access to the shared folder.
-
Edit the Web.Config file and look for the key CompletedNotificationSharedFolder in the appSettings section. Update the value with the location (for example): <add key="CompletedNotificationSharedFolder" value="\\\\VM3061\\Notifications\\" />
Instances folder setup
All instances should be created under the App_Data\Instances folder. Each instance will have its own processing folder. The folder name should match the instance’s name that is used to connect to Archer. For example, if the instance in SaaS is 555555, then the instance folder name will be 555555.
If the instance name is ArcherDev for a non-SaaS client, then that the instance folder name will ArcherDev.
To setup the instances folder, perform the following steps:
-
Create a folder with the instance name under App_Data\Instances folder or copy the instance folder from the integration utility instance folder NotificationConfiguration\{instance}.
-
If you created the folder manually, then copy the following files from the instance folder in the integration utility. If you copied the whole folder, then remove the other files and keep the following files.
-
ArcherConfiguration.xml
-
AllDeliveryPaths.json
-
AllConferenceBridges.json
-
Notifications folder
The Notifications folder stores notification files that fail to be written to the shared folder. The update results service will check this folder in case the shared folder was not available.
Logging information
The application provides logging information in 2 ways.
-
Log files: Processing information is logged in the file EverbridgeNotifications.log within the App_Data/Logs folder. The file is rolled daily. The default logging allows logs to roll for 30 days.
-
System Event logs: The application logs processing errors to the System Event log. The application event log is called EBNotification.
Setting up the notifications application
To contact the Web API service from the notification application, perform the following steps.
-
Obtain the Notification Type field’s numeric ID:
-
Open the Notifications application in Application Builder.
-
Click on the Fields tab.
-
Find the Notification Type field.
-
Hover over the field name. The numeric ID will be shown on the lower right corner of the window (16661 in the example below)
-
-
Note the Web API service URL. For example, http://localhost:8083/.
-
In the Notifications application, you need to edit the Send Notification custom object.
-
Open the Layout tab.
-
Edit the Send Notification custom object.
-
There are 2 variables that you need to update.
urlEverBridge: Update this variable with the Web API URL. Pay attention to the surrounding quotes.
typeFieldId: Update this variable with the Notification Type field’s numeric ID. There are no quotes around this numeric field.
-
Do not modify any other parts of the script.
-
Click OK and Save the changes.
-
-
The script will show the notification button if the following conditions are true.
-
The notification record type is an Everbridge type (Standard, Poll, or Conference Bridge).
-
All required fields are populated.
-
The record is in View mode.
-
Testing the notification service
In order to test the notification service, perform the following steps:
-
Create a new notification record.
-
Select an Everbridge notification type.
-
Populate all required fields.
-
Save the record.
-
Switch to View mode.
-
Click the Send notification to Everbridge button.
-
The system will respond with Success or fail message.
-
If the notification is successful, a notification history record will be created within the notification record.
-
If the notification fails, check the log files and system events for more information and correct as needed.
-
Everbridge notification results windows service
The windows service application EverbridgeNotificationResults.exe is used to retrieve active notifications results from Everbridge and update the corresponding Notification History record in Archer.
The windows service is set to run constantly on pre-defined interval (default is 5 minutes) to check for updates on notification results. It will process the notification files created by the Web API service.
It will process and update the notifications until they are completed or stopped. The service uses the same registry profiles that are used by the Web API Service.
Installing the notification results service
-
Unzip the EverbridgeNotificationResults.zip file to a folder on the same server as the other parts of the integration.
-
Edit the EverbridgeNotificationResults.exe.config file to update the settings.
-
ProcessingIntervalInMinutes: This setting defined the interval in minutes between processing results runs. The minimum is 5 minutes. If the value is less than 5, the default value of 5 will be used.
-
CompletedNotificationSharedFolder: This is the shared folder that contains the notification files generated by the Web API notification service. You need to make sure that the windows service will have full access to read/write/delete files in that folder.
-
NotificationsFilesNotMovedToSharedFolder: This is the folder where the Web API notification service will save the notification files if for some reason it is not able to save to the Completed Notification Shared Folder. This folder is the Notifications folder under the App_Data folder in the Web API notification service.
-
The processing log files will be under the Logs folder.
-
All necessary folders will be created by the windows service when it runs for the first time.
-
NotificationFiles: This folder contains the notification files that are active. The files will be deleted when the notification is completed and results are updated in Archer.
-
Instances: This folder contains the folders for each instance. Each instance folder contains a copy of the file ArcherConfiguration.xml that is used by the Web API notification service.
-
InvalidNotifications: In case the notification files are invalid, they are moved to this folder.
-
FailedNotificationResults: if the notification results retrieval fails to pull data from Everbridge, detailed results files for the notifications will be created in this folder. The files will be JSON files with the following name format. NotificationResulFailure{notification ID}.json.
-
Logs: This folder contains 2 log files.
-
EBResultsService.log: This log file contains information related to the service starting, stopping, etc.
-
EverbridgeNotificationResults.log: This log file contains information related to the notification processing.
-
To install /uninstall the windows service, you need to run the service from the command line as an administrator.
Important: The Everbridge Notification Results utility (EverbridgeNotificationResults.exe) MUST always be run with full administrative rights. To do this, right-click on the executable, and select Run as administrator.
-
Run the following command:
-
Install the service : EverbridgeNotificationResults.exe install
-
Start the service from the Windows Services control panel.
-
The service can also be stopped from the Services control panel. However, if it is processing notifications at the time of the request, it will stop after the currently processed notifications are finished.
Logging information
The Notification Results Service provides logging information in 2 ways.
-
Log files: There are 2 log files for the service. The files are rolled daily. The default logging allows logs to roll for 30 days.
-
EBResultsService.log: This log file contains information related to the service but not processing notifications (information related to the service starting, stopping, etc).
-
EverbridgeNotificationResults.log: This log file contains information related to notification processing.
-
System Event logs: The application logs processing errors to the System Event log. The application event log is called EBResults.
Certification environment
Date tested: July 2017
|
Product Name |
Version Information |
Operating System |
|
Archer |
6.2.2 |
Windows 2012 |
|
Everbridge Platform |
July 2017 |
SaaS |
Appendix A
The worksheet in this appendix provides a place to organize much of the information needed to configure the Everbridge integration.
Archer accounts
The Everbridge integration uses distinct Archer accounts to perform the various tasks without session collision. These accounts do not require sysadmin level access, but they do require Application Owner level access in order to ensure visibility and access into to all content of the applications.
Capture your access / account information below and then leverage it in the Instance File Upload Setup tab of the configuration utility.
Archer Instance
|
URL |
|
|
Instance |
|
Archer Accounts
|
|
Username |
Password |
|
Contacts Synchronization |
|
|
|
Notification Creation |
|
|
|
Notification Results |
|
|
Everbridge Account
Organization ID
Contact synchronization
The synchronization activity relies on Reports to get the information out of Archer and then transforms to put the information into Everbridge
|
New Contacts Report Guid |
|
|
Updated Contacts Guid |
|
If possible, pull the results for one of the reports to provide clarity. This can be done with a transport only data feed, or execution of the search through the API.
|
|
Everbridge Element |
Archer Field Name(s) |
|---|---|---|
|
Req'd |
First Name |
|
|
Req'd |
Last Name |
|
|
Req'd |
Record Type |
|
|
Req'd |
External ID |
|
|
|
Middle Initial |
|
|
|
Suffix |
|
|
|
Country |
|
|
|
Business Name |
|
|
|
Groups |
|
|
|
SSO User ID |
|
|
|
Addresses |
|
|
|
Phone Numbers |
|
|
|
Extension Phone Numbers |
|
|
|
Email Addresses |
|
|
|
SMS |
|
|
|
Custom Fields |
|
Note: The Address element can be made up of multiple elements as noted below:
-
Location 1
-
Street Address
-
Apt/Suite/Unit
-
City
-
State/Province
-
Postal Code
-
Country
-
Latitude
-
Longitude
Additionally, note that Mobile and SMS are distinct values. They *can* be sourced by the same field if desired.
Task management / Error reporting
The Everbridge Contacts Upload functionality leverages the Task Management application to log errors if they occur. The data around the error is stored as an attachment to a Task Management record.
The system needs the ID’s of:
-
Task Management Application
-
Level within the application
-
Attachment field
-
Any other required fields
For the Task Management application, you can also leverage the Core GUID’s and the Resolve Applications & Fields tab in the integration utility.