Gurucul
Gurucul is changing the way enterprises protect themselves against fraud, insider threats and external intruders on premises and in the cloud. The company’s user behavior analytics and identity access intelligence technology use machine learning and predictive anomaly detection algorithms to reduce the attack surface for accounts, unnecessary access rights and privileges, and identify, predict and prevent breaches. Gurucul provides Hybrid Behavior Analytics (HBA) architecture with the breadth of Identity Access Intelligence to User Behavior Analytics and the depth from cloud apps to on-premises behavior.
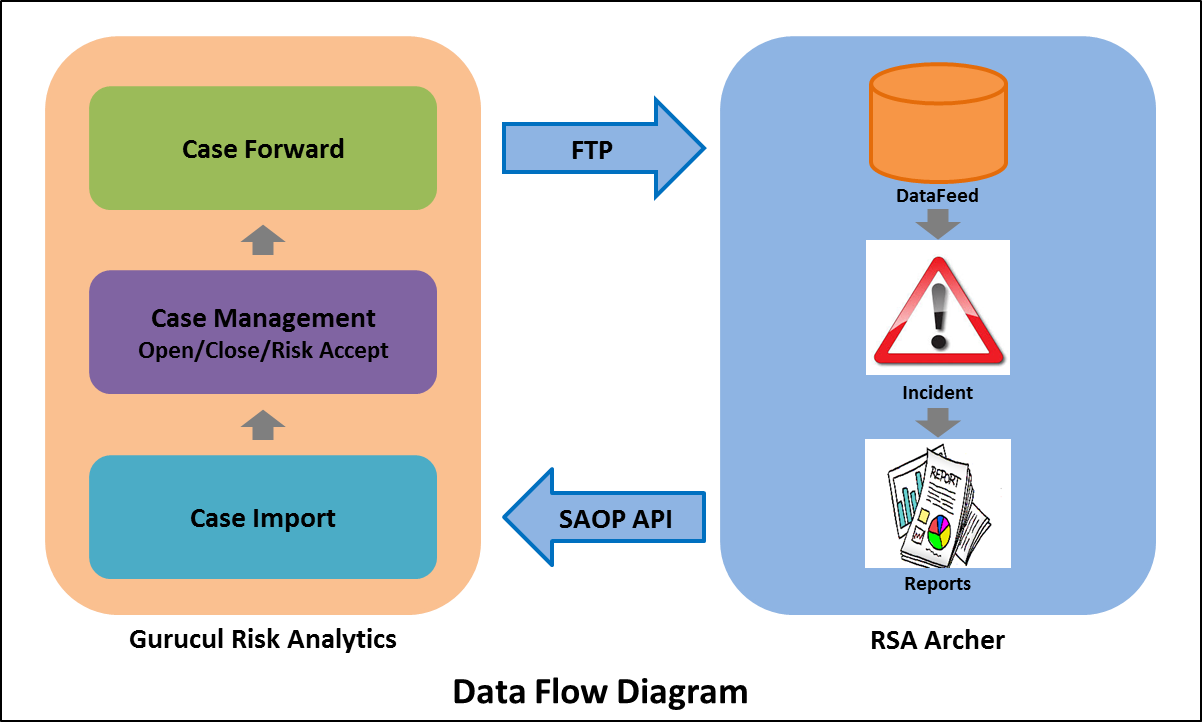
Gurucul technology is used globally by organizations to detect insider fraud, IP theft, external attacks and more. By integrating GRA and Archer, organizations can monitor, manage, and remediate security incidents related to anomalous user behavior.
Archer Exchange: With the Archer Exchange, the Archer team and our trusted partners have created a broad selection of supplemental, value-added offerings to help you get your unique risk management program on the right path, right from the start. You can leverage the Archer Exchange offerings to expand the use of Archer solutions into new business processes and address specific industry, geographic, regulatory, or technical requirements. The Archer Exchange features a fast and agile development cycle, enabling quick delivery of new and updated offerings for trending issues and connections to innovative technologies.
On this page
Revision history
Last Updated: August, 2017
Overview
|
Partner Integration Overview |
|
|---|---|
|
GRC Use Case |
IT Security Risk Management/ Security Operations Management |
|
Uses Out of The Box Solution |
Security Incident Management |
|
Uses Custom Application |
Yes (GRA Anomalies) |
|
Requires On-Demand license |
Yes, 1 ODA |
Data flow diagram
Archer configuration
Installing the GRA anomalies application package
Before configuring the GRA Data Feed, you must first install the GRA Anomalies application package (GRA_Application.zip). This is an on-demand application that has a child relationship to the out of the box Security Incidents application. To install the application package, perform the following steps:
-
On the Archer Server, go to Administration > Application Builder > Install Packages.
-
Click Import and browse to the package import file (GRA_Application.zip). Click OK.
-
Click Install to install the package.
The process complete without any errors.
Configuring the security incidents application
Once the application package has been installed, it will add a cross-reference to the Security Incidents application. This will allow you to see GRA anomaly records from a given Security Incident. It is also necessary to create a custom field to store the GRA Case ID and create new Security Incident records from GRA. To do this, perform the following steps:
-
On the Archer server, browse to Administration > Application Builder > Security Incidents.
-
Click the Fields tab, and then select Add New.
-
Select the Create a new field from scratch radio button and set the Field Type as Text.
-
Name the field GRA Case ID and click Save.
-
Add the field to the layout by selecting the Layout tab.
-
Drag the GRA Case ID field to the layout in the position you desire.
-
Drag the GRA Anomaly Cross Reference to the layout in the position you desire.
-
Now that the application is installed and the layout is configured, you can move on to setting up the Data Feed from GRA to create the actual Security Incident records and their associated GRA Anomalies.
Installing the GRA data feed
Gurucul GRA Security Incidents (GRA Cases) are created in Archer via a preconfigured Data Feed. This Data Feed loads the case information from an XML file that is pushed to the Archer server via FTP. To configure the Data Feed, perform the following steps:
-
On your Archer Server, browse to Administration > Integration > Data Feeds.
-
Select Import and browse to the GRA Data Feed file (GraDataFeed.dfx5).
-
Review the Data Feed configuration on the General Tab. Ensure that the Target is Security Incidents.
-
Review the settings on the Transport tab. Leave the Transport Method as File Transporter, but make any necessary changes to the Path as required.
-
Review the settings on the Data Map tab.
-
Under the Data Map–Key Field Definitions tab, ensure that the Key Fields are set as follows:
-
Security Incidents GRA Case ID
-
GRA Anomaly Anomaly Reference
Review the settings on the Update/Archive tab and make any necessary changes.
-
-
Set a Schedule for the feed by clicking the Schedule tab.
-
Make any necessary changes to the schedule or click the Start button to run the feed immediately.
Partner product configuration
This section provides instructions for configuring Gurucul Risk Analytics (GRA) with the Archer GRC Platform. This document is not intended to suggest optimum installations or configurations.
It is assumed that the reader has both working knowledge of all products involved, and the ability to perform the tasks outlined in this section. Administrators should have access to the product documentation for all products to install the required components.
All Gurucul components must be installed and working prior to the integration. Perform the necessary tests to confirm that this is true before proceeding.
Important: The integration described in this guide is being provided as a reference implementation for evaluation and testing purposes. It may or may not meet the needs and use cases for your organization. If additional customizations or enhancements are needed, it is recommended that customers contact Professional Services for assistance.
Creating a data source in Gurucul Risk Analytics (GRA)
Please note that to deliver the GRA Anomalies feed file to the Archer server, FTP must be enabled on the Archer system. This can be done via the built-in Windows FTP server, or via another third-party FTP server. The instructions for doing so are outside the scope of this document.
-
Log into GRA
-
Open a browser of your choice and type the following web address to launch the web interface:
http://<hostname>:8080
This opens the login page of GRA.
-
-
Navigate to Configuration > Data > Setup > Data Source
-
Click on the +Add button on the top right corner of the screen
-
Provide the Data Source details as described below
Connection Name: Suitable Name Select Data Source Type as: FTP
Host: <ArcherServerIP>
Port: 21
Username: <FTPUsername>
Password: <FTPPassword>
Remote Directory: /ProgramFiles/archer/DataFeed/grafeeds/(this is the default - must match config in .DFX file)
Transport Protocol: FTP
-
After providing the details as described, click the Test Connection button. The connection status should be Successful as shown above.
Sending GRA cases to Archer
To configure the Forwarder Job to send GRA Cases to Archer, perform the following steps:
-
Navigate to Sidebar > Configure > Data > Data Forwarders Workflow > Forwarder Job
(top right corner)
-
Set the Details as follows:
Destination Type: FTP
Destination: <Connection Name> (as configured in previous section)
Configuration Name: Archer-XML
-
Click Next:
-
Select the Data that you want to forward.
-
Click Next:
-
Confirm the Data and click Next:
-
Provide a suitable Job Title and Description. Next, click Start:
-
The job Status should display SUCCESS.
-
The Data Feed Import File is created on the Archer server (C:\ProgramFiles\Archer\Data Feed\grafeeds by default).
Now that the Job Forwarder is set up to forward the data to the Archer server, the next step is to install the GRA Anomalies application package and configure the GRA Data Feed.
Note: GRA Cases can be forwarded to Archer using Data Forwarder also.
Retrieving GRA cases from Archer
Gurucul GRA can pull updated incidents from Archer using the Archer Web Services API. This is done via a report called GRA Status Report that is part of the application package. To see this report, perform the following steps in Archer:
-
Click on Administration > Manage Applications > Management Reporting > Master Reports Listing.
-
Filter reports starting with GRA and click on GRA Status Report:
-
Below is an incident list visible in GRA Status Report:
-
This report can be imported into GRA to capture any changes made in Archer.
Create the Archer data source
To configure a GRA Data Source to retrieve updated incident info from Archer, perform the following steps:
-
Log into GRA
-
Open a browser of your choice and type the following web address to launch the web interface:
http://<hostname>:8080
This opens the login page of GRA.
-
-
Navigate to Configuration > Data > Setup > Data Source
-
Click on the +Add button on the top right corner of the screen
-
Set the Details as follows:
Connection Name: <SuitableName>
Select Data source Type as: archer
Host Name: <ArcherServerIP>
Username: <APIUserAccount>
Password: *********
Instance Name: <InstanceName>
Transport Protocol: HTTP
-
After providing the details as described, click the Test Connection button. The connection status should be Successful as shown above.
Running the Job to Retrieve Cases from Archer
To create the job that will retrieve case updates from Archer, perform the following steps:
-
In the GRA Admin UI, navigate to Sidebar > Configure > Data > Data Import > Case > +Add (top right corner)
-
Select the Import Type as archer and the Connection Type as RSA_Archer. Click Next.
-
Review the Archer Template and click Save:
-
Provide a suitable Job Title and Description:
-
Click Start. The Job Status should display SUCCESS as in the example above.
-
When a Job is complete, the data can be seen under Respond > Cases > Imported Cases in the GRA
Certification environment for Archer
Date Tested: July 17, 2017
|
Product Name |
Version Information |
Operating System |
|---|---|---|
|
Archer GRC |
6.2 |
Virtual Appliance |
|
Gurucul Risk Analytics |
6.2 |
CentOS7 |
Gurucul GRA data feed configuration
|
GRA Source Field |
Archer Target Field |
|---|---|
|
Security Incidents |
|
|
Case_Owner |
CaseOwner |
|
DateTime_Closed |
Date/TimeClosed |
|
DateTime_Modified |
Date/TimeModified |
|
gra_case_id |
GRA_Case_ID* |
|
Incident_Details |
IncidentDetails |
|
Incident_Status |
IncidentStatus |
|
Incident_Summary |
IncidentSummary |
|
Priority |
Priority |
|
Source |
Source |
|
Title |
Title |
|
GRA Anomaly |
|
|
account_name |
AccountName |
|
activity_count |
ActivityCount |
|
anomaly_name |
AnomalyName |
|
anomaly_reference |
AnomalyReference* |
|
anomaly_status |
Status |
|
resource_name |
ResourceName |
*Denotes that this is a Key Field to uniquely identify a record.