Microsoft 365 OneDrive and SharePoint Integration for Archer Classic Mode
The Microsoft 365 OneDrive and SharePoint integration allows Archer Users operating in Classic Mode to select files from OneDrive or SharePoint within an Archer record and view or edit the Microsoft 365 document within the Archer record layout.
Please Note: The Archer New User Experience has enabled this integration natively to the Archer platform. Clients who are not using the Archer New User Experience may continue leveraging the Microsoft 365 OneDrive and SharePoint integration for Archer Classic Mode available on the Archer Exchange.
Archer Exchange: With the Archer Exchange, the Archer team has created a broad selection of supplemental, value-added offerings to help you get your unique risk management program on the right path, right from the start. You can leverage the Archer Exchange offerings to expand the use of Archer solutions into new business processes and address specific industry, geographic, regulatory, or technical requirements.
On this page
Release notes
| Release date | Release version | Changes |
| April 2026 | 2025.12 | Integration now applies exclusively to Archer Classic, as the New User Experience now provides native integration. |
|
February 2026 |
2025.12 |
Recertified on Archer Platform release 2025.12 |
| March 2022 | 6.10 | Initial release |
Overview
Many organizations use Microsoft 365 OneDrive or SharePoint which is a cloud storage offering with file sharing and editing capabilities and much more. The Microsoft 365 OneDrive and SharePoint integration with Archer allows users to easily reference and interact with files stored on OneDrive or SharePoint within Archer.
With the Microsoft 365 OneDrive and SharePoint integration, Archer Users operating in Archer Classic Mode will be provided an option to navigate to their OneDrive or SharePoint. Users can select one or more files to associate to the record via an enhanced External Links field. Once a file is added to the Archer record, Archer users will be provided a link in which they can view the embedded document within the record or edit the document in a separate window using OneDrive or SharePoint.
Features & benefits
Microsoft 365 OneDrive and SharePoint Integration with Archer enables Archer Users in Classic Mode to:
-
Easily select files from your OneDrive or SharePoint with an enhanced External Links field within an Archer record.
-
View or edit attached Microsoft 365 documents within the confines of the Archer record layout.
Benefits:
-
Enables users to quickly select and view files from critical file repositories within their OneDrive or SharePoint file shares.
-
Store and access these critical files from one location rather than storing them in duplicative locations.
User Guide
-
Go to the record page containing the External Links field(s) configured to use this integration.
-
Click Add New Link.
-
If you are already logged into their Microsoft Account through the browser, an Open from OneDrive button displays on the Link Manager form. If you are not already authenticated into the organization’s Microsoft account, the system prompts you to select an account and authenticate via the organization’s normal methods (for example: email address/password, SSO, multi-factor authentication, and so forth).
-
-
Click Open from OneDrive link. OneDrive File Picker window displays in a separate window.
-
Select 1 or more files from the OneDrive or SharePoint directory. Click Open.
-
If a single file is selected, the Link Manager displays the URL and the Filename of the selected file in the URL and Link Text fields, allowing you to make edits to the Link Text value.
-
If multiple files are selected, Link Manager window does not display.
-
If linking a file from your hard drive or network drive that has not yet been uploaded to OneDrive, click Upload on the OneDrive File Picker interface to upload a new file or files; these are then available for selection.
-
The External Links field will be populated with the file or files selected.
-
-
Click Save, Save and Close or any applicable User Action transition to save the record.
-
Open a record containing the External Links field to the OneDrive or SharePoint Integration.
-
In View mode, click on View Doc link.
-
Document can be viewed in the same window.
-
Open a record containing the External Links field to the OneDrive or SharePoint Integration.
-
Click Edit in the top of the record.
-
Click on Edit Doc link.
-
Document opens in a new window for editing.
Note: Microsoft does not permit Microsoft Office files to be edited within an embedded window on a non-Microsoft site, hence the need to edit file is a separate pop-up window.
Administrator Guide
Prerequisites (ODA and system requirements)
|
Components |
Prerequisites |
|---|---|
|
Archer solution area |
All |
| Archer use case | Any |
| Archer applications | Any |
|
Uses custom objects |
Yes |
| Requires Archer On-Demand Application license | Zero (0) Archer On-Demand Application licenses are required. |
| Requires Archer license | No additional licenses are required for this offering. |
|
Archer Platform Requirements |
Archer Platform Release 2025.12 and later. |
|
Supported Archer Environments |
Note: Archer Users must be operating in Classic Mode. Archer New User Experience users may use the native integration. |
|
Network Requirements |
Archer users are required to have network access to their corporate Microsoft 365 OneDrive or SharePoint from the browsers they are utilizing to access the Archer platform. |
Components
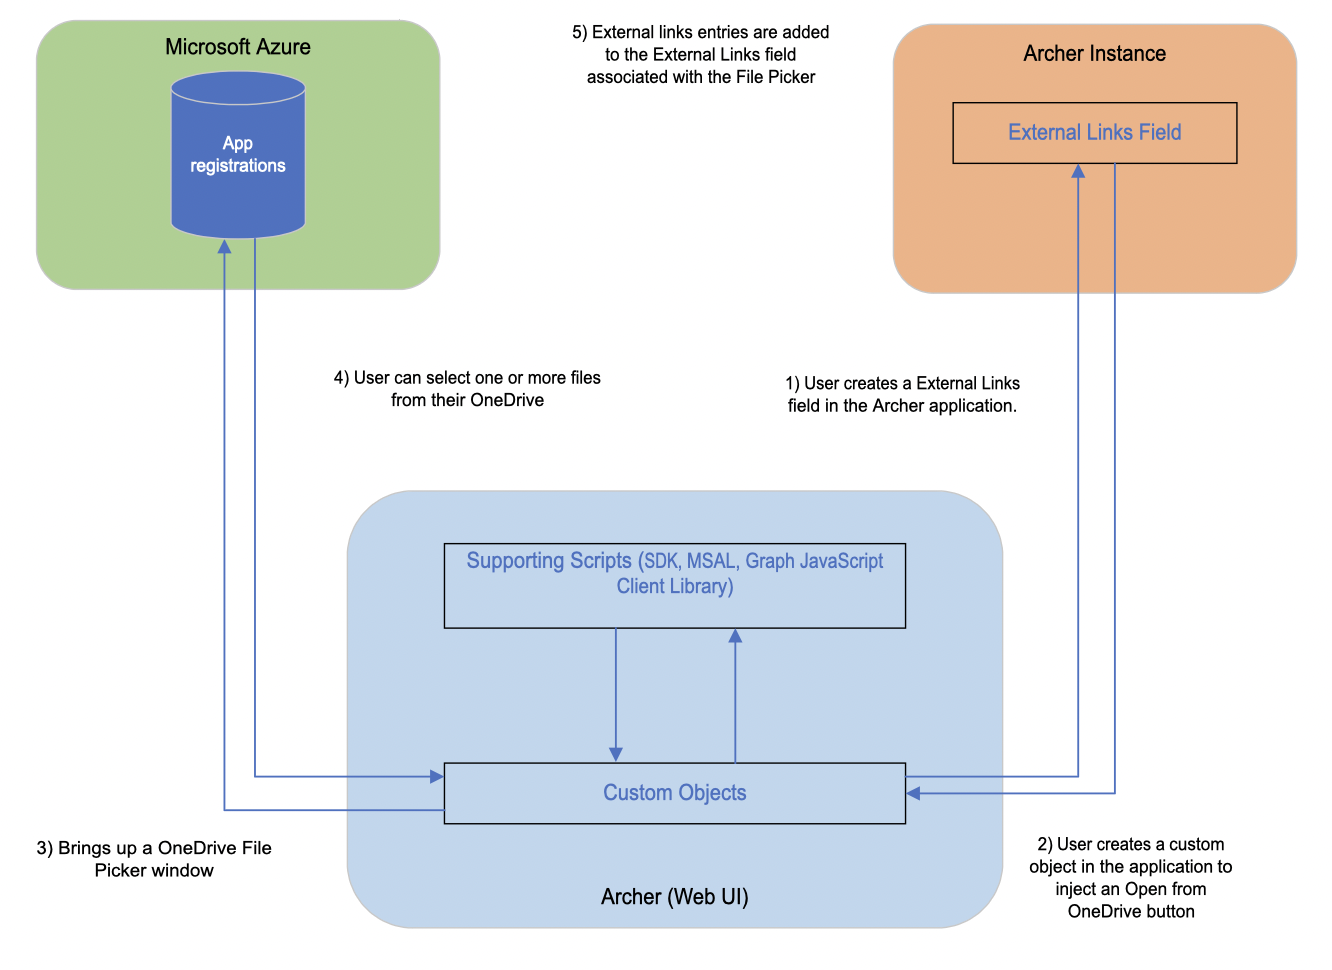
This integration uses custom objects to create an Open from OneDrive dialog button in the External Links field which brings up a file window so the user can select one or more files from their OneDrive or SharePoint. The user will be able to select one or more files from their OneDrive or SharePoint home directory or any of the other shared folders they can access.
Upon selection of one or more files, the names and URLs of the selected files are used to automatically populate entries in the associated External Links fields. If the link references a Microsoft Office document (Word, Excel, PowerPoint, Visio, etc.), an additional View Doc link is displayed next to each external link. When the Archer record is in View mode, clicking the link will display the document for viewing in an embedded iframe on the Archer record layout. In the case that the Archer record is in Edit mode, an additional Edit Doc link is displayed next to each Microsoft Office-related external link, clicking the link will open the document in a separate window for editing.
Architecture diagram
Installation
-
Unzip Archer_Microsoft365_OneDrive_and_SharePoint_2025.12.zip into the target folder. The zip file contains 3 custom objects (JavaScript files):
-
OneDriveSharePoint_Supporting_Scripts_for_Custom_iView.js
-
OneDriveSharePoint_Supporting_Scripts.js
-
OneDriveSharePoint_ExternalLinksField_Integration_CustomObject.js
-
-
Configure the integration.
-
Text the integration according to your company standards and procedures to ensure that the use case works with your existing processes.
Configuration
Contact your Microsoft Azure administrator to create a new Application in Azure via the App registrations page: https://portal.azure.com/#blade/Microsoft_AAD_RegisteredApps/ApplicationsListBlade
Registering the application
-
Click the + New Registration link.
-
Enter a value for the Name to identify the application (e.g. Archer External Links Field OneDrive/SharePoint File Picker Integration).
-
For Supported account types, select Accounts in this organizational directory only ([Organization Name] only - Single tenant).
-
Click Register.
Collecting values needed for the custom object
-
Back on the App Registrations page, click on the newly created application in the Owned applications tab.
-
Make note of the following values, as they will be needed for configuration of the custom object:
-
Application (client) ID
-
Directory (tenant) ID
Configure redirect URLs and enable tokens
-
Click on the Redirect URLs link to be taken to the Authentication page.
-
Under Single-page application section, click the Add URL link and type or paste in the URL of the Archer page that will host the iView custom object.
-
This is going to be the URL to the public iView page in the Archer environment. (See the Microsoft 365 OneDrive and SharePoint Integration for Archer Classic Mode section below for instructions on creating the Custom iView).
Ex: https://[YourArcherHostURL]/Portal/IViewsRender.aspx?iviewId=[ID]. The Querystring parameters need to be set to the following:-
YourArcherHostURL: Archer URL
-
ID: iView ID (which can be seen when hovering over the iView name in Manage Global iView page within the Admin section of the Archer platform.)
-
-
-
In Enable tokens select Access tokens (used for implicit flows) and ID tokens (used for implicit and hybrid flows)
Configure API permissions
-
Click on the API permissions link in the left menu and the + Add a permission link under Configured permissions.
-
Click on Microsoft Graph and then Delegated permissions.
-
Copy and paste the following permissions into the search text box and select them.
-
Files.Read.All
-
Files.Read.Selected
-
Files.ReadWrite.Selected
-
User.Read
-
Files.ReadWrite (not needed for the current integration, but might be needed for assigning permissions in the future)
-
Files.ReadWrite.All (not needed for the current integration, but might be needed for assigning permissionsin the future)
b. Click on the Add Permissions button to go back to Configured permissions page.
-
-
Click + Add a permission, select SharePoint and then Delegated Permissions.
-
Copy and paste the following permissions into the search text box and select them.
-
AllSites.Read
-
MyFiles.Read
-
MyFiles.Write
b. Click on the Add Permissions button to go back to Configured permissions page.
Your page should look similar to this: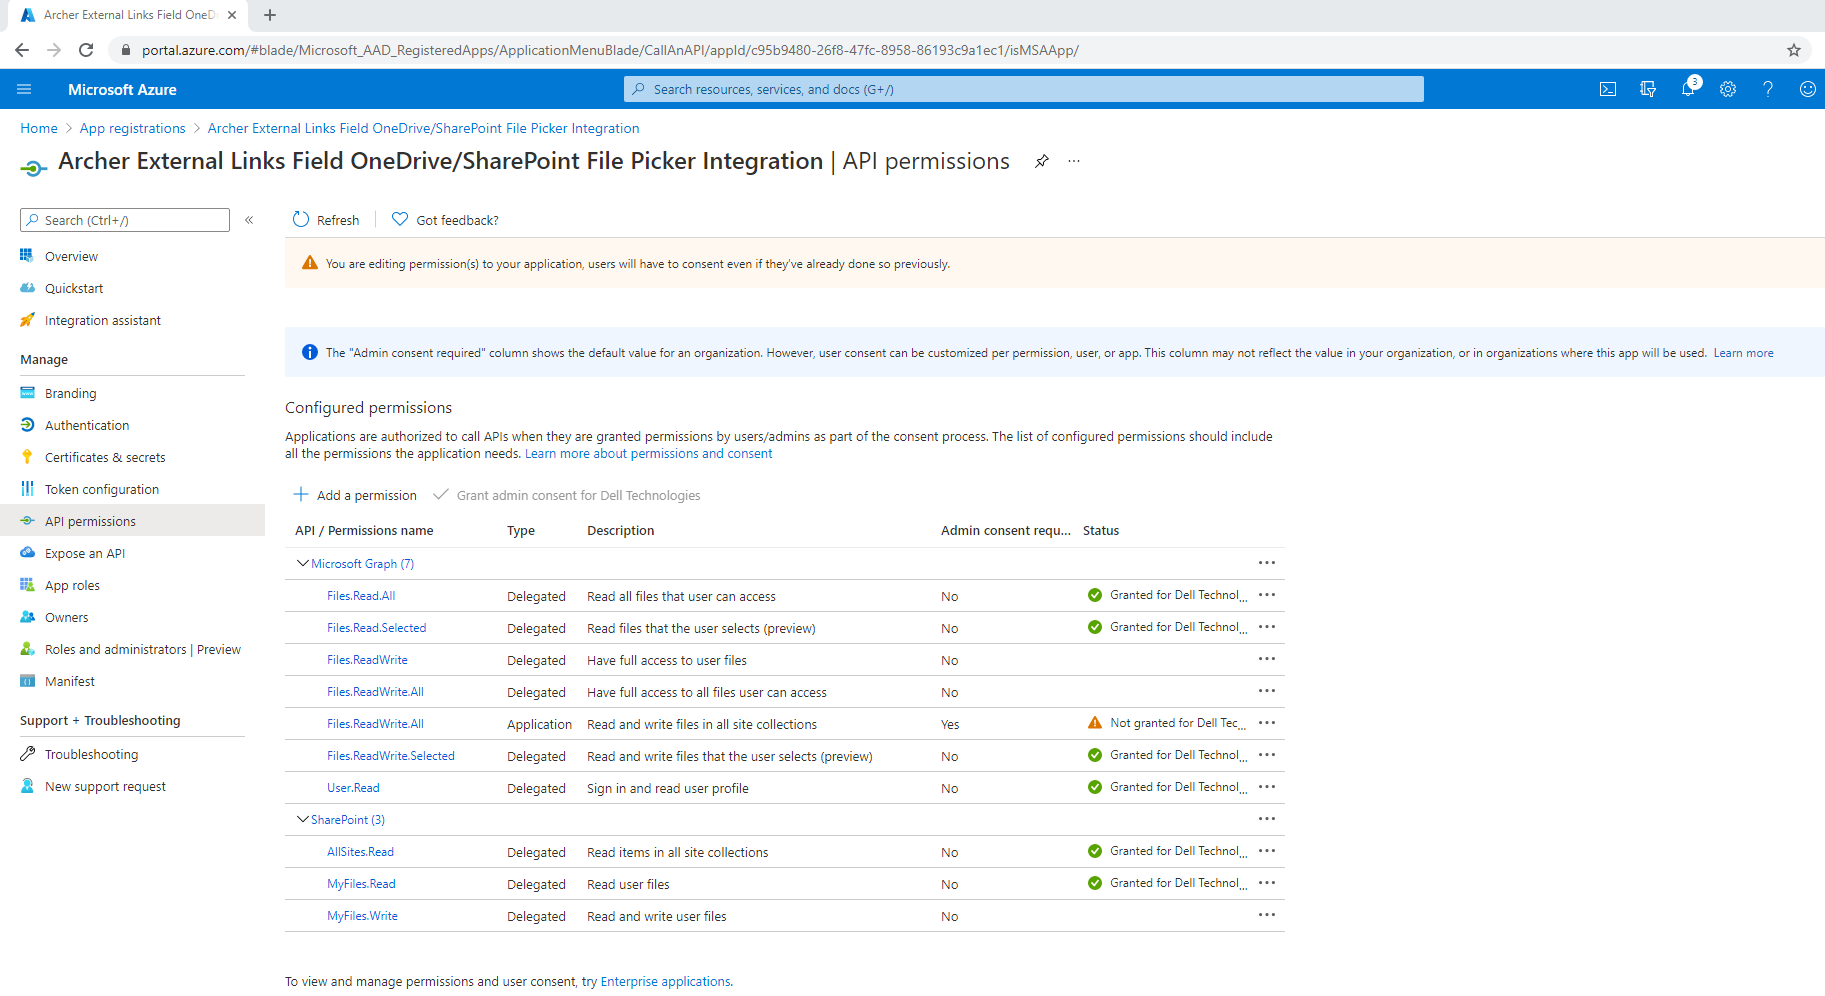
-
-
Request that the Azure/SharePoint admin at the organization grant permissions to these APIs to the entire organization to avoid individual users having to opt-in.
Add and configure a custom iView
-
Navigate to the Global iViews page and create a new Custom iView.
-
Open the attached file OneDriveSharePoint_Supporting_Scripts_for_Custom_iView.js in an IDE (e.g. Visual Studio, Visual Studio Code) or a text editor (e.g. Notepad++, Notepad) to make edits needed for the specific implementation.
-
strClientId: The Application (Client) ID for the registered application, as noted in the Collecting Values needed for the Custom Object section above.
-
strTenantId: The Directory (tenant) ID for the registered application, as noted in the Collecting Values needed for the Custom Object section above.
-
Here is an example of a completed section:
-
//-------------------------------------------------------------
//PARAMETERS TO SET
// Application (Client) Id of the registered application
varstrClientId = "c95b9480-0000-0000-0000-86193c9a1ec1";
//Directory (tenant) ID of the registered application
varstrTenantId = "945c199a-0000-0000-0000-5a91be5752dd";
//-------------------------------------------------------------
3. Add the contents of the custom object script edited in the step above to the Custom Content section.
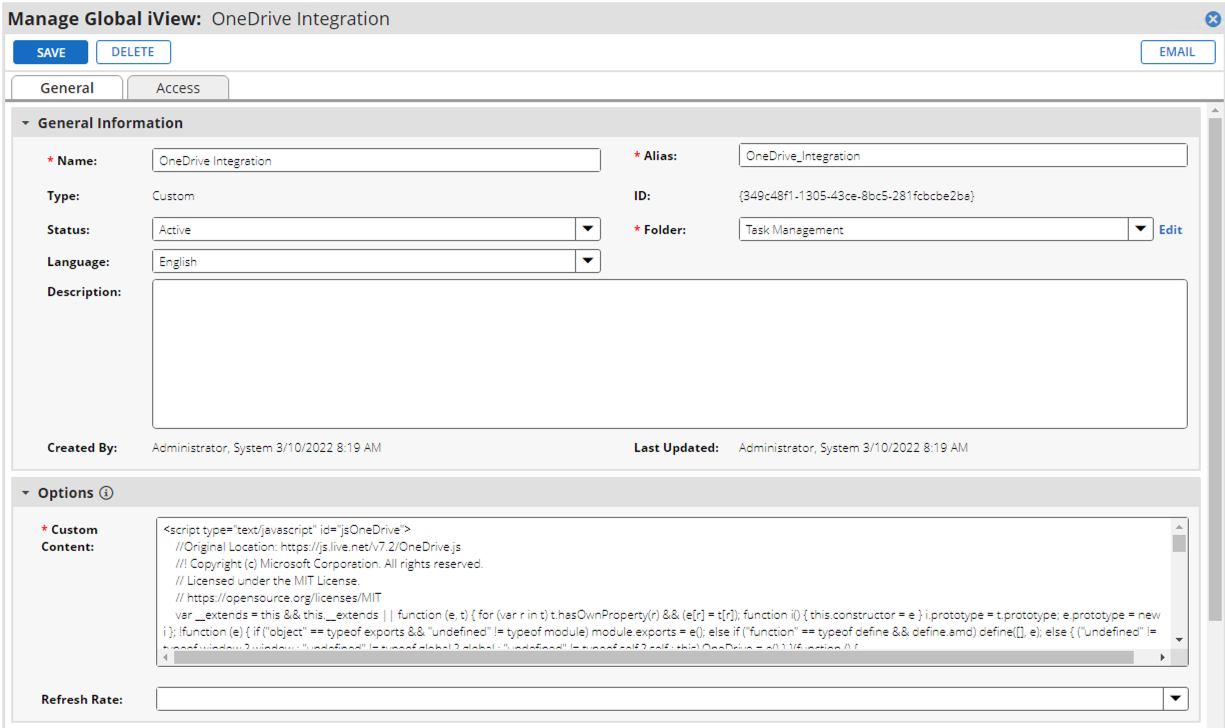
4. Save the custom iView.
5. On the Global iViews list, hover over the name of the newly created iView and note the numeric ID that appears in the lower left corner of the page. This ID will be needed to configure the Redirect URLs section for the App Registration within Azure. See the Microsoft 365 OneDrive and SharePoint Integration for Archer Classic Modesection above for instructions on adding the URL of this this newly created iView to the App registration.
Note: This OneDriveSharePoint_Supporting_Scripts_for_Custom_iView.js script can be deployed in custom widget and can be utilized in the New Dashboard.
Create external links field
Create an External Links field and place it on the layout of any Archer application, questionnaire, or sub-form.
-
Set the Protocols to HTTPS
Important: Note the exact field name of the field (e.g. “Supporting Documents (SharePoint)”) as it will be needed for the custom object.
Create the supporting scripts custom object
Add a custom object to the layout called “OneDrive/SharePoint Supporting Scripts”.
Note: the custom object must be placed outside of any Tab Set or within the Tab Set that the External Links field(s) reside to ensure the scripts execute when the record page loads.
-
Copy and paste the contents of the attached file OneDriveSharePoint_Supporting_Scripts.js into the Code field.
-
This object contains local copies of three Microsoft authored APIs.
-
-
OneDrive JavaScript SDK
-
Script ID: jsOneDrive
-
Original Location: https://js.live.net/v7.2/OneDrive.js
-
Documentation: https://docs.microsoft.com/en-us/onedrive/developer/controls/file-pickers/js-v72/open-file?view=odsp-graph-online
-
Purpose: Contains functions for launching the OneDrive file picker and returning metadata about the files selected.
-
-
Microsoft Authentication Library (MSAL) for JavaScript
-
Script ID: jsMSAL
-
Original Location: https://secure.aadcdn.microsoftonline-p.com/lib/1.0.0/js/msal.min.js
-
Documentation: https://github.com/AzureAD/microsoft-authentication-library-for-js#readme
-
Purpose: The MSAL library for JavaScript enables client-side JavaScript web applications running in a web browser to authenticate users using Azure AD work and school accounts (AAD), Microsoft personal accounts (MSA) and social identity providers like Facebook, Google, LinkedIn, Microsoft accounts, etc. through Azure AD B2C service. It also apps to get tokens to access Microsoft Cloud services such as Microsoft Graph. Used in this implementation for initially authenticating the user into their Microsoft Account to retrieve their home SharePoint/OneDrive for Business directory.
-
-
Microsoft Graph JavaScript Client Library
-
Script ID: jsgraph-js-sdk
-
Original Location: https://cdn.jsdelivr.net/npm/@microsoft/microsoft-graph-client/lib/graph-js-sdk.js
-
Purpose: The Microsoft Graph JavaScript client library is a lightweight wrapper around the Microsoft Graph API that can be used server-side and in the browser.
-
2. Set the Display to Both.
Add and configure field-specific custom object
Add a custom object to the layout for the External Links field or fields present on the layout (e.g.SupportingDocumentsSharepointCustomObject).
-
Open the attached file OneDriveSharePoint_ExternalLinksField_Integration_CustomObject.js in an IDE (e.g. Visual Studio, Visual Studio Code) or a text editor (e.g. Notepad++, Notepad) to make edits needed for the specific implementation.
-
Make changes to the values in the Parameters to set section
-
strRedirectUri: This is going to be the URL to the public iView page in the Archer environment. The Querystring parameters need to be set to the following:
-
YourArcherHostURL: Archer URL
-
ID: iView ID (which can be seen when hovering over the iView name in Manager iView’s page).
-
Here are examples:
https://[YourArcherHostURL]/Portal/IViewsRender.aspx?iviewId=[ID]
https://sandbox.archer.com/Portal/IViewsRender.aspx?iviewId=209
-
-
strClientId: The Application (Client) ID for the registered application, as noted in the Collecting Values needed for the Custom Object section above.
-
strTenantId: The Directory (tenant) ID for the registered application, as noted in the Collecting Values needed for the Custom Object section above.
-
arrExternalLinksFields: Add an object to the arrExternalLinksFields array for each External Links field on the layout which requires OneDrive integration. Each object will be placed inside the square brackets of the array [] and offset by commas if multiple External Links fields need to be configured.
The object, enclosed in curly braces {} will have two comma-separated properties:
-
ExternalLinksFieldName, which will be set to the field name of the External Links Field to which the OneDrive File Picker needs to be integrated.
-
FileFilter, which will be set to a string of file extension you wish to permit to be selected, e.g. ".doc,.docx,.xls,.xlsx,.pdf". If you wish to allow all files to be uploaded, set the value of FileFilter to "".
-
-
Here is an example of a completed section:
//-------------------------------------------------------------
//PARAMETERS TO SET
//The redirectUri needs to be set to the .
//The redirectUri needs to be present in the Single-page application Redirect URIs found on the Authentication tab of the App registration in Microsoft Azure.
varstrRedirectUri = "https://sandbox.archer.com/Portal/IViewsRender.aspx?iviewId=209";
// Application (Client) Id of the registered application
varstrClientId = "c95b9480-0000-0000-0000-86193c9a1ec1";
//Directory (tenant) ID of the registered application
varstrTenantId = "945c199a-0000-0000-0000-5a91be5752dd";
//Add an object to the arrExternalLinksFields array for each External Links field which requires OneDrive for Business integration.
//The object will have two properties:
//ExternalLinksFieldName which will be set to the field name of the External Links Field
//FileFilter, which will be set to a string of file extension you wish to permit to be selected, e.g. ".doc,.docx,.xls,.xlsx,.pdf". If you wish to allow all files to be uploaded, set the value of FileFilter to ""
vararrExternalLinksFields = [
{ ExternalLinksFieldName: "Supporting Documents (Excel/Word) from SharePoint", FileFilter: ".doc,.docx,.xls,.xlsx,.xlsm,.xlsb" },
{ ExternalLinksFieldName: "Other Links (SharePoint)", FileFilter: "" }
];
//-------------------------------------------------------------
3. Paste the contents of the configured script into the Code field and set the Display property to Both.
4. Save the custom object and the layout and the application/questionnaire.
Add the OneDrive-button.png to the icons folder
-
Save this image
 to your local hard drive as OneDrive-button.png.
 -
Go to Application Builder > Global Values Lists and edit any Values List.
-
Click on the Edit icon of the first Value
-
Click on the Edit link for the Image and then click Add New.
-
Select the OneDrive-button.png file that you saved to your hard drive and click OK and OK again to upload it. (This is to upload the file to the icons folder, not to associate it with a values list.)
Troubleshooting
This section provides practical advice for diagnosing and resolving common issues or questions encountered while using this offering.
General Guidelines
-
For an enhanced user experience, configure the External links field as two columns.
-
Ensure the Azure application Client ID and Tenant ID is correct in the custom iView and External Links custom objects.
-
Ensure the Redirect URI is correct in External Links custom objects and the same is registered in the Azure application.
-
The External Links field name in Archer and the value of the ExternalLinksFieldNameproperty of the object(s) within the arrExternalLinksFields array in the External Links custom object must match.
-
To allow only certain file types to be attached to the External Links field from the OneDrive or SharePoint, use the “FileFilter” attribute within the object(s) within the arrExternalLinksFields array in “arrExternalLinksFields” parameter in External Links custom object, otherwise the FileFilter should be set to ""(i.e. an empty string).
Preserving SharePoint Document Links During File Structure Changes
If a document is linked to SharePoint and the file structure changes, such as moving the document from Folder 1 to Folder 2, the link will not be broken. The URLs in SharePoint are file-specific, meaning that even if the file is relocated to a different folder within the SharePoint site, the ID and the link remain preserved.
Certification environment
Date tested: February 2026
|
Product Name |
Version Information |
Operating System |
|---|---|---|
|
Archer Suite |
2025.12 |
Virtual Appliance |