BitSight
BitSight transforms how companies take on third party risk management and security performance management. BitSight’s leading security reporting service delivers actionable security ratings, cyber risk quantification, cyber risk metrics and security benchmarks through continuous monitoring of large pools of objective and independently verified data. By enabling more complete security visibility and evaluating how well an organization’s attack surface and third parties are protected against cybersecurity threats, BitSight helps to improve cybersecurity posture and manage risk more efficiently and effectively.
The BitSight and Archer integration brings infosec data from BitSight to the Archer Platform enabling a mapping between the quantitative, dynamic security rating information generated for a specific company by BitSight with vendor catalog and risk management information that resides in the Archer.
On this page
Release notes
Release 2.0
Last updated: June 2022
Version 2.0 is a complete rewrite from our first release, provides more functionality, and an improved user experience for retrieving new companies and recurring updates.
New and changed features
-
Easily add new companies from within Archer’s Third Party Profile and obtain BitSight ratings for
those companies.
-
Ability to obtain ratings for all companies in your BitSight portfolio into Archer automatically (V1 allowed only one) in one process.
-
Receive Alerts and Security Incidents/Public Disclosures per company based on your BitSight subscription (Total Risk Monitoring or Risk Monitoring) to monitor the risk your vendors present to your organization.
-
Ability to leverage the new BitSight Assessment Accelerator (BAA) licensing model for one-time pull of detailed vector ratings to evaluate potential vendors or perform periodic risk assessments.
-
Ability to switch subscriptions between Total Risk Monitoring and Risk Monitoring licenses from within Archer.
-
Allow for new companies to be requested if they are in your Third Party Profile list in Archer but not yet in BitSight and will be automatically added to your portfolio when available.
Fixed issues
None
Known issues
None
Release 1.0
-
BitSight’s first opportunity for customers to integrate with Archer
-
The Integration only pulled ratings one company at a time via a data feed
-
Displayed headline security ratings as well as detailed vector ratings
Overview of BitSight Security Ratings
Key features and benefits
With the offering, you will be able to:
-
Ability to quickly add BitSight Security Ratings linked to Third Party Profiles
-
Nightly updates of risk ratings and detailed vectors
-
Ability to switch subscription types
-
Custom alerts defined in the BitSight Portal presented in Archer
-
Security Incidents/Public Disclosures populated in Archer
Prerequisites (ODA and system requirements)
|
Components |
Prerequisites |
|---|---|
|
Archer Solution Area(s) |
Archer Third Party Governance |
|
Archer Use Case(s) |
Archer Third Party Catalog |
|
Archer Applications |
Third Party Profile |
|
Uses Custom Application |
Yes |
|
Requires On-Demand license |
Yes, 2 On-Demand Licenses are required. |
|
Archer requirements |
Archer 6.10 P1 and later |
|
Partner/Vendor Requirements |
Valid BitSight subscription and/or license is required. |
|
Operating System |
Windows Server 2012 R2 |
|
Database Server |
Microsoft SQL Server 2014 (64-bit) |
|
Services Server |
Java Runtime Environment (JRE) 8 (64-bit) |
Compatible Use Cases and Applications
Related Applications
|
Application |
Use Case |
Primary Purpose(s) of the Relationship |
|---|---|---|
|
Third Party Profile |
Third Party Catalog |
|
Impacted Use Case(s)
| Archer Use Case(s) |
|---|
|
Third Party Catalog |
Impacted fields (integrations only)
A single cross reference between Third Party Profiles and the BitSight Portfolio ODA will link the two records together. All other integration data is mapped to the new BitSight ODAs.
Additional resources
The following additional resources are available for this offering:
BitSight Security Ratings components
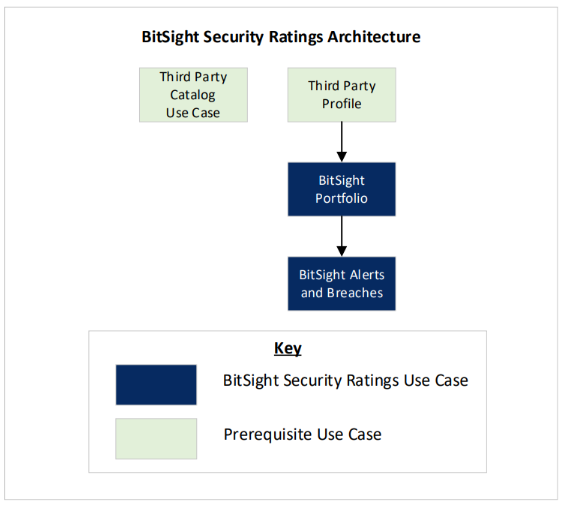
Architecture diagram
Below is the architecture of the BitSight Security Ratings solution.
Third Party Profile (TPP) will start the process by adding a new vendor record. The web site domain will be used to pull data from BitSight to create BitSight Portfolio records in Archer.
The BitSight Portfolio application stores all the critical security rating information about your vendors to make informed decisions about the risk they pose to your organization. Functionality within this application allows you to manage your subscription/licenses and view related alerts and public disclosures/security breaches. The data can be calculated up into the Third Party Profile for risk practitioners to drive assessments and decisions.
The BitSight Alerts and Breaches application stores all the alerts defined in your BitSight Portal for companies with the Total Risk Monitoring (TRM) or Risk Monitoring (RM) subscriptions. Alerts include specific vulnerabilities, rating percent changes, defined rating threshold changes, risk vector grade changes, NIST CSF Grades, and exposed credentials. In addition, any public disclosures/security breaches are also documented in this application.
The BitSight Dashboard is configured to allow easy access to common functionality for adding new vendors, performing mapping between TPP and BitSight Portfolio records, obtaining headline ratings, and the detailed vectors. Direct links to the BitSight Portal and BitSight Reports provide quick access to additional functionality. Insightful reports display security incidents/breaches, critical alerts, and rating changes.
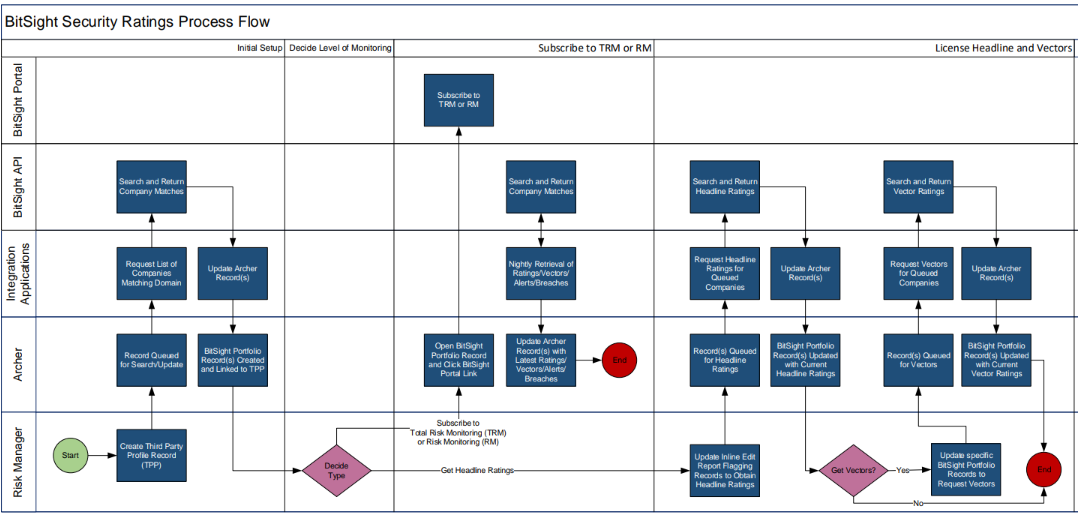
Swim Lane diagram
The following information describes the swim lane diagram further below. Please reference the diagram for a visual understanding of the process.
The Initial Setup process starts with creating a record in Third Party Profile and specifying the web site domain of that company. A scheduled job identifies records with new vendors, retrieves a list of companies that match BitSight’s catalog of companies tracked, and creates those BitSight Portfolio records in Archer. If only 1 record was returned, it will be linked to the Third Party Profile record. If it multiple records were returned (large companies with multiple web sites/domains), a simple mapping process would be completed using an inline edit report or directly from the Third Party Profile to link to the desired BitSight Portfolio record.
The practitioner would then need to Decide the Level of Monitoring based on the information they need for this vendor. The two paths are:
-
Using a Total Risk Monitoring or Risk Monitoring subscription
-
High level headline ratings
-
If further details needed, you could utilize a BitSight Assessment Accelerator (BAA) to obtain detailed vector information.
-
If Subscribe to TRM or RM was selected, the risk practitioner would click into the BitSight Portfolio company record, click on the BitSight Portal Link, and subscribe to either TRM or RM. The nightly integration applications would retrieve the data appropriate for each license.
|
Feature |
Risk Monitoring |
Total Risk Monitoring |
|---|---|---|
|
Headline Rating |
þ |
þ |
|
Detailed Vector Ratings |
ý |
þ |
|
Alerts |
þ |
þ |
|
Security Breaches/Public Disclosures |
þ |
þ |
If License Headline and Vectors was chosen, an inline edit report helps quickly select records to receive the headline ratings for selected companies. Periodically the integration applications run to identify those records queued, retrieve the headline data from BitSight, and update the records in Archer.
If additional vector information is desired, the risk practitioner would edit the BitSight Portfolio record and change the setting to perform a one-time pull of the detailed vectors. Periodically the integration applications run to identify those records queued, retrieve the detailed vector data from BitSight, and update the records in Archer.
The following diagram shows the general workflow of the solution:
Hint: Using the zoom feature, you can zoom in closer to display all the components clearly.
Applications
The following applications are used in the BitSight Security Ratings solution.
|
Application |
Description |
|---|---|
|
Third Party Profile |
Third Party Profile is where you specify the web site domain of the company which triggers the BitSight search and populates records in the BitSight Portfolio ODA described below. Risk ratings are calculated into the Third Party Profile to provide insights into your Third Party Risk program. |
|
BitSight Portfolio |
The BitSight Portfolio ODA manages the type of subscription/license and appropriate data to make informed risk decisions about your vendors. BitSight Total Risk Monitoring and the BAA One Time Pull of Risk Vectors will show detailed risk vector information. Risk Monitoring and Headline ratings will show aggregate ratings, but not the details. |
|
BitSight Alerts and Breaches |
For companies subscribed to Total Risk Monitoring and Risk Monitoring, a nightly job will update the BitSight Alerts and Breaches application with any alerts configured in the BitSight Portal and any Security Breaches/Public Disclosures identified. |
Personas and Access Roles
The following table describes the functions that make up the application’s organization roles. Depending on the organization of your company, these functions and responsibilities may vary.
|
Function |
Description |
|---|---|
|
BitSight Admins |
BitSight Admins have full create, read, update, and delete access to both BitSight ODAs (Portfolio and Alerts/Breaches) and ability to reset synchronization settings/flags. |
|
BitSight Users |
BitSight Users are typically Risk Managers evaluating vendors/suppliers. They have access to the BitSight dashboard, edit access to certain fields in the BitSight Portfolio to manage the licensing/subscriptions to obtain appropriate risk information for a company, and can view all Alerts and Breaches associated to each of the companies in the portfolio. |
|
BitSight API Users |
Provides access to two API user accounts used to create and update the BitSight Portfolio and BitSight Alerts and Breaches applications. Also has update access to update a field in the Third Party Profile application to reset a flag for searching for companies. These accounts follow the least-privilege access model for enhanced security. |
Installing BitSight Security Ratings
Installation overview
Complete the following tasks to install the offering.
Step 1: Prepare for the installation
-
Ensure that your Archer system meets the following requirements:
-
Archer Platform version 6.10 P1.
-
-
Read and understand the "Packaging Data" section of the Archer Online Documentation.
Step 2: Install the package
Installing a package requires that you import the package file, map the objects in the package to objects in the target instance, and then install the package. See Installing the Application Package for complete information. Manual configuration is also necessary to properly setup the solution.
Step 3: Set up integration applications
The BitSight integration utilizes scheduled integration applications. See Setting Up Integration Applications for complete information.
Note: Data Feeds may be available in a future version, however they will not be available for SaaS or Hosted customers due to the restrictions Archer IRM has regarding JavaScript Transporter Data Feeds which were not directly developed by Archer IRM.
Step 4: Test the installation
Test the application according to your company standards and procedures, to ensure that the use case works with your existing processes.
Installing the package
Task 1: Back up your database
There is no Undo function for a package installation. Packaging is a powerful feature that can make significant changes to an instance. Archer strongly recommends backing up the instance database before installing a package. This process enables a full restoration if necessary.
An alternate method for undoing a package installation is to create a package of the affected objects in the target instance before installing the new package. This package provides a snapshot of the instance before the new package is installed, which can be used to help undo the changes made by the package installation. New objects created by the package installation must be manually deleted.
Task 2: Import the package
-
Go to the Install Packages page.
-
From the menu bar, click
 .
. -
Under Application Builder, click Install Packages.
-
-
In the Available Packages section, click Import.
-
Click Add New, then locate and select the package file that you want to import.
-
Click OK.
The package file is displayed in the Available Packages section and is ready for installation.
Task 3: Map objects in the package
Important: This step is required only if you are upgrading to a later version of BitSight Security Ratings.
-
In the Available Packages section, select the package you want to map.
-
In the Actions column, click
 for that package.
The analyzer runs and examines the information in the package. The analyzer automatically matches the system IDs of the objects in the package with the objects in the target instances and identifies objects from the package that are successfully mapped to objects in the target instance, objects that are new or exist but are not mapped, and objects that do not exist (the object is in the target but not in the source).
Note: This process can take several minutes or more, especially if the package is large, and may time out after 60 minutes. This time-out setting temporarily overrides any IIS time-out settings set to less than 60 minutes.
When the analyzer is complete, the Advanced Package Mapping page lists the objects in the package file and corresponding objects in the target instance. The objects are divided into tabs, depending on whether they are found within Applications, Solutions, Access Roles, Groups, Sub- forms, or Questionnaires.
-
On each tab of the Advanced Mapping Page, review the icons that are displayed next to each object name to determine which objects require you to map them manually.
|
Icon |
Name |
Description |
|---|---|---|
|
|
Awaiting Mapping Review |
Indicates that the system could not automatically match the object or children of the object to a corresponding object in the target instance. Objects marked with this symbol must be mapped manually through the mapping process. Important: New objects should not be mapped. This icon should remain visible. The mapping process can proceed without mapping all the objects. Note: You can execute the mapping process without mapping all the objects. The |
|
|
Mapping Completed |
Indicates that the object and all child objects are mapped to an object in the target instance. Nothing more needs to be done with these objects in Advanced Package Mapping. |
|
|
Do Not Map |
Indicates that the object does not exist in the target instance or the object was not mapped through the Do Not Map option. These objects will not be mapped through Advanced Package Mapping, and must be remedied manually. |
|
|
Undo |
Indicates that a mapped object can be unmapped. This icon is displayed in the Actions column of a mapped object or object flagged as Do Not Map. |
-
For each object that requires remediation, do one of the following:
-
To map each item individually, on the Target column, select the object in the target instance to which you want to map the source object. If an object is new or if you do not want to map an object, select Do Not Map from the drop-down list.
Important: Ensure that you map all objects to their lowest level. When objects have child or related objects, a drill-down link is provided on the parent object. Child objects must be mapped before parent objects are mapped. For more details, see "Mapping Parent/Child Objects" in the Archer Online Documentation.
-
To automatically map all objects in a tab that have different system IDs but the same object name as an object in the target instance, do the following:
-
In the toolbar, click Auto Map.
-
Select an option for mapping objects by name.
Option
Description
Ignore
case
Select this option to match objects with similar names regardless of the case of the characters in the object names.
Ignore spaces
Select this option to match objects with similar names regardless of whether spaces exist in the object names.
-
Click OK. The Confirmation dialog box opens with the total number of mappings performed. These mappings have not been committed to the database yet and can be modified in the Advanced Package Mapping page.
-
Click OK.
-
To set all objects in the tab to Do Not Map, in the toolbar, click Do Not Map.
Note: To undo the mapping settings for any individual object, click
 in the Actions column.
 -
When all objects are mapped, the ![]() icon is displayed in the tab title. The
icon is displayed in the tab title. The ![]() icon is displayed next to the object to indicate that the object will not be mapped.
icon is displayed next to the object to indicate that the object will not be mapped.
-
Verify that all other objects are mapped correctly.
-
(Optional) To save your mapping settings so that you can resume working later, see "Exporting and Importing Mapping Settings" in the Archer Online Documentation.
-
Once you have reviewed and mapped all objects, click
 .
. -
Select I understand the implications of performing this operation and click OK.
The Advanced Package Mapping process updates the system IDs of the objects in the target instance as defined on the Advanced Package Mapping page. When the mapping is complete, the Import and Install Packages page is displayed.
Important: Advanced Package Mapping modifies the system IDs in the target instance. Any Data Feeds and Web Service APIs that use these objects will need to be updated with the new system IDs.
Task 4: Install the package
All objects from the source instance are installed in the target instance unless the object cannot be found or is flagged to not be installed in the target instance. A list of conditions that may cause objects not to be installed is provided in the Log Messages section. A log entry is displayed in the Package Installation Log section.
-
Go to the Install Packages page.
-
From the menu bar, click
. -
Under Application Builder, click Install Packages.
-
-
In the Available Packages section, locate the package file that you want to install, and click Install.
-
In the Configuration section, select the components of the package that you want to install.
-
To select all components, select the top-level checkbox.
-
To install only specific global reports in an already installed application, select the checkbox associated with each report that you want to install.
Note: Items in the package that do not match an existing item in the target instance are selected by default.
-
In the Configuration section, under Install Method, select an option for each selected component. To use the same Install Method for all selected components, select a method from the top-level drop-down list.
Note: If you have any existing components that you do not want to modify, select Create New Only. You may have to modify those components after installing the package to use the changes made by the package.
-
In the Configuration section, under Install Option, select an option for each selected component. To use the same Install Option for all selected components, select an option from the top-level drop-down list.
Note: If you have any custom fields or formatting in a component that you do not want to lose, select Do not Override Layout. You may have to modify the layout after installing the package to use the changes made by the package.
-
To deactivate target fields and data-driven events that are not in the package, in the Post- Install Actions section, select the Deactivate target fields and data-driven events that are not in the package checkbox. To rename the deactivated target fields and data-driven events with a user-defined prefix, select the Apply a prefix to all deactivated objects checkbox, and enter a prefix. This can help you identify any fields or data-driven events that you may want to review for cleanup post-install.
-
Click Install.
-
Click OK.
Task 5: Review the package installation log
-
Go to the Package Installation Log tab of the Install Packages page.
-
From the menu bar, click
. -
Under Application Builder, click Install Packages.
-
Click the Package Installation Log tab.
-
-
Click the package that you want to view.
-
In the Package Installation Log page, in the Object Details section, click View All Warnings.
Manual changes in third party profile
Most organizations intend to leverage the BitSight integration solution by pairing with the Third Party Profile application in the Third Party Catalog use case. The steps below outline a suggested approach for leveraging that data. Your organization may enhance the Third Party Profile with additional calculations, DDEs, or notifications to leverage the BitSight security ratings.
Important: It is critical the fields below be created with the exact name and values outlined below to ensure proper functionality. The fields can be placed anywhere on the application, but the naming is critical for the integration applications.
-
Manage the Third Party Profile application in Application Builder
-
Create a new Record Permission field
-
Name: ARP_Automatic Record Permission - BitSight
-
Change Permission Model to Automatic
-
In the Default Users/Groups section, add the following groups:
-
BitSight API Accounts with Read and Update
-
BitSight Admins with Read and Update
-
-
-
On the Risk Ratings tab (or wherever you prefer), create the following objects:
-
Create New Section: BitSight Portfolio Matching
-
Create Layout Object Text Box:
-
Name: BitSight Portfolio Matching Instructions
-
Description: Instructions: Enter a domain (company.com) to restrict the BitSight Portfolio lookup to link between TPP and BitSight Portfolio records. If this TPP record is new, you will need to enter this information and save the record for processing to search and create BitSight Portfolio records in Archer.
-
Display when editing a record: checked
-
Display when viewing a record: checked
-
-
Create Text Field:
-
Name: Domain
-
Single Line
-
Make this a searchable field: checked
-
Enable editing in search results: checked
-
-
-
Create Section: BitSight Portfolio
-
Create Layout Object Text Box:
-
Name: BitSight Rating Information
-
Description: The BitSight Rating information below is pulled from the related BitSight Portfolio record.
-
Display when editing a record: checked
-
Display when viewing a record: checked
-
-
BitSight Portfolio cross-reference should already exist from package creation and can be dragged onto layout. If the field is not available, create a new cross-reference field with these settings:
-
Name: BitSight Portfolio
-
Display Control: Grid
-
Make this a searchable field: checked
-
Enable editing in search results: checked
-
Allow users to select existing records: checked
-
Record Lookup Configuration - Fields to display:
-
BitSight Company Name
-
Domain
-
Description
-
Industry
-
Current Subscription Type
-
Related Third Party Profile
-
-
Grid Display Properties - Fields to display:
-
BitSight Company Name
-
Description
-
Industry
-
Current Subscription Type
-
Rating
-
Rating Category
-
Rating Date
-
-
Minimum Selection: No Minimum
-
Maximum Selection: 1
-
-
Values List:
-
Name: BitSight Rating Category
-
Make this a searchable field: checked
-
Global Values List: BitSight Rating Category
-
Make this a calculated field: checked
-
Formula:
IF (COUNTA([BitSight Portfolio])=1,REF([BitSight Portfolio],[Rating Category]),NOVALUE())
-
-
Numeric:
-
Name: BitSight Rating
-
Make this a searchable field: checked
-
Make this a calculated field: checked
-
Formula:
IF (COUNTA([BitSight Portfolio])=1, REF([BitSight Portfolio],[Latest Rating]), NOVALUE() )
-
-
-
Create Section: BitSight Debug Section
-
Create Values List:
-
Name: BitSight Portfolio Created?
-
Field-Specific Values List
-
Values:
-
No (Set “No” to default value)
-
Yes
-
-
Make this a searchable field: checked
-
Enable bulk update from search: checked
-
Enable editing in search results: checked
-
-
Create Values List:
-
Name: BitSight Subscription
-
Global Values List: BitSight Current Subscription Type
-
Make this a searchable field: checked
-
Make this a calculated field: checked
-
Formula:
IF (
COUNTA([BitSight Portfolio])=0, NOVALUE(),
REF([BitSight Portfolio],[Current
Subscription Type])
)
-
-
-
Update values list graphics
The Global Values List BitSight Rating Grades displays graphics for the vectors. Update the GVL to display the color-coding graphics in the Portfolio.
-
Under Application Builder, click Global Values Lists
-
Search or click on the GVL named BitSight Rating Grades
-
Click on each value and upload the appropriate image:
-
Click Edit near the Image section
-
Click Add New on the top-right to upload the image
-
Scroll down or search for “BitSight” and select the appropriate image
-
Click the OK button
-
Click the Save button
-
Repeat for all values B, C, D, F, and N/A
-
-
Click Save and Close button
Create new report in third party profile
-
Name: BitSight Company Listing
-
Selected Fields:
-
Third Party Name
-
Third Party Status
-
Domain
-
BitSight Portfolio
-
BitSight Rating Category
-
BitSight Rating
-
BitSight Subscription
-
-
Filters:
-
None - Unless you only want to show TPPs without a portfolio for matching purposes
-
-
Sorting:
-
Third Party Name - Ascending
-
Optional if used in your organization:
-
Subsidiary Third Party Name - Ascending
-
Sub-Subsidiary Third Party - Ascending
-
-
Display Format: Column - Flat
-
Record Count: Return All
-
Results Per Page: 50
-
Enable Inline Edit: Checked
-
Search and Save report
-
Description: Report for BitSight profile selection using inline edit.
-
Permissions: Global to Everyone
-
Update BitSight quick links iView
-
Overview: Add the new report created above to the list of links
-
Edit the properties of the BitSight Quick Links iView
-
In the Configuration section, click Add New
-
Name: BitSight TPP Listing
-
Action: Embed in an existing window
-
Change the search dropdown from Forum to Reports
-
Search for BitSight Company Listing
-
Add BitSight Company Listing to the Selected Links
-
Choose any Primary Graphic of your choice.
-
Setup integration applications
Task 1: Create two Archer API user accounts
Below are some suggested names and settings. However, please follow any organizational standards and simply take note of the differences when configuring the JavaScript applications.
-
First Account Settings:
-
First Name: dfm_BitSightAPIDaily
-
Last Name: API
-
User Name: dfm_BitSightAPIDaily
-
Security Parameter: Data Feed and API Parameter (or whatever parameter your company uses with non-expiring passwords)
-
Password: Whatever you want
-
Force Password Change: unchecked
-
Groups: BitSight API Accounts
-
-
Second Account Settings (Similar as above, but different account):
-
First Name: dfm_BitSightAPINightly
-
Last Name: API
-
User Name: dfm_BitSightAPINightly
-
Security Parameter: Data Feed and API Parameter (or whatever parameter your company uses with non-expiring passwords)
-
Password: Whatever you want
-
Force Password Change: unchecked
-
Groups: BitSight API Accounts
-
Task 2: Create BitSight API token
A BitSight API token must be created and utilized within the JavaScript integration applications to connect to BitSight. Below are the steps to create or locate the BitSight API token.
-
Login to BitSight Portal: https://service.bitsighttech.com/
-
Click on Gear icon on top-right of screen
-
Click Account option
-
Scroll down to API Token section
-
Click the Generate New Token button
-
Copy the Current API Token text for use in the integration applications.
Task 3: Configuring integration between Archer and BitSight
The integration applications must be configured correctly to successfully run.
This integration utilizes several JavaScript applications executed on a scheduled basis to perform the various tasks to pull data from BitSight into Archer via API. This allows organizations utilizing SaaS, Hosted, or on-Prem to utilize the same solution.
Many organizations utilize special enterprise job scheduling software tools such as Tidal, ActiveBatch, BMC Control-M, etc. The steps outlined below demonstrate the configuration with Windows Task Scheduler, however many of the same concepts apply for other scheduling software.
Important: Ensure the server running the integrations applications can make outbound calls to the Internet if you are using a SaaS or Hosted Archer instance. You may need to work with your networking and/or data security teams to update the firewall rules for outbound calls over HTTPS (port 443).
Install Node.JS on scheduling server
No matter which job scheduling software you choose to implement, Node.JS must be installed to execute the applications. The latest version of Node.JS is recommended.
-
Log into the server with administrator rights where you will run the JavaScript applications from programmatically.
-
Download and install the node.js application from http://nodejs.org
-
Choose all default options (or change as necessary)
-
Regarding “Tools for Native Modules” you do NOT need to check the box to automatically install the necessary tools.
-
Create Folder and Install Node Packages
-
-
Locate or create the folder/path where you want to run the JavaScript applications
Suggestion/Example: C:\Archer\BitSightIntegration
Tip: Avoid using spaces in your path/folder names for automated jobs
-
Install the required node packages with the Node Package Manager (npm)
-
Open a “Node.js command prompt” from your Windows Start Menu
Tip: Pin the “Node.js command prompt” to your taskbar
-
Change directories to the path/folder created in the step above.
-
Run the command “npm install request”
Note: Yes, we are aware the “request” library is deprecated. Archer IRM only allows four specific libraries to be used in JavaScript Transporter data feeds and “request” is one of them. Our plan is to release a version of these applications as JavaScript Transporter data feeds once JST logging is improved in Archer and Archer IRM allows a process for SaaS/Hosted customers to run non-Archer IRM developed code.
-
Run the command “npm install xmldom”
-
Run the command “npm install xml2js”
-
From the app-pack zip file, place the following files in the folder/path you created above:
-
100-BitSightTPPSearch.js
-
110-BitSightGetHeadlineRatingsNewLicense.js
-
120-ChangeSubscriptions.js
-
130-BitSightGetBAAVectors.js
-
200-BitSightSubscriptions.js
-
210-BitSightGetHeadlineRatingsNightly.js
-
220-PublicDisclosures.js
-
230-Alerts.js
-
daily.bat
-
nightly.bat
-
sendmailDaily.ps1
-
sendmailNightly.ps1
-
-
Configure every JavaScript file with your Archer URL, Archer Instance, Archer API Accounts, Archer paths, and BitSight Token.
Note: It is critical to use the correct API account for each of the JavaScript applications or the session IDs of the daily execution could interfere with the nightly jobs and terminate the longer running jobs.
-
All JavaScript applications starting with “1” will use the daily API account: dfm_BitSightAPIDaily
-
100-BitSightTPPSearch.js
-
110-BitSightGetHeadlineRatingsNewLicense.js
-
120-ChangeSubscriptions.js
-
130-BitSightGetBAAVectors.js
-
-
All JavaScript applications starting with “2” will use the nightly API account: dfm_BitSightAPINightly
-
200-BitSightSubscriptions.js
-
210-BitSightGetHeadlineRatingsNightly.js
-
220-PublicDisclosures.js
-
230-Alerts.js
-
-
-
Edit each .js in any text editor (notepad, notepad++, etc.)
-
Locate the defaultParams variable (search for “var defaultParams”) and change the following settings to the appropriate setting for your company
-
archer_username - The account you setup for the data feeds/API above
Example: dfm_BitSightAPIDaily (for applications 100 to 130) or dfm_BitSightAPINightly (for applications 200-230)
-
archer_password - Password for the accounts created above
-
archer_instanceName - Case sensitive name of your Archer Instance.
Example: Dev
Note: SaaS/Hosted customers will have an instance number instead of text
-
archer_webroot - Main URL of your Archer instance with a trailing slash.
Example: https://archer.mycompany.com/
-
bitsight_token - A valid BitSight token is required to run the solution. See section above to create or locate your BitSight Token.
Example: “47440143ea9b6c6aac5f873dbd5e551390adc2c5”
-
-
If you wish to enable verbose logging, change the bVerboseLogging variable to true.
-
Note: Enabling verbose logging is only necessary if you have any errors running the integration applications. Verbose logging will output more log data to help identify and correct any problems. Most issues with integration setup are with outbound connectivity through firewalls if you are connecting to an Archer server in a different location than your scheduling server.
Task 4: Configure the nightly.bat and daily.bat files
-
Edit the nightly.bat and daily.bat in any text editor (notepad, notepad++, etc.)
-
Locate and change the following settings to the appropriate setting for your company
-
Change the Archer Instance Name on this line:
-
set ArcherInstanceName=Dev
Note: This setting is informational for logging to help determine which instance is having issues should an error occur
-
-
-
At the very bottom of the file, we provide the ability to send an email via the sendmail(daily/nightly).ps PowerShell script if an error is detected. Your enterprise job scheduler may have a different method to send emails based on output from the batch file. The output for a successful execution to the console will be “SUCCESS”. If an error is detected in any of the scripts, the output will show “ERROR: BitSight Nightly Job - Execution Server: COMPUTERNAME - Archer Instance: ArcherInstanceName - Log file: logfile”
If you are interested in using our script, complete the following steps:
-
Remove the “REM” before the “PowerShell” text to uncomment the line in both .bat files.
-
Edit both .ps1 files in any text editor (notepad, notepad++, etc.)
-
Locate and change the following settings to the appropriate settings within your organization for the mail server, to and from email addresses, the subject line, any changes to the message body, and email security settings:
-
$emailSmtpServer
-
$emailSmtpServerPort
-
$emailFrom
-
$emailTo
-
Multiple email addresses are separated by commas.
Example: me@abc.com,you@abc.com
Suggestion: We suggest you send this email to a generic email inbox where multiple people can see the email rather than a single person.
Note: By default, emails are sent to archer.logs@bitsight.com so any issues can be addressed quickly in the event the person internally is no longer with the company or the email is invalid.
-
-
$emailMessage.Subject
Note: You can leave as-is or change to a different format
-
$emailMessage.Body
Note: You can leave as-is or change to a different format
-
-
If your email server requires SSL (highly likely):
-
Uncomment $SMTPClient.EnableSsl
-
-
If your email server requires authentication (highly likely):
a. Uncomment and set the following fields:
-
$emailSmtpUser
-
$emailSmtpPass
-
Suggestion: You can use the following PowerShell command to create a “secure string” so the password is not stored locally in the file.
Read-Host "Enter Password" -AsSecureString | ConvertFrom-SecureString
b. Uncomment the $SMTPClient.Credentials row
-
Save the .ps1 file
Task 5: Setup job scheduling
Some organizations are required to use enterprise job schedulers such as Tidal, ActiveBatch, BMC Control-M, etc. BitSight nor Tutela cannot provide support for those tools, however the settings below for Windows Task Scheduler may help you with the necessary settings in your organization.
-
Log into the Windows server with administrator rights where you will run the scripts from programmatically
-
Start the Windows Task Scheduler application on the server from the Start Menu
-
Create folders for Archer jobs
-
Right-click Task Scheduler Library and click New Folder
-
Type “Archer-BitSight” and click OK button
-
Create nightly job
-
Right-click the “Archer-BitSight” folder and click Create Task…
-
General Tab Settings:
-
Name: Archer BitSight Nightly Jobs
-
Description: This task launches the BitSight applications to process nightly jobs to replicate BitSight Security Ratings in the Archer platform from the BitSight API to enable our organization to effectively manage 3rd party security risk.
-
Click the Change User or Group… button and set to a user account which has administrator or Logon as Batch privileges
Note: You will likely need to setup an appropriate service account for this with a non-expiring password or a method to change the password and update the password in this task periodically.
-
Change the radio button selection to “Run whether user is logged on or not”
-
Set Configure for to current operating system
-
-
Triggers Tab Settings:
-
Click New… button
-
Begin the task: On a schedule
-
Settings:
-
Daily
-
Start: Current Day at whatever time make sense.
Example: 4/1/2022 at 6:00am.
Note: Based on BitSight server processing, we would suggest starting this processing no earlier than 5am Eastern Time Zone (UTC -5). Recure every: 1 days
-
-
Advanced Settings:
-
Stop task if it runs longer than 8 hours: Checked
-
Enabled: Checked
-
-
Click OK button
-
-
Actions Tab Settings:
-
Click New… button
-
Action: Start a program
-
Program/Script: [Full path to the batch file.] Example: C:\Archer\BitSight\nightly.bat
-
Start in (optional): [Full path of your batch file.] Example: C:\Archer\BitSight\
-
Click OK button
-
-
Conditions Tab Settings:
-
Network: Start only if the following network connection is available:
-
Checked
-
Set dropdown to Any Connection
-
-
-
Settings Tab Settings:
-
Allow task to be run on demand: Checked
-
Stop the task if it runs longer than 8 hours: Checked
-
If the running task does not end when requested, force it to stop: Checked
-
If the task is already running, then the following rule applies: Do not start a new instance
-
-
Click the OK button to save your new task
-
Test the scheduled job
-
Right-click the scheduled job and click Run
Create daily job
-
Right-click the “Archer-BitSight” folder and click Create Task…
-
General Tab Settings:
-
Name: Archer BitSight Daily Jobs
-
Description: This task launches the BitSight applications to process daily jobs to replicate BitSight Security Ratings in the Archer platform from the BitSight API to enable our organization to effectively manage 3rd party security risk.
-
Click the Change User or Group… button and set to a user account which has administrator or Logon as Batch privileges
Note: You will likely need to setup an appropriate service account for this with a non-expiring password or a method to change the password and update the password in this task periodically.
-
Change the radio button selection to “Run whether user is logged on or not”
-
Set Configure for to current operating system
-
-
Triggers Tab Settings:
-
Click New… button
-
Begin the task: On a schedule
-
Settings:
-
Daily
-
Start: Current Day at whatever time make sense.
Example: 4/1/2022 at 6:02am
Tip: We suggest setting at a slightly different minute than the nightly to offset the execution times. In the case above we suggest 2 minutes after 6AM.
Since this job runs every x minutes per day, there is no suggested time to run this job. You may decide to run it more frequently during the day to give a more “real-time” experience for your end-users.
-
Recure every: 1 days
-
-
Advanced Settings:
-
Repeat task every: 5 minutes for a duration of 1 day
Note: You can choose to run this at whatever interval makes sense and is acceptable by your business partners. Some organizations have more flexibility to run this job more frequently during business hours and less often at off-hours. Training to your end-users will inform them on what they can expect with the solution as far as execution times. Perhaps add this information into to help text or as a text box on the BitSight Portfolio application. Setting the expectation of your users will reduce support calls to the Archer team asking why processing hasn’t completed yet.
-
Stop task if it runs longer than 1 hour: Checked
-
Enabled: Checked
-
-
Click OK button
-
-
Actions Tab Settings:
-
Click New… button
-
Action: Start a program
-
Program/Script: [Full path to the batch file.]
Example: C:\Archer\BitSight\daily.bat
-
Start in (optional): [Full path of your batch file.]
Example: C:\Archer\BitSight\
-
Click OK button
-
-
Conditions Tab Settings:
-
Network: Start only if the following network connection is available:
-
-
Checked
-
Set dropdown to Any Connection
-
Settings Tab Settings:
-
Allow task to be run on demand: Checked
-
Stop the task if it runs longer than 1 hour: Checked
-
If the running task does not end when requested, force it to stop: Checked
-
If the task is already running, then the following rule applies: Do not start a new instance
-
-
Click the OK button to save your new task
-
Test the scheduled job
-
Right-click the scheduled job and click Run
Task 6: Security and hardening
BitSight token
The BitSight API Token used in the integration has the same privilege as the user who created the token. It is suggested to protect the API token as you would a username and password. While the API token cannot login to the BitSight portal directly, any available functionality via the API could be used.
Least privilege model
The Archer API security credentials used in this integration follow the least privilege access model by design. The Archer API accounts can only:
-
Read and update Third Party Profile records
-
Create, Read, and Update BitSight Portfolio records
-
Create, Read, and Update BitSight Alerts and Breaches records
API integration code security
Archer API security credentials and the BitSight Token are accessible by anyone who can read the files in the integration code folder. It is suggested to restrict the access of the folder to the least amount of users as possible on a need to know basis.
Upgrading BitSight security ratings integration
If you have used the first version of the BitSight Security Ratings Archer integration, there is no direct upgrade path. Version 2.0 was rewritten from the ground up and significantly enhanced in all aspects of the solution from functionality, information available, and end-user experience.
Organizations may consider retaining the old BitSight fields manually created in Third Party Profile for historical purposes; especially if risk-based decisions were made based on that data. Or you can remove those legacy fields entirely after utilizing the 2.0 version for a while confirming the new solution is meeting your organization’s needs.
Using BitSight security ratings
Additional configuration
Many Archer customers continue to further configure/customize their Archer implementations to meet their organization’s unique needs and improve their risk posture.
These changes typically include
-
Various verbiage/taxonomy changes
Note: Caution is needed around integration points. Contact Tutela Solutions for assistance to ensure compatibility.
-
Security permissions with additional access roles
-
Customized email notifications upon certain events/triggers
-
New or updated dashboards and reports
-
Unique calculations of risk into Third Party Profile (TPP)
-
Additional linkage to other applications in Archer such as Incidents, Findings, Action Plans, and/or Exceptions, etc.
-
API integrations and/or Data Feeds to automate creation of records such as Incidents, Findings, etc. within Archer or integration outside of Archer to another system.
Access groups and roles
The following end-user groups/roles are available by default:
-
BitSight Admins
|
Component |
Create |
Read |
Update |
Delete |
Import |
|---|---|---|---|---|---|
|
Third Party Profile |
X |
X |
X |
|
X |
|
BitSight Portfolio |
X |
X |
X |
X |
X |
|
BitSight Alerts and Breaches |
X |
X |
X |
X |
X |
-
BitSight Users
|
Component |
Create |
Read |
Update |
Delete |
Import |
|---|---|---|---|---|---|
|
Third Party Profile |
X |
X |
X |
|
X |
|
BitSight Portfolio |
|
X |
X |
|
|
|
BitSight Alerts and Breaches |
|
X |
|
|
|
Note: Additional record permissions may need to be setup in TPP based on your organization’s security access model. Typically, the Relationship Manager field has access to the TPP record. Given BitSight’s usage for managing risk, you are likely to use the Risk Analysts field. Please review the Access Considerations section below for additional implementation ideas to segment access further.
BitSight licensing overview
The use of the BitSight Archer integration will depend on your organization’s subscription and/or licensing model. Most organizations are already using BitSight’s Total Risk Monitoring (TRM) and Risk Monitoring (RM) subscription services. These subscriptions are managed in the BitSight Portal. While initial subscriptions or cancellations are still performed in the BitSight Portal, this integration allows you to change between TRM and RM easily.
The BitSight Assessment Accelerator (BAA) is a licensing model offered by BitSight to perform initial risk evaluations and then obtain detailed risk vectors. The BAA is only available via API and this version of the BitSight Archer integration supports this enhanced model. This is particularly helpful for organizations evaluating multiple vendors before deciding which ones to pursue further without having to use a full TRM or RM license.
BitSight alerts setup
Alert information that flows into Archer is based on the configuration in the BitSight Portal for the user who generated the BitSight API Token. Alerts are highly customizable and provide threshold settings for each of the types of alerts and by tier of the company monitored.
Note: If you want BitSight alert information to flow into Archer, you must setup the alert configuration in the BitSight Portal. Only alerts generated in the past day and with the settings at the time of the retrieval are obtained and displayed in Archer. Refer to the BitSight Online Help for assistance configuring the alerts in the BitSight Portal.
Existing BitSight customers
If you are an existing BitSight customer with a portfolio of companies/vendors in the BitSight Portal, the Nightly.bat job will import all your currently subscribed companies/vendors from your portfolio into Archer’s BitSight Portfolio application. Alerts and security disclosures are also populated from the past day. This applies to all companies in your portfolio with a Total Risk Monitoring or Risk Monitoring subscription.
-
Run the Nightly.bat script manually
-
Map/Link Third Party Profile records to BitSight Portfolio records
-
There are many ways to do this based on the data in your Third Party Profile depending on the number of records you have in your TPP, type of data in your TPP, and/or the number of BitSight companies in your portfolio.
-
If you have a “small” number of TPP records:
-
Utilize the BitSight TPP Listing inline edit report to link your TPP to the BitSight portfolio record. Steps:
-
Click the BitSight Dashboard
-
Click the BitSight TPP Listing link in the BitSight Links iView
-
For each TPP you want to link to a BitSight Portfolio, use inline edit to edit the BitSight Portfolio field.
-
Search or navigate to the appropriate record
-
Select the checkbox of the correct portfolio record
-
Click the OK button
-
Click the save icon to the right of the record to commit your changes
-
Repeat these steps for each TPP you want to link to the BitSight Portfolio records.
-
-
-
-
If you have a “small” number of BitSight Company records/subscriptions:
-
An alternative method would be to start from the BitSight Portfolio records automatically loaded into Archer. Steps:
-
Click the dropdown icon on the BitSight dashboard
-
Click the BitSight Portfolio application
-
Enable Inline Editing
-
For each Portfolio you want to link to a TPP, use inline edit to edit the Related Third Party Profile field.
-
Search or navigate to the appropriate record
-
Select the checkbox of the correct TPP record
-
Click the OK button
-
Click the save icon to the right of the record to commit your changes
-
Repeat these steps for each Portfolio you want to link to the TPP records.
-
-
-
-
If you have many TPP records and/or BitSight company subscriptions/records:
-
You may want to consider performing a data import to link between TPP and BitSight Portfolio records:
-
Create a report of applicable TPP records with fields to help perform matching and appropriate filters to restrict applicable TPP records. Ensure a unique field is used for the import process such as the Third Party ID field which is the unique tracking ID for TPP records.
-
Create a report of applicable BitSight Portfolio records with fields to help perform matching and appropriate filters to restrict applicable BitSight Portfolio records. Ensure the “BitSight Company Name” field is included in the export report for matching.
-
Utilize various Excel functionality such as vlookup or manual data entry to perform appropriate matching between the records to create a .csv import file.
-
Ultimately, you need to create a .csv import file with the following fields minimum:
-
Unique ID from TPP (Example: Third Party ID)
-
BitSight Company Name
-
-
Perform a Data Import into TPP
-
Upload the .csv import file
-
iThe rest of the default options are acceptable in Step 1
-
Click Next button to continue to Step 2
-
Set Import Type to Update Existing Records
-
Change Lookup Field(s) to Third Party ID (or whatever key field you plan to use for matching TPP records)
-
Ensure proper mapping of field you want to import (you only need to import the TPP key field and BitSight Company Name)
-
Change the BitSight Company Name field mapping option to: BitSight Portfolio (BitSight Company Name)
-
Click Next button to Continue
-
Click Import button to import the records
-
-
-
-
BitSight dashboard
The BitSight Dashboard includes a number of quick links to assist your usage of the solution. Ensure you have access to the dashboard before continuing.
High level process overview
The usage of the BitSight Security Ratings solution in Archer depends on the types of BitSight subscriptions and licensing your organization purchased from BitSight. Please follow the instructions based on your organization’s BitSight agreement.
Both TRM/RM and BAA
The process below outlines the suggested full process for organizations with both TRM/RM subscriptions and BAA tokens/licensing:
-
Create vendor record in TPP with Domain field populated (ex. bitsight.com)
-
There are many ways to create a TPP, but the BitSight dashboard includes a quick link Create New Third Party Profile
-
-
Backend processes automatically create one or more BitSight Portfolio records in Archer
-
If only 1 record is returned, the linkage between the BitSight Portfolio record to TPP is automatically established
-
If multiple records are returned, you will map the desired BitSight Portfolio record using a report from TPP and use inline edit to map to the BitSight Portfolio
-
-
Determine next action:
If you are evaluating the vendor compared to other vendors for an initial search/exploration on their security posture, then you will likely use the headline rating option first. If your organization already has an existing relationship with this vendor and wish to monitor the risk they pose to your organization and therefore TRM or RM may be more appropriate as your first step.
-
Only obtain headline rating
-
Use the BitSight Assessment Accelerator (BAA): Headline Ratings inline edit report from the BitSight dashboard to request headline ratings for specific companies
Note: Only companies in the BitSight Portfolio eligible for headline ratings are shown:
-
Does not have a current TRM/RM subscription
-
Does not already have an active headline rating license
-
BitSight Portfolio is linked to a TPP record
-
-
The backend process will obtain the headline rating for your review/reporting
-
Headline ratings will continue to update automatically on a nightly basis for 1 year.
-
-
If the rating is unacceptable, the process may end here for this company. If you want to retrieve additional detailed information, you could skip BAA Vectors and go directly to TRM/RM.
-
If you want a one-time pull of the BAA Risk Vectors, use the BitSight Assessment Accelerator (BAA): Risk Vectors report from the BitSight dashboard for a list of companies eligible for BAA.
-
Perform the following steps:
Edit the selected BitSight Portfolio record
Change Pull Today's BitSight Risk Vectors? To “Yes”. This will use one of your BAA tokens
Click the Save and Close button
Allow background processing to complete
Risk vectors will be available in the Risk Vectors section for review.
b. Subscribe to TRM or RM: Follow the detailed steps in the section below named Subscribing to TRM or RM
TRM and/or RM subscriptions only
If your organization only intends to use TRM and/or RM subscriptions, please review the section Appendix E: Disable BAA Functionality in the Appendix. This section provides instructions to disable BAA functionality to improve the User Interface and User Experience.
The process below outlines the process for organizations with only TRM and/or RM subscriptions:
-
Create vendor record in TPP with Domain field populated (ex. bitsight.com)
-
There are many ways to create a TPP, but the BitSight dashboard includes a quick link Create New Third Party Profile
-
-
Backend processes automatically create one or more BitSight Portfolio records in Archer
-
If only 1 record is returned, the linkage between the BitSight Portfolio record to TPP is automatically established
-
If multiple records are returned, you will map the desired BitSight Portfolio record using a report from TPP and use inline edit to map to the BitSight Portfolio
-
-
Subscribe to TRM or RM
-
Follow the detailed steps in the section below named Subscribing to TRM or RM
-
BAA only
If your organization only intends to use BAA Licensing, please review the section Appendix F: Disable TRM/RM Functionality in the Appendix. This section provides instructions to disable BAA functionality to improve the User Interface and User Experience.
The process below outlines the process for organizations with only BAA licenses:
Note: BAA Only customers will not be able to access the BitSight Portal links on the BitSight Portfolio record page in the General Information section. Ask your Archer administrator to remove those links from view until subscriptions are added to your BitSight agreement.
-
Create vendor record in TPP with Domain field populated (ex. bitsight.com)
-
There are many ways to create a TPP, but the BitSight dashboard includes a quick link Create New Third Party Profile
-
-
Backend processes automatically create one or more BitSight Portfolio records in Archer
-
If only 1 record is returned, the linkage between the BitSight Portfolio record to TPP is automatically established
-
If multiple records are returned, you will map the desired BitSight Portfolio record using a report from TPP and use inline edit to map to the BitSight Portfolio
-
-
Only obtain headline rating
-
Use the BAA Headline Ratings inline edit report to request headline ratings
-
The backend process will obtain the headline rating for your review/reporting. Headline ratings will continue to update automatically on a nightly basis for 1 year.
-
If the rating is unacceptable, the process may end here. If you want to retrieve additional information, continue to the next step to obtain risk vectors.
-
-
If you want a one-time pull of the BAA Vectors, use the BitSight Assessment Accelerator (BAA) Risk Vectors report from the BitSight dashboard for a list of companies eligible for BAA Vectors OR go directly to the BitSight Portfolio record. Perform the following steps:
-
Edit the BitSight Portfolio record
-
Change Pull Today's BitSight Risk Vectors? To “Yes”. This will use one of your BAA tokens
-
Click the Save and Close button
-
Allow background processing to complete
-
Risk vectors will be available in the Risk Vectors section for review.
-
Subscribing to TRM or RM
The integration in Archer allows you to quickly locate the company record in the BitSight Portal to subscribe to a company’s risk information. This assumes you have the rights to manage the BitSight Portal for your company.
Note: It is important to perform the steps with the appropriate user account since the backend processing utilizes a specific API Token associated to a user account.
-
View the desired BitSight Portfolio company record
-
Click the BitSight Portal Subscription Link to open the BitSight Portal and subscribe to TRM or RM
-
Steps within the BitSight Portal:
-
Click the Subscribe button to see a list of options.
-
Click your desired level of monitoring.
-
-
Click the Confirm button to use one of your subscriptions.
-
Select the appropriate options for Company Relationship, Life Cycle Stage, and Tier, then click the Save and View Company button.
-
The overnight backend process will obtain the appropriate data for your review/reporting
-
TRM and RM subscriptions will continue to update automatically on a nightly basis
Switching from TRM to RM (Or switching from RM to TRM)
The integration in Archer allows you to switch subscriptions between TRM and RM and vice versa. Below are the steps to switch subscriptions:
-
Edit the selected BitSight Portfolio company record
-
Change the Change Subscription Type field to either “Risk Monitoring” or “Total Risk Monitoring” (options are based on your current subscription).
Note: If you save the record, you will switch subscriptions upon next scheduled backend job synchronization.
-
Click the Save and Close button
-
Allow background processing to complete
-
The subscription will change to the selected type (assuming available subscriptions for your account).
Unsubscribing TRM or RM
The integration in Archer allows you to quickly locate the company record in the BitSight Portal to unsubscribe from a company’s risk information. This assumes you have the rights to manage the BitSight Portal for your company.
Important: It is important to perform the steps with the appropriate user account since the backend processing utilizes a specific API Token associated to a user account.
-
View the desired BitSight Portfolio company record
-
Click the BitSight Portal Subscription Link to open the BitSight Portal
-
To unsubscribe from TRM or RM within the BitSight Portal:
-
Click on the company name
-
Click the Actions button
-
Click the Unsubscribe option
-
Click the Confirm button
-
-
The overnight backend process will update the subscription type to Not Subscribed
Certification environment
Date tested: April 2022
|
Product Name |
Version Information |
Operating System |
|---|---|---|
|
Archer |
6.10 P1 |
Windows |
|
BitSight Security Ratings |
2.0 |
Windows |
Access considerations
The implementation provided does not use record permission fields and is only secured via group/role access. Therefore, all records in the BitSight Portfolio and Alerts applications are open to all users in the BitSight Admins and Users groups.
You may want to consider adding inherited record permissions (IRP) from TPP to restrict access to specific BitSight Portfolios and Alerts. This will help show appropriate records to your users in dashboards and reports. Perhaps you want to allow Relationship Managers to view the BitSight ratings and alert, but not edit any of the fields in the BitSight Portfolio. You can update their role to allow read access to the BitSight applications and then inherit that user’s access into BitSight Portfolio with an IRP. You will need to also inherit into the BitSight Alerts and Breaches application.
If you implement IRPs, you will want to set up an automatic record permission to allow appropriate access to your BitSight Admins and Users groups in both BitSight applications.
Known future improvements
-
Ability to load all Public Disclosures/Security Breaches for a company when added to your portfolio into Archer.
-
Ability to view trendline graphic and highlight information.
-
BitSight Assessment Accelerator questionnaire answer pre-population.
FAQ
Q: What happens to the vector information if I switch from TRM to RM or if we utilize a BAA Risk Vector token?
A: Risk vector information will remain visible for users. A warning message will show up to inform you the risk vectors are potentially dated and no longer representative of the risk the company poses to your organization.
Q: How long does it take to process changes to create BitSight Portfolio records, obtain headline ratings, or obtain BAA Vector data?
A: Your organization will define the frequency of these backend processing jobs. Contact your Archer administrator and ask what about the frequency. Some organizations run the jobs every 5 minutes, others 1 hour, and some only 1 time per day.
Q: How long does it take to perform the nightly job to pull all TRM/RM, headline ratings, risk vectors, alerts and/or security incidents/Public disclosures?
A: The processing will vary per organization based on the number of subscriptions, type of subscriptions, location of Archer servers, location of scheduling server, network speed, nightly job server processing speed, devices between the servers, other processing in Archer, etc. Expect to see less than 1 second per company monitored for all data to process in the nightly jobs.
Q: Why aren’t all companies able to get Headline Ratings in the “BitSight Assessment Accelerator (BAA): Headline Ratings” report?
A: Only companies in the BitSight Portfolio eligible for headline ratings are shown:
-
Does not have a current TRM/RM subscription
-
Does not already have an active headline rating license
-
BitSight Portfolio is linked to a TPP record
Q: Why aren’t all companies able to get Risk Vectors in the “BitSight Assessment Accelerator (BAA): Risk Vectors” report?
A: Only companies in the BitSight Portfolio eligible for BAA Risk Vectors are shown
-
Does not have a current TRM/RM subscription
-
Has an active (unexpired) headline rating license
-
BitSight Portfolio is linked to a TPP record
Q: What happens if I select “Pull Today’s BitSight Risk Vectors” twice in the same day? Will it use an additional BAA token license?
A: If you happen to run the job to pull the risk vectors more than one time within 24 hours, you will not use an additional BAA token license. The job will update any risk vector changes detected.
Q: Why are the Alerts and Security Incidents/Public Disclosures in the same ODA?
A: To make the most efficient use of Archer ODA licensing for your organization, we use DDEs to show/hide appropriate fields for each type of BitSight event. Reporting is based on the Record Type and shows the pertinent information. Due to the fact there are many alerts and security incidents per company, this application needed to be separate than the BitSight Portfolio application.
Q: Can I retire the BitSight Alerts and Breaches ODA if I’m not using TRM or RM subscriptions?
A: Yes, if you have no intention of using the TRM or RM subscriptions which pull the alerts and security breaches/public disclosures, then you can retire the ODA. You can always use it later if desired. If you plan to retire the ODA, we suggest also inactivating the following .js files by commenting out code in the nightly.bat file related to the 220 and 230 applications.
Disable BAA functionality
If your organization is only using TRM and/or RM subscriptions, the following administrative steps will remove the BAA licensing functionality to improve the User Interface and User Experience.
Remove links in the “BitSight Links” iView.
-
Click on the BitSight workspace.
-
Locate the BitSight Links iView and click the three dot menu on the right.
-
Click Edit Properties option.
-
Click the blue X on the right to remove the following links:
-
BitSight Assessment Accelerator (BAA): Headline Ratings
-
BitSight Assessment Accelerator (BAA): Risk Vectors
-
-
Click the OK button to save.
-
Optionally adjust the size of the iViews to look appealing.
Update the nightly.bat script
-
Make a backup copy of the nightly.bat file.
-
Edit the nightly.bat file.
-
Delete or comment all rows that deal with the “210” script.
-
Save the nightly.bat file.
Update the daily.bat script
-
Make a backup copy of the daily.bat file.
-
Edit the daily.bat file.
-
Delete or comment all rows that deal with the “110 and 130” scripts.
-
Save the daily.bat file.
Disable TRM/RM functionality
If your organization is only using BAA licensing, the following administrative steps will remove the subscription functionality to improve the User Interface and User Experience.
-
Manage the BitSight Portfolio application in Application Builder and perform the following steps:
-
In the General Information section, move/drag the BitSight Portal Company Overview
field into the debug section or off layout.
-
In the General Information section, move/drag the BitSight Portal Subscription Link
field into the debug section or off layout.
-
In the Alerts section, move/drag all the fields into the debug section or off layout.
-
Delete the Alerts section.
-
-
Manage the BitSight Alerts and Breaches application in Application Builder and perform the following steps:
-
Click on the Properties tab of the application
-
Change Status to “Retired”
-
-
Click on the BitSight workspace and remove the following iViews:
-
Critical Alerts Last 30 days by Company
-
Rating Changes Last 90 Days
-
Recent Security Incidents/Breaches
-
Security Incidents/Breaches Drill
-
-
Update the nightly.bat script.
-
Make a backup copy of the nightly.bat file.
-
Edit the nightly.bat file.
-
Delete or comment all rows that deal with the “200, 220, and 230” scripts.
Note: The “210” script is the only applicable functionality for BAA only users
-
Save the nightly.bat file.
-
-
Update the daily.bat script.
-
Make a backup copy of the daily.bat file.
-
Edit the daily.bat file.
-
Delete or comment all rows that deal with the “120” script.
-
Save the daily.bat file.
-