SecurityScorecard
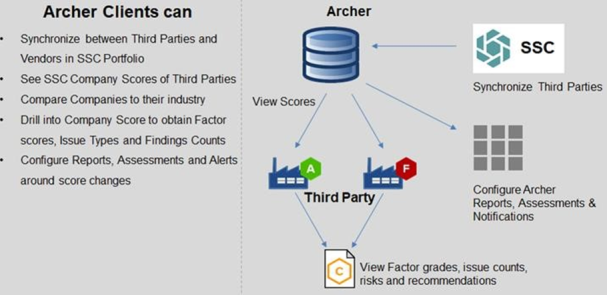
SecurityScorecard’s integrated solution with Archer helps enterprises manage vendor risk and institutional security. The integrated solution allows organizations to leverage use cases available in Archer and the SecurityScorecard platform, to have a more comprehensive view of vendor risk specific to individual vendors and across their entire organization.
With the Archer Exchange, the Archer team has created a broad selection of supplemental, value-added offerings to help you get your unique risk management program on the right path, right from the start. You can leverage the Archer Exchange offerings to expand the use of Archer solutions into new business processes and address specific industry, geographic, regulatory, or technical requirements.
On this page
Release notes
|
Release date |
Release |
Notes |
|---|---|---|
|
Version 6.14 |
July 2024 |
Resigned expired JS file |
|
Release Version |
Published Date |
Notes |
|
Version 6.14 |
February 2024 |
Resigned JS file by Archer to support Archer SaaS customers |
|
Archer 6.9 SP1 |
November 2023 |
Resigned JS file |
|
Archer 6.9 SP1 |
November 2022 |
|
|
Archer 6.9 SP1 |
February 2021 |
|
|
Archer 6.4.1.1 |
May 2020 |
|
|
Archer 6.4.1.1 |
August 2017 |
Initial Release |
Known issues
-
Because of the API request limitations from SecurityScorecard, portfolios with 300+ entries might encounter timeouts when utilizing JavaScript data feeds. Please contact SecurityScorecard if experiencing issues running the data feeds.
-
For more information please visit: https://securityscorecard.readme.io/docs/rate-limits
Overview of Security Scorecard integration
Key features and benefits
The Security Scorecard integration enables organizations to:
-
Provide cybersecurity ratings for third parties and supporting data to provide detailed and in-depth information on the potential risks within those third parties- in the form of Factor ratings and Finding counts.
-
Enable cyber and risk professionals to assess the cybersecurity of potential business partners and to monitor cybersecurity ratings of existing partners.
Prerequisites (ODA and system requirements)
The following table lists the components and prerequisites for the SecurityScorecard integration.
|
Components |
Prerequisites |
|
Archer Solution Area(s) |
Third Party Management |
|
Archer Use Case(s) |
Third Party Catalog |
|
Archer Applications |
Third Party Profile Third Party Engagements |
|
Uses Custom Application |
Yes |
|
Requires On-Demand license |
1 - 3 Archer On-Demand Application (ODA) licenses are required for this offering. |
|
Archer requirements |
Archer 6.14 and later |
|
Partner/Vendor Requirements |
Valid Risk Recon License is required |
|
Supported Archer Environments |
|
Compatible Use Cases and Applications
Related Applications
|
Application |
Use Case |
Primary Purpose of the Relationship |
|
Third Party Profile |
|
The Third-Party Profile application is used to document all the third-party relationships used by an organization. In this application, the organizational structure of the third-party relationship is established, third party contacts documented, and relationship manager, risk analyst, and procurement / legal officer accountabilities are created. This application is the hub for navigation throughout the solution and contains summary metrics and reporting. |
|
Engagements |
|
The Engagements application serves as the repository for all products and services provided by a third-party to the organization. Engagements are documented by type, description; and business unit; are associated with the third party delivering the engagement; the associated contracts and business processes and are assigned to an engagement owner and manager. The Engagements application serves as the focal point for presenting all the engagement-centric risk assessments and performance metrics and financial spend and 4th party supply chain dependencies documented. |
Impacted Use Cases
-
Third Party Catalog
-
Third Party Risk Management
-
Operational Scenario Analysis
-
Third Party Engagement
Additional resources
The following additional resources are available for this offering:
-
Third-party website: www.securityscorecard.io
-
Installation Guide Videos: https://securityscorecard-3.wistia.com/projects/w3d5amd1ar
SecurityScorecard Integration components
Architecture diagram
The following diagram shows the relationships between the applications that make up SecurityScorecard integration.
Applications
-
SecurityScoreCard Monitoring
-
SecurityScoreCard Event Log
-
SecurityScoreCard Portfolio
Personas and Access Roles
The following table describes the functions that make up the application’s organization roles. Depending on the organization of your company, these functions and responsibilities may vary.
|
Name |
Type |
Install Method |
Install Option |
Required |
|
SSC: Administrator |
Access Role |
|
Override Permissions |
Recommended See appendix for Role based permissions and the Group assignments |
|
SSC: Read-Only |
Access Role |
|
Override Permissions |
|
|
SSC: User |
Access Role |
|
Override Permissions |
|
|
SecurityScorecard Event Log |
Application |
Create New Only |
Do not Override Layout(s) |
Required |
|
SecurityScorecard Monitoring |
Application |
Create New Only |
Do not Override Layout(s) |
Recommended |
|
SecurityScorecard Portfolio |
Application |
Create New Only |
Do not Override Layout(s) |
Required |
|
SecurityScorecard |
Dashboard |
Create New Only |
Do not Override Layout(s) |
Required |
|
SecurityScorecard Assessment |
Questionnaire |
Create New Only |
Do not Override Layout(s) |
Required |
|
SecurityScorecard |
Workspace |
Create New Only |
Do not Override Layout(s) |
Required |
|
SecurityScorecard Portfolio: Bottom 10 Companies |
Report |
Create New Only |
|
Required |
|
SecurityScorecard Portfolio: Company Score Distribution |
Report |
Create New Only |
|
Required |
|
SecurityScorecard Portfolio: SecurityScorecard Portfolio |
Report |
Create New Only |
|
Required |
|
SecurityScorecard Portfolio: SSC Scheduled Report Distribution |
Report |
Create New Only |
|
Required |
|
SecurityScorecard Portfolio: Top 10 Risk Factors |
Report |
Create New Only |
|
Required |
Role and Group Assignments
The following table describes the Role based permissions and the Group assignments included with this package:
|
|
SSC: Administrator |
SSC: User |
SSC: Read Only |
|||||||||
|
Page Name |
C |
R |
U |
D |
C |
R |
U |
D |
C |
R |
U |
D |
|
SecurityScorecard Assessment: Content Record |
X |
X |
X |
X |
|
X |
X |
|
|
X |
|
|
|
SecurityScorecard Assessment: Data Import |
X |
X |
X |
X |
|
|
|
|
|
|
|
|
|
SecurityScorecard Assessment: Email Option |
|
X |
|
|
|
X |
|
|
|
X |
|
|
|
SecurityScorecard Assessment: Export Options |
|
X |
|
|
|
X |
|
|
|
X |
|
|
|
SecurityScorecard Assessment: Print Option |
|
X |
|
|
|
X |
|
|
|
X |
|
|
|
SecurityScorecard Assessment: Save Report |
X |
X |
X |
X |
X |
X |
X |
X |
X |
X |
X |
X |
|
SecurityScorecard Assessment: Schedule |
X |
X |
X |
X |
X |
X |
X |
X |
|
|
|
|
|
SecurityScorecard Event Log: Content Record |
X |
X |
X |
X |
|
X |
|
|
|
X |
|
|
|
SecurityScorecard Event Log: Data Import |
X |
X |
X |
X |
|
|
|
|
|
|
|
|
|
SecurityScorecard Event Log: Email Option |
|
X |
|
|
|
X |
|
|
|
X |
|
|
|
SecurityScorecard Event Log: Export Options |
|
X |
|
|
|
X |
|
|
|
X |
|
|
|
SecurityScorecard Event Log: Print Option |
|
X |
|
|
|
X |
|
|
|
X |
|
|
|
SecurityScorecard Event Log: Save Report |
X |
X |
X |
X |
X |
X |
X |
X |
X |
X |
X |
X |
|
SecurityScorecard Monitoring: Content Record |
X |
X |
X |
X |
|
X |
|
|
|
X |
|
|
|
SecurityScorecard Monitoring: Data Import |
X |
X |
X |
X |
|
|
|
|
|
|
|
|
|
SecurityScorecard Monitoring: Email Option |
|
X |
|
|
|
X |
|
|
|
X |
|
|
|
SecurityScorecard Monitoring: Export Options |
|
X |
|
|
|
X |
|
|
|
X |
|
|
|
SecurityScorecard Monitoring: Print Option |
|
X |
|
|
|
X |
|
|
|
X |
|
|
|
SecurityScorecard Monitoring: Save Report |
X |
X |
X |
X |
X |
X |
X |
X |
X |
X |
X |
X |
|
SecurityScorecard Portfolio: Content Record |
X |
X |
X |
X |
|
X |
|
|
|
X |
|
|
|
SecurityScorecard Portfolio: Data Import |
X |
X |
X |
X |
|
|
|
|
|
|
|
|
|
SecurityScorecard Portfolio: Email Option |
|
X |
|
|
|
X |
|
|
|
X |
|
|
|
SecurityScorecard Portfolio: Export Options |
|
X |
|
|
|
X |
|
|
|
X |
|
|
|
SecurityScorecard Portfolio: Print Option |
|
X |
|
|
|
X |
|
|
|
X |
|
|
|
SecurityScorecard Portfolio: Save Report |
X |
X |
X |
X |
X |
X |
X |
X |
X |
X |
X |
X |
|
Group Assignments: |
SecurityScorecard Administrators |
SecurityScorecard Users |
SecurityScorecard Read Only |
|||||||||
Installing the Security Scorecard integration
This section provides instructions for configuring Security Scorecard with the Archer Platform. This document is not intended to suggest optimum installations or configurations.
It is assumed that the reader has both working knowledge of all products involved, and the ability to perform the tasks outlined in this section. Administrators should have access to the product documentation for all products to install the required components.
All components must be installed and working prior to the integration. Perform the necessary tests to confirm that this is true before proceeding.
Important: The integration described in this guide is provided as a reference implementation for evaluation and testing purposes. It may or may not meet the needs and use cases for your organization. If additional customizations or enhancements are needed, it is recommended that customers contact Archer Professional Services for assistance.
-
Ensure that your Archer system is at Archer Platform version 6.14.
-
Read and understand "Packaging Data" in the Archer Platform Help.
Installing a package requires that you import the package file, map the objects in the package to objects in the target instance, and then install the package. For more information, see Installing the Packages.
You must import and schedule each use case data feed that you want to use. See Setting Up Data Feeds for complete information.
Test the application according to your company standards and procedures, to ensure that the use case works with your existing processes.
Installing the package
To configure the Archer platform, you must first download the installation package from the Archer Exchange and extract the following components:
|
File Name |
Description |
|
SecurityScorecard_Archer_6.14.zip |
SecurityScorecard Application Package |
|
SSC Images |
12 Image files to be used for company grades and factor grades. |
|
Data Feeds |
Data feed configuration for SecurityScorecard integration. Contains 6 data feed files: SSC_0__Event_Log_Nightly_Cleanup.dfx5 SSC_1__Events_Nightly_Cleanup.dfx5 SSC_2__Sync_Portfolio.dfx5 SSC_3__Sync_Industry_Factor_Scores.dfx5 SSC_4__Get_Historical_Scores.dfx5 SSC_5__Get_Event_Logs.dfx5 |
There is no undo function for package installation. Packaging is a powerful feature that can make significant changes to an instance. Archer strongly recommends that you back up the instance database before installing a package. This process enables a full restoration if necessary.
An alternate method for undoing a package installation is to create a package of the affected objects in the target instance before installing the new package. This package provides a snapshot of the instance before the new package is installed, which can be used to help undo the changes made by the package installation. You must manually delete new objects created by the package installation.
-
From the menu bar, click
 > Application Builder > Install Packages.
 -
In the Available Packages section, click Import.
-
Click Add New, then select the package file that you want to import.
-
Click OK.
-
The Available Packages section displays the package file and is ready for installation.
-
Click Install icon next to the package file
-
Package mapping is not necessary. All components of the install will be new.
-
When prompted, click okay to the warning message that appears.
-
-
Select the following configuration for the installation:
| Name | Type | Install Method | Install Option | Recommended or Required |
|---|---|---|---|---|
|
SSC: Administrator |
Access Role |
|
Override Permissions |
Recommended |
|
SSC: Read-Only |
Access Role |
|
Override Permissions |
Recommended |
|
SSC: User |
Access Role |
|
Override Permissions |
Recommended |
|
|
|
|
|
|
|
SecurityScorecard Event Log |
Application |
Create New Only |
Do not Override Layout(s) |
Required |
|
SecurityScorecard Monitoring |
Application |
Create New Only |
Do not Override Layout(s) |
Recommended |
|
SecurityScorecard Portfolio |
Application |
Create New Only |
Do not Override Layout(s) |
Required |
|
|
|
|
|
|
|
SecurityScorecard |
Dashboard |
Create New Only |
Do not Override Layout(s) |
Required |
|
SecurityScorecard Assessment |
Questionnaire |
Create New Only |
Do not Override Layout(s) |
Required |
|
SecurityScorecard |
Workspace |
Create New Only |
Do not Override Layout(s) |
Required |
|
SecurityScorecard Portfolio: Bottom 10 Companies |
Report |
Create New Only |
|
Required |
|
SecurityScorecard Portfolio: Company Score Distribution |
Report |
Create New Only |
|
Required |
|
SecurityScorecard Portfolio: SecurityScorecard Portfolio |
Report |
Create New Only |
|
Required |
|
SecurityScorecard Portfolio: SSC Scheduled Report Distribution |
Report |
Create New Only |
|
Required |
|
SecurityScorecard Portfolio: Top 10 Risk Factors |
Report |
Create New Only |
|
Required |
-
Click the Install Button
-
From the menu bar, click
> Application Builder > Install Packages. -
In the Available Packages section, select the package you want to map.
-
In the Actions column, click
 for that package.
The analyzer runs and examines the information in the package. The analyzer automatically matches the system IDs of the objects in the package with the objects in the target instances and identifies objects from the package that are successfully mapped to objects in the target instance, objects that are new or exist but are not mapped, and objects that do not exist (the object is in the target but not in the source).
This process can take several minutes or more, especially if the package is large, and may time out after 60 minutes. This time-out setting temporarily overrides any IIS time-out settings set to less than 60 minutes.
-
When the analyzer is complete, the Advanced Package Mapping page lists the objects in the package file and corresponding objects in the target instance. The objects are divided into tabs, depending on whether they are found within Applications, Solutions, Access Roles, Groups, Sub- forms, or Questionnaires.
In each tab of the Advanced Mapping Page, review the icons next to each object to determine which objects you must map manually.
-
For each object that requires remediation you can map each item individually or map all object on a tab.
To map each item individually, do the following.
-
On the Target column, select the object in the target instance to which you want to map the source object.
-
If an object is new or if you do not want to map an object, select Do Not Map from the drop-down list.
-
Ensure that you map all objects to their lowest level. When objects have child or related objects, the parent object provides a drill-down link. You must map child objects before parent objects. For more details, see "Mapping Parent/Child Objects" in the Archer Platform Help.
To automatically map all objects in a tab that have different system IDs but the same object name as an object in the target instance, do the following.
-
In the toolbar, click Auto Map.
-
Select an option for mapping objects by name.
-
Ignore case - Select this option to match objects with similar names regardless of the case of the characters in the object names.
-
Ignore spaces - Select this option to match objects with similar names regardless of whether spaces exist in the object names.
-
-
Click OK. The Confirmation dialog box opens with the total number of mappings performed. These mappings have not been committed to the database yet and can be modified in the Advanced Package Mapping page.
-
Click OK. To set all object in the tab to Do Not Map, in the toolbar, click Do Not Map. To undo the mapping settings for any individual object, in the Actions column, click Undo.
-
When all objects are mapped, the ![]() icon is displayed in the tab title. The
icon is displayed in the tab title. The ![]() icon is displayed next to the object to indicate that the object will not be mapped.
icon is displayed next to the object to indicate that the object will not be mapped.
-
Verify that all other objects are mapped correctly.
-
(Optional) To save your mapping settings so that you can resume working later, see "Importing and Exporting Mapping Settings" in the Archer Platform Help.
-
Once you have reviewed and mapped all objects, click Execute.
-
Select I understand the implications of performing this operation and click OK.
The Advanced Package Mapping process updates the system IDs of the objects in the target instance as defined on the Advanced Package Mapping page. When the mapping is complete, the Import and Install Packages page is displayed.
Important: Advanced Package Mapping modifies the system IDs in the target instance. You will need to update any Data Feeds and Web Service APIs that use these objects, with the new system IDs.
All objects from the source instance are installed in the target instance unless the object cannot be found or is flagged to not be installed in the target instance. The Log Messages section provides a list of conditions that may cause objects not to be installed. The Package Installation Log section displays a log entry.
-
From the menu bar, click
> Application Builder > Install Packages. -
In the Available Packages section, locate the package file that you want to install, and click Install.
-
In the Selected Components section, click the Lookup button to open the Package Selector window.
-
To select all components, select the top-level checkbox.
-
To install only specific global reports in an already installed application, select the checkbox associated with each report that you want to install. Items in the package that do not match an existing item in the target instance are selected by default.
-
-
Under the Install Method drop-down menu, select an option for each selected component. To use the same Install Method for all selected components, select a method from the top-level drop-down list. If you have any existing components that you do not want to modify, select Create New Only. You may have to modify those components after installing the package to use the changes made by the package.
-
To deactivate target fields and data-driven events that are not in the package, in the Post-Install Actions section, select the Deactivate target fields and data-driven events that are not in the package checkbox. To rename the deactivated target fields and data-driven events with a user-defined prefix, select the Apply a prefix to all deactivated objects checkbox, and enter a prefix. This can help you identify any fields or data-driven events that you may want to review for cleanup post-install.
-
Click Install.
-
Click OK.
-
From the menu bar, click
> Application Builder > Install Packages. -
In the Package Installation Log tab, click the package that you want to view.
-
In the Package Installation Log page, in the Object Details section, click View All Errors. To view individual logs, in the Errors column of the log you want to view, click the Failures link or Warnings link. Clicking View All Errors, Failures, or Warnings opens the specific errors on a different page.
-
Click the Export icon to export the log file.
-
Click Close.
To facilitate the connection of your Third Party Profile records to the SecurityScorecard Portfolio records seven fields must be created. The SecurityScorecard Domain field is the only field that will accept user input (other fields are calculations), therefore you should configure the permissions of this field at this time.
-
Add a new tab to the Default Tab Set named SecurityScorecard.
-
Add a Section to the SecurityScorecard tab called SecurityScorecard Information.
-
Add a second section called SecurityScorecard Monitoring.
-
Create the SecurityScorecard Domain text field.
-
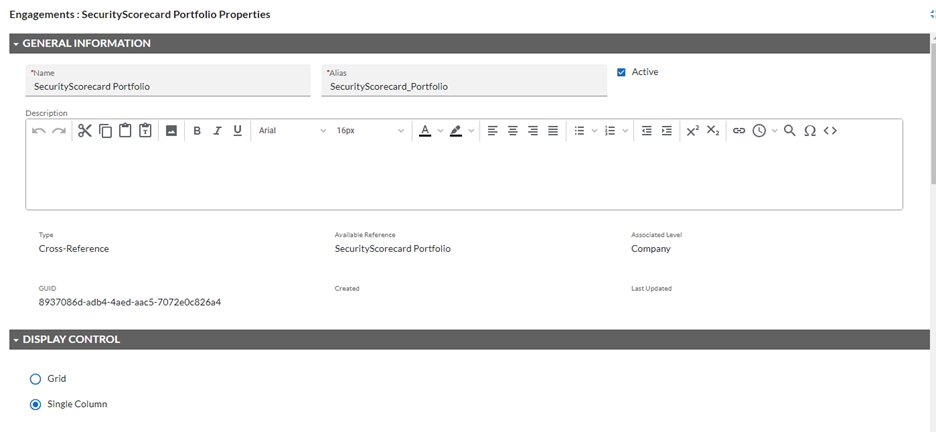
Create the SecurityScorecard Portfolio cross-reference field and select Company for the Available Reference.
-
Select the following field properties and options:
-
Single Column
-
Make this a calculated field
-
-
Input the following configuration for the Calculation Properties.
-
Matching Filters section:
-
ID - 1
-
Field Name - Domain
-
Operator - Field Value Match
-
Values - Third Party Profile: SecurityScorecard Domain
-
-
Additional Related Filters section:
-
ID - 1
-
Field Name - Domain
-
Operator - Does Not Equal
-
-
-
-
Create a numeric field for Last 30 Day Score Change. The field configuration is shown below.
-
Calculation (copy and paste this into the formula box): REF([SecurityScorecard Portfolio],[Last 30 Day Score Change])
-
-
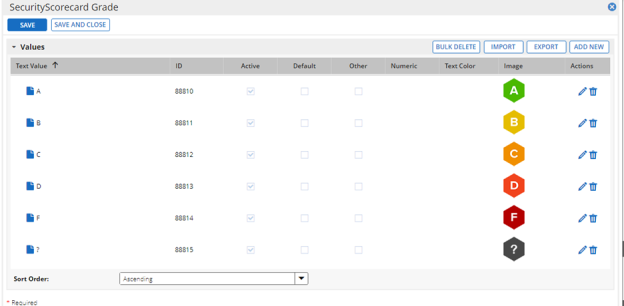
Create a values list field named SecurityScorecard Grade. The SecurityScorecard Grade field is a calculated values list. The first step will be to create the field as a values list and save it with no calculation. The calculation will be added in the last step. The process for adding images to the values is covered in “Installing SecurityScorecard Images”. After you have added values A, B, C, D, F and ? select Apply to save the record. Go to the Options tab and add the calculation.
-
Calculation: REF([SecurityScorecard Portfolio],[Grade])
-
Add the information in the General section
-
Name: SecuirtyScorecard Grade
-
Alias: SecuirtyScorecard_Grade
-
-
In Values, add the Text and Images values for A, B, D, D, F, and ?.
-
In Calculation Properties Formula type: REF([SecurityScorecard Portfolio],[Grade])
-
-
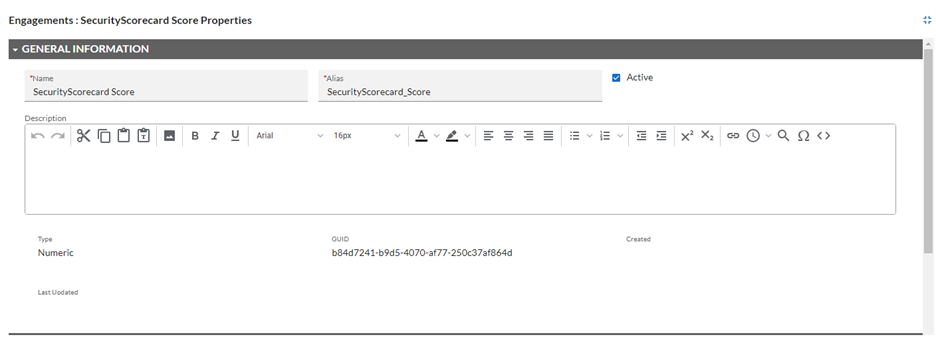
Create a numeric field called “SecurityScorecard Score”. The field configuration is shown below.
-
Calculation: REF([SecurityScorecard Portfolio],[Score])
-
Name: SecurityScorecard Score
-
Alias: SecurityScorecare_Score
-
Type: Numeric
-
Properties - select:
-
Format the numeric value using the thousand seperators
-
Make this a calculated field
-
-
-
Calculation Properties:
-
Formula: FEF([SecurityScorecardPortfolio],[Score])
-
Recalculations: As needed (Recommended)
-
Error Handling: Display Error
-
-
-
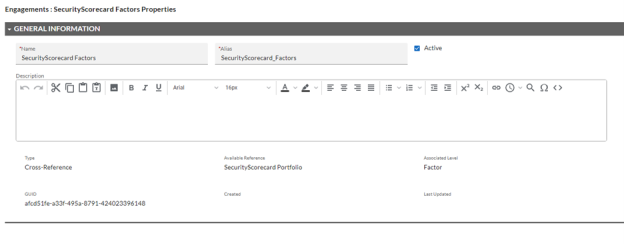
Create a cross-reference list field called SecurityScorecard Factors.
-
General Information:
-
Name: SecurityScorecard Factors
-
Alias: Security_Scorecard_Factors
-
Type: Cross-Reference
-
Available Reference: SecuirtyScorecard Portfolio
-
Associated Level: Factor
-
-
Display Control: Grid
-
Options: Make this a calculated field
-
Calculation Properties - Additional Related Filters:
-
ID - 1
-
Field Name - Company Key
-
Operator - Does Not Equal
-
-
Field to Display - SecurityScorecard Portfolio:
-
Name (Key)
-
Description
-
Grade
-
Score
-
Industry Grad
-
Industry Score
-
-
Sorting:
-
ID - 1
-
Field - Name
-
Order - Ascending
-
-
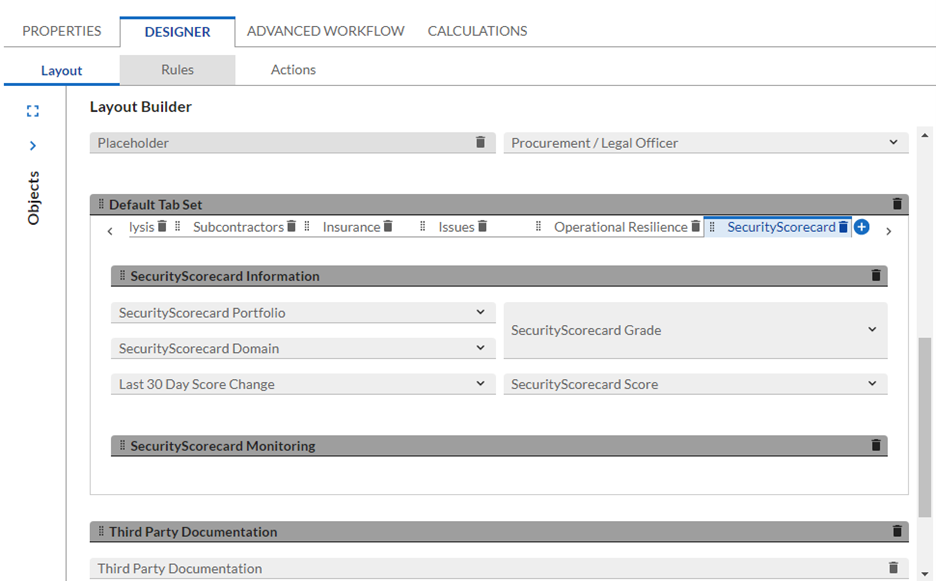
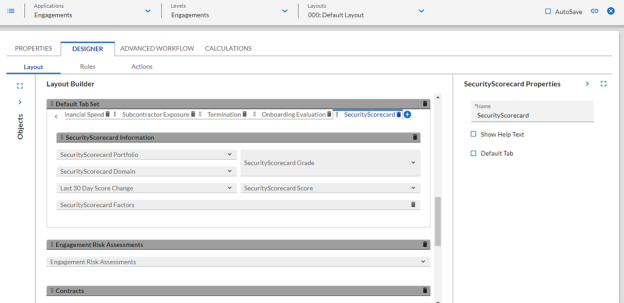
10. Pull the fields on layout as shown in the image below. SecurityScorecard Grade should span 2 rows. The SecurityScorecard Monitoring field is a related records field that was created during the package installation process. It will be located on the left in the list of fields off layout.
Optional: Repeat the steps for the “Subsidiary” and “Sub-Subsidiary” levels of the Third Party Profile application if your organization utilizes these levels.
SecurityScorecard information related to the Third Party Profile record can be displayed within the Engagements application if desired. Create the NEW fields for the Engagements application by following the steps below.
-
We recommend that you add a new tab to the Default Tab Set named “SecurityScorecard”. Create the new tab by selecting “New” in the Default Tab Set section. After the tab is created, create a new section called “SecurityScorecard Information”.
-
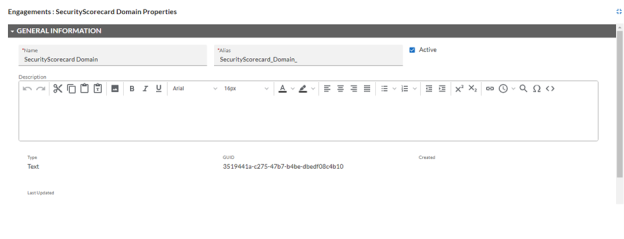
Create the SecurityScorecard Domain text field. Select the arrow to the right of “Add New Field” then select TEXT from the list of field choices. The images below show the field configuration.
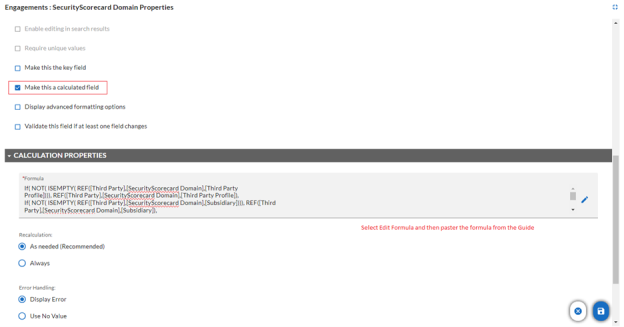
Calculation: If( NOT( ISEMPTY( REF([Third Party],[SecurityScorecard Domain],[Third Party Profile]))), REF([Third Party],[SecurityScorecard Domain],[Third Party Profile]), If( NOT( ISEMPTY( REF([Third Party],[SecurityScorecard Domain],[Subsidiary]))), REF([Third Party],[SecurityScorecard Domain],[Subsidiary]), If( NOT( ISEMPTY( REF([Third Party],[SecurityScorecard Domain],[Sub-Subsidiary]))), REF([Third Party],[SecurityScorecard Domain],[Sub-Subsidiary]),NOVALUE())))
-
Create the SecurityScorecard Portfolio cross-reference field. Select “Add New Field” as directed in Step 3 then select “Cross-Reference” as the field type. The remaining images in this step show the field configuration.
-
Create a numeric field for “Last 30 Day Score Change”. The field configuration is shown below. Calculation (copy and paste this into the formula box): REF([SecurityScorecard Portfolio],[Last 30 Day Score Change])

-
The SecurityScorecard Grade field is a calculated values list. The first step will be to create the field as a values list and save it with no calculation. The calculation will be added in the last step. Create a values list field and name it “SecurityScorecard Grade”.
-
The field configuration is shown below. Skip the options tab until you have completed the values tab. The process for adding images to the values is covered here. After you have added values A, B, C, D, F and ? select “Apply” to save the record. Now go to the “Options” tab and add the calculation.
-

b. Calculation: REF([SecurityScorecard Portfolio],[Grade])
-
Create a numeric field called “SecurityScorecard Score”. The field configuration is shown below. The calculation is: REF([SecurityScorecard Portfolio],[Score])
-
Create a cross-reference list field called “SecurityScorecard Factors”. The field configuration is shown below.
-
Pull the fields on layout as shown in the image below. SecurityScorecard Grade should span 2 rows.
-
Repeat the layout changes for the Layouts of the Engagements application to ensure a consistent user experience.
Two of the values list fields within the SecurityScorecard solution require the Archer administrator to upload 10 local images to visualize the SecurityScorecard grades. Follow the steps below to upload the image files to your Archer instance:
Prerequisites:
-
Download the SecurityScorecard_Archer_6.14.zip file from the Archer Exchange.
-
Extract the SSC Images folder to your local hard drive.
-
Log into Archer.
-
Navigate to the Administration menu.
a. Under Application Builder, select the Global Values Lists menu option.
-
Filter the list for the SSC: Company Grades global values list.
-
Click into it the SSC: Company Grades global values list.
-
Click the A value in the list.
-
Click the Edit link under the Image.
-
-
For each image in the SSC Images folder perform the following steps:
-
Click the Add New link in the Available Graphics pop-up.
-
Click the Add New link in the upload pop-up.
-
Select an image file from the SSC Images folder, then click the Open button.
-
Click the OK button in the upload pop-up.
-
Repeat steps a-d until all 10 images have been uploaded to the Archer server.
-
-
Review the list of images in the Graphic Selector pop-up, verify that the following images have been uploaded.

-
Once the image files are uploaded, click the Cancel button on the Graphic Selector pop-up.
Configure SecurityScorecard
A Standard or Enterprise SecurityScorecard account is required for this integration. The user must initially login to their SSC account and generate an API key. The Portfolio ID of the Portfolio selected for synchronization with Archer must also be determined. Upon configuration, the Archer data feeds will communicate with the SecurityScorecard Platform adding all 3rd Party records from the SecurityScorecard Platform to Archer.
-
Confirm with customer service that your API service is enabled.
-
Obtain an API token form the Settings page within the SecurityScorecard platform.
-
The next step is to determine the Portfolio ID of the SSC Portfolio that will be used to synchronize with Archer.
-
A SecurityScorecard Customer Success representative can assist, or you can copy and paste the Portfolio ID from the URL of the desired portfolio.
Setting Up Data Feeds
Before you upload a JavaScript file, you must configure JavaScript Transporter settings in the Archer Control Panel.
-
On the General tab, go to the JavaScript Transporter section.
-
Open the Archer Control Panel.
-
Go to Instance Management and select All Instances.
-
Select the instance you want to use.
-
On the General tab, go to the JavaScript Transporter section.
-
-
In the Max Memory Limit field, set the value to 2048 MB (2 GB).
-
In the Script Timeout field, set the value to 120 minutes (2 hours).
-
(Optional) If you want to allow only digitally signed JavaScript files in the data feed, enable Require Signature.
-
In the JavaScript Transporter Settings section, select the checkbox Require Signature. A new empty cell appears in the Signing Certificate Thumbprints section
-
In the Signing Certificate Thumbprints section, double-click an empty cell.
-
Enter the digital thumbprint of the trusted certificate used to sign the JavaScript file.
Important: If you enable Require Signature and specify no thumbprints, no JavaScript files will be accepted by the system.
-
(Optional) If you want to add additional thumbprint sources, repeat steps 1-3 for each thumbprint.
-
On the toolbar, click Save.
-
When running JavaScript data feeds, you can set the Archer instance to only allow digitally signed JavaScript files from trusted sources for security considerations.
For a certificate to be trusted, all the certificates in the chain, including the Root CA Certificate and Intermediate CA certificates, must be trusted on both the Web Server and Services Server machines.
Archer Technologies LLC certificate is not present on every machine’s root by default.
-
On the JavaScript file, right-click and select Properties.
-
Click the Digital Signatures tab.
-
From the Signature List window, select Archer Technologies LLC.
-
Click the Details button.
-
Click View Certificate.
-
Click Install Certificate.
-
Select Local Machine.
-
Click Next.
-
Select Place all certificates in the following store and click Browse.
-
Select Trusted Root Certification Authorities and click OK.
-
Click Next.
-
Click Finish.
-
-
-
Upon successful import, click OK.
-
In the Archer Control Panel environment, open the Manage Computer Certificates program.
-
Click Start.
-
Type: certificate
-
From the search results, click Manage Computer Certificates.
-
-
Ensure that your trusted source certificates are in the Certificates sub-folder of the Trust Root Certification Authorities folder.
-
In the Certificates sub-folder, double-click the Archer Technologies LLC that contains the thumbprint you want to obtain.
-
Verify that the certificate is trusted.
-
In the Certificate window, click the Certification Path tab.
-
Ensure that the Certificate Status windows displays the following message:
This certificate is OK
Note: If the Certificate Status windows displays something different, follow the on-screen instructions.
-
-
Obtain the trusted certificate thumbprint.
-
In the Certificate window, click the Details tab.
-
Select the Thumbprint field.
The certificate's digital thumbprint appears in the window.
-
Copy the thumbprint.
-
After the work above has been completed, you will need to import and configure the four data feeds to facilitate the synchronization of SecurityScorecard data into your Archer instance. To do this, perform the following steps:
Prerequisites:
-
Download the SecurityScorecard_Archer_6.14.zip file from the Archer Community.
-
Extract the DataFeeds folder on your local hard drive.
-
User account to execute the data feeds (see Data Feed Account Setup below for specifications).
Data Feed Account Setup:
-
Create a new Archer user account:
-
Use a non-expiring security parameter for this account (recommended).
-
Generate a strong password (recommended).
-
Grant the user the “SSC: Administrator” access role (recommended). Account must have at CRUD access to the “SecurityScorecard Event Log” application.
-
Make a note of the username and password for this account as they will be needed during the installation of the data feeds.
-
Log into Archer.
-
Navigate to the Administration menu.
-
Under Integration, select the Data Feeds menu option.
-
-
Click the “Import” link in the Manage Data Feeds section.
-
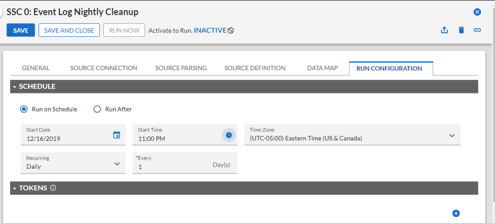
Locate and select the SSC_0_Event_Log_Nightly_Cleanup.dfx5 file on your local hard drive and select it.
-
Archer will open the data feed in edit mode.
-
Admin Notifications (optional).
-
Within the General tab you can setup an email notification to Archer administrators to advise of data feed execution success, warning and failures. Below are instructions on how to turn this on:
-
Within the Notifications section on the General tab, select “Send job status notifications to selected users when jobs status changes”.
-
Select the appropriate groups/users to receive the notification.
-
-
-
Transport Configuration.
-
Security section:
-
Enter the “URL” within the Security section to the URL of your Archer instance.
-
-
Transport Configuration section:
-
Enter the “User Name” of the Archer account that will execute the data feed (see Data Feed Account Setup above for details).
-
Enter the “Password” of the data feed account that will execute the data feed.
-
Enter the “Instance” of your Archer environment.
-
-
-
Configure schedule (Recommended Frequency: Nightly).
-
Click on the Schedule tab.
-
In the Recurrences section enter the following information: (recommended).
-
-
Log into Archer.
-
Navigate to the Administration menu.
a. Under Integration, select the Data Feeds menu option.
-
Click the “Import” link in the Manage Data Feeds section.
-
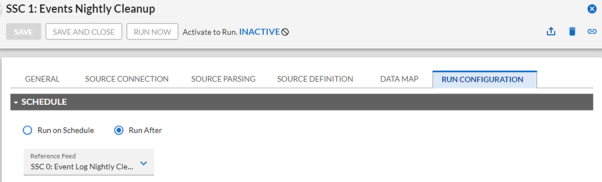
Locate and select the SSC_1__Events_Nightly_Cleanup.dfx5 file on your local hard drive and select it.
-
Archer will open the data feed in edit mode.
-
Admin Notifications (optional).
a. Within the General tab you can setup an email notification to Archer administrators to advise of data feed execution success, warning and failures. Below are instructions on how to turn this on:
-
Within the Notifications section on the General tab, select “Send job status notifications to selected users when jobs status changes”.
-
Select the appropriate groups/users to receive the notification.
-
-
Transport Configuration.
a. Security section: Enter the “URL” within the Security section to the URL of your Archer instance.
b. Transport Configuration section:
-
Enter the “User Name” of the Archer account that will execute the data feed (see Data Feed Account Setup above for details).
-
Enter the “Password” of the data feed account that will execute the data feed. iii. Enter the “Instance” of your Archer environment.
-
Configure schedule (Recommended Frequency: Nightly).
-
Click on the Schedule tab.
-
In the Recurrences section enter the following information: (recommended).
-
-
Log into Archer.
-
Navigate to the Administration menu.
a. Under Integration, select the Data Feeds menu option.
-
Click the “Import” link in the Manage Data Feeds section.
-
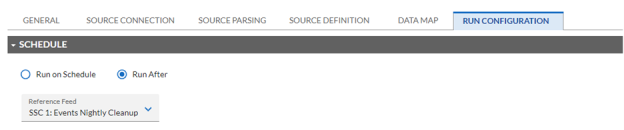
Locate and select the SSC_2__Sync_Portfolio.dfx5 file on your local hard drive and select it.
-
Archer will open the data feed in edit mode.
-
Admin Notifications (optional).
a. Within the General tab you can setup an email notification to Archer administrators to advise of data feed execution success, warning and failures. Below are instructions on how to turn this on:
-
Within the Notifications section on the General tab, select “Send job status notifications to selected users when jobs status changes”.
-
Select the appropriate groups/users to receive the notification.
-
-
Transport Configuration.
-
Click on the Transport tab.
-
In the Transport section select “JavaScript Transporter” for the Transport Method.
-
In the Transport Configuration section click the Upload tab in the top right.
-
Upload the “Sync_Portfolio.js” file.
-
Click on the Transport tab. In the Custom Parameters section, enter 5 Custom Parameters as follows:
-
host | Plain Text | api.securityscorecard.io
-
api_key | Plain Text | [Enter your API TOKEN] (see page 8 of this guide)
-
portfolio | Plain Text | [Enter your PORTFOLIO ID] (see page 8 of this guide) iv. verifyCerts |Plain Text | true or false
-
proxy | Plain Text | (optional)
-
-
9. Configure schedule (Recommended Frequency: Nightly).
-
Click on the Schedule tab.
-
In the Recurrences section enter the following information: (recommended).
-
Log into Archer.
-
Navigate to the Administration menu.
-
Under Integration, select the Data Feeds menu option.
-
-
Click the “Import” link in the Manage Data Feeds section.
-
Locate and select the SSC_3__Sync_Industry_Factor_Scores.dfx5 file on your local hard drive and select it.
-
Archer will open the data feed in edit mode.
-
Admin Notifications (optional).
-
Within the General tab you can setup an email notification to Archer administrators to advise of data feed execution success, warning and failures. Below are instructions on how to turn this on:
-
Within the Notifications section on the General tab, select “Send job status notifications to selected users when jobs status changes”.
-
Select the appropriate groups/users to receive the notification.
-
-
-
Transport Configuration
-
Click on the Transport tab.
-
In the Transport section select “JavaScript Transporter” for the Transport Method.
-
In the Transport Configuration section click the Upload tab in the top right.
-
Upload the “Sync_Industry_Info.js” file.
-
8. Click on the Transport tab.
-
In the Custom Parameters section, enter 3 Custom Parameters as follows:
-
host | Plain Text | api.securityscorecard.io
-
api_key | Plain Text | [Enter your API TOKEN] (see page 8 of this guide)
-
portfolio | Plain Text | [Enter your PORTFOLIO ID] (see page 8 of this guide) iv. verifyCerts |Plain Text | true or false
v. proxy | Plain Text | (optional)
9. Configure schedule (Recommended Frequency: Nightly).
-
-
Click on the Schedule tab.
-
In the Recurrences section enter the following information: (recommended).

-
Log into Archer.
-
Navigate to the Administration menu.
a. Under Integration, select the Data Feeds menu option.
-
Click the “Import” link in the Manage Data Feeds section.
-
Locate and select the SSC_4__Get_Historical_Scores.dfx5 file on your local hard drive and select it.
-
Archer will open the data feed in edit mode.
-
Admin Notifications (optional).
-
Within the General tab you can setup an email notification to Archer administrators to advise of data feed execution success, warning and failures. Below are instructions on how to turn this on:
-
Within the Notifications section on the General tab, select “Send job status notifications to selected users when jobs status changes”.
-
Select the appropriate groups/users to receive the notification.
-
-
-
Transport Configuration.
-
Click on the Transport tab
-
In the Transport section select “JavaScript Transporter” for the Transport Method.
-
In the Transport Configuration section click the Upload tab in the top right.
-
Upload the “Get_Historical_Scores.js” file.
-
-
Custom Parameters:
-
Click on the Transport tab
-
In the Custom Parameters section, enter 3 Custom Parameters as follows:
-
host | Plain Text | api.securityscorecard.io
-
api_key | Plain Text | [Enter your API TOKEN] (see page 8 of this guide)
-
portfolio | Plain Text | [Enter your PORTFOLIO ID] (see page 8 of this guide) iv. verifyCerts |Plain Text | true or false
v. proxy | Plain Text | (optional)
-
-
-
Configure schedule (Recommended Frequency: Nightly).
-
Click on the Schedule tab.
-
In the Recurrences section enter the following information: (recommended).
-

-
Import Log into Archer.
-
Navigate to the Administration menu.
a. Under Integration, select the Data Feeds menu option.
-
Click the “Import” link in the Manage Data Feeds section.
-
Locate and select the SSC_5__Get_Event_Logs.dfx5 file on your local hard drive and select it.
-
Archer will open the data feed in edit mode.
-
Admin Notifications (optional).
-
Within the General tab you can setup an email notification to Archer administrators to advise of data feed execution success, warning and failures. Below are instructions on how to turn this on:
-
Within the Notifications section on the General tab, select “Send job status notifications to selected users when jobs status changes”.
-
Select the appropriate groups/users to receive the notification.
-
-
-
Transport Configuration.
-
Click on the Transport tab.
-
In the Transport section select “JavaScript Transporter” for the Transport Method.
-
In the Transport Configuration section click the Upload tab in the top right.
-
Upload the “Get_Historical_Logs.js” file.
-
-
Custom Parameters:
-
Click on the Transport tab.
-
In the Custom Parameters section, enter 3 Custom Parameters as follows:
-
host | Plain Text | api.securityscorecard.io
-
api_key | Plain Text | [Enter your API TOKEN] (see page 8 of this guide)
-
portfolio | Plain Text | [Enter your PORTFOLIO ID] (see page 8 of this guide) iv. verifyCerts |Plain Text | true or false
v. proxy | Plain Text | (optional)
-
-
-
Configure schedule (Recommended Frequency: Nightly).
-
Click on the Schedule tab.
-
In the Recurrences section enter the following information: (recommended).

-
Validating the SecurityScorecard Use Case
Once the Data Feeds are configured, follow these steps to execute the Data Feed. Note that only one Data Feed can be executed at a time and any Data Feed with a Data Feed reference must be executed first. For example, if Data Feed 3 references Data Feed 2, then Data Feed 2 must be executed first.
-
Log into Archer.
-
Navigate to the Administration menu.
a. Under Integration, select the Data Feeds menu option.
-
Execute the Data Feeds.
-
Filter the list for “SSC”.
-
Click into the “SSC 2: Sync Portfolio” data feed.
-
-
Navigate to the Schedule tab.
-
Click the Start button within the Immediate Processing section.
iii. Wait for the status marker to update to “Completed”.
c. Repeat the above steps for:
-
SSC 3: Sync Industry Factor Scores.
-
SSC 4: Get Historical Scores. iii. SSC 5: Get Event Logs in that order.
-
On the menu bar, click Show All.
-
Select SecurityScorecard in the leftmost column.
-
Select SecurityScorecard under the Solutions column.
-
Select SecurityScorecard Portfolio name in the last column.
-
Review the Company, Factor and Sub-Factor information loaded by the data feeds based on the portfolio id you entered during the configuration of the data feeds.
-
Select SecurityScorecard under the Solutions column.
-
Select SecurityScorecard Event Log name in the last column.
Review the Event Summary and Event Detail information loaded by the data feeds based on the portfolio id you entered during the configuration of the data feeds.
-
If you chose to install the 3 access roles during the package installation process (see appendix for Role based permissions and the Group assignments) the next step is to assign users to the 3 security groups.
-
If you chose NOT to install the 3 access roles during the package installation process, manually configure role-based access for the 3 security groups, then assign users to the security groups.
-
Log into Archer.
-
Navigate to the Administration menu.
a. Under Application Builder, select the Questionnaires menu option.
-
Select the SecurityScorecard Assessment from the Questionnaires list.
-
Select the Layout Tab.
-
In the Designer sub-tab Create new fields to configure, configure existing fields, and drag fields on and off layout to make them appear on the questionnaire.
-
In the Campaigns sub-tab (under Properties) click Auto-Generating Campaign to adjust the assignment. By default, this is set to the Relationship Manager.
-
Log into Archer.
-
Navigate to the Administration menu.
-
Under Application Builder, select the Questionnaires menu option.
-
-
Select Applications under the Application Builder Section.
-
Select the SecurityScorecard Monitoring Application.
-
Click the Layout Tab.
-
Click the Actions sub-tab.
-
Select Notify: SecurityScorecard Alert.
-
This Notification currently sends the assigned Relationship Manager a notification if the SecurityScorecard score changed beyond the configured threshold for a vendor.
-
In the General Tab, Configure the template’s Letterhead and Body Layout.
-
In the Content tab, modify the text sent to the user in the Subject and Body Field.
-
Use the Toolbar field to find autofill fields, reports or links to insert into the body.
-
-
In the Delivery tab.
-
Modify the email sender properties in the Email Properties section.
-
Configure whether the multiple recipients receive individual emails in the Email Recipient Options section.
-
List Recipients in the recipient section.
-
-
Log into Archer.
-
Navigate to the Administration menu.
-
Under Notifications, select the On-Demand Notification Templates menu option.
-
-
Select the SecurityScorecard Vendor Invitation from the list.
-
In the General Tab Configure the template’s Letterhead and Body Layout.
-
In the Content tab modify the text sent to the user in the Subject and Body Field as needed.
-
In the Access tab modify the permissions of the on-demand template as needed, by default anyone with access to the Third Party Profile record will be able to send this notification.
-
To activate the On-Demand Notification Template, click on the General tab.
-
Set the Status field to Active under the General Information section.
-
-
Log into Archer.
-
Navigate to the Administration menu.
-
Under Notifications, select the Scheduled Report Distributions menu option.
-
-
Select SSC Scheduled Report Distribution from the list.
-
In the General Tab Configure the template’s Letterhead and Body Layout.
-
In the Content tab modify the text sent to the user in the Subject and Body Field as needed.
-
In the Delivery tab:
-
Modify the email sender properties in the Email Properties section.
-
Set the delivery schedule to configure when the email will be sent in the Delivery Schedule section.
-
Configure whether the multiple recipients receive individual emails in the Email Recipient Options tab.
-
List Recipients in the Recipient section.
-
-
To activate the Schedule Report Distribution, click on the General tab.
-
Set the Status field to Active under the General Information section.
-
-
Log into Archer.
-
Navigate to the Administration menu.
-
Under Workspaces and Dashboards, select the Dashboards menu option.
-
-
Select SecurityScorecard.
-
On the General tab.
-
Use the General information section to modify the name of the Dashboard or change the Description.
-
Use the Layout Design Tab to format the Dashboard. Archer will provide a preview if this.
-
Use the Documentation section to attach relevant files.
-
-
Click the Layout tab.
-
Drag and drop the available iViews to the desired location or click Select iViews to insert additional iViews into the Dashboard.
-
-
In the Access tab select public to grant all users access to the Template or select private to restrict access to specified groups.
Using the SecurityScorecard Integration
After installation is complete, you are now ready to use the solution and begin receiving
SecurityScorecard data. The first step is to populate the SecurityScorecard Domain field with the domain of each Third Party Profile in Archer. This field is found on the SecurityScorecard tab of the Third Party Profile. Be sure to correctly enter the domain name by excluding any prefixes and extra text. An example of a correctly formatted domain entry is securityscorecard.com.
-
On the menu bar, click Show All.
-
Select the SecurityScorecard in the leftmost column.
-
Click SecurityScorecard under the Dashboards section.
-
Here toggle between different iViews to find data visuals on current data.
-
In the Bottom 10 Companies iView you will find companies with the lowest scores.
-
In the Company Score Distribution iView you will find a distribution chart of company scores.
-
In the SecurityScorecard portfolio iView you can find the data related to all companies in the system.
-
In the Top 10 Risk Factors iView you can find a list of the Risk Factors that received the highest scores.
-
On the menu bar, click Show All.
-
Select SecurityScorecard in the leftmost column.
-
Click SecurityScorecard under the Solutions column.
-
Select the Search Icon next to the SecurityScorecard Portfolio application in the last column.
-
In the Keyword Search Section type in the company name whose domain you wish to find.
-
In the Fields to Display section, make sure that the Domain Field appears on the Rightmost Column name, Selected.
-
A valid search entry will return a chart with all relevant domains.
-
On the menu bar, click Show All.
-
Select Third Party Management in the leftmost column.
-
Select Third Party Catalog under the Solutions column.
-
Select the Search Icon next to the Third Party Profile application in the last column.
-
In the Keyword Search section type in the company name for which you will input a Domain.
-
Click on the company name under the Third Party Name Column.
-
Click the Edit button at the top of the record.
-
Click on the SecurityScorecard Tab.
-
Enter the domain in the SecurityScorecard Domain Field.
-
Click the Save button at the top of the record.
-
The Third Party Profile will now contain the SecurityScorecard data based on the domain entered.
-
SecurityScorecard data loaded into a Third Party Risk profile, through the steps provided above, the same information can also be displayed on any engagement linked to the third party profile.
-
To find this data, in the menu bar, click Third Party Management.
-
On the Solutions column select Third Party Catalog.
-
On the Application Column Select Engagements.
-
Open an Engagement by clicking an Engagement Record on the list.
-
Right under the Relationship Contacts section, select the SecurityScorecard Tab from the row of tabs.
-
You will find the SecurityScorecard data which was linked to the Third Party Profile record.
-
Select the SecurityScorecard data.
-
On the menu bar, click Show All in the leftmost column.
-
Click SecurityScorecard Under the Solutions section.
-
Select SecurityScorecard Portfolio under Applications.
-
Select a SecurityScorecard Portfolio from the list.
-
Under the Industry Information section select the Factors tab.
-
You will see the company’s Grades for each respective Factor.
-
Click on the hyperlink text in the Factors grid to find more information about the Factor relating to the Company. In the Sub-factors section, you can find how the Company was graded at a more granular level.
-
Click on the Sub-Factor Title to learn more about the Sub-Factor and the company events that contributed towards the given Grade.
-
Click on an event located in the Events Section on the Sub-Factor page.
-
Here you can find additional information on the events that contributed towards a company’s given Grade.
-
Click the Event Log
-
You will see all events that contribute to the factor grades.
-
Click on an Event to find additional information including which Factors and Sub-Factors were involved.
If you chose to install the SecurityScorecard Monitoring ODA during package installation, Archer can generate assessments or email notifications when user defined thresholds are breached. To setup a new monitoring plan follow these steps:
-
On the menu bar, click Show All.
-
Select SecurityScorecard in the leftmost column.
-
Select SecurityScorecard under the Solutions column.
-
Select the Create New Record Icon next to SecurityScorecard Monitoring in the last column.
-
Enter a name for the monitoring plan.
-
Select the Vendor monitored by SecurityScorecard.
-
Select the Type of monitoring.
-
Issue Monitoring:
-
Select an issue type.
-
Select the Finding Count Threshold.
-
-
Score Monitoring:
-
Select the Measurement method.
-
Enter the Score Threshold.
-
-
-
Select the Action(s) that should occur when the threshold is breached.
-
Notification:
-
Uses the “Notify: SecurityScorecard Alert” data driven event notification template.
-
-
Assessment:
-
Uses the “SecurityScorecard Assessment” questionnaire.
-
-
-
Click the "Save" button at the top of the screen to save.
Certification Environment
Date Tested: July 2024
|
Product Name |
Version Information |
Operating System |
|
Archer |
6.14 |
Virtual Appliance |
|
SecurityScorecard |
NA |
NA |