Securonix Snypr
Securonix Snypr sends out CEF formatted violation events into the Unified Log Collector of Security Operations Management. These CEF formatted events are forwarded to the Archer Platform as Security Alerts. Security Alerts are aggregated by user into a Security Incident.
On this page
Revision history
Last updated: August, 2017
Overview
|
Partner Integration Overview |
|
|---|---|
|
GRC Use Case |
Security Operations and Breach Management |
|
Uses Out of the Box Applications |
Security Incidents, Security Alerts |
|
Uses Custom Application |
No |
|
Requires On-Demand license |
No |
This solution requires access to Archer Security Operations Management 1.3.1. For more information on this offering, go to the Archer Community: https://www.archerirm.communty/s/solution-use-case-overviews/archer-cyber-incident-amp-breach-response/ba-p/571777
Archer configuration
Unified Log Collector (UCF) configuration
For Securonix to send events to UCF, it must be added using the Generic SEIM Tool functionality of UCF (see the section "Configure a Generic SEIM Tool" in the Archer Security Operations Management guide for more information).
-
Edit the message-script-identifier.js file in the <install_dir>\SAIMintegration service\config\mapping\scripts folder as follows:
The securonix log is in the CEF format; add an else if condition in the script under the script Identifier function, below the other else is added for Splunk, Arc sight and so on. This else if that you add must be present within the if (splitString.length>3) loop.
elseif(siemVendor=="HPE"){scriptResponse= buildReponse("securonix.js","Securonix","2");
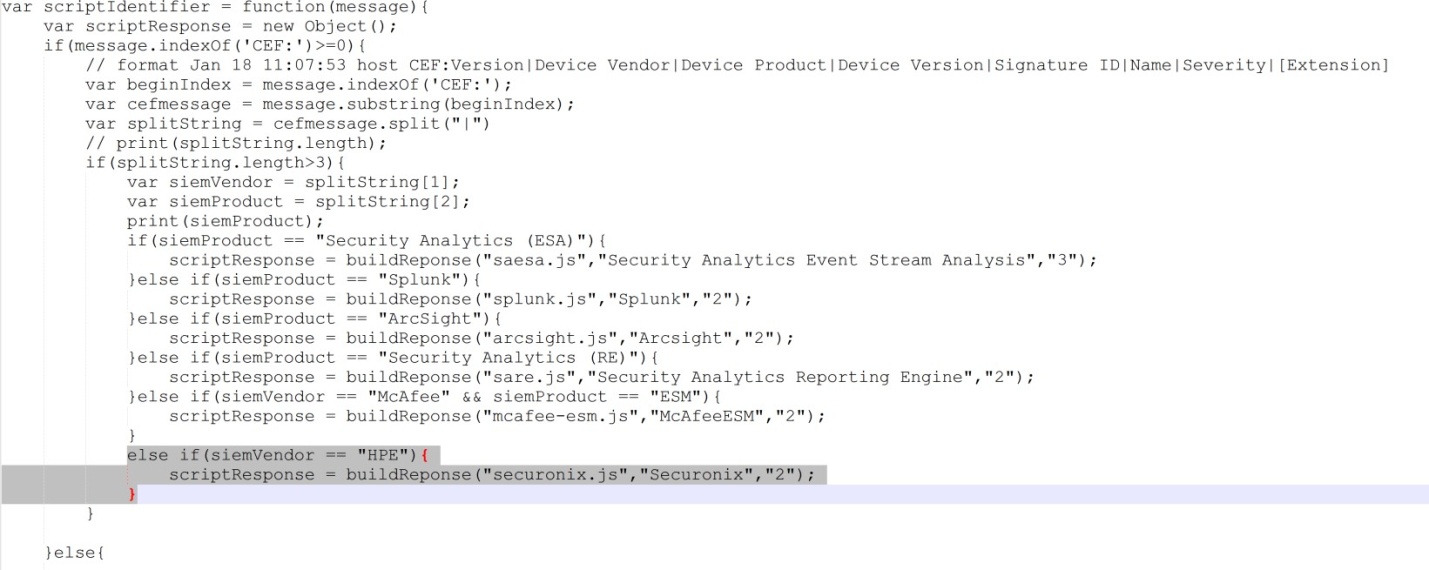
If you are using Securonix instead of HPUBA, then change your siem Vendor in the above string from HPE to Securonix.
-
Rename the securonix.txt file to securonix.js and place it in the <install_dir>\SAIM integration service\config\mapping\scripts folder.
Note: The account Name field of Securonix is mapped to aggregation criteria by default. If the aggregation criteria (in the CEF) contain the field Unknown, then in the securonix.js file aggregation criteria are mapped to the src field in CEF. If src is empty, aggregation criteria are mapped to the dst field in CEF. Lastly, if dst is also empty, then the aggregation criteria will continue to remain Unknown and all alerts with aggregation criteria containing the field Unknown will get aggregated to a single incident on Archer.
Archer application field configuration
Adding a value to the source field in security alerts
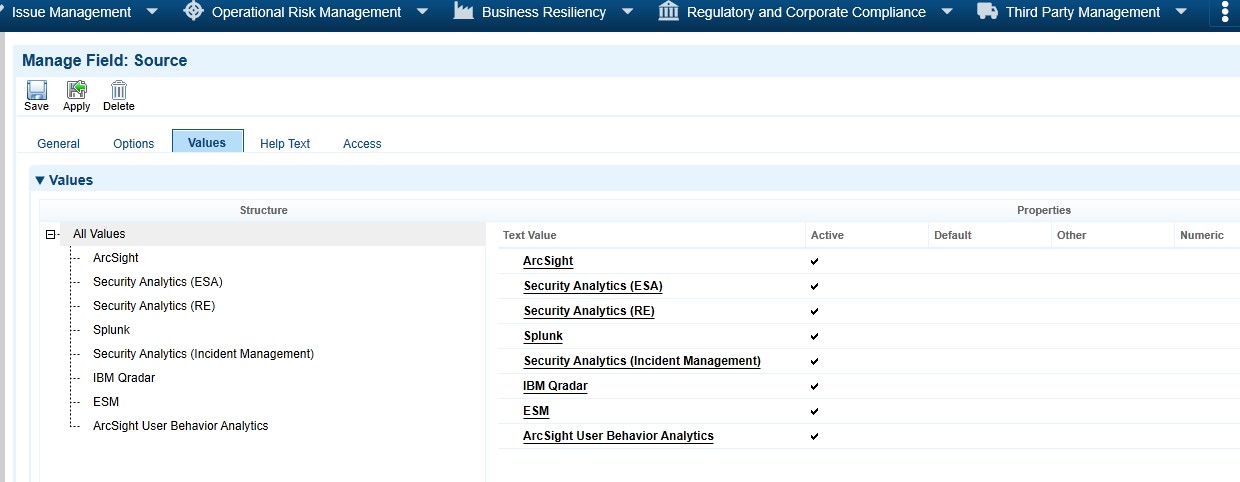
To list Securonix as a source for incoming alerts, you must edit the Source field in the Security Alerts application.
-
On the Administration tab, click Application Builder > Applications.
-
Open the application Security Alerts.
-
On the Field tab, click the Source field.
-
On the Values tab, click Add New.
-
Enter the Text Value as:
-
ArcSight User Behavior Analytics if the vendor is HPE.
-
Risk and Threat Intelligence if the vendor is Securonix.
-
-
Click Save.
-
Click Save for the field and the application to commit the new value to the field and application.
-
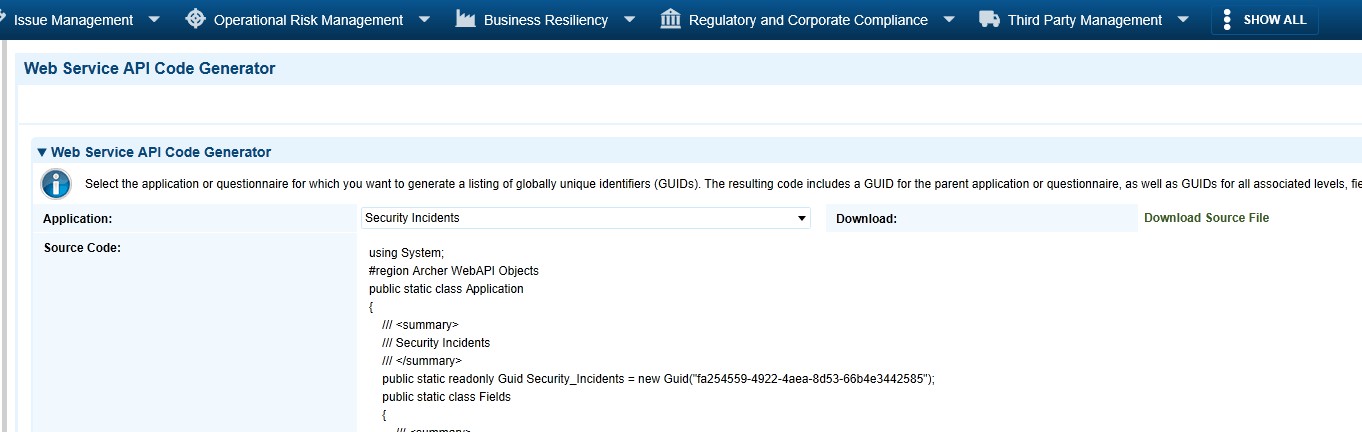
Extract the GUID of the newly created Source value from Archer as follows:
-
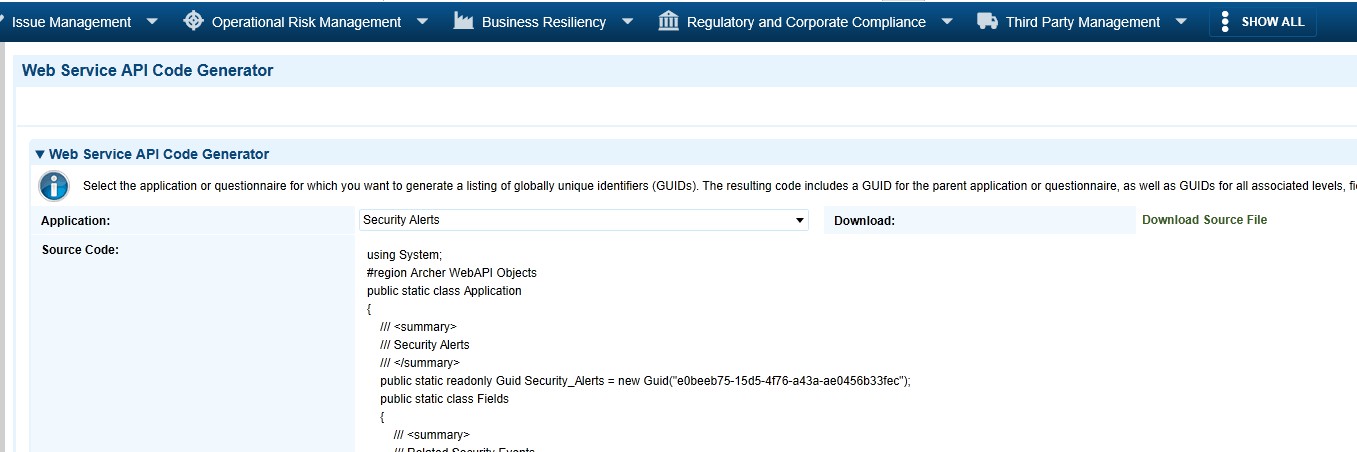
On the Administration tab, click Integration > Obtain API Resources > Generate API Code.
-
Select the application Security Alerts.
-
Click Download Source File.
-
Open the Security_Alerts.cs file.
-
Search for the newly created Source value –Arc Sight User Behavior Analytics (Risk and Threat Intelligence in the case of Securonix).
-
Note: The value has a corresponding GUID (for reference: %GUID%) associated with it, which is used to configure the mapping file. Example: public static read only Guid Arc Sight_User_Behavior_Analytics=new Guid("aba5af52-024246cf-9df9- 212e4dd32c14");
-
Add the value of the Source field in the mapping file in the Unified Log Collector.
-
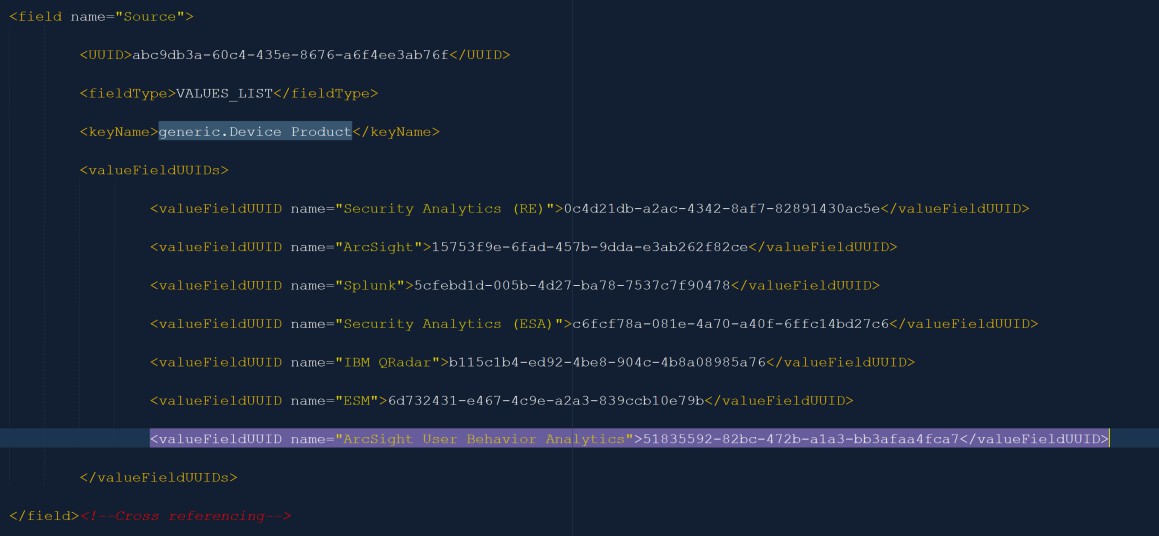
In the <install_dir>/SAIMintegrationservice/config/mappingfolder, open the secops_import_archer.xml file.
-
Navigate to the Source field under the Generic2_SecurityAlerts Application mappings.
-
In <valueFieldUUIDs> for Source field, add another element for Arc Sight User Behavior Analytics (Risk and Threat Intelligence in the case of Securonix)
<valueFieldUUIDname="ArcSightUserBehavior Analytics">%GUID%</valueFieldUUID>
The GUID must be the GUID obtained from the Step 8 above.
-
Adding a value to the source field in security incidents
To list Securonix as a source for incoming incidents, you must edit the Source Field in the Security Incidents application.
-
On the Administration tab, click Application Builder > Applications.
-
Open the application Security Incidents.
-
On the Field tab, click the Source field.
-
On the Values tab, click Add New.
-
Enter the Text Value as:
-
Arc Sight User Behavior Analytics if the vendor is HPE.
-
Risk and Threat Intelligence if the vendor is Securonix.
-
-
Click Save.
-
Click Save for the field and the application to commit the new value for the field and application.
-
Extract the GUID of the newly created Source value from Archer GRC as follows:
-
On the Administration tab, click Integration > Obtain API Resources > Generate API Code.
-
Select the application Security Incidents.
-
Click Download Source File.
-
Open the Security_Incidents.cs file.
-
Search for the newly created Source value –Arc Sight User Behavior Analytics (Risk and Threat Intelligence in the case of Securonix).
Note: The value has a corresponding GUID (for reference: %GUID%) associated with it, which is used to configure the mapping file. Example: public stat is created only Guid ArcSight_User_Behavior_Analytics=newGuid("aba5af52-024246cf-9df9- 212e4dd32c14");
-
9. Add the value of the Source field in the mapping file in the Unified Log Collector, as follows:
-
In the<install_dir>/SAIMintegrationservice/config/mappingfolder, open the secops_import_archer.xml file.
-
Navigate to the Source field under the Generic2_SecurityIncidents application mappings.
-
In<valueFieldUUIDs>for Source field, add another element for Arc Sight User Behavior Analytics (Risk and Threat Intelligence in the case of Securonix) <valueFieldUUIDname="ArcSightUserBehavior Analytics">%GUID%</valueFieldUUID>
The GUID must be the GUID obtained from the Step 8 above.
Adding additional Securonix fields to Archer
To receive the full details for Securonix alert, you must create a few custom fields in the Security Alerts application.
Source UID
-
On the Administration tab, click Application Builder > Applications.
-
Open the application Security Alerts.
-
On the Field tab, click Add New.
-
Select the radio button Create a new field from scratch and set the field type as Text.
-
Type Source UID for the name of the field.
-
Click Save.
-
On the Administration tab, click Application Builder > Applications.
-
Open the application Security Incidents.
-
On the Field tab, click the Source UID.
-
Copy the ID field.
-
In the UCF, in the<install_dir>/SAIMintegrationservice/config/mappingfolder, open the
secops_import_archer.xml file.
-
Create a new field under the Generic2_SecurityAlerts application mappings as follows:
<fieldname="SourceUID">
<UUID>2507D1BE-7BCB-4DF1-B0E6-0CEC7C466C3A</UUID>
<fieldType>TEXT</fieldType>
<keyName>generic.suid</keyName>
</field>
-
Replace the UUID with the ID copied from step j. above.
Destination UID
-
Follow steps 1-10 above, substituting Destination UID as the field name.
-
In the UCF, in the<install_dir>/SAIMintegrationservice/config/mappingfolder, open the
secops_import_archer.xml file.
-
Create a new field under the Generic2_SecurityAlerts application mappings as follows:
<fieldname="DestinationUID">
<UUID>2507D1BE-7BCB-4DF1-B0E6-0CEC7C466C3A</UUID>
<fieldType>TEXT</fieldType>
<keyName>generic.duid</keyName>
</field>
-
Replace the UUID with the ID copied from the field definition in Archer.
User first name
-
Follow steps 1-10 from Source UID above, substituting User First Name as the field name.
-
In the UCF, in the<install_dir>/SAIMintegrationservice/config/mappingfolder, open the
secops_import_archer.xml file.
-
Create a new field under the Generic2_SecurityAlerts application mappings as follows:
<fieldname="UserFirstName">
<UUID>2507D1BE-7BCB-4DF1-B0E6-0CEC7C466C3A</UUID>
<fieldType>TEXT</fieldType>
<keyName>generic.FirstName</keyName>
</field>
-
Replace the UUID with the ID copied from the field definition in Archer.
User last name
-
Follow steps 1-10 from SourceUID above, substituting User Last Name as the field name.
-
In the UCF, in the<install_dir>/SAIMintegrationservice/config/mappingfolder, open the
secops_import_archer.xml file.
-
Create a new field under the Generic2_SecurityAlerts application mappings as follows:
<fieldname="UserLastName">
<UUID>2507D1BE-7BCB-4DF1-B0E6-0CEC7C466C3A</UUID>
<fieldType>TEXT</fieldType>
<keyName>generic.LastName</keyName>
</field>
-
Replace the UUID with the ID copied from the field definition in Archer.
User job title
-
Follow steps1-10 from SourceUID above, substituting User Job Title as the field name.
-
In the UCF, in the<install_dir>/SAIMintegrationservice/config/mappingfolder, open the
secops_import_archer.xm lfile.
-
Create a new field under the Generic2_SecurityAlerts application mappings as follows:
<fieldname="UserJobTitle">
<UUID>2507D1BE-7BCB-4DF1-B0E6-0CEC7C466C3A</UUID>
<fieldType>TEXT</fieldType>
<keyName>generic.JobTitle</keyName>
</field>
-
Replace the UUID with the ID copied from the field definition in Archer.
User employee ID
-
Follow steps1-10 from SourceUID above, substituting User Employee ID as the field name.
-
In the UCF, in the <install_dir>/SAIMintegrationservice/config/mappingfolder, open the
secops_import_archer.xml file.
-
Create a new field under the Generic2_SecurityAlerts application mappings as follows:
<fieldname="UserEmployeeID">
<UUID>2507D1BE-7BCB-4DF1-B0E6-0CEC7C466C3A</UUID>
<fieldType>TEXT</fieldType>
<keyName>generic.EmployeeID</keyName>
</field>
-
Replace the UUID with the ID copied from the field definition in Archer.
User department
-
Follow steps1-10 from Source UID above, substituting User Department as the field name.
-
In the UCF, in the <install_dir>/SAIMintegrationservice/config/mappingfolder, open the
secops_import_archer.xml file.
-
Create a new field under the Generic2_SecurityAlerts application mappings as follows:
<fieldname="UserDepartment">
<UUID>2507D1BE-7BCB-4DF1-B0E6-0CEC7C466C3A</UUID>
<fieldType>TEXT</fieldType>
<keyName>generic.Department</keyName>
</field>
-
Replace the UUID with the ID copied from the field definition in Archer.
Manager employee ID
-
Follow steps1-10from Source UID above, substituting Manager Employee ID as the field name.
-
In the UCF, in the<install_dir>/SAIMintegrationservice/config/mappingfolder, open the
secops_import_archer.xml file.
-
Create a new field under the Generic2_SecurityAlerts application mappings as follows:
<fieldname="ManagerEmployeeID">
<UUID>2507D1BE-7BCB-4DF1-B0E6-0CEC7C466C3A</UUID>
<fieldType>TEXT</fieldType>
<keyName>generic.ManagerEmployeeID</keyName>
</field>
-
Replace the UUID with the ID copied from the field definition in Archer.
Violation risk score
-
Follow steps1-10 from Source UID above, substituting Violation Risk Score as the field name.
-
In the UCF, in the <install_dir>/SAIMintegrationservice/config/mappingfolder, open the
secops_import_archer.xml file.
-
Create a new field under the Generic2_SecurityAlerts application mappings as follows:
<fieldname=”ViolationRiskScore">
<UUID>2507D1BE-7BCB-4DF1-B0E6-0CEC7C466C3A</UUID>
<fieldType>TEXT</fieldType>
<keyName>generic.ViolationRiskScore</keyName>
</field>
-
Replace the UUID with the ID copied from the field definition in Archer.
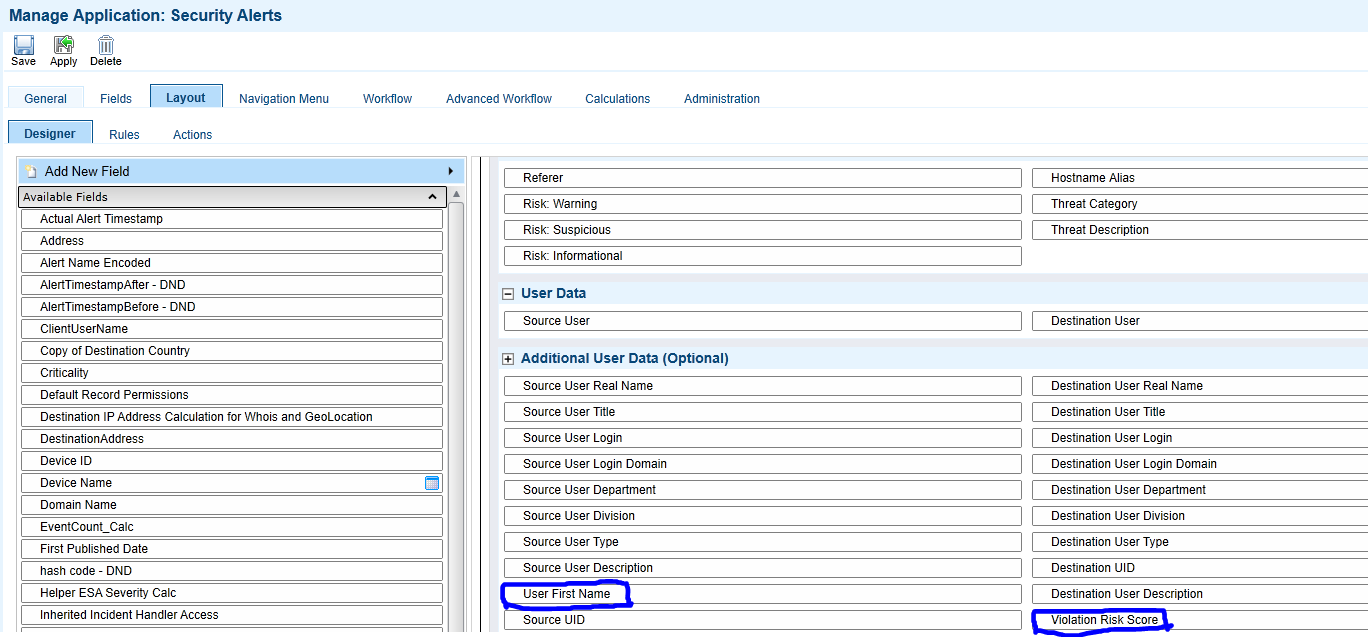
Adding new fields to the layout
Now that these custom fields have been created, it will be necessary to add them to the layout to see their values. To do this, perform the following steps:
-
On the Administration tab, click Application Builder > Applications.
-
Open the application Security Alerts.
-
Go to the Layout tab and drag and drop all the newly created fields from the left onto the position that you want them on the screen.
-
Save the application to ensure the desired changes are persisted. Also, be sure to restart the Unified Log Collector before ingesting any alerts.
Partner product configuration
Before you begin
This section provides instructions for configuring Securonix Snypr with Archer. This document is not intended to suggest optimum installations or configurations.
It is assumed that the reader has both working knowledge of all products involved, and the ability to perform the tasks outlined in this section. Administrators should have access to the product documentation for all products to install the required components.
All Snypr components must be installed and working prior to the integration. Perform the necessary tests to confirm that this is true before proceeding.
Important: The configuration shown in this Implementation Guide is for example and testing purposes only. It is not intended to be the optimal set up for the device. It is recommended that customers make sure Securonix Snypr is properly configured and secured before deploying to a production environment. For more information, please refer to the Securonix Snypr documentation or website.
Securonix Snypr configuration
Select the policy in Snypr for which you want to edit and send CEF formatted alerts to Archer GRC.
-
In the step 4 – Choose Action For Violation Results, enable the CEF Ouput button.
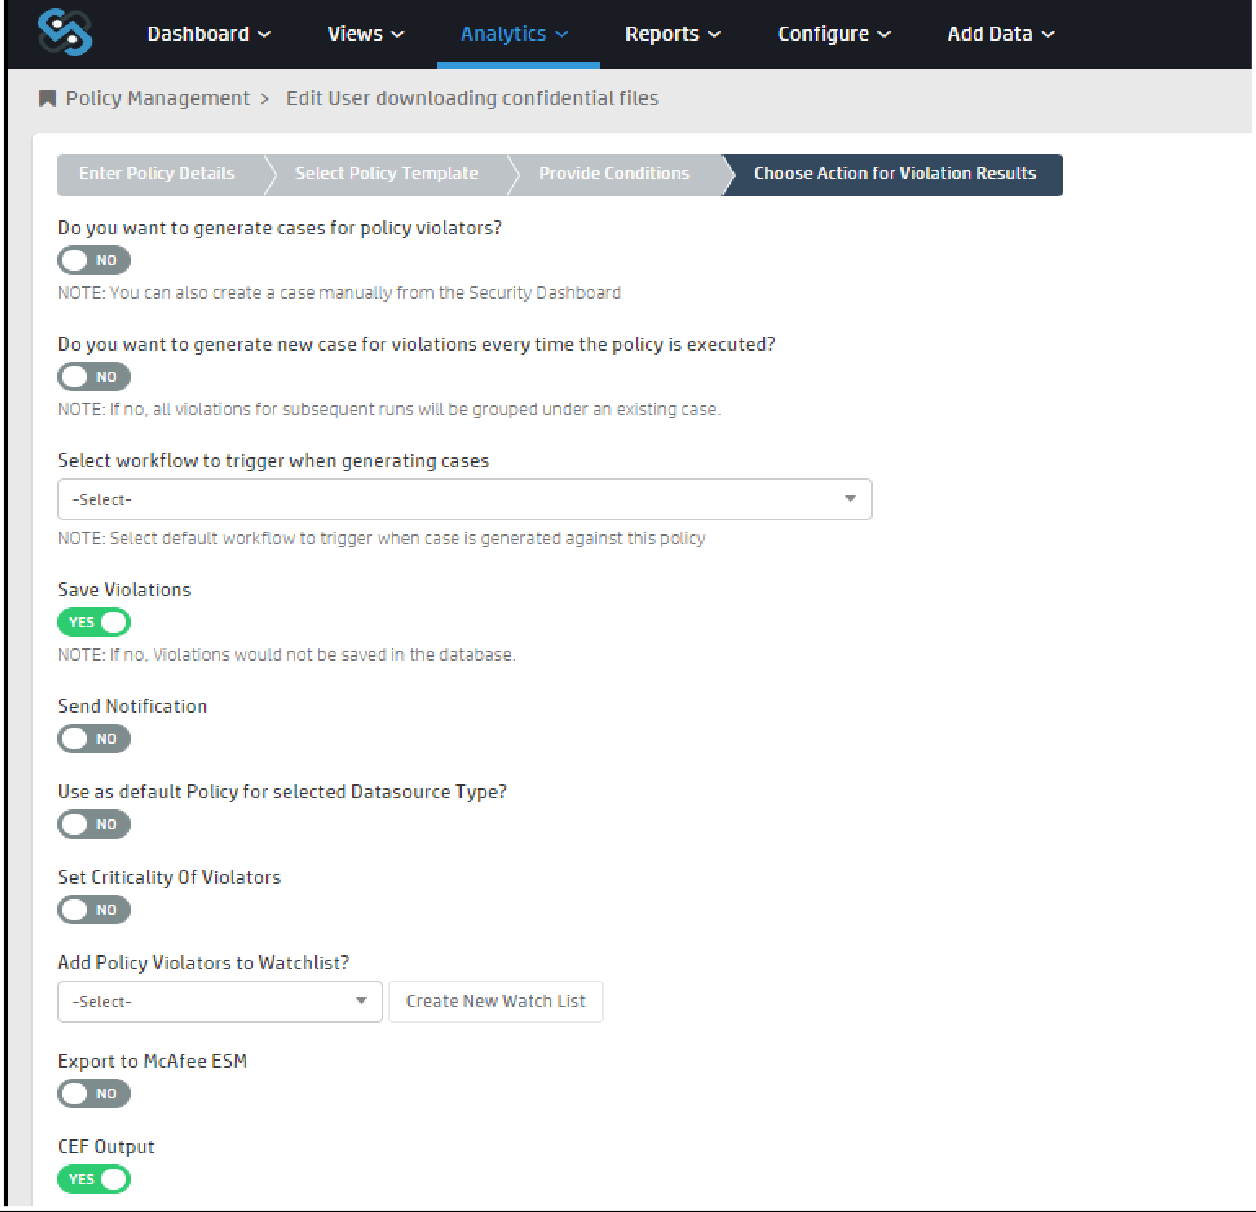
This opens up a new box below,

-
In the drop down, select Create New Connection option. This opens a new screen called Add Connection.
-
Enter a new Connection Name, enter the IP Address of the Unified Log Collector under Host and hit Save.
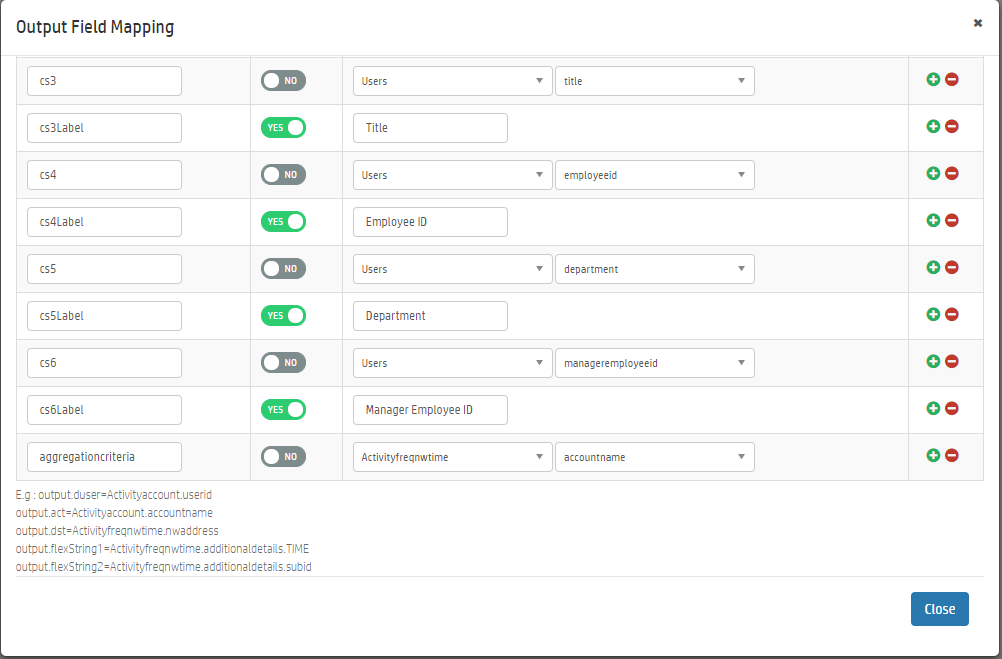
-
Click on the Output Field Mapping button, it opens a new box, there add a new field called aggregation criteria and map it to the account name field under the Activityfreqnwtime table.
-
Now when the policy for which CEF violations are to be sent to Archer GRC is run, the violations are sent directly to Archer GRC as CEF data.
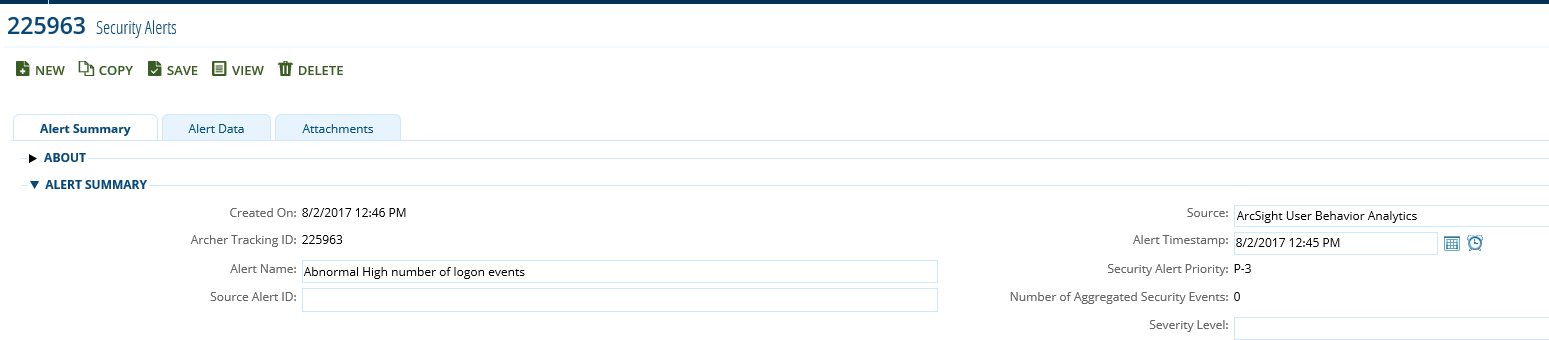
Below is a sample alert on the Archer system.
Certification environment
Date Tested: August 1, 2017
|
Product Name |
Version Information |
Operating System |
|---|---|---|
|
Archer GRC |
6.2 |
Windows 2012 |
|
Security Operations Management |
1.3.1.1 |
Windows 2012 |
|
Securonix Snyper |
6.0 |
|