Tenable.sc Vulnerability Management
Tenable.scTM consolidates and evaluates vulnerability data across your organization, while prioritizing security risks and providing a clear view of your security posture. Built on Nessus technology, Tenable.sc discovers unknown assets that can be cataloged as part of your asset inventory.
The integration of Tenable.sc with the Archer IT & Security Vulnerabilities Program use case enables customers to leverage the discovered devices and catalog those network devices with the vulnerability library. With Archer, customers can then identify which assets require remediation based on the business priority of that asset.
On this page
Release notes
|
Release Version |
Published Date |
Notes |
|---|---|---|
|
Archer 6.4 SP1 |
August 2018 |
Initial Release |
|
Archer 6.7 |
June 2020 |
Offering updated to leverage the Application Managed Output Writer for JavaScript Transporter and notes to update required Archer version 6.7 use cases. |
|
Archer 6.7 |
December 2021 |
Re-Signed JavaScript file. |
|
Archer 6.12 |
January 2023 |
Authentication and User Agent header update |
|
Archer 6.12 |
July 2024 |
Re-Signed JavaScript file with latest certificate. |
Overview of Tenable.sc Vulnerability Management
Key features and benefits
The Tenable.sc integration with Archer enables organizations to do the following:
-
Supplement the Vulnerability Library application with plugin content, which includes extensive CVE coverage.
-
Discover and catalog of assets, including unauthorized assets.
-
Capture network vulnerabilities using scanning technologies.
-
Gain quick visibility to assess risk posture on critical infrastructure devices.
-
Validate vulnerabilities inside Archer once scanners no longer detect vulnerabilities.
Additionally, Tenable.sc calculates a Vulnerability Priority Rating score, which is a combination of the threat intelligence and machine learning to determine the likelihood a vulnerability will be exploited inside your environment.
Important: In the event your integration is attempting to extract large amounts data, the execution of the JavaScript code could take multiple hours. In order to avoid a timeout of the session token, the Archer Services Parameter must be extended. Currently the Archer Services account timeout parameter is set by default to 30 minutes. In the event the JavaScript code has not completed in the allotted timeframe, the data feed will fail.
Requirements
|
Components |
Requirement |
|---|---|
|
Archer Solution |
IT & Security Risk Management |
|
Archer Use Case |
IT Security Vulnerabilities Program |
|
Archer Applications |
Devices, Vulnerability Library, and Vulnerability Scan Results |
|
Requires On-Demand license |
No |
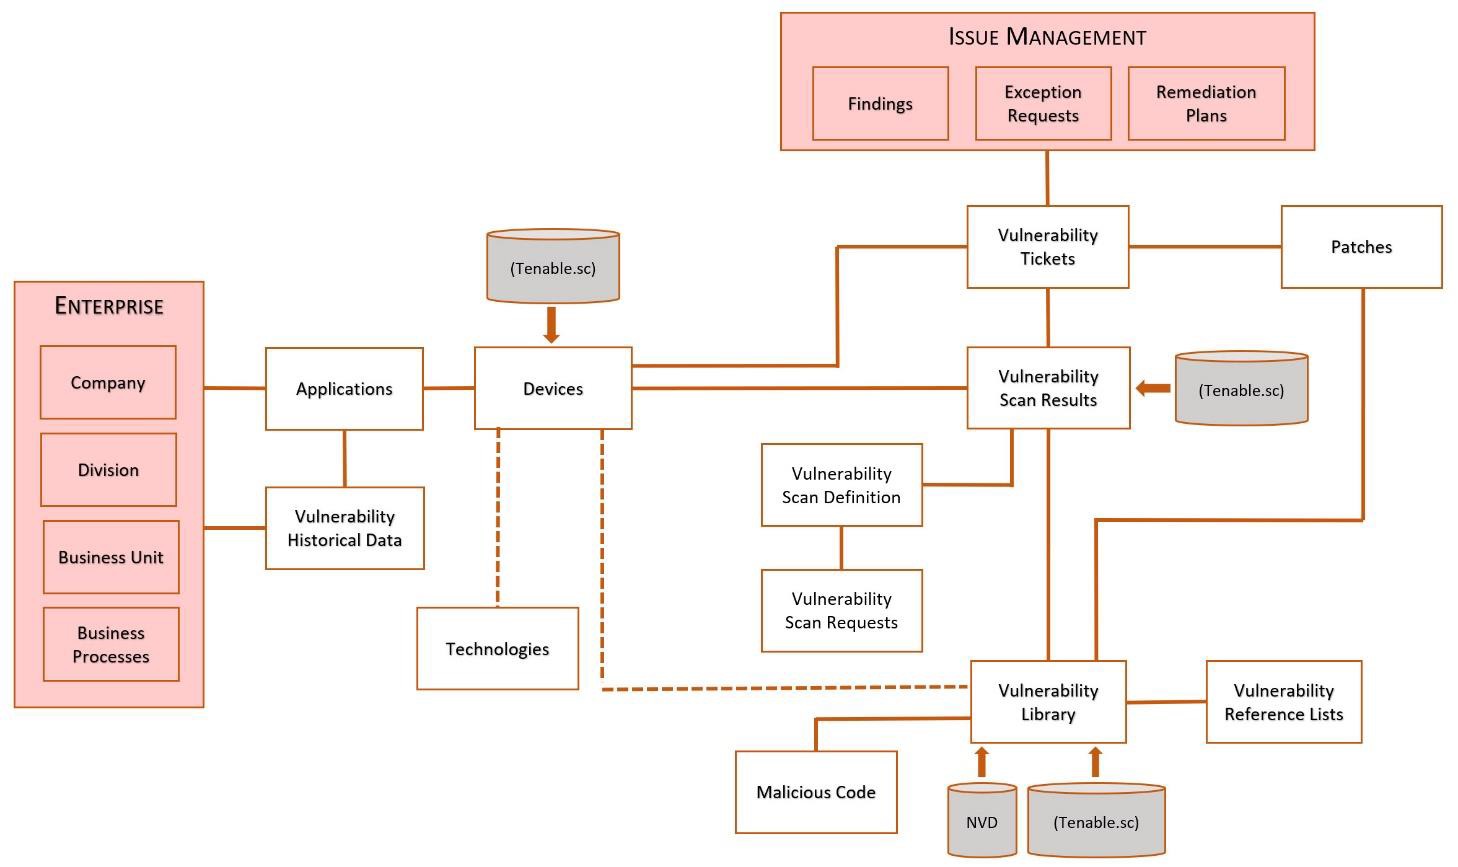
Integration diagram
Configurations
This section provides instructions for configuring the Tenable.sc data feeds with the Archer Platform. This document is not intended to suggest optimum installations or configurations.
It is assumed that the reader has both working knowledge of all products involved, and the ability to perform the tasks outlined in this section. Administrators should have access to the product documentation for all products in order to install the required components.
All Tenable.sc components must be installed and working prior to the integration. Perform the necessary tests to confirm that this is true before proceeding.
Important: The Archer IT Security Vulnerabilities Program use case and the Enterprise Catalog package must be installed and working prior to performing the integration. Perform the necessary tests to confirm that this is true prior to proceeding. The integration described in this guide is being provided as a reference implementation for evaluation and testing purposes. It may or may not meet the needs and use cases for your organization. If additional customizations or enhancements are needed, it is recommended that customers contact Archer Help for assistance.
System requirements
The following components are required for installation and operation of the Tenable.sc data feeds for the IT Security Vulnerabilities Program use case. The applications listed in the following table serve as the targets for the data feeds.
|
Component |
Details |
|
Archer |
Archer 6.12 |
|
Prerequisite Applications (Archer IT Security Vulnerabilities Program) |
|
Data feed configuration
Data feeds
Tenable.sc provides a REST API that allows for the capability to script in interactions directly with the Tenable.sc server. With Archer JavaScript Transporter our clients can easily authenticate to the server and make multiple, dependent API calls extracting large amounts of data in a single data feed.
The following data feeds are provided with this integration:
|
Data Feed |
Description |
|
Tenable.sc Plugins Archer 6.12 |
The Tenable.sc Plugins Archer 6.12 feed is a JavaScript Transporter feed that utilizes API calls to extract all requested plugin definitions. Tenable.sc data is imported and leveraged in the Vulnerability Library application. |
|
Tenable.sc Hosts Archer 6.12 |
The Tenable.sc Hosts Archer 6.12 feed is a JavaScript Transporter feed that utilizes API calls to extract all the asset inventory discovered based on a client’s scanner configuration and implementation. Tenable.sc data is imported and leveraged in the Devices application. For data ingestion, Archer offers configurable settings that allow individual clients to define how to uniquely identify devices in their organization. |
|
Tenable.sc Vulnerabilities Archer 6.12 |
The Tenable.sc Vulnerabilities Archer 6.12 feed is a JavaScript Transporter feed that utilizes API calls to extract the vulnerabilities detected on each asset. For data ingestion, Archer offers configurable settings that allow individual clients to define how to uniquely identify devices in their organization. However, it is critical to note that any alteration of the unique identifier for this feed must continue to include the Repository ID as defined by Tenable.sc. |
Important: You must install all package files before importing data feeds. Package files include the IT Security Vulnerabilities Program use case package, the Enterprise Catalog package, and the Issues Management prerequisite use case package. For more information, see the “Installing the Packages” section of the IT Security Vulnerabilities Program use case in the Archer Online Documentation.
Import and run the data feeds in the following order:
-
(Optional) NVD Data Feeds
Note: For information on setting up the NVD data feeds, see the NIST National Vulnerability Database (NVD) Data Feeds for Archer IT Security Vulnerability Program Implementation Guide on the Archer Exchange.
-
Tenable.sc_Plugins_Archer_6.12.dfx5
-
Tenable.sc_Hosts_Archer_6.12.dfx5
-
Tenable.sc_Vulnerabilities_Archer_6.12.dfx5
Note: After setting up the data feeds, you can schedule the feeds to run when you want to. For more information, see the Scheduling Data Feeds section.Tenable.sc documentation and the API best practice guide can be found on its website (https://docs.tenable.com/Tenablesc.htm).
Configure the JavaScript Transporter Settings
Before you upload a JavaScript file, you must configure JavaScript Transporter settings in the Archer Control Panel.
-
On the General tab, go to the JavaScript Transporter section.
-
Open the Archer Control Panel.
-
Go to Instance Management and select All Instances.
-
Select the instance.
-
On the General tab, go to the JavaScript Transporter section.
-
-
Set the Max Memory Limit and the Script Timeout variable to align with the resources necessary to retrieve data. Most incremental feeds can probably be achieved with a Max Memory Limit of 3048 MB (3 GB) and a Script Timeout of 300 minutes (5 hours).
-
Require Signature is enabled by default on install and required for all Hosted clients.
-
In the Signing Certificate Thumbprints section, add a thumbprint for each digitally signed JavaScript file.
-
Double-click an empty cell in the Signing Certificate Thumbprints section.
-
Enter the digital thumbprint of the trusted certificate used to sign the JavaScript file.
Note: For information on how to obtain digital thumbprints, see Obtaining Digital Thumbprints.
Important: If you enable Require Signature and do not specify thumbprints, JavaScript files will not be accepted by the system.
-
-
On the toolbar, click Save.
Digital Thumbprints
When running JavaScript data feeds, you can set the system to only allow digitally signed JavaScript files from trusted sources for security considerations.
For a certificate to be trusted, all the certificates in the chain including the Root CA Certificate and Intermediate CA certificates must be trusted on both the Web Server and Services Server machines.
Archer Technologies LLC cert in the Trusted Root CA Store
Note: Archer Technologies LLC certificate is not present on every machine’s root by default.
-
On the JavaScript file, Right-click and select Properties.
-
Click the Digital Signatures tab.
-
From the Signature List window, select Archer Technologies LLC.
-
Click the Details button
-
Click View Certificate.
-
Click Install Certificate.
-
Select Local Machine and click Next.
-
Select Place all certificates in the following store and click Browse.
-
Select Trusted Root Certification Authorities and click OK.
-
Click Next.
-
Click Finish.
-
-
-
Upon successful import, click OK.
Obtaining a Certificate Thumbprint
-
On the Web Server and Services Server machines, open the Manage Computer Certificates program.
-
Launch “certmgr” from the Start menu.
-
Navigate to Certificates – Local Computer > Trusted Root Certification Authorities > Certificates.
-
-
Verify that the certificate is trusted.
-
Double click the Archer Technologies LLC certificate.
-
In the Certificate window, click the Certification Path tab.
-
Ensure that the Certificate Status windows displays the following message: “This certificate is OK”.
Note: If the Certificate Status windows displays something different, follow the on-screen instructions.
-
-
Obtain the trusted certificate thumbprint.
-
In the Certificate window, click the Details tab.
-
Scroll to, and select, the Thumbprint field.
-
The certificate's digital thumbprint appears in the window. Copy thumbprint.
Note: For information on adding digital thumbprints, see Step 4a of “Configure the JavaScript Transporter Settings” section of the document, regarding where thumbprint is relevant.
-
Set up the Tenable.sc Plugins Archer 6.12 data feed
Note: If you have an existing integration, you must make some adjustments to your existing data due to the rebranding of Security Center to Tenable.sc. In the existing Vulnerability Library data for all existing Security Center data, change the DFM Key from "Security Center-ID" to "Tenable.sc-ID". Depending on your current integrations into this application, it might be as simple as turning the DFM Key into a calculated field. Example: CONCATENATE([Source],"-",[ID])
Important: Before you upload a JavaScript file, configure JavaScript Transporter settings in the Archer Control Panel. For more information, see Configure the JavaScript Transporter Settings. With the exception of the optional parameters specified in this procedure, changes to the JavaScript Transporter configuration file can only be achieved in a hosted environment with a Professional Services engagement. For more information, contact your account representative.
-
Go to the Manage Data Feeds page.
-
From the menu bar, click
 .
. -
Under Integration, click Data Feeds.
-
-
In the Manage Data Feeds section, click Import.
-
Locate and select the Tenable.sc_Plugins_RSA_Archer_6.12.dfx5 file.
-
Click Open.
-
In the General Information section, in the Status field, select Active.
-
In the Additional Properties section, enable Optimize Calculations.
-
Click the Transport tab.
-
In the Transport Configuration section, complete the following:
-
Click Upload.
-
From the Upload JavaScript File dialog, click Add New.
-
Locate and select the signed-TenableSC_1.0.17.js file, and click Open.
-
From the Upload JavaScript File dialog, click OK.
-
-
The JavaScript code allows clients to pass in different variables through our Custom Parameters section. The following table describes the supported values for specific Custom Parameters.
|
Key |
Value |
Description |
|---|---|---|
|
dataSource |
Only one valid value Default = vulns |
|
|
url |
Requires valid value Default = [empty] |
|
|
accessKey |
Requires valid value Default = [empty] |
|
|
secretKey |
Requires valid value Default = [empty] |
|
|
proxy |
Optional Default = [empty] |
|
|
ignoreLastRunTime |
Requires valid value Default = false |
LastRunTime is a token supplied in the data feed, and by default is the date used in the query logic. In order to use startDate, the ignoreLastRunTime parameter must be set = true. Date Logic:
|
|
startDate |
Optional Default = [empty] |
Additional parameter that allows clients to apply minimal, built-in search filter criteria for data extraction. The plugin query retrieves all plugin data over a specified range by passing values to the startOffset and endOffset values in the query. The startOffset value always defaults to “0”, while the endOffset is the last record in the range. By default, endOffset is a numerical value equal to the equivalent of the current date + 1. Below is an example of how the logic is applied (extraction of data is by batchSize = 1000):
|
|
verifyCerts |
Default = false [Configurable value of true / false] |
Validates the website address matches the address on the certificate, similar to browser level validation. |
|
userAgent |
Optional Default = ‘ARCHER DATAFEED CLIENT’ |
Requires a String value |
Important: The keys and values are case-sensitive and cannot include extra spaces at the end of the strings. The listed values are in place by default but can be configured to suit your environment.
Note: Tenable.sc treats startOffset as exclusive. And while the query sorts by “modifiedTime”, it should be noted Tenable.sc automatically invokes a secondary ascending sort on plugin ID. This is relevant in the event the data return from Tenable is greater than the batchSize indicated. By the web call automatically applying the plugin ID ascending as the secondary sort, we are now assured the query will return all data in the same order on every execution, as "id" is unique to the plugin query.
-
The following additional parameters are valid options for the Custom Parameters section for the current JavaScript file.
|
Key |
Value |
Description |
|---|---|---|
|
batchSize |
Default = 1000 (records at a time) [Configurable] |
Used for defining batches of content to be retrieved in a single call. JavaScript makes incremental calls to pull the next batch of data. |
|
socketLimit |
Default = 10 [Configurable value of 1-25] |
Indicates the maximum number of open socket channels to an endpoint to be used for TCP connections. |
|
maxRetry |
Default = 1 [Configurable value of 0-2] |
Indicates the amount of times a retry will occur where a "socket hung up" error is encountered. If a retry is unsuccessful and the maxRetry is exceeded, the data feed will fail. |
|
requestsPerMin |
Default = 60 [Configurable value] |
A parameter to allow clients to govern the number of API requests made by Archer to the external integration. |
|
lastRunTimeOffset |
Default = -1 [Configurable value] |
Ensures no data loss in the scenarios where calculations with Datetime can be a factor. |
-
For each key type, determine whether you want it to be Protected or Plain Text. Selecting Protected encrypts the key value for the specified key in the log.
-
Click the Source Definition tab.
-
Click the Tokens sub-tab.
-
Verify token values. The following table describes token values to verify.
Token
Value
LastRunTime
(Populated by feed)
-
Note: For more information about tokens, see "Data Feed Tokens" in the Archer Online Documentation.
-
Verify that key field values are not missing from the data feed setup window.
-
Click Save.
Note: Temporal scores reflect characteristics of the vulnerability that change over time. Since temporal scores are optional, in the case where temporal scores are not provided, Archer applies by default the metric value that has no effect on the overall CVSS score. Default values simulate ‘skipping’ the impacts where users feel a specific metric does not apply.
Set up the Tenable.sc Hosts Archer 6.12 data feed
For the acquiring asset inventory from the scanner data, we use the vulnTool = sumip in the query to make the web call to the API. IP Summary is a view of aggregated data through Analysis endpoint. Therefore, the aggregation of IPs is still a byproduct of the discovered vulnerabilities.
Important: Before you upload a JavaScript file, configure JavaScript Transporter settings in the Archer Control Panel. For more information, see Configure the JavaScript Transporter Settings. With the exception of the optional parameters specified in this procedure, changes to the JavaScript Transporter configuration file can only be achieved in a hosted environment with a Professional Services engagement. For more information, contact your account representative. Archer implements with a unique key on DNS identification. However, we understand that environment configurations are unique across the infrastructure of an organization, therefore the unique key to identify if a Device already exists inside Archer, is configurable to each client. And where clients have multiple scanners scanning the same set of devices or IP ranges, the unique key should be altered to a matching algorithm that identifies the device, regardless of the source.
-
Go to the Manage Data Feeds page.
-
From the menu bar, click
. -
Under Integration, click Data Feeds.
-
-
In the Manage Data Feeds section, click Import.
-
Locate and select the Tenable.sc_Hosts_RSA_Archer_6.12.dfx5 file for the data feed.
-
Click Open.
-
In the General Information section, in the Status field, select Active.
-
In the Additional Properties section, enable Optimize Calculations.
-
Click the Transport tab.
-
In the Transport Configuration section, complete the following:
-
Click Upload.
-
From the Upload JavaScript File dialog, click Add New.
-
Locate and select the signed-TenableSC_1.0.17.js file, and click Open.
-
From the Upload JavaScript File dialog, click OK.
-
-
The JavaScript code allows clients to pass in different variables through our Custom Parameters section. The following table describes the supported values for specific Custom Parameters.
|
Key |
Value |
Description |
|---|---|---|
|
dataSource |
Only one valid value Default = hosts |
|
|
url |
Requires valid value Default = [empty] |
|
|
accessKey |
Requires valid value Default = [empty] |
|
|
secretKey |
Requires valid value Default = [empty] |
|
|
proxy |
Optional Default = [empty] |
|
|
hostSeverities |
Requires valid value Default = 4,3,2,1,0 |
Filter passed to the query. Eliminates unwanted host data from the query results. Data is only returned where the host were discovered on vulnerabilities with the defined severity levels. 4 = Critical; 3 = High; 2 = Medium; 1 = Low; 0 = Informational |
|
vulnDateFilterType |
Default = firstSeen [Configurable value, but only one value allowed] |
Filter passed to the query. We calculate the concept of a startDate and endDate, by using either the LastRunTime token, startDate parameter, or a default date value. The selected date is then used as the filter logic passed as part of the query to eliminate unwanted hosts being returned. Example: "filters": { "filterName": "firstSeen", "operator": "=", "value": "#:#" } Valid filterName values:
|
|
ignoreLastRunTime |
Requires valid value Default = false |
LastRunTime is a token supplied in the data feed, and by default is the date used in the query logic. In order to use startDate, the ignoreLastRunTime parameter must be set = true. Date Logic:
|
|
startDate |
Optional Default = [empty] |
Additional parameter, other than LastRunTime token, that allows clients to apply minimal, built-in search filter criteria for data extraction. An example of how the logic is applied (extraction of data is by batchSize = 1000, vulnDataFilterType = firstSeen, and startDate = 2019-04-21):
|
|
vulnLoadActive |
Requires valid value Default = true [Configurable value of true or false] |
Indicates whether to pull data from the Cumulative database. Also known as the Active database. |
|
vulnLoadPatched |
Requires valid value Default = true [Configurable value of true or false] |
Indicates whether to pull data from the Mitigated database. Also known as Patched database. |
|
verifyCerts |
Default = false [Configurable value of true or false] |
Validates the website address matches the address on the certificate, similar to browser level validation. |
|
userAgent |
Optional Default = ‘ARCHER DATAFEED CLIENT’ |
Requires a String value |
Important: The keys and values are case-sensitive and cannot include extra spaces at the end of the strings. The listed values are in place by default but can be configured to suit your environment.
Note: Tenable.sc treats startOffset as exclusive.
-
(Optional) The following additional parameters are valid options for the Custom Parameters section for the current JavaScript file.
|
Key |
Value |
Description |
|---|---|---|
|
batchSize |
Default = 1000 (records at a time) [Configurable] |
Used for defining batches of content to be retrieved in a single call. JavaScript makes incremental calls to pull the next batch of data. |
|
socketLimit |
Default = 10 [Configurable value of 1- 25] |
Indicates the maximum number of open socket channels to an endpoint to be used for TCP connections. |
|
maxRetry |
Default = 1 [Configurable value of 0-2] |
Indicates the amount of times a retry will occur where a "socket hung up" error is encountered. If a retry is unsuccessful and the maxRetry is exceeded, the data feed will fail. |
|
requestsPerMin |
Default = 60 [Configurable value] |
A parameter to allow clients to govern the number of API requests made by Archer to the external integration. |
|
lastRunTimeOffset |
Default = -1 [Configurable value] |
Ensures no data loss in the scenarios where calculations with Datetime can be a factor. Example: if startDate = 2020-06- 03, the code will calculate the number of days ago by using 2020-06-02. |
-
For each key type, determine whether you want it to be Protected or Plain Text. Selecting Protected encrypts the key value for the specified key in the log.
-
Click the Source Definition tab.
-
Click the Tokens sub-tab.
-
Verify token values. The following table describes token values to verify.
Token
Value
LastRunTime
(Populated by feed)
Note: For more information about tokens, see "Data Feed Tokens" in the Archer Online Documentation.
-
-
Verify that key field values are not missing from the data feed setup window.
-
Click Save.
Set up the Tenable.sc Vulnerabilities Archer 6.12 data feed
For vulnerabilities extraction, we use the vulnTool = vulnDetails in the query to make the web call to the API. This is an aggregated view of the data through the Analysis endpoint.
Important: Before you upload a JavaScript file, configure JavaScript Transporter settings in the Archer Control Panel. For more information, see Configure the JavaScript Transporter Settings. With the exception of the optional parameters specified in this procedure, changes to the JavaScript Transporter configuration file can only be achieved in a hosted environment with a Professional Services engagement. For more information, contact your account representative. For vulnerabilities detected, Archer implements with a unique key concept to associate the vulnerability detected to a specific host and a vulnerability definition. However, we understand that environment configurations are unique across an organization’s infrastructure, therefore the unique keys are configurable to each client, such as determining if a device already exists in your Archer environment. And where clients have multiple scanners scanning the same set of devices or IP ranges, the unique key should be altered to a matching algorithm that identifies the device, regardless of the source. Unique key default values are as follows:
|
Identification of an object |
Logic (configurable) |
|---|---|
|
Vulnerability detected (VSR) |
If DNS exists, concatenate SOURCE + DNS + PLUGIN ID + PORT + PROTOCOL + REPOSITORY ID. If DNS does not exist, concatenate the SOURCE + PLUGIN ID + IP + PORT + PROTOCOL + REPOSITORY ID + FIRST FOUND. |
|
Device (Link Only) |
Use the DNS as the match on an active Device. |
|
Vulnerability Library definition (Link Only) |
If a Plugin ID exists, create a match from the detection to the vulnerability definition. |
-
Go to the Manage Data Feeds page.
-
From the menu bar, click .
-
Under Integration, click Data Feeds.
-
-
In the Manage Data Feeds section, click Import.
-
Locate and select the Tenable.sc_Vulnerabilities_RSA_Archer_6.12.dfx5 file for the data feed.
-
Click Open.
-
In the General Information section, in the Status field, select Active.
-
In the Additional Properties section, enable Optimize Calculations.
-
Click the Transport tab.
-
In the Transport Configuration section, complete the following:
-
Click Upload.
-
From the Upload JavaScript File dialog, click Add New.
-
Locate and select the signed-TenableSC_1.0.17.js file, and click Open.
-
From the Upload JavaScript File dialog, click OK.
-
-
The JavaScript code allows clients to pass in different variables through our Custom Parameters section. The following table describes the supported values for specific Custom Parameters.
|
Key |
Value |
Description |
|---|---|---|
|
dataSource |
Only one valid value Default = hosts |
|
|
url |
Requires valid value Default = [empty] |
|
|
accessKey |
Requires valid value Default = [empty] |
|
|
secretKey |
Requires valid value Default = [empty] |
|
|
proxy |
Optional Default = [empty] |
|
|
vulnSeverities |
Requires valid value Default = 4,3,2,1 |
Filter passed to the query. Eliminates unwanted vulnerability data from the query results. Data is only returned on vulnerabilities with the specified severity levels. 4 = Critical; 3 = High; 2 = Medium; 1 = Low; 0 = Informational |
|
vulnDateFilterType |
Default = firstSeen [Configurable value, but only one value allowed] |
Filter passed to the query. We calculate the concept of a startDate and endDate, by using either the LastRunTime token, startDate parameter, or a default date value. The selected date is used as the filter logic passed as part of the query to eliminate unwanted vulnerabilities being returned. Example: "filters": { "filterName": "firstSeen", "operator": "=", "value": "#:#" } Valid filterName values:
Logic to calculate the value criteria:
|
|
ignoreLastRunTime |
Requires valid value Default = false |
LastRunTime is a token supplied in the data feed, and by default is the date used in the query logic. In order to use startDate, the ignoreLastRunTime parameter must be set = true. Date Logic:
|
|
startDate |
Optional Default = [empty] |
Additional parameter, other than LastRunTime token, that allows clients to apply minimal, built-in search filter criteria for data extraction. An example of how the logic is applied (extraction of data is by batchSize = 1000, vulnDataFilterType = firstSeen, and startDate = 2019-04-21):
|
|
vulnLoadActive |
Requires valid value Default = true [Configurable value of true or false] |
Indicates whether to pull data from the Cumulative database. Also known as the Active database. |
|
vulnLoadPatched |
Requires valid value Default = true [Configurable value of true or false] |
Indicates whether to pull data from the Mitigated database. Also known as Patched database. |
|
verifyCerts |
Default = false [Configurable value of true or false] |
Validates the website address matches the address on the certificate, similar to browser level validation. |
|
userAgent |
Optional Default = ‘ARCHER DATAFEED CLIENT’ |
Requires a String value |
Important: The keys and values are case-sensitive and cannot include extra spaces at the end of the strings. The listed values are in place by default but can be configured to suit your environment.
Note: Tenable.sc treats startOffset as exclusive.
-
(Optional) The following additional parameters are valid options for the Custom Parameters section for the current JavaScript file.
|
Key |
Value |
Description |
|---|---|---|
|
batchSize |
Default = 1000 (records at a time) [Configurable] |
Used for defining batches of content to be retrieved in a single call. JavaScript makes incremental calls to pull the next batch of data. |
|
socketLimit |
Default = 10 [Configurable value of 1- 25] |
Indicates the maximum number of open socket channels to an endpoint to be used for TCP connections. |
|
maxRetry |
Default = 1 [Configurable value of 0-2] |
Indicates the amount of times a retry will occur where a "socket hung up" error is encountered. If a retry is unsuccessful and the maxRetry is exceeded, the data feed will fail. |
|
requestsPerMin |
Default = 60 [Configurable value] |
A parameter to allow clients to govern the number of API requests made by Archer to the external integration. |
|
lastRunTimeOffset |
Default = -1 [Configurable value] |
Ensures no data loss in the scenarios where calculations with Datetime can be a factor. Example: if startDate = 2020-06- 03, the code will calculate the number of days ago by using 2020-06-02. |
-
For each key type, determine whether you want it to be Protected or Plain Text. Selecting Protected encrypts the key value for the specified key in the log.
-
Click the Source Definition tab.
-
Click the Tokens sub-tab.
-
Verify token values. The following table describes token values to verify.
Token
Value
LastRunTime
(Populated by feed)
CrossReferencesMode
LinkOnly
RelatedReferencesMode
LinkOnly
Note: For more information about tokens, see "Data Feed Tokens" in the Archer Online Documentation.
-
-
Verify that key field values are not missing from the data feed setup window.
-
Click Save.
Important: By leveraging a combination of the “hasBeenMitigated” and “repository” information provided by the Tenable.sc in the web call, Archer is able to accurately determine whether a vulnerability is Active, Patched, or Reopened in the Scan Status field available in the Vulnerability Scan Results application.
Using the Tenable.sc data feeds
Scheduling data feeds
Important: A data feed must be active and valid to successfully run.
As you schedule your data feed, the Data Feed Manager validates the information. If any information is invalid, an error message displays. You can save the data feed and correct the errors later; but the data feed does not process until you make corrections.
Note: All IT Security Vulnerabilities Program data feeds are set to run daily by default.
-
From the menu bar, click
.
-
Go to the Schedule tab of the data feed that you want to modify.
-
From the menu bar, click
. -
Under Integration, click Data Feeds.
-
Select the data feed.
-
Click the Schedule tab.
-
-
Go to the Recurrences section and complete frequency, start and stop times, and time zone. The following table describes the fields in the Recurrences section.
Field
Description
Frequency
Specifies the interval in which the data feed runs, for example, Minutely, Hourly, Daily, Weekly, Monthly, or Reference.
-
Minutely. Runs the data feed by the interval set. For example, if you specify 45 in the Every list, the data feed executes every 45 minutes.
-
Hourly. Runs the data feed by the interval set, for example, every hour (1), every other hour (2) and so forth.
-
Daily. Runs the data feed by the interval set, for example, every day (1), every other day (2) and, so forth.
-
Weekly. Runs the data feed based on a specified day of the week, for example, every Monday of the first week (1), every other Monday (2), and so forth.
-
Monthly. Runs the data feed based on a specified week of the month, for example, 1st, 2nd, 3rd, 4th, or Last.
-
Recurrence. Runs a specified data feed as runs before the current one.
This option indicates to the Data Feed Service that this data feed starts as soon as the referenced data feed completes successfully. For example, you can select to have a Threats data feed run immediately after your Assets data feed finishes. From the Reference Feed list, select after which existing data feed the current data feed starts.
A reference data feed will not run when immediately running a data feed. The Run Data Feed Now option only runs the current data feed.
Every
Specifies the interval of the frequency in which the data feed runs.
Start Time
Specifies the time the data feed starts running.
Start Date
Specifies the date on which the data feed schedule begins.
Time Zone
Specifies the time zone in of the server that runs the data feed.
-
-
(Optional) To override the data feed schedule and immediately run your data feed, in the Run Data Feed Now section, click Start.
-
Click Save.
Certification environment
Date tested: July 2024
|
Product Name |
Version Information |
Operating System |
|---|---|---|
|
Archer |
6.12 |
Virtual Appliance |
|
Tenable.sc |
NA |
NA |