ThreatWatch
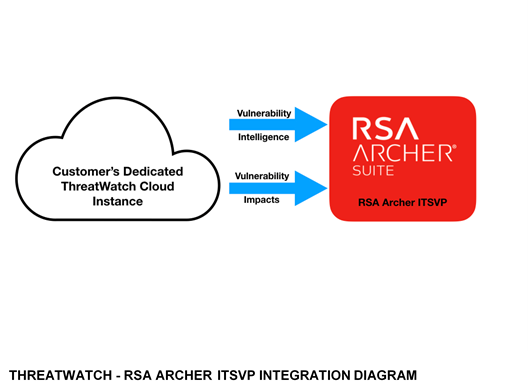
The ThreatWatch integration with Archer populates vulnerability intelligence and impact items into the IT Security Vulnerabilities Program (ITSVP) solution in Archer. This provides access to near real-time vulnerability intelligence along with continuous impact assessment of organizational assets (without the need for intrusive network scans).
On this page
Release history
Last updated: February 2020
This is the second release of the ThreatWatch integration with Archer.
-
Added support for vulnerability intel from ThreatWatch to Archer.
-
Added support for vulnerability impacts from ThreatWatch to Archer.
-
Added 3 new Sub-Forms in Archer for ThreatWatch data. These replace the 3 ODA’s in version 1.0.
Overview
Benefits
With the ThreatWatch integration, you can:
-
Get cutting-edge vulnerability intelligence with automatic risk prioritization
-
Utilize proactive non scan-based impact assessment for different kinds of assets in Archer.
-
Easily generate reports and findings from the latest vulnerability intelligence.
-
Provide management with information about which vulnerability impacts are critical and need to be addressed immediately.
Requirements
|
Components |
Requirement |
|---|---|
|
Archer Solution |
IT Security Risk Management |
|
Archer Use Case |
IT Security Vulnerabilities Program |
|
Archer Applications |
Vulnerability Library, Vulnerability Scan Results |
|
Uses Custom Application |
No |
|
Requires On-Demand license |
No |
Prerequisites (system requirements)
|
Components |
Recommended Software |
|---|---|
|
Operating System |
Windows Server 2012 R2 or 2016 Standard or Datacenter editions. |
|
Database Server |
Microsoft SQL Server 2016 SP 1 (64-bit) or 2016 Enterprise Edition (64-bit) or 2017 (64-bit) or greater Note: SQL Express is not supported |
|
Services Server |
Java Runtime Environment (JRE) 8 (64-bit) |
|
Archer |
Archer 6.6 and later |
|
Prerequisite applications |
N/A |
Integration diagram
Additional resources
The following additional resources are available for this application:
Configure the ThreatWatch – Archer integration
This section provides instructions for configuring ThreatWatch with the Archer platform. This document is not intended to suggest optimum installations or configurations.
It is assumed that the reader has both working knowledge of all products involved, and the ability to perform the tasks outlined in this section. Administrators should have access to the product documentation for all products in order to install the required components.
All ThreatWatch components must be installed and working prior to the integration. Perform the necessary tests to confirm that this is true before proceeding.
Important: The integration described in this guide is being provided as a reference implementation for evaluation and testing purposes. It may or may not meet the needs and use cases for your organization. If additional customizations or enhancements are needed, it is recommended that customers contact Archer Help for assistance.
Configure Archer
Task 1: Configure the JavaScript Transporter settings
Before you upload a JavaScript file within the data feed manager, you must configure JavaScript Transporter settings in the Archer Control Panel. If your organization has already implemented digital thumbprints for JavaScript Transporter data feeds, this section can be skipped.
-
Open the Archer Control Panel.
-
Go to Instance Management and select All Instances.
-
Select the instance.
-
On the General tab, go to the JavaScript Transporter section.
-
-
In the Max Memory Limit field, set the value to 2048 MB (2 GB).
-
In the Script Timeout field, set the value to 120 minutes (2 hours).
-
Require Signature is enabled by default on install. Signed Certificate Thumbprints are required for all Hosted clients.
-
In the Signing Certificate Thumbprints section, add a thumbprint for each digitally signed JavaScript file.
-
Double-click an empty cell in the Signing Certificate Thumbprints section.
-
Enter the digital thumbprint of the trusted certificate used to sign the JavaScript file.
Note: For information on how to obtain digital thumbprints, see Obtaining Digital Thumbprints.
Important: If you enable Require Signature and do not specify thumbprints, JavaScript files will not be accepted by the system.
-
-
On the toolbar, click Save.
Digital Thumbprints
When running JavaScript data feeds, you can set the system to only allow digitally signed JavaScript files from trusted sources for security considerations.
For a certificate to be trusted, all the certificates in the chain including the Root CA Certificate and Intermediate CA certificates must be trusted on both the Web Server and Services Server machines.
ThreatWatch Inc cert in the Trusted Root CA Store
Important: You must install the certificates on the Archer Server.
-
On the JavaScript file, Right-click and select Properties.
-
Click the Digital Signatures tab.
-
From the Signature List window, select ThreatWatch Inc.
-
Click the Details button.
-
Click View Certificate.
-
Click Install Certificate.
-
Select Local Machine and click Next.
-
Select Place all certificates in the following store and click Browse.
-
Select Trusted Root Certification Authorities and click OK.
-
Click Next.
-
Click Finish.
-
-
-
Upon successful import, click OK.
Obtaining a Certificate Thumbprint
-
On the Web Server(s) and Services Server(s) machines, open the Manage Computer Certificates program.
-
Launch “certmgr” from the Start menu.
-
Navigate to Certificates – Local Computer > Trusted Root Certification Authorities > Certificates
-
Ensure the following certificates are in the Certificates sub-folder of the Trust Root Certification Authorities folder.
-
ThreatWatch Inc.
-
-
-
Verify that the certificate is trusted.
-
Double click the ThreatWatch Inc certificate.
-
In the Certificate window, click the Certification Path tab.
-
Ensure that the Certificate Status windows displays the following message: “This certificate is OK”.
Note: If the Certificate Status windows displays something different, follow the on-screen instructions.
-
-
Obtain the trusted certificate thumbprint.
-
In the Certificate window, click the Details tab.
-
Scroll to, and select, the Thumbprint field.
-
The certificate's digital thumbprint appears in the window. Copy thumbprint.
-
Note: For information on adding digital thumbprints, see Step 4a of “Configure the JavaScript Transporter Settings” section of the document, regarding where thumbprint is relevant.
Task 2: Create the ThreatWatch Patches Sub-Form for the Vulnerability Library application
-
On the Archer main page menu bar, click
 .
. -
Under Application Builder, click Sub-Forms.
-
Click Add New.
-
Select the Create a new Sub-Form from scratch radio button and click OK.
-
In the New Sub-Form window, enter ThreatWatch Patches for the name, then click OK.
-
Click the Layout tab.
-
From the Designer window, click Add New Field, then create the following fields.
|
Field Name |
Field Type |
|---|---|
|
Patch ID |
Text |
|
Patch Name |
Text |
|
Patch Source |
Text |
|
Patch Tracking ID |
Text |
|
Patch URL |
External Links |
-
Drag the recently created fields onto the layout, then click Apply.
-
In the layout tab, rename the General Information section to ThreatWatch Patch Information.
-
Click Save.
-
Under Application Builder, click Applications.
-
Select the Vulnerability Library application.
-
Click the Layout tab. From the Designer tab, click Add New Field and select.
-
Enter ThreatWatch Patches in the Name field.
-
Under the Sub-form field, click the ellipses. From the list of available sub-forms, select ThreatWatch Patches, then click OK.
-
Click the Options tab. In the Grid Display Properties select Display Fields, then click the fields you created in step 7.
Task 3: Create the ThreatWatch Products Sub-Form for the Vulnerability Library application
-
On the Archer main page menu bar, click
. -
Under Application Builder, click Sub-Forms.
-
Click Add New.
-
Select the Create a new Sub-Form from scratch radio button and click OK.
-
In the New Sub-Form window, enter ThreatWatch Products for the name, then click OK.
-
Click the Layout tab.
-
From the Designer window, click Add New Field, then create the following fields.
|
Field Name |
Field Type |
|---|---|
|
Product Name |
Text |
|
Product Tracking ID |
Text |
|
Product Vendor |
Text |
|
Product Version |
Text |
-
Drag the recently created fields onto the layout, then click Apply.
-
In the layout tab, rename the General Information section to ThreatWatch Product Information.
-
Click Save.
-
Under Application Builder, click Applications.
-
Select the Vulnerability Library application.
-
Click the Layout tab. From the Designer tab, click Add New Field and select.
-
Enter ThreatWatch Products in the Name field.
-
Under the Sub-form field, click the ellipses. From the list of available sub-forms, select ThreatWatch Products, then click OK.
-
Click the Options tab. In the Grid Display Properties select Display Fields, then click the fields you created in step 7.
Task 4: Create the ThreatWatch Remediations Sub-Form for the Vulnerability Library application
-
On the Archer main page menu bar, click
. -
Under Application Builder, click Sub-Forms.
-
Click Add New.
-
Select the Create a new Sub-Form from scratch radio button and click OK.
-
In the New Sub-Form window, enter ThreatWatch Remediations for the name, then click OK.
-
Click the Layout tab.
-
From the Designer window, click Add New Field, then create the following fields.
|
Field Name |
Field Type |
|---|---|
|
Remediation Tracking ID |
Text |
|
Remediation Description |
Text |
|
Remediation Source |
Text |
|
Remediation URL |
Text |
-
Drag the recently created fields onto the layout, then click Apply.
-
In the layout tab, rename the General Information section to ThreatWatch Remediation Information.
-
Click Save.
-
Under Application Builder, click Applications.
-
Select the Vulnerability Library application.
-
Click the Layout tab. From the Designer tab, click Add New Field and select.
-
Enter ThreatWatch Remediations in the Name field.
-
Under the Sub-form field, click the ellipses. From the list of available sub-forms, select ThreatWatch Remediations, then click OK.
-
Click the Options tab. In the Grid Display Properties select Display Fields, then click the fields you created in step 7.
Task 5: Configure the Vulnerability Library application to display/add ThreatWatch Vulnerability fields
-
On the Archer main page menu bar, click
. -
Under Application Builder, click Applications.
-
Select the Vulnerability Library application from the applications list.
-
In the Vulnerability Library application, Select Layout tab and then select Designer tab.
-
Under Related CVEs, select New tab under the Default Tab Set.
-
In the New Tab dialog box, specify the tab name as ThreatWatch in the Tab Name text box.
-
Check the Default Tab check box option.
-
Click Ok. This new tab will be displayed with tab name ThreatWatch.
-
Create and add one new Text field: ThreatWatch ID.
-
Drag-drop the following fields created in the steps above into the Vulnerability Library application layout: ThreatWatch ID field into the General Section, and the three Sub-Form fields into the ThreatWatch tab.

-
Click Save.
Task 6: Configure the Vulnerability Scan Results application to include ThreatWatch Impact Details
Follow below steps to include ThreatWatch fields in the Vulnerability Scan Results application layout. ThreatWatch fields will be displayed in a new ThreatWatch section.
-
On the Archer main page menu bar, click
.
-
Under Application Builder, click Applications.
-
Select Vulnerability Scan Results application from the applications list.
-
In the Vulnerability Scan Results, Select Layout tab and then select Designer tab.
-
Under Add New Field; Add New Layout Object; drag-drop Add Section under the Vulnerability Scan Dates.
-
For the added section, click Edit Section Properties. Specify the Section Name as Additional ThreatWatch Impact Details. Click OK.
-
The following custom fields need to be created and added to the Vulnerability Scan Results application *** Set the following fields to Private access: Everyone. This lets everyone have read access to the fields but without modify capabilities.
|
Field Name |
Field Type |
|---|---|
|
ThreatWatch Asset ID |
Text |
|
ThreatWatch Match Confidence |
Numeric |
|
ThreatWatch Prioritization |
Text |
|
ThreatWatch Resolve Comment |
Text |
|
ThreatWatch Resolve Timestamp |
Date |
-
Once all the fields are dragged-dropped into the section, layout should be displayed as below:

-
Click Apply displayed under the Manage Application: Vulnerability Scan Results.
Task 7: Setting up the ThreatWatch Vulnerability Intel Data Feed
-
On the Archer main page menu bar, click
. -
Under Integration, click Data Feed.
-
Under the Manage Data Feeds section, click Import.
-
Locate the data feed file for ThreatWatch Vulnerability Intel named ThreatWatch_Vulnerability_Intel.dfx5 and click Open.
-
In the General tab, in General Information section, select Active in the Status dropdown list field.
-
Click the Transport tab.
-
Click the Upload option displayed under the Transport Configuration section.
-
From the Upload JavaScript File window, click Add New.
-
Locate the JavaScript file named ThreatWatch_Vulnerability_Intel.js, and click Open.
-
On the Upload JavaScript File window, click OK.
-
-
In the Custom Parameters section, specify values for following keys:
|
Key Name |
Type |
Value |
|---|---|---|
|
tw_handle |
Plain Text |
User’s ThreatWatch login handle |
|
tw_token |
Plain Text |
API token generated by the user in the ThreatWatch Instance |
|
tw_instance |
Plain Text |
ThreatWatch instance endpoint (i.e. mycompany.threatwatch.io) |
-
In the Navigation tab, under Navigation section, ensure that Xml File Iterator is selected in the Navigation method dropdown list.
-
Make sure everything is mapped correctly in the Data Map Tab; map the tw_id source field to the ThreatWatch ID target field:
|
Source Field |
Target Field |
Target Application |
|---|---|---|
|
patch_description |
ThreatWatch Patches > Patch Name |
Vulnerability Library |
|
patch_ID |
ThreatWatch Patches > Patch ID |
Vulnerability Library |
|
patch_publisher |
ThreatWatch Patches > Patch Source |
Vulnerability Library |
|
patch_tracking_id |
ThreatWatch Patches > Patch Tracking ID |
Vulnerability Library |
|
patch_url |
ThreatWatch Patches > Patch URL > Url |
Vulnerability Library |
|
product_name |
ThreatWatch Products > Product Name |
Vulnerability Library |
|
product_tracking_id |
ThreatWatch Products > Product Tracking ID |
Vulnerability Library |
|
product_vendor |
ThreatWatch Products > Product Vendor |
Vulnerability Library |
|
product_version |
ThreatWatch Products > Product Version |
Vulnerability Library |
|
description |
ThreatWatch Remediations > Remediation Description |
Vulnerability Library |
|
remediation_tracking_id |
ThreatWatch Remediations > Remediation Tracking ID |
Vulnerability Library |
|
source |
ThreatWatch Remediations > Remediation Source |
Vulnerability Library |
|
url |
ThreatWatch Remediations > Remediation URL |
Vulnerability Library |
-
In the same Data Map tab, under Key Fields Definitions section, ensure that each Reference Field has a Key Field Definition field name set in the dropdown list:
-
Reference Field: Vulnerability Library > Key Field Definitions: ID.
-
Reference Field: ThreatWatch Patches > Key Field Definitions: Patch Tracking ID.
-
Reference Field: ThreatWatch Products > Key Field Definitions: Product Tracking ID.
-
Reference Field: ThreatWatch Remediation > Key Field Definitions: Remediation Tracking ID.
-
-
Click Save.
Task 8: Setting up the ThreatWatch Vulnerability Impact Data Feed
-
On the Archer main page menu bar, click
. -
Under Integration, click Data Feed.
-
Under the Manage Data Feeds section, click Import.
-
Locate the data feed file for ThreatWatch Vulnerability Intel named ThreatWatch_Vulnerability_Impact.dfx5 and click Open.
-
In the General tab, in General Information section, select Active in the Status dropdown list field.
-
Click the Transport tab.
-
Click Upload option displayed under Transport Configuration section.
-
From the Upload JavaScript File window, click Add New.
-
Locate the Java Script file of the Data Feed named: ThreatWatch_Vulnerability_Impacts.js and click Open.
-
On the Upload JavaScript File dialog, click OK.
-
-
In the Custom Parameters section, specify values for following keys:
|
Key Name |
Type |
Value |
|---|---|---|
|
tw_handle |
Plain Text |
User’s ThreatWatch login handle |
|
tw_token |
Plain Text |
API token generated by the user in the ThreatWatch Instance |
|
tw_instance |
Plain Text |
ThreatWatch instance endpoint (i.e. mycompany.threatwatch.io) |
-
In the Navigation tab, under the Navigation section, ensure that Xml File Iterator is selected in the Navigation method dropdown list.
-
In the Data Map tab, map the following Source Fields to the Target Fields:
|
Source Field |
Target Field |
Target Application |
|---|---|---|
|
asset_id |
ThreatWatch Asset ID |
Vulnerability Scan Results |
|
confidence |
ThreatWatch Match Confidence |
Vulnerability Scan Results |
|
action_bucket |
ThreatWatch Prioritization |
Vulnerability Scan Results |
|
resolve_comment |
ThreatWatch Resolve Comment |
Vulnerability Scan Results |
|
resolve_timestamp |
ThreatWatch Resolve Timestamp |
Vulnerability Scan Results |
-
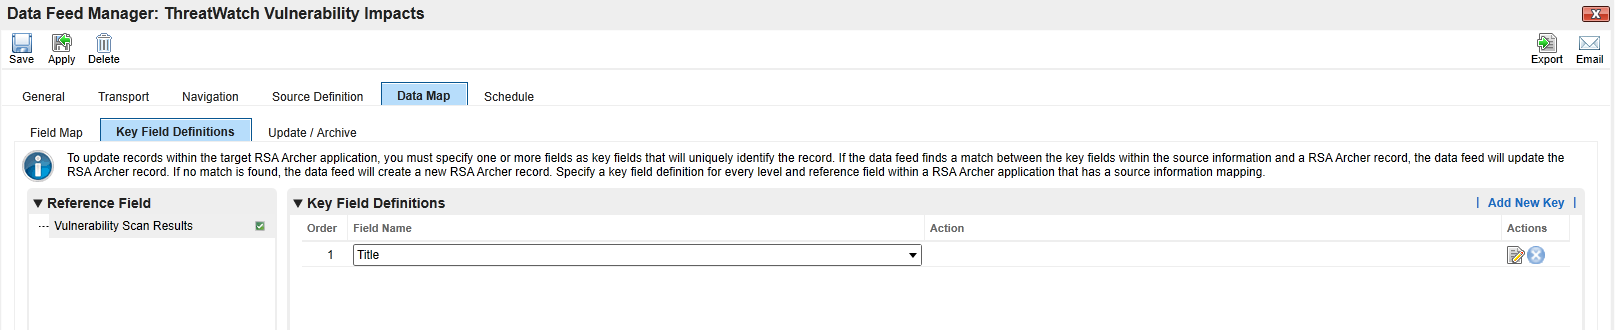
In the same Data Map tab, under Key Fields Definitions section, ensure that each Reference Field has a Key Field Definition field name set in the dropdown list:
-
Reference Field: Vulnerability Scan Results > Key Field Definitions: Title.
-
-
Click Save.
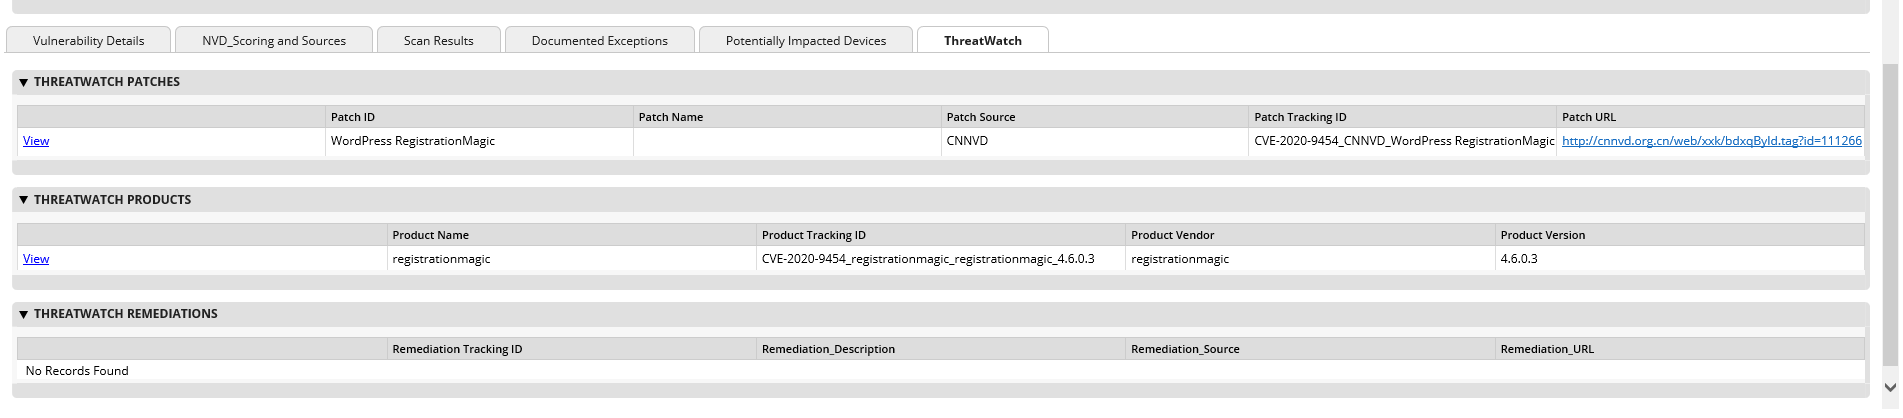
Using the ThreatWatch – Archer integration
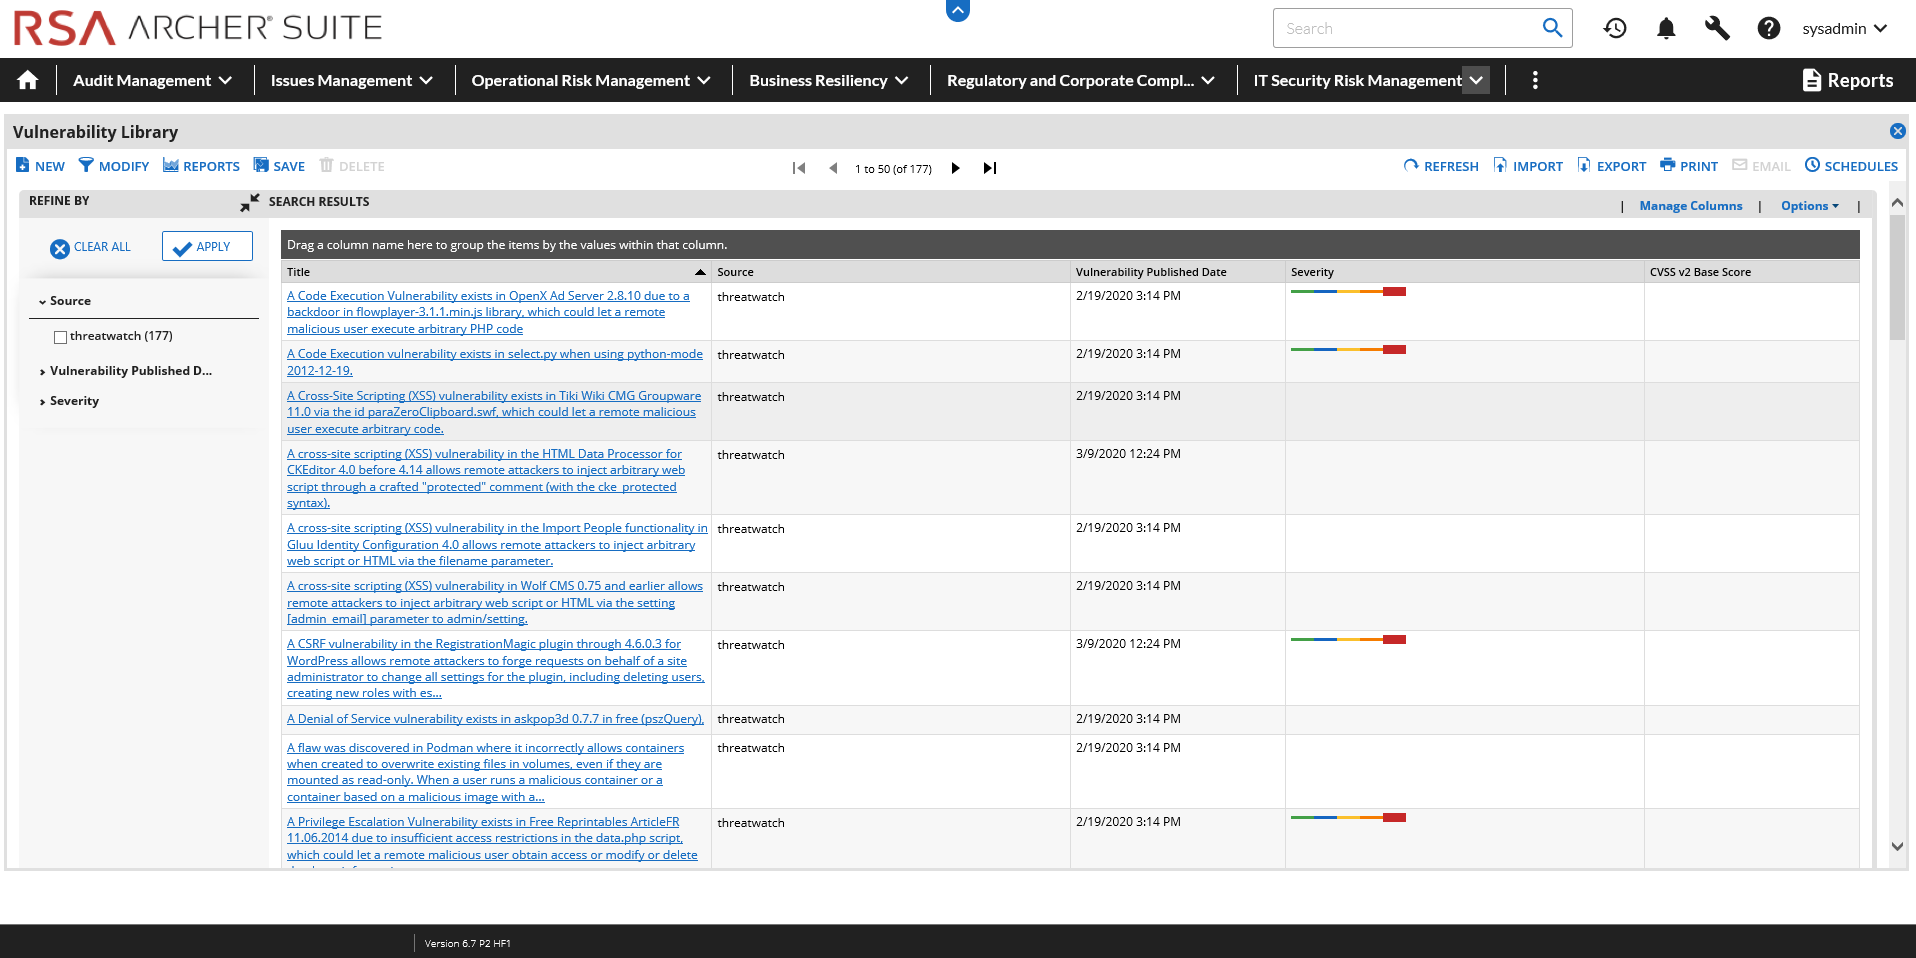
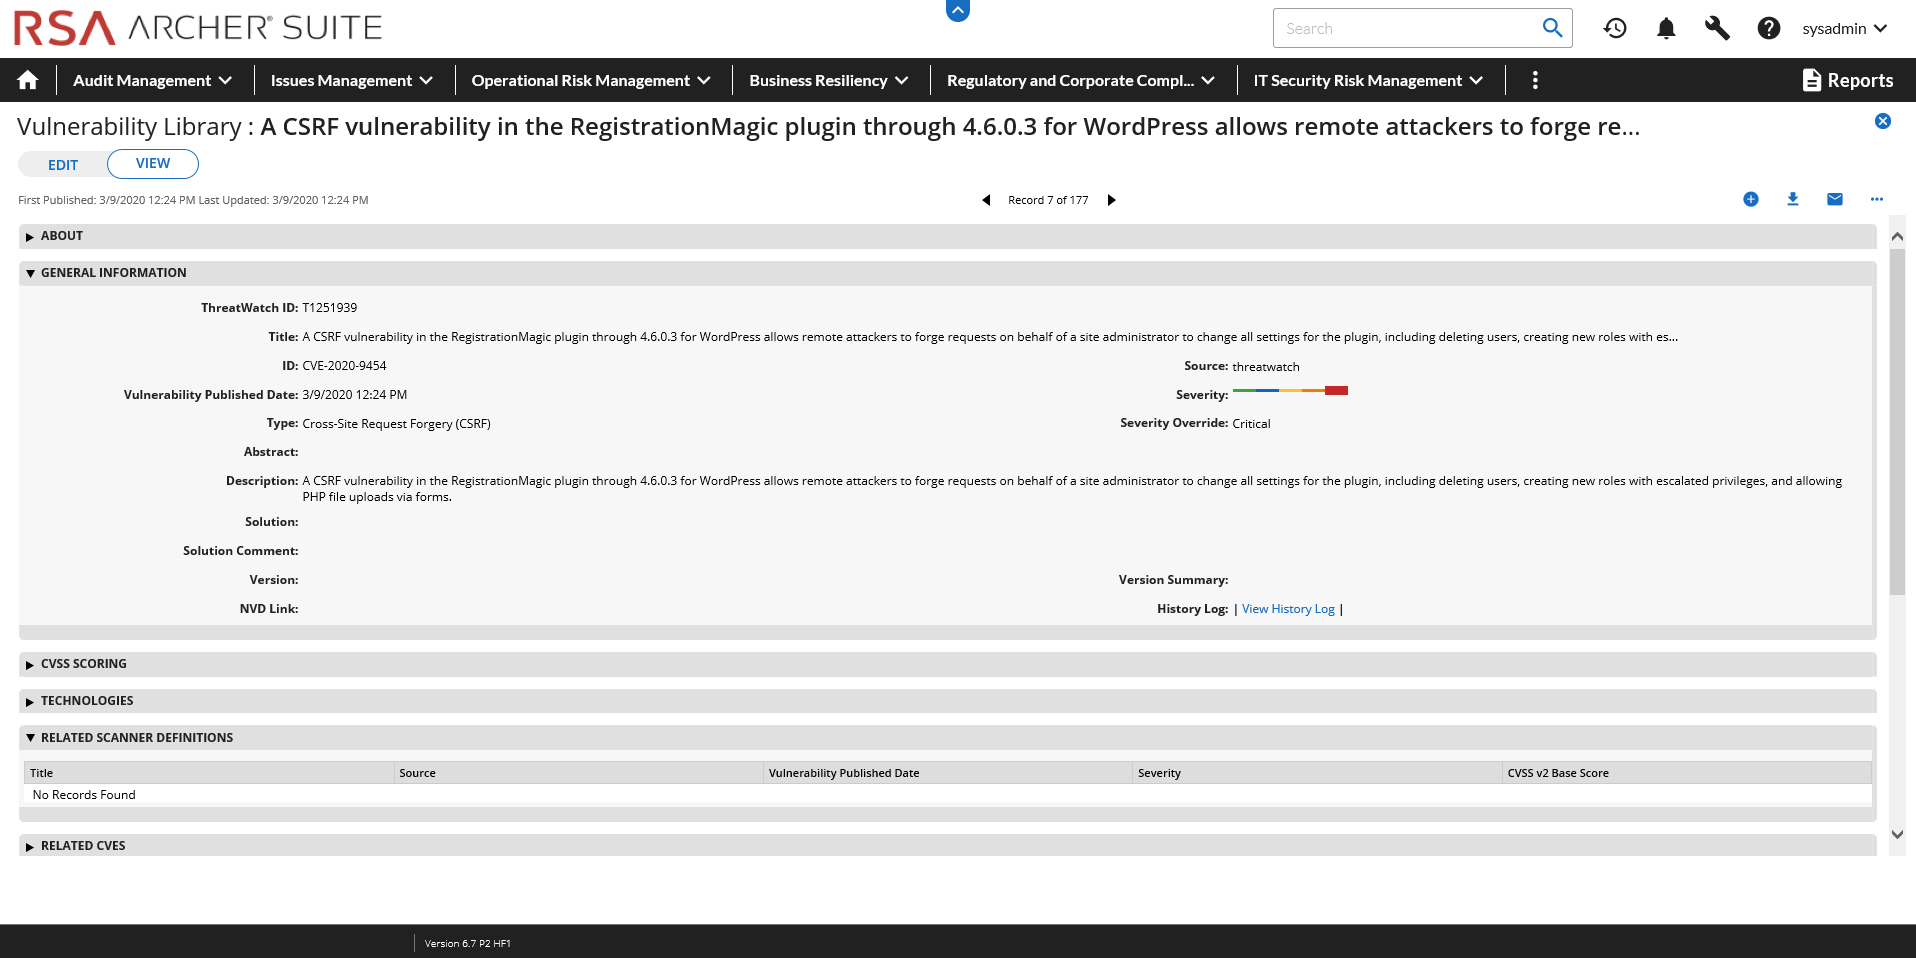
Archer users can open the “Vulnerability Library” core application in the ITSVP use-case to view latest vulnerability intelligence. This will help keep Archer users updated on the most recent vulnerabilities which are automatically prioritized based on CVSS vector and score details.
Users can easily generate custom reports which help depict vulnerability trends over a period of time.
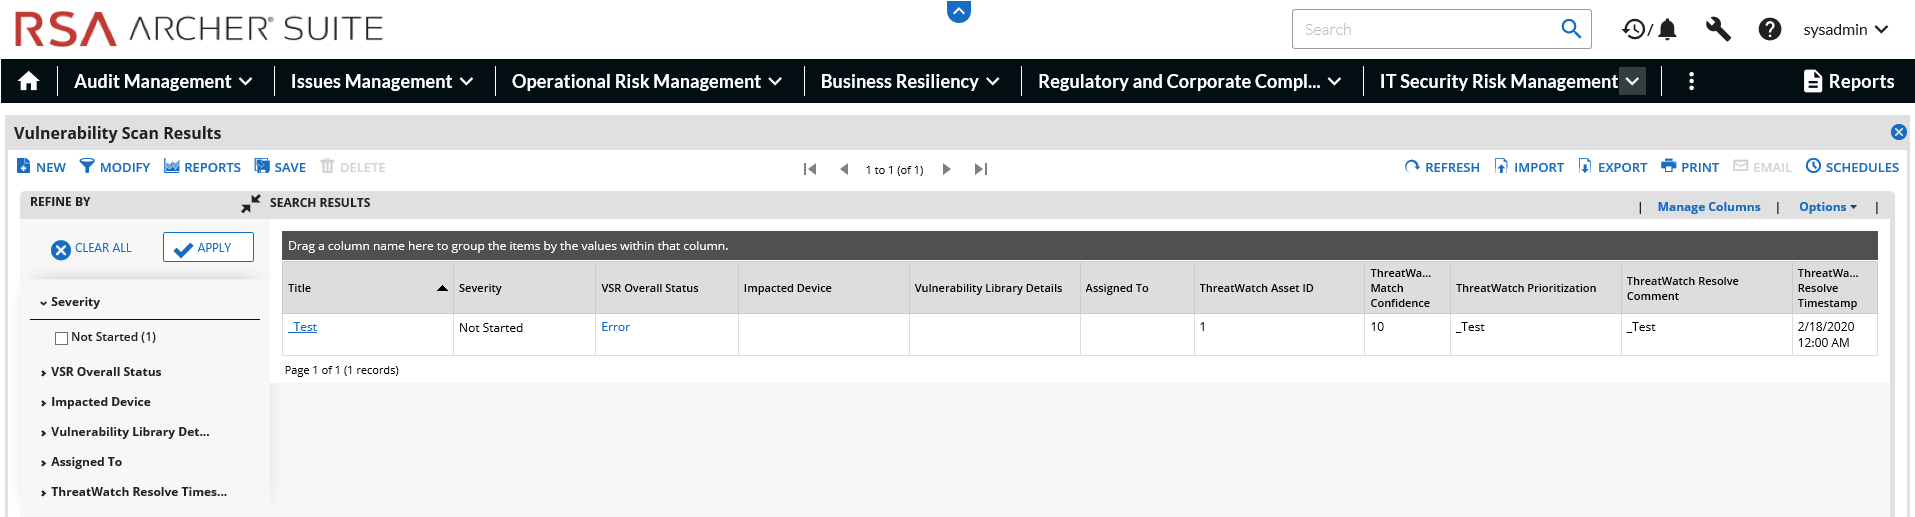
(Optional) Task 1 : Include ThreatWatch fields in the Vulnerability Scan Results Default Search Records Table
Archer users can open the “Vulnerability Scan Results” core application in the ITSVP solution to view vulnerability impacts on any organizational assets (which are already ingested in their ThreatWatch cloud instance). These impacts are automatically prioritized as either “DoNow” or “DoLater” in the “Impact Prioritization” field.
The User can easily generate custom reports which depict the number of open vulnerabilities based on prioritization for immediate action.
-
Go into the Vulnerability Scan Results application within Application Builder. Application Builder > Applications > Vulnerability Library.
-
Click into the Navigation Menu tab and select Default Search.
-
Select Fields to Display ThreatWatch Asset ID, ThreatWatch Match Confidence, ThreatWatch Prioritization, ThreatWatch Resolve Comments, ThreatWatch Resolve Timestamp.
-
ThreatWatch fields will be displayed in the Select column.
-
Click Ok and Save/Apply the modifications to the application.
-
ThreatWatch fields will now be visible in the Default Search records table for the Vulnerability Scan Results application.
Task 2: Scheduling Data Feeds
Important: A data feed must be Active and valid to successfully run.
As you schedule your data feed, the Data Feed Manager validates the information. If any information is invalid, an error message appears. You can save the data feed and correct the errors later; but the data feed does not process until you make corrections.
Note: All IT Security Vulnerabilities Program data feeds are sent to run daily by default.
-
Go to the Schedule tab of the data feed that you want to modify.
-
Go to the Recurrences section and complete frequency, start and stop times, and time zone.
-
To override the data feed schedule and immediately run your data feed, in the Run Data Feed Now section, click Start.
-
Click Save.
Certification environment
Date: March 2020
|
Product Name |
Version Information |
Operating System |
|---|---|---|
|
Archer |
6.7 |
Virtual Appliance |
|
ThreatWatch |
NA |
NA |