Archer Mail Merge Wizard Tool & Utility
The Archer Mail Merge Wizard Tool & Utility simplifies the mail merge process by automatically generating the required field syntax and producing bulk mail merge outputs. This tool minimizes manual errors, reduces complexity, and speeds up template creation, enabling users to generate accurate and efficient mail merge documents with ease.
Archer Exchange: With the Archer Exchange, the Archer team has created a broad selection of supplemental, value-added offerings to help you get your unique risk management program on the right path, right from the start. You can leverage the Archer Exchange offerings to expand the use of Archer solutions into new business processes and address specific industry, geographic, regulatory, or technical requirements.
On this page
Release Notes
|
Release Date |
Release Version |
Notes |
|---|---|---|
| April 2026 | 2025.12 |
|
|
April 2025 |
2025.02 |
Initial Release Known issue:
|
Overview
In Archer, mail merges are used to automate the creation of documents or reports by merging data from records within the system into a pre-defined template. The data from Archer records—such as fields, values, and other information—can be automatically inserted into specific placeholders in a document, eliminating the need for manual data entry. This allows for the bulk creation of customized documents, ensuring consistency and accuracy across multiple documents.
The mail merge process in Archer typically involves selecting specific fields or records within Archer to populate the document, defining a template with placeholders (merge fields) where data will be inserted, and then executing the merge. Archer generates the documents by merging the selected data with the template, creating individualized output for each record. This process helps save time, reduces the risk of errors, and improves efficiency when producing large volumes of customized documents.
Mail merge syntax can be complex and time-consuming to generate manually, particularly when handling large datasets. Generating output from multiple records can be overwhelming and prone to errors, increasing the risk of incorrect syntax, which can lead to costly mistakes. Additionally, building a new template from scratch can be a long and tedious process, further adding to the challenges of managing mail merge tasks efficiently.
With the Archer Mail Merge Wizard, clients can quickly generate mail merge syntax for supported field types by targeting specific applications and levels. Additionally, it provides the ability to perform bulk exports by specifying a template ID and supplying content IDs.
Features and benefits
The Archer Mail Merge Wizard enables organizations to do the following.
-
Effortlessly create new mail merge templates or update existing ones
-
Automatically generate mail merge syntax for supported field types
-
Ensure correct formatting with built-in options tailored to each field type
-
Perform bulk exports by targeting specific templates as needed
-
Generate complex, error-prone conditional and cross-reference syntax with ease
Archer Mail Merge Wizard benefits include the following.
-
Automatically generates correct mail merge field syntax, eliminating the need for manual entry
-
Efficiently processes multiple records, reducing manual overhead
-
Minimizes the risk of incorrect syntax in template documents
-
Speeds up the creation of new templates, saving valuable time.
User guide
 Start the tool
After completing the installation, add the tool's icon to the Desktop and Start menu. Open the application and login with your target instance credentials. System Administrator privileges are required.
Identify Fields for Mail Merge
-
Use the Select Application and Select Level drop-downs to specify the application and level for mail merge generation. The relevant fields display, organized by field type.
To quickly locate a field, enter its name in the Search bar. Drag and drop selected fields into the Application Fields table.
-
Click the Edit icon to format the selected field. This opens the format window, where you can configure the desired settings. Some fields, such as Tracking ID and Record Status, will not have the Edit icon enabled.
To remove a field from selection, click the red icon next to the corresponding row in the table. When a field is selected, its formatting details appears in the Selected Field Format Details Panel. Once finished, click Save to apply the changes.
-
For Cross-References, Sub-forms, or Related Records, select and add the related field through the Related Module Fields table. Once selected and formatted, click the Add button to include the field in the Application Fields table. After clicking Add, this warning message displays: Once the field is added, it cannot be edited. Click OK to add the reference field to the main Application Fields table. If any modifications are needed, remove the newly added reference field and follow the process again to edit it. The Clear button can be used to reset the panel.
Generate Conditional Syntax
Conditional syntax can also be generated by selecting the Conditional Syntax icon, which opens the If-Else Generation window.
In the Condition section, choose a field name, select an operator, and enter a value. In the True section, either select a field or enter a hardcoded string. In the False section, select a field or input a hardcoded string. The system generates syntax that displays the True content if the condition is met; otherwise, it will display the False content. Click Save to add the generated syntax to the Application Fields table.
Generate Mail Merge Syntax Document
After selecting all the desired fields, click the Generate button to create the document with the syntax included. Choose a file location and name, then click Save. If the syntax appears collapsed when opening the document, press Alt+F9 to expand it. The syntax can then be copied and used as needed.
Bulk Export Existing Mail Merge Syntax
To export from an existing template, click the Bulk Export icon to open the export window. Enter the Template ID, select the file extension as configured in the mail merge template, choose an export location, and import a CSV file containing only the Content IDs for the target application. Ensure the correct extension and Content IDs are used to avoid errors. Once the export is complete, a Process Complete popup will appear—click OK to confirm. Navigate to the selected file location, where a .zip file containing all exported documents will be generated.
Administrator guide
Prerequisites (ODA &system requirements)
|
Components |
Prerequisites |
|---|---|
|
Archer solution areas |
N/A |
|
Archer use cases |
N/A |
|
Archer applications |
N/A |
|
Uses custom objects |
No |
|
Requires Archer On-Demand Application (ODA) license |
N/A |
|
Archer requirements |
Archer Platform Release 2025.12 and later |
|
Supported Archer environments |
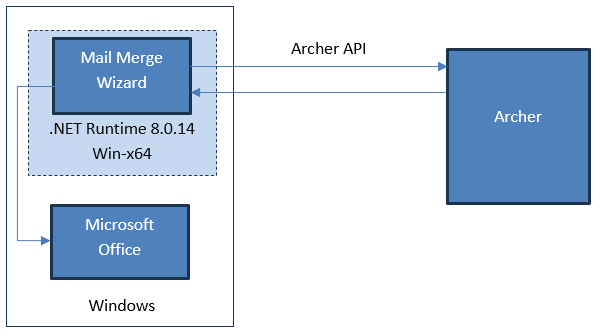
Note: The tool can be installed in a windows environment with Microsoft Office and windowsdesktop-runtime-8.0.14-win-x64. This is applicable for both On-Premise and SaaS. |
|
Partner/vendor requirements |
N/A |
|
Operating System |
Windows |
|
Additional software |
Microsoft Office, windowsdesktop-runtime-8.0.14-win-x64 |
Additional Resources
The following additional resources are available for this offering:
-
Third-party website Download .NET 8.0 Desktop Runtime (v8.0.14) - Windows x64 Installer
Architecture Diagram
Install Archer Mail Merge Wizard tool & utility
Important: The information in this publication is provided "as is". Archer makes no representations or warranties of any kind with respect to the information in this publication, and specifically disclaims implied warranties of merchantability or fitness for a particular purpose. Client is solely responsible for ensuring that the installation of the application is performed in a secure manner. Archer recommends clients perform a full security evaluation prior to implementation.
I. Run the Installer
Task 1: Follow the installer window and complete the installation
-
Run the installer. Follow the steps in the installation wizard.
-
Click Next in the Confirmation Screen to install.
-
Once the installation is complete click Close to close the installation wizard.
Task 2: Set up the location of the macro
-
Go to the Installation path and locate the file ifFieldGenerator.dotm. This file contains macro function.
-
Open MS Word and go to Options. In the Options window select Trust Center and open the Trust Center Settings.
-
Verify the location C:\Program Files\Microsoft Office\root\Templates\ is added in the trust center Trusted Locations.
-
Copy the ifFieldGenerator.dotm file from installation folder to C:\Program Files\Microsoft Office\root\Templates\.
-
Verify the same location is added in the App.config file inside the installation folder.
II: Test the Installation
Test the application according to your company standards and procedures to ensure that it works with your existing processes.
Certification Environment
Date Tested: April 2026
|
Product Name |
Version Information |
Operating System |
|---|---|---|
|
Archer |
2025.12 |
Windows |