Archer Data Feed Initiator
To queue a data feed for execution in Archer, a user needs ‘Manage Data Feed’ permissions. A user with those permissions can run a data feed on demand by clicking the “Run Now” button in the Data Feed Manager. However, if the feed in question is leads a convoy, the rest of the convoy will not follow on as it would for a scheduled execution.
Previously, administrators have requested adding a custom object that would allow a user who does not have this permission to queue a data feed. While this can be achieved, it includes a security flaw: the JavaScript must contain Archer credentials with permissions to execute the feed.
Data Feed Initiator addresses both limitations with a .NET web application and a custom object.
A frequent request from business users of Archer is to provide real-time processing of data from external systems.
-
The SOC has an SLA of 24 hours for remediating critical vulnerabilities discovered on enterprise assets. When the network scanner finishes its work, the vulnerability scan results are ingested into Archer by a data feed. The scan does not always run for the same number of hours and minutes, but we want the results to be ingested as quickly as possible after the scan completes. The business has asked for the feed to run every five minutes so that the gap between the scan being completed and the data feed starting is as short as possible.
-
When an incident is reported, the incident response procedures need to be copied into a response plan specific to that incident. Since there is no way for the Archer admin to guess the frequency with which incidents will be reported, she has opted to schedule the data feed to run every 15 minutes. This will ensure that the work never takes longer than 15 minutes to complete, but it will not be instantaneous either.
In each case, a Data Feed Initiator implementation could help the Archer admin address their usersbusiness requirements. In the case of the vulnerability scan results, when the network admin sees that the scan has completed, they can log in to Archer and click the Initiator button to queue the data feed. In the case of the incident response procedures, the user who reports the incident can click the Initiator button, making the process nearly instantaneous.
Archer Exchange: With the Archer Exchange, the Archer team has created a broad selection of supplemental, value-added offerings to help you get your unique risk management program on the right path, right from the start. You can leverage the Archer Exchange offerings to expand the use of Archer solutions into new business processes and address specific industry, geographic, regulatory, or technical requirements.
On this page
Release notes
Last updated: December 2020
Benefits
With Data Feed Initiator, you can:
-
Queue the data feed on button click from a custom object.
-
Reduce minutely feeds, improving the performance.
-
Reduce the risk arising from storing the Archer credentials in custom object.
Design
Data Feed Initiator is an MVC Web API application written in C#. It exposes a RESTful endpoint that receives and handles requests to execute one or more data feeds. Since the application stores its credentials in a config file, if those credentials have rights to execute a data feed, the requesting user need not have any special permissions. Additionally, the credentials do not need to be included in the JavaScript for the custom object that calls it.
The solution includes code for a custom object that will display a button in the Archer UI. When clicked, this button issues an AJAX request to the RESTful endpoint, causing the execution of the desired data feeds. The solution accepts a parameter that indicates whether the feed is the lead of a convoy, so even when running it on-demand, the rest of the convoy will follow on as expected.
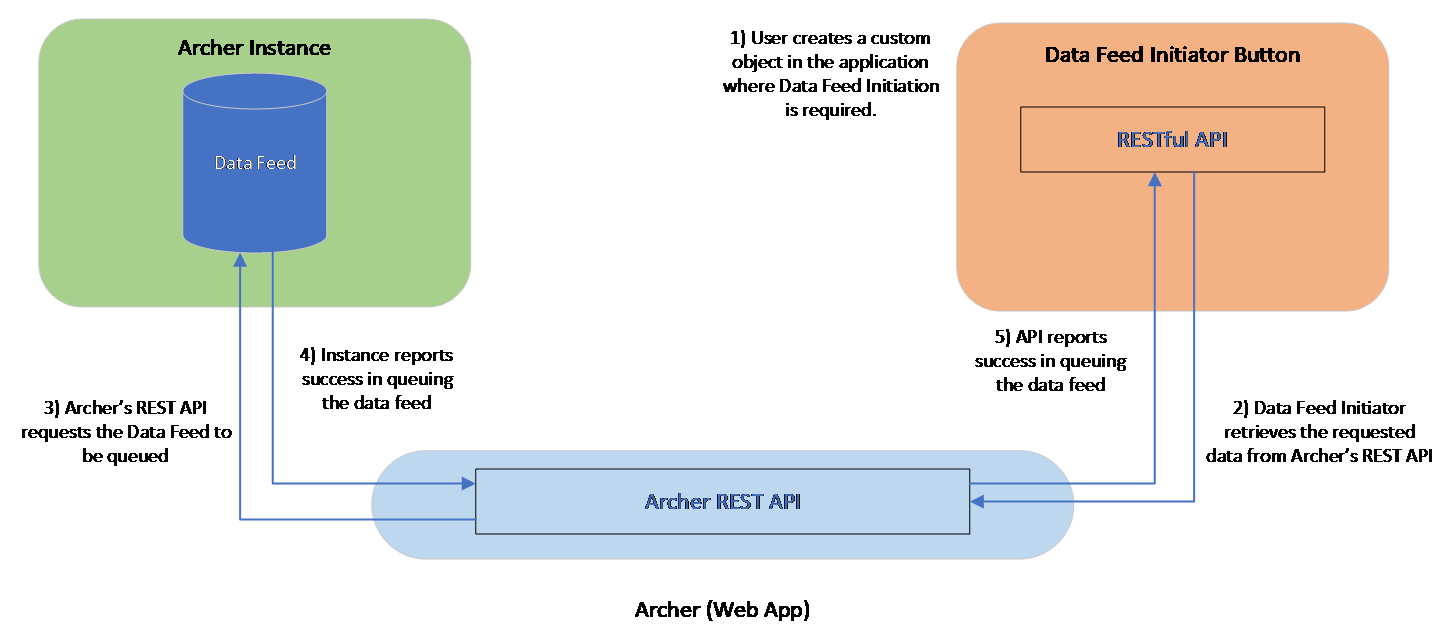
Architecture diagram
The following diagram provides a high-level overview of the data flow process for the Archer Data Feed Initiator.
Logging
The solution makes use of a well-known logging framework called NLog. NLog allows for the creation of one or more log <target> entries, and one or more associated <logger>entries. The targets define potential “listeners” for log information, and the loggers define the rules associated with each of them, including log level. Although a sample config file is provided with the solution, a full discussion of the configuration file and its use is outside the scope of this document. For additional details, please see the NLog documentation.
Installing and configuring Archer Data Feed Initiator
This section provides instructions for configuring the Archer Data Feed Initiator within the Archer Platform.
It is assumed that the reader has both working knowledge of all products involved, and the ability to perform the tasks outlined in this section. Administrators must have access to the documentation for all products in order to install the required components.
Important: The utility described in this guide is based on current requirements. If additional customization or enhancements are needed, please contact Archer Support for assistance.
Installation and configuration
The Archer Data Feed Initiator installation package contains two components:
-
Data Feed Initiator Web App
-
Custom Object
The Data Feed Initiator is an ASP.NET web application. The solution includes XML configuration file and Custom Object. These allow for the specification of authentication credentials, along with other necessary details.
The Data Feed Initiator expects you to specify some values in a web configuration file, deploy a web application, and configure a custom object in your archer application to call your web application (discussed in the next section). These values will refer to your Archer instance.
ASP.NET web applications use an XML configuration file in the form of the web.config. This file contains the following configuration details:
<appSettings>
<addkey="archerBaseUrl"value="[YourArcherUrl] "/>
<addkey="cacheFilePath"value="[logFileNameAndPath]"/>
<addkey="cacheFileEncryptionPassphrase"value="[EncryptionCatchphrase]"/>
<addkey="useSslValidation"value="[true/false]"/>
<add key="securityProtocolVersion" value="[Ssl3/Tls/Tls11/Tls12]"/>
<addkey="archerInstance"value="[YourArcherInstance]"/>
<addkey="archerUser"value="[Username]"/>
<addkey="archerPassword"value="[Password]"/>
<addkey="httpTimeoutMilliseconds"value="[HttpTimeout]"/>
</appSettings>
The following is an example of the configuration for theXML configuration code.
<appSettings>
<addkey="archerBaseUrl"value="https://dfi.archer.com/archer"/>
<addkey="cacheFilePath"value="c:\temp\"/>
<addkey="cacheFileEncryptionPassphrase"value="d0n7TryTh1s@h0m3!"/>
<addkey="useSslValidation"value="false"/>
<addkey="securityProtocolVersion" value="Tls12"/>
<addkey="archerInstance"value="Bodacious"/>
<addkey="archerUser"value="apiuser"/>
<addkey="archerPassword"value="Archer2017!"/>
<addkey="httpTimeoutMilliseconds"value="30000"/>
</appSettings>
The following is a description of each of the settings in web.config file.
|
Setting |
Description |
|---|---|
|
archerBaseUrl |
The root URL for the Archer instance from which information will be pulled. |
|
cacheFilePath |
The path where a flat file will be written to cache Archer ID values. When the solution is started, values will be looked up from the configured Archer instance and stored in the cache file. This enables the solution to correctly reference fields, modules, and other resources using IDs appropriate to the Archer instance. |
|
cacheFileEncryptionPassphrase |
If this is provided, the cache file will be encrypted using this as the passphrase, provided security at rest for the lookup information. |
|
useSslValidation |
When set to true, custom validation is used for the SSL cert. This is necessary when using a self-signed cert to avoid the validation dialogs that will pop up. |
|
securityProtocolVersion |
This value dictates which security protocol should be used. Options include: SSL3, TLS 1.0, TLS 1.1, and TLS 1.2. |
|
archerInstance |
The name of the Archer instance from which information will be pulled. |
|
archerUser |
The name of the user that will be used for pulling information from Archer. |
|
archerPwd |
The password of the user that will be used for pulling information from Archer. |
|
httpTimeoutMilliseconds |
The httpTimeoutMilliseconds provides a configuration setting that enables the user to override the default HTTP timeout of 30,000 milliseconds (30 seconds). This value is in milliseconds and should be set to the number of seconds you want HTTP timeout to take * 1000. |
Configurate Data Feed Initiator
-
Copy and extract the zip file “Archer_Data_Feed_Initiator_6.8_Installation_Package.zip” to a location/folder on your web server.
-
Provide read access to IIS_IUSRS for the extracted web applicationDFI.
-
Right Click on the Web application folder and click Properties.
-
Click the Security Tab > Edit > Add > Add IIS_IUSRS > OK.
-
Select the following options:
-
Read and execute
-
Modify
-
List folder contents
-
Read
-
Write
-
-
In the Permissions dialog, click OK.
-
In the folder properties dialog, click OK.
-
-
Deploy the package as a website in your IIS.
-
If you do not have Archer installed in the root of your default website, configure the solution as an application that sits side by side with Archer.
-
If you have Archer installed in the root of your default website, you will need to configure the solution as a new website. Use the same IP as the default website and bind the site to a different port (i.e., 8080 instead of 80, or 4430 instead of 443).
-
-
Edit the <appSettings> section in your web.config to store valid values for the Archer instance to be targeted.
-
Navigate to the application folder DFIand locate the Web.config file.
-
Open web.config file and provide the following information:
<appSettings>
<addkey="archerBaseUrl"value="[YourArcherUrl] "/>
<addkey="cacheFilePath"value="[logFileNameAndPath]"/>
<addkey="cacheFileEncryptionPassphrase"value="[EncryptionCatchphrase]"/>
<addkey="useSslValidation"value="[true/false]"/>
<add key="securityProtocolVersion" value="[Ssl3/Tls/Tls11/Tls12]"/>
<addkey="archerInstance"value="[YourArcherInstance]"/>
<addkey="archerUser"value="[Username]"/>
<addkey="archerPassword"value="[Password]"/>
<addkey="httpTimeoutMilliseconds" value="[HttpTimeout]" />
</appSettings>
-
The following table provides a description of each setting.
|
Setting |
Description |
|---|---|
|
[YourArcherUrl] |
Your Archer host URL Example: https://dfi.archer.com/archer |
|
[logFileNameAndPath] |
Path for log and cache files. Example: c:\temp\ |
|
[EncryptionCatchphrase] |
Encryption pass phrase Example: d0n7TryTh1s@h0m3! |
|
[true/false] |
True or false to validate SSL Example: false |
|
[Ssl3/Tls/Tls11/Tls12] |
The version of security protocol to be used in communicating with the Archer web server Example: Tls12 |
|
[YourArcherInstance] |
Instance name of your Archer environment Example: ArcherProd Note: Instance name is case sensitive. |
|
[Username] |
Username of the account Example: dfiuser Note: The user at minimum requires Read, Update access to the Data Feed Manager Page and Read access to the application where the custom object is placed. |
|
[Password] |
Password of the user account Example: Password@123 |
|
[HttpTimeout] |
httpTimeoutMilliseconds Example: 30000 |
-
Save and Close the web.config file.
Note: Changing the Archer URL in the Config file requires the deletion of the previously used cache file. Create a unique Archer user account for the web application to use so that no other process can authenticate with the same credentials and invalidate the session being used by the application.
-
Open NLog.config. Navigate to the application folder DFIand locate file target and provide the following information.
filename="[logFilePath]"
Example: fileName="c:\temp\DatafeedInitiator.log"
Name of the file to write to. Provide name of the file to write to with the full path.
archiveFileName="[archivelogFilePath]"
Example: archiveFileName="c:\temp\logArchive\DatafeedInitiator.{#}.log"
Name of the file to be used for an archive. It contains a special placeholder {#} that will be replaced with a sequence of numbers depending on the archiving strategy. The number of hash characters used determines the number of numerical digits to be used for numbering files.
-
Check the HTTP/HTTPS Site Connection by typing the Data Feed Initiator URL for example https://dfi.archer.com/DFI, in a web browser.
-
If it is successful, the web browser displays the ASP.NET page.
-
If unsuccessful, the web browser displays the error Service Unavailable.
-
-
Determine if the web application is executing by appending text like the following to the url in your browser with the GUID being that of the data feed you want to run:
https://[myDataFeedInitiatorBaseUrl]/api/DataFeed/?dataFeedGuid=<datafeedGUID>&isConvoy=<true/false>
The following is an example url:
If the process is successful a json file will be downloaded with Data Feed ID as the file content.
Note: This test should result in the requested data feed being queued for execution. If this test is successful, you can move on to configuring the custom object.
Configure custom object button code
-
Log in to the Archer UI as a user who has rights to manage applications.
-
Edit the application to which you will add the Data Feed Initiator custom object button.
-
Edit the file “CustomObjectButtonCode.js”JavaScript included with the solution to contain the correct GUID for the data feed to be run and be sure that the right value is being passed (true or false) indicating whether this feed is part of a convoy. Also ensure that the URL that points to the web application you just deployed is updated and correct.
The JavaScript source for the custom object is included here for reference. Review and update the values in square brackets prior to deployment.
<center><buttonname="onDemandButton"type="Button"onclick="myCustomFunction('[Data Feed GUID]',[isConvoy])">Run Data Feed</button></center>
<scripttype="text/javascript">
var debugging = true;
var alertOnSuccess = true;
function myCustomFunction(feedGuid, isFeedConvoy)
{
$.ajax({
type: 'GET',
url: '[protocol]://[host name]/[application name]/api/DataFeed/?dataFeedGuid=' + feedGuid + '&isConvoy=' + isFeedConvoy,
success: function (data, textStatus, jqXHR) {
if (debugging) console.log('POST succeeded returning to button click');
$("button[name='onDemandButton']").prop('disabled', true);
if (alertOnSuccess) alert('The requested data feed has been queued for execution.');
returntrue;
},
error: function (XMLHttpRequest, textStatus, errorThrown) {
msg = 'An error prevented the requested data feed from being queued for execution. Please contact the administrator.';
title = 'Warning';
WarningAlert(msg, title);
if (debugging) console.log('Status: ' + textStatus);
if (debugging) console.log('Error: ' + errorThrown);
}
});
}
</script>
The following values describe the bracketed text that appears in the sample custom object code.
|
Setting |
Description and Example |
|---|---|
|
[Data Feed GUID] |
GUID of the Datafeed: Example: 'AC52C71A-F95E-4B07-A45B-96194E7F0D1B' |
|
[isConvoy] |
If the datafeed is part of convoy Example: false |
|
[protocol]: |
Protocol of the site url where Data Feed Initiator is deployed. (http/https) Example: https: |
|
//[host name]/ |
Hostname of the site url where Data Feed Initiator is deployed. Example: //dfi.archer.com/ |
|
/[application name]/ |
Application Name in the site url where Data Feed Initiator is deployed. Example: / DFI/ |
Note: It is recommended that the custom object be deployed in its own dedicated section within the layout. Explanatory text can be added to the layout section, as well as help text that the user can click for additional details about the intent and function of the button you are building.
-
Copy the edited JavaScript into a custom object on the layout for the application. Configure the custom object for Read or Edit mode as your business requirements dictate. The user can click the button and cause the data feed to be executed.
Flexible configuration of Data Feed Initiator
The utility supports two different configuration options, allowing the implementer to decide how they want to specify the feed or feeds to run:.
If the GUID and isConvoy properties are passed to the utility from the JavaScript of the custom object, those properties will be used to determine the feed that gets run when the button is clicked. The custom code would look like the following in this case:
<center><buttonname="onDemandButton"type="Button"onclick="myCustomFunction('<Datafeed GUID>',<true/false>)">Run Data Feed</button></center>
<scripttype="text/javascript">
var debugging = true;
var alertOnSuccess = true;
function myCustomFunction(feedGuid, isFeedConvoy){
$.ajax({
type: 'GET',
url: '[protocol]://[host name]/[application name]/api/DataFeed/?dataFeedGuid=' + feedGuid + '&isConvoy=' + isFeedConvoy,
…
IfGUID and isConvoy properties are not passed from the JavaScript of the custom object, the utility will read the web.config file to find the details of the feeds that should be run. They are specified in config as a comma-separated list. Each feed’s GUID is separated from its associated isConvoy property by the pipe (|) character. Following changes would be required in this case.
Modify <appSettings> section in web.config file to include the feeds key.
<addkey="feeds"value="<Datafeed GUID1>|< true/false>,<Datafeed GUID2>|< true/false> "/>
An example of this configuration is shown in the following sample entry:
<addkey="feeds"value="AC52C71A-F95E-4B07-A45B-96194E7F0D18|false,7302C4FA-31A7-42F3-90C1-950DB84C43DD|true "/>
The custom code would need to be changed as the following.
<center><buttonname="onDemandButton"type="Button"onclick="myCustomFunction()">Run Data Feed</button></center>
<scripttype="text/javascript">
var debugging = true;
var alertOnSuccess = true;
function myCustomFunction(){
$.ajax({
type: 'GET',
url: '[protocol]://[host name]/[application name]/api/DataFeed’,
…
Security
Since the web.config will store Archer credentials, when the tool runs for the first time the <app settings> section in web config file will be encrypted.
Note: Run the utility at least once after configuring so that credentials are encrypted.
Troubleshooting guidelines
-
JavaScript custom object might encounter issues with cross-domain requests (CORS). To avoid this, it is recommended to have the domain name/IP of base URL of the initiator used in custom object match the domain name/IP of base URL of Archer.
-
It is suggested to have custom object in a separate section. If user wants to place the custom object in a tab set, then it is suggested to place it in a separate section in the default tab.
-
Check whether the data feed is running successfully before configuring the custom object. Please note the successful message on click of custom object will only mention that the datafeed is successfully queued. It does not tell whether the data feed run is successful/failure.
-
The cache file stored in “cacheFilePath” (mentioned in the app settings of the web config file) should be deleted if any changes are made to the web config file.
-
If the user account used for data feed initiator (mentioned in the web config file) gets locked/inactive/permissions are changed then the custom object continues to show that successful message and data feed will be queued(except for inactive) unless cache file is deleted. It is suggested to perform a periodic check of user account and delete the cache file in the “cacheFilePath” if there are any permission/status changes to the user account.