Archer Scripts Data Driven Events Analysis
This offering provides an interactive view of Data Driven Events (DDEs) rules and actions for all application layouts. It allows Archer admin users to quickly go through all rules and the associated actions in one page with both a summary view and a detailed view. The tool provides a searching and filtering feature to allow admins to easily troubleshoot DDE issues.
On this page
Release history
Last updated: May 2019
Overview
Benefits
With the application, you can:
-
Display all rules and actions in one page, enabling admins to quickly review data drive event logic.
-
Automatically detect orphaned rules and actions.
-
Quickly search for fields targeted by DDEs for troubleshooting.
-
Search for target groups, users, and fields for troubleshooting.
-
Review DDE statistics such as number of rules, actions, and grouped by types.
Prerequisites
|
Components |
Recommended Software |
|---|---|
|
ODA License |
One (1) ODA license |
|
Operating System |
Same as client’s Archer environment |
|
Database Server |
Same as client’s Archer environment |
|
Services Server |
Java Runtime Environment (JRE) 8 (64-bit) |
|
Archer |
Archer 6.4 P2 and later |
|
Use Cases |
All use cases |
Components
Architecture diagram
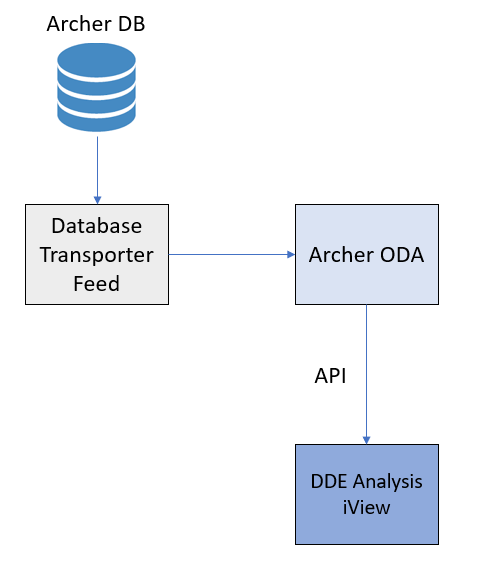
Applications
The following on-demand applications are used with this offering.
|
Application |
Description |
|---|---|
|
DDE ODA |
This application stores the DDE information populated by a Database Transporter Feed. |
Personas and Access Roles
This tool targets the system admin group. No roles or groups are required.
Installing Archer Scripts DDE Analysis Tool & Utility
Complete the following tasks to install the offering.
Task 1: Prepare for the installation
-
Ensure that your Archer system meets the following requirements:
-
Archer Platform version 6.4 P2 or higher
-
-
Go to the Archer Exchange to obtain information on how to download the DDE Analysis Tool directly from Archer Scripts, along with supporting documentation (you may be required to sign up or log in).
-
Read and understand the "Packaging Data" section of the Archer Help.
Task 2: Install the package
Installing a package requires that you import the package file, map the objects in the package to objects in the target instance, and then install the package. See Installing the Application Package for complete information.
Task 3: Set up data feeds
You must import and schedule each use case data feed that you want to use. See Setting Up Data Feeds for complete information.
Task 4: Test the installation
Test the application according to your company standards and procedures, to ensure that the use case works with your existing processes.
Installing the package
Task 1: Back up your database
There is no Undo function for a package installation. Packaging is a powerful feature that can make significant changes to an instance. Archer strongly recommends backing up the instance database before installing a package. This process enables a full restoration if necessary.
An alternate method for undoing a package installation is to create a package of the affected objects in the target instance before installing the new package. This package provides a snapshot of the instance before the new package is installed, which can be used to help undo the changes made by the package installation. New objects created by the package installation must be manually deleted.
Task 2: Import the package
-
Go to the Install Packages page.
-
From the menu bar, click
 .
. -
Under Application Builder, click Install Packages.
-
-
In the Available Packages section, click Import.
-
Click Add New, then locate and select the package file that you want to import.
-
Click OK. The package file is displayed in the Available Packages section and is ready for installation.
Task 3: Map objects in the package
Important: This step is required only if you are upgrading to a later version of Archer Scripts Data Driven Events (DDEs) Analysis Tool.
-
In the Available Packages section, select the package you want to map.
-
In the Actions column, click
 for that package.
The analyzer runs and examines the information in the package. The analyzer automatically matches the system IDs of the objects in the package with the objects in the target instances and identifies objects from the package that are successfully mapped to objects in the target instance, objects that are new or exist but not mapped, and objects that do not exist (the object is in the target but not in the source).
Note: This process can take several minutes or more, especially if the package is large, and may time out after 60 minutes. This time-out setting temporarily overrides any IIS time-out settings set to less than 60 minutes.
When the analyzer is complete, the Advanced Package Mapping page lists the objects in the package file and corresponding objects in the target instance. The objects are divided into tabs, depending on whether they are found within Applications, Solutions, Access Roles, Groups, Sub- forms, or Questionnaires.
-
On each tab of the Advanced Mapping Page, review the icons that are displayed next to each object name to determine which objects require you to map them manually.
|
Icon |
Name |
Description |
|---|---|---|
|
|
Awaiting Mapping Review |
Indicates that the system could not automatically match the object or children of the object to a corresponding object in the target instance. Objects marked with this symbol must be mapped manually through the mapping process. Important: New objects should not be mapped. This icon should remain visible. The mapping process can proceed without mapping all the objects. Note: You can execute the mapping process without mapping all the objects. The |
|
|
Mapping Completed |
Indicates that the object and all child objects are mapped to an object in the target instance. Nothing more needs to be done with these objects in Advanced Package Mapping. |
|
|
Do Not Map |
Indicates that the object does not exist in the target instance or the object was not mapped through the Do Not Map option. These objects will not be mapped through Advanced Package Mapping, and must be remedied manually. |
|
|
Undo |
Indicates that a mapped object can be unmapped. This icon is displayed in the Actions column of a mapped object or object flagged as Do Not Map. |
-
For each object that requires remediation, do one of the following:
-
To map each item individually, on the Target column, select the object in the target instance to which you want to map the source object. If an object is new or if you do not want to map an object, select Do Not Map from the drop-down list.
Important: Ensure that you map all objects to their lowest level. When objects have child or related objects, a drill-down link is provided on the parent object. Child objects must be mapped before parent objects are mapped. For more details, see "Mapping Parent/Child Objects" in Archer Help.
-
To automatically map all objects in a tab that have different system IDs but the same object name as an object in the target instance, do the following:
-
In the toolbar, click Auto Map.
-
Select an option for mapping objects by name.
Option
Description
Ignore case
Select this option to match objects with similar names regardless of the case of the characters in the object names.
Ignore spaces
Select this option to match objects with similar names regardless of whether spaces exist in the object names.
-
Click OK.
The Confirmation dialog box opens with the total number of mappings performed. These mappings have not been committed to the data base yet and can be modified in the Advanced Package Mapping page.
-
Click OK.
-
-
To set all objects in the tab to Do Not Map, in the toolbar, click Do Not Map.
Note: To undo the mapping settings for any individual object, click ![]() in the Actions column.
in the Actions column.
When all objects are mapped, the ![]() icon is displayed in the tab title. The
icon is displayed in the tab title. The ![]() icon is displayed next to the object to indicate that the object will not be mapped.
icon is displayed next to the object to indicate that the object will not be mapped.
-
Verify that all other objects are mapped correctly.
-
(Optional) To save your mapping settings so that you can resume working later, see "Exporting and Importing Mapping Settings" in Archer Help.
-
Once you have reviewed and mapped all objects, click
 .
. -
Select I understand the implications of performing this operation and click OK.
The Advanced Package Mapping process updates the system IDs of the objects in the target instance as defined on the Advanced Package Mapping page. When the mapping is complete, the Import and Install Packages page is displayed.
Important: Advanced Package Mapping modifies the system IDs in the target instance. Any Data Feeds and Web Service APIs that use these objects will need to be updated with the new system IDs.
Task 4: Install the package
All objects from the source instance are installed in the target instance unless the object can not be found or is flagged to not be installed in the target instance. A list of conditions that may cause objects not to be installed is provided in the Log Messages section. A log entry is displayed in the Package Installation Log section.
-
Go to the Install Packages page.
-
From the menu bar, click
. -
Under Application Builder, click Install Packages.
-
-
In the Available Packages section, locate the package file that you want to install, and click Install.
-
In the Configuration section, select the components of the package that you want to install.
-
To select all components, select the top-level checkbox.
-
To install only specific global reports in an already installed application, select the checkbox associated with each report that you want to install.
-
Note: Items in the package that do not match an existing item in the target instance are selected by default.
-
In the Configuration section, under Install Method, select an option for each selected component. To use the same Install Method for all selected components, select a method from the top-level drop-down list.
Note: If you have any existing components that you do not want to modify, select Create New Only. You may have to modify those components after installing the package to use the changes made by the package.
-
In the Configuration section, under Install Option, select an option for each selected component. To use the same Install Option for all selected components, select an option from the top-level drop-down list.
Note: If you have any custom fields or formatting in a component that you do not want to lose, select Do not Override Layout. You may have to modify the layout after installing the package to use the changes made by the package.
-
To deactivate target fields and data-driven events that are not in the package, in the Post-Install Actions section, select the Deactivate target fields and data-driven events that are not in the package checkbox. To rename the deactivated target fields and data-driven events with a user-defined prefix, select the Apply a prefix to all deactivated objects check box, and enter a prefix. This can help you identify any fields or data-driven events that you may want to review for clean up post-install.
-
Click Install.
-
Click OK.
Task 5: Review the package installation log
-
Go to the Package Installation Log tab of the Install Packages page.
-
From the menu bar, click
. -
Under Application Builder, click Install Packages.
-
Click the Package Installation Log tab.
-
-
Click the package that you want to view.
-
In the Package Installation Log page, in the Object Details section, click View All Warnings.
Setting up data feeds
Import the following data feed: Archer Scripts DDE Analysis Tool Feed
Task 1: Import a data feed
-
Go to the Manage Data Feeds page.
-
From the menu bar, click
. -
Under Integration, click Data Feeds.
-
-
In the Manage Data Feeds section, click Import.
-
Locate and select the “Archer Scripts DDE Analysis Tool Data Feed.dfx5” file for the data feed.
-
From the General tab in the General Information section, in the Status field, select Active.
-
Click the Transport tab. Update the Connection String in the Database Configuration section. Depending on the authentication method, you can use the 2 options below. Options a) is SSPI. Option b) is to use specific user name (sql account) and password.
-
Data Source=YourArcherDBServerName;InitialCatalog=YourArcherInstanceDBName; Integrated Security=SSPI
-
Data Source=YourArcherDBServerName;Initial Catalog=YourArcherInstanceDBName;UID={username};PWD={password}
(then type in the user name and password in the User Name and Password sections.
-
-
Verify that key field values are not missing from the data feed setup window.
-
Click Save.
Task 2: Schedule a data feed
Important: A data feed must be active and valid to successfully run.
As you schedule your data feed, the Data Feed Manager validates the information. If any information is invalid, an error message is displayed. You can save the data feed and correct the errors later; but the data feed does not process until you make corrections.
-
Go to the Schedule tab of the data feed that you want to modify.
-
From the menu bar, click
. -
Under Integration, click Data Feeds.
-
Select the data feed.
-
Click the Schedule tab.
-
-
Go to the Recurrences section and complete frequency, start and stop times, and time zone.
-
(Optional) To override the data feed schedule and immediately run your data feed, in the Run Data Feed Now section, click Start.
-
Click Save.
Using Archer Scripts DDE Analysis Tool & Utility
Click on the DDE workspace to see the dashboard where the DDE Analysis Tool is located.
The window sections are the following.
-
The Application/Questionnaire of the DDEs being reviewed.
-
The Level of the DDEs being reviewed.
-
The Layout of the DDEs being reviewed.
-
Type of DDEs; this can be used as filters for the DDE result.
-
Search. Supports field search and target search. Search results are highlighted in yellow.The field “Action Information” is located in an Apply Conditional Layout DDE action.
-
DDE summary section that shows DDE stats per Layout. It also identifies the orphan actions.
-
The DDE details section displays the DDE rules on the left side and the related DDE actions on the right side. You can click and expand each rule/action, or click the Expand All/Collapse All buttons to expand/collapse all rules/actions. This allows system admins to quickly browse through all the DDEs to learn the logics, or for troubleshooting.