Archer User Profile and Contact Synchronization
Assigning accountability for tasks, findings, and remediation is a key component for nearly all Archer use cases. Several Archer use cases utilize the Contacts application to store metadata about users. The user profile information, including the credentials used to log into the Archer Platform, is stored separately. Therefore, the Platform stores similar user and contact data in two different locations.
Archer Exchange: With the Archer Exchange, the Archer team has created a broad selection of supplemental, value-added offerings to help you get your unique risk management program on the right path, right from the start. You can leverage the Archer Exchange offerings to expand the use of Archer solutions into new business processes and address specific industry, geographic, regulatory, or technical requirements.
On this page
Release history
|
Release date |
Release |
Notes |
|---|---|---|
|
2025.10 |
December 2025 |
|
|
Archer Release Version |
Published Date |
Notes |
|---|---|---|
|
2025.02 |
March 2025 |
Recertified on Archer platform release 2025.02 with resigned JavaScript file. |
|
2024.03 |
June 2024 |
The offering has been updated to allow customers the ability to specify if they want to filter against the Update Date or Create Date when selecting users by Last Runtime. |
|
6.12 |
February 2023 |
The offering has been updated to use SOAP for authentication instead of REST. |
|
6.12 |
October 2022 |
The Offering has been updated to utilize the Archer JST data feed. The offering uses the Archer Rest API and a data feed to synchronize key attributes such as first and last name, username, email address and phone number etc., |
|
6.8 |
April 2022 |
Updated documentation with notes regarding implementation in Archer SaaS environments |
|
6.8 |
February 2021 |
Offering Updated:
|
|
6.3 |
February 2018 |
Initial Release |
Overview
The Archer User Profile and Contacts Synchronization Tool & Utility uses the Archer RESTful API and a data feed to synchronize fields, if populated, between the User Profile and the Contacts application.
Archer User Profile and Contacts Synchronization is available to both Archer on-premises and Archer SaaS clients.
Key features and benefits
The Archer User Profile and Contacts Synchronization Tool & Utility establishes a consistent process for synchronizing user and contact data and assures data integrity between this metadata. It automates this process and improves data consistency across these two data sets.
With Archer User Profile and Contacts Synchronization, organizations can:
-
Sync User Profile key attributes with the Contacts application.
-
Enable a one-way sync between these data sources.
-
Reduce the manual effort of creating or updating the contacts records.
Prerequisites
|
Components |
Recommended Software |
|---|---|
| Archer Solution Area | This offering applies to various solution areas. |
| Archer Use Case | Enterprise Catalog |
| Archer Applications | Contacts |
| Uses Custom Objects | No |
|
Requires Archer On-Demand Application (ODA) License |
This offering does not require an Archer On-Demand Application (ODA) license. |
|
Archer requirements |
Archer Platform Release 2025.10 and later |
|
Supported Archer Environments |
|
Components
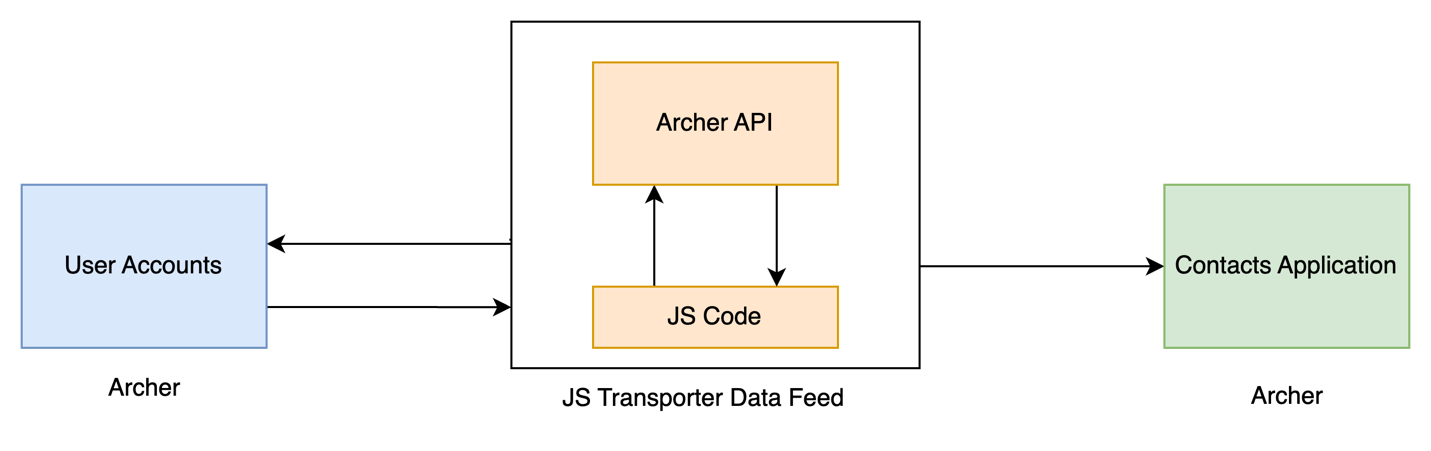
The following diagram provides a high-level overview of the data flow process for the Archer User Profile and Contacts Synchronization.
Installing Archer User Profile and Contacts Synchronization
It is assumed that the reader has both working knowledge of all products involved, and the ability to perform the tasks outlined in this section. Administrators must have access to the documentation for all products to install the required components.
Archer use cases that utilize the Contacts application must be installed and working prior to the integration.
To configure the Archer Platform, you must first download the following components from Archer Exchange.
|
File Name |
Description |
|---|---|
|
User Profile Contact Sync (JST).dfx5 |
Archer JavaScript Transporter Data Feed |
|
signed-UserProfileContactSync.js |
Signed JavaScript file used by the JavaScript Transporter data feeds. |
You must import and schedule each use case data feed that you want to use. See Setting Up Data Feeds for complete information.
Test the application according to your company standards and procedures, to ensure that the use case works with your existing processes.
Setting up data feeds
Before you upload a JavaScript file, you must configure JavaScript Transporter settings in the Archer Control Panel.
-
On the General tab, go to the JavaScript Transporter section.
-
Open the Archer Control Panel.
-
Go to Instance Management and select All Instances.
-
Select the instance you want to use.
-
On the General tab, go to the JavaScript Transporter section.
-
-
In the Max Memory Limit field, set the value to 2048 MB (2 GB).
-
In the Script Timeout field, set the value to 120 minutes (2 hours).
-
(Optional) If you want to allow only digitally signed JavaScript files in the data feed, enable Require Signature.
-
In the JavaScript Transporter Settings section, select the checkbox Require Signature. A new empty cell appears in the Signing Certificate Thumbprints section
-
In the Signing Certificate Thumbprints section, double-click an empty cell.
-
Enter the digital thumbprint of the trusted certificate used to sign the JavaScript file.
Note: For information on how to obtain digital thumbprints, see Obtaining Digital Thumbprints.
Important: If you enable Require Signature and specify no thumbprints, no JavaScript files will be accepted by the system.
-
(Optional) If you want to add additional thumbprint sources, repeat steps b-c for each thumbprint.
-
-
On the toolbar, click Save.
When running JavaScript data feeds, you can set the Archer instance to only allow digitally signed JavaScript files from trusted sources for security considerations.
For a certificate to be trusted, all the certificates in the chain, including the Root CA Certificate and Intermediate CA certificates, must be trusted on both the Web Server and Services Server machines.
Archer Technologies LLC certificate is not present on every machine’s root by default.
-
On the JavaScript file, right-click and select Properties.
-
Click the Digital Signatures tab.
-
From the Signature List window, select Archer Technologies LLC.
-
Click the Details button.
-
Click View Certificate.
-
Click Install Certificate.
-
Select Local Machine.
-
Click Next.
-
Select Place all certificates in the following store and click Browse.
-
Select Trusted Root Certification Authorities and click OK.
-
Click Next.
-
Click Finish.
-
-
-
Upon successful import, click OK.
-
In the Archer Control Panel environment, open the Manage Computer Certificates program.
-
Click Start.
-
Type: certificate
-
From the search results, click Manage Computer Certificates.
-
-
Ensure that your trusted source certificates are in the Certificates sub-folder of the Trust Root Certification Authorities folder.
-
In the Certificates sub-folder, double-click the Archer Technologies LLC certificate that contains the thumbprint you want to obtain.
-
Verify that the certificate is trusted.
-
In the Certificate window, click the Certification Path tab.
-
Ensure that the Certificate Status windows displays the following message: This certificate is OK
Note: If the Certificate Status windows displays something different, follow the on-screen instructions.
-
-
Obtain the trusted certificate thumbprint.
-
In the Certificate window, click the Details tab.
-
Select the Thumbprint field. The certificate's digital thumbprint appears in the window.
-
Copy the thumbprint.
-
Configure the data feeds
Important: Before you upload a JavaScript file, configure JavaScript Transporter settings in the Archer Control Panel. For more information, see Configure the JavaScript Transporter Settings.After setting up the data feeds, you can schedule them to run as needed per your organization’s requirements. For more information on Scheduling data feeds, see the Scheduling Data Feeds section.
-
Go to the Manage Data Feeds page.
-
From the menu bar, click
 .
. -
Under Integration, click Data Feeds.
-
-
In the Manage Data Feeds section, click Import.
-
Locate and select the User Profile Contact Sync (JST).dfx5 file for the data feed.
-
In the General Information section, in the Status field, select Active.
-
Click the Source Connection tab.
-
In the Transport Configuration section, do the following:
-
Click Upload.
-
From the Upload JavaScript File dialog, click Add New.
-
Locate and select the signed_UserProfileContactSync.js file.
-
Click Open.
-
From the Upload JavaScript File dialog, click OK.
-
-
In the Custom Parameters section, enter key values. The following table describes the value for each key in Custom Parameters.
|
Key |
Value |
|---|---|
|
archer_url |
The URL to the root of your Archer instance Example: https://[YourArcherHostURL]/archer |
|
archer_instance |
Instance name of your Archer environment Example: ArcherProd Note: Instance name is case sensitive. |
|
archer_username |
Username of the account Example: adminuser |
|
archer_password |
Password of the user account Example: Password@123 |
-
The following additional parameters are providedin the Custom Parameters section for the current JavaScript file.
|
Key |
Value |
|---|---|
|
oDataFilter |
This is how you filter for specific users you want to pull |
|
oDataSelect |
This is how you specify which columns within the user record you want Example: $select=Address,BusinessUnit,Company,Department,FirstName,Id,LastName,MiddleName,Title,UserName |
|
includeGroups |
If this value is true, it retrieves the Group info from a user account. The GroupNames and GroupIds source fields can then be mapped in the data feed to be used in the Contacts application.Note: GroupNames and Group Ids are returned in semicolon-delimited strings Example: true |
|
useLastRuntimeFilter |
If this value is true, an additional user filter will be applied, based on the value of either filter By Update Date or filter By Create Date Example: true |
|
pageSize |
Set this to 0 to retrieve all the users in a single request. If there are more than 1000 users, it is recommended to set the value to 100. Example: 100 |
|
proxy |
Only necessary for SaaS implementations (or if the customer is on-prem and their network requires a proxy, in which case they will know the correct value). Example: http://tempworkaround:8118/ |
|
verifycerts |
If verifyCerts= true, the node JS validates whether the endpoint certificate is from a trusted Certificate Authority (CA). The related API requests succeed if the endpoint certificate is from a trusted CA. Example: true / false |
|
filterByUpdateDate
|
If this value is true, an additional user filter will be applied, requiring the user’s last update date to be greater than the value of the LastRuntime token. Example: true |
|
filterByCreateDate |
If this value is true, an additional user filter will be applied, requiring the user’s create date to be greater than the value of the LastRuntime token. Example: true |
When you schedule a data feed, the Data Feed Manager validates the information. If any information is invalid, an error message will display. You can save the data feed and correct the errors later, but the data feed is not processed until the errors are rectified.
Important: A data feed must be active and valid to successfully run.
-
Go to the Schedule tab of the data feed that you want to modify.
-
From the menu bar, click
. -
Under Integration, click Data Feeds.
-
Select the data feed you want to modify.
-
Click the Schedule tab.
-
-
Complete the Recurrences section. The following table describes the fields in the Recurrences section.
|
Field |
Description |
|---|---|
|
Frequency |
Specifies the interval in which the data feed runs.
|
|
Every |
Specifies the interval of the frequency in which the data feed runs. |
|
Start Time |
Specifies the time the data feed begins running. |
|
Start Date |
Specifies the date on which the data feed schedule begins. |
|
Time Zone |
Specifies the time zone in of the server that runs the data feed. |
-
(Optional) In the Run Data Feed Now section, click Start to override the data feed schedule and run the data feed immediately.
-
Click Save.
Troubleshooting
-
Do not include default.aspx in the Archer URL.
-
Note that the Archer instance name is case sensitive.
-
Assure that dedicated, active Archer user account credentials are used in the data feed.
-
All Source Fields automatically populate when you import the data feed. To repopulate the source fields again, upload the SampleOutput.xml file.
-
The following list of fields are supported in ODATA Filter.
-
AccountStatus
-
Company
-
DistinguishedName
-
DomainId*
-
FirstName
-
Id*
-
LastName
-
MiddleName
-
Title
-
UserName
*Indicates that when using Domain Id or Id field within the ODATA filter, do not enclose its value with Single Quote(‘). However, all other field values should be enclosed with single quote(‘).
-
Certification environment
Date Tested: December 2025
|
Product Name |
Version Information |
Operating System |
|---|---|---|
|
Archer |
2025.10 |
Virtual Appliance |