Tenable.io Vulnerability Management
The Tenable.io integration utilizes the Archer IT Security Vulnerabilities Program use case to catalog network devices along with vulnerability data sourced from Tenable.io. This enables organizations to pinpoint assets in need of remediation by considering both the business priority of the asset and the severity of the detected vulnerability.
Important: The information in this publication is provided "as is". Archer makes no representations or warranties of any kind with respect to the information in this publication, and specifically disclaims implied warranties of merchantability or fitness for a particular purpose. Client is solely responsible for ensuring that the installation of the application is performed in a secure manner. Archer recommends clients perform a full security evaluation prior to implementation.
Archer Exchange: With the Archer Exchange, the Archer team has created a broad selection of supplemental, value-added offerings to help you get your unique risk management program on the right path, right from the start. You can leverage the Archer Exchange offerings to expand the use of Archer solutions into new business processes and address specific industry, geographic, regulatory, or technical requirements.
On this page
Release notes
|
Last updated |
Published Date |
Summary |
|---|---|---|
|
2025.10 |
April 2026 |
|
|
2025.04 |
July 2025 |
|
|
2024.11 |
April 2025 |
Initial release available:
|
Overview
Tenable.io is a cloud-based cybersecurity platform designed to help organizations manage and assess their cybersecurity posture. It provides continuous visibility and critical insights into the security status of an organization's assets, networks, and vulnerabilities.
The integration of Tenable.io with the Archer IT & Security Vulnerabilities Program use case enables customers to leverage the discovered devices and catalog those network devices with the vulnerability library. With Archer, clients can then identify which assets require remediation based on the business priority of that asset.
Key features & benefits
The Tenable.io Vulnerability Management integration with Archer enables organizations to do the following:
-
Supplement the Vulnerability Library application with plugin content, which includes extensive CVE coverage.
-
Discover and catalog of assets, including unauthorized assets.
-
Capture network vulnerabilities using scanning technologies.
-
Gain quick visibility to assess risk posture on critical infrastructure devices.
-
Validate vulnerabilities inside Archer once scanners no longer detect vulnerabilities.
-
Identify which vulnerabilities with automated prioritization, that combines vulnerability data, threat intelligence and data science.
Benefits:
-
Reduce the risk of security breaches by identifying and addressing vulnerabilities.
-
Continuously scan networks, systems, and applications to detect vulnerabilities in real-time and stay up-to-date security posture.
-
Assess severity and potential impact of vulnerabilities and prioritize which vulnerabilities to address first based on their potential risk to the business.
-
Comprehensive reporting and documentation of vulnerabilities, remediation efforts, and compliance status.
Components & architecture
Prerequisites (ODA and system requirements)
|
Components |
Prerequisites |
|---|---|
|
Archer Solution Area(s) |
IT & Security Risk Management |
|
Archer Use Case(s) |
|
|
Archer Applications |
|
|
Uses Custom Objects |
No |
|
Requires Archer On-Demand Application (ODA) License |
Zero (0) Archer On-Demand Application licenses required. |
|
Archer requirements |
Archer Platform Release 2025.04 and later |
|
Supported Archer Environments |
Note: This offering is available only to Archer SaaS clients on Archer Platform Release 2025.04 or later, which has the updates to the Archer IT Security Vulnerabilities Program required for this offering. While a prior version was available for on-premises clients in Archer Platform Release 2024.11, the current offering does not support on-premises environments |
|
Partner/Vendor Requirements |
Valid Tenable.io license is required. Additional fees may apply. |
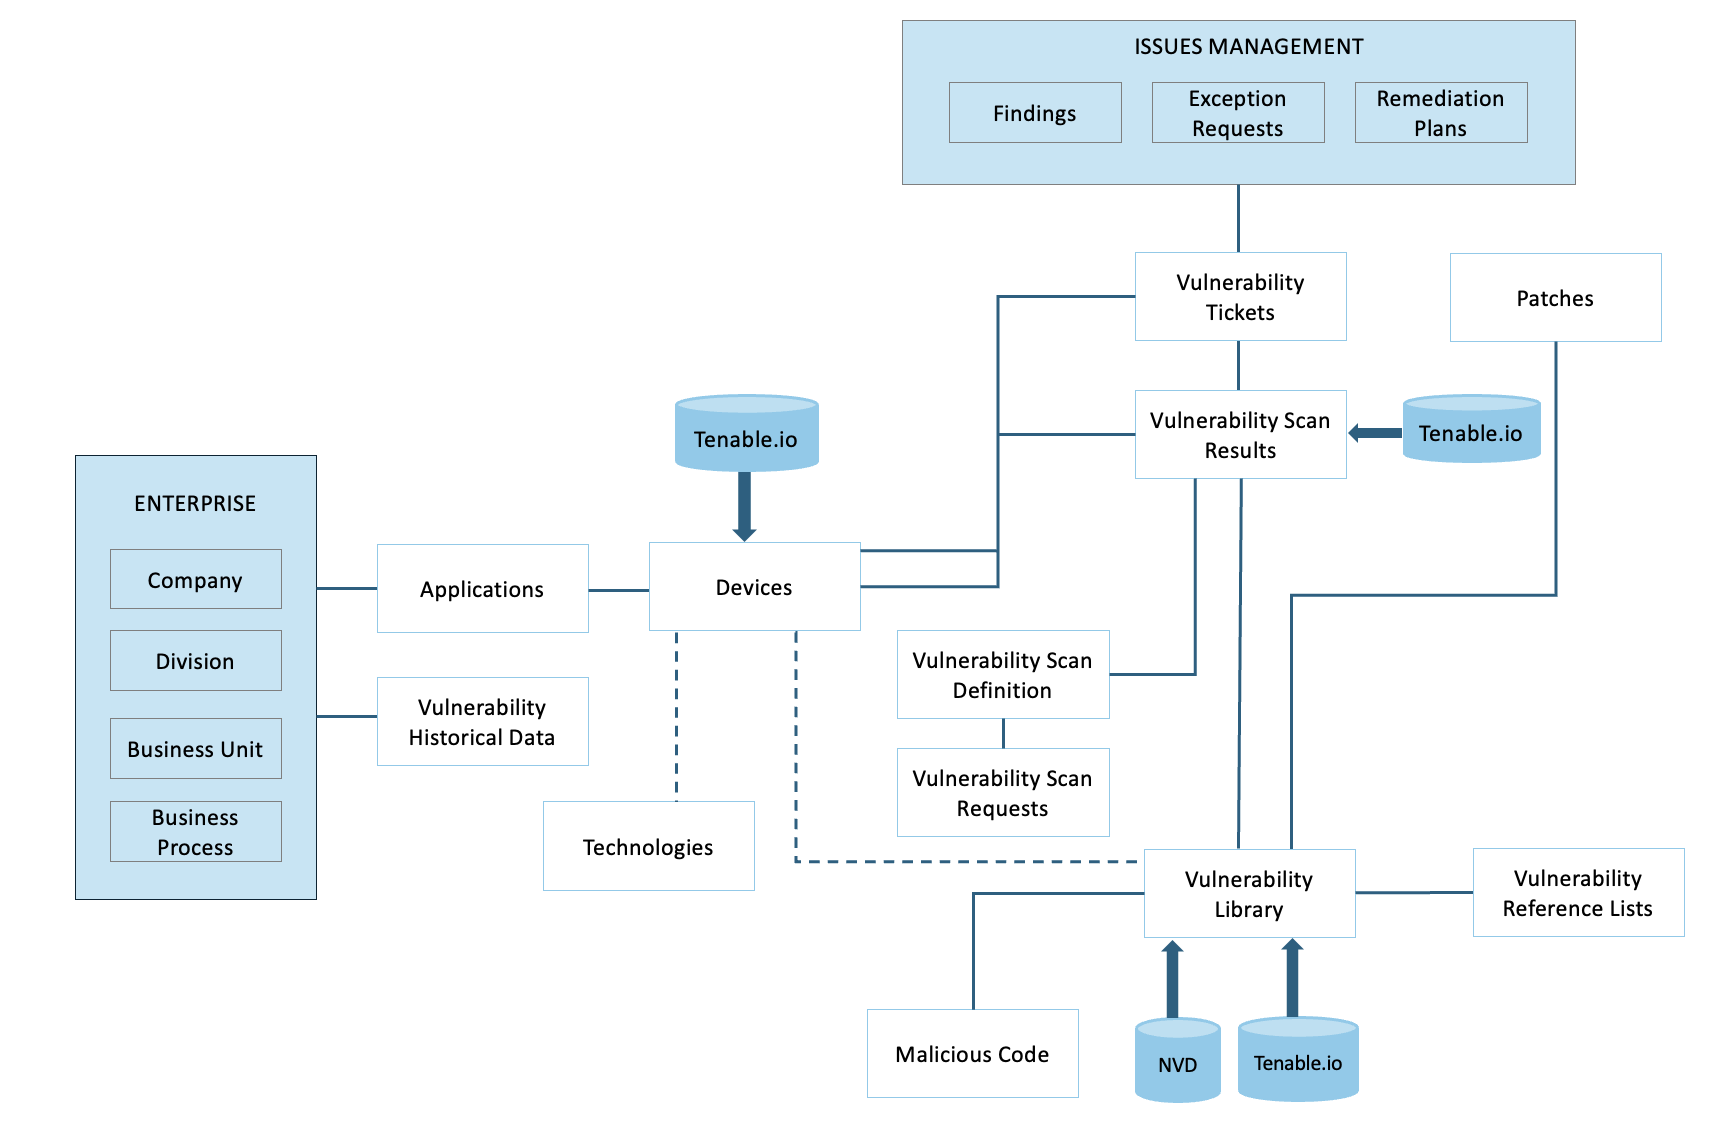
Architecture diagram
The following diagram shows the relationships between the applications that make up the Tenable.io Vulnerability Management integration.
Data feeds
Tenable.io provides a REST API that allows for the capability to script in interactions directly with the Tenable.io server. With Archer JavaScript Transporter, clients can easily authenticate to the server and make multiple, dependent API calls extracting large amounts of data in a single data feed.
The following table lists the data feeds provided with this integration.
|
Data Feed |
Description |
|---|---|
|
Tenable.io Plugins |
This JavaScript Transporter feed retrieves configured Tenable.io plugin definitions. The extracted plugin data is imported into and used by the Vulnerability Library application to support vulnerability identification and management. |
|
Tenable.io Assets Generate |
This JavaScript Transporter feed initiates the Tenable.io Assets Export job using the https://cloud.tenable.com/assets/export API endpoint. The feed triggers the export process but does not create or update any records in Archer. Asset ingestion is performed by the Tenable.io Assets Ingest data feed. The time required for the feed to run varies based on the volume of Tenable.io data. You can configure Archer settings to define how devices are uniquely identified within your organization. |
|
Tenable.io Assets Ingest |
This data feed imports asset inventory into the Devices application. The feed runs after the Assets Generate feed, which initiates the asset export job, to ensure the most current asset data is available. The feed retrieves asset inventory discovered based on the scanner configuration defined in the Assets Generate feed. The imported asset data is then used within the Devices application. |
|
Tenable.io Vulnerability Generate |
This JavaScript Transporter feed initiates the vulnerability export job using the https://cloud.tenable.com/vulns/export endpoint. This feed does not create or update any records in Archer. Vulnerability ingestion is performed by the Assets Vulnerability data feed. The time required for the feed to run varies based on the volume of Tenable.io data. You can configure the feed to filter which vulnerabilities are ingested. |
|
Tenable.io Vulnerability Ingest |
This data feed imports vulnerability data into the Vulnerability Scan Results application. The feed runs after the Vulnerability Generate feed, which initiates the vulnerability extraction job. The feed retrieves vulnerabilities detected on each asset based on the configurations defined in the Vulnerability Generate feed. |
Related applications
|
Application |
Use Case |
Primary Purpose(s) of the Relationship |
|---|---|---|
|
Vulnerability Library |
IT Securities Vulnerabilities Program (IT Security & Risk Management) |
|
|
Vulnerability Scan Results |
IT Securities Vulnerabilities Program (IT Security & Risk Management) |
|
|
Vulnerability Reference Lists |
IT Securities Vulnerabilities Program (IT Security & Risk Management) |
|
|
Devices |
IT Asset Catalog |
|
Impacted use case
The following Archer use case is impacted: IT Securities Vulnerabilities Program
Additional resources
The following additional resources are available for this offering:
Set up the data feeds
Before you begin
You must install all package files before importing data feeds. Package files include the IT Security Vulnerabilities Program use case package, the Enterprise Catalog package, and the Issues Management prerequisite use case package. For more information, see the “Installing the Packages” section of the IT Security Vulnerabilities Program use case in the Archer Help Center.
Data feed order
Import and run the data feeds in the following order.
-
(Optional) NVD Data Feeds
For information on setting up the NVD data feeds, see NIST National Vulnerability Database (NVD) Integration.
-
Tenable.io Plugins 2025.10
-
Run both Generate data feeds:
-
Tenable.io Assets Generate 2025.10
-
Tenable.io Vulnerability Generate 2025.10
A time gap of ~5 hours has been provided between Assets Generate and Ingest data feeds. If the Assets Generate takes more time than 5 hours to complete due to high volume of Assets data, adjust the time gap between the data feeds accordingly.
-
-
Tenable.io Assets Ingest 2025.10
-
Tenable.io Vulnerability Ingest 2025.10
Configure the JavaScript Transporter settings
Complete the following steps before you configure the Vulnerability Generate and Ingest data feeds.
-
Open the Archer Control Panel.
-
Go to Instance Management > All Instances.
-
Select an instance.
-
On the General tab, go to the JavaScript Transporter section.
-
In the Max Memory Limit field, set the value to 2048 MB (2 GB).
-
In the Script Timeout field, set the value to 120 minutes (2 hours).
-
Require Signature is active by default on install. Signed Certificate Thumbprints are required for all Hosted clients.
-
In the Signing Certificate Thumbprints section, add a thumbprint for each digitally signed JavaScript file.
-
In the Signing Certificate Thumbprints section, double-click an empty cell.
-
Enter the digital thumbprint of the trusted certificate used to sign the JavaScript file.
Note: For more information on how to obtain digital thumbprints, see "Digital Thumbprints" below.
Important: If you enable Require Signature and do not specify thumbprints, JavaScript files will not be accepted by the system.
-
-
-
On the toolbar, click Save.
When running JavaScript data feeds, you can set the system to only allow digitally signed JavaScript files from trusted sources for security considerations.
For a certificate to be trusted, all certificates in the chain, including the Root CA Certificate and Intermediate CA certificates, must be trusted on both the Web Server and Services Server machines.
By default, the Archer Technology LLC certificate is not present on every machine’s root.
-
On the JavaScript file, right-click and select Properties.
-
Click the Digital Signatures tab.
-
From the Signature List window, select Archer Technologies LLC.
-
Click the Details button.
-
Click View Certificate.
-
Click Install Certificate.
-
Select Local Machine.
-
Click Next.
-
Select Place all certificates in the following store, and click Browse.
-
Select Trusted Root Certification Authorities, and click OK.
-
Click Next.
-
Click Finish.
-
-
-
Click OK.
-
On the Web Server and Services Server machines, open the Manage User Certificates program.
-
From the Windows Start menu, launch certmgr. (Manage User Certificates).
-
Navigate to Certificates – Local Computer > Trusted Root Certification Authorities > Certificates.
-
Ensure the following certificates are in the Certificates sub-folder of the Trust Root Certification Authorities folder:
-
Archer Technologies LLC.
-
Archer Security 2048 V3 (Standard certificate).
-
-
-
Verify that the certificate is trusted.
-
Double-click the Archer Technologies LLC certificate.
-
In the Certificate window, click the Certification Path tab.
-
Ensure that the Certificate Status window displays the following message: “This certificate is OK.”
Note: If the Certificate Status window displays a different message, follow the onscreen instructions.
-
-
Obtain the trusted certificate thumbprint.
-
In the Certificate window, click the Details tab.
-
Scroll to and select the Thumbprint field.
The certificate's digital thumbprint appears in the window.
-
Copy the thumbprint.
Note: For information on adding digital thumbprints, see Step 7a of "Configuring the JavaScript Transporter Settings".
-
Set up the Tenable.io data feeds (new)
Important: Before you upload a JavaScript file, configure JavaScript Transporter settings in the Archer Control Panel. For more information, see Configure the JavaScript Transporter Settings. With the exception of the optional parameters specified in this procedure, changes to the JavaScript Transporter configuration file can only be achieved in a hosted environment with a Professional Services engagement. For more information, contact your account representative.
-
Go to the Manage Data Feeds page.
-
From the menu bar, click
 .
. -
Under Integration, click Data Feeds.
-
-
In the Manage Data Feeds section, click Import.
-
Locate and select the applicable data feed file:
-
Tenable.io Plugins 2025.10.dfx5
-
Tenable.io Assets Generate 2025.10.dfx5
-
Tenable.io Assets Ingest 2025.10.dfx5
-
Tenable.io Vulnerability Generate 2025.10.dfx5
-
Tenable.io Vulnerability Ingest 2025.10.dfx5
-
-
Click Open.
-
In the General Information section, in the Status field, select Active.
-
In the Additional Properties section, enable Optimize Calculations.
-
Click the Transport tab.
-
In the Transport Configuration section, complete the following:
-
Click Upload.
-
From the Upload JavaScript File dialog, click Add New.
-
Locate and select the signed-TenableIO_1.0.4.1.js file and click Open.
-
From the Upload JavaScript File dialog, click OK.
-
-
Provide custom parameters. The following tables describe the required and optional parameters and their supported values.
Important: The keys and values are case-sensitive and cannot include extra spaces at the end of the strings. The listed values are in place by default but can be configured to suit your environment.
When increasing custom parameters settings to a higher value, you may also need to increase the 'Max Memory Limit' settings in the Archer Control Panel accordingly. Set the minimum value of the 'Max Memory Limit' setting to 2048 MB. Plugins feed parameters
Parameter
Required or optional
Default value
Description
feedType
Required
(empty)
Specifies which Tenable.io data pipeline the data feed uses. This parameter is case-insensitive and must be set to the following value for this feed:
-
PluginsUses the Plugins pipeline. The feed calls the
GET /plugins/pluginendpoint with page-based pagination. It supports an initialLoad mode that can resume across multiple Archer runs by using the PreviousRunContext token.
If this parameter is not set to one of the supported values, the data feed fails immediately with an “Invalid Feed Type” error.
baseUrl
Required
(empty)
Specifies the base URL for the Tenable.io API (for example: https://cloud.tenable.com). This value is prepended to all API endpoint paths to construct the full request URL.
The value is not validated or normalized. If the value includes a trailing slash, the resulting API requests may contain a double slash, which can cause malformed URLs.
accessKey
Required
(empty)
Specifies the Tenable.io API access key used for authentication. This value is combined with the secretKey to form the x-apikeys request header in the following format: accessKey=<access_key>;secretKey=<secret_key>
For security purposes, the access key is never written to logs. There is no validation performed at startup. If the access key is missing or invalid, the data feed fails at runtime when the first API request is made, returning an HTTP 401 Unauthorized error.
secretKey
Required
(empty)
The Tenable.io API secret key, which is paired with accessKey for authentication.
The behavior and format are the same as for the accessKey parameter.
proxy
Optional
(empty)
Specifies an optional HTTP or HTTPS proxy URL (for example, http://proxy.company.com:8080). When this value is provided, two actions occur:
-
transportSettings.useProxy is set to true
-
Each web request sets the HTTP_PROXY and HTTPS_PROXY environment variables to the specified value, which the native fetch API automatically uses.
If the value is empty, no proxy is configured and all connections are made directly. The value is passed through without validation; an improperly formatted proxy URL will result in connection failures at runtime.
verifyCerts
Optional
'false' (string)
Specifies whether TLS/SSL certificate verification is enforced. This value must be provided as a string ("true" or "false") rather than a boolean. Verification is evaluated in two locations: during Init() and within each API framework web request.
-
When set to "false", the process sets the Node.js environment variable NODE_TLS_REJECT_UNAUTHORIZED to "0", disabling certificate verification globally.
-
When set to "true", standard certificate verification is applied.
The default value of "false" supports environments where self‑signed certificates are used. Any value other than "true" (case‑insensitive) is interpreted as "false".
last_updated
Optional
<LastRunTime>
Specifies the date used to filter plugins based on when they were last modified. Provide a date in YYYY-MM-DD format or use the special token <LastRunTime>. Only plugins modified on or after the specified date are included in the export.
If the parameter is left empty or set to <LastRunTime>, it resolves to the LastRunTime token from the previous successful Archer run and is formatted as YYYY-MM-DD.
When the feed is configured with type set to initialLoad, this value is automatically overridden to 2000-01-01, regardless of configuration, to ensure the entire plugin catalog is retrieved.
size
Optional
1000
Specifies the number of plugin records returned per page when retrieving plugin data.
The total number of pages processed is calculated based on the total record count returned by the API and this page size. Setting this value too high may exceed Tenable.io API limits, while setting it to 0 can result in invalid requests and unintended behavior.
type
Optional
(empty)
Controls the operating mode of this data feed.
When this parameter is left empty, the feed runs in standard incremental mode and retrieves only plugins modified on or after the date specified by last_updated. All available pages are processed in a single run.
When set to initialLoad, the feed switches to initial load mode with the following behavior changes:
-
The last_updated value is automatically set to 2000-01-01, ensuring that the entire plugin catalog is included, regardless of previous run history.
-
The feed uses the PreviousRunContext token to track pagination progress and resume from the last processed page across multiple Archer runs.
-
Pagination is limited based on the iterationLimit setting. After the specified number of pages is processed, the current page number is saved to PreviousRunContext, and the run ends. Subsequent runs resume processing from the saved page number.
This mode supports loading large plugin catalogs incrementally over multiple scheduled runs.
debug
Optional
false
Enables verbose diagnostic logging throughout the data retrieval pipeline. This parameter accepts a Boolean value; however, when loaded from the Archer CustomParameters, it is provided as the string 'true' or 'false'.
When enabled, the client produces additional log output, including:
-
The number of records sent to Archer per batch
-
Within the API framework: cooldown durations, elapsed milliseconds, and detailed request/response events
Because debug logging generates a high volume of output—and only the most recent 30 informational log entries are retained (errors are preserved indefinitely)—this option should remain disabled in production environments.
iterationLimit
Optional
0
Integer. This setting applies only when feedType is set to Plugins and type is set to initialLoad. It controls the maximum number of pages the feed processes in a single run.
-
If the value is 0 or greater than 50, the feed automatically clamps the value to 50 at run time.
-
Each processed page increments an internal iteration counter.
-
When the counter reaches the configured limit and additional pages remain, the feed saves the current page number to previousRunContext and ends the run.
-
On the next Archer run, the feed resumes processing from the saved page.
When all pages are processed, the feed sets previousRunContext to -1. This indicates that the initial load is complete. Subsequent runs detect this value and return immediately without making any API calls.
iterationCounter
Optional
0
Internal run‑time counter. This is not a configurable setting.
-
The counter increments once per page during a Plugins initialLoad run.
-
Its value is compared against iterationLimit to determine when the run should stop.
-
The counter is initialized in the object definition for completeness, but it has no meaningful value before listPlugins() begins.
Assets Generate feed parameters
Parameter
Required or optional
Default value
Description
feedType
Required
(empty)
Specifies which Tenable.io data pipeline the data feed uses. This parameter is case-insensitive and must be set to the following value for this feed:
-
Assets
The fees runs the Assets pipeline, which also operates in two phases: Generate and Ingest. For this feed (Generate), the feed calls the POST /assets/export endpoint to create an asset export job in Tenable.io.
If this parameter is not set to one of the supported values, the data feed fails immediately with an “Invalid Feed Type” error.
objective
Required
(empty)
Specifies which phase of the two-phase export pipeline to run. This parameter is case-insensitive and must be set to the following value for this feed:
-
Generate
The feed starts a new export job in Tenable.io. It returns immediately after the API accepts the request and does not wait for the export job to complete.
The export job UUID is managed by Tenable.io and is later identified during the Ingest phase using the export status listing.
If this parameter is not set to one of the supported values, the data feed fails immediately with an “Invalid Objective” error.
baseUrl
Required
(empty)
Specifies the base URL for the Tenable.io API (for example: https://cloud.tenable.com). This value is prepended to all API endpoint paths to construct the full request URL.
The value is not validated or normalized. If the value includes a trailing slash, the resulting API requests may contain a double slash, which can cause malformed URLs.
accessKey
Required
(empty)
Specifies the Tenable.io API access key used for authentication. This value is combined with the secretKey to form the x-apikeys request header in the following format: accessKey=<access_key>;secretKey=<secret_key>
For security purposes, the access key is never written to logs. There is no validation performed at startup. If the access key is missing or invalid, the data feed fails at runtime when the first API request is made, returning an HTTP 401 Unauthorized error.
secretKey
Required
(empty)
The Tenable.io API secret key, which is paired with accessKey for authentication.
The behavior and format are the same as for the accessKey parameter.
proxy
Optional
(empty)
Specifies an optional HTTP or HTTPS proxy URL (for example, http://proxy.company.com:8080). When this value is provided, two actions occur:
-
transportSettings.useProxy is set to true
-
Each web request sets the HTTP_PROXY and HTTPS_PROXY environment variables to the specified value, which the native fetch API automatically uses.
If the value is empty, no proxy is configured and all connections are made directly. The value is passed through without validation; an improperly formatted proxy URL will result in connection failures at runtime.
verifyCerts
Optional
'false' (string)
Specifies whether TLS/SSL certificate verification is enforced. This value must be provided as a string ("true" or "false") rather than a boolean. Verification is evaluated in two locations: during Init() and within each API framework web request.
-
When set to "false", the process sets the Node.js environment variable NODE_TLS_REJECT_UNAUTHORIZED to "0", disabling certificate verification globally.
-
When set to "true", standard certificate verification is applied.
The default value of "false" supports environments where self‑signed certificates are used. Any value other than "true" (case‑insensitive) is interpreted as "false".
chunk_size
Required
100
Specifies the number of asset records included in each export chunk. Valid values range from 100 to 10,000. A non‑zero value is required by the Tenable.io API. If this parameter is missing or set to 0, the export request fails. When not explicitly configured, the default value of 100 is used.
include_open_ports
Optional
false
Determines whether observed open port data is included for each asset in the export. Accepts string values of 'true' or 'false' and is passed as a boolean in the export request. Enabling this option increases the size of the export payload.
created_at
Optional
(empty)
(resolves to <LastRunTime>)
Specifies the primary date threshold for including assets in the export. Accepts an ISO date string or the special token <LastRunTime>. Only assets created on or after the specified date are included. The value is converted to Unix epoch seconds and is always applied to the export request. If left empty or set to <LastRunTime>, the value resolves to the previous successful run time, defaulting to 2000-01-01T00:00:00Z on the initial run.
updated_at
Optional
[] (omitted when empty)
Specifies a date used to filter assets based on when they were last updated. Provide an ISO date string to include only assets updated on or after the specified date. The value is converted to Unix epoch seconds and applied as a filter in the export request. If left empty, this filter is not applied.
is_licensed
Optional
[] (omitted when empty)
Filters assets based on their licensing status in Tenable.io. Accepts string values of 'true' or 'false', which are converted to a boolean before being applied as a filter. When set, only licensed or unlicensed assets (as specified) are included in the export. If left empty, no licensing filter is applied.
This parameter is only applied if it is explicitly provided in the Custom Parameters. Otherwise, it is omitted from the export request.
first_scan_time
Optional
[] (omitted when empty)
Specifies a date used to filter assets based on when they were first scanned. The value must be provided as an ISO date string. The value is converted to Unix epoch seconds and applied as a filter in the export request. If left empty, this filter is not applied
last_authenticated_scan_time
Optional
[] (omitted when empty)
Specifies a date used to filter assets based on the time of their most recent authenticated scan. The value must be provided as an ISO date string. The value is converted to Unix epoch seconds and applied as a filter in the export request. If left empty, this filter is not applied.
last_assessed
Optional
[] (omitted when empty)
Specifies a date used to filter assets based on when they were last assessed. The value must be provided as an ISO date string. The value is converted to Unix epoch seconds and applied as a filter in the export request. If left empty, this filter is not applied.
sources
Optional
Default: '' (single or multiple values)
Specifies the asset discovery sources used to filter the export. Array of strings. Multiple values can be provided as comma-separated values.
Expected values can include ACUNETIX_360, ACUNETIX_PREMIUM, AQUA_CSPM, AWS, AWS_CONFIG, and AWS_EC2.
debug
Optional
false
Enables verbose diagnostic logging throughout the data retrieval pipeline. This parameter accepts a Boolean value; however, when loaded from the Archer CustomParameters, it is provided as the string 'true' or 'false'.
When enabled, the client produces additional log output, including:
-
The number of records sent to Archer per batch
-
Within the API framework: cooldown durations, elapsed milliseconds, and detailed request/response events
Because debug logging generates a high volume of output—and only the most recent 30 informational log entries are retained (errors are preserved indefinitely)—this option should remain disabled in production environments.
Vulnerability Generate feed parameters
Parameter Required or optional Default value Description feedType Required (empty) Specifies which Tenable.io data pipeline the data feed uses. This parameter is case-insensitive and must be set to the following value for this feed:
-
VulnerabilityUses the Vulnerability pipeline, which operates in two phases:
-
Generate: Calls the POST /vulns/export endpoint to create a vulnerability export job in Tenable.io.
-
Ingest: Retrieves and processes all chunks from the most recently completed (FINISHED) vulnerability export job.
-
If this parameter is not set to one of the supported values, the data feed fails immediately with an “Invalid Feed Type” error.
objective Required (empty) Specifies which phase of the two-phase export pipeline to run. This parameter is case-insensitive and must be set to the following value for this feed:
-
Generate
The feed starts a new export job in Tenable.io. It returns immediately after the API accepts the request and does not wait for the export job to complete.
The export job UUID is managed by Tenable.io and is later identified during the Ingest phase using the export status listing.
If this parameter is not set to one of the supported values, the data feed fails immediately with an “Invalid Objective” error.
baseUrl Required (empty) Specifies the base URL for the Tenable.io API (for example: https://cloud.tenable.com). This value is prepended to all API endpoint paths to construct the full request URL.
The value is not validated or normalized. If the value includes a trailing slash, the resulting API requests may contain a double slash, which can cause malformed URLs.
accessKey Required (empty) Specifies the Tenable.io API access key used for authentication. This value is combined with the secretKey to form the x-apikeys request header in the following format: accessKey=<access_key>;secretKey=<secret_key>
For security purposes, the access key is never written to logs. There is no validation performed at startup. If the access key is missing or invalid, the data feed fails at runtime when the first API request is made, returning an HTTP 401 Unauthorized error.
secretKey Required (empty) The Tenable.io API secret key, which is paired with accessKey for authentication.
The behavior and format are the same as for the accessKey parameter.
proxy Optional (empty) Specifies an optional HTTP or HTTPS proxy URL (for example, http://proxy.company.com:8080). When this value is provided, two actions occur:
-
transportSettings.useProxy is set to true
-
Each web request sets the HTTP_PROXY and HTTPS_PROXY environment variables to the specified value, which the native fetch API automatically uses.
If the value is empty, no proxy is configured and all connections are made directly. The value is passed through without validation; an improperly formatted proxy URL will result in connection failures at runtime.
verifyCerts Optional 'false' (string) Specifies whether TLS/SSL certificate verification is enforced. This value must be provided as a string ("true" or "false") rather than a boolean. Verification is evaluated in two locations: during Init() and within each API framework web request.
-
When set to "false", the process sets the Node.js environment variable NODE_TLS_REJECT_UNAUTHORIZED to "0", disabling certificate verification globally.
-
When set to "true", standard certificate verification is applied.
The default value of "false" supports environments where self‑signed certificates are used. Any value other than "true" (case‑insensitive) is interpreted as "false".
num_assets Optional 500 Defines the number of assets’ vulnerability findings included per export chunk.
Valid values range from 50 to 4999. Values outside this range are automatically set to 500.
The value is passed directly as num_assets in the POST /vulns/export request.
include_unlicensed Optional false Determines whether vulnerability findings for assets that are not counted against the Tenable.io license are included in the export. This parameter accepts string values of 'true' or 'false' and is passed as a boolean value in the POST /vulns/export request body. since Optional <LastRunTime> When set, only vulnerabilities observed on or after the specified date are included. The value must be provided as an ISO date string or as the special token <LastRunTime>. The value is converted to Unix epoch seconds and applied as a required filter in the export request.
If the parameter is left empty or set to <LastRunTime>, it automatically resolves to the LastRunTime token from the previous successful Archer run. On the initial run, this defaults to 2000-01-01T00:00:00Z, which results in all available vulnerability data being retrieved.
This parameter is the primary driver for incremental vulnerability loads and is always applied, regardless of other filter settings.
first_found Optional (empty) When set, only vulnerabilities first found on or after the specified date are included in the export. The value must be provided as an ISO date string (for example, 2024-01-01 or 2024-01-01T00:00:00Z). The value is converted to Unix epoch seconds and applied as a filter in the export request. If left empty, this filter is not applied. last_found Optional (empty) When set, only vulnerabilities last found on or after the specified date are included in the export. The value must be provided as an ISO date string. The value is converted to Unix epoch seconds and applied as a filter in the export request. If left empty, this filter is not applied. last_fixed Optional (empty) When set, only vulnerabilities that were fixed on or after the specified date are included in the export. The value must be provided as an ISO date string. The value is converted to Unix epoch seconds and applied as a filter in the export request. If left empty, this filter is not applied. cve_category Optional '' (single or multiple values)
Specifies one or more CVE categories to use as filters during vulnerability export. The value must be provided as an array of strings. Multiple values can be provided as comma-separated values.
Possible values include:
-
cisa known exploitable
-
emerging threats
-
in the news
-
persistently exploited
-
ransomware
-
recent active exploitation
-
top 50 vpr
When non-empty, filters to vulnerabilities matching the specified CVE categories.
Passed as-is into the filters object. If the parameter is empty or not provided as an array, the filter is not applied.
exploit_maturity Optional '' (single or multiple values) Specifies exploit maturity levels used to filter vulnerability exports. The value must be provided as an array of strings. Multiple values can be provided as comma-separated values.
Possible values include:
-
high
-
functional
-
poc
-
unproven
When non-empty, filters to vulnerabilities with the specified exploit maturity levels. Passed as-is into the filters object. If the array is empty or not provided, this filter is not applied.
plugin_family Optional '' (single or multiple values) Specifies Tenable plugin families used to filter vulnerability exports. The value must be provided as an array of strings. Multiple values can be provided as comma-separated values.
When non-empty, filters to vulnerabilities from the specified Tenable plugin families. Passed as-is into the filters object. If the array is empty or not provided, this filter is not applied
plugin_type Optional '' (single or multiple values)
Specifies the Tenable plugin type used to filter vulnerability exports. Provide a string value to include only vulnerabilities detected by plugins of the specified type. If the value is left empty, this filter is not applied. severity Optional '' (single or multiple values)
Specifies the vulnerability severity levels used to filter exports. Provide an array of string values. Multiple values can be provided as comma-separated values.
Possible values include:
-
info
-
low
-
medium
-
high
-
critical
When non-empty, filters to vulnerabilities of the specified severity levels. Passed as-is into the filters object. If the value is empty or not provided as an array, the filter is not applied.
state Optional '' (single or multiple values)
Specifies the vulnerability state values used to filter exports. The value must be provided as an array of strings. Multiple values can be provided as comma-separated values.
Possible values include:
-
OPEN
-
REOPENED
-
FIXED
When non-empty, filters to vulnerabilities in the specified states. Passed as-is into the filters object. If the value is empty or not provided as an array, the filter is not applied.
source Optional '' (single or multiple values)
Specifies the scan sources used to filter vulnerability exports. The value must be provided as an array of strings. Multiple values can be provided as comma-separated values.
Possible values include:
-
AGENT
-
NNM
-
NESSUS
When non-empty, filters to vulnerabilities detected by the specified scan
sources. Passed as-is into the filters object. If the value is empty or not provided as an array, the filter is not applied.
debug
Optional
false
Enables verbose diagnostic logging throughout the data retrieval pipeline. This parameter accepts a Boolean value; however, when loaded from the Archer CustomParameters, it is provided as the string 'true' or 'false'.
When enabled, the client produces additional log output, including:
-
The number of records sent to Archer per batch
-
Within the API framework: cooldown durations, elapsed milliseconds, and detailed request/response events
Because debug logging generates a high volume of output—and only the most recent 30 informational log entries are retained (errors are preserved indefinitely)—this option should remain disabled in production environments.
Assets Ingest feed parameters
Parameter
Required or optional
Default value
Description
feedType
Required
(empty)
Specifies which Tenable.io data pipeline the data feed uses. This parameter is case-insensitive and must be set to the following value for this feed:
-
AssetsUses the Assets pipeline, which also operates in two phases:
-
Generate: Calls the POST /assets/export endpoint to create an asset export job in Tenable.io.
-
Ingest: Retrieves and processes all chunks from the most recently completed (FINISHED) asset export job.
-
If this parameter is not set to one of the supported values, the data feed fails immediately with an “Invalid Feed Type” error.
objective
Required
(empty)
Specifies which phase of the two-phase export pipeline to run. This parameter is case-insensitive and must be set to the following value for this feed:
-
Ingest
The feed does the following:
-
Checks the PreviousRunContext token to determine whether a prior export job was partially processed.
-
If a previous job is incomplete, resumes processing from the last saved chunk.
-
If the previous job is complete, locates the most recent export job with a status of FINISHED and begins processing from chunk 0.
-
Processes up to chunkLimit chunks per run (0 processes all remaining chunks).
-
Saves progress after each run in the format {uuid}-{processed}-{total} to PreviousRunContext for resumption in subsequent runs.
If this parameter is not set to one of the supported values, the data feed fails immediately with an “Invalid Objective” error.
baseUrl
Required
(empty)
Specifies the base URL for the Tenable.io API (for example: https://cloud.tenable.com). This value is prepended to all API endpoint paths to construct the full request URL.
The value is not validated or normalized. If the value includes a trailing slash, the resulting API requests may contain a double slash, which can cause malformed URLs.
accessKey
Required
(empty)
Specifies the Tenable.io API access key used for authentication. This value is combined with the secretKey to form the x-apikeys request header in the following format: accessKey=<access_key>;secretKey=<secret_key>
For security purposes, the access key is never written to logs. There is no validation performed at startup. If the access key is missing or invalid, the data feed fails at runtime when the first API request is made, returning an HTTP 401 Unauthorized error.
secretKey
Required
(empty)
The Tenable.io API secret key, which is paired with accessKey for authentication.
The behavior and format are the same as for the accessKey parameter.
proxy
Optional
(empty)
Specifies an optional HTTP or HTTPS proxy URL (for example, http://proxy.company.com:8080). When this value is provided, two actions occur:
-
transportSettings.useProxy is set to true
-
Each web request sets the HTTP_PROXY and HTTPS_PROXY environment variables to the specified value, which the native fetch API automatically uses.
If the value is empty, no proxy is configured and all connections are made directly. The value is passed through without validation; an improperly formatted proxy URL will result in connection failures at runtime.
verifyCerts
Optional
'false'(string)
Specifies whether TLS/SSL certificate verification is enforced. This value must be provided as a string ("true" or "false") rather than a boolean. Verification is evaluated in two locations: during Init() and within each API framework web request.
-
When set to "false", the process sets the Node.js environment variable NODE_TLS_REJECT_UNAUTHORIZED to "0", disabling certificate verification globally.
-
When set to "true", standard certificate verification is applied.
The default value of "false" supports environments where self‑signed certificates are used. Any value other than "true" (case‑insensitive) is interpreted as "false".
chunkLimit Required 0 Specifies the maximum number of export chunks the Ingest run processes in a single run.
-
When set to 0 (the default), the Ingest run processes all remaining chunks in one run.
-
When set to a value greater than 0, each run processes and writes up to chunkLimit chunks to Archer. Any remaining chunks are handled in subsequent runs.
The Assets Ingest feed does not persist a PreviousRunContext resumption state. If a run is interrupted before completion, the next run restarts from chunk 0 rather than resuming from the last processed chunk.
debug
Optional
false
Enables verbose diagnostic logging throughout the data retrieval pipeline. This parameter accepts a Boolean value; however, when loaded from the Archer CustomParameters, it is provided as the string 'true' or 'false'.
When enabled, the client produces additional log output, including:
-
The number of records sent to Archer per batch
-
Within the API framework: cooldown durations, elapsed milliseconds, and detailed request/response events
Because debug logging generates a high volume of output—and only the most recent 30 informational log entries are retained (errors are preserved indefinitely)—this option should remain disabled in production environments.
Vulnerability Ingest feed parameters
Parameter
Required or optional
Default value
Description
feedType
Required
(empty)
Specifies which Tenable.io data pipeline the data feed uses. This parameter is case-insensitive and must be set to the following value for this feed:
-
VulnerabilityUses the Vulnerability pipeline, which operates in two phases:
-
Generate: Calls the POST /vulns/export endpoint to create a vulnerability export job in Tenable.io.
-
Ingest: Retrieves and processes all chunks from the most recently completed (FINISHED) vulnerability export job.
-
If this parameter is not set to one of the supported values, the data feed fails immediately with an “Invalid Feed Type” error.
objective
Required
(empty)
Specifies which phase of the two-phase export pipeline to run. This parameter is case-insensitive and must be set to the following value for this feed:
-
Ingest
The feed does the following:
-
Checks the PreviousRunContext token to determine whether a prior export job was partially processed.
-
If a previous job is incomplete, resumes processing from the last saved chunk.
-
If the previous job is complete, locates the most recent export job with a status of FINISHED and begins processing from chunk 0.
-
Processes up to chunkLimit chunks per run (0 processes all remaining chunks).
-
Saves progress after each run in the format {uuid}-{processed}-{total} to PreviousRunContext for resumption in subsequent runs.
If this parameter is not set to one of the supported values, the data feed fails immediately with an “Invalid Objective” error.
baseUrl
Required
(empty)
Specifies the base URL for the Tenable.io API (for example: https://cloud.tenable.com). This value is prepended to all API endpoint paths to construct the full request URL.
The value is not validated or normalized. If the value includes a trailing slash, the resulting API requests may contain a double slash, which can cause malformed URLs.
accessKey
Required
(empty)
Specifies the Tenable.io API access key used for authentication. This value is combined with the secretKey to form the x-apikeys request header in the following format: accessKey=<access_key>;secretKey=<secret_key>
For security purposes, the access key is never written to logs. There is no validation performed at startup. If the access key is missing or invalid, the data feed fails at runtime when the first API request is made, returning an HTTP 401 Unauthorized error.
secretKey
Required
(empty)
The Tenable.io API secret key, which is paired with accessKey for authentication.
The behavior and format are the same as for the accessKey parameter.
proxy
Optional
(empty)
Specifies an optional HTTP or HTTPS proxy URL (for example, http://proxy.company.com:8080). When this value is provided, two actions occur:
-
transportSettings.useProxy is set to true
-
Each web request sets the HTTP_PROXY and HTTPS_PROXY environment variables to the specified value, which the native fetch API automatically uses.
If the value is empty, no proxy is configured and all connections are made directly. The value is passed through without validation; an improperly formatted proxy URL will result in connection failures at runtime.
verifyCerts
Optional
'false' (string)
Specifies whether TLS/SSL certificate verification is enforced. This value must be provided as a string ("true" or "false") rather than a boolean. Verification is evaluated in two locations: during Init() and within each API framework web request.
-
When set to "false", the process sets the Node.js environment variable NODE_TLS_REJECT_UNAUTHORIZED to "0", disabling certificate verification globally.
-
When set to "true", standard certificate verification is applied.
The default value of "false" supports environments where self‑signed certificates are used. Any value other than "true" (case‑insensitive) is interpreted as "false".
chunkLimit
Optional
0
Specifies the maximum number of export chunks processed during a single run:
-
A value of 0 (default) processes all remaining chunks in one run.
-
A value greater than 0 limits processing to the specified number of chunks per run.
After each run, the feed saves its progress to the PreviousRunContext token in the format:
{uuid}-{processedChunkCount}-{totalChunkCount}
This allows subsequent Ingest runs to resume from the last processed chunk, enabling large vulnerability exports to be consumed incrementally across multiple scheduled runs.
debug
Optional
false
Enables verbose diagnostic logging throughout the data retrieval pipeline. This parameter accepts a Boolean value; however, when loaded from the Archer CustomParameters, it is provided as the string 'true' or 'false'.
When enabled, the client produces additional log output, including:
-
The number of records sent to Archer per batch
-
Within the API framework: cooldown durations, elapsed milliseconds, and detailed request/response events
Because debug logging generates a high volume of output—and only the most recent 30 informational log entries are retained (errors are preserved indefinitely)—this option should remain disabled in production environments.
-
-
For each key type, determine whether you want it to be Protected or Plain Text. Selecting Protected encrypts the key value for the specified key in the log.
-
Click the Source Definition tab. Click the Tokens sub-tab. Verify token values.
The following table describes token values to verify. Token
Value
LastRunTime
(Populated by feed)
PreviousRunContext (Populated by feed) -
Verify that key field values are not missing from the data feed setup window.
-
Click Save.
Note: For more information about tokens, see "Data Feed Tokens" in the Platform Help.
Field mapping reference
The following sections list the mappings of the source and target fields in each data feed.
|
Source Field |
Target Field |
|---|---|
|
DFMKey |
DFMKey |
|
Source |
Source |
|
ID |
ID |
|
Name |
Title |
|
Plugin_Type |
Tenable Check Type |
|
Synopsis |
Abstract |
|
Description |
Description |
|
Solution |
Solution |
|
See_Also |
Tenable see Also |
|
Plugin_Publication_Date |
Tenable Plug In Published Date |
|
Vuln_Publication_Date |
TenableVulnerability Published Date |
|
Patch_Publication_Date |
Tenable Patch Publish Date |
|
Exploitability_Ease |
Tenable Exploit Ease |
|
Exploit_Available |
Tenable Exploit Available |
|
Risk_Factor |
Tenable Risk Factor |
|
CPE |
Tenable CPE Full Configuration Name |
|
Plugin_Modification_Date |
Tenable Plug In Modified Date |
|
Plugin_Version |
Version |
|
Required_Ports |
Tenable Required Ports |
|
Required_UDP_Ports |
Tenable Required UDP Ports |
|
Dependencies |
Tenable Dependencies |
|
AccessVector |
Tenable CVSS v2 Vector |
|
Cvss_Temporal_Score |
CVSS v2 Temporal Score |
|
Cvss_Base_Score |
CVSS v2 Base Score |
|
AccessVector |
Tenable CVSS v3 Vector |
|
Cvss3_Temporal_Score |
CVSS v3 Temporal Score |
|
Cvss3_Base_Score |
CVSS v3 Base Score |
|
Score |
Tenable vprScore |
|
TYPE |
Vulnerability Reference Lists/Type |
|
url |
Vulnerability Reference Lists/url |
|
Attack_Vector |
Tenable CVSS v2 Access Vector |
|
Attack_Complexitiy |
Tenable CVSS v2 Access Complexity |
|
Authentication |
Tenable CVSS v2 Authentication |
|
Confidentiality |
Tenable CVSS v2 Impact Confidentiality |
|
Integrity |
Tenable CVSS v2 Impact Integrity |
|
Availability |
Tenable CVSS v2 Impact Availability |
|
Exploitability |
Tenable CVSS v2 Exploitability |
|
Remediation_Level |
Tenable CVSS v2 Remediation Level |
|
Report_Confidence |
Tenable CVSS v2 Report Confidence |
|
Attack_Vector |
Tenable CVSS v3 Attack Vector |
|
Attack_Complexitiy |
Tenable CVSS v3 Attack Complexity |
|
Privileges |
Tenable CVSS v3 Privileges Required |
|
User_Interaction |
Tenable CVSS v3 User Interaction |
|
Scope |
Tenable CVSS v3 Scope |
|
Confidentiality_Impact |
Tenable CVSS v3 Confidentiality Impact |
|
Integrity_Impact |
Tenable CVSS v3 Integrity Impact |
|
Availability_Impact |
Tenable CVSS v3 Availability Impact |
|
Exploitability |
Tenable CVSS v3 Exploit Code Maturity |
|
Remediation_Level |
Tenable CVSS v3 Remediation Level |
|
Report_Confidence |
Tenable CVSS v3 Report Confidence |
|
Operating_System_Technology |
CPE Operating System Technologies |
|
Application_Technology |
CPE Application Technologies |
|
Hardware_Technology |
CPE Hardware Technologies |
|
Family_Id |
Tenable Family ID |
|
Family_Name |
Tenable Family Name |
|
Source Field |
Target Field |
|---|---|
|
ID |
Device Name |
|
Source |
Last Updated By |
|
Last_Scan_Time |
Last Scan Date Time |
|
Last_Authenticated_Scan_Date |
Last Vulnerability Authenticated Scanned Date Time |
|
Serial_Number |
Serial Number |
|
Ipv4s |
External IPv4 Address |
|
Ipv6s |
External IPv6 Address |
|
FQDNS |
Domain Name |
|
Mac_Addresses |
MAC Address |
|
Netbios_Names |
NetBIOS Name |
|
Operating_Systems |
Operating System |
|
System_Types |
Description |
|
Host_Names |
Host Name |
|
Name |
Network Name |
|
Operating_System_Technology |
Operating System Technologies |
|
Application_Technology |
Application Technologies |
|
Hardware_Technology |
Hardware Technologies |
|
Source Field |
Target Field |
|---|---|
|
Archer_Source |
Source |
|
Title |
Title |
|
DFMKey |
DFMKey |
|
Fqdn |
FQDN |
|
Hostname |
Hostname |
|
Uuid |
Host ID |
|
Ipv4 |
IPv4 |
|
Ipv6 |
Ipv6 |
|
Mac_Address |
MAC Address |
|
Netbios_name |
NetBIOS Name |
|
Operating_System |
Operating System |
|
Network_Id |
Network ID |
|
Output |
Results |
|
Bid |
Tenable Plugin ID |
|
Description |
Tenable Plugin Information |
|
Id |
Vulnerability Library Details/ID |
|
Modification_Date |
Last Date Updated |
|
Score |
Priority |
|
CVE |
CVE ID |
|
Operating_System_Technology |
CPE Operating System Technology |
|
PortNumber |
Port Number |
|
Protocal |
Protocol |
|
Service |
Service |
|
Started_At |
Last Device Scan Date |
|
Severity |
Severity |
|
Severity_Id |
Tenable Severity ID |
|
First_Found |
First Found Date |
|
Last_Found |
Last Found Date |
Schedule & run the Tenable.io data feeds
Note: The data feeds are dependent on the Tenable.io API response data volume and their run time might take longer than the session timeout set for the Archer Services Parameter account. The data feed might fail due to 'Invalid session token'. If this happens, increase the session timeout of Archer Service Parameter. See the following article in the Archer Community for details https://www.archerirm.community/s/article/Failure-of-Long-Running-Jobs-for-Data-Imports-or-Content-Deletion-in-Archer.
A data feed must be active and valid to successfully run. A successful data feed run processes all input data, completes all expected record updates, and does not report any failures in the Run Details Report.
Validating a data feed
The Data Feed Manager validates the information when a data feed is scheduled. If any information is invalid, the data feed displays an error message. You can save the data feed and correct the errors later, but the data feed does not process until you make corrections.
Running a data feed
You can set up data feeds to run automatically at regular intervals. This reduces the time and effort required to import data from an external file.
You can initiate data feeds at various times and configure them to run in regular increments for an indefinite period of time.
You can run the data feed immediately.
To prevent excess server load, schedule data feeds on a staggered basis. Archer recommends scheduling a maximum of 10 data feeds to run at a time.
Setting up a reference data feed
A reference feed allows you to specify another feed. This indicates to the Data Feed Service that this feed will start running as soon as the referenced feed completes successfully.
-
Go to the Run Configuration tab > Schedule section.
-
Do one of the following to schedule your data feed.
-
Run on Schedule. You can configure your data feed to run on a defined schedule.
-
Run After. The Data Feed Services starts the current data feed after the referenced data feed completes successfully.
-
Run Now.
-
- Save the feed.
Data feed scenarios
The following section describes common data feed run scenarios and their expected behavior. Each scenario includes a use case, required configuration parameters, and run details.
Important: The Vulnerabilities and Assets integrations require two separate Archer data feed instances: One configured with the Generate objective and one configured with the Ingest objective. These feeds are typically scheduled so that the Generate feed runs first, followed by the Ingest feed after sufficient time has elapsed for Tenable.io to complete the export process. For small exports this is usually a few minutes; larger historical loads may require additional time.
Scenario 1: Standard incremental vulnerability load
Use case
A daily scheduled feed that imports vulnerabilities observed since the previous run.
Generate feed configuration
|
Parameter |
Value |
|---|---|
|
feedType |
Vulnerability |
|
objective |
Generate |
|
since |
(empty; resolves to LastRunTime) |
|
state |
open, reopened, fixed |
Ingest feed configuration
|
Parameter |
Value |
|---|---|
|
feedType |
Vulnerability |
|
objective |
Ingest |
|
chunkLimit |
0 (process all chunks in a single run) |
Behavior
The Generate feed creates a new export job containing vulnerability changes since LastRunTime. The Ingest feed identifies the most recent export job with a FINISHED status, downloads all chunks, and writes records to Archer in one run.
After ingestion completes, PreviousRunContext is set to: {uuid}-{total}-{total}
Because the number of processed chunks equals the total, subsequent Ingest runs will search for a newer export job rather than attempting to resume the prior one.
Scenario 2: Large vulnerability base load (chunked)
Use case
An initial load of all historical vulnerability data. Large exports may contain hundreds of chunks and cannot be processed in a single Archer run.
Generate feed configuration (run once)
|
Parameter |
Value |
|---|---|
|
feedType |
Vulnerability |
|
objective |
Generate |
|
since |
2020-01-01 (or empty for full history back to 2000-01-01) |
|
num_assets |
500 |
Ingest feed configuration (scheduled repeatedly)
|
Parameter |
Value |
|---|---|
|
feedType |
Vulnerability |
|
objective |
Ingest |
|
chunkLimit |
10 (process 10 chunks per run) |
Behavior
Each Ingest run processes up to chunkLimit chunks and stores progress in PreviousRunContext using the format:
{uuid}-{processed}-{total}Subsequent runs resume from the saved offset. When processed == total, the load is complete. Future Ingest runs then look for a newer export job and exit if none is found.
Example progression (200 total chunks, chunkLimit = 10)
|
Run |
PreviousRunContext In |
Action |
PreviousRunContext Out |
|---|---|---|---|
|
1 |
(empty) |
Processes chunks 1–10 |
abc123-10-200 |
|
2 |
abc123-10-200 |
Processes chunks 11–20 |
abc123-20-200 |
|
… |
… |
… |
… |
|
20 |
abc123-190-200 |
Processes chunks 191–200 |
abc123-200-200 |
|
21 |
abc123-200-200 |
No newer export job found |
(unchanged) |
Scenario 3: Vulnerability load filtered by severity and state
Use case
Import only open Critical and High vulnerabilities for a risk-prioritized view.
Generate feed configuration
|
Parameter |
Value |
|---|---|
|
feedType |
Vulnerability |
|
objective |
Generate |
|
since |
Empty (resolves to LastRunTime) |
|
severity |
critical, high |
|
state |
open, reopened |
Ingest feed configuration
|
Parameter |
Value |
|---|---|
|
feedType |
Vulnerability |
|
objective |
Ingest |
|
chunkLimit |
0 |
Behavior
The Generate feed passes severity and state filters in the POST /vulns/export request. Filtering is applied server-side by Tenable.io, and only matching records appear in the export.
The Ingest feed requires no additional configuration changes; filtering is performed exclusively during the Generate phase.
Scenario 4: Plugin base load (chunked)
Use case
An initial load of the complete Tenable.io plugin library.
Feed configuration
|
Parameter |
Value |
|---|---|
|
feedType |
Plugins |
|
type |
initialLoad |
|
iterationLimit |
10 |
|
size |
1000 |
Behavior
The last_updated value is forced to 2000-01-01, ensuring all plugins are included. Each run processes up to 10 pages (10,000 plugin records total) and stores the last processed page number in PreviousRunContext.
Processing resumes from the stored page number in the next run. When all pages have been processed, PreviousRunContext is set to -1. Subsequent runs detect this value and return immediately.
Example progression
|
Run |
PreviousRunContext In |
Action |
PreviousRunContext Out |
|---|---|---|---|
|
1 |
(empty) |
Processes pages 1–10 |
10 |
|
2 |
10 |
Processes pages 11–20 |
20 |
|
N |
X |
Plugin catalog exhausted |
-1 |
|
N+1 |
-1 |
Returns immediately |
-1 |
Scenario 5: Standard incremental plugin load
Use case
A daily scheduled feed that imports plugins added or updated since the last run.
Feed configuration
|
Parameter |
Value |
|---|---|
|
feedType |
Plugins |
|
type |
Empty |
|
size |
1000 |
Behavior
The last_updated parameter resolves to LastRunTime (formatted as YYYY-MM-DD). All matching pages are processed in a single run with no iteration limit.
PreviousRunContext is not used for incremental plugin loads.
Scenario 6: Standard incremental asset load
Use case
A daily scheduled feed that imports assets created since the previous run.
Generate feed configuration
|
Parameter |
Value |
|---|---|
|
feedType |
Assets |
|
objective |
Generate |
|
created_at |
Empty (resolves to LastRunTime) |
|
chunk_size |
1000 |
Certification environment
Date Tested: April 2026
|
Product Name |
Version Information |
Operating System |
|---|---|---|
|
Archer |
2025.10 |
Virtual Appliance |
|
Tenable.io |
NA |
NA |